- 실전 예제
- 실무 주의사항
1. 실전 예제
1-1. 예제 만들기
@Trace애노테이션으로 로그 출력하기@Retry애노테이션으로 예외 발생시 재시도 하기
요 두개를 만들어 보겠다.
ExamRepository
package com.example.springaop.exam;

import org.springframework.stereotype.Repository;

@Repository
public class ExamRepository {

    private static int seq = 0;
    /**
     * 5번에 1번 실패하는 요청
     */
    public String save(String itemId) {
        seq++;
        if (seq % 5 == 0) {
            throw new IllegalStateException("예외 발생");
        }
        return "ok";
    }
}
- 5번에 1번 정도 실패하는 저장소
ExamService
package com.example.springaop.exam;

import lombok.RequiredArgsConstructor;
import org.springframework.stereotype.Service;

@Service
@RequiredArgsConstructor
public class ExamService {
    private final ExamRepository examRepository;
    public void request(String itemId) {
        examRepository.save(itemId);
    }
}
ExamRepository
package com.example.springaop.exam;

import org.junit.jupiter.api.Test;
import org.springframework.beans.factory.annotation.Autowired;
import org.springframework.boot.test.context.SpringBootTest;

@SpringBootTest
public class ExamTest {

    @Autowired
    ExamService examService;

    @Test
    void test() {
        for (int i = 0; i < 5; i++) {
            examService.request("data" + i);
        }
    }
}
1-2. 로그 출력 AOP
- 로그 출력용 AOP를 먼저 만들어보겠습니다.
@Trace가 메서드에 붙어 있으면 호출 정보가 출력되는 편리한 기능이다.
Trace
package com.example.springaop.exam.annotation;

import java.lang.annotation.ElementType;
import java.lang.annotation.Retention;
import java.lang.annotation.RetentionPolicy;
import java.lang.annotation.Target;

@Target(ElementType.METHOD)
@Retention(RetentionPolicy.RUNTIME)
public @interface Trace {
}
TraceAspect
package com.example.springaop.exam.aop;

import lombok.extern.slf4j.Slf4j;
import org.aspectj.lang.JoinPoint;
import org.aspectj.lang.annotation.Aspect;
import org.aspectj.lang.annotation.Before;

@Slf4j
@Aspect
public class TraceAspect {
    @Before("@annotation(com.example.springaop.exam.annotation.Trace)")
    public void doTrace(JoinPoint joinPoint) {
        Object[] args = joinPoint.getArgs();
        log.info("[trace] {} args={}", joinPoint.getSignature(), args);
    }
}
- 포인트컷을 사용해서
@Trace가 붙은 메서드에어드바이스를 적용 Service,Repository에도@Trace추가- Test코드에
Import(TraceAspect.class)추가
테스트 결과
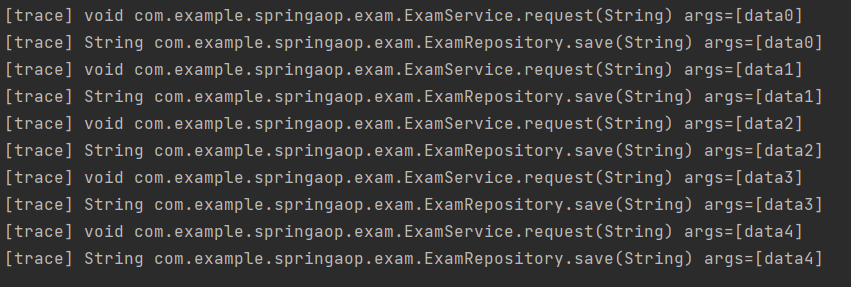
@Trace가 붙은request(),save()호출시 로그가 잘 남는 것을 확인할 수 있다.
1-3. 재시도 AOP
@Retry애노테이션이 있으면 예외가 발생했을 때 다시 시도해서 문제를 복구한다.
@Retry
package com.example.springaop.exam.annotation;

import java.lang.annotation.ElementType;
import java.lang.annotation.Retention;
import java.lang.annotation.RetentionPolicy;
import java.lang.annotation.Target;

@Target(ElementType.METHOD)
@Retention(RetentionPolicy.RUNTIME)
public @interface Retry {
    // 재시도 횟수 3
    int value() default 3;
}
RetryAspect
package com.example.springaop.exam.aop;

import com.example.springaop.exam.annotation.Retry;
import lombok.extern.slf4j.Slf4j;
import org.aspectj.lang.ProceedingJoinPoint;
import org.aspectj.lang.annotation.Around;
import org.aspectj.lang.annotation.Aspect;

@Slf4j
@Aspect
public class RetryAspect {

    @Around("@annotation(retry)")
    public Object doRetry(ProceedingJoinPoint joinPoint, Retry retry) throws Throwable {

        log.info("[retry] {} retry={}", joinPoint.getSignature(), retry);
        int maxRetry = retry.value();
        Exception exceptionHolder = null;

        for (int retryCount = 1; retryCount <= maxRetry; retryCount++) {
            try {
                log.info("[retry] try count={}/{}", retryCount, maxRetry);
                return joinPoint.proceed();
            } catch (Exception e) {
                exceptionHolder = e;
            }
        }

        throw exceptionHolder;
    }
}@annotation(retry),Retry retry를 사용해서 어드바이스에 애노테이션을 파라미터로 전달한다.retry.value()를 통해서 애노테이션에 지정한 값을 가져올 수 있다.- 예외가 발생해서 결과가 정상 반환되지 않으면
retry.value()만큼 재시도한다.
테스트 결과

- 실행 결과를 보면 5번째 문제가 발생했을 때 재시도 덕분에 문제가 복구되고, 정상 응답되는 것을 확인할 수 있다.
2. 실무 주의사항
2-1. 프록시와 내부 호출 - 문제
- 스프링은 프록시 방식의 AOP를 사용한다.
- AOP를 적용하려면 항상 프록시를 통해서 대상 객체(Target)을 호출해야 한다.
- 이렇게 해야 프록시에서 먼저 어드바이스를 호출하고, 이후에 대상 객체를 호출한다.
--> 하지만 대상 객체의 내부에서 메서드 호출이 발생하면 프록시를 거치지 않고 대상 객체를 직접 호출하는 문제가 발생한다.
내부 호출 예제를 만들어보겠습니다.
CallServiceV0
package com.example.springaop.internalcall;

import lombok.extern.slf4j.Slf4j;
import org.springframework.stereotype.Component;

@Slf4j
@Component
public class CallServiceV0 {

    public void external() {
        log.info("call external");
        this.internal(); //내부 메서드 호출(this.internal())
    }

    public void internal() {
        log.info("call internal");
    }
}
CallLogAspect
package com.example.springaop.internalcall.aop;

import lombok.extern.slf4j.Slf4j;
import org.aspectj.lang.JoinPoint;
import org.aspectj.lang.annotation.Aspect;
import org.aspectj.lang.annotation.Before;

@Slf4j
@Aspect
public class CallLogAspect {
    @Before("execution(* com.example.springaop.internalcall..*.*(..))")
    public void doLog(JoinPoint joinPoint) {
        log.info("aop={}", joinPoint.getSignature());
    }
}
CallServiceV0Test
package com.example.springaop.internalcall;

import com.example.springaop.internalcall.aop.CallLogAspect;
import org.junit.jupiter.api.Test;
import org.springframework.beans.factory.annotation.Autowired;
import org.springframework.boot.test.context.SpringBootTest;
import org.springframework.context.annotation.Import;

@Import(CallLogAspect.class)
@SpringBootTest
class CallServiceV0Test {

    @Autowired
    CallServiceV0 callServiceV0;

    @Test
    void external() {
        callServiceV0.external();
    }

    @Test
    void internal() {
        callServiceV0.internal();
    }

}
external() 테스트 결과

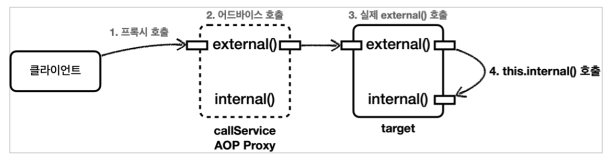
callServiceV0.external()을 실행할 때는 프록시를 호출한다. 따라서CallLogAspect어드바이스가 호출된 것을 확인할 수 있다.- 여기서 문제는
callServiceV0.external()안에서internal()을 호출할 때 발생한다. 이때는
CallLogAspect어드바이스가 호출되지 않는다.
자기 자신의 내부 메서드를 호출하는
this.internal()이 되는데, 여기서this는 실제 대상 객체(target)의 인스턴스를 뜻한다. 결과적으로 이러한 내부 호출은 프록시를 거치지 않는다. 따라서 어드바이스도 적용할 수 없다.
internal() 테스트 결과

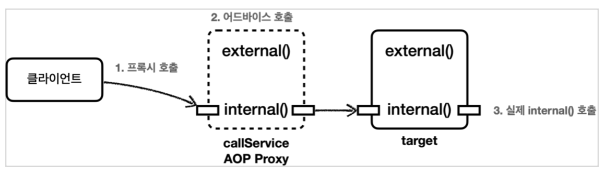
- 외부에서 호출하는 경우 프록시를 거치기 때문에
internal()도CallLogAspect어드바이스가 적용된 것을 확인할 수 있다.
프록시 방식의 AOP 한계
스프링은 프록시 방식의 AOP를 사용한다. 프록시 방식의 AOP는 메서드 내부 호출에 프록시를 적용할 수 없다. 지금부터 이 문제를 해결하는 방법을 하나씩 알아보자.
2-2. 프록시와 내부 호출 - 대안1 자기 자신 주입
내부 호출을 해결하는 가장 간단한 방법은 자기 자신을 의존관계 주입 받는 것이다.
CallServiceV1
package com.example.springaop.internalcall;

import lombok.extern.slf4j.Slf4j;
import org.springframework.beans.factory.annotation.Autowired;
import org.springframework.stereotype.Component;

@Slf4j
@Component
public class CallServiceV1 {

    private CallServiceV1 callServiceV1;

    @Autowired
    public void setCallServiceV1(CallServiceV1 callServiceV1) {
        this.callServiceV1 = callServiceV1;
    }

    public void external() {
        log.info("call external");
        callServiceV1.internal(); //외부 메서드 호출
    }

    public void internal() {
        log.info("call internal");
    }
}
callServiceV1를 수정자를 통해서 주입 받는 것을 확인할 수 있다. 스프링에서 AOP가 적용된 대상을 의존관계 주입 받으면 주입 받은 대상은 실제 자신이 아니라 프록시 객체이다.
CallServiceV1Test
package com.example.springaop.internalcall;

import com.example.springaop.internalcall.aop.CallLogAspect;
import org.junit.jupiter.api.Test;
import org.springframework.beans.factory.annotation.Autowired;
import org.springframework.boot.test.context.SpringBootTest;
import org.springframework.context.annotation.Import;

@Import(CallLogAspect.class)
@SpringBootTest
class CallServiceV1Test {

    @Autowired
    CallServiceV1 callServiceV1;

    @Test
    void external() {
        callServiceV1.external();
    }
}
테스트 결과


internal()을 호출할 때 자기 자신의 인스턴스를 호출하는 것이 아니라 프록시 인스턴스를 통해서 호출하는 것을 확인할 수 있다. 당연히 AOP도 잘 적용된다.
2-3. 프록시와 내부 호출 - 대안2 지연 조회
- 생성자 주입이 실패하는 이유는 자기 자신을 생성하면서 주입해야 하기 때문이다.
- 스프링 빈을 지연해서 조회하면 되는데,
ObjectProvider(Provider),ApplicationContext를 사용하면 된다.
CallServiceV2
package com.example.springaop.internalcall;

import lombok.RequiredArgsConstructor;
import lombok.extern.slf4j.Slf4j;
import org.springframework.beans.factory.ObjectProvider;
import org.springframework.stereotype.Component;

/**
 * ObjectProvider(Provider), ApplicationContext를 사용해서 지연(LAZY) 조회
 */
@Slf4j
@Component
@RequiredArgsConstructor
public class CallServiceV2 {

    // private final ApplicationContext applicationContext;
    private final ObjectProvider<CallServiceV2> callServiceProvider;

    public void external() {
        log.info("call external");
        // CallServiceV2 callServiceV2 = applicationContext.getBean(CallServiceV2.class);
        CallServiceV2 callServiceV2 = callServiceProvider.getObject();
        callServiceV2.internal(); //외부 메서드 호출
    }

    public void internal() {
        log.info("call internal");
    }
}ObjectProvider는 객체를 스프링 컨테이너에서 조회하는 것을 스프링 빈 생성 시점이 아니라 실제
객체를 사용하는 시점으로 지연할 수 있다.callServiceProvider.getObject()를 호출하는 시점에 스프링 컨테이너에서 빈을 조회한다. 여기서는 자기 자신을 주입 받는 것이 아니기 때문에 순환 사이클이 발생하지 않는다.
테스트 결과

- AOP가 잘 적용 되는 것을 확인 할 수 있다.
2-4. 프록시와 내부 호출 - 대안3 구조 변경
가장 나은 대안은 내부 호출이 발생하지 않도록 구조를 변경하는 것이다. 실제 이 방법을 가장 권장한다.
CallServiceV3
package com.example.springaop.internalcall;

import lombok.RequiredArgsConstructor;
import lombok.extern.slf4j.Slf4j;
import org.springframework.stereotype.Component;

// 구조 변경

@Slf4j
@Component
@RequiredArgsConstructor
public class CallServiceV3 {

    private final InternalService internalService;

    public void external() {
        log.info("call external");
        internalService.internal(); //외부 메서드 호출
    }
}
InternalService
@Slf4j
@Component
public class InternalService {
    public void internal() {
        log.info("call internal");
    }
}
테스트결과 성공
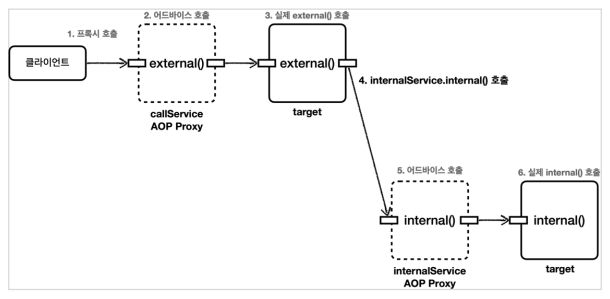
- 내부 호출 자체가 사라지고,
callService internalService를 호출하는 구조로 변경되었다. 덕분에 자연스럽게 AOP가 적용된다.
2-5. 프록시 기술과 한계 - 타입 캐스팅
JDK 동적 프록시와 CGLIB를 사용해서 AOP 프록시를 만드는 방법에는 각각 장단점이 있다.
- JDK 동적 프록시는 인터페이스가 필수이고, 인터페이스를 기반으로 프록시를 생성한다.
- CGLIB는 구체 클래스를 기반으로 프록시를 생성한다.
- 인터페이스가 있는 경우에는 JDK 동적 프록시나 CGLIB 둘중에 하나를 선택할 수 있다.
- 스프링이 프록시를 만들때 제공하는
ProxyFactory에proxyTargetClass옵션에 따라 둘중 하나를 선택해서 프록시를 만들 수 있다.
JDK 동적 프록시 한계
인터페이스 기반으로 프록시를 생성하는 JDK 동적 프록시는 구체 클래스로 타입 캐스팅이 불가능한 한계가 있다.
ProxyCastingTest
package com.example.springaop.proxyvs;

import com.example.springaop.member.MemberService;
import com.example.springaop.member.MemberServiceImpl;
import lombok.extern.slf4j.Slf4j;
import org.junit.jupiter.api.Test;
import org.springframework.aop.framework.ProxyFactory;

import static org.junit.jupiter.api.Assertions.assertThrows;

@Slf4j
public class ProxyCastingTest {

    @Test
    void jdkProxy() {
        MemberServiceImpl target = new MemberServiceImpl();
        ProxyFactory proxyFactory = new ProxyFactory(target);
        proxyFactory.setProxyTargetClass(false); // JDK 동적 프록시

        // 프록시를 인터페이스로 캐스팅 성공
        MemberService memberServiceProxy = (MemberService) proxyFactory.getProxy();
        log.info("proxy class={}", memberServiceProxy.getClass());

        // JDK 동적 프록시를 구현 클래스로 캐스팅 시도 실패, ClassCastException 예외 발생
        assertThrows(ClassCastException.class, () -> {
                    MemberServiceImpl castingMemberService = (MemberServiceImpl) memberServiceProxy;
                }
        );
    }

    @Test
    void cglibProxy() {
        MemberServiceImpl target = new MemberServiceImpl();
        ProxyFactory proxyFactory = new ProxyFactory(target);
        proxyFactory.setProxyTargetClass(true);//CGLIB 프록시

        //프록시를 인터페이스로 캐스팅 성공
        MemberService memberServiceProxy = (MemberService) proxyFactory.getProxy();
        log.info("proxy class={}", memberServiceProxy.getClass());

        //CGLIB 프록시를 구현 클래스로 캐스팅 시도 성공
        MemberServiceImpl castingMemberService = (MemberServiceImpl) memberServiceProxy;
    }
}
JDK 동적 프록시 캐스팅
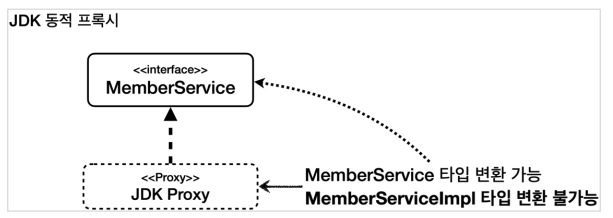
- JDK Proxy를 대상 클래스인
MemberServiceImpl타입으로 캐스팅 하려고 하니 예외가 발생한다. - JDK 동적 프록시는 인터페이스를 기반으로 프록시를 생성하기 때문이다. JDK Proxy는
MemberService인터페이스를 기반으로 생성된 프록시이다. 따라서 JDK Proxy는MemberService로 캐스팅은 가능하지만MemberServiceImpl이 어떤 것인지 전혀 알지 못한다.
CGLIB 프록시 캐스팅
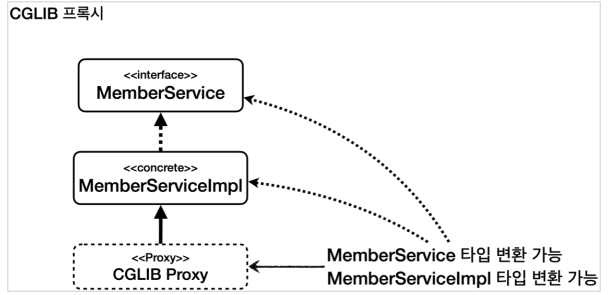
- CGLIB Proxy를 대상 클래스인
MemberServiceImpl타입으로 캐스팅하면 성공한다. - CGLIB는 구체 클래스를 기반으로 프록시를 생성하기 때문이다. CGLIB Proxy는
MemberServiceImpl구체 클래스를 기반으로 생성된 프록시이다. 따라서 CGLIB Proxy는MemberServiceImpl은 물론이고,MemberServiceImpl이 구현한 인터페이스인MemberService로도 캐스팅 할 수 있다.
2-6. 프록시 기술과 한계 - 의존관계 주입
JDK 동적 프록시를 사용 시 의존관계 주입을 할 때 어떤 문제가 발생하는지 알아보자.
ProxyDIAspect
package com.example.springaop.proxyvs.code;

import lombok.extern.slf4j.Slf4j;
import org.aspectj.lang.JoinPoint;
import org.aspectj.lang.annotation.Aspect;
import org.aspectj.lang.annotation.Before;

@Slf4j
@Aspect
public class ProxyDIAspect {
    @Before("execution(* com.example.springaop..*.*(..))")
    public void doTrace(JoinPoint joinPoint) {
        log.info("[proxyDIAdvice] {}", joinPoint.getSignature());
    }
}
ProxyDITest
package com.example.springaop.proxyvs;

import com.example.springaop.member.MemberService;
import com.example.springaop.member.MemberServiceImpl;
import com.example.springaop.proxyvs.code.ProxyDIAspect;
import lombok.extern.slf4j.Slf4j;
import org.junit.jupiter.api.Test;
import org.springframework.beans.factory.annotation.Autowired;
import org.springframework.boot.test.context.SpringBootTest;
import org.springframework.context.annotation.Import;

@Slf4j
@SpringBootTest(properties = {"spring.aop.proxy-target-class=false"}) // JDK 동적 프록시, DI 예외 발생
//@SpringBootTest(properties = {"spring.aop.proxy-target-class=true"}) // CGLIB 프록시, 성공
@Import(ProxyDIAspect.class)
public class ProxyDITest {
    @Autowired
    MemberService memberService; //JDK 동적 프록시 OK, CGLIB OK

    @Autowired
    MemberServiceImpl memberServiceImpl; //JDK 동적 프록시 X, CGLIB OK

    @Test
    void go() {
        log.info("memberService class={}", memberService.getClass());
        log.info("memberServiceImpl class={}", memberServiceImpl.getClass());
        memberServiceImpl.hello("hello");
    }
}spring.aop.proxy-target-class=false: 스프링이 AOP 프록시를 생성할 때 JDK 동적 프록시를
우선 생성한다. 물론 인터페이스가 없다면 CGLIB를 사용한다.
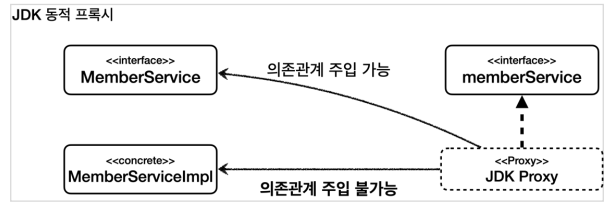
JDK 동적 프록시를 구체 클래스 타입에 주입
테스트 결과
\
- 타입과 관련된 예외가 발생한다.
memberServiceImpl에 주입되길 기대하는 타입은hello.aop.member.MemberServiceImpl이지만 실제 넘어온 타입은com.sun.proxy.$Proxy51이다. 따라서 타입 예외가 발생한다고 한다.

@Autowired MemberServiceImpl memberServiceImpl: JDK Proxy는MemberService인터페이스를 기반으로 만들어진다. 따라서MemberServiceImpl타입이 뭔지 전혀 모른다. 그래서 해당 타입에 주입할 수 없다.MemberServiceImpl = JDK Proxy가 성립하지 않는다.
CGLIB 프록시를 구체 클래스 타입에 주입
@SpringBootTest(properties = {"spring.aop.proxy-target-class=true"})테스트 결과

- 성공
@Autowired MemberServiceImpl memberServiceImpl: CGLIB Proxy는MemberServiceImpl구체 클래스를 기반으로 만들어진다. 따라서 해당 타입으로 캐스팅 할 수 있다.MemberServiceImpl = CGLIB Proxy가 성립한다.
지금까지 JDK 동적 프록시가 가지는 한계점을 알아보았다. 실제로 개발할 때는 인터페이스가 있으면
인터페이스를 기반으로 의존관계 주입을 받는 것이 맞다.
2-7. 프록시 기술과 한계 - CGLIB
CGLIB는 구체 클래스를 상속 받기 때문에 다음과 같은 문제가 있다.
CGLIB 구체 클래스 기반 프록시 문제점
- 대상 클래스에 기본 생성자 필수
- 생성자 2번 호출 문제
- final 키워드 클래스, 메서드 사용 불가
대상 클래스에 기본 생성자 필수
- CGLIB를 사용할 때 CGLIB가 만드는 프록시의 생성자는 우리가 호출하는 것이 아니다. CGLIB 프록시는 대상 클래스를 상속 받고, 생성자에서 대상 클래스의 기본 생성자를 호출한다. 따라서 대상 클래스에 기본 생성자를 만들어야 한다.
생성자 2번 호출 문제
1. 실제 target의 객체를 생성할 때
2. 프록시 객체를 생성할 때 부모 클래스의 생성자 호출
final 키워드 클래스, 메서드 사용 불가
final키워드가 클래스에 있으면 상속이 불가능하고, 메서드에 있으면 오버라이딩이 불가능하다. CGLIB는
상속을 기반으로 하기 때문에 두 경우 프록시가 생성되지 않거나 정상 동작하지 않는다.- 프레임워크 같은 개발이 아니라 일반적인 웹 애플리케이션을 개발할 때는
final키워드를 잘 사용하지 않는다. 따라서 이 부분이 특별히 문제가 되지는 않는다.
2-8. 프록시 기술과 한계 - 스프링의 해결책
스프링은 CGLIB 라이브러리를 스프링 내부에 함께 패키징해서 별도의 라이브러리 추가 없이 CGLIB를 사용할 수 있게 되었다.
CGLIB 기본 생성자 필수 문제 해결
스프링 4.0부터 CGLIB의 기본 생성자가 필수인 문제가 해결되었다.
objenesis라는 특별한 라이브러리를 사용해서 기본 생성자 없이 객체 생성이 가능하다.- 참고로 이 라이브러리는 생성자 호출 없이 객체를 생성할 수 있게 해준다.
생성자 2번 호출 문제
스프링 4.0부터 CGLIB의 생성자 2번 호출 문제가 해결되었다.
- 이것도 역시
objenesis라는 특별한 라이브러리 덕분에 가능해졌다. - 이제 생성자가 1번만 호출된다.
스프링 부트 2.0 - CGLIB 기본 사용
스프링 부트 2.0 버전부터 CGLIB를 기본으로 사용하도록 했다.
- 이렇게 해서 구체 클래스 타입으로 의존관계를 주입하는 문제를 해결했다.
- 스프링 부트는 별도의 설정이 없다면 AOP를 적용할 때 기본적으로
proxyTargetClass=true로 설정해서 사용한다. - 따라서 인터페이스가 있어도 JDK 동적 프록시를 사용하는 것이 아니라 항상 CGLIB를 사용해서 구체클래스를 기반으로 프록시를 생성한다.
참고
김영한: 스프링 핵심 원리 - 고급편(인프런)
Github - https://github.com/b2b2004/Spring_ex
