- WAR 배포 방식의 단점
- 내장 톰캣
- 편리한 부트 클래스 만들기
- 스프링 부트와 웹 서버
- 스프링 부트 실행 가능 Jar
1. WAR 배포 방식의 단점
웹 애플리케이션을 개발하고 배포하려면 다음과 같은 과정을 거쳐야 한다.
- 톰캣 같은 웹 애플리케이션 서버(WAS)를 별도로 설치해야 한다.
- 애플리케이션 코드를 WAR로 빌드해야 한다.
- 빌드한 WAR 파일을 WAS에 배포해야 한다.
단점
- 톰캣 같은 WAS를 별도로 설치해야 한다.
- 개발 환경 설정이 복잡하다.
- 단순한 자바라면 별도의 설정을 고민하지 않고,
main()메서드만 실행하면 된다. - 웹 애플리케이션은 WAS 실행하고 또 WAR와 연동하기 위한 복잡한 설정이 들어간다.
- 단순한 자바라면 별도의 설정을 고민하지 않고,
- 배포 과정이 복잡하다. WAR를 만들고 이것을 또 WAS에 전달해서 배포해야 한다.
- 톰캣의 버전을 변경하려면 톰캣을 다시 설치해야 한다.
이런 문제를 해결하기 위해 톰캣을 라이브러리로 제공하는 내장 톰캣(embed tomcat) 기능을 제공한다.
2. 내장 톰캣
2-1. 설정
springboot-embed라는 프로젝트를 생성했습니다.
build.gradle
 //내장 톰캣 추가
 implementation 'org.apache.tomcat.embed:tomcat-embed-core:10.1.5'
2-2. 서블릿
내장 톰캣은 쉽게 이야기해서 톰캣을 라이브러리로 포함하고 자바 코드로 직접 실행하는 것이다. 코드로 알아보자.
EmbedTomcatServletMain
package hello.embed;
import hello.servlet.HelloServlet;
import org.apache.catalina.Context;
import org.apache.catalina.LifecycleException;
import org.apache.catalina.connector.Connector;
import org.apache.catalina.startup.Tomcat;
public class EmbedTomcatServletMain {
public static void main(String[] args) throws LifecycleException {
System.out.println("EmbedTomcatServletMain.main");
//톰캣 설정
Tomcat tomcat = new Tomcat();
Connector connector = new Connector();
connector.setPort(8080);
tomcat.setConnector(connector);
//서블릿 등록
Context context = tomcat.addContext("", "/");
tomcat.addServlet("", "helloServlet", new HelloServlet());
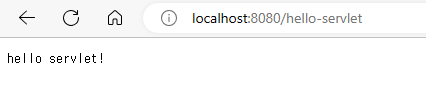
context.addServletMappingDecoded("/hello-servlet", "helloServlet");
tomcat.start();
}
}
결과 확인
2-3. 스프링
이번에는 내장 톰캣에 스프링까지 연동해보자.
EmbedTomcatSpringMain
package hello.embed;

import hello.spring.HelloConfig;
import org.apache.catalina.Context;
import org.apache.catalina.LifecycleException;
import org.apache.catalina.connector.Connector;
import org.apache.catalina.startup.Tomcat;
import org.springframework.web.context.support.AnnotationConfigWebApplicationContext;
import org.springframework.web.servlet.DispatcherServlet;

public class EmbedTomcatSpringMain {

    public static void main(String[] args) throws LifecycleException {
        System.out.println("EmbedTomcatSpringMain.main");

        // 톰캣 설정
        Tomcat tomcat = new Tomcat();
        Connector connector = new Connector();
        connector.setPort(8080);
        tomcat.setConnector(connector);

        // 스프링 컨테이너 생성
        AnnotationConfigWebApplicationContext appContext = new AnnotationConfigWebApplicationContext();
        appContext.register(HelloConfig.class);

        // 스프링 MVC 디스패처 서블릿 생성, 스프링 컨테이너 연결
        DispatcherServlet dispatcher = new DispatcherServlet(appContext);

        // 디스패처 서블릿 등록
        Context context = tomcat.addContext("", "/");
        tomcat.addServlet("", "dispatcher", dispatcher);
        context.addServletMappingDecoded("/", "dispatcher");
        tomcat.start();
    }
}
- 내장 톰캣을 생성해서 8080 포트로 연결하도록 설정한다.
- 스프링 컨테이너를 만들고 필요한 빈을 등록한다.
- 스프링 MVC 디스패처 서블릿을 만들고 앞서 만든 스프링 컨테이너에 연결한다.
- 디스패처 서블릿을 내장 톰캣에 등록한다.
- 내장 톰캣을 실행한다.
결과 확인
2-4. 빌드와 배포1
- 자바의
main()메서드를 실행하기 위해서는jar형식으로 빌드해야 한다. jar안에는META-INF/MANIFEST.MF파일에 실행할main()메서드의 클래스를 지정해주어야 한다.- Gradle의 도움을 받으면 이 과정을 쉽게 진행할 수 있다.
build.gradle
task buildJar(type: Jar) {
    manifest {
        attributes 'Main-Class': 'hello.embed.EmbedTomcatSpringMain'
    }
    with jar
}
cmd창을 열고 해당 프로젝트로 이동하여 gradlew clean buildJar 명령어를 치면 build/libs/embed-0.0.1-SNAPSHOT.jar이 만들어 진다.

java -jar embed-0.0.1-SNAPSHOT.jar로 실행해보면 오류가 발생한다. 스프링 관련 클래스를 찾을 수 없다는 오류이다.JAR압축을 풀어보면 스프링 라이브러리나 내장 톰캣 라이브러리가 전혀 보이지 않는다. 따라서 해당 오류가 발생한 것이다.- jar 파일은 jar파일을 포함할 수 없다.
- WAR와 다르게 JAR 파일은 내부에 라이브러리 역할을 하는 JAR 파일을 포함할 수 없다. 포함한다고 해도 인식이 안된다. 이것이 JAR 파일 스펙의 한계이다. 그렇다고 WAR를 사용할 수 도 없다. WAR는 웹 애플리케이션 서버(WAS) 위에서만 실행할 수 있다.
2-5. 빌드와 배포2
대안으로 FatJar라고 불리는 방법이 있다.
- Jar 안에는 Jar를 포함할 수 없다. 하지만 클래스는 얼마든지 포함할 수 있다.
- 라이브러리에 사용되는
jar를 풀면class들이 나온다. 이class를 뽑아서 새로 만드는jar에
포함하는 것이다.
build.gradle
task buildFatJar(type: Jar) {
    manifest {
        attributes 'Main-Class': 'hello.embed.EmbedTomcatSpringMain'
    }
    duplicatesStrategy = DuplicatesStrategy.WARN
    from { configurations.runtimeClasspath.collect { it.isDirectory() ? it : zipTree(it) } }
    with jar
}
gradlew clean buildFatJar로 빌드build/libs/embed-0.0.1-SNAPSHOT.jar생성

- 용량을 확인해보면 10M 이상의 상당히 큰 사이즈가 나왔다.
오류
포트번호가 겹치고 있다.
8080 포트 번호를 확인 후 포트를 죽여줬다.

또 다른 오류 발생
수동으로 /webapps폴더 생성

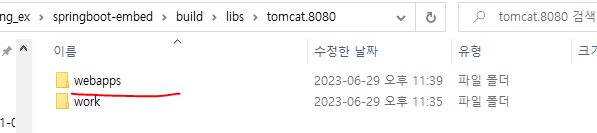
오류 해결 정상 작동

jar 압축 풀기
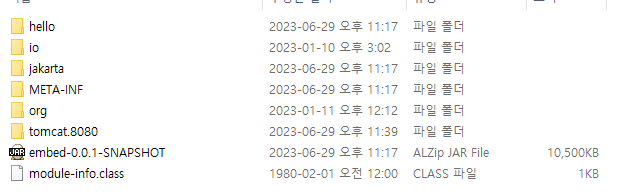
jar -xvf embed-0.0.1-SNAPSHOT.jar를 통해서 압축을 풀었다.
- Jar를 풀어보면 우리가 만든 클래스를 포함해서, 수 많은 라이브러리에서 제공되는 클래스들이 포함되어
있는 것을 확인할 수 있다.
Fat Jar의 장점
- Fat Jar 덕분에 하나의 jar 파일에 필요한 라이브러리들을 내장할 수 있게 되었다.
- 내장 톰캣 라이브러리를 jar 내부에 내장할 수 있게 되었다.
- 덕분에 하나의 jar 파일로 배포부터, 웹 서버 설치+실행까지 모든 것을 단순화 할 수 있다.
3. 편리한 부트 클래스 만들기
지금까지 진행한 내장 톰캣 실행, 스프링 컨테이너 생성, 디스패처 서블릿 등록의 모든 과정을 편리하게 처리해주는 나만의 부트 클래스를 만들어보자.
MySpringApplication
package hello.boot;

import org.apache.catalina.Context;
import org.apache.catalina.LifecycleException;
import org.apache.catalina.connector.Connector;
import org.apache.catalina.startup.Tomcat;
import org.springframework.web.context.support.AnnotationConfigWebApplicationContext;
import org.springframework.web.servlet.DispatcherServlet;

import java.util.List;

public class MySpringApplication {
    public static void run(Class configClass, String[] args) {
        System.out.println("MySpringBootApplication.run args=" + List.of(args));

        //톰캣 설정
        Tomcat tomcat = new Tomcat();
        Connector connector = new Connector();
        connector.setPort(8080);
        tomcat.setConnector(connector);

        //스프링 컨테이너 생성
        AnnotationConfigWebApplicationContext appContext = new AnnotationConfigWebApplicationContext();
        appContext.register(configClass);

        //스프링 MVC 디스패처 서블릿 생성, 스프링 컨테이너 연결
        DispatcherServlet dispatcher = new DispatcherServlet(appContext);

        //디스패처 서블릿 등록
        Context context = tomcat.addContext("", "/");
        tomcat.addServlet("", "dispatcher", dispatcher);
        context.addServletMappingDecoded("/", "dispatcher");
        try {
            tomcat.start();
        } catch (LifecycleException e) {
            throw new RuntimeException(e);
        }
    }
}
configClass: 스프링 설정을 파라미터로 전달받는다.args:main(args)를 전달 받아서 사용한다. 참고로 예제에서는 단순히 해당 값을 출력한다.tomcat.start()에서 발생하는 예외는 잡아서 런타임 예외로 변경했다.
@MySpringBootApplication
package hello.boot;

import org.springframework.context.annotation.ComponentScan;

import java.lang.annotation.*;

@Target(ElementType.TYPE)
@Retention(RetentionPolicy.RUNTIME)
@Documented
@ComponentScan
public @interface MySpringBootApplication {
}- 컴포넌트 스캔 기능이 추가된 단순한 애노테이션이다.
- 시작할 때 이 애노테이션을 붙여서 사용하면 된다.
MySpringBootMain
package hello;

import hello.boot.MySpringApplication;
import hello.boot.MySpringBootApplication;

@MySpringBootApplication
public class MySpringBootMain {
    public static void main(String[] args) {
        System.out.println("MySpringBootMain.main");
        MySpringApplication.run(MySpringBootMain.class, args);
    }
}hello에 위치한 이유는@MySpringBootApplication에 컴포넌트 스캔이 추가되어 있는데, 컴포넌트 스캔의 기본 동작은 해당 애노테이션이 붙은 클래스의 현재 패키지 부터 그 하위 패키지를 컴포넌트 스캔의 대상으로 사용하기 때문이다 애노테이션이 붙은hello.MySpringBootMain클래스의 패키지 위치는hello이므로 그 하위의hello.spring.HelloController를 컴포넌트 스캔한다.MySpringApplication.run(설정 정보, args)이렇게 한줄로 실행하면 된다.
--> 모양이 어디서 본 것과 비슷하다 바로 스프링 부트이다.
@SpringBootApplication
public class BootApplication {
    public static void main(String[] args) {
        SpringApplication.run(BootApplication.class, args);
    }
}
4. 스프링 부트와 웹 서버
4-1. 프로젝트 생성
스프링 부트 기능 제공
- 내장 톰캣을 사용해서 빌드와 배포를 편리하게 한다.
- 빌드시 하나의 Jar를 사용하면서, 동시에 Fat Jar 문제도 해결한다.
- 지금까지 진행한 내장 톰캣 서버를 실행하기 위한 복잡한 과정을 모두 자동으로 처리한다.
springboot-start 프로젝트를 새로 생성하였습니다.
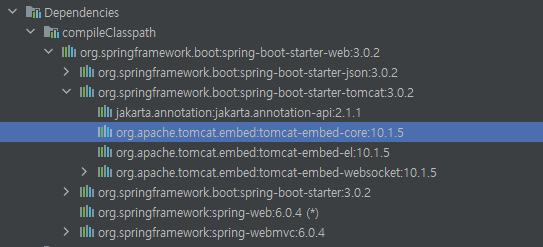
내장 톰캣 의존관계 확인
spring-boot-starter-web를 사용하면 내부에서 내장 톰캣을 사용한다.
4-2. 실행 과정
스프링 부트 내부에서 스프링 컨테이너를 생성하는 코드
class ServletWebServerApplicationContextFactory implements ApplicationContextFactory {
    ...

    private ConfigurableApplicationContext createContext() {
        if (!AotDetector.useGeneratedArtifacts()) {
            return new AnnotationConfigServletWebServerApplicationContext();
        }
        return new ServletWebServerApplicationContext();
    }
}- 이름 그대로 애노테이션 기반 설정이 가능하고, 서블릿 웹 서버를 지원하는 스프링 컨테이너이다.
스프링 부트 내부에서 내장 톰캣을 생성하는 코드
@Override
public WebServer getWebServer(ServletContextInitializer... initializers) {
    ...
    Tomcat tomcat = new Tomcat();
    ...
    Connector connector = new Connector(this.protocol);
    ...
    return getTomcatWebServer(tomcat);
}- 이런식으로 우리가 앞서 내장 톰캣에서 진행했던 것과 동일한 방싱그올 스프링 컨테이너를 생성하고 내장 톰캣 생성, 그 둘을 연결하는 과정을 하고 있다.
4-3. 빌드와 배포
내장 톰캣이 포함된 스프링 부트를 직접 빌드해보자.

localhost:8080/hello-spring 요청시
잘 호출되는 것을 확인 할 수있다.
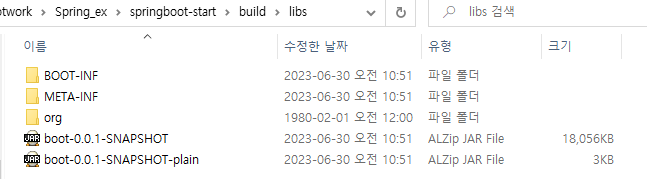
스프링 부트 jar 분석 -> 압축풀기
jar -xvf boot-0.0.1-SNAPSHOT.jar
META-INF- MANIFEST.MF
org/springframework/boot/loader- JarLauncher.class : 스프링 부트 main() 실행 클래스
BOOT-INF- classes : 우리가 개발한 class 파일과 리소스 파일
- hello/boot/BootApplication.class
- hello/boot/controller/HelloController.class
… - lib : 외부 라이브러리
- spring-webmvc-6.0.4.jar
- tomcat-embed-core-10.1.5.jar
... - classpath.idx : 외부 라이브러리 경로
- layers.idx : 스프링 부트 구조 경로
- classes : 우리가 개발한 class 파일과 리소스 파일
5. 스프링 부트 실행 가능 Jar
실행 가능 Jar
jar 내부에 jar를 포함할 수 있는 특별한 구조의 jar를 만들고 동시에 만든 jar를 내부 jar를 포함해서 실행할 수 있게 한다. 이것을 실행 가능 Jar(Executable Jar)라고 한다.
Jar 실행 정보
java -jar xxx.jar를 실행하게 되면 우선 META-INF/MANIFEST.MF파일을 찾는다. 그리고 여기에
있는 Main-Class를 읽어서 main()메서드를 실행하게 된다. 스프링 부트가 만든 MANIFEST.MF를
확인해보자.
META-INF/MANIFEST.MF
Manifest-Version: 1.0
Main-Class: org.springframework.boot.loader.JarLauncher
Start-Class: hello.boot.BootApplication
Spring-Boot-Version: 3.0.2
Spring-Boot-Classes: BOOT-INF/classes/
Spring-Boot-Lib: BOOT-INF/lib/
Spring-Boot-Classpath-Index: BOOT-INF/classpath.idx
Spring-Boot-Layers-Index: BOOT-INF/layers.idx
Build-Jdk-Spec: 17Main-Class- 우리가 기대한
main()이 있는hello.boot.BootApplication이 아니라JarLauncher라는 전혀 다른 클래스를 실행하고 있다. JarLauncher는 스프링 부트가 빌드시에 넣어준다.org/springframework/boot/loader/JarLauncher에 실제로 포함되어 있다.- 스프링 부트는
jar내부에 jar를 읽어들이는 기능이 필요하다. 또 특별한 구조에 맞게 클래스 정보도
읽어들여야 한다. 바로JarLauncher가 이런 일을 처리해준다. 이런 작업을 먼저 처리한 다음Start-Class에 지정된main()을 호출한다.
- 우리가 기대한
Start-Class: 우리가 기대한main()이 있는hello.boot.BootApplication가 적혀있다.- 기타: 스프링 부트가 내부에서 사용하는 정보들이다.
Spring-Boot-Version: 스프링 부트 버전Spring-Boot-Classes: 개발한 클래스 경로Spring-Boot-Lib: 라이브러리 경로Spring-Boot-Classpath-Index: 외부 라이브러리 모음Spring-Boot-Layers-Index: 스프링 부트 구조 정보
실행 과정 정리
1. java -jar xxx.jar
2. MANIFEST.MF 인식
3. JarLauncher.main() 실행
BOOT-INF/classes/ 인식
BOOT-INF/lib/ 인식
4. BootApplication.main() 실행
