👩💻들어가며
첫번째 포스팅에서 화면 뼈대 구성까지 진행하였습니다.
큰 어려움은 없었는데요!
🐣이번에는 store를 만들어보고자 합니다🐣
💻 슈퍼마켓 구현하기 (2) 요약
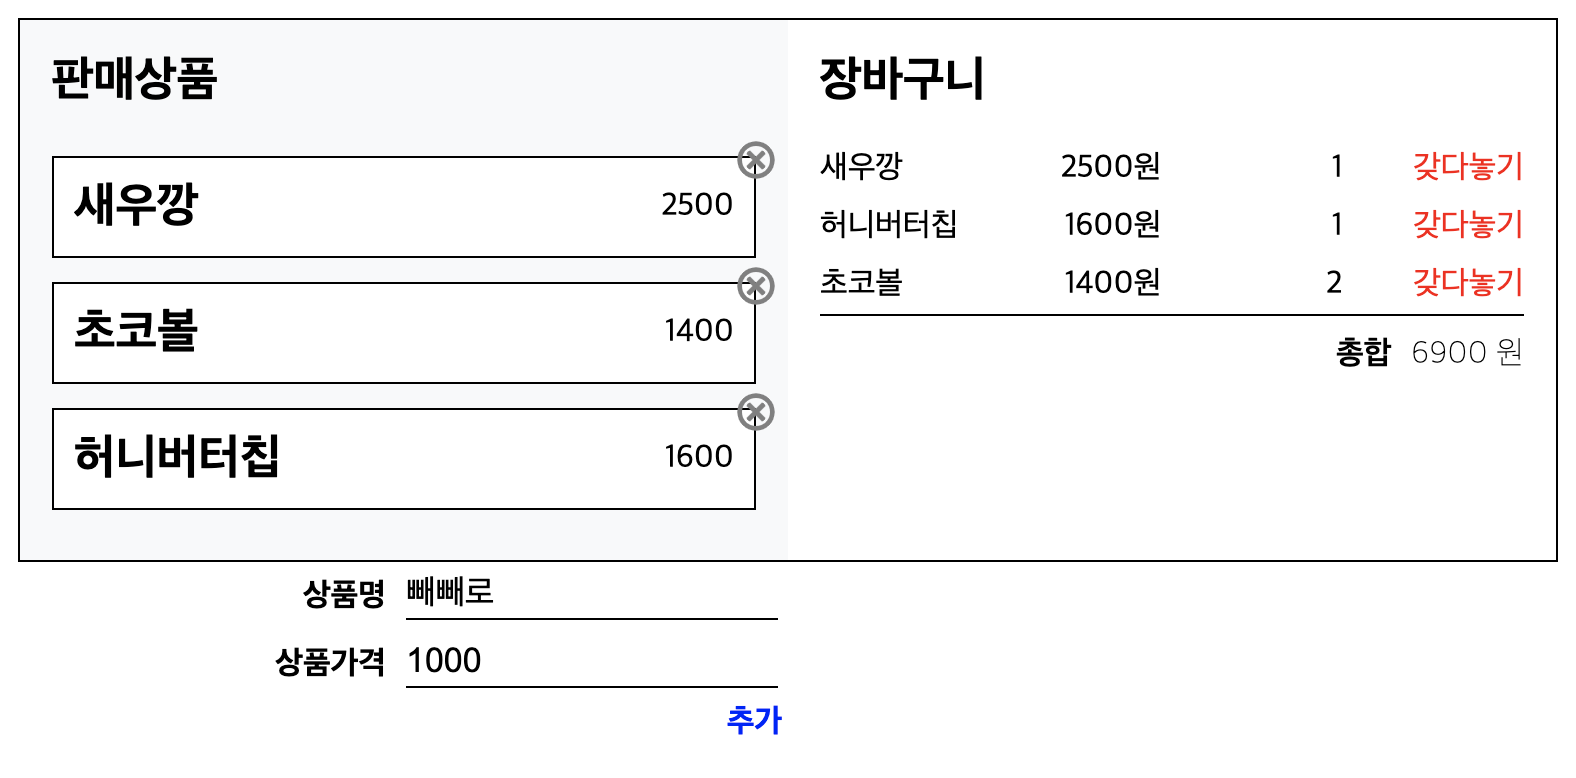
슈퍼마켓 구현하기(2) 포스트는 상태관리를 위한 store를 만들고, 각각의 store들을 rootStore를 통해서 연결시켜주는 내용을 담고있습니다.
코드 작성
mobX 공식문서를 읽어보니, decorator는 ES standard가 아니라서 잘 안쓴다고 나와있더라구요! 그래서 makeObservable을 이용해서 annotation을 설정하도록 하겠습니다.
(저는 decorator가 더 귀엽고 아기자기한데.. 귀여운게 밥먹여주지는 않으니 😏)
👨🌾 step 1. 판매상품 store 만들기
- ProductStore에서 Product가 먼저 생성, 저장되니 상품 interface를 해당 파일에서 export시켜줍니다.
- mobX에서 return값은 proxy형태이니, computed에서는 toJS를 씌워서 계산 값을 반환시켜줍니다.
src/stores/ProductStore.ts
import {makeObservable, action, observable, computed, toJS} from 'mobx';

export interface Product{
    id: number;
    name: string;
    price: number;
    choice: number;
}

export default class ProductStore{
    constructor(){
        makeObservable(this,{
            productList: observable,
            addProduct: action,
            removeProduct: action,
            getProducts: computed,
            getProductsNum: computed,
        })
    }
    productList: Product[] =[
        {id:0, name:'매운새우깡', price:1800, choice:1},
        {id:1, name:'콘쵸', price: 1200, choice: 1},
        {id:2, name:'허니버터칩', price:1500, choice:1}
    ]

    addProduct(newProduct: Product){
        this.productList = [...this.productList, newProduct]
    }

    removeProduct(id: number){
        this.productList.splice(id, 1)
    }

    get getProducts(){
        return toJS(this.productList);
    }

    get getProductsNum(){
        return toJS(this.productList.length)
    }
}
step1 정리 🥕
- makeObservable사용
- Product interface 정의
- Array.push()대신 spread Syntax 사용
- return값은 toJS로 처리함으로써 proxy 반환 방지
👨🌾 step 2. 장바구니 store 만들기
- ProductStore과 비슷하게 makeObservable로 annotation을 설정해줍니다.
- Product interface를 import 합니다.
- BasketStore에서는 item과 관련하여 3가지 기능이 필요합니다.
-item 추가 (add + update)
-item 빼기 (1개씩 choice 감소)
-item 제거 (list에서 삭제)
src/srotes/BasketStore.ts
import {makeObservable, action, observable, computed, toJS} from 'mobx';
import {Product} from './ProductStore';

export default class BasketStore {
    constructor(){
        makeObservable(this,{
            itemList: observable,
            totalPrice: observable,
            updateItem: action,
            returnItem: action,
            removeItem: action,
            setTotalPrice: action,
            getItems: computed,
            getTotalPrice: computed,
        })
    }
    itemList: Product[]=[];
    totalPrice: number = 0;

    updateItem(item: Product){
        const found = this.getItems.findIndex((el)=>el.id === item.id);

        if(found>=0) this.itemList[found].choice++;
        else this.itemList = [...this.itemList, item];

        this.setTotalPrice();
    }

    returnItem(id: number){
        this.itemList = this.itemList.map((item)=>{
            if(item.id === id) item.choice--;
            return item;
        })
        this.setTotalPrice();
    }

    removeItem(id: number){
        const idx = this.itemList.findIndex(el=>el.id===id);
        this.itemList.splice(idx,1);
        this.setTotalPrice();
    }

    setTotalPrice(){
        this.totalPrice = this.itemList.reduce((acc: number, current: Product)=>{
            return acc + (current.price * current.choice);
        }, 0)
    }

    get getItems(){
        return toJS(this.itemList);
    }

    get getTotalPrice(){
        return toJS(this.totalPrice);
    }
}
step2 정리 🥕
step1과 동일
👨🌾 step 3. rootStore 설정하기
- 모든 store들을 연결해주는 하나의 rootStore를 만들어줍니다.
- 각각의 store들은 rootStore를 매개로 필요한 값을 주고받을 수 있습니다.
- ✨rootStore 적용 방법✨
1. rootStore 생성 src/stores/rootStore.ts
2. Provider로 rootStore를 프로젝트에 적용 src/index.tsx
3. 각 store component에서 constructor argument로 rootStore 받기 _ src/stores/*
1. rootStore생성✨
src/stores/rootStore.ts
import BasketStore from './BasketStore';
import ProductStore from './ProductStore';

export default class RootStore{
    constructor(){
        this.basketStore = new BasketStore(this);
        this.productStore = new ProductStore(this);
    }

    basketStore: BasketStore;
    productStore: ProductStore;
}
Store 인스턴스 생성시 꼭 this를 넣어줘야 rootStore를 통한 다른 store로 접근이 가능해집니다!!
2. Provider로 rootStore를 프로젝트에 적용✨
src/index.tsx
import React from 'react';
import ReactDOM from 'react-dom';
import App from './App';

import {Provider} from 'mobx-react'
import RootStore from './stores/rootStore'

const rootStore = new RootStore();
ReactDOM.render(
  <Provider {...rootStore}>
    <App />
  </Provider>

,
  document.getElementById('root')
);
3. rootStore를 constructor argument로 지정✨
constructor의 argument로 rootStore를 받아줍니다!
src/stores/BasketStore.ts
...
import RootStore from './rootStore';
...
export default class BasketStore{
	constructor(rootStore: RootStore){
    	...
    }
    ...
 }
src/stores/ProductStore.ts
...
import RootStore from './rootStore';
...
export default class ProductStore{
	constructor(rootStore: RootStore){
    	...
    }
    ...
 }
step3 정리 🥕
- rootStore에서 this를 넘겨주어야 store끼리 상호작용 가능
- Provider로 프로젝트에 store적용
- store를 정의하고 있는 각각의 class component는 생성자의 argument로 rootStore꼭 받아줘야함! (타입 정의 까지!)
🤷♀️ 지금까지 궁금한 내용 🤷♀️
- Provider의 디테일한 사용법
- interface를 모아두는 파일을 만들어서 쓰는 것이 효율적인지?
- spread syntax는 어떤 때에 어떤 이유로 사용해야 하는지?
-> JS스럽게 쓰는 것(reference에서 참고함)이 잘 쓰는 것인지?
Reference
✨ Spread-syntax
https://velog.io/@kwonh/ES6-%ED%8E%BC%EC%B9%A8%EC%97%B0%EC%82%B0%EC%9E%90%EC%A0%84%EA%B0%9C%EC%97%B0%EC%82%B0%EC%9E%90-Spread-Syntax-Spread-Operator
✨ JS스럽게 코드 쓰는 법
https://velog.io/@wooder2050/JS%EC%8A%A4%EB%9F%BD%EA%B2%8C-%EC%A2%8B%EC%9D%80-%EC%BD%94%EB%93%9C-%EC%93%B0%EA%B8%B0-%EA%BF%80%ED%8C%81
✨ 슈퍼마켓 구현하기
https://hyeok999.github.io/2020/04/16/mobx-hooks-market/
https://velog.io/@velopert/MobX-3-%EC%8B%AC%ED%99%94%EC%A0%81%EC%9D%B8-%EC%82%AC%EC%9A%A9-%EB%B0%8F-%EC%B5%9C%EC%A0%81%ED%99%94-%EB%B0%A9%EB%B2%95-tnjltay61n
