# 회로 실습
## threading.Thread 클래스
- _13_threading_2.py
쓰레드로 다중 작업하기 p 145
import threading
import time
flag_exit = False
def t1_main():
  while True:
    print("\tt1")
    time.sleep(0.5)
    if flag_exit: break

def t2_main():
  while True:
    print("\t\tt2")
    time.sleep(0.2)
    if flag_exit: break
t1 = threading.Thread(target=t1_main)
t1.start()

t2 = threading.Thread(target=t2_main)
t2.start()

try:
  while True:
    userInput = input()
    print(userInput)

except KeyboardInterrupt:
  pass

flag_exit = True
t1.join()
t2.join()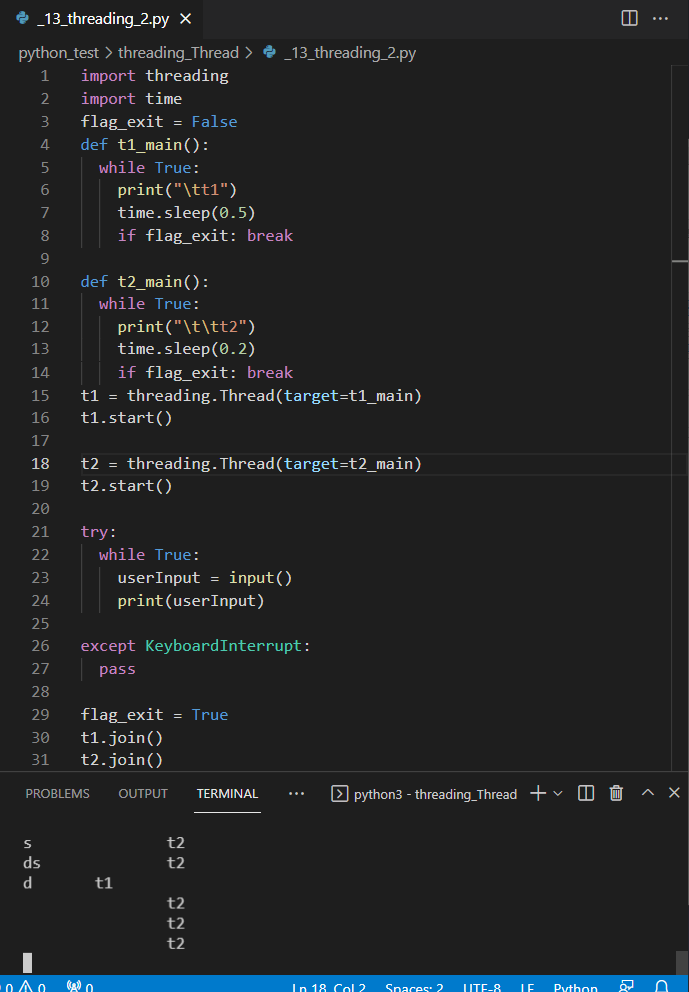
- _13_threading_3.py
쓰레드로 LED 점멸 반복해보기
_06_gpio_output_3.py와 결과는 동일하다.
import threading
import time
import RPi.GPIO as GPIO

led_pin = 17

flag_exit = False
def blink_led():
  while True:
    GPIO.output(led_pin, True)
    time.sleep(0.5)
    GPIO.output(led_pin, False)
    time.sleep(0.5)

    if flag_exit: break

GPIO.setmode(GPIO.BCM)
GPIO.setup(led_pin, GPIO.OUT)

tBL = threading.Thread(target=blink_led)
tBL.start()

try:
  while True:
    print("main")
    time.sleep(1.0);

except KeyboardInterrupt:
  pass

flag_exit = True
tBL.join()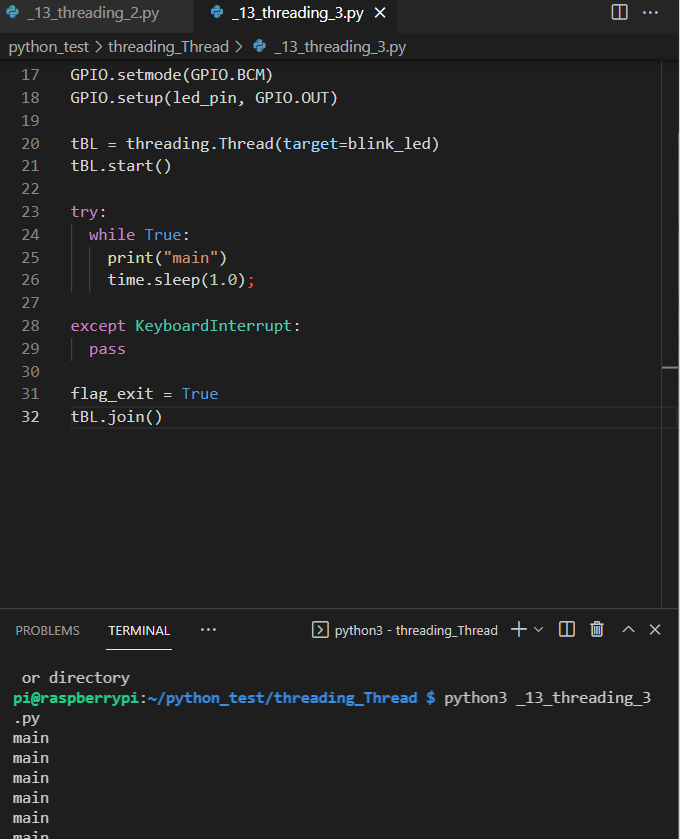
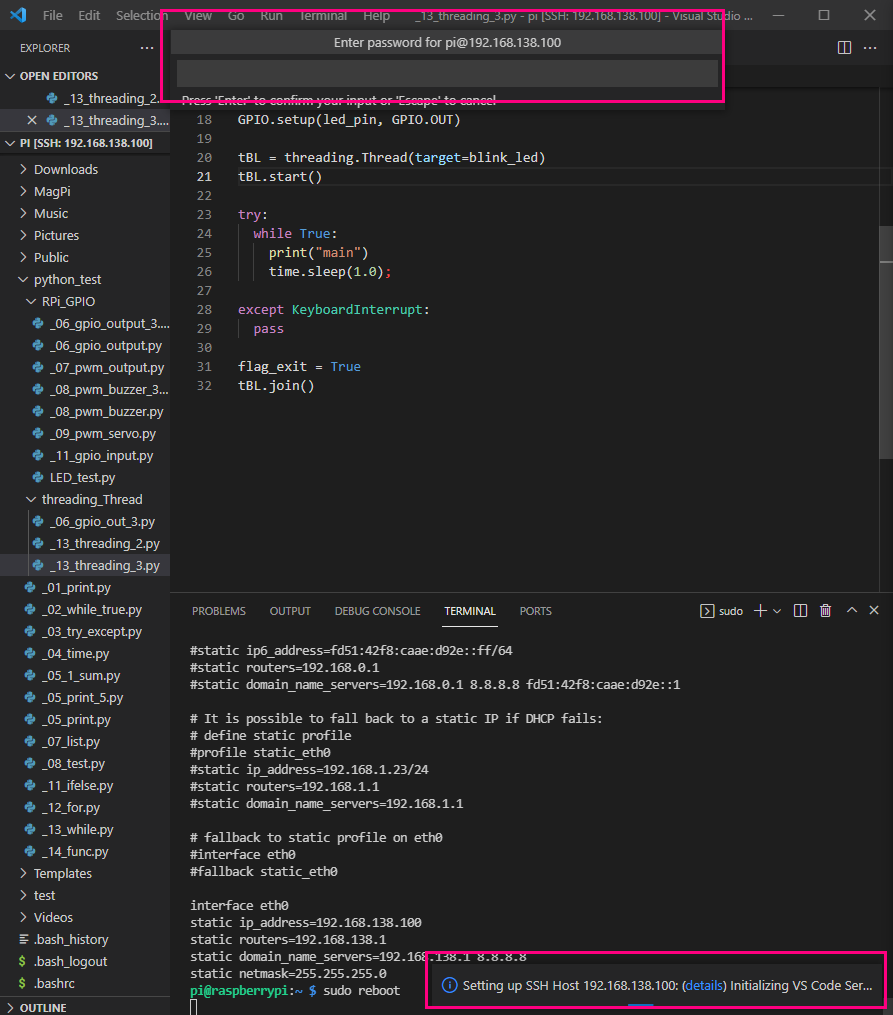
raspberry 인터넷 사용하기
sudo nano.... 를 입력하여
sudo nano /etc/dhcpcd.conf

라즈베리 파이 네트워크 설정 변경 config 파일

아래 내용 추가
interface eth0
static ip_address=192.168.138.100
static routers=192.168.138.1
static domain_name_servers=192.168.138.1 8.8.8.8
static netmask=255.255.255.0
아래는 cat etc/dhcpcd.conf 입력하여 확인하는 것


sudo reboot입력하여 재부팅하자
조금 대기하면 연결 할 것인지 물어본다.
비밀번호 입력하고 접속한다.
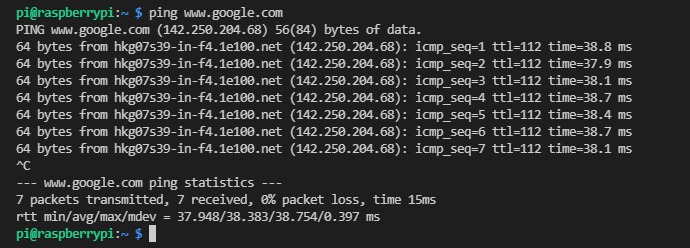
ping www.google.com입력하여 결과를 확인한다.
플라스크 웹 서버
웹 서버 역할
라즈베리파이 주로 플라스크(Flask, Django) 많이 사용함.
Flask <- Micro Web Framework
장점 :
쉽게 배울 수 있음. Python, HTML + CSS + Javascript 가볍게 사용 할 수 있음 (코드 몇 줄이면 금방 만든다) 가볍게 배포 할 수 있음. (virtualenv에 Flask 깔고 바로 배포 하면 됨!)단점 :
Django 에 비해서 자유도는 높으나, 제공해 주는 기능이 덜 하다. 복잡한 어플리케이션을 만들려고 할 때 해야 할 것들이 많다. ### flask 설치 이미 있다고 나온다. flask 실습
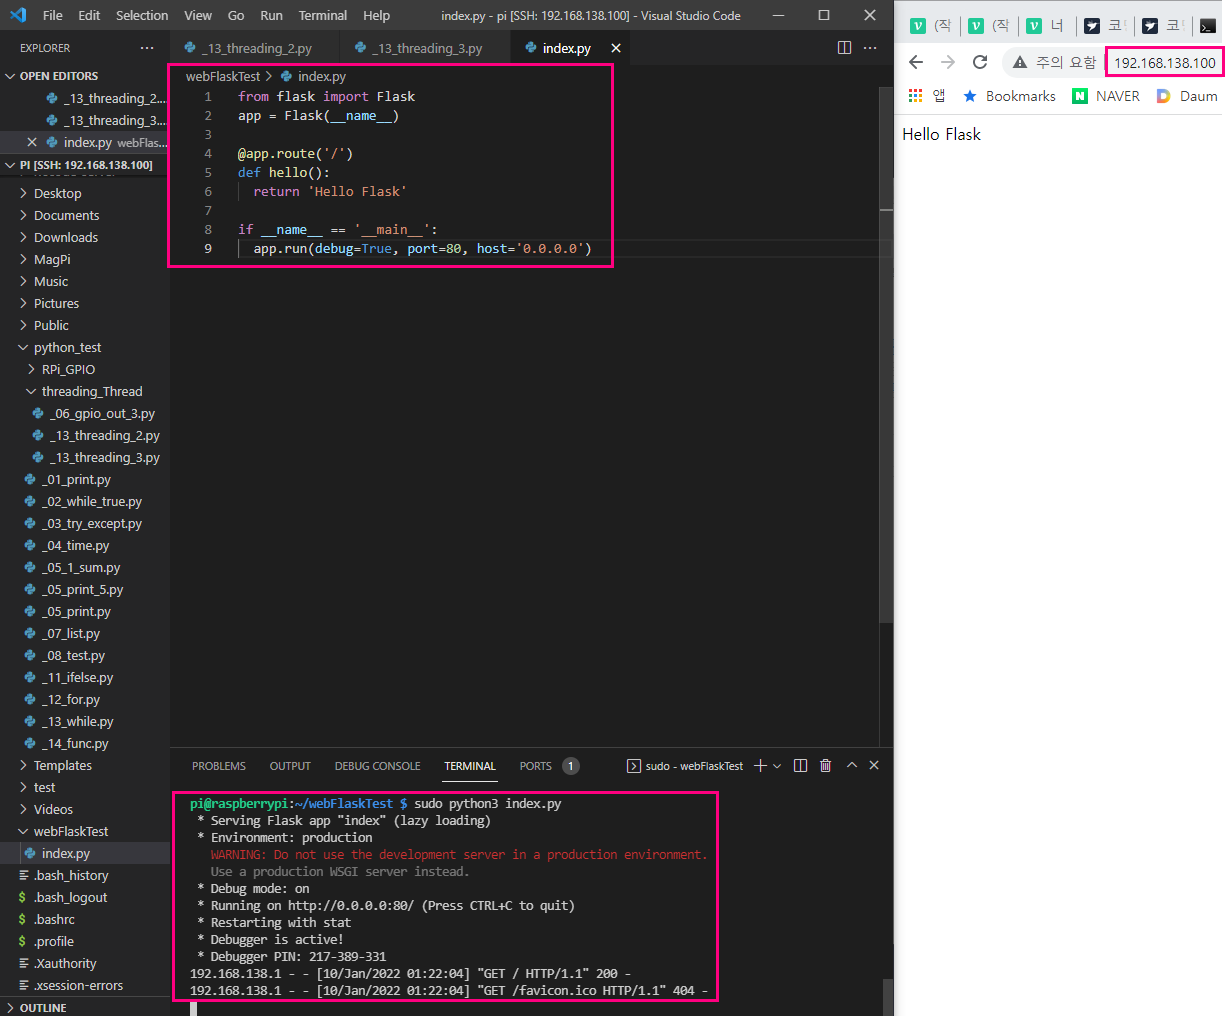
/home/pi/webFlaskTest/index.py 생성
및 코드 실행
from flask import Flask
app = Flask(__name__)

@app.route('/')
def hello():
  return 'Hello Flask'

if __name__ == '__main__':
  # name은 바꿔도 되나, main은 바꾸면 안된다.
  app.run(debug=True, port=80, host='0.0.0.0')
  # debug는 따로 설정 안해도 될 것이다.
  # default가 80이니까 안쳐도 되는것고 만약 8800이런식으로 입력하면
  # 192.168.138.100:8080 이렇게 입력해야한다.
간단하게 웹을 만들었다.
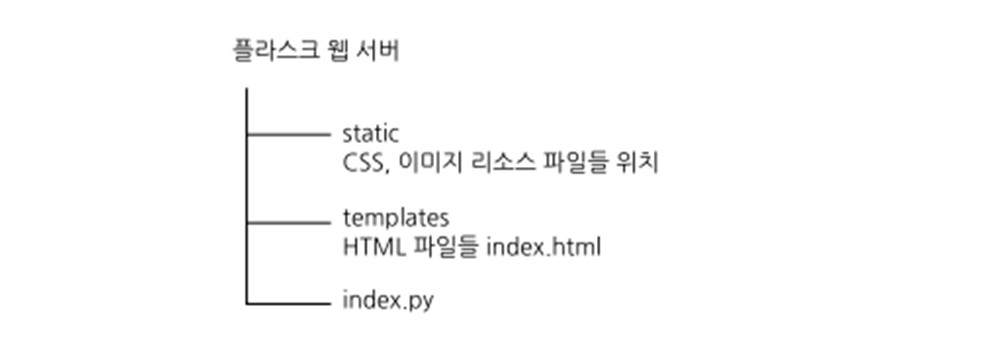
플라스크 웹 서버 기본 구조
꼭 해당 폴더로 생성해야 한다.
추가적인 page를 만들고 리턴값도 만들어보았다. 저장하면 live로 업데이트 된다.
from flask import Flask
app = Flask(__name__)

@app.route('/')
def hello():
  return 'Hello Flask'

@app.route('/sub1')
def sub1():
  return 'SUB1 page'

@app.route('/sub2')
def sub2():
  return 'Sub2 page'

if __name__ == '__main__':
  # name은 바꿔도 되나, main은 바꾸면 안된다.
  app.run(debug=True, port=80, host='0.0.0.0')
  # debug는 따로 설정 안해도 될 것이다.
  # default가 80이니까 안쳐도 되는것고 만약 8800이런식으로 입력하면
  # 192.168.138.100:8080 이렇게 입력해야한다.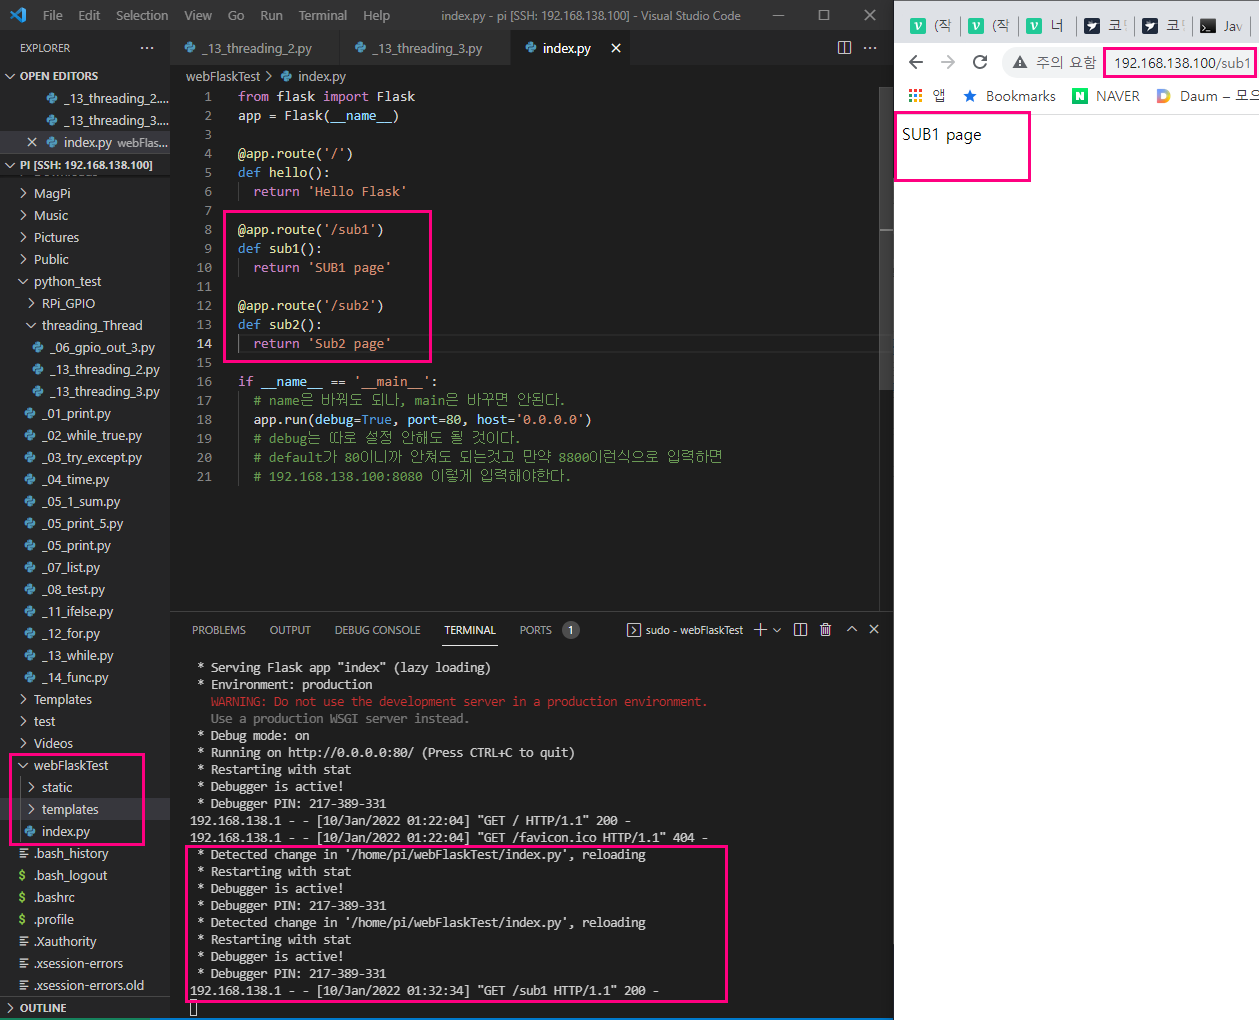
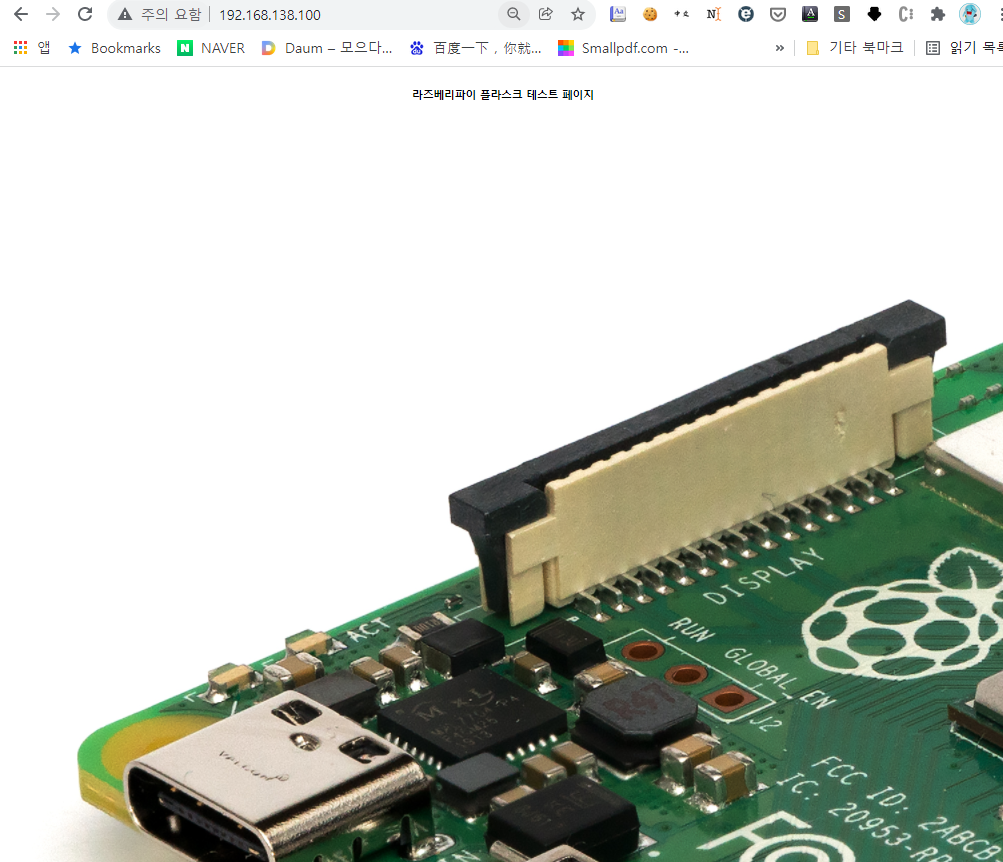
html page불러오고 사진 추가하기
html, index.py 작성하고 static폴더에 사진 추가하자
/webFlaskTest/template/test_html.html
<html>
  <head>
    <title>
      Flask Html test page
    </title>
  </head>
  <body>
    <center>
      <br>
        <strong>라즈베리파이 플라스크 테스트 페이지</strong>
    </br>
    <img = src="static/pi.png"
    </center>
  </body>
</html>
/webFlaskTest/index.py
from flask import Flask, render_template

app = Flask(__name__)

@app.route('/')
def index():
  return render_template('test_html.html')

@app.route('/sub1')
def sub1():
  return 'SUB1 page'

@app.route('/sub2')
def sub2():
  return 'Sub2 page'

if __name__ == '__main__':
  # name은 바꿔도 되나, main은 바꾸면 안된다.
  app.run(debug=True, port=80, host='0.0.0.0')
  # debug는 따로 설정 안해도 될 것이다.
  # default가 80이니까 안쳐도 되는것고 만약 8800이런식으로 입력하면
  # 192.168.138.100:8080 이렇게 입력해야한다.
사진이 너무 크다
get, post방식으로 flask 사용
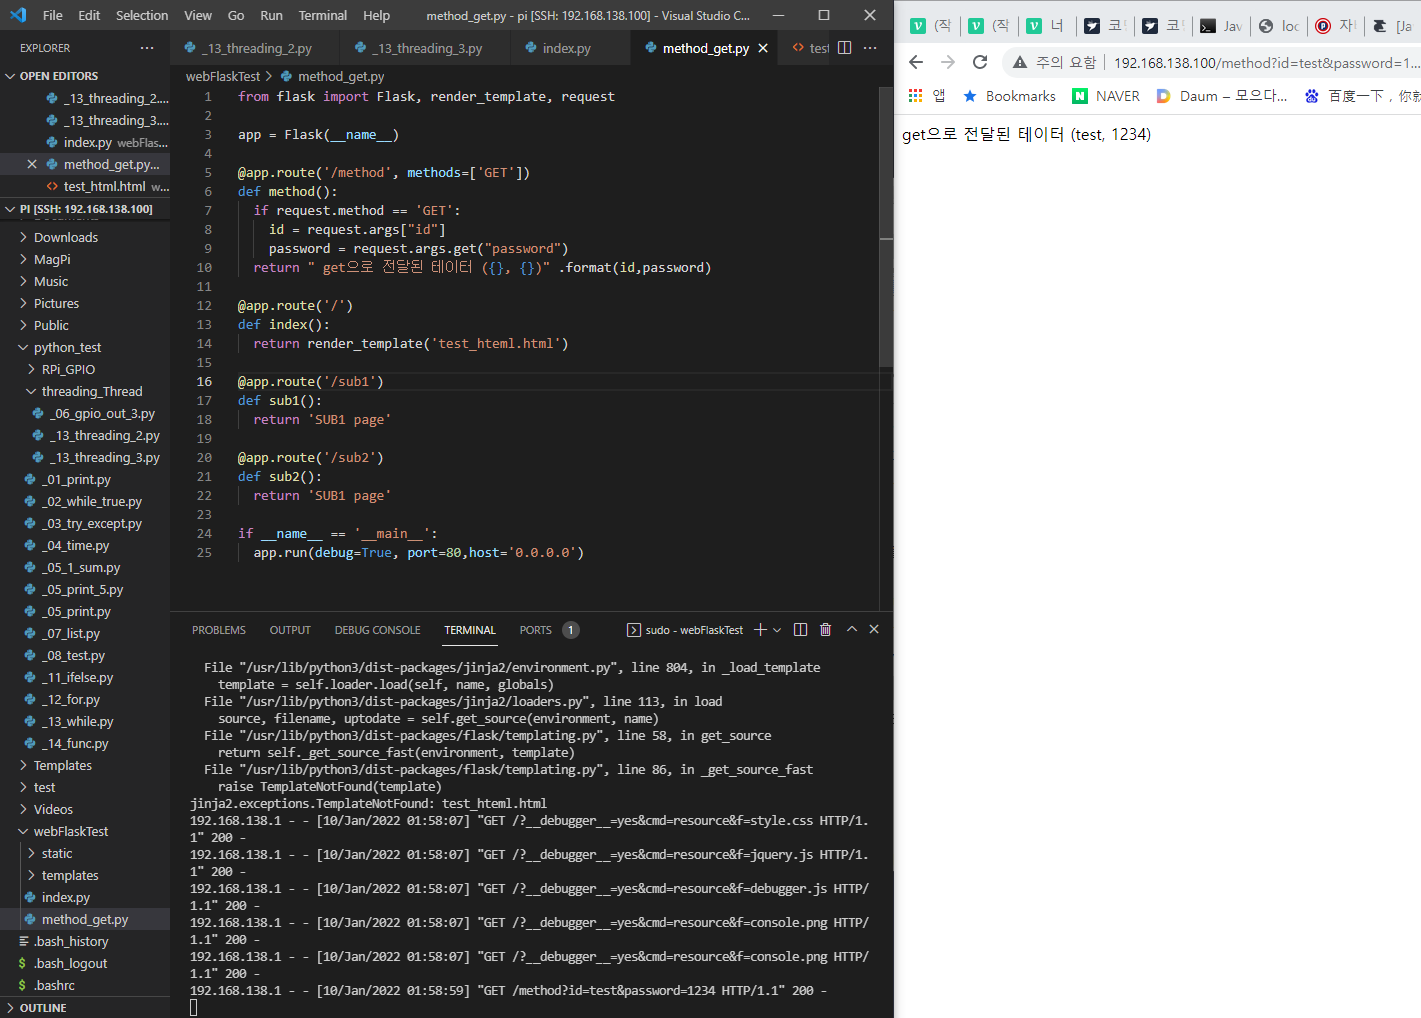
http://192.168.138.100/method?id=test&password=1234
url에 상위 주소를 입력해야 한다.
?로 시작하고 id=test 처럼 보내줌 파라미터 여러 개는 &로 구분함.
- method_get.py
from flask import Flask, render_template, request

app = Flask(__name__)

@app.route('/method', methods=['GET'])
def method():
  if request.method == 'GET':
    id = request.args["id"]
    password = request.args.get("password")
  return " get으로 전달된 테이터 ({}, {})" .format(id,password)

@app.route('/')
def index():
  return render_template('test_hteml.html')

@app.route('/sub1')
def sub1():
  return 'SUB1 page'

@app.route('/sub2')
def sub2():
  return 'SUB1 page'

if __name__ == '__main__':
app.run(debug=True, port=80,host='0.0.0.0')method라는 메서드를 호출하는 것이고
id와 password를 받아서 다시 return한다.
password를 입력하지 않으면 에러가 발생한다.
Get 방식으로 url에 파라미터를 넣어서 전달 할 수 있지만, 불편하기 때문에 html 파일을 통해 요청해보기
<html>
  <head>
    <title>
      get 방식 요청 테스트
    </title>
  </head>
  <body>
    <h2>ID : {{id}} , PASSWORD : ((password}}</h2>
    <form method='get' action='/method_get_act'>
      <label id='label1'>id</label>
      <input name='id' type='text'/>
      <br/>
      <label id='label2'> password</label>
      <input name='password' type='text'/>
      <br />
      <br />
      <input name='Submit1' type='submit' value='submit'/>
    </form>
  </body>
</html>
from flask import Flask, render_template, request
app = Flask(__name__)
# @app.route('/method', methods=['GET'])
# def method():
# if request.method == 'GET':
# id = request.args["id"]
# password = request.args.get("password")
# return " get으로 전달된 테이터 ({}, {})" .format(id,password)
@app.route('/method_get', methods=['GET'])
def method_get():
return render_template('method_get.html')
@app.route('/method_get_act', methods=['GET'])
def method_get_act():
if request.method == 'GET':
id_param = request.args["id"]
password_param = request.args.get("password")
return render_template('method_get.html', id=id_param, password=password_param)
if __name__ == '__main__':
app.run(debug=True, port=80,host='0.0.0.0')http://192.168.138.100/method_get_act?id
위 url로 접속한다. 아래와 같은 화면이 나오고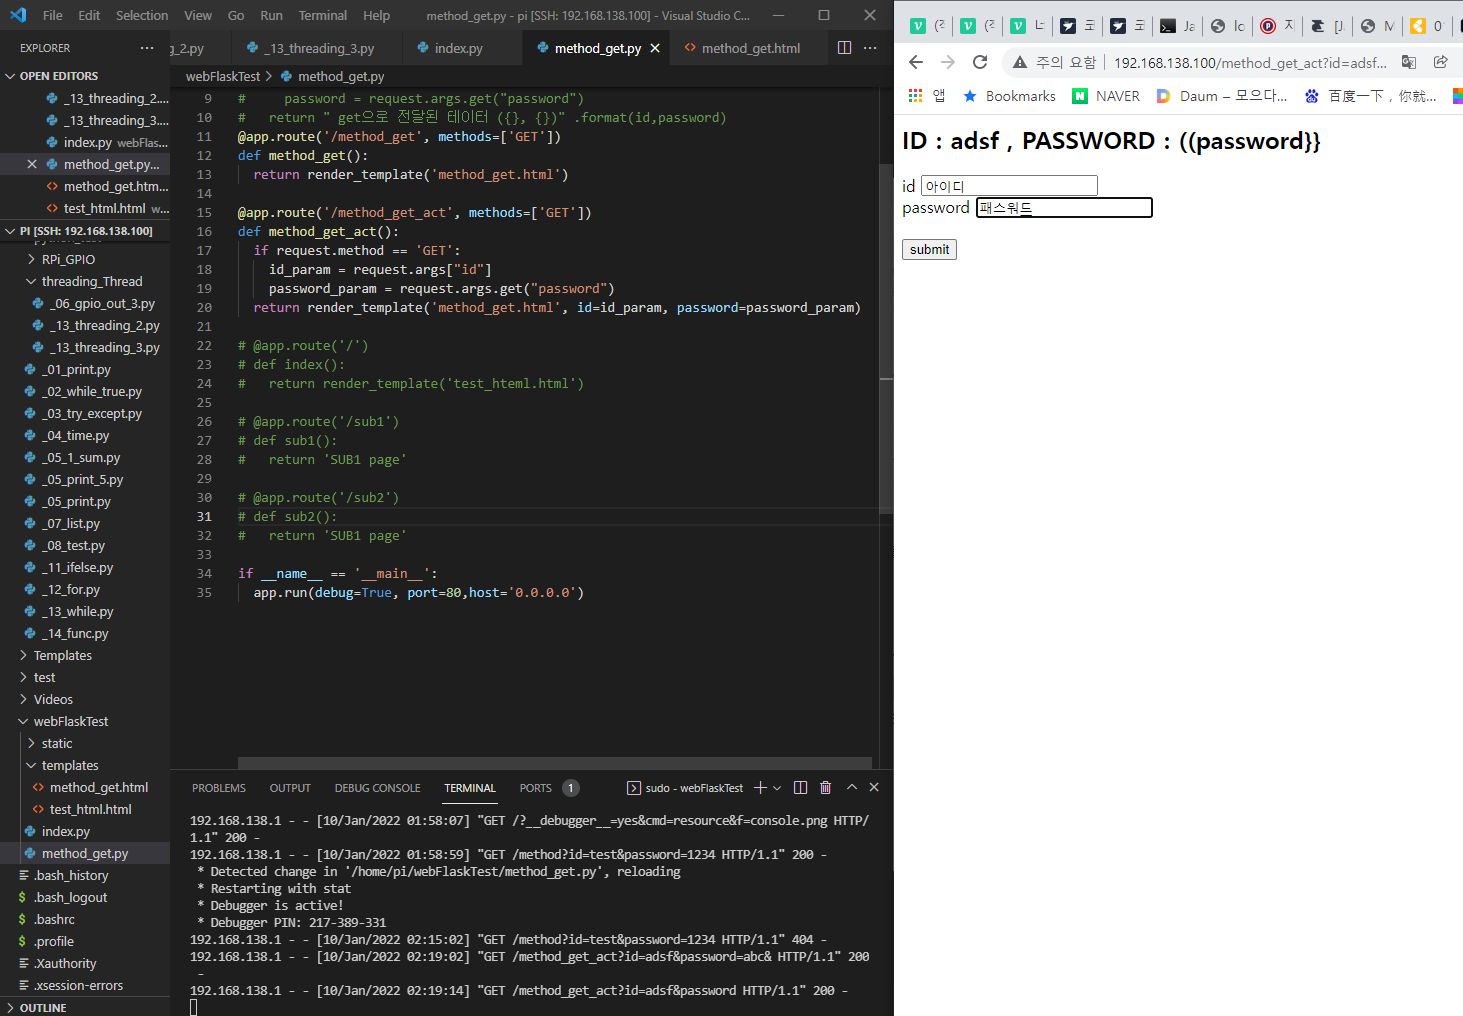
input창에 아이디, 패스워드 입력하면 url에도 반영되고 html창에도 적용된 화면을 볼 수 있다.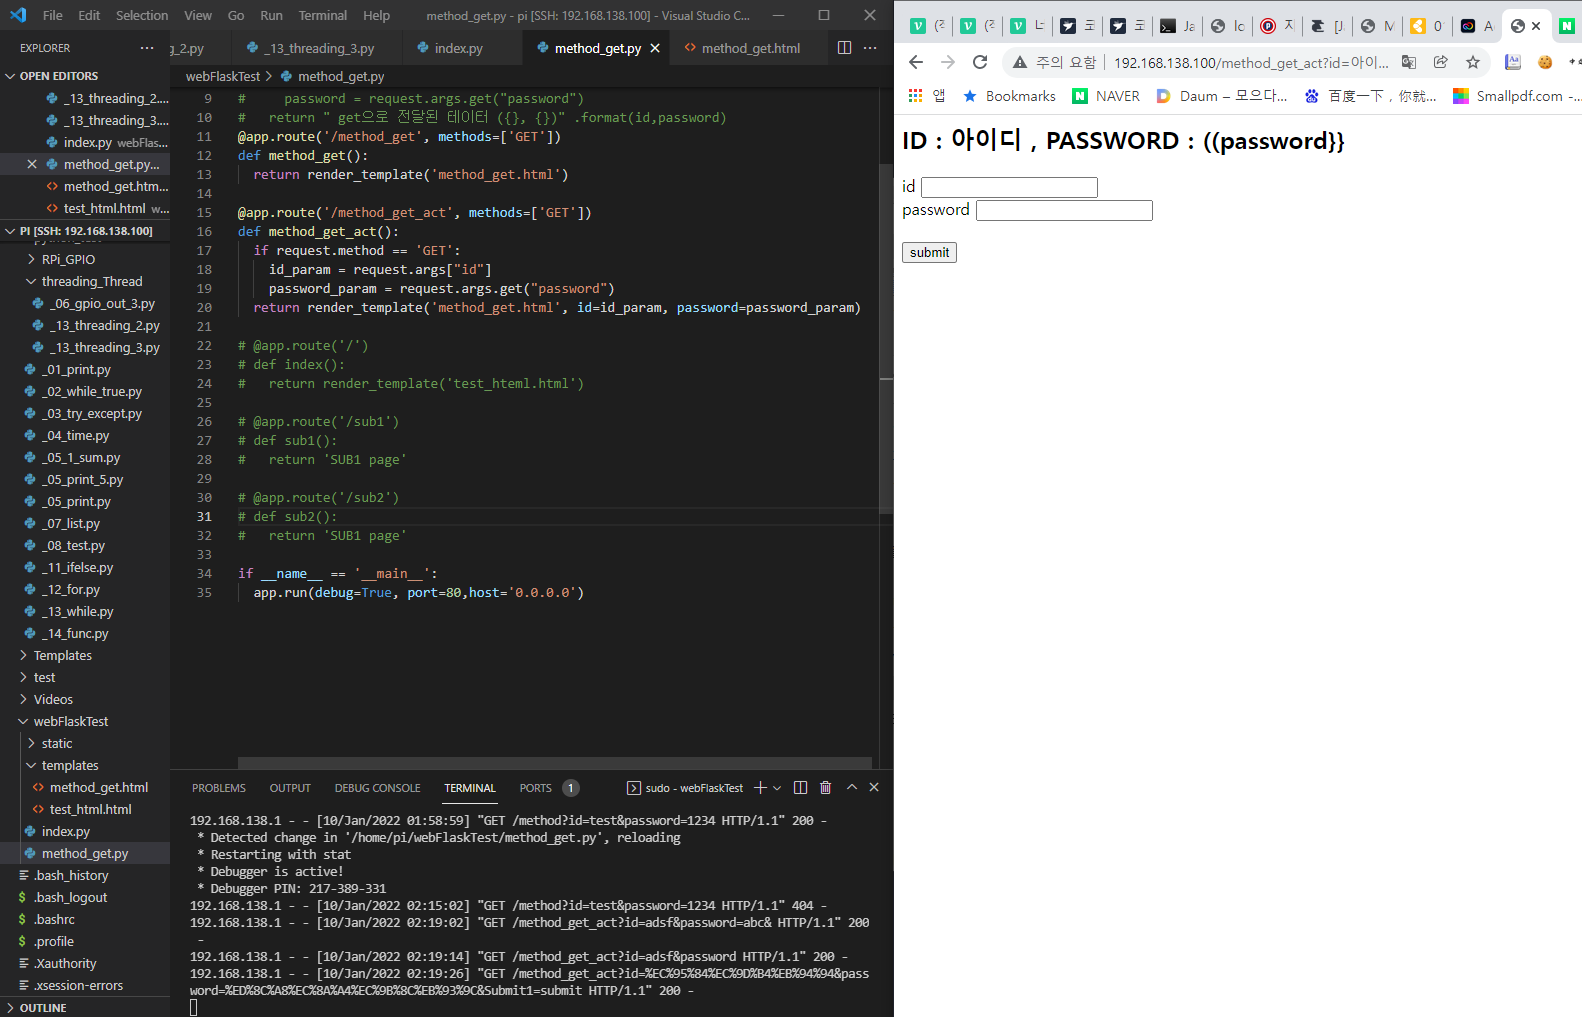
url을 복사해오면 incode된 주소가 나온다.
http://192.168.138.100/method_get_act?id=%EC%95%84%EC%9D%B4%EB%94%94&password=%ED%8C%A8%EC%8A%A4%EC%9B%8C%EB%93%9C&Submit1=submit
GET 방식은 data가 url에 노출되기 때문에 민감한 정보에 대해서는 위험하여 사용하지 않는다. -> POST를 사용한다.
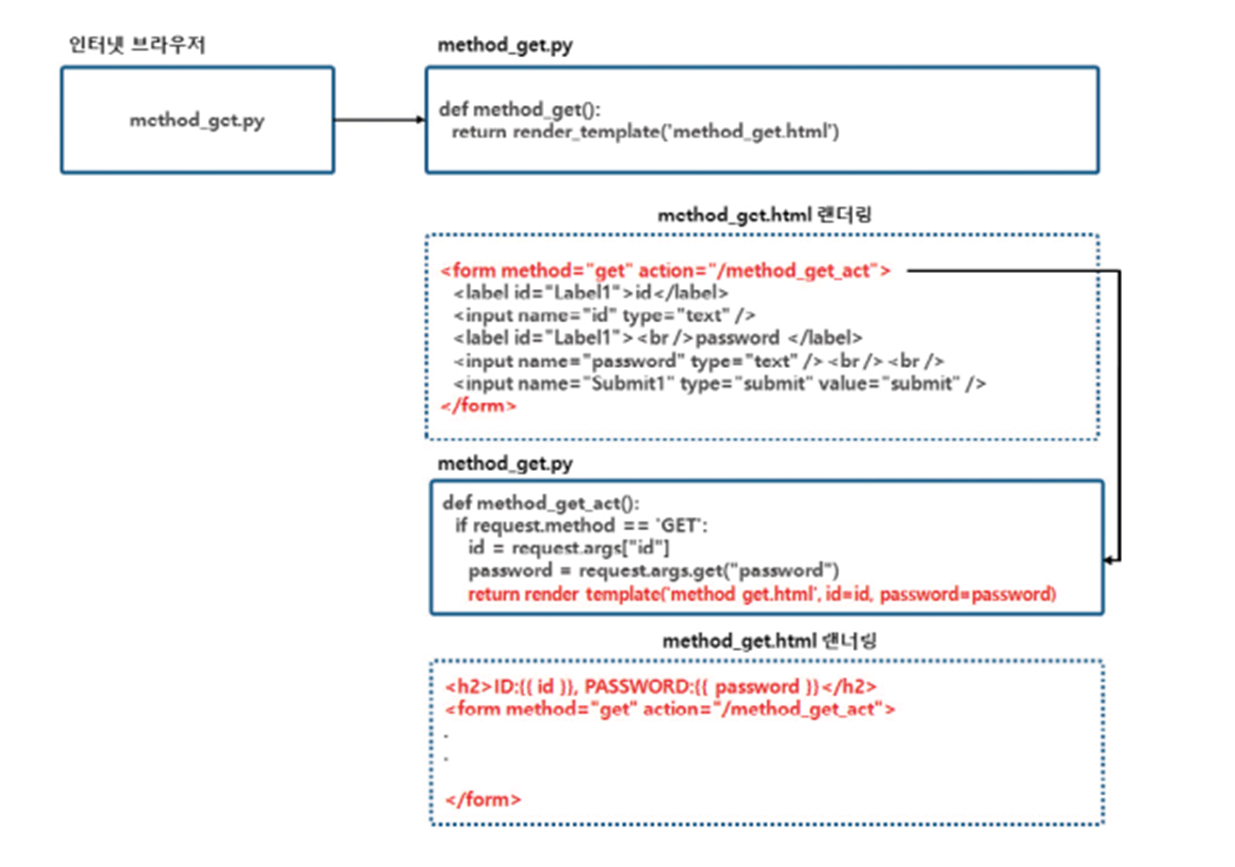
웹 브라우저와 플라크스 서버 간 호출 순서
POST 방식 파라미터
Post 방식은 URL에 파라미터를 통한 요청을 하지 않는다.
<html>
  <head>
    <title>
      get 방식 요청 테스트
    </title>
  </head>
  <body>
    <h2>ID : {{id}} , PASSWORD : ((password}}</h2>
    <form method='post' action='/method_post_act'>
      <label id='Label1'>id</label>
      <input name='id' type='text'/>
      <br/>
      <label id='Label2'> password</label>
      <input name='password' type='text'/>
      <br />
      <br />
      <input name='Submit1' type='submit' value='submit'/>
    </form>
  </body>
</html>
from flask import Flask, render_template, request
app = Flask(__name__)
@app.route('/method_post', methods=['GET', 'POST'])
def method_post():
return render_template('method_post.html')
@app.route('/method_post_act', methods=['GET','POST'])
def method_post_act():
if request.method == 'POST':
id_param = request.form["id"]
password_param = request.form["password"]
return render_template('method_post.html', id=id_param, password=password_param)
if __name__ == '__main__':
app.run(debug=True, port=80,host='0.0.0.0')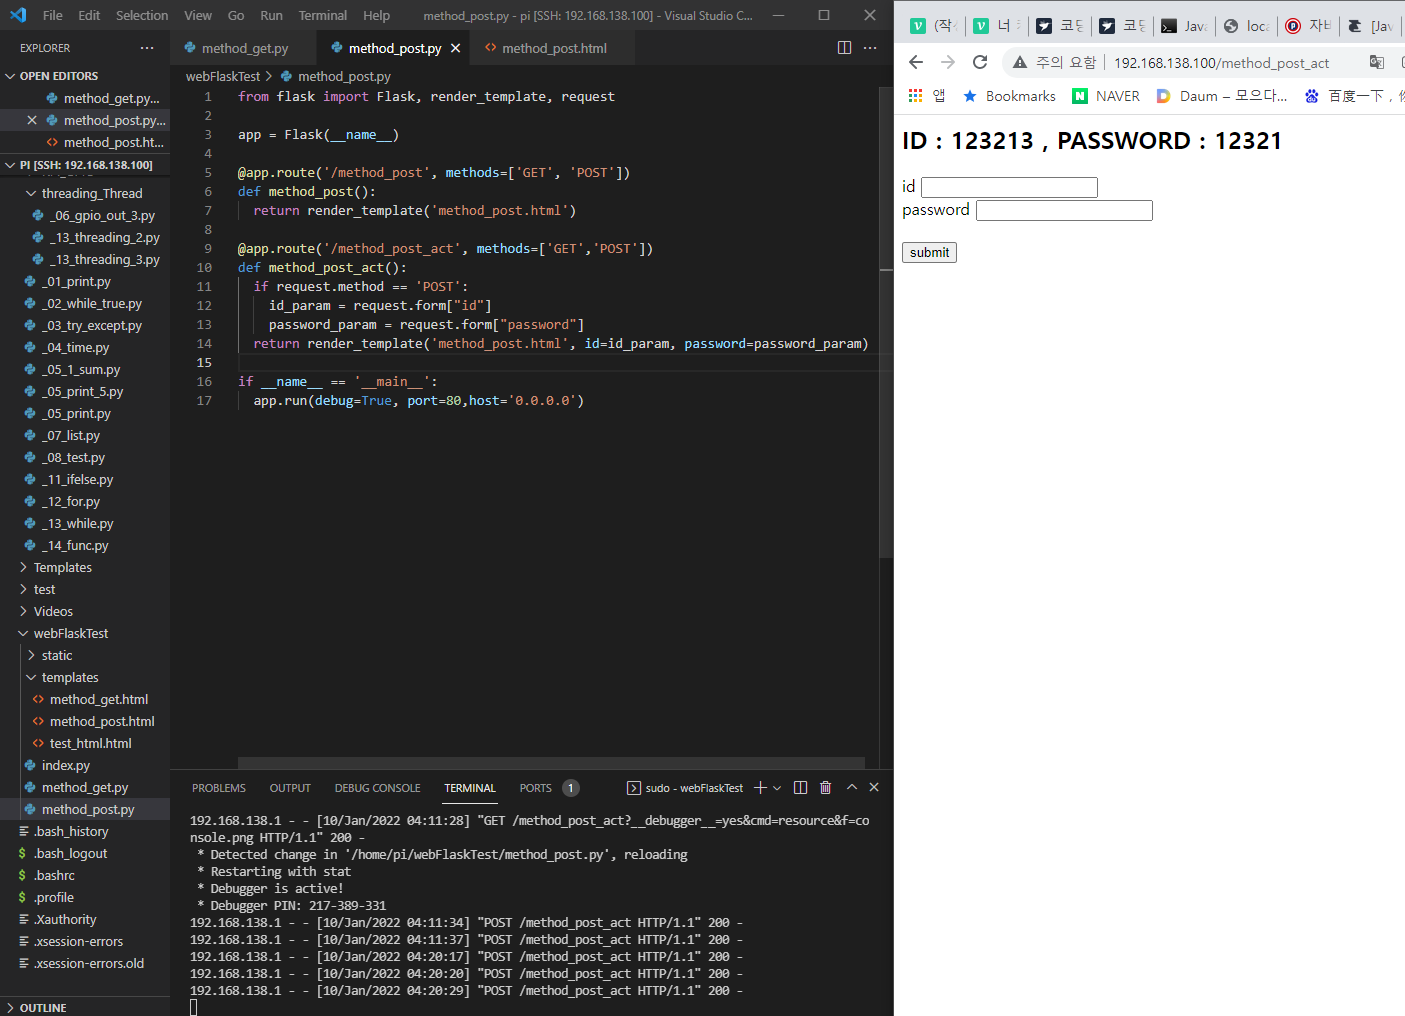
웹 GPIO 제어하기(IoT 원격)
- flask + HTML 을 사용해서 원격으로 led on/ off 해보기
<html>
<head>
<title>
Web LED Control
</title>
</head>
<body>
<center>
<br>
<strong>HOME IOT Service</strong>
</br>
<table style='width:50%'>
<tr>
<td class='auto-style6' style='height:81; width:30%'>
<strong>
<a href="led_control_act?led=1"> LED 켜기</a>
</strong>
</td>
<td class='auto-style6' style='height:81; width:30%'>
<strong>
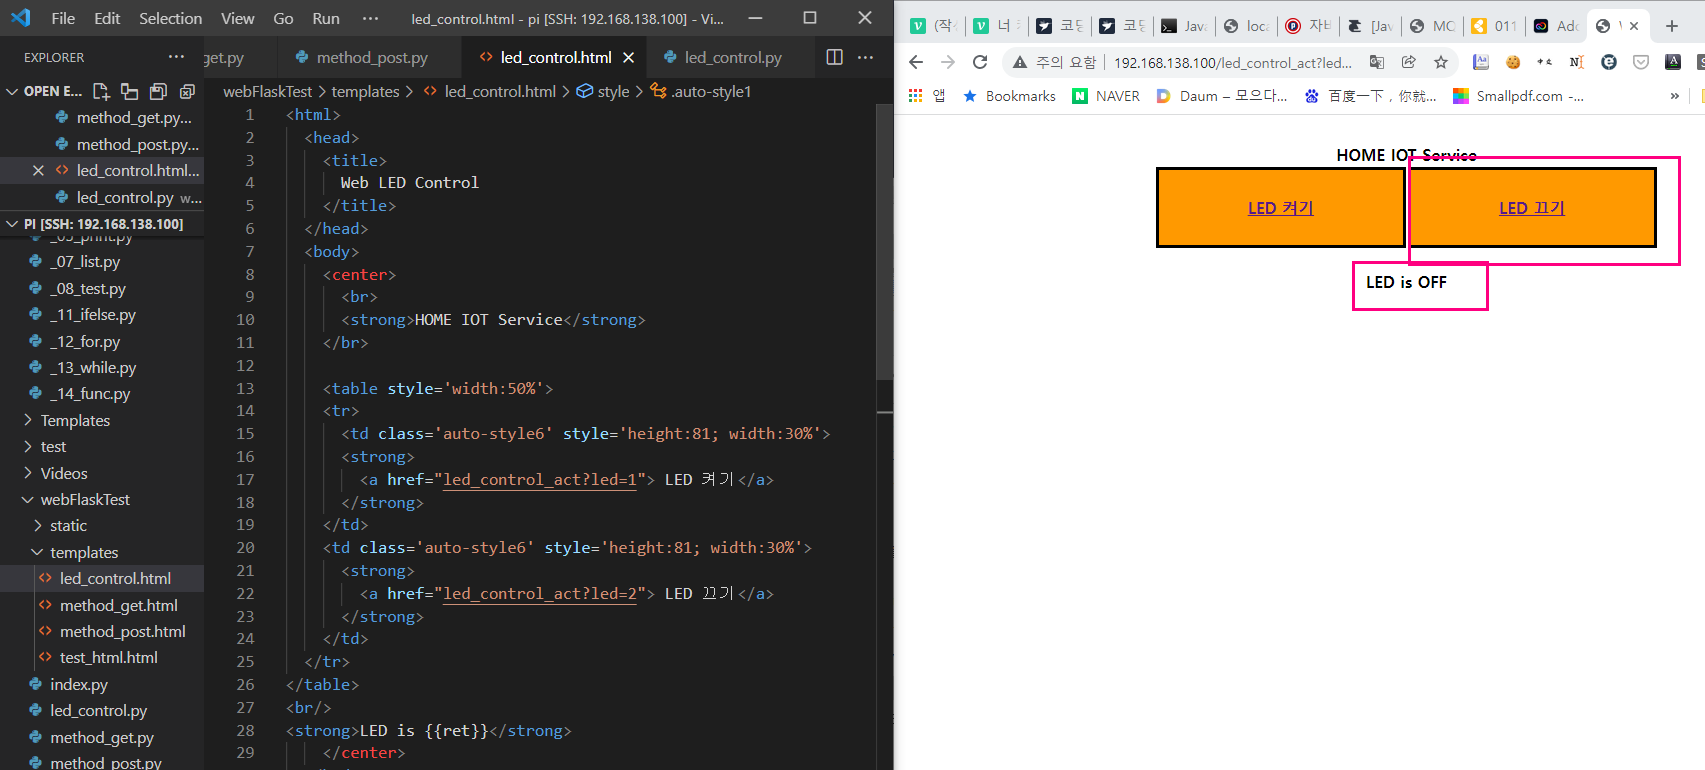
<a href="led_control_act?led=2"> LED 끄기</a>
</strong>
</td>
</tr>
</table>
<br/>
<strong>LED is {{ret}}</strong>
</center>
</body>
</html>
<style type ='text/css'>
.auto-style1{
text-align: center;
}
.auto-style3{
background-color: #008000;
}
.auto-style6{
border-style: solid;
border-color: #000000;
text-align: center;
color: #FFFFFF;
background-color: #FF9900;
}
</style>from flask import Flask, render_template, request
import RPi.GPIO as GPIO
LED=17
GPIO.setmode(GPIO.BCM)
GPIO.setup(LED, GPIO.OUT)
app = Flask(__name__)
@app.route('/led_control')
def led_control():
return render_template('led_control.html')
@app.route('/led_control_act', methods=['GET'])
def led_control_act():
if request.method == 'GET':
status = ''
led = request.args['led']
if led =='1':
GPIO.output(LED,True)
status = 'ON'
else:
GPIO.output(LED,False)
status = 'OFF'
return render_template('led_control.html', ret = status)
if __name__ == '__main__':
app.run(debug=True, port=80,host='0.0.0.0')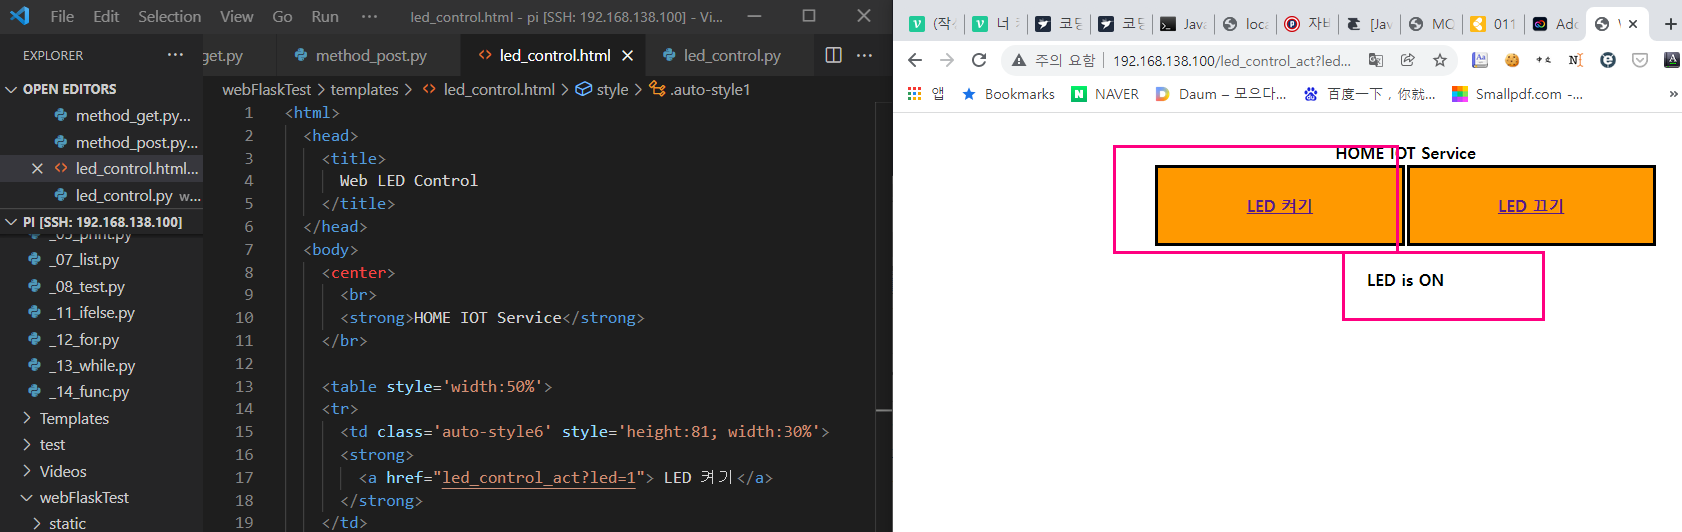
bootstrap 사용하기
button
사진과 같이 다운받는다.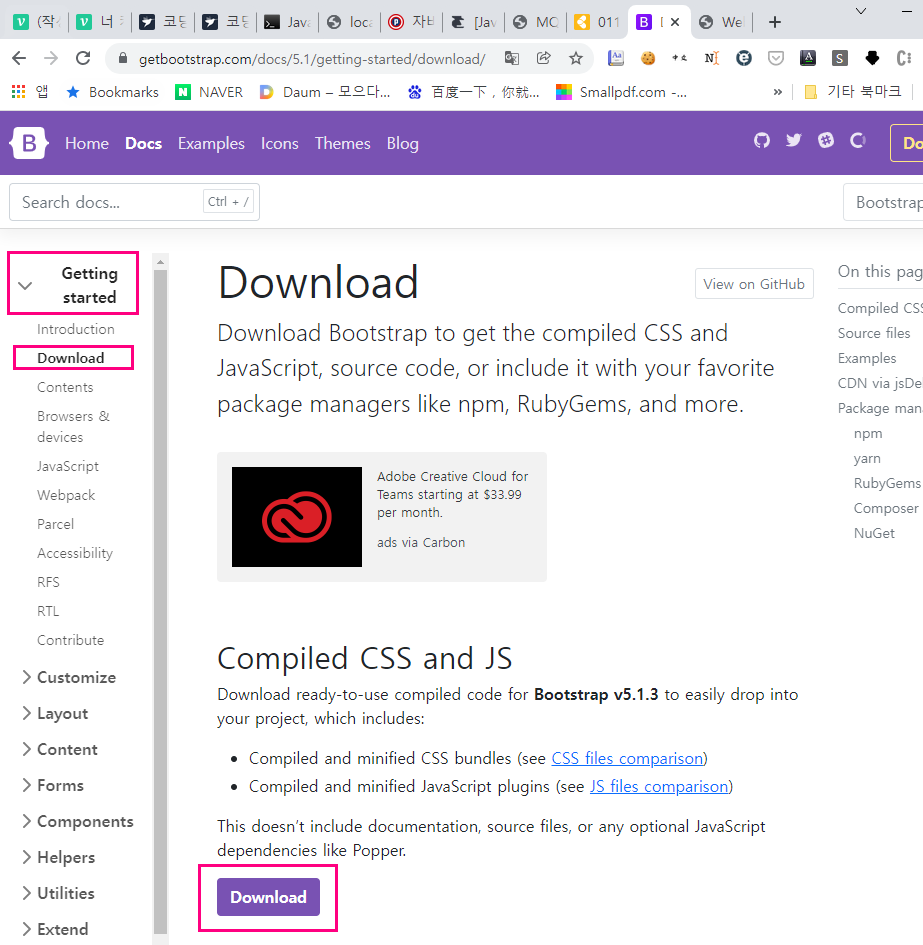
압축을 풀고 css, js폴더를 static폴더에 붙여 넣는다.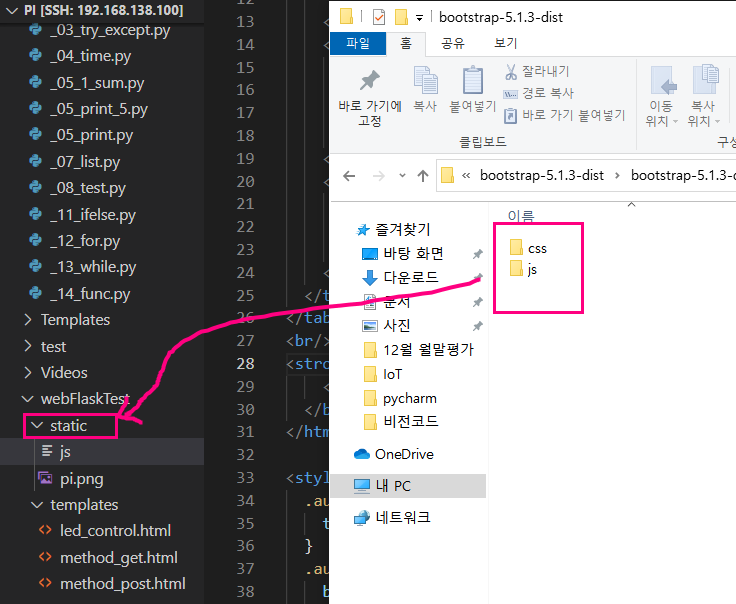
이제 bootstrap 라이브러리를 사용할 수 있다.
card
<div class='card' style='width: 18rem;'>
  {% if ret == 'ON' %}
  <img src='static/on.png' class='card-img-top'>
  {% elif ret == 'OFF' %}
  <img src='static/off.png' class='card-img-top'>
  {% endif %}
  <div class='card-body'>
    <h5 class='card-title'>title</h5>
    <p class='card-text'> LED is {{ret}}</p>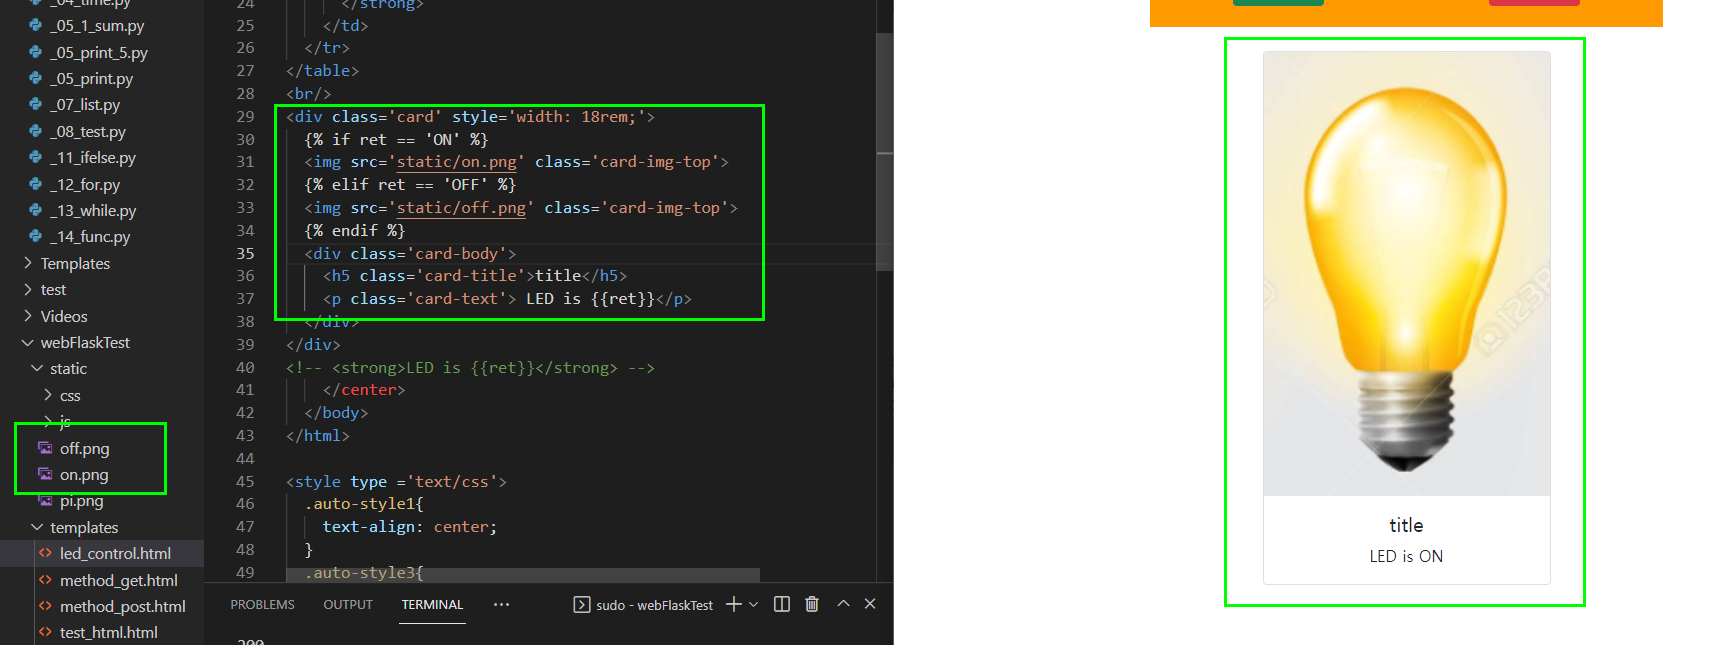
chart js 사용하기
2.8버전이 쉬우니 이걸로 해보자
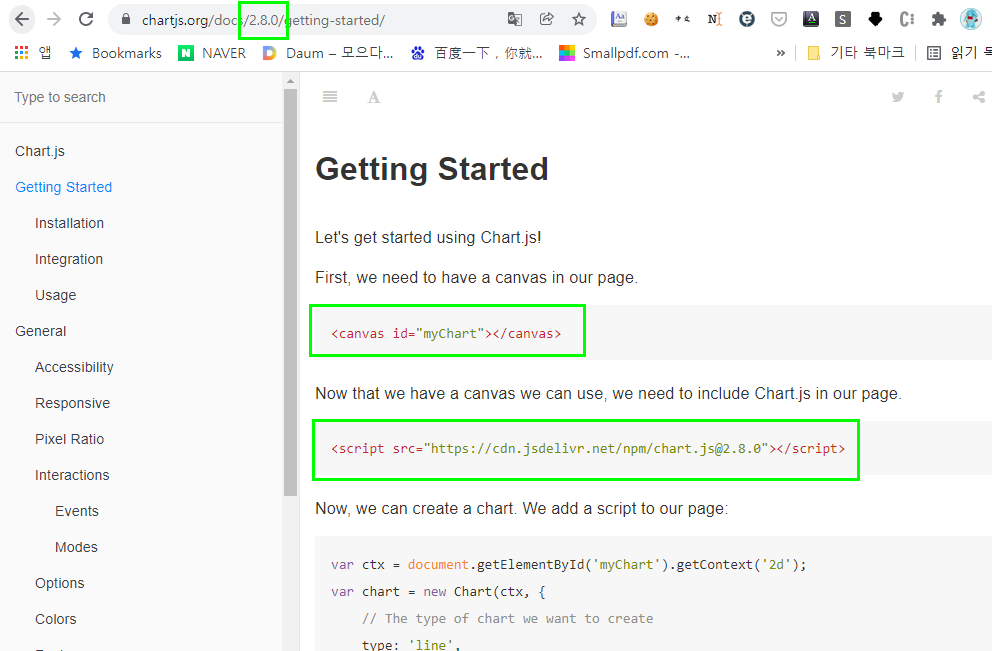
bar chart를 넣어보았다.
해당 코드는 3.7버전에서 긁어와봤다.

- led_control.html
<script src="https://cdn.jsdelivr.net/npm/chart.js@2.8.0"></script>
<canvas id="myChart" width="400" height="400"></canvas>
<script>
const ctx = document.getElementById('myChart').getContext('2d');
const myChart = new Chart(ctx, {
    type: 'bar',
    data: {
        labels: ['on', 'off'],
        datasets: [{
            label: '# of Votes',
            data: {{ values }},
            backgroundColor: [
                'rgba(255, 99, 132, 0.2)',
                'rgba(54, 162, 235, 0.2)',
                'rgba(255, 206, 86, 0.2)',
                'rgba(75, 192, 192, 0.2)',
                'rgba(153, 102, 255, 0.2)',
                'rgba(255, 159, 64, 0.2)'
            ],
            borderColor: [
                'rgba(255, 99, 132, 1)',
                'rgba(54, 162, 235, 1)',
                'rgba(255, 206, 86, 1)',
                'rgba(75, 192, 192, 1)',
                'rgba(153, 102, 255, 1)',
                'rgba(255, 159, 64, 1)'
            ],
            borderWidth: 1
        }]
    },
    options: {
        scales: {
            y: {
                beginAtZero: true
            }
        }
    }
});
</script>- led_control.py
from flask import Flask, render_template, request
import RPi.GPIO as GPIO

LED=17
GPIO.setmode(GPIO.BCM)
GPIO.setup(LED, GPIO.OUT)

app = Flask(__name__)

@app.route('/led_control')
def led_control():
  data = []
  return render_template('led_control.html', values = data)

@app.route('/led_control_act', methods=['GET'])
def led_control_act():
  data = []
  if request.method == 'GET':
    status = ''
    led = request.args['led']
    if led =='1':
      GPIO.output(LED,True)
      status = 'ON'
      data = [1,0]
    else:
      GPIO.output(LED,False)
      status = 'OFF'
      data = [0,1]
  return render_template('led_control.html', ret = status, values = data)

if __name__ == '__main__':
  app.run(debug=True, port=80,host='0.0.0.0')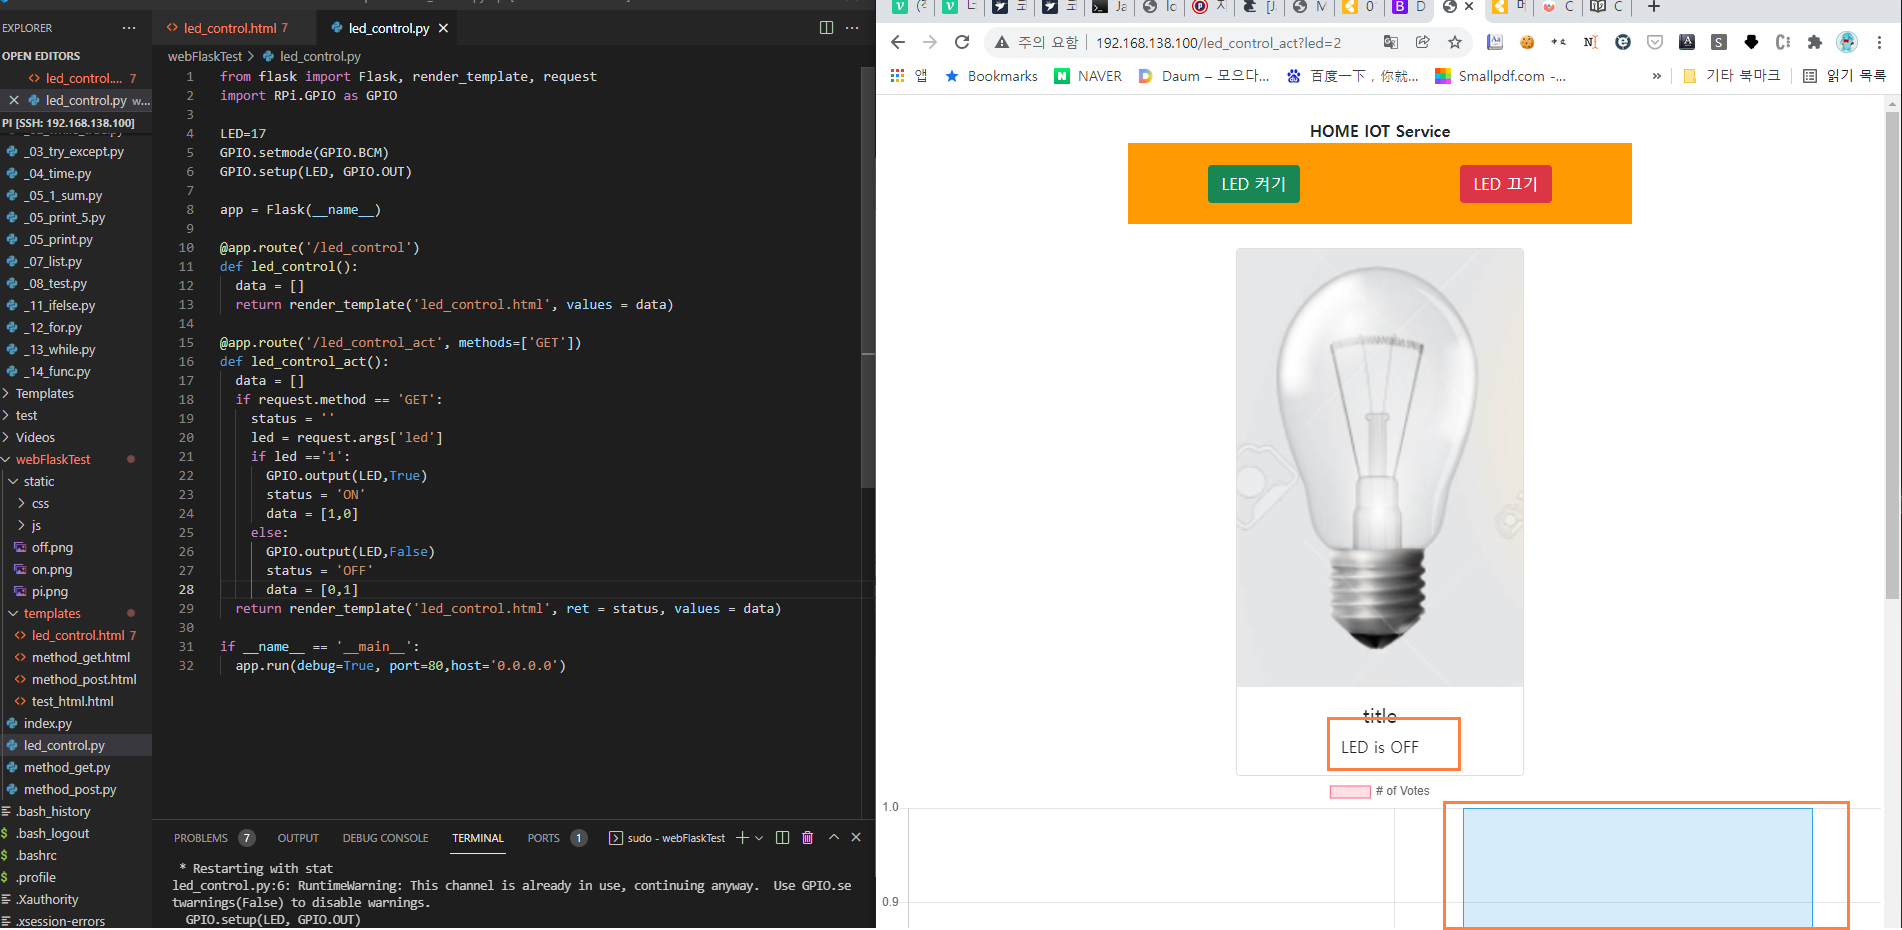
실습
1번
# 문제 풀이1
# 라즈베리 파이 보드 GPIO 17번 핀으로 제어하는 LED 회로 구성
# N키를 누르면 led가 켜지고
# F키를 누르면 led가 꺼지도록 만들어 보기
# While
# Input()
# If, elif
# Gpio setup output
import RPi.GPIO as GPIO

led_pin=17
GPIO.setmode(GPIO.BCM)
GPIO.setup(led_pin, GPIO.IN)
GPIO.setup(led_pin, GPIO.OUT)

try:
  while True:
    userInput = input()
    if userInput == 'N':
      GPIO.output(led_pin, True)
    elif userInput == 'F':
      GPIO.output(led_pin, False)

except KeyboardInterrupt:
  pass

GPIO.cleanup()
2번
# 문제 풀이2
# 라즈베리 파이 보드 GPIO 18번 핀으로 제어하는 LED 회로 구성
# 숫자 0 누르면 LED 밝기 0
# 숫자 5 누르면 LED 밝기 50%
# T 누르면 100%로 조절하기
# PWM활용
# Pwm.ChangeDutyCycle()

import RPi.GPIO as GPIO
import time

led_pin=17
GPIO.setmode(GPIO.BCM)
GPIO.setup(led_pin, GPIO.IN)
GPIO.setup(led_pin, GPIO.OUT)

pwm = GPIO.PWM(led_pin, 1000.0) # 1.0Hz
pwm.start(0.0) # 0.0 ~ 100.0

try:
  while True:
    userInput = input()
    GPIO.output(led_pin, True)
    if userInput == '5':
      for t_high in range(0,101):
        pwm.ChangeDutyCycle(t_high)
        time.sleep(0.01)
    elif userInput == '0':
      for t_high in range(100, -1, -1):
        pwm.ChangeDutyCycle(t_high)
        time.sleep(0.01)


except KeyboardInterrupt:
  pass

pwm.stop()
GPIO.cleanup()
3번
# 문제 풀이3
# GPIO 18번으로 제어하는 부저 회로 구성
# A 를 누르면 도를 0.5초 동안
# S 를 누르면 레를 0.5초 동안
# D 를 누르면 미를 0.5초 동안
# F 를 누르면 파를 0.5초 동안
# G 를 누르면 솔를 0.5초 동안
# H 를 누르면 라를 0.5초 동안
# J 를 누르면 시를 0.5초 동안
# K 를 누르면 도를 0.5초 동안
# melody = [262,294,330,349,392,440,494,523]

import RPi.GPIO as GPIO
import time

buzzer_pin = 18
GPIO.setmode(GPIO.BCM)
GPIO.setup(buzzer_pin, GPIO.OUT)
pwm = GPIO.PWM(buzzer_pin, 1.0) # 1.0Hz
pwm.start(50.0) # 0.0~100.0
melody = [262,294,330,349,392,440,494,523]
try:
  while True :
    userInput = input()
    if userInput == 'A':
      pwm.ChangeFrequency(melody[0])
      time.sleep(0.5)
      pwm.ChangeDutyCycle(0.0)
    elif userInput == 'S':
      pwm.start(50.0)
      pwm.ChangeFrequency(melody[1])
      time.sleep(0.5)
      pwm.ChangeDutyCycle(0.0)
    elif userInput == 'D':
      pwm.start(50.0)
      pwm.ChangeFrequency(melody[2])
      time.sleep(0.5)
      pwm.ChangeDutyCycle(0.0)
    elif userInput == 'F':
      pwm.start(50.0)
      pwm.ChangeFrequency(melody[3])
      time.sleep(0.5)
      pwm.ChangeDutyCycle(0.0)
    elif userInput == 'G':
      pwm.start(50.0)
      pwm.ChangeFrequency(melody[4])
      time.sleep(0.5)
      pwm.ChangeDutyCycle(0.0)
    elif userInput == 'H':
      pwm.start(50.0)
      pwm.ChangeFrequency(melody[5])
      time.sleep(0.5)
      pwm.ChangeDutyCycle(0.0)
    elif userInput == 'J':
      pwm.start(50.0)
      pwm.ChangeFrequency(melody[6])
      time.sleep(0.5)
      pwm.ChangeDutyCycle(0.0)
    elif userInput == 'K':
      pwm.start(50.0)
      pwm.ChangeFrequency(melody[7])
      time.sleep(0.5)
      pwm.ChangeDutyCycle(0.0)
except KeyboardInterrupt:
  pass

pwm.ChangeDutyCycle(0.0)
pwm.stop()
GPIO.cleanup()
5번
import RPi.GPIO as GPIO

button_pin = 22
led_pin = 18
GPIO.setmode(GPIO.BCM)
GPIO.setup(button_pin, GPIO.IN)
GPIO.setup(led_pin, GPIO.OUT)

buttonInputPrev = False
ledOn = False

try:
  while True:
    buttonInput = GPIO.input(button_pin)

    if buttonInput and not buttonInputPrev:
      print('rising edge')
      ledOn = True if not ledOn else False
      GPIO.output(led_pin, ledOn)
    elif not buttonInput and buttonInputPrev:
      print("falling edge")
    else: pass

    buttonInputPrev = buttonInput

except KeyboardInterrupt:
  pass

GPIO.cleanup()
6번
# 문제 풀이7
# 라즈베리파이 보드의 GPIO22번 핀으로 버튼 입력 받고
# GPIO 18번 핀으로 부저 회로 구성
# 버튼 입력은 외부 인터럽트 처리 or 반복문  사용하고 싶은거 사용
# 누를때마다 도,레,미,파,솔,라,시,도 소리 변경되게 작성
# 조건문으로 상태 변경 처리

import RPi.GPIO as GPIO
import time

led_state1 = False # 전원 on/off
led_state2 = False # 밝기 50%/100%
def buttonPressed(channel):
  global led_state1
  global led_state2
  if led_state1 == False and led_state2 == False:
    # 밝기 0% -> 밝기 50%
    led_state1 = True
    led_state2 = True
    print('밝기 50%')
  elif led_state1 == True and led_state2 == True:
    # 밝기 50% -> 밝기 100%
    led_state2 = False
    print('밝기 100%')
  elif led_state1 == True and led_state2 == False:
    # 밝기 100% -> 밝기 0%
    led_state1 = False
    print('밝기 0%')


button_pin = 22
led_pin = 18

GPIO.setmode(GPIO.BCM)
GPIO.setup(led_pin, GPIO.OUT)

GPIO.setup(button_pin, GPIO.IN)
GPIO.add_event_detect(button_pin, GPIO.RISING)
GPIO.add_event_callback(button_pin, buttonPressed)

pwm = GPIO.PWM(led_pin, 1000.0) # 1.0Hz 밝기
pwm.start(0.0) # 0.0 ~ 100.0

try:
  while True:
    if led_state1 == True and led_state2 == True:
      # GPIO.output(led_pin, led_state1)
      pwm.ChangeDutyCycle(50)
      time.sleep(0.01)
    elif led_state1 == True and led_state2 == False:
      pwm.ChangeDutyCycle(100)
      time.sleep(0.01)
    elif led_state1 == False and led_state2 == False:
      pwm.ChangeDutyCycle(0)
      time.sleep(0.01)

except KeyboardInterrupt:
  pass

pwm.stop()
GPIO.cleanup()
7번~10번 자습
pwm.ChangeDutyCycle
파장의 극점?을 조절한다.
값은 %값으로 0~100이다.
pwm.ChangeDutyCycle(50)
pwm.ChangeFrequency
파장의 빈도수를 조절한다.
pi로 wifi사용하기
220.90.129.??? 으로 pi ip를 잡으면 와이파이를 사용할 수 있다. 왜냐면
220.90.129.61이 내 pc의 무선lan 어댑터 wifi IPv4주소이기 때문이다.
현재는 192.168.138.1로 강제했기 때문에 pi가 wifi연결을 할 수 없다.