웹소켓 프로토콜
socket.io
웹페이지가 열리는 브라우저가 websocket을 지원하면 websocket 방식으로 동작하고 지원하지 않는 브라우저라면 http를 이용헤 websocket을 흉내내는 방식으로 통신을 지원한다.
socket.io는 nodeJS에 종속적이다.
socket.js
스프링에서 위와 같은 문제를 해결하기 위한 방법으로 socketJS를 솔루션으로 제공한다. 서버 개발시 일반 websocket으로 통신할지 socketJS호환으로 통신할지 결정할 수 있다. 그리고 클라이언트는 socketJS client를 통해 서버랑 통신한다.
stomp
stomp는 단순(또는 스트리밍)텍스트 지향 메세지 프로토콜이다. spring에 종속적이며, 구독 방식으로 사용하고 있다. 가볍기에 보통 많이 사용한다.
보통 Node.js를 이용할땐 socket.io를 사용하고,
Spring을 사용할 땐 socket.js, stomp를 주로 사용한다.
stomp에 대해서 주로 알아보자.
웹소켓 클라이언트 만들기
전체적인 stomp의 흐름은 다음과 같다.
서버와 연결할 클라이언트 객체 생성
-> 서버와 연결할 클라이언트 Connection
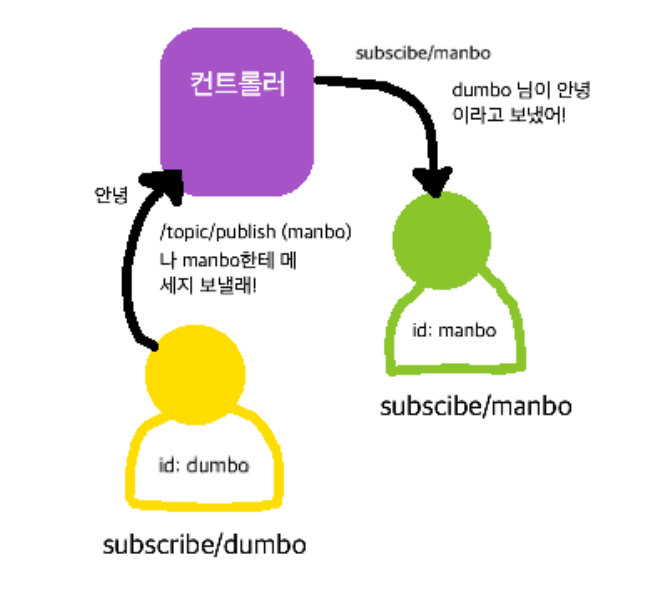
-> 메세지 전송 전 Subsciber와 Piblisher를 지정
->Subscribe를 하면 해당 URL로 나에게 메세지를 보낼 수 있는 경로가 생긴다.
-> Publisher를 하면 Publish 한 URL로 메세지가 이동한다.
- app: WebSocket으로 앱으로 접속을 위한 포인트, 실제 메세지를 보낼 때 사용
- topic: 일대 다수의 커넥션에서 메세지를 전송
- queue: 일대일 커넥션에서 메세지를 전송
- user: 메세지를 보내기 위한 사용자를 특정
사전에 서버로부터 소켓 연결 endpoint를 받아야 한다.
endpoint: "/api/ws"
웹소켓 클라이언트 구축 전 soketjs-client와 stompjs를 install 해야 한다. 사실 모든 브라우저는 소켓을 지원하지만 IE9 이하에서는 socket을 지원하지 않기 때문에 soketjs-client를 추가로 설치하는 것이다.
npm i soketjs-client, @stomp/stompjs --save
그리고 타입스크립트를 사용한다면 .d.ts file 을 install 해주어야 한다.
npm i @types/stopmjs, @types/soket/soketjs-client --save
import는 다음과 같이 하면 된다.
import SockJS from 'sockjs-client';
import StompJs from '@stomp/stompjs';
1. 우선 client 객체를 만들어 주자
const client = new StompJs.Client({
	brokerURL: '/api/ws',
  	connectHeaders:{
    	login: 'user',
      	passcode: 'password',
    },
  debug: function(str){
  	console.log(str)
  },
  reconnectDelay: 5000, //자동재연결
  heartbeatIncoming: 4000,
  heartOutgoing: 4000,
})
2. 연결 되었을 때 실행할 함수와 에러처리를 담당하는 함수를 만들어주자.
client.onConnect = function(frame){
};

client.onStompError = function(frame){
	console.log('Broker reported error: '+ frame.headers['message']);
  	console.lig('Addtional details: '+ frame.body)
}
3. 그 후 클라이언트를 활성화시켜준다.
client.activate();클라이언트를 비활성화 해주고 싶을 때는 아래와 같이 입력하면 된다.
활성화 연결이 있는 경우 다시 연결 및 연결을 중지한다.
client.deactivate();brokerURL이 http 일 경우 ws를 https일 경우 wss를 붙여서 사용하면 된다.
const client = new StompJs.Client({
	brokerURL: 'ws://local.corsmarket.ml/api/ws',
  	connectHeaders:{
    	login: 'user',
      	passcode: 'password',
    },
  debug: function(str){
  	console.log(str)
  },
  reconnectDelay: 5000, //자동재연결
  heartbeatIncoming: 4000,
  heartOutgoing: 4000,
})

client.onConnect = function(frame){
};

client.onStompError = function(frame){
	console.log('Broker reported error: '+ frame.headers['message']);
  	console.lig('Addtional details: '+ frame.body)
}
SoketJS로 소켓 미지원 브라우저 대응하기
(필요에 따라 서버와 합의하여 선택적으로 사용하자)
if(typeof WebSocket !== 'function'){
	client.webSocketFactory = function(){
    return new SockJS('http://localhost:15674/stomp')
    };
}
메세지 보내기
클라이언트와 서버가 연결되면 publish 메서드를 사용하여 메세지를 보낼 수 있다. destination은 목적지라는 뜻이다. 어디로 메세지를 보낼지 결정한다. body는 보낼 내용이다.
client.publish({
	destination: '/topic/general'
  	body: 'Hello world'
  	headers: {priority: '9'},
})v5부턴 바이너리 메세지도 전송 된다고 한다. (header에 'content-type': 'application/octet-stream' 로 contentType을 써준다.)
const binaryData = generateBinaryData();
client.publish({
	destination: '/topic/special',
  	binaryBody: binaryData,
  	header: {'content-type': 'application/octet-stream'}
})
메세지 받기
구독한 대상에 대해 메세지를 받기 위해 subscribe메서드를 사용한다.
const subscribe = client.subscribe('/queue/test', callback);