컴포넌트 스캔
컴포넌트 스캔과 의존관계 자동 주입 시작하기
개선점
-
지금까지 스프링 빈(Bean)을 등록할 때 구성파일에
@Bean을 사용했다- 예제에서는 몇개가 안되었지만, 이렇게 등록해야 할 스프링 빈이 수십, 수백개가 되면 일일이 등록하기도 귀찮고, 설정 정보도 커지고, 누락하는 문제가 발생한다.
- 관리할 빈이 많아지면 관리하기 번거로워 진다
- 예제에서는 몇개가 안되었지만, 이렇게 등록해야 할 스프링 빈이 수십, 수백개가 되면 일일이 등록하기도 귀찮고, 설정 정보도 커지고, 누락하는 문제가 발생한다.
-
굳이 빈 설정파일을 만들지 않거나,
@Bean을 안쓰고 빈 등록을 할 수 있다- @Component 과 Component Scan을 사용
-
설정파일이 없다면 의존관계는 어떻게 주입할까?
- @Autowired를 사용해 자동 의존관계 주입
컴포넌트 스캔이란?(Component Scan)
[정의]
스프링이 스프링 빈(Bean)으로 등록될 준비가 된 클래스들을 스캔하여 빈(Bean)으로 등록해주는 과정을 말한다.
@Component 어노테이션이 붙어있는 클래스들은 전부 컴포넌트 스캔의 대상이 됨.
@Configuration, @Service, @Repository, @Controller, 등의 어노테이션에도 전부 @Component이 포함되어 있어 자동으로 컴포넌트 스캔의 대상이 된다.
[스캔 범위]
설정 정보 클래스의 패키지를 포하마한 모든 하위 패키지이다.
// 꼭 필요한 위치부터 탐색을 시작해야 스캔하는 시간이 단축된다.
@ComponentScan(
	basePackages = "hello.core"
)
출처: https://code-lab1.tistory.com/170 [코드 연구소:티스토리]
새로운 AutoAppConfig.java 생성
@Configuration
@ComponentScan(
        excludeFilters = @ComponentScan.Filter(type = FilterType.ANNOTATION, classes = Configuration.class)
)
public class AutoAppConfig {

}- 컴포넌트 스캔을 사용하려면 먼저 @ComponentScan을 설정 정보에 붙여주면 된다.
- 기존의 AppConfig와는 다르게 @Bean으로 등록한 클래스가 하나도 없음.
참고 1
컴포넌트 스캔을 사용하면 @Configuration이 붙은 설정 정보도 자동으로 스캔된다.
그러면 기존에 작성했던 설정 정보에 따라 스프링 빈에 모두 등록되기 때문에 excludeFilters를 이용해 @Configuration이 붙은 클래스는 컴포넌트 스캔에서 제외.
보통 설정(실무적으로) 정보를 컴포넌트 스캔 대상에서 제외하지는 않지만, 기존 예제 코드를 유지하기 위해서 이렇게 하는 것이다.
참고 2
@Configuration이 컴포넌트 스캔의 대상이 된 이유도 @Configuration 소스코드를 열어보면 @Component 애노테이션이 붙어있기 때문이다.
// 이제 각 클래스가 컴포넌트 스캔의 대상이 되도록 @Component 애노테이션 생성
// MemoryMemberRepository @Component 추가
@Component
public class MemoryMemberRepository implements MemberRepository {}
// RateDiscountPolicy @Component 추가
@Component
public class RateDiscountPolicy implements DiscountPolicy {}
// MemberServiceImpl @Component, @Autowired 추가
// AppConfig에서는 @Bean으로 직접 설정 정보를 작성했고, 의존관계도 직접 명시
// 이제는 이런 설정 정보 자체가 없기 때문에, 의존관계 주입도 이 클래스 안에서 해결
@Component
public class MemberServiceImpl implements MemberService {
private final MemberRepository memberRepository;
@Autowired
public MemberServiceImpl(MemberRepository memberRepository) {
this.memberRepository = memberRepository;
}
}
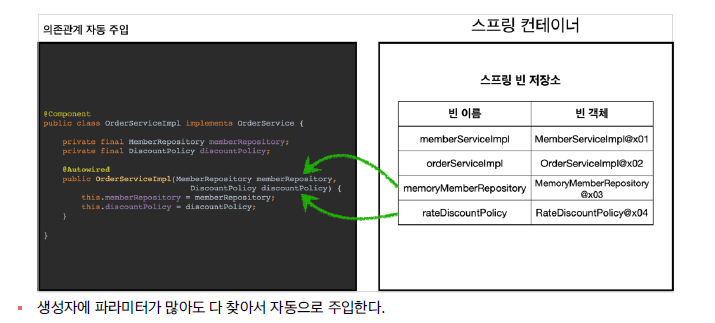
// OrderServiceImpl @Component, @Autowired 추가
// @Autowired를 사용하면 생성자에서 여러 의존관계도 한번에 주입
@Component
public class OrderServiceImpl implements OrderService {
private final MemberRepository memberRepository;
private final DiscountPolicy discountPolicy;
@Autowired
public OrderServiceImpl(MemberRepository memberRepository, DiscountPolicy discountPolicy) {
this.memberRepository = memberRepository;
this.discountPolicy = discountPolicy;
}
}
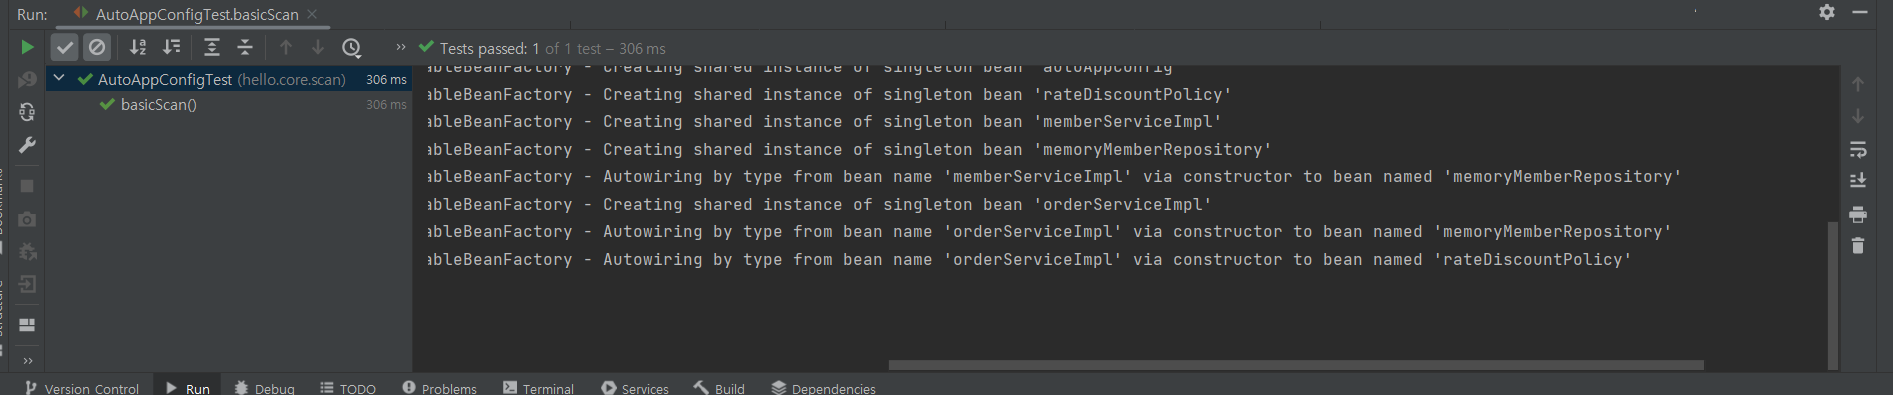
AutoAppConfigTest.java
// AnnotationConfigApplicationContext를 사용하는 것은 기존과 동일
// 설정 정보도 AutoAppConfig 클래스를 넘겨준다
// 실행해보면 기존과 같이 잘 동작하는 것을 확인

package hello.core.scan;

import hello.core.AutoAppConfig;
import hello.core.member.MemberService;
import org.junit.jupiter.api.Test;
import org.springframework.context.annotation.AnnotationConfigApplicationContext;

import static org.assertj.core.api.Assertions.*;

public class AutoAppConfigTest {

    @Test
    void basicScan(){
        AnnotationConfigApplicationContext ac = new AnnotationConfigApplicationContext(AutoAppConfig.class);

        MemberService memberService = ac.getBean(MemberService.class);
        assertThat(memberService).isInstanceOf(MemberService.class);

    }
}
컴포넌트 스캔의 동작 상태
컴포넌트 스캔과 자동 의존관계 주입의 동작형태 그림
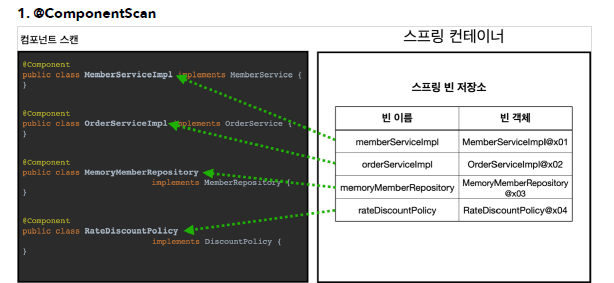
- @ComponentScan은 @Component가 붙은 모든 클래스를 스프링 빈으로 등록
- 스프링 빈의 기본 이름은 클래스명을 사용하되 맨 앞글자만 소문자를 사용
- 빈 이름 기본 전략 : MemberServiceImpl 클래스 -> memberServiceImpl
- 빈 이름 직접 지정 : 만약 스프링 빈의 이름을 직접 지정하고 싶으면 @Component("memberService2") 이런식으로 이름을 부여
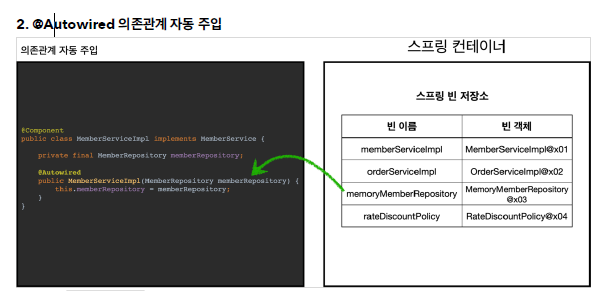
- 생성자에 @Autowired를 지정하면, 스프링 컨테이너가 자동으로 해당 스프링 빈을 찾아서 주입
- 이때 기본 조회 전략은 타입이 같은 빈을 찾아 주입
- getBean(MemberRepository.class)와 동일
참고 문헌
탐색 위치와 기본 스캔 대상
탐색할 패키지의 시작 위치 지정
모든 자바 클래스를 다 컴포넌트 스캔하면 시간이 오래 걸리고 꼭 필요한 위치부터 탐색하도록 시작 위치를 지정
// basePackages : 탐색할 패키지의 시작 위치를 지정 및 패키지를 포함해서 하위 패키지를 모두 탐색
// basePackages = {"hello.core", "hello.service"} 이렇게 여러 시작 위치를 지정할 수도 있음
// basePackageClasses : 지정한 클래스의 패키지를 탐색 시작 위치로 지정
// 만약 지정하지 않는다면 @ComponentScan이 붙은 설정 정보 클래스의 패키지가 시작 위치가 됨

@ComponentScan(
	basePackages = "hello.core",
}
권장하는 방법
개인적으로 즐겨 사용하는 방법은 패키지 위치를 지정하지 않고, 설정 정보 클래스의 위치를 프로젝트 최상단에 두는 것.
최근 스프링 부트도 이 방법을 기본으로 제공.
예를 들어 프로젝트가 다음과 같이 구조가 되어 있으면,
- com.hello
- com.hello.service
- com.hello.repository
com.hello -> 프로젝트 시작 루트, 여기에 AppConfig 같은 메인 설정 정보를 두고, @ComponentScan 애노테이션을 붙이고, basePackages 지정은 생략
이렇게 com.hello를 포함한 하위는 모두 자동으로 컴포넌트 스캔의 대상이 됨.
프로젝트 메인 설정 정보는 프로젝트를 대표하는 정보이기 때문에 프로젝트 시작 루트 위치에 두는 것이 좋음.
참고
스프링 부트를 사용하면 스프링 부트의 대표 시작 정보인 @SpringBootApplication를 이 프로젝트 시작 루트 위치에 두는 것이 관례이다. (그리고 이 설정 안에 바로 @ComponentScan이 들어있다)
컴포넌트 스캔 기본 대상
컴포넌트 스캔은 @Component 뿐만 아니라 다음과 내용도 추가로 대상에 포함
- @Component : 컴포넌트 스캔에서 사용
- @Controller : 스프링 MVC 컨트롤러에서 사용
- @Service : 스프링 비즈니스 로직에서 사용
- @Repository : 스프링 데이터 접근 계층에서 사용
- @Configuration : 스프링 설정 정보에서 사용
해당 클래스의 소스 코드를 보면 @Component를 포함
@Component
public @interface Controller {
}
@Component
public @interface Service {
}
@Component
public @interface Configuration {
}
참고
사실 애노테이션에는 상속관계라는 것이 없다. 그래서 이렇게 애노테이션이 특정 애노테이션을 들고 있는 것을 인식할 수 있는 것은 자바 언어가 지원하는 기능은 아니고, 스프링이 지원하는 기능이다.
컴포넌트 스캔의 용도 뿐만 아니라 다음 애노테이션이 있으면 스프링은 부가 기능을 수행
- @Controller : 스프링 MVC 컨트롤러로 인식
- @Repository : 스프링 데이터 접근 계층으로 인식하고, 데이터 계층의 예외를 스프링 예외로 변환해준다.
- @Configuration : 앞서 보았듯이 스프링 설정 정보로 인식하고, 스프링 빈이 싱글톤을 유지하도록 추가처리한다.
- @Service : 사실 @Service는 특별한 처리를 하지 않는다. 대신 개발자들이 핵심 비즈니스 로직이 여기에 있겠구나 라고 비즈니스 계층을 인식하는데 도움이 된다.
참고
useDefaultFilters 옵션은 기본으로 켜져있음. 이 옵션을 끄면 기본 스캔 대상들이 제외
필터
- includeFilters : 컴포넌트 스캔 대상을 추가로 지정
- excludeFilters : 컴포넌트 스캔에서 제외할 대상을 지정
컴포넌트 스캔 대상에 추가할 애노테이션
package hello.core.scan.filter;

import java.lang.annotation.*;

@Target(ElementType.TYPE)
@Retention(RetentionPolicy.RUNTIME)
@Documented
public @interface MyIncludeComponent {
}
컴포넌트 스캔 대상에 제외할 애노테이션
package hello.core.scan.filter;

import java.lang.annotation.*;

@Target(ElementType.TYPE)
@Retention(RetentionPolicy.RUNTIME)
@Documented
public @interface MyExcludeComponent {
}
컴포넌트 스캔 대상에 추가할 클래스
package hello.core.scan.filter;

@MyIncludeComponent
public class BeanA {
}
컴포넌트 스캔 대상에서 제외할 클래스
package hello.core.scan.filter;

@MyExcludeComponent
public class BeanB {
}
설정 정보와 전체 테스트 코드
// includeFilters에 MyIncludeComponent 애노테이션을 추가해서 BeanA가 스프링 빈에 등록
// excludeFilters에 MyExcludeComponent 애노테이션을 추가해서 BeanB가 스프링 빈에 등록되지 않음

package hello.core.scan.filter;

import org.junit.jupiter.api.Test;
import org.springframework.beans.factory.NoSuchBeanDefinitionException;
import org.springframework.context.annotation.AnnotationConfigApplicationContext;
import org.springframework.context.annotation.ComponentScan;
import org.springframework.context.annotation.Configuration;
import org.springframework.context.annotation.FilterType;

import static org.assertj.core.api.Assertions.*;
import static org.junit.jupiter.api.Assertions.assertThrows;
import static org.springframework.context.annotation.ComponentScan.*;

public class ComponentFilterAppConfigTest {

    @Test
    void filterScan(){
        AnnotationConfigApplicationContext ac = new AnnotationConfigApplicationContext(ComponentFilterAppConfig.class);
        BeanA beanA = ac.getBean("beanA", BeanA.class);
        assertThat(beanA).isNotNull();

        assertThrows(NoSuchBeanDefinitionException.class,
                ()-> ac.getBean("beanB", BeanB.class));
    }

    @Configuration
    @ComponentScan(
            includeFilters = @Filter(type = FilterType.ANNOTATION, classes = MyIncludeComponent.class),
            excludeFilters = @Filter(type = FilterType.ANNOTATION, classes = MyExcludeComponent.class)
            )
    static class ComponentFilterAppConfig{

    }
}
FilterType 옵션
FilterType은 5가지 옵션
- ANNOTATION : 기본값, 애노테이션으르 인식해서 동작
- ex) org.example.SomeAnnotation
- ASSIGNABLE_TYPE : 지정한 타입과 자식 타입을 인식해서 동작
- ex) org.example.SomeClass
- ASPECTJ : AspectJ 패턴 사용
- ex) org.example..*Service+
- REGEX : 정규 표현식
- ex) org.example.Default.*
- CUSTOM : TypeFilter이라는 인터페이스를 구현해서 처리
- ex) org.example.MyTypeFilter
참고
@Component면 충분하기 때문에, includeFilters를 사용할 일이 없음.
excludeFilters는 여러가지 이유로 간혹 사용할 때가 있지만 많진 않음.
중복 등록과 충돌
-
자동 빈 등록 vs 자동 빈 등록
-
컴포넌트 스캔에 의해 자동으로 스프링 빈이 등록되는데, 그 이름이 같은 경우 스프링은 오류 발생
- ConflictBeanDefinitionException 예외 발생
-
- 수동 빈 등록 vs 자동 빈 등록
// MemoryMemberRepository 수동 bean
@Component
public class MemoryMemberRepository implements MemberRepository{

// AutoAppConfig 자동 bean
package hello.core;


import hello.core.member.MemberRepository;
import hello.core.member.MemoryMemberRepository;
import org.springframework.context.annotation.Bean;
import org.springframework.context.annotation.ComponentScan;
import org.springframework.context.annotation.Configuration;
import org.springframework.context.annotation.FilterType;

@Configuration
@ComponentScan(
        excludeFilters = @ComponentScan.Filter(type = FilterType.ANNOTATION, classes = Configuration.class)
)
public class AutoAppConfig {

    @Bean(name="memoryMemberRepository")
    MemberRepository memberRepository(){
        return new MemoryMemberRepository();
    }
}
-
수동 빈 등록이 우선권을 가짐
-
수동 빈이 자동 빈을 오버라이딩

수동 빈과 자동 빈을 동시에 등록 시 스프링 부트 실행 오류
CoreApplication 실행시
Description:

The bean 'memoryMemberRepository', defined in class path resource [hello/core/AutoAppConfig.class], could not be registered. A bean with that name has already been defined in file [C:\20211103_lab\study\core\out\production\classes\hello\core\member\MemoryMemberRepository.class] and overriding is disabled.

Action:
// spring.main.allow-bean-definition-overriding=true
// application.properties에 삽입하고 실행 시 해결
Consider renaming one of the beans or enabling overriding by setting spring.main.allow-bean-definition-overriding=true


Process finished with exit code 1