문득 [프레임워크 없는 프론트엔드 개발]이라는 책을 읽으면서 가상 돔에 대해서 정리하고자 한다.
- 리액트에 의해 가상 DOM의 개념은 선언적 렌더링 엔진의 성능을 개선시키는 방법이 되었다.
- 출력된 UI는 메모리에 유지되고, 실제 DOM과 동기화 되며, 가능한 적은 작업을 수행하고 이를 '조정'이라고 부른다
- 가상 DOM의 핵심은 diff 알고리즘(실제 DOM을 문서에서 분리된 새로운 DOM 요소의 사본으로 바꾸는 가장 빠른 방법을 찾아내는 알고리즘)
DOM
- DOM은 브라우저 상에서 자바스크립트가 HTML 문서를 조작하기 위한 API
- 브라우저가 렌더링할 때의 과정
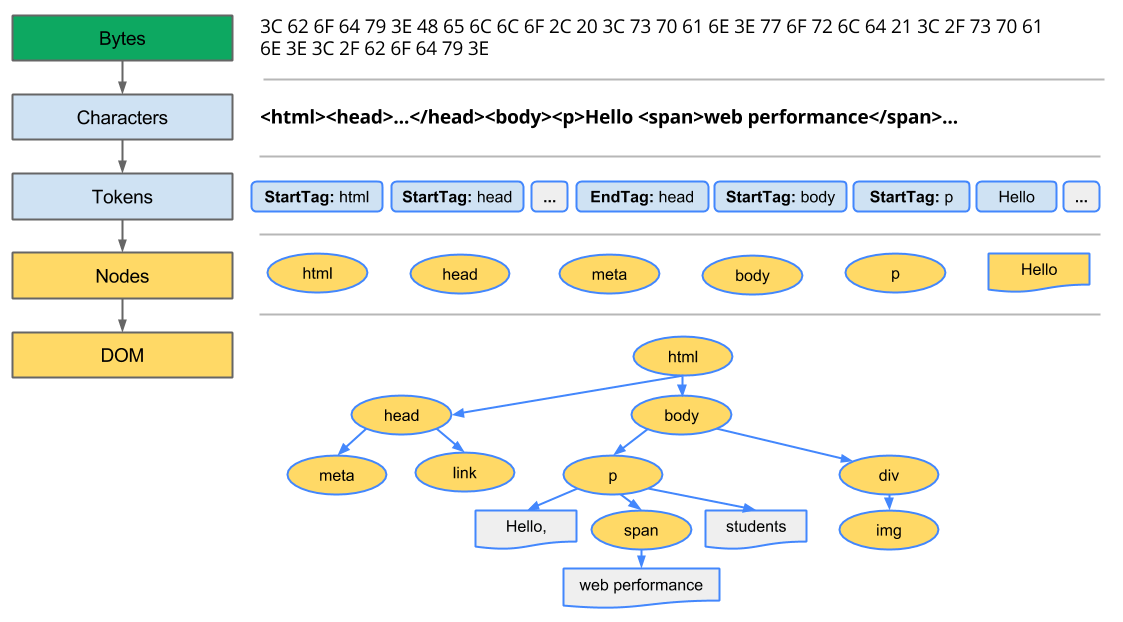
렌더링의 동작 과정

1. Dom Tree 구축 위한 HTML 파싱
: 브라우저가 서버로부터 HTML을 전달받으면, 렌더링 엔진이 HTML을 파싱(구문 분석)하고, DOM의 Node로 이루어진 트리를 만든다.
2. Render Tree 구축
: CSS파일과 각 엘리먼트의 inline 스타일을 파싱하고 CSSOM(CSS Object Model)을 생성한다.
3. Render Tree 배치
: 생성된 Render Tree의 각 Node들이 스크린상의 좌표와 크기 등이 결정된다.
4. Render Tree 그리기
: 구성된 레이아웃을 화면에 그리는 과정이 진행되고 트리의 각 노드들을 거쳐가면서 화면이 스크린에 나타난다. DOM을 임의적으로 조작하면 이 과정을 반복하게 된다.
🔥 DOM의 문제
- DOM의 변화로 위의 과정이 반복될수록 브라우저의 전체적인 성능이 떨어지고 속도가 느려지게 된다.
- SPA로 만들어진 페이지의 DOM 객체는 매우 많고 복잡하여 비효율적인 프로세스가 만들어진다.
리액트의 Virtual DOM

Virtual DOM은 real dom으로부터 virtual dom을 만든 메모리 상에 존재하는 하나의 객체이고, 리액트는 특정 state에 변화가 생겼다는 알림을 받으면 Real DOM이 아닌 Virtual DOM을 렌더링 시킨다.
여기서 핵심은 브라우저를 렌더링 시키는 비용보다 객체를 새로 만드는 비용이 더 저렴하기 때문에 Virtual DOM을 사용하는 것이다.
Virtual DOM이 빠른 이유
1.real dom으로부터 virtual dom을 만든다(virtual dom은 메모리 상에 존재하는 하나의 객체다)
2.변화가 생기면 새로운 버전의 virtual dom을 만든다.
3.old 버전의 virtual dom과 new 버전의 virtual dom을 비교한다.(diff algorithm)
4.비교 과정을 통해서 발견한 차이점을 real dom에 적용한다.
리액트는 render() 함수를 통해 리액트 element들의 트리를 만든다.
리액트 state 값이 바뀌면서 re-rendering이 발생하면 render() 함수는 새로운 리액트 element tree를 생성해서 반환해줘야 하는데 하나의 트리가 N개의 element를 가지고 있을 때, 새로운 element tree로 변환하는데 적지않은 O(n³)시간이 소요된다.
그래서 리액트의 가상 돔은 이전 가상 돔과 현재의 가상돔을 비교해서 바뀐 부분만 변경한다. 가장 효과적으로 갱신하는 방법으로 Reconciliation이 있다.
diffing 알고리즘?
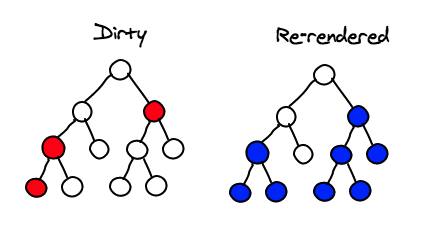
짧게 말해서 "실제 DOM이랑 비교해서 변경 사항이 있는 부분만 다시 그려준다."
- 컴포넌트 내에 state가 변경된 경우에 해당 컴포넌트를 'dirty' 하다고 하고, batch에 추가 한다.
- Virtual Dom 요소와 실제 브라우저에 등록되어 있는 DOM 요소를 비교/순회하며 dirty 체크된 요소를 처리한다.
- 속성 값만 변한 경우에는 속성 값만 업데이트한다.
- 태그 혹은 컴포넌트 변경 시, 해당 노드를 포함한 하위의 모든 노드를 언마운트한 뒤에 새로운 Virtual Dom으로 대체한다.
- 변경 혹은 업데이트가 모두 마친 뒤에는 실제 돔에 결과를 업데이트 한다.
applyDiff 함수
렌더 함수를 살펴보기 전에 확인하기.
const render = () => {
	window.requestAnimationFrame(() => {
    	const main = document.querySelector('.todoapp');
     	const newMain = registry.renderRoot(main, state)
        applyDiff(document.body, main, newMain)
    }
}
- requestAnimationFrame: 이 API는 메인 스레드를 차단하지 않으며 repaint가 이벤트 루프에서 스케줄링되기 직전에 실행된다.
- applyDiff 함수 매개변수는 현재 DOM 노드, 실제 DOM 노드, 새로운 가상 DOM 노드의 부모이다.
applyDiff 함수 동작 순서
- 새 노드가 정의되지 않은 경우 실제 노드를 삭제
if(realNode && !virtualNode) {
realNode.remove()- 실제 노드가 정의되지 않았지만 가상 노드가 존재하는 경우 부모 노드에 추가
if(!realNode && virtualNode) {
	parentNode.appendChild(virtualNode)
}- 두 노드(실제 노드와 가상 노드)가 모두 정의된 경우 두 노드 간에 차이가 있는 확인
if(isNodeChanged(virtualNode, realNode)) {
	realNode.replaceWith(virtualNode)
}- 모든 하위 노드에 대해 동일한 diff 알고리즘 적용
const realChildren = Array.from(realNode.children)
const virtualChildren = Array.from(virtualNode.children)

const max = Math.max(
	realChildren.length,
  	virtualChildren.length
)

for (let i = 0, i < max; i++){
	applyDiff(
   		realNode,
   		realChildren[i],
   		virtualChildren[i]
 	)
}
applyDiff 함수와 isNodeChanged 함수 작성하기.
const applyDiff = (
  parentNode,
  realNode,
  virtualNode
) => {
  	// 새 노드가 정의되지 않은 경우 실제 노드를 삭제.
  	if (realNode && !virtualNode) {
  		realNode.remove()
  		return ;
 	}

  	// 실제 노드가 정의되지 않았지만 가상 노드가 존재하는 경우 부모 노드에 추가.
  	if (!realNode && virtualNode) {
     	parentNode.appendChild(virtualNode)
      	return ;
    }

  	// 두 노드(실제 노드와 가상 노드)가 모두 정의된 경우 두 노드 간에 차이가 있는 확인
  	if(isNodeChanged(virtualNode, realNode)) {
		realNode.replaceWith(virtualNode)
      return ;
	}

  	// 모든 하위 노드에 대해 동일한 diff 알고리즘 적용
  	const realChildren = Array.from(realNode.children)
	const virtualChildren = Array.from(virtualNode.children)

	const max = Math.max(
		realChildren.length,
  		virtualChildren.length
	)

	for (let i = 0, i < max; i++) {
		applyDiff(
   			realNode,
   			realChildren[i],
   			virtualChildren[i]
 		)
	}
}

const isNodeChanged = (virtualNode, realNode) => {
  	// 타입이 다른지 확인
    if(virtualNode.type !== realNode.type) {
        return true;
    }


 	const n1Attributes = virtualNode.attributes;
  	const n2Attributes = realNode.attributes;

  	// 속성 수가 다르다
  	if(n1Attributes.length !== n2Attributes.length) {
     	return true;
    }

  	// 하나 이상의 속성이 변경되었다.
  	const differentAttribute = Array.from(n1Attribute).find(attribute => {
  		const { name } = attribute;
      	const attribute1 = virtualNode.getAttribute(name);
      	const attribute2 = realNode.getAttribute(name);

      	return attribute1 !== attribute2;
  	}

    if (differentAttribute) {
    	return true;
    }

  	// 노드에는 자식이 없으며, textContent가 다르다.
  	if (virtualNode.children.length === 0
        && realNode.children.length === 0
        && virtualNode.textContent !== realNode.textContent) {
     	return true;
    }

 	return false
}- 속성 수가 다르다
- 하나 이상의 속성이 변경되었다.
- 노드에는 자식이 없으며, textContent가 다르다.
React Fiber
: reconciliation의 한계로 인해 react v16.0에서 소개된 리액트의 새로운 코어 알고리즘
reconciliation의 문제점
virtual tree 상에서 변경 사항을 찾아내기 위해서 diff 알고리즘이 진행될 텐데, 이 때 두 객체를 비교하기 위해선 재귀적으로 진행할 수 밖에 없다.
재귀 알고리즘은 call stack과 연관이 있고, 가장 상단에 있는 함수가 호출되면 해당 함수는 call stack 가장 아래에 쌓일 것.
비동기 작업들은 event loop가 call stack이 비어있는 여부를 확인한 후에야 콜백함수들을 call stack에 올려 놓고 실행한다.
즉각적으로 user event에 대응할 수도 없을 뿐더러, 프레임 드롭이라는 문제를 일어날 수 있다.
React Fiber의 목적
: react fiber가 해결하고자 하는 것은 이런 순회 작업을 멈출 수도 있고, 재개할 수도 있고, 필요에 따라서는 그냥 내다버릴 수도 있게 만드는 것.
- 작업을 멈추고, 나중에 다시 시작한다.
- 다양한 종류의 작업에 따라서 우선순위를 부여한다.
- 완성된 작업물을 재사용할 수 있다.
- 더 이상 필요하지 않은 작업물이면 버릴 수 있다.
리액트 팀은 자바스크립트 엔진의 call stack 대신 virtual stack을 구현(실제 stack이 아니라, 메모리 상에 존재하는 가상의 stack)
Vitual Stack
Vitual Stack은 단일 연결 리스트를 활용해 구현되었다.
단일 연결 리스트로 구현된 React Filber
render 함수의 인자로 넘어온 element 객체는 fiber node로 변환되고, 그 node 들은 모두 연결된다.
class Node {
  constructor(instance) {
    this.instance = instance
    this.child = null // 자식 노드
    this.sibling = null // 형제 노드
    this.return = null // 부모 노드
  }
}
각 fiber 노드들은 3가지 필드를 가진다.
- child: 자식노드
- sibling: 형제 노드
- return: 부모 노드(return하고 나면 그 다음에 접근하게 되는 노드가 부모 노드)
return
The return fiber is the fiber to which the program should return after processing the current one. It is conceptually the same as the return address of a stack frame. It can also be thought of as the parent fiber.
If a fiber has multiple child fibers, each child fiber's return fiber is the parent. So in our example in the previous section, the return fiber of Child1 and Child2 is Parent.
그리고 인자로 받아 온 노드들을 모두 단일 연결 리스트로 연결 시켜주는 함수.
function link(parent, elements) {
  if (elements == null) elements = []

  parent.child = elements.reduceRight((prev, cur) => {
    const node = new Node(cur)
    node.return = parent
    node.sibling = prev
    return node
  }, null)
  return parent.child
}- link 함수는 parent 노드의 가장 첫번째 자식을 반환.
const children = [{ name: "b1" }, { name: "b2" }]
const parent = new Node({ name: "a1" })
const child = link(parent, children)

child.instance.name === "b1" //true
child.sibling.instance === children[1] // true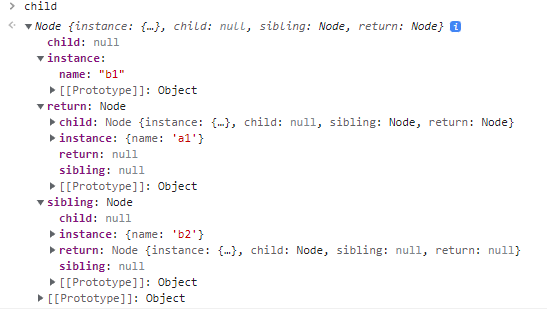
현재 노드와 자식 노드들의 연결을 도와주는 helper 함수
function doWork(node) {
  console.log(node.instance.name)
  const children = node.instance.render()
  return link(node, children)
}
연결된 함수들을 탐색하는 walk 함수(기본적으로 깊이 우선 탐색으로 이루어짐).
function walk(o) {
  let root = o
  let current = o
  while (true) {
    let child = doWork(current)
    //자식이 있으면 현재 active node로 지정한다.
    if (child) {
      current = child
      continue
    }

    //가장 상위 노드까지 올라간 상황이라면 그냥 함수를 끝낸다.
    if (current === root) {
      return
    }

    //형제 노드를 찾을 때까지 while문을 돌린다. 이 함수에서는 자식에서 부모로 올라가면서 형제가 있는지를 찾아주는 역할을 하고 있다.
    while (!current.sibling) {
      //top 노드에 도달했으면 그냥 끝낸다.
      if (!current.return || current.return === root) {
        return
      }

      //부모노드를 현재 노드에 넣어준다.
      current = current.return
    }
    current = current.sibling // while문을 빠져나왔다는 것은 sibling을 찾았다는 것이다. 찾은 sibling을 현재 current node에 넣어준다.
  }
}- 이 함수를 사용하면 스택이 계속해서 쌓이지 않는다.
- call stack의 최하단에는 walk 함수가 깔려있고, 계속해서 doWork 함수가 호출되었다가 사라지는 로직. - 이 함수의 핵심은 current node에 대한 참조를 계속해서 유지한다는 점.
- 함수가 중간에 stop해도, current node로 돌아와서 작접 재개가 가능하다.
재귀는 한번 시작하면 끝까지 실행해야 하지만 이제는 중간에 멈춰도 작업 기록이 남아있기에 멈출 수 있다.
하나의 프레임 안에서 일어나는 일

- input event : 가능한 빠른 유저 피드백을 주기 위해 input event가 실행된다.
- Timers : 예약된 시간에 도달했는지 확인하기 위해서 타이머를 확인한다. 이후, 시간이 맞다면 대응하는 콜백 함수를 실행.
- Begin Frame : Begin Frame(각각의 프레임의 이벤트)을 확인한다. window.resize, scroll, media query change 등등 같이 확인.
- requestAnimationFrame : RAF를 실행한다. painting이 시작되기 전에 callback 이 실행된다.
- layout : element가 화면에서 styled되고 보여질지를 결정.
- paint : 각 요소의 내용들이 브라우저에 의해 화면에 채워지는 단계.
- idle period : 브라우저가 유휴시간에 들어간다.
브라우저는 idle period가 되면 requestIdleCallback이 실행된다.
requestIdleCallback
var handle = window.requestIdleCallback(callback[, options])
: 브라우저의 idle 상태에 호출될 함수를 대기열에 넣고, 일반적으로 first-in-first-out(FIFO) 순서로 호출.
- timeout 옵션이 지정된 callback은 제한 시간이 지나기 전에 이들을 실행하기 위해 순서에 맞지 않게 호출될 수 있다.
이 함수의 콜백함수가 받게 될 파라미터에는 deadline이라는 객체가 있다. 이 객체는 2 가지 속성을 가지고 있다.
- timeRemining : current frame에서 얼마나 시간이 남아있는지를 return.
- didTimeout : callback task의 시간이 초과했는지 여부를 return.
fiber는 requestIdleCallback을 활용
- fiber는 주어진 node들을 쪼개고, fiber node를 하나의 실행 단위로 여긴다.
Fiber의 2가지 단계: render & commit
- render 단계에서 순회를 하면서 effect(Node의 변경 사항) list를 모으는 일을 하는데, 작업을 멈췄다가 다시 시작하는 것이 가능해졌다.
render
render가 순회하는 흐름.
- current node로부터 순회.
- node에 수정이 필요하면 그 내용에 알맞는 tag를 붙인다.(INSERT, DELETE, UPDATE 등)
- 자식 node에 대한 fiber 생성.
- 자식 fiber가 생성되지 않으면 순회를 멈추고 effect list는 부모 노드와 합쳐지고, current node의 sibling node(형제 노드)로 순회를 간다.
- 만약 자식 fiber가 생성되면 그 node로 순회를 한다.
- idle time을 확인.
- 시간이 남으면 다음 node로 순회.
- 시간이 없으면 waiting.
- 더 이상 노드가 없으면 pendingCommit 상태로 돌아간다.(effect list가 다 수집되었다는 것을 의미)

빨간 네모 박스가 effect node.

그 effet node들 끼리 list가 형성되는 것.
- effect list는 선형 리스트(linear list)로 이루어져 있어서 tree를 순회하는 방식보다 빠르다.
자식 vitual dom element 배열을 순회하면서 각각의 element를 fiber노드로 만드는 함수
const reconcileChildren = (currentFiber, newChildren) => {
  let newChildIndex = 0;
  let prevSibling // previous child fiver

  // while문에서 element를 fiber로 생성
  while(newChildIndex < newChildren.length){
  	let newChild = newChildren[newChildIndex]
    let tag

    // fiber type을 정의하기 위해 if문에서 tag에 적절한 값들을 할당.
    if(newChild.type === ELEMENT_TEXT){
    	tag = TAG_TEXT // type 이 ELEMENT_TEXT라는 것은 text라는 것을 의미.
    }else if(typeof newChild.type === 'string'){
    	tag = TAG_HOST // string === native DOM이라는 의미.
    }

    let newFiber = {
    	tag,
      	type : newChild.type,
      	props : newChild.props,
      	stateNode : null,
      	return : currentFiber,
      	effectTag : INSERT,
      	nextEffect : null
    }

    if(newFiber){
    	if(newChildIndex === 0){
        	currentFiber.child = newFiber // 첫번째 child라는 것을 의미.
        }else{
        	prevSibling.sibling = newFiber // 첫번째 자식의 형제를 두번째 자식을 가리키게 한다.
        }
      prevSibling = newFiber
    }
    newChildIndex++
  }
}
fiber node가 가지고 있는 effect를 모으고, effect list를 만들어내는 함수
각각의 fiber는 2가지 속성을 가지고 있다.
- firstEffect: effect를 가지고 있는 첫번째 자식.
- lastEffect: effect를 가지고 있는 마지막 자식.
- nextEffect: 각각의 자식 fiber를 연결하고, 연결 리스트를 만드는데에 사용.
// nextEffect: 두 자식 fiber 사이를 연결.

const compleUnitOfWork = (currentFiber) => {
	let returnFiber = currentFiber.return  // 부모 피버
    if(returnFiber){
    	// returnFiber.firstEffect가 없으면
		// returnFiber.firstEffect는  currentFiber.firstEffect가 된다.
    	if(!returnFiber.firstEffect){
        	returnFiber.firstEffect = currentFiber.firstEffect
        }

      	if(currentFiber.lastEffect){
        	if(returnFiber.lastEffect){
              	// currentFiber와 returnFiber가 lastEffect가 있으면
              	// currentFiber.firstEffect를 returnFiber.lastEffect와 연결한다.
            	returnFiber.lastEffect.nextEffect = currentFiber.firstEffect
            }
          	// currentFiber.lastEffect가 있으면서 returnFiber.lastEffect가 없으면
			// currentFiber.lastEffect를 returnFiber.lastEffect에 삽입.
          	returnFiber.lastEffect = currentFiber.lastEffect
        }

      const effectTag = currentFiber.effectTag

      // effectTag가 있는가?
      if(effectTag){
        // returnFiber.lastEffect가 있는가?
      	if(returnFiber.lastEffect){
          	// returnFiber.lastEffect와 currentFiber를 연결.
        	returnFiber.lastEffect.nextEffect = currentFiber
        }else{
          	// returnFiber.lastEffect가 없으면 currentFiber 삽입
        	returnFiber.firstEffect = currentFiber
        }
        returnFiber.lastEffect = currentFiber
      }
    }
}
모든 fiber node를 순회하고 effect list를 만들어내는 함수
const performUnitOfWork = (currentFiber) => {
	beginWork(currentFiber)

  	//child node가 있으면 child node 먼저 순회
  	if(currentFiber.child){
    	return currentFiber.child
    }

  	//child node가 없다면, effect 수집.
	// 자신 -> 형제 -> 부모순으로
  	while(currentFiber){
    	completeUnitOfWork(currentFiber)
      	if(currentFiber.sibling){
        	return currentFiber.sibling
        }
      	// 만약 형제 node가 없으면 부모 node로 이동.
      	currentFiber = currentFiber.return
    }
}
commit
commit phase에서는 중간에 작업을 멈출 수 없다. 이 단계에는 이전 단계에서 모았던 effect list 를 한 번에 dom에 적용하는데 멈추는 일 없이 한번에 적용한다.
- currentFiber가 가지고 있는 effectTag에 따라서 실제 dom에 적용하는 함수
const commitWork = currentFiber => {
  if (!currentFiber) return
  let returnFiber = currentFiber.return
  let returnDOM = returnFiber.stateNode // 부모 요소

  if (currentFiber.effectTag === INSERT) {
    returnDOM.appendChild(currentFiber.stateNode)
  } else if (currentFiber.effectTag === DELETE) {
    returnDOM.removeChild(currentFiber.stateNode)
  } else if (currentFiber.effectTag === UPDATE) {
    if (currentFiber.type === ELEMENT_TEXT) {
      if (currentFiber.alternate.props.text !== currentFiber.props.text) {
        currentFiber.stateNode.textContent = currentFiber.props.text
      }
    }
  }
  currentFiber.effectTag = null
}- effect list를 순회하면서 commitWork를 호출하는 함수
const commitRoot = () => {
  let currentFiber = workInProgressRoot.firstEffect
  while (currentFiber) {
    commitWork(currentFiber)
    currentFiber = currentFiber.nextEffect
  }
  // Assign the current root fiber that is successfully rendered to currentRoot
  currentRoot = workInProgressRoot
  workInProgressRoot = null
}
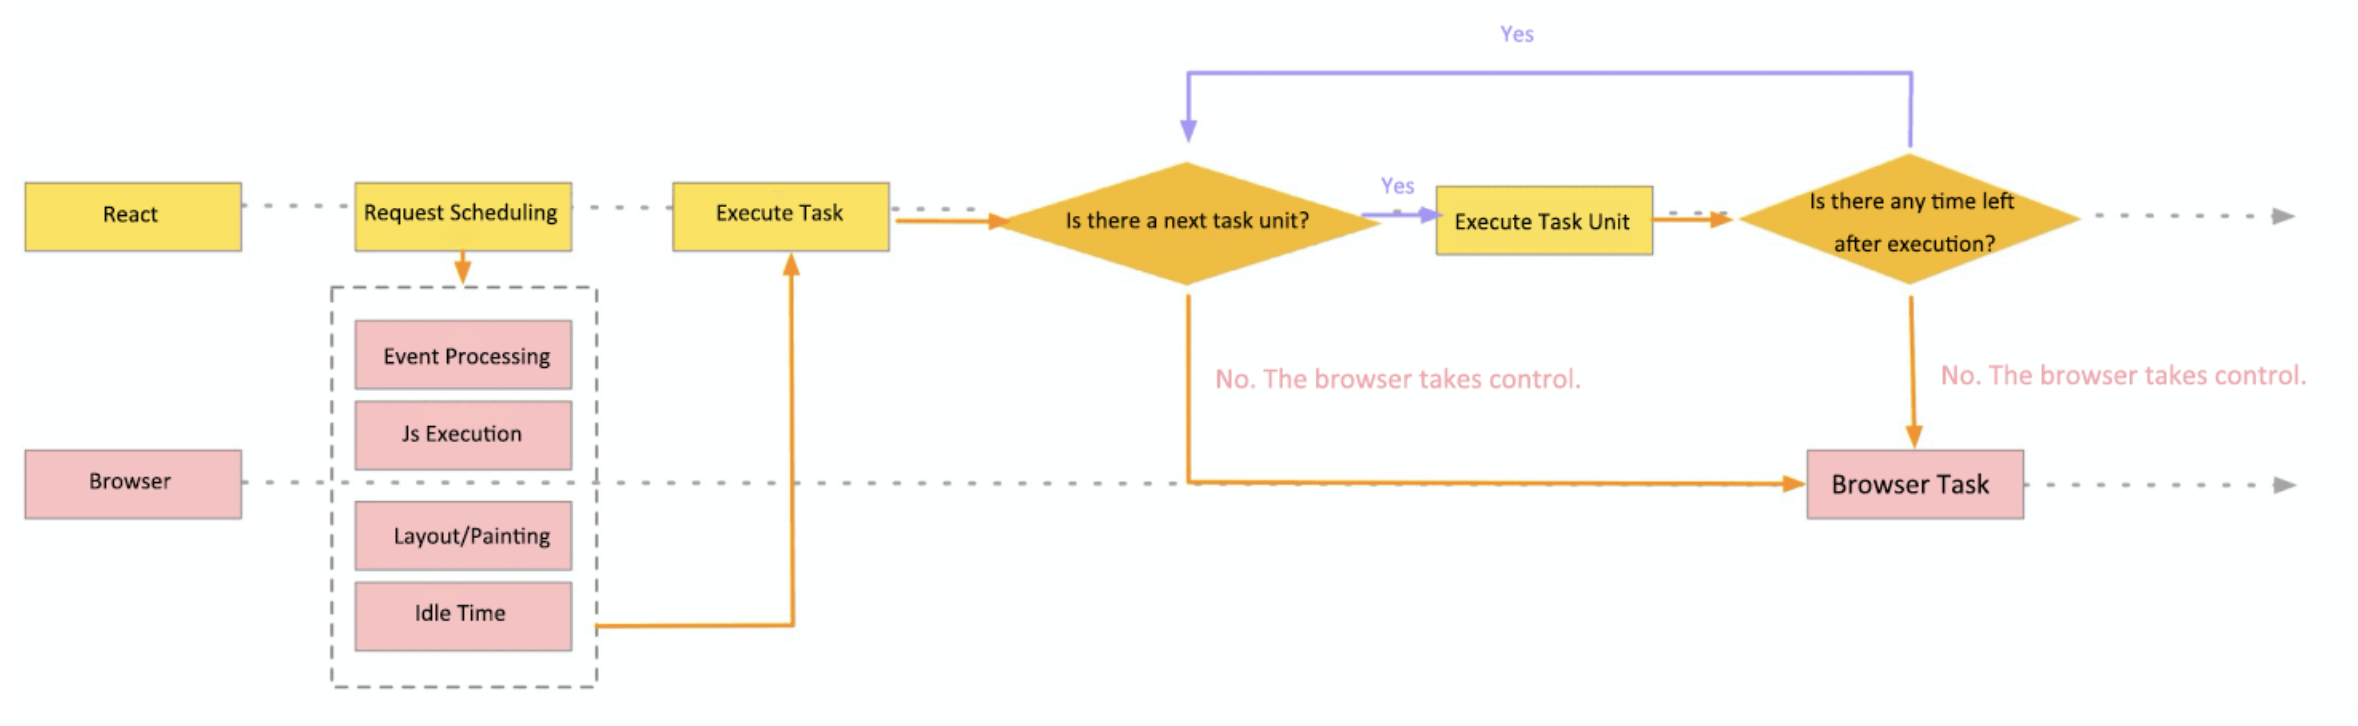
- requestIdleCallback에 넣어줄 workloop 함수를 정의
const workloop = (deadline) => {
  let shouldYield = false // 작업 유무
  while (nextUnitOfWork && !shouldYield) { // render phase
    nextUnitOfWork = performUnitOfWork(nextUnitOfWork)
    shouldYield = deadline.timeRemaining() < 1 // performUnitOfWork작업을 한 후에 1ms도 남지 않았으면, 브라우저에게 다시 통제권을 넘길 것이다.
  }
  if (!nextUnitOfWork && workInProgressRoot) {
    console.log('The end of the render stage ')
    commitRoot() // commit phase.
  }
  // Request the browser to reschedule another task
  requestIdleCallback(workloop, { timeout: 1000 })
}
결론
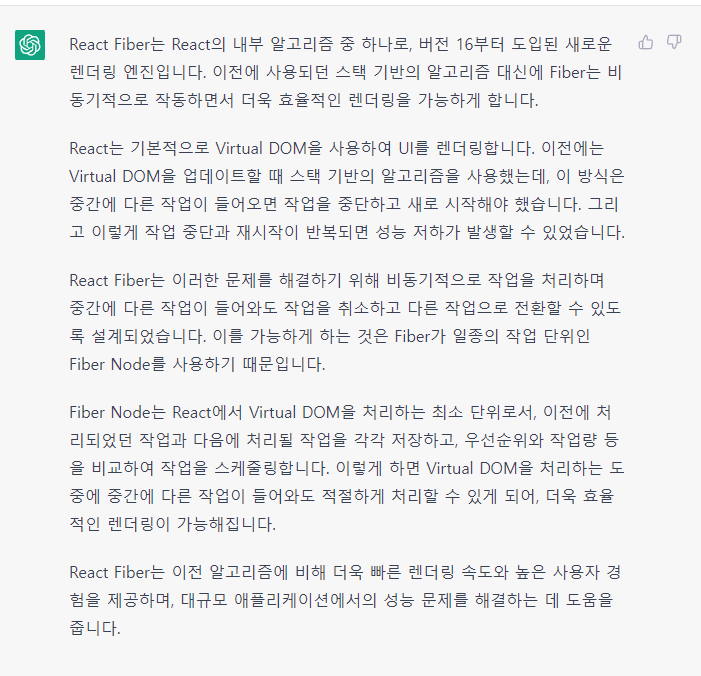
가상 돔을 공부하려고 했는데 가상 스택.. React Fiber까지 알게 되어서 좋지만 React Fiber는 사실 크게 이해 되지 않지만.. 가상 돔이 왜 필요해졋는지 그리고 가상 돔에 어떠한 문제가 있어서 React Fiber가 생겼는지 알 수 있는 공부였다. ChatGPT한테 물어보니 쉽게 설명을 해줘서 자주 이용하면 좋을 것 같기도 했다.