
Compose Basic Codelab Unit 2 링크
Compose Camp Unit 1 Repository
Kotlin 기초
Conditionals
-
if - else if - else
이것은 굳이 설명 없이 넘어갈게요! -
when
if - else 에서 조건이 많을 경우 when을 사용하면 좋습니다.
when (parameter) {
	condition1 -> body1
    condition2 -> body2
}

// 예시: 다음과 같이 사용할 수 있어요.
when (x) {
	1 -> println("1")
    2 -> println("2")
    3, 5 -> println("3 or 5")
    in 10..19 -> println("10 ~ 19")
    is Int -> println("Int")
}
nullability
? 를 사용하면 nullable,
!! 를 사용하면 non-null 값입니다.
var str ?= null
println(str?.length)	// print null
println(str!!.length)	// null exception
?: (Elvis 연산자)를 사용할 수 있어요.
val len = str?.length ?: 0
// str이 null인 경우 print 0
class and object
객체로 인스턴스화
val name = ClassName()
constructor
class SmartDevice(
	val name: String, val category: String	// primary constructor
) {
    var deviceStatus = "online"

    constructor(	// 부생성자
    	name: String, category: String, statusCode: Int
    ) : this(name, category) {  //  this(주생성자의 파라미터)
        deviceStatus = when (statusCode) {
            0 -> "offline"
            1 -> "online"
            else -> "unknown"
        }
    }
    ...
}
IS-A , HAS-A
// IS-A (Inherits) - 상속
// A: subClass, B: superClass
open B { fun func() }	// using `open` keyword in superclass
class A : B() {
	override fun func() {}	// using `override` keyword in subclass
}

// HAS_A (contains/uses) - 포함
class A(
	val b: B
)
visibility modifiers
| Modifier | Accessible in same class | Accessible in subclass | Accessible in same module | Accessible outside module |
|---|---|---|---|---|
| private | ✔ | 𝗫 | 𝗫 | 𝗫 |
| protected | ✔ | ✔ | 𝗫 | 𝗫 |
| internal | ✔ | ✔ | ✔ | 𝗫 |
| public | ✔ | ✔ | ✔ | ✔ |
using function as a data type
(parameters) -> return type
val coins: (Int) -> String { quantity ->
	"$quantity quarters"
}
repeat
for (iteration in start..end) { }
=> repeat(times) { iteration -> }
How to Debug (Android Studio)
앱 프로세스에 디버거 연결
- 앱을 실행한다.
- 기기 or 에뮬레이터가 실행되면 아래 사진 속 버튼을 누르고, 연결할 프로세스를 선택한다.
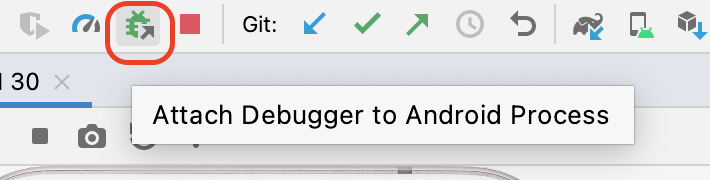
- 하단에 Debug창이 표시된다.
디버거로 앱 실행
- Debug 'app' 클릭

- 하단에 Debug창이 표시된다.
Debug 기능
자세한 건 링크 참고 !!
- Debug 창에는 Debugger, Console 버튼이 있다.
- Debugger: 별도의 창 3개를 표시 (Frames, Variables, Overhead)
- Frames: 중단점이 설정된 줄이 강조표시 되어있음
- Variables: 변수 검사 기능
- Frames: 중단점이 설정된 줄이 강조표시 되어있음
- Console: logcat 출력 표시
- Debugger: 별도의 창 3개를 표시 (Frames, Variables, Overhead)
- 중단점 기능: 특정 코드 줄 번호 옆의 여백을 클릭 (다시 클릭하면 중단점 삭제)
- 중단 후 재개: Resume Program
- Step Into: 명령이 메서드 또는 다른 코드를 호출하는 경우, Step Into를 사용하면 디버거를 실행하여 중단점을 설정하기 전에 수동 탐색할 필요 없이 코드를 입력할 수 있다.
- Step Over: 런타임에 앱 코드를 단계별로 실행할 수 있다.
- Step Out: Step Into와 반대로 작동, 호출 스택으로 이동한다.
remember 함수를 이용한 상태 저장
remember 를 사용하여 리컴포지션에서 객체를 저장할 수 있다.
상태와 업데이트가 UI에 적절하게 반영되도록 일반적으로 remember과 mutableStateOf 함수가 함께 사용된다.
import androidx.compose.runtime.mutableStateOf
import androidx.compose.runtime.remember
import androidx.compose.runtime.getValue	// 직접 가져와야 함
import androidx.compose.runtime.setValue	// 직접 가져와야 함

var amount by remember { mutableStateOf("") }
TextField(
	value = amount,
    onValueChanged = { amount = it },
)
by : Kotlin 속성 위임에 해당됨
상태 Hoisting
Stateful vs Stateless
- Stateful: 시간이 지남에 따라 변할 수 있는 상태를 소유하고 있음
- Stateless: 구성 가능한 함수에서 상태를 추출할 때 결과로 생성되는 구성 가능한 함수, 상태가 없는 컴포저블임
hoisting이 필요한 경우
- 상태를 여러 구성 가능한 함수와 공유하는 경우
- 앱에서 재사용할 수 있는 Stateless 컴포저블을 만드는 경우
상태 Hoisting을 Composable에 적용
- 컴포저블에 매개변수 2개가 추가되는 경우가 많다
- value: T- onValueChange: (T) -> Unit // 값을 업데이트하는 람다 콜백
@Composable
fun TipTimeScreen() {
   var amountInput by remember { mutableStateOf("") }

   val amount = amountInput.toDoubleOrNull() ?: 0.0
   val tip = calculateTip(amount)

   Column(
       modifier = Modifier.padding(32.dp),
       verticalArrangement = Arrangement.spacedBy(8.dp)
   ) {
       Text(
           text = stringResource(R.string.calculate_tip),
           fontSize = 24.sp,
           modifier = Modifier.align(Alignment.CenterHorizontally)
       )
       Spacer(Modifier.height(16.dp))
       EditNumberField(value = amountInput,
           onValueChange = { amountInput = it }
       )
       Spacer(Modifier.height(24.dp))
       Text(
           text = stringResource(R.string.tip_amount, tip),
           modifier = Modifier.align(Alignment.CenterHorizontally),
           fontSize = 20.sp,
           fontWeight = FontWeight.Bold
       )
   }

}

@Composable
fun EditNumberField(
       value: String,
       onValueChange: (String) -> Unit
   ) {
   TextField(
       value = value,
       onValueChange = onValueChange,
       label = { Text(stringResource(R.string.cost_of_service)) },
       modifier = Modifier.fillMaxWidth(),
       singleLine = true,
       keyboardOptions = KeyboardOptions(keyboardType = KeyboardType.Number)
   )
}amountInput상태를EditNumberField()에서TipTimeScreen()composable로 호이스팅