1. django 알아보기
Django?
: python 기반 웹 프레임워크
flask vs django
| Flask | Django |
|---|---|
| 마이크로 웹 프레임워크 (작다, 최소한의 기능을 가지고 있음) | 거의 모든 것이 내장 되어 있다 (프로젝트 사이즈가 크다) |
| 추가적인 모듈을 import 해야한다 | 이미 라이브러리가 내장 되어있어 그냥 쓰면 된다 |
가상환경에서 장고 설치 및 실행
설치하기
프로젝트 폴더 생성
cd django-proj
virtualenv venv
./venv/Script/activate.ps1
#설치 후 확인
pip install django
pip freeze
#프로젝트를 실행할 폴더 생성
django-admin startproject <proj-name>
#
cd webproj
python manage.py runserver
-> http://127.0.0.1:8000/
Django의 구성요소
1. manage.py - 장고 실행

2. 생성한 프로젝트 이름과 같은 이름으로 하위 폴더가 생성됨
__init__ - 디텍토리가 pyhon 모듈로 인식되게 하는 역할
asgi, wsgi - 서버에서 프로젝트를 가동할 때 사용할 부분
settings.py - 전반적인 설정을 반영
  {
  secret-key - secret key가 있음
  debug - debug 모드로 전환
  allowed_hosts - 입력되어있는 주소에 대해 django 접근할 수 있도록
  installed_apps,middleware - 설치된 앱 중에 어떤 것을 실행할 것인가
  root_urlconf - 어떤 모듈 url로 진행할 것인지
  templates - 보이는 화면 들어있는 요소
  wsgi_application - python 상에서 웹서버와 소통하기 위한 애플리케이션
  database - 프로젝트 상에서 다루게 되는 자료를 저장하는 것을 다루는 곳
  auth_password_validators - 관리자 부분에서 비밀번호 관리
  }
urls.py -url 관리하는 곳
	{
	urlpatterns - admin의 url이 들어오면 admin.site.urls가 관리함
    }
django Project and App
한 project는 여러 App로 구성되어 있다.
각 기능에 대해 독립적으로 구현할 수 있다는 것이 장점이다.
django App 만들기
django-admin startapp homepage #homepage라는 폴더가 생성됨

admin.py - admin에 대한 내용이 들어감
apps.py - app에 대한 설정
models.py - 데이터베이트의 스키마를 클래스 형태로 작성
views.py - 홈페이지라는 곳에서 view를 어떻게 설정할지
django의 MVT Pattern
디자인 패던 - 각 코드의 모듈화를 통해 각 코드가 독립적으로, 유기적으로 원하는 기능을 실행할 수 있도록 만들어주는 구조
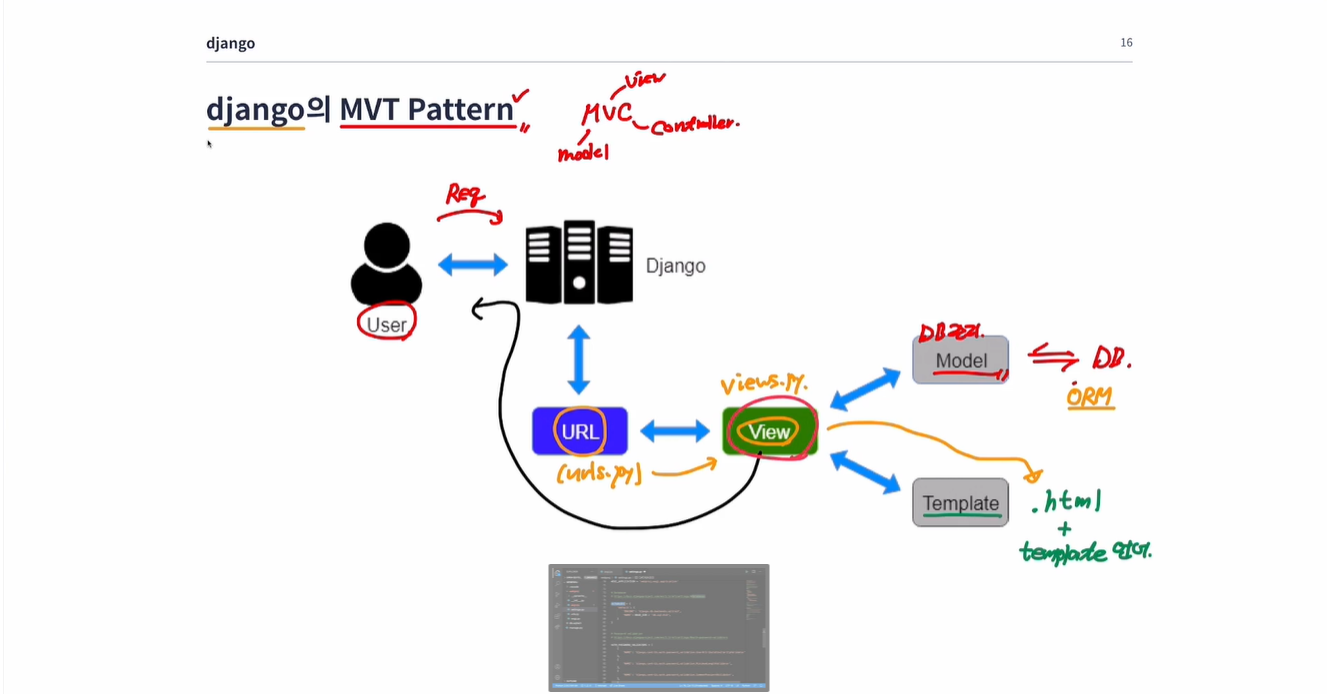
MVC : model view contrller
MVT : model template view
- user가 request를 보낸다.
- server django는 URL(urls.py)를 체크하고
- View(views.py)로 보낸다.
-> model은 DB관리(ORM : object related model)와
-> Teplate은 html파일로 전달, template 언어를 이용해서 html을 for if등을 사용 가능 - 사용자에게 response
2. View
: url에 해당하는 함수들을 담당함
from django.shortcuts import HttpResponse, render

# Create your views here.

def index(request):
    return HttpResponse("Hello World!")
어느 경로로 요청이 들어오면 함수를 나타낼지 정해야함 -> homepage 폴더가 아닌 프로젝트의 메인 폴더의(webproj) urls.py에서 작성
뷰에 대한 정보를 불러와야함 -> homepage에서 불러오므로 설정해준다.
from django.contrib import admin
from django.urls import path
from homepage.views import index

urlpatterns = [
    path('', index), #127.0.0.1/
    path('admin/', admin.site.urls), #127.0.0.1/admin/
]
homepage라는 app을 사용하기 위해서는 webproj settings.py에서 INSTALLED_APP설정해야한다.
INSTALLED_APPS = [
    'django.contrib.admin',
    'django.contrib.auth',
    'django.contrib.contenttypes',
    'django.contrib.sessions',
    'django.contrib.messages',
    'django.contrib.staticfiles',
    'homepage',
]
python manage.py runserver
1. 사용자가 127.0.0.1에 요청을 보낸다.
2. urls.py에서 path를 확인한다. 동일한 패턴을 확인하고 index(함수)를 실행하게 된다.
3. views.py에서 index를 실행한다.admin(관리자)
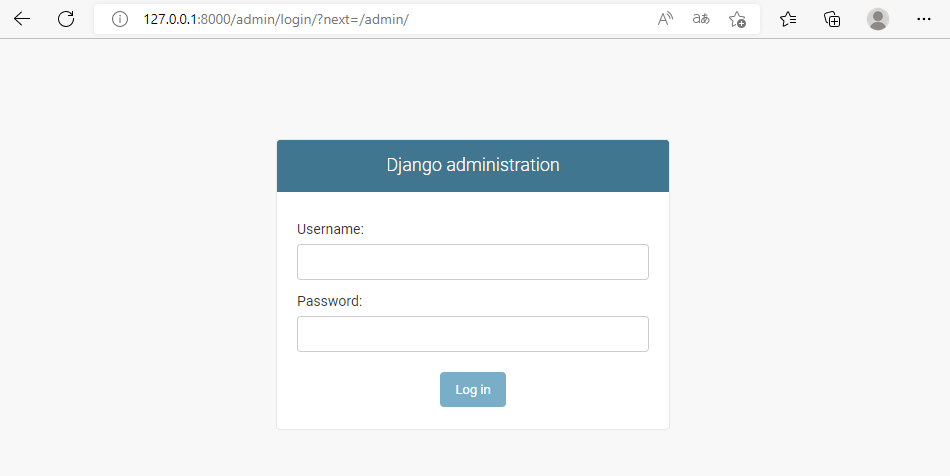
이는 cmd 환경에서 계정을 만들 수 있다.
장고를 만들 때 자동으로 admin이라는 db가 생성되는데 이를 migration 해줘야한다.
db가 생성, 삭제 될 때 내용이 저장되어야한다.
#SQlite를 연동함
python manage.py migrate
python manage.py createsuperuser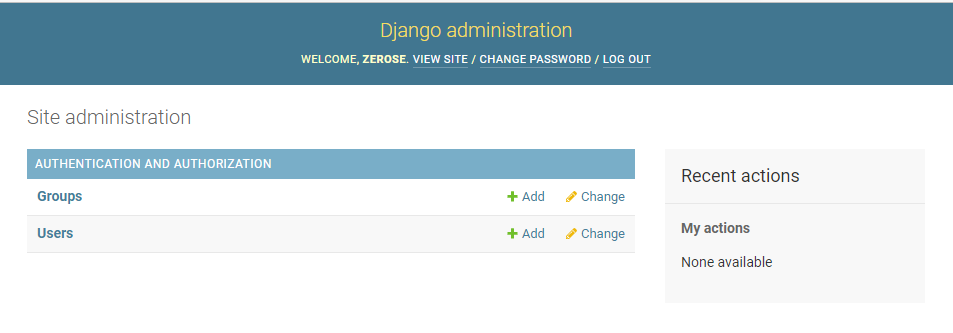
3. Template
: 보여줄 문서 (HTML, CSS, javascript)
: template 언어 사용
Template
#<h1> html 헤더 사용
def index(request):
    return HttpResponse("<h1>Hello World!</h1>")
django 는 html 문서를 따로 관리해줄 수 있는 render 함수를 제공한다.
render( reqeust , '.html' , {인자} )
Migration
: migration은 db적 관점이 아닌, 코드 리팩토링 의미로 사용
1. template를 새로 만든다.
2. html 파일을 만들어야한다.
3. 각 앱의 diratory에서 관리 한다.(dir의 구조는 바뀔 수 있다)
-> homepage 폴더에서 template라는 폴더 생성
-> 안에 index.html 파일 생성
html 에는 크게 head(파일의 뒤에서 이루어지는 것들)와 body(사용자가 눈으로 확인할 수 있는 부분)가 있다.(foot도 존재)
<!DOCTYPE html> # html5로 작성된 것을 알림
<html>
    <head>
    <title>Python django example</title>
    </head>

    <body>
        <h1>Title</h1>
        <p>hihihi hi hi</p>
    </body>
</html>
views.py도 수정
def index(request):
    #return HttpResponse("<h1>Hello World!</h1>")
    return render(request, 'index.html',{})
settings.py에서 html파일이 어디있는지 명시해야한다.
import os

TEMPLATES = [
    {
        'BACKEND': 'django.template.backends.django.DjangoTemplates',
        'DIRS': [
            os.path.join(BASE_DIR, "homepage","template"), #1
            BASE_DIR + 'homepage/template/index.html'], #2
        'APP_DIRS': True,
        'OPTIONS': {
            'context_processors': [
                'django.template.context_processors.debug',
                'django.template.context_processors.request',
                'django.contrib.auth.context_processors.auth',
                'django.contrib.messages.context_processors.messages',
            ],
        },
    },
]
디렉토리의 위치를 입력할 때 #2의 방법도 있지만 os를 통한 #1의 방법이 더욱 좋다.
이 때 BASE_DIR을 더해주는 것은 폴더가 컴퓨터에서 어디에 위치한지를 알려주어야 한다.
rander
#views.py
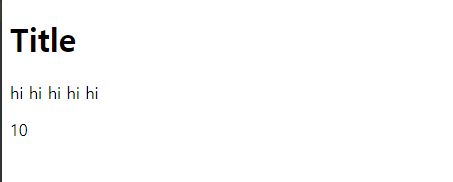
def index(request):
number = 10
return render(request, 'index.html', {"my_num" : number})
<!index.html>
<!DOCTYPE html> <! html5로 작성된 것을 알림>
<html>
    <head>
    <title>Python django example</title>
    </head>

    <body>
        <h1>Title</h1>
        <p>hi hi hi hi hi</p>
        <p>{{ my_num }}</p> #template 언어
    </body>
</html>
template 언어는 {{}}를 활용하여 사용하게 된다.
template 작성할 때 외부로 부터 오는 데이터를 dictionary 형태로 사용하게 된다. 위의 형태처럼
template filter
: 변수의 값을 특정형식으로 변환할 때 사용한다.
#views.py
def index(request):
    # return HttpResponse("<h1>Hello World!</h1>")
    name = "Michael"
    return render(request, 'index.html', {"my_naem" : name})
<!index.html>
<!DOCTYPE html> <! html5로 작성된 것을 알림>
<html>
    <head>
    <title>Python django example</title>
    </head>

    <body>
        <h1>Title</h1>
        <p>hi hi hi hi hi</p>
        <p>{{ my_name }}</p>
        <p>{{ my_name | length }}</p>
        <p>{{ my_name | upper }}</p>
    </body>
</html>
template tag
{% tag ... %}

{% endtag ... %}fortag
: for a in b 형태로 사용하면 됨.
def index(request):
    # return HttpResponse("<h1>Hello World!</h1>")
    nums = [1,2,3,4,5]
    return render(request, 'index.html', {"my_list" : nums})
{% for element in my_list %}
<p>{{element}}</p> #값을 받아오기 때문에 {{}}를 사용해야한다.
{% endfor %} 1,2,3,4,5
iftag{% for element in my_list %} {% if element|divisibleby:"2" %} <p>{{element}}</p> {% endif %} {% endfor %}
	2,4

 ```html
        {% for element in my_list %}
            {% if not element|divisibleby:"2" %}
            <p>{{element}}</p>
            {% endif %}
        {% endfor %}
1,3,5