개요
테라폼은 내 계정에 있는 수많은 리소스 중 어떤 리소스가 관리 대상인지 어떻게 알 수 있을까?
이번 포스팅에서는 테라폼이 인프라의 상태를 어떻게 탐지하는지, 그리고 테라폼 프로젝트의 파일 레이아웃, 격리, 잠금 등에 미치는 영향을 어떻게 탐지하는지 알아보고자 한다.
테라폼 상태란?
- 테라폼은 생성한 인프라에 대한 정보를 실행할 때마다 테라폼 상태 파일에 기록한다.
- 기본적으로 테라폼을 실행한 로컬 위치에 terraform.tfstate 파일을 생성하며, 구성 파일(.tf)의 테라폼 리소스가 실제 리소스의 표현으로 매핑되는 내용이 JSON 형식으로 기록된다.
- 테라폼을 실행할 때마다 선택한 Provider에서 리소스의 최신 상태를 가져와서 테라폼 구성과 비교해 어느 변경 사항을 적용해야 하는지 결정할 수 있다. 즉 terraform plan의 출력은 컴퓨터의 코드와 실제 세계에 배포된 인프라 간의 차이라고 보면 된다.
- 주의해야 할 점은, 상태 파일은 테라폼 내부에서 사용하기 위한 프라이빗 API이므로 내용을 직접 편집하거나 작성하면 안된다. 만약 상태 파일을 조작해야 할 경우 terraform import 또는 terraform state 명령을 사용해야 한다.
단일 상태 파일 관리시 문제점
- 개인 프로젝트라면 로컬 컴퓨터의 단일 terraform.tfstate 파일에 상태를 저장해도 무방하다.
- 다만 실제 운영 환경에서 팀 단위로 사용하고자 할 때는 다음과 같은 문제에 직면하게 된다.
- 상태 파일을 모두가 액세스 할 수 있는 공유 위치에 저장해야 함.
- 만약 별도의 잠금 기능 없이 두 팀원이 동시에 테라폼을 실행하는 경우, 상태 파일이 동시에 업데이트되어 데이터가 손실되거나 파일이 손상될 수 있음.
- 운영, 스테이징, 개발 등 환경 별로 상태 파일이 격리 되어 있지 않았을 때의 이슈 발생 가능성.
버전 관리 시스템을 써볼까?
- 여러 팀원이 파일에 모두 액세스할 수 있게 하는 가장 일반적인 방법은 'Git'과 같은 버전 관리 시스템에 두는 것이다. 하지만 테라폼 상태 파일을 버전 관리 파일에 저장하는 것은 다음과 같은 이유 때문에 적절하지 않다.
- 때때로 테라폼을 실행하기 전 최신 변경 사항을 가져오거나 실행하고 나서 푸시하는 것을 잊기 쉽다. 즉 수동 조작을 통한 휴먼에러가 발생할 수 있다는 뜻이다.
- 다수가 동시에 하나의 상태 파일에 apply 명령을 실행하지 못하게 하는 잠금 기능을 제공하지 않는다.
- 테라폼 상태 파일의 모든 데이터는 평문으로 저장된다. 따라서 만약 중요한 데이터를 저장하게 될 경우 보안의 문제가 될 수 있다.
Nope! 정답은 원격 백엔드
- 가장 좋은 방법은 테라폼에 내장된 원격 백엔드 기능을 사용하는 것이다. 이것은 상태 파일을 아마존 S3, 애저 스토리지, 구글 클라우드 스토리지, 테라폼 클라우드 원격 공유 저장소에 저장하는 것으로 앞서 말한 문제를 모두 해결한다.
- 원격 백엔드 구성 시 plan이나 apply 명령을 실행할 때마다 해당 백엔드에 상태 파일을 자동으로 업로드한다.
- 대부분의 원격 백엔드는 기본적으로 잠금 기능을 지원한다. 다른 사람이 apply 명령을 실행 중인 경우 이미 잠금이 활성화 되어 있어 잠금이 해제될 때까지 기다려야 한다.
-lock-timeout=<TIME>매개 변수를 사용하면 잠금이 해제되기까지 테라폼이 얼마 동안 대기하도록 할지 설정할 수 있다. - 대부분의 원격 백엔드는 데이터를 보내거나 상태 파일을 저장할 때 암호화 하는 기능을 제공한다.
- 본 포스팅에서는 아마존 S3를 사용한 실습을 진행할 예정이다. 아마존 S3를 사용하면 다음과 같은 장점이 있다.
- 관리형 서비스이므로 추가 인프라를 배포하고 따로 관리할 필요가 없다.
- 99.999999999%의 내구성, 99.99%의 가용성, 저렴한 비용.
- 데이터 전송 및 저장시 암호화 지원(단, S3 버킷에 액세스 할 수 있는 팀원은 여전히 상태 파일을 암호화되지 않은 형태로 볼 수 있음)
- 다이나모DB를 통한 잠금 지원.
- 버전 관리 지원.
실습 1
S3 Bucket 생성
# 별도 디렉터리 생성

mkdir tfstate-backend
cd tfstate-backend
# backend.tf 생성
cat <<EOT > backend.tf
provider "aws" {
region = "ap-northeast-2"
}
# 버킷명은 모든 AWS 리전의 모든 AWS 계정에서 고유해야 한다.
resource "aws_s3_bucket" "mys3bucket" {
bucket = "jinju-tf-study-tfstate"
}
# 코드 이력을 관리하기 위해 상태 파일의 버전 관리를 활성화한다.
# Enable versioning so you can see the full revision history of your state files
resource "aws_s3_bucket_versioning" "mys3bucket_versioning" {
bucket = aws_s3_bucket.mys3bucket.id
versioning_configuration {
status = "Enabled"
}
}
output "s3_bucket_arn" {
value = aws_s3_bucket.mys3bucket.arn
description = "The ARN of the S3 bucket"
}
EOT# 배포
terraform init && terraform plan && terraform apply -auto-approve
terraform state list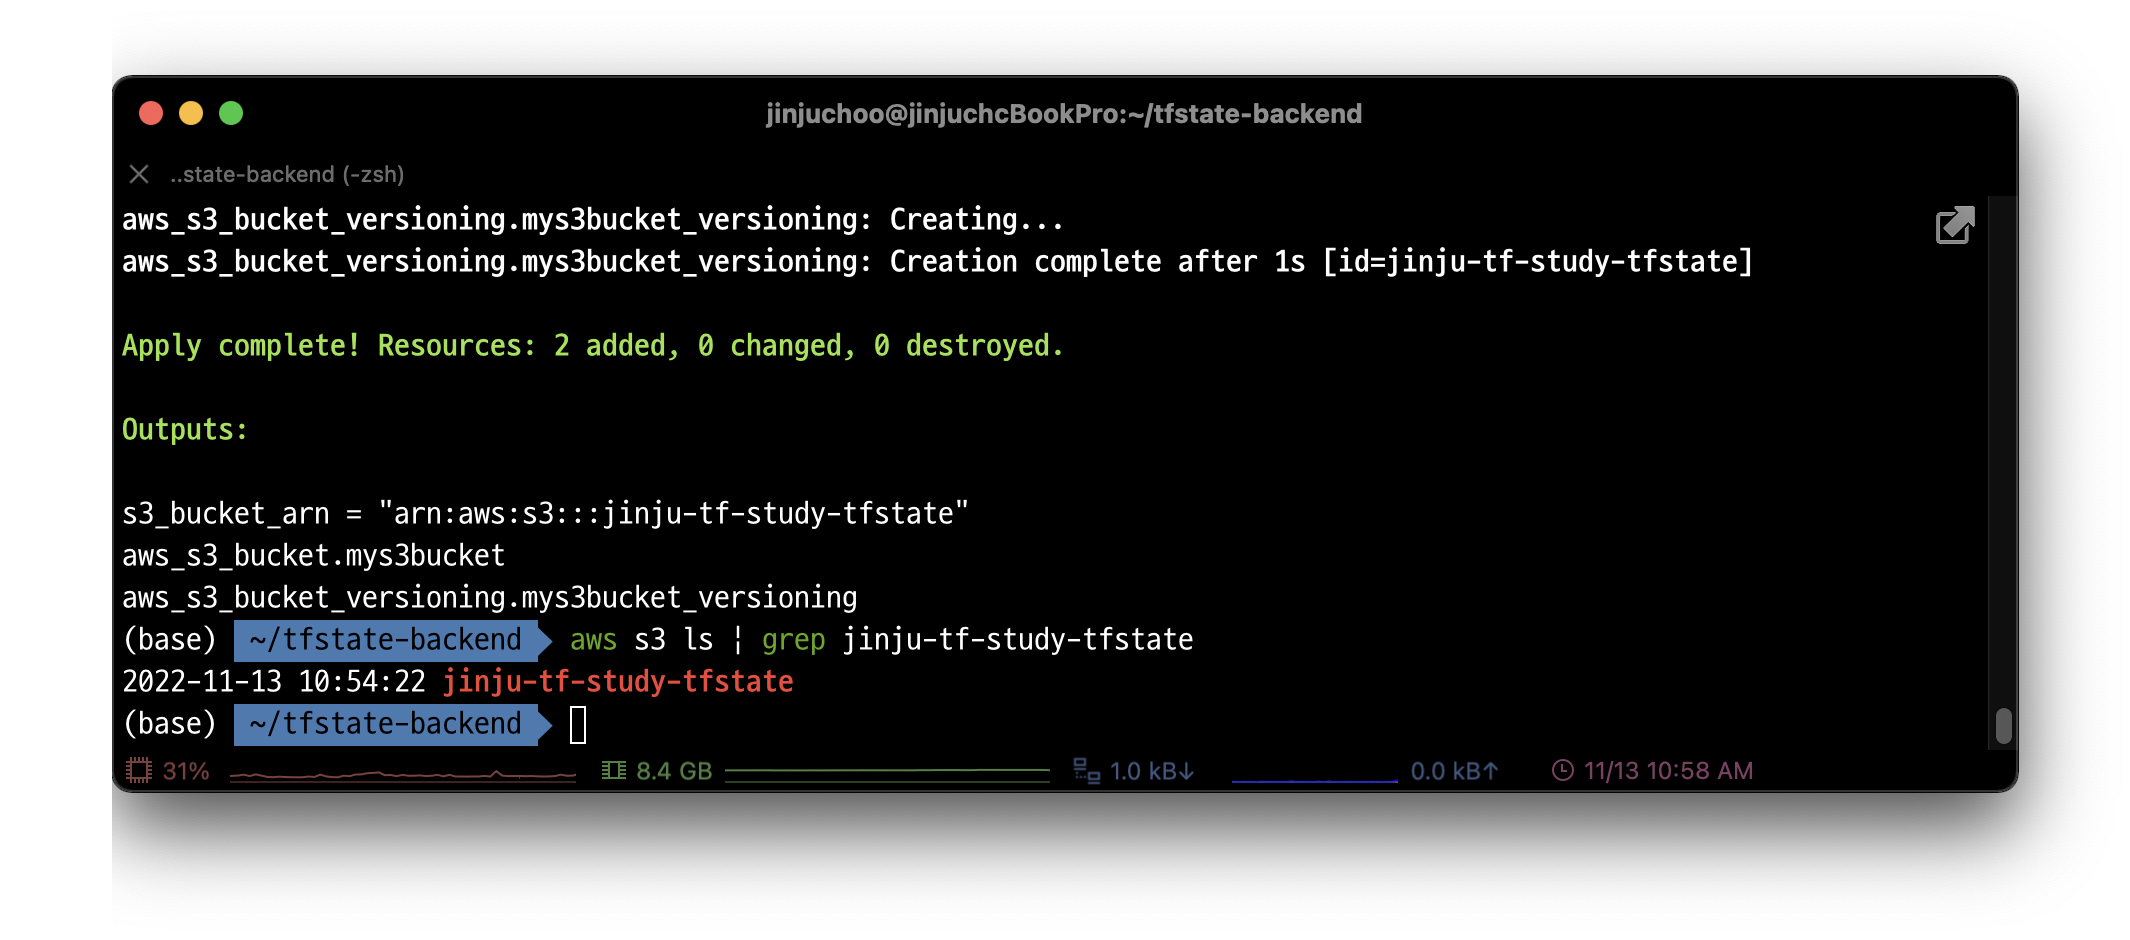 배포가 정상적으로 완료되었고, Outputs 변수를 통해 해당 버킷의 arn 또한 출력되었다.
DynamoDB 생성
이전에 콘솔에서 DynamoDB를 생성한 경험이 없으므로, 코드 적용 전 해당 실습을 먼저 진행하였다.
[콘솔] 테이블 생성
DynamoDB 콘솔을 사용하여 새 Music 테이블을 생성하려면
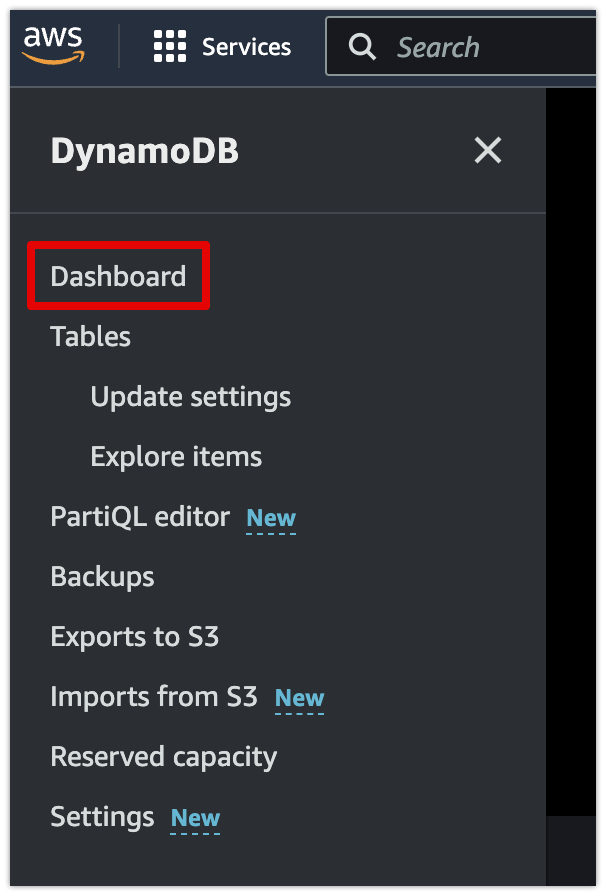
1. AWS Management Console에 로그인하고 DynamoDB 콘솔을 연다.
2. 콘솔 왼쪽의 탐색 창에서 [Dashboard]를 선택한다.
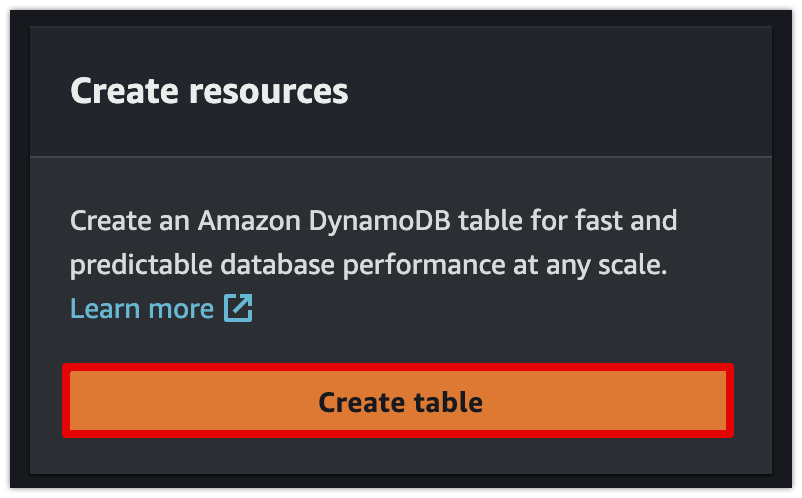
3. 콘솔의 오른쪽에서 [Create table(테이블 생성)]을 선택한다.
4. 다음과 같이 테이블 세부 정보를 입력한다.
- Table name: Music
- Partition key: Artist
- Sort key: SongTitle
- 나머지 항목은 기본 설정(Default settings)이 선택된 상태로 유지한다.
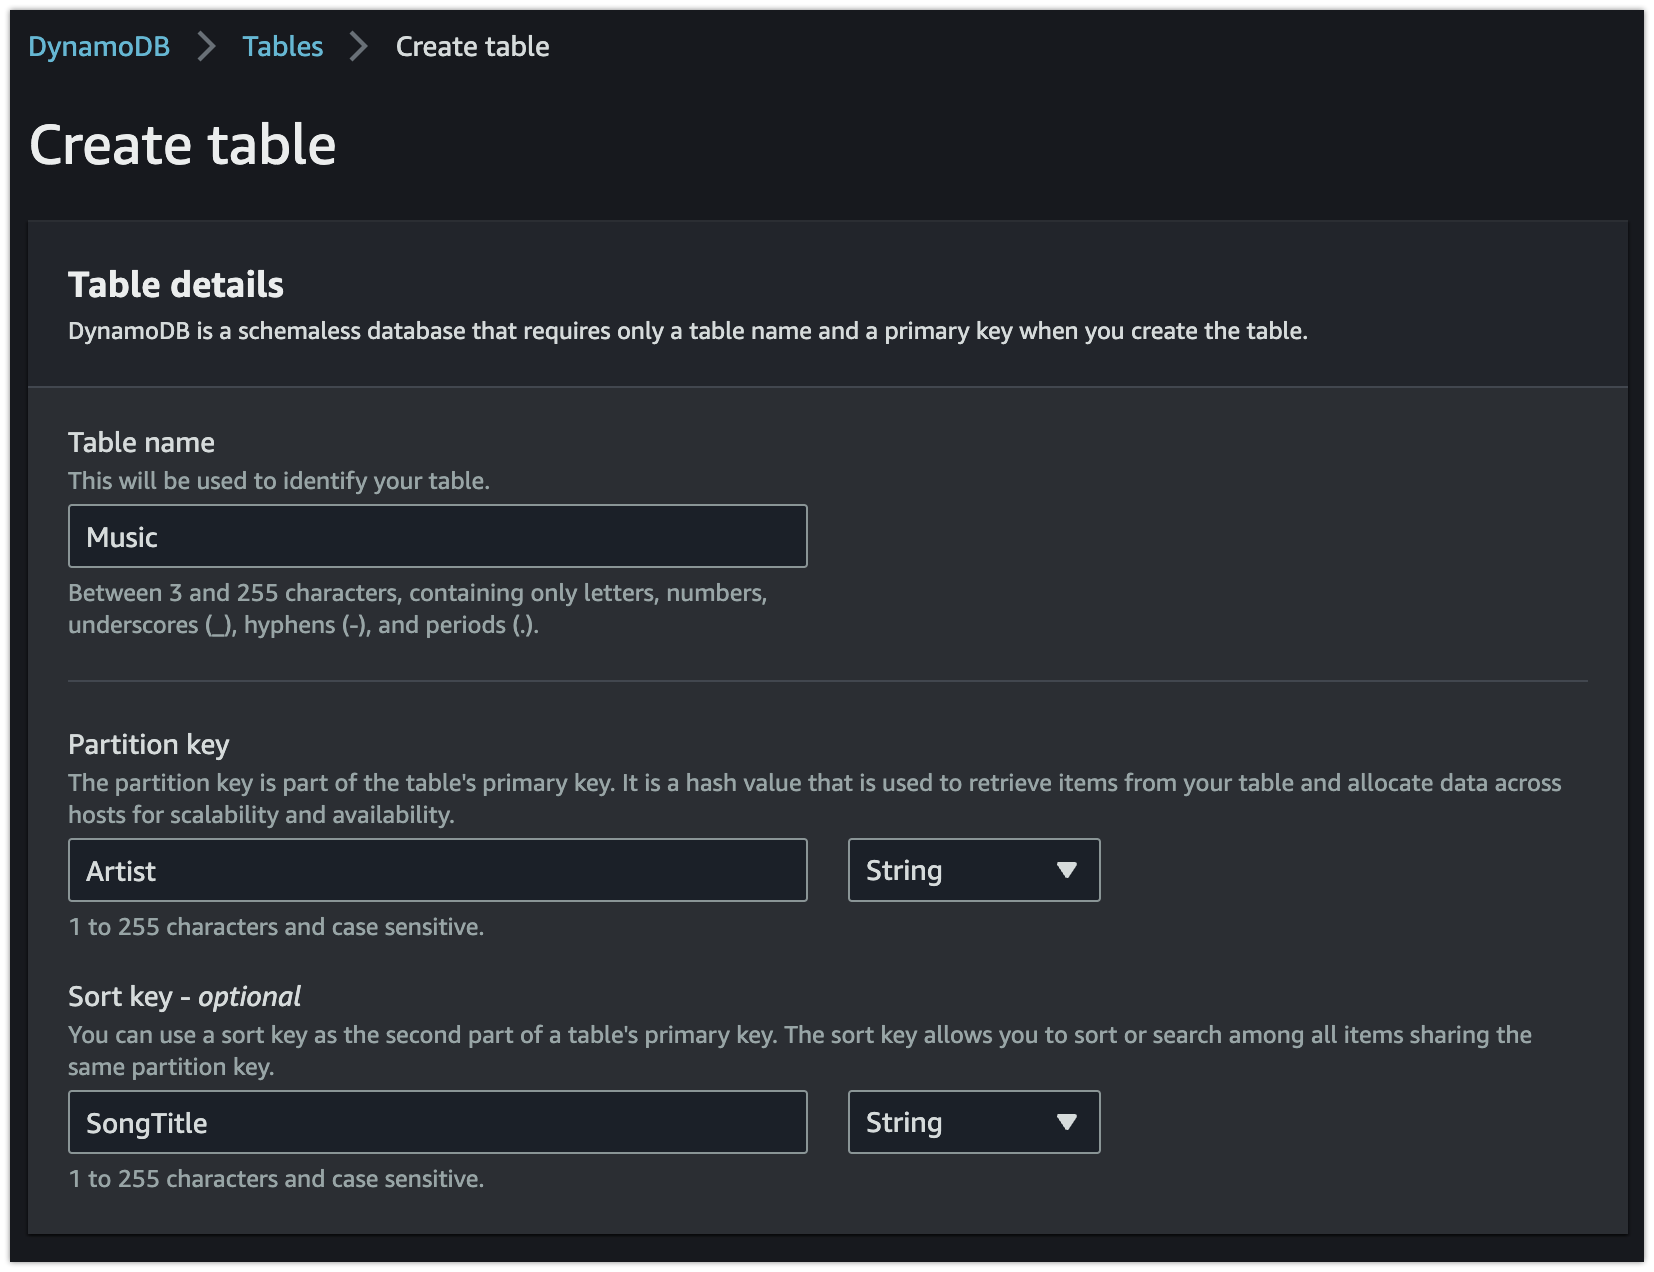
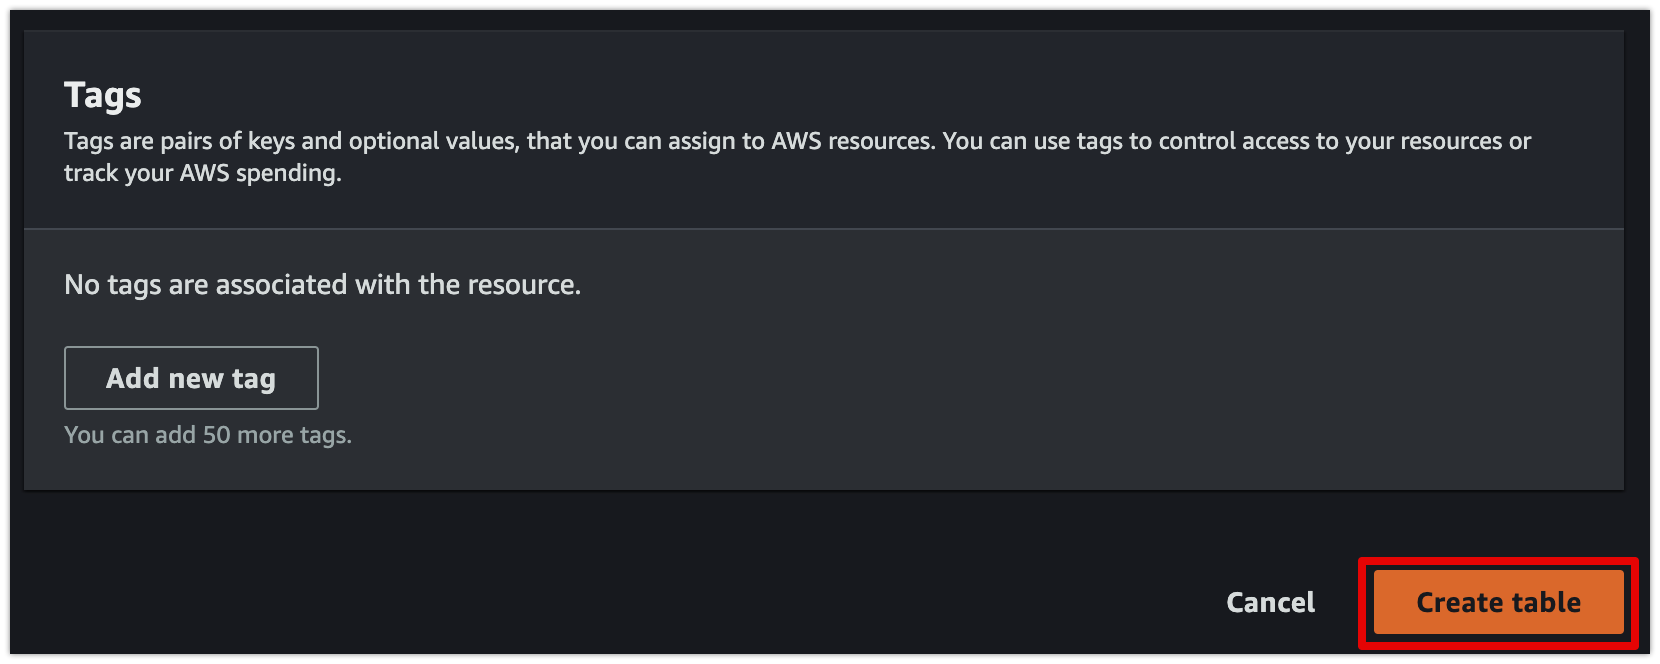
- 우측 하단 [Create table]을 선택하여 테이블을 생성한다.
[콘솔] 데이터 쓰기
이 단계에서는 이전 단계에서 생성한 Music 테이블에 여러 항목을 삽입한다.
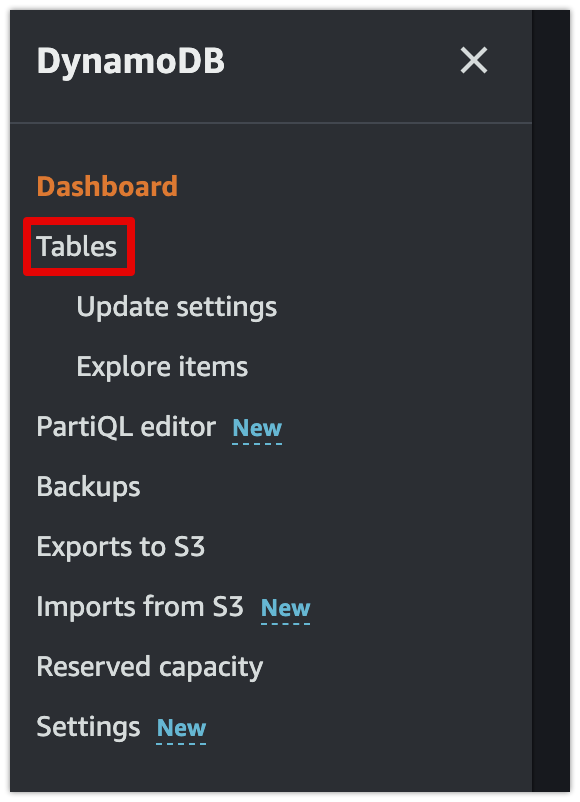
1. 콘솔 왼쪽의 탐색 창에서 [Tables]를 선택한다.
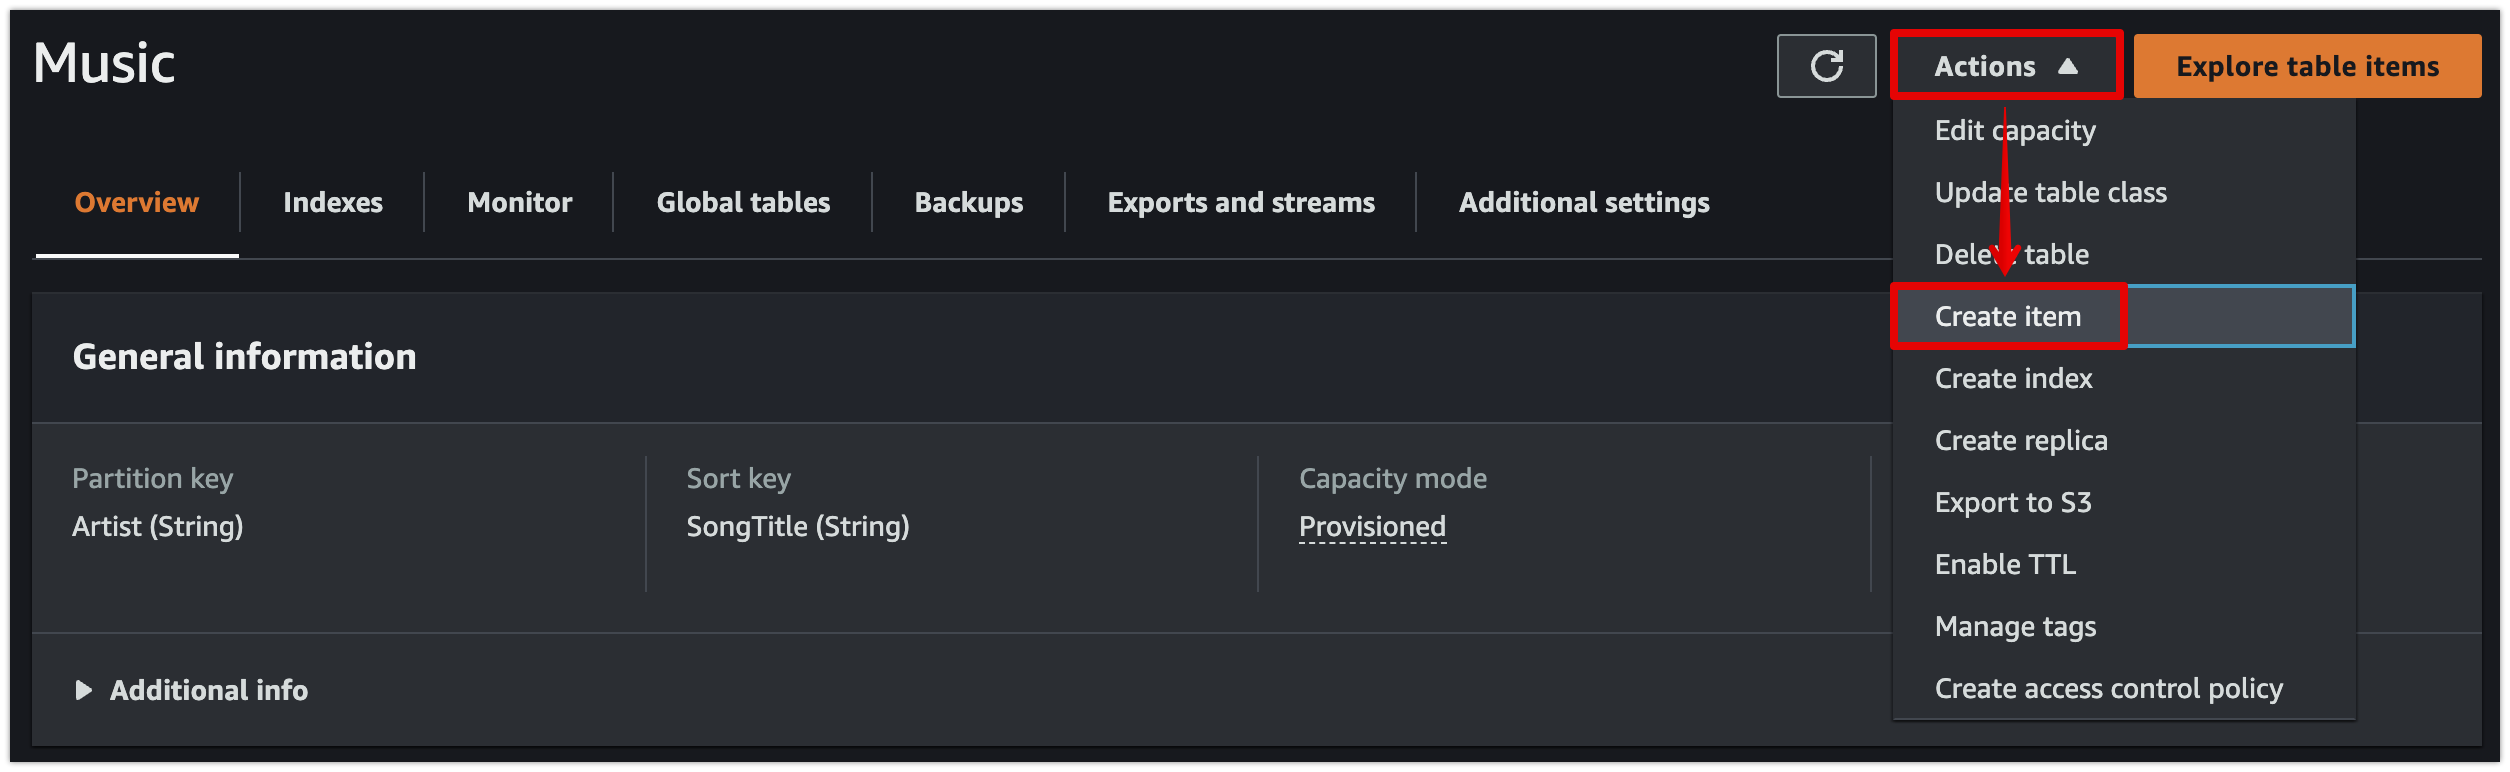
2. 테이블 목록에서 [Music] 테이블을 선택한다.

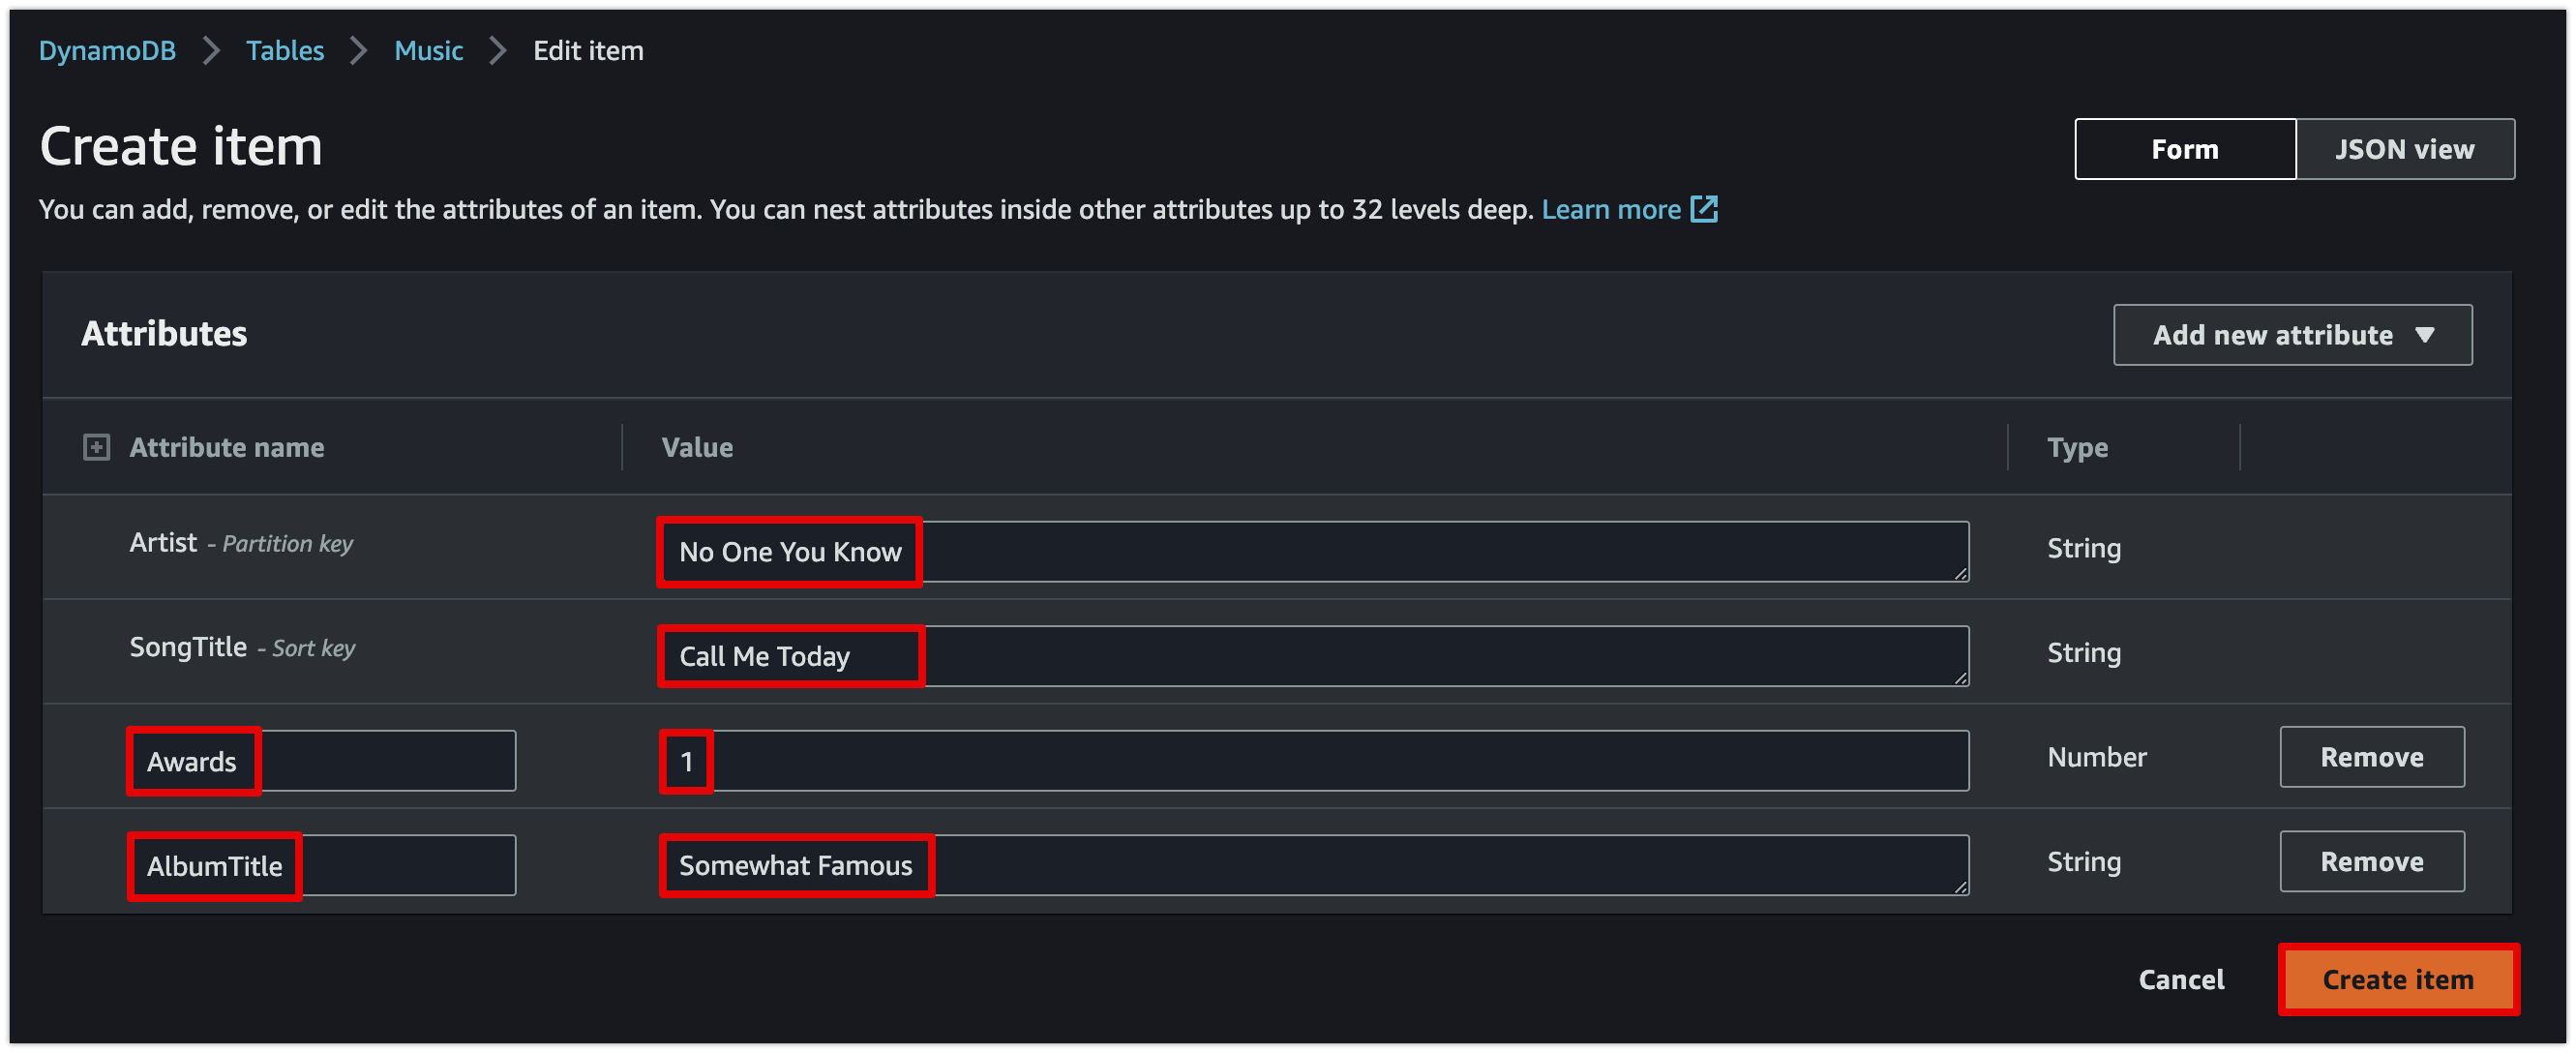
3. [Actions] 메뉴에서 [Create item]을 선택한다.
4. [Add new attribute]를 선택한 다음 [Number]를 선택한다. 생성된 Attribute name은 Awards로 지정한다.
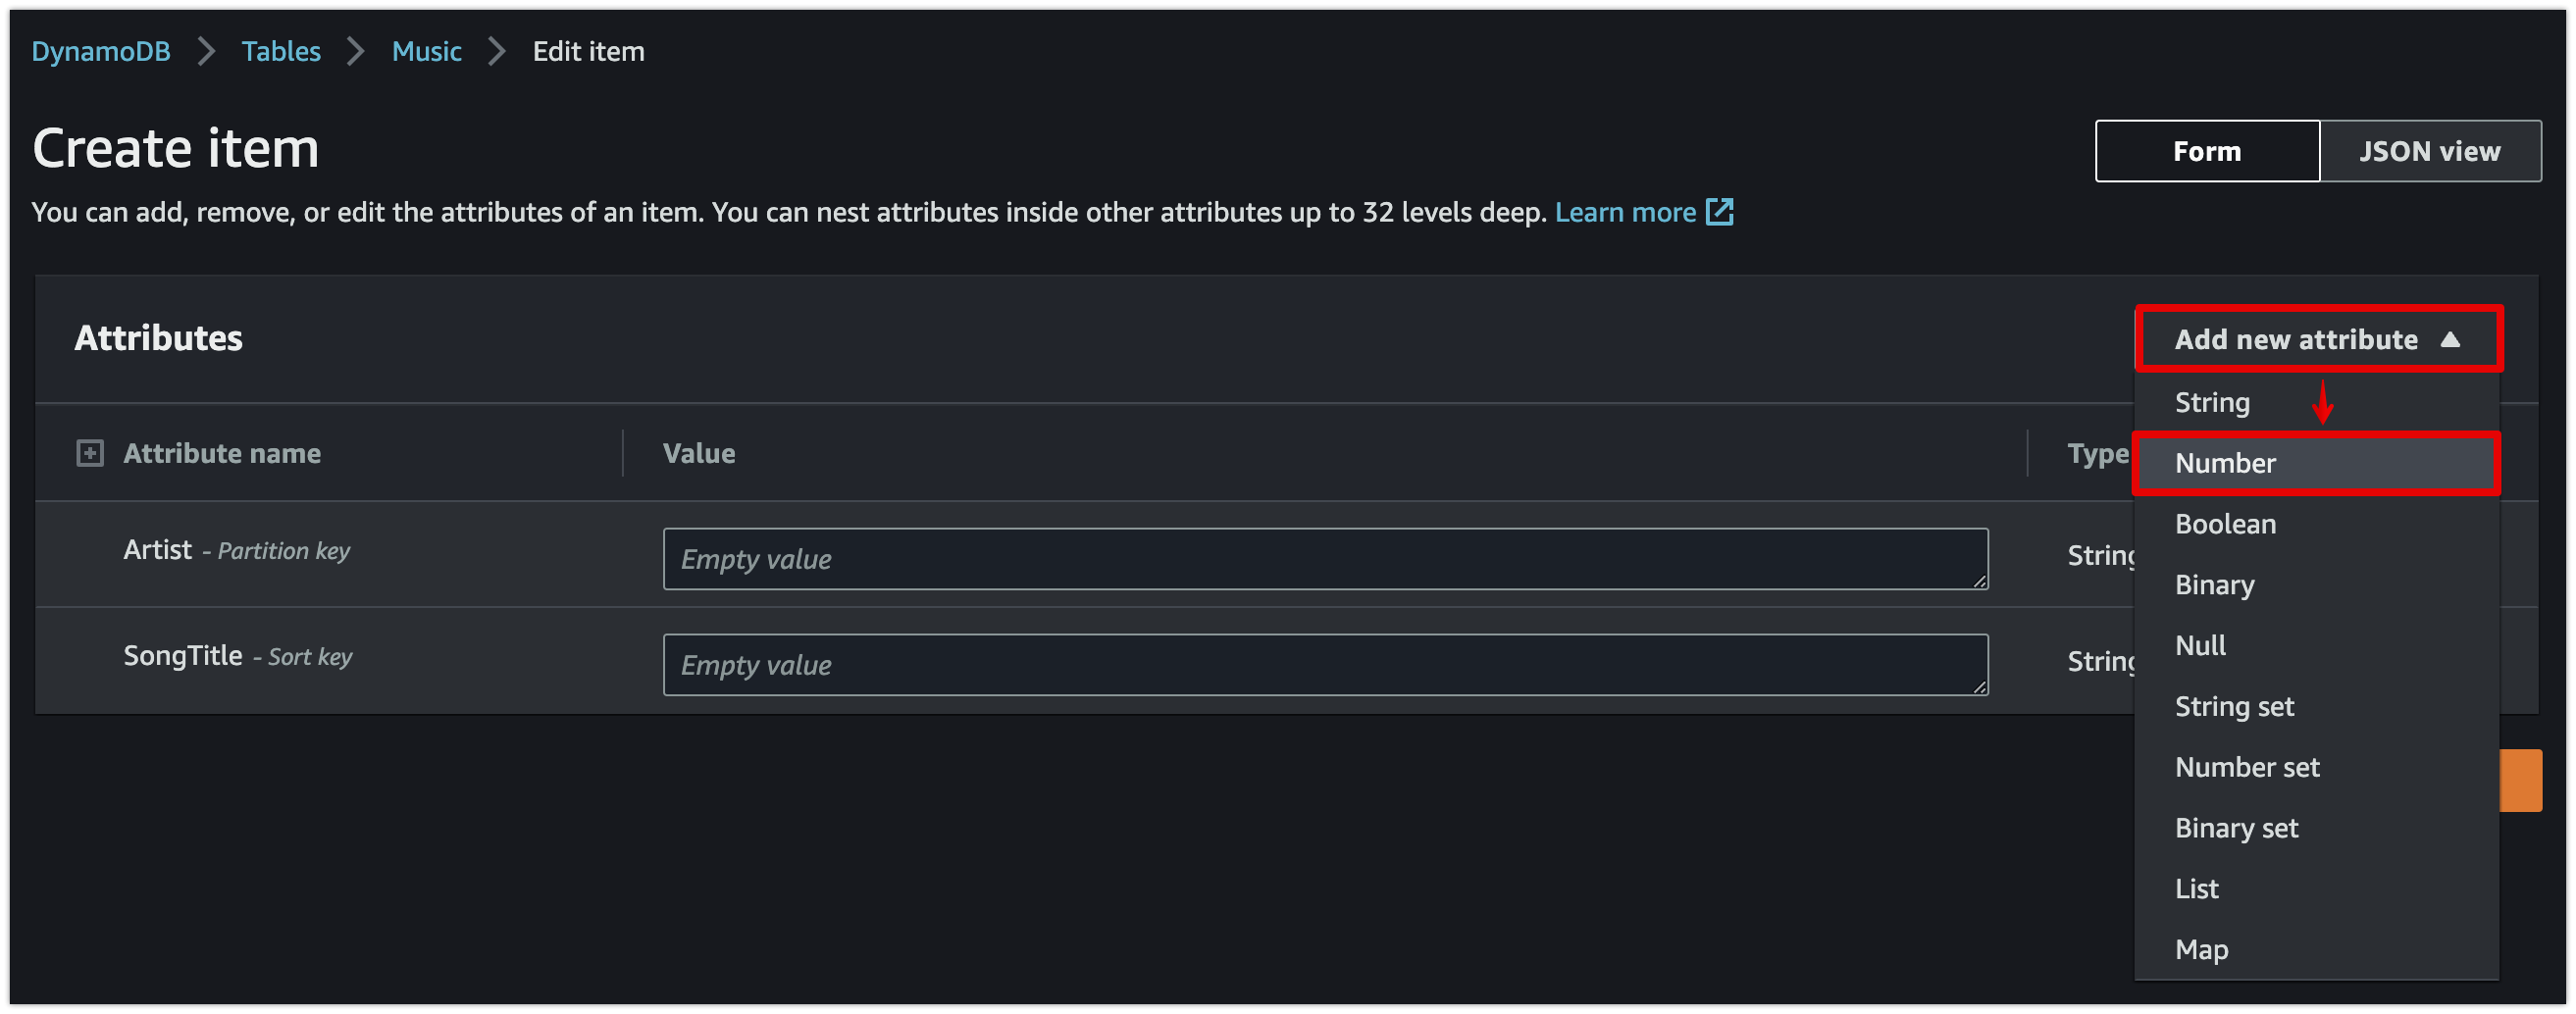
5. 4번 과정을 반복하여 [String] item을 하나 더 생성하고, 이번에 생성된 Attribute name은 AlbumTitle로 지정한다.
6. 각 항목들에 대해 다음과 같은 값을 입력한 후 [Create Item]을 선택한다.
7. 위 절차를 반복하여 다음 값으로 다른 항목을 생성한다.
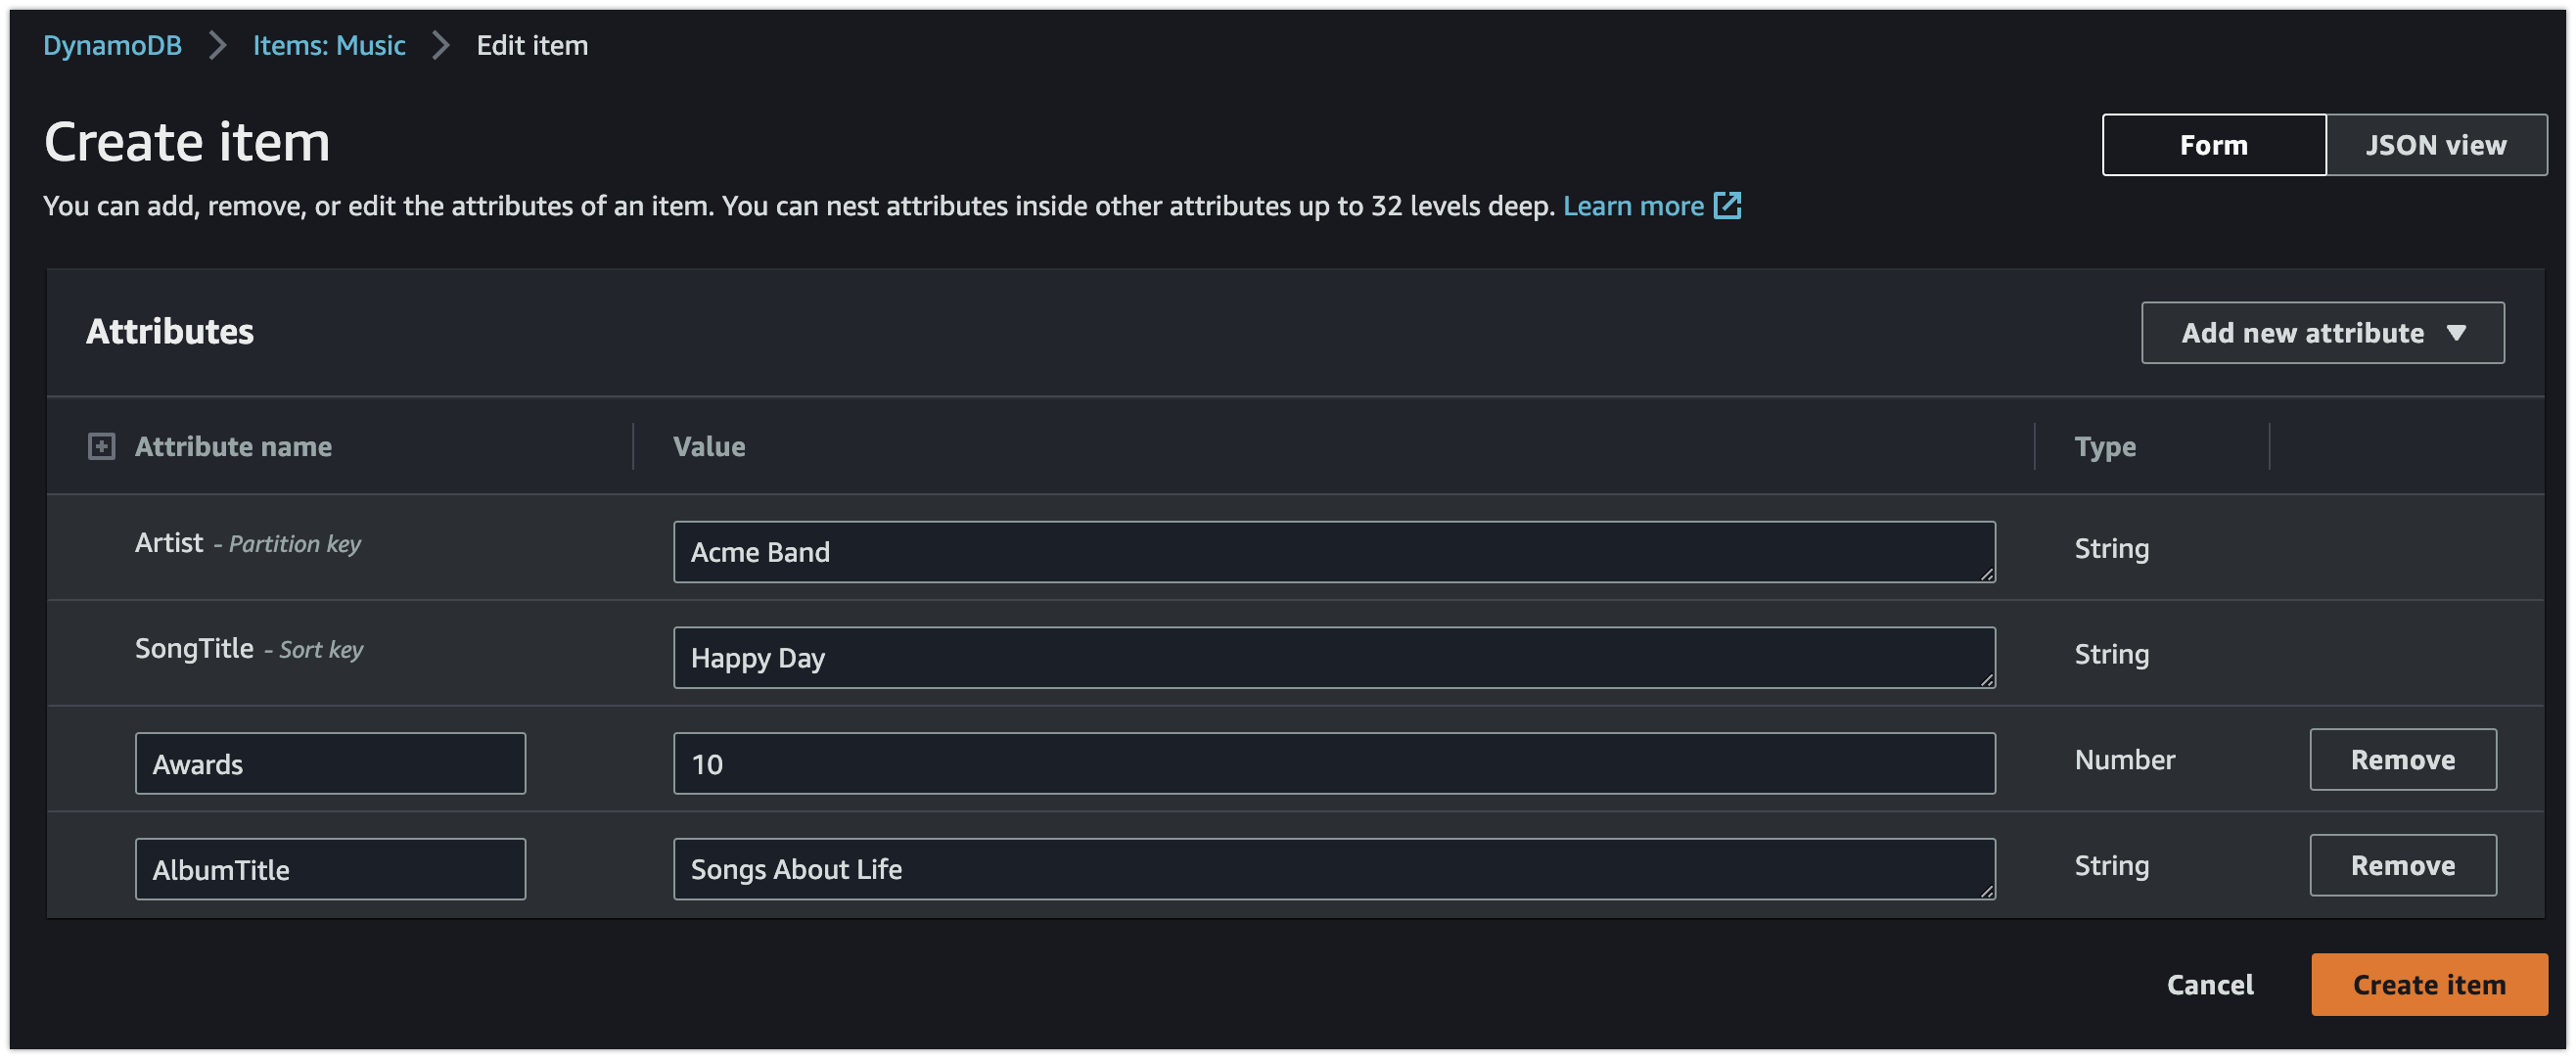
8. 이 작업을 한 번 더 수행하여 이전 단계와 Artist는 같지만 다른 속성의 값이 다른 항목을 또 하나 생성한다.

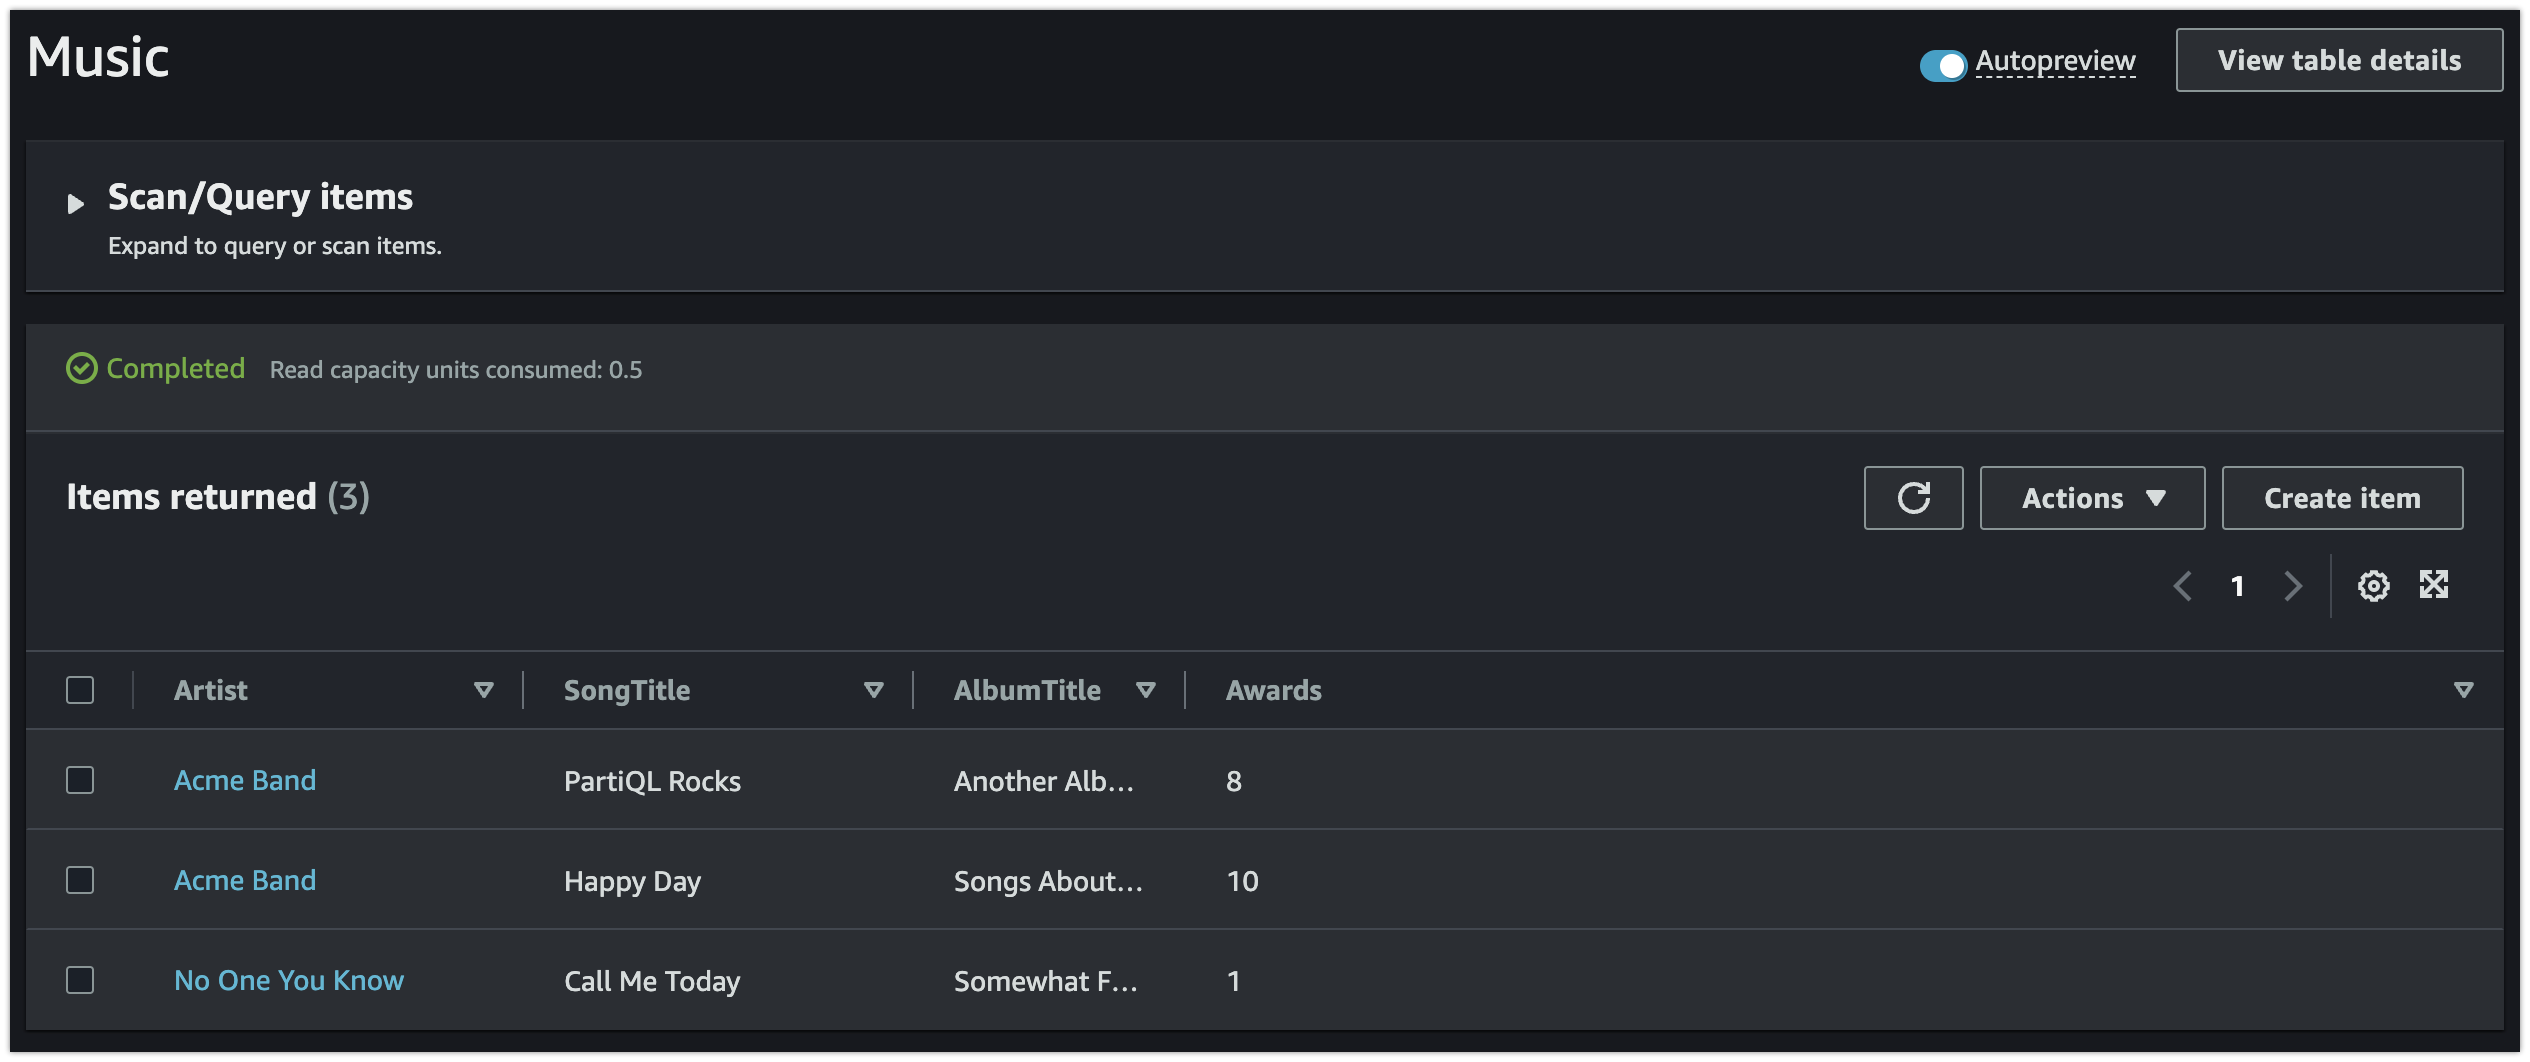
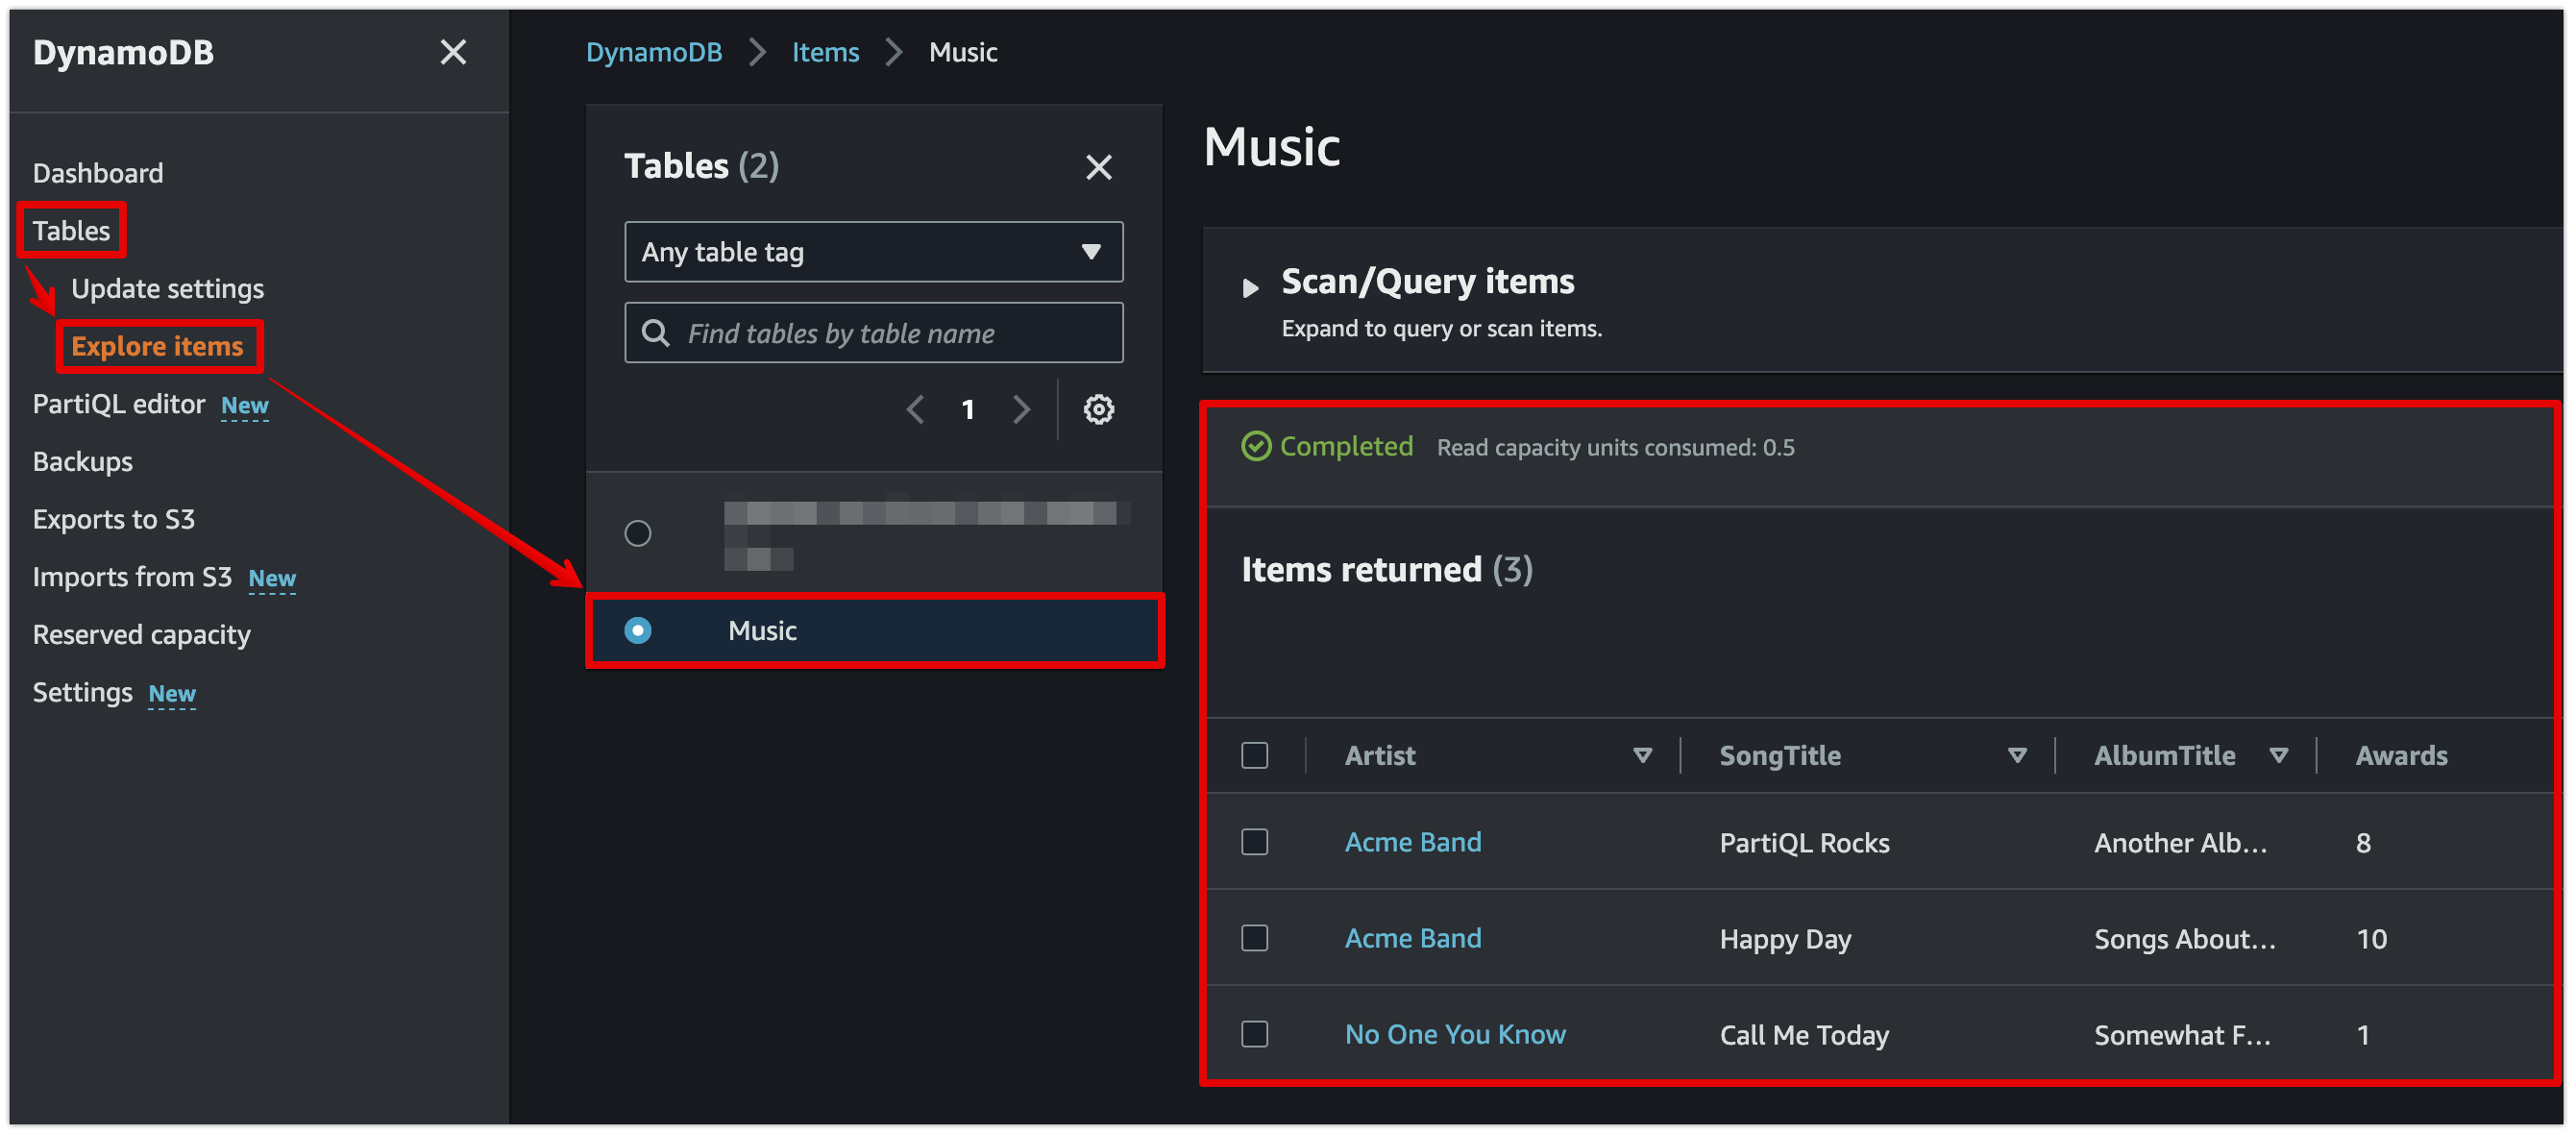
[콘솔] 데이터 읽기
- DynamoDB 콘솔 왼쪽 탐색 창에서 [Tables] - [Explore items] - [Music] 테이블 선택
이외 데이터 업데이트, 데이터 쿼리 방법 등은 AWS 공식 문서 내용을 참고하자.
[콘솔] 테이블 삭제
- 과금 방지를 위해 생성한 리소스를 삭제한다.

backend.tf 코드 업데이트
cat <<EOT > backend.tf
provider "aws" {
  region = "ap-northeast-2"
}

# 버킷명은 모든 AWS 리전의 모든 AWS 계정에서 고유해야 한다.
resource "aws_s3_bucket" "mys3bucket" {
  bucket = "jinju-tf-study-tfstate"
}

# 코드 이력을 관리하기 위해 상태 파일의 버전 관리를 활성화한다.
# Enable versioning so you can see the full revision history of your state files
resource "aws_s3_bucket_versioning" "mys3bucket_versioning" {
  bucket = aws_s3_bucket.mys3bucket.id
  versioning_configuration {
    status = "Enabled"
  }
}
# DynamoDB 잠금을 사용하기 위해서는 LockID 라는 기본 키가 있는 테이블을 생성해야 함.
resource "aws_dynamodb_table" "mydynamodbtable" {
  name         = "jinju-terraform-locks"
  billing_mode = "PAY_PER_REQUEST"
  hash_key     = "LockID"

  attribute {
    name = "LockID"
    type = "S"
  }
}

output "s3_bucket_arn" {
  value       = aws_s3_bucket.mys3bucket.arn
  description = "The ARN of the S3 bucket"
}

output "dynamodb_table_name" {
  value       = aws_dynamodb_table.mydynamodbtable.name
  description = "The name of the DynamoDB table"
}
EOT
# 배포
terraform init && terraform plan && terraform apply -auto-approve
terraform state list
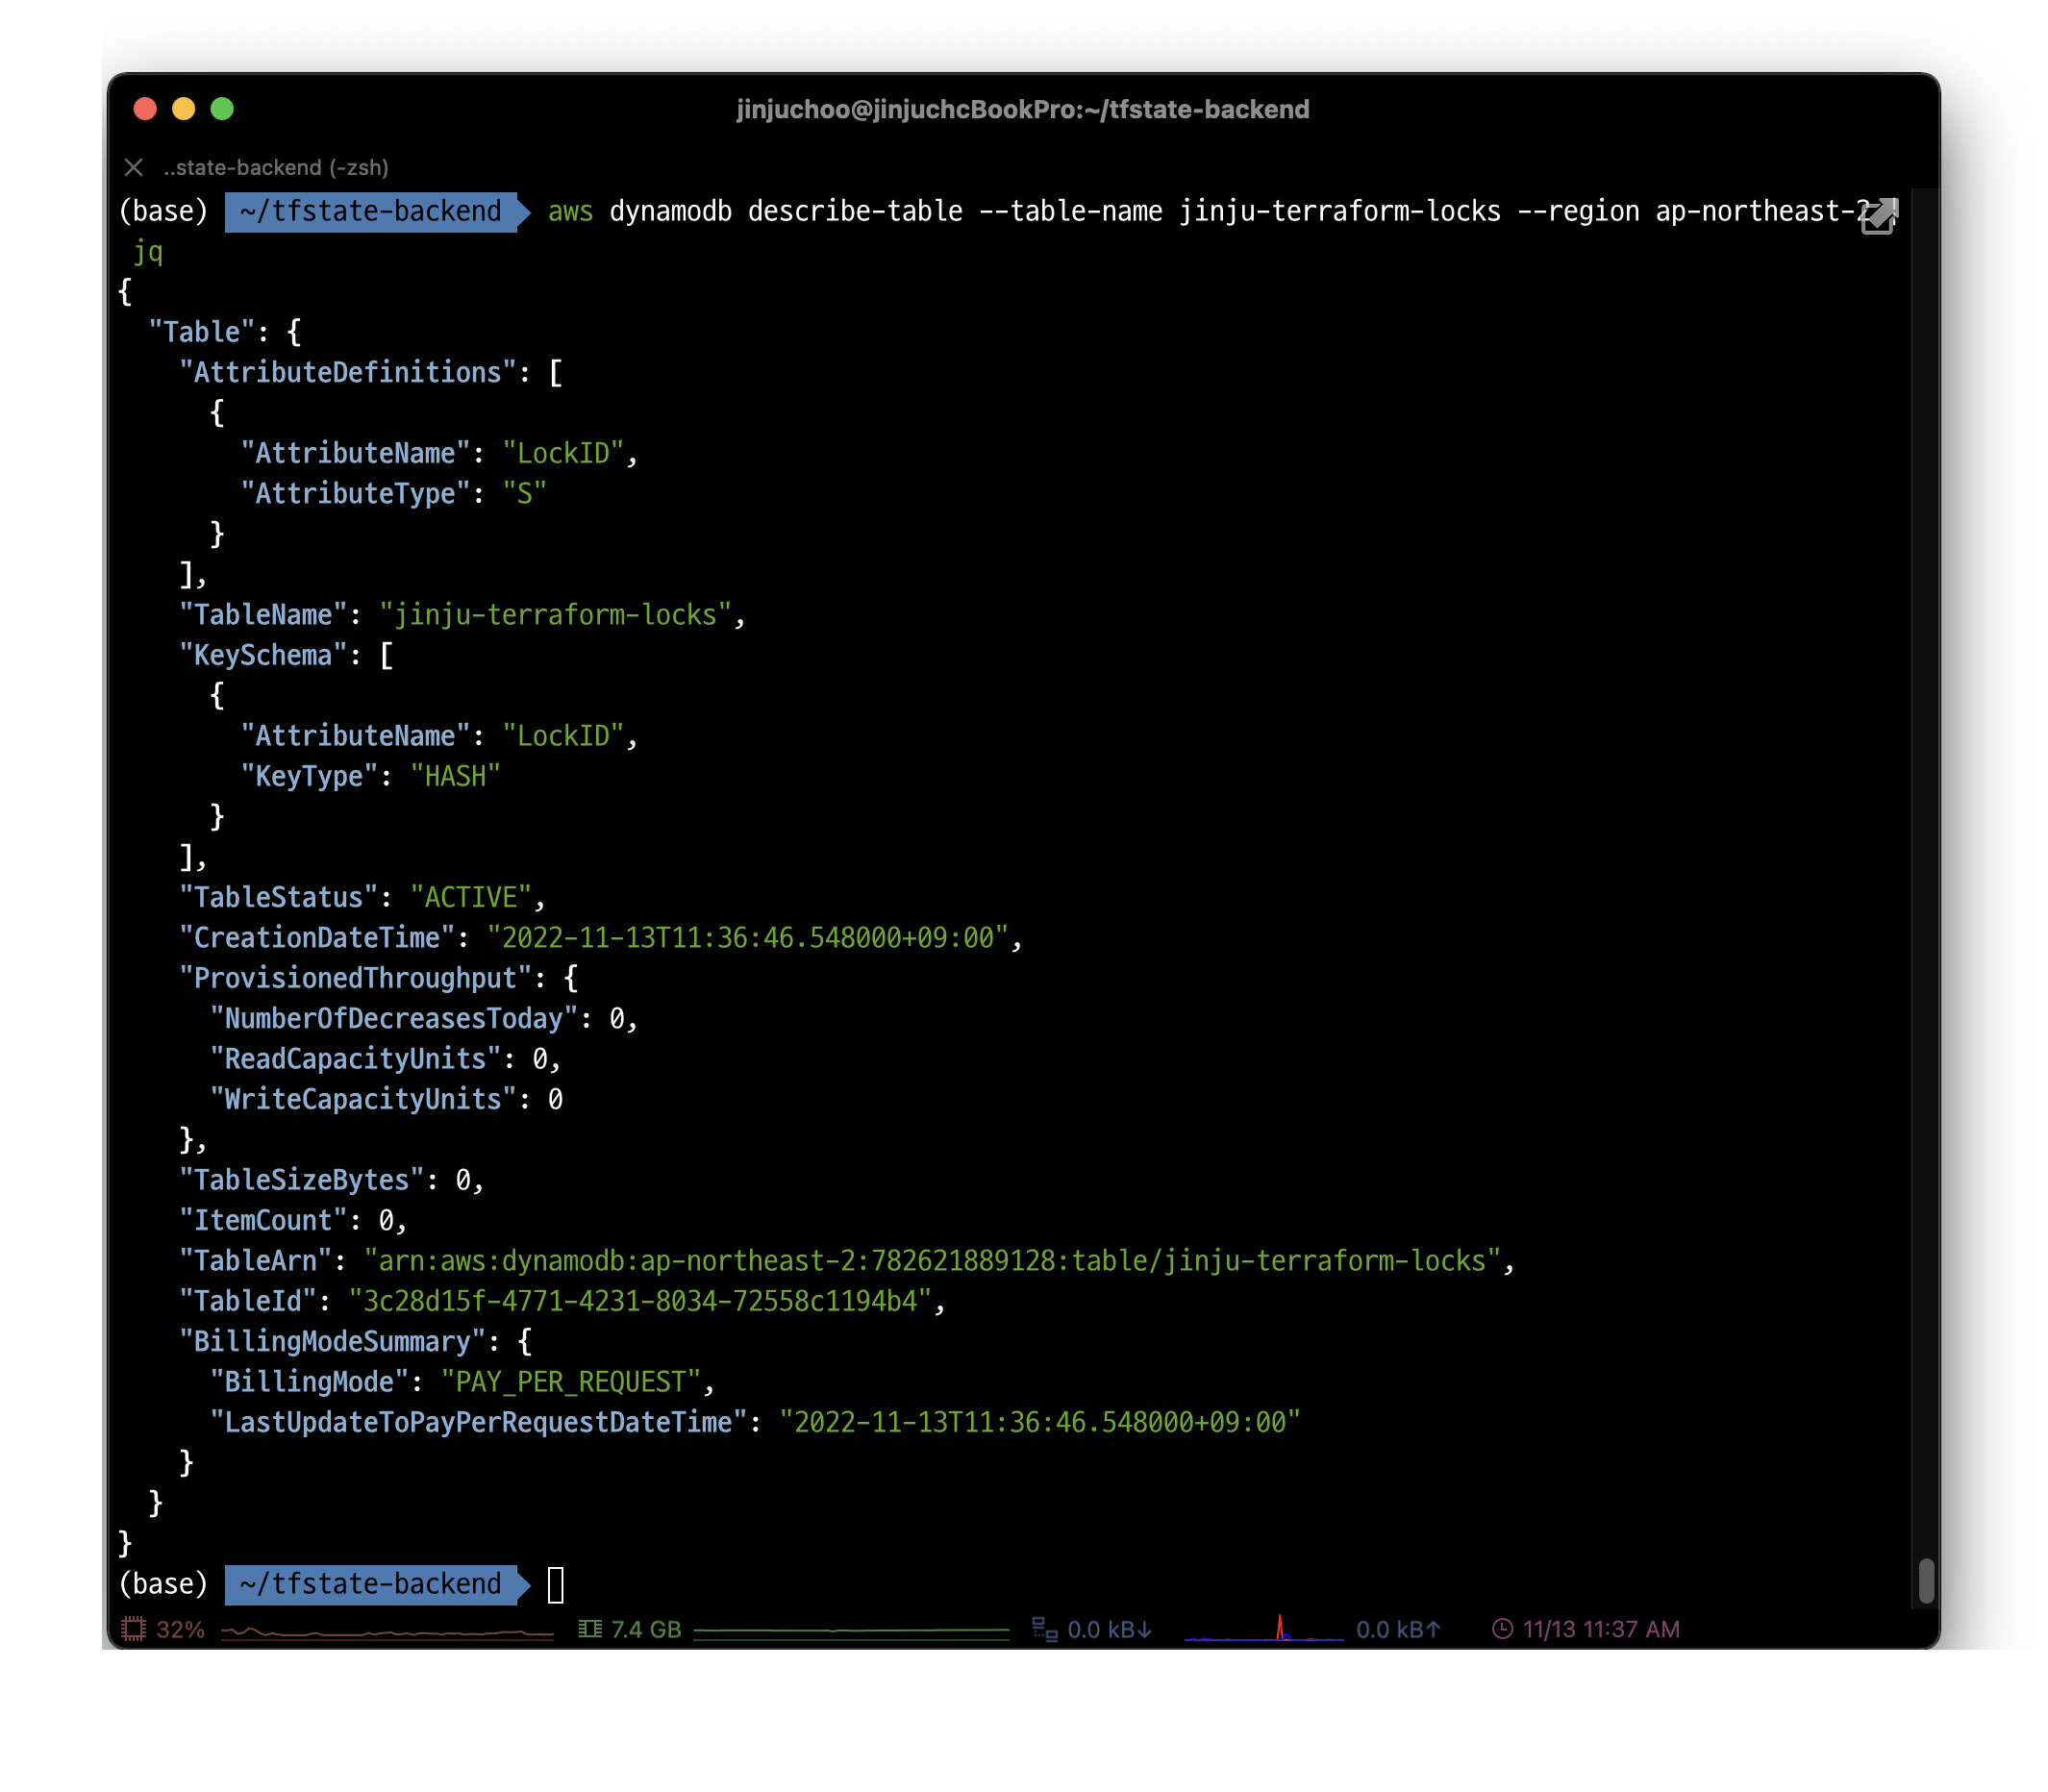
# DynamoDB 테이블 생성 확인
aws dynamodb describe-table --table-name jinju-terraform-locks | jq
aws dynamodb describe-table --table-name jinju-terraform-locks --output table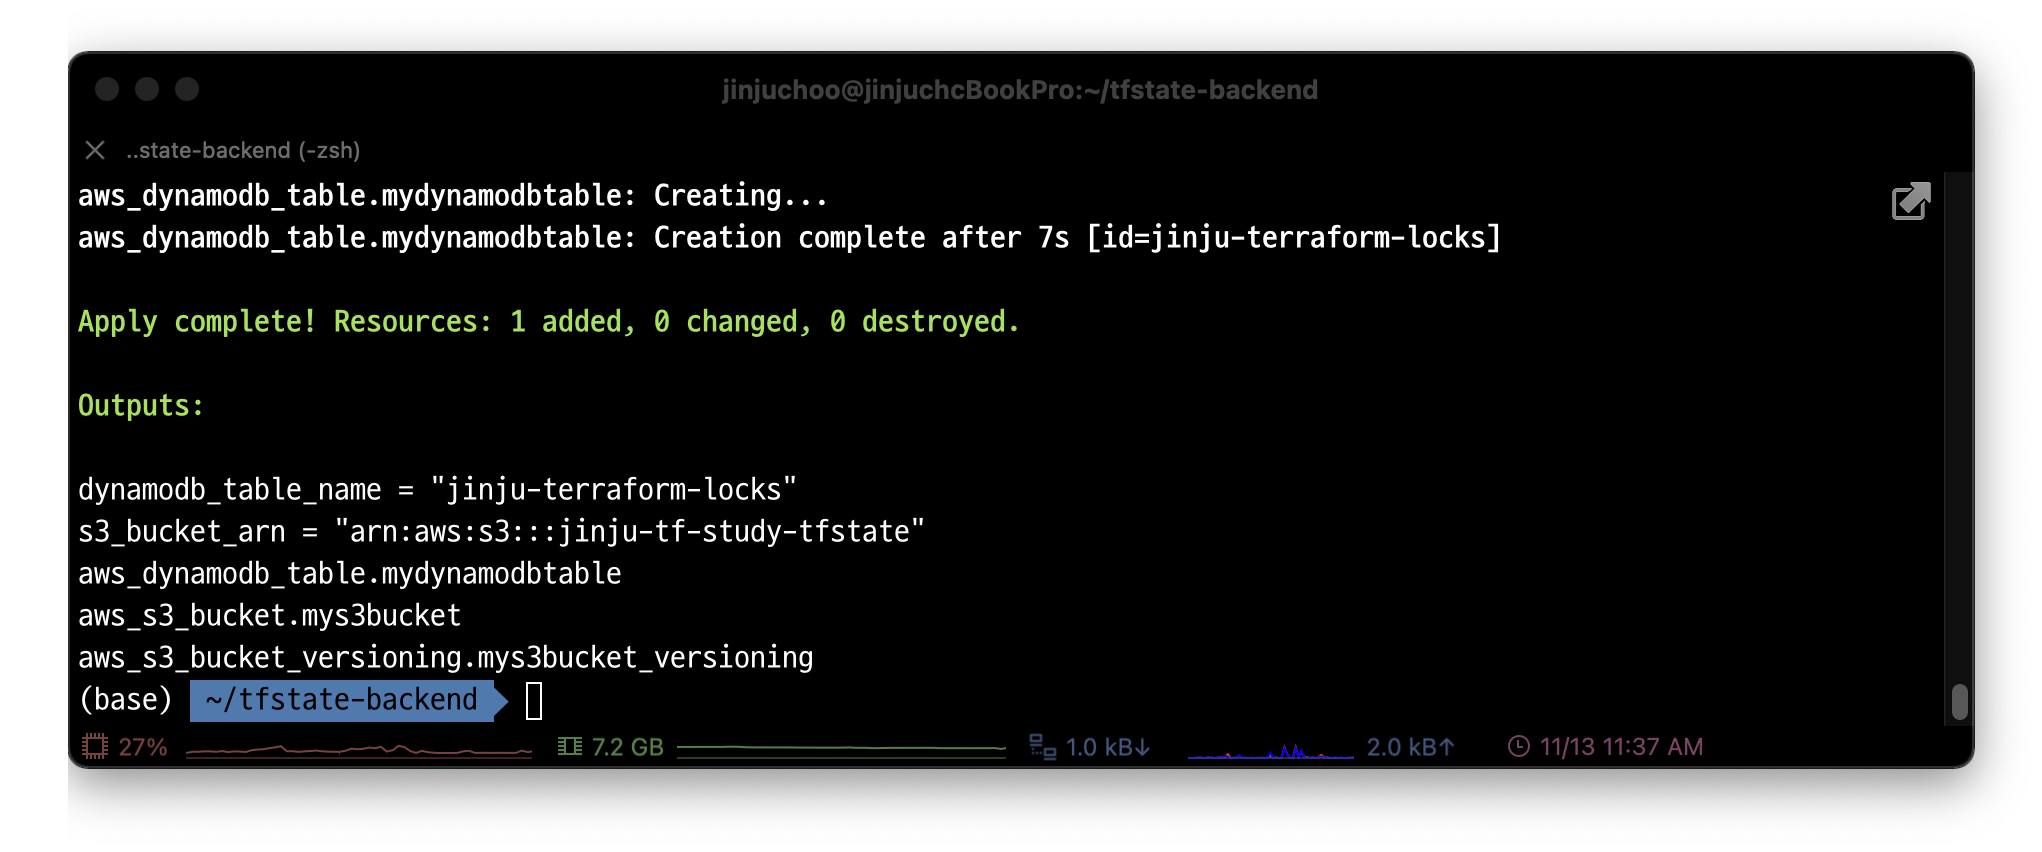
# 리소스 삭제
terraform destroy -auto-approve
상태 파일 격리
- 위와 같이 원격 백엔드와 잠금을 같이 사용하면 협업에는 문제가 생기지 않지만 '격리'라는 문제는 아직 남아있다. 즉 운영/스테이징/개발 환경을 단 하나의 테라폼 파일 또는 같은 폴더에 정의하게 될 경우 모든 테라폼 상태가 하나의 파일에 저장되므로 실수로 전체를 날려버릴 수 있다.
- 테라폼에서 상태 파일을 격리하는 두 가지 방법은 다음과 같다.
- 작업 공간을 통한 격리: 동일한 구성을 빠르고 격리된 테스트 환경에 적합.
- 파일 레이아웃을 이용한 격리: 보다 강력하게 분리해야 하는 운영 환경에 적합.
작업 공간을 통한 격리
- Terraform workspace를 통해 테라폼 상태를 별도의 이름을 가진 여러 개의 작업 공간에 저장할 수 있다.
- 테라폼은 'default'라는 기본 작업 공간에서 시작하며 작업 공간을 따로 지정하지 않으면 기본 작업 공간을 사용한다.
- 새 작업 공간을 만들거나 작업 공간을 전환하려면 terraform worksapce 명령을 사용한다.
terraform workspace show: 현재 작업 공간 위치 확인terraform workspace new: 새 작업 공간 생성terraform workspace list: 현재 생성된 작업 공간 목록terraform workspace select: 작업 공간 전환
작업 공간 사용시의 단점
- 모든 작업 공간의 상태 파일은 동일한 백엔드(예를 들어 동일한 S3 버킷)에 저장된다. 즉 모든 작업 공간이 같은 인증 메커니즘을 사용한다.
- terraform workspace 명령을 실행하지 않으면 코드나 터미널에 작업 공간에 대한 정보가 표시되지 않는다.
- 이전 항목 2개를 결합하면 어느 작업 공간에 있는지 보이지 않기 때문에 실제 작업시 휴먼 에러가 발생할 수 있다.
따라서 환경을 적절하게 격리하려면 아래 파일 레이아웃 방식을 사용하는 것이 좋다.
파일 레이아웃을 이용한 격리
- 격리 수준을 더 높이려면 스테이징, 프로덕션 등 환경과 VPC, 서비스, 데이터베이스 같은 각 구성 요소를 별도의 테라폼 폴더 혹은 별도의 상태 파일에서 사용하는 것이 좋다.
실습 2
- 다음과 같은 형상이 되도록 구성할 것이다. 자세한 추가 설명은 추후 덧붙이겠다.
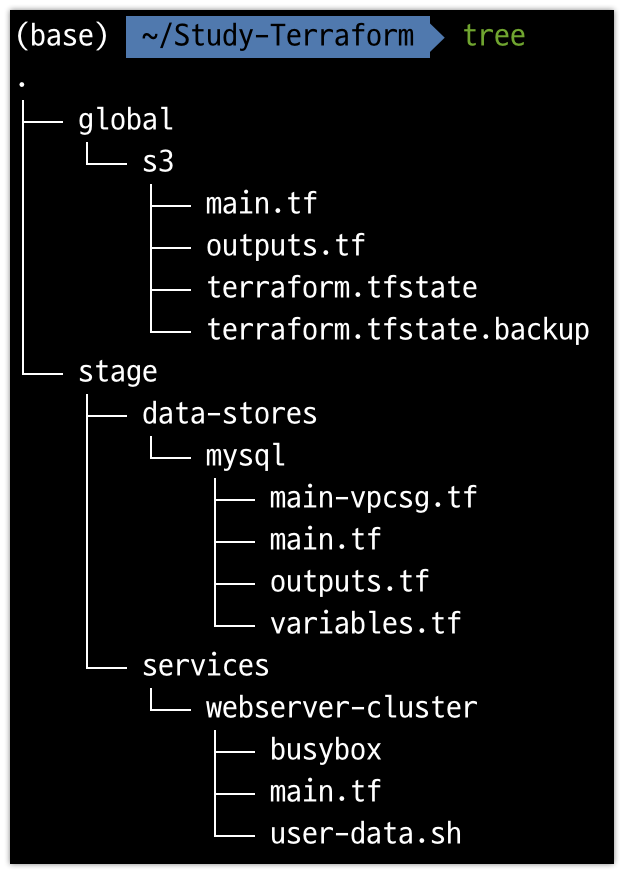
백엔드 리소스 생성
-
global/s3/main.tf ..
# 디렉터리 생성
mkdir -p global/s3 && cd global/s3
# 코드 파일 생성
cat <<EOT > main.tf
provider "aws" {
  region = "ap-northeast-2"
}

resource "aws_s3_bucket" "mys3bucket" {
  bucket = "jinju-s3-tfstate-week3-files"
}

# Enable versioning so you can see the full revision history of your state files
resource "aws_s3_bucket_versioning" "mys3bucket_versioning" {
  bucket = aws_s3_bucket.mys3bucket.id
  versioning_configuration {
    status = "Enabled"
  }
}

resource "aws_dynamodb_table" "mydynamodbtable" {
  name         = "jinju-terraform-locks-week3-files"
  billing_mode = "PAY_PER_REQUEST"
  hash_key     = "LockID"

  attribute {
    name = "LockID"
    type = "S"
  }
}
EOT

cat <<EOT > outputs.tf
output "s3_bucket_arn" {
  value       = aws_s3_bucket.mys3bucket.arn
  description = "The ARN of the S3 bucket"
}

output "dynamodb_table_name" {
  value       = aws_dynamodb_table.mydynamodbtable.name
  description = "The name of the DynamoDB table"
}
EOT
# 배포 terraform init && terraform plan && terraform apply -auto-approve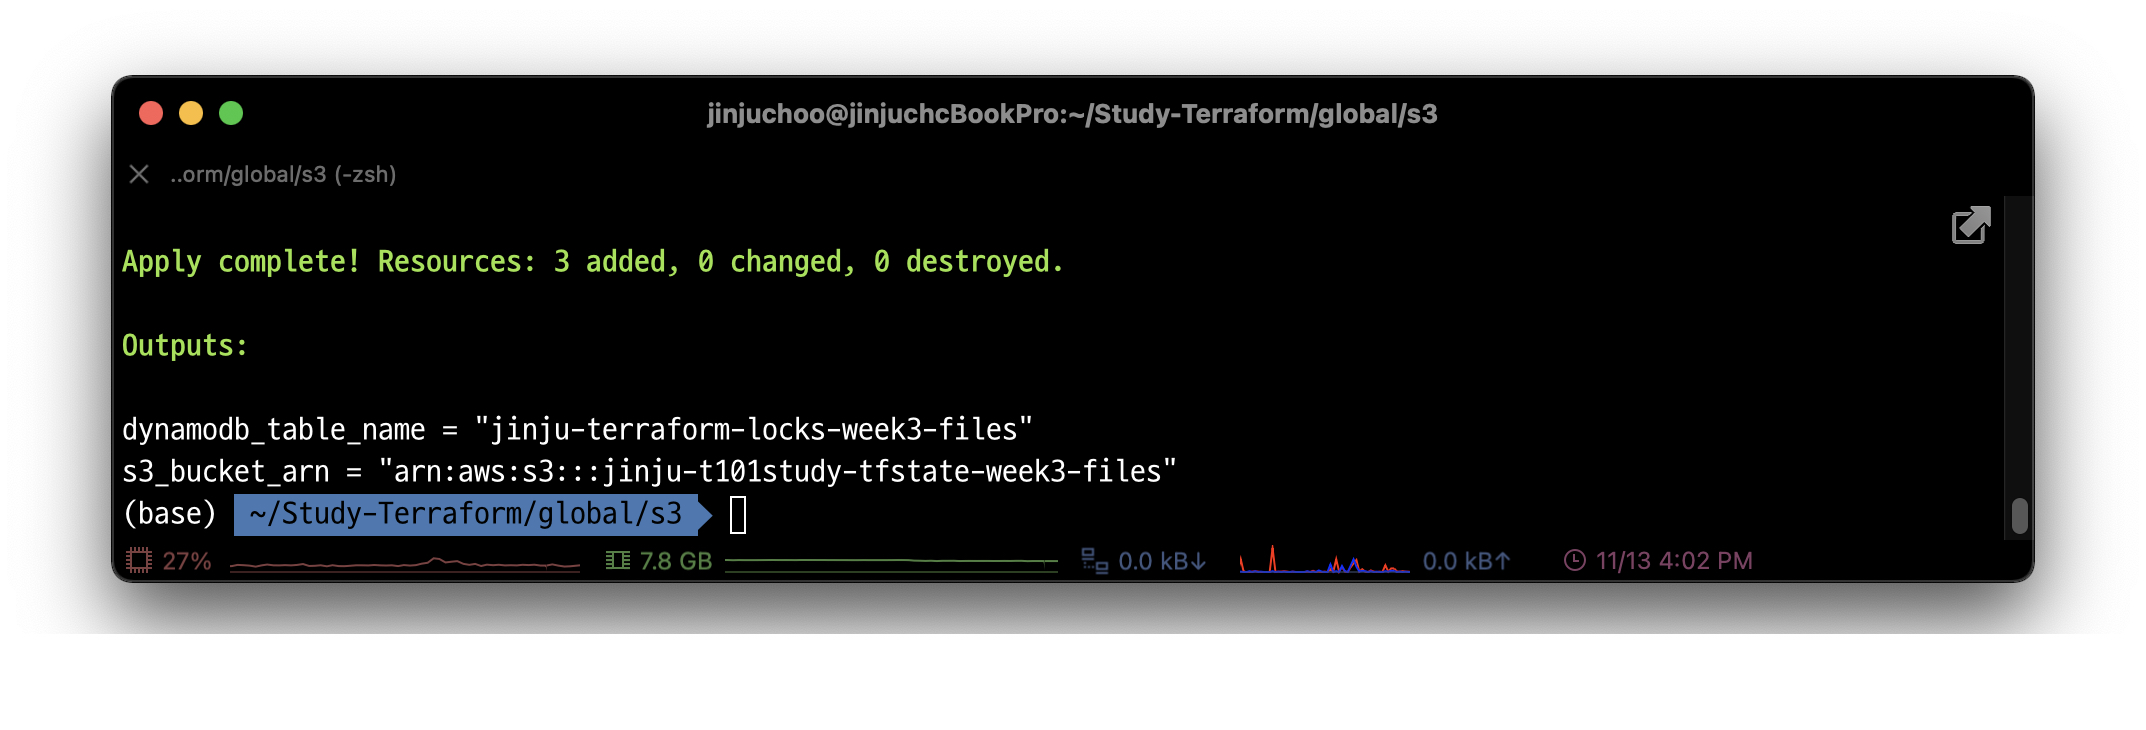
# 배포 확인
terraform state list
aws s3 ls
aws dynamodb list-tables --output text

# 기존 작업 디렉터리로 이동
cd ../..
RDS 생성
-
stage/data-stores/mysql/main.tf ..
# 디렉터리 생성
mkdir -p stage/data-stores/mysql && cd stage/data-stores/mysql
# VPC & 보안그룹 코드 파일 생성: main-vpcsg.tf
cat <<EOT > main-vpcsg.tf
terraform {
  backend "s3" {
    bucket = "jinju-s3-tfstate-week3-files"
    key    = "stage/data-stores/mysql/terraform.tfstate"
    region = "ap-northeast-2"
    dynamodb_table = "jinju-terraform-locks-week3-files"
  }
}

provider "aws" {
  region  = "ap-northeast-2"
}

resource "aws_vpc" "myvpc" {
  cidr_block       = "10.10.0.0/16"
  enable_dns_hostnames = true

  tags = {
    Name = "jinju-tf-study-vpc"
  }
}

resource "aws_subnet" "mysubnet3" {
  vpc_id     = aws_vpc.myvpc.id
  cidr_block = "10.10.3.0/24"

  availability_zone = "ap-northeast-2a"

  tags = {
    Name = "jinju-tf-study-subnet3"
  }
}

resource "aws_subnet" "mysubnet4" {
  vpc_id     = aws_vpc.myvpc.id
  cidr_block = "10.10.4.0/24"

  availability_zone = "ap-northeast-2c"

  tags = {
    Name = "jinju-tf-study-subnet4"
  }
}

resource "aws_route_table" "myrt2" {
  vpc_id = aws_vpc.myvpc.id

  tags = {
    Name = "jinju-tf-study-rt2"
  }
}

resource "aws_route_table_association" "myrtassociation3" {
  subnet_id      = aws_subnet.mysubnet3.id
  route_table_id = aws_route_table.myrt2.id
}

resource "aws_route_table_association" "myrtassociation4" {
  subnet_id      = aws_subnet.mysubnet4.id
  route_table_id = aws_route_table.myrt2.id
}

resource "aws_security_group" "mysg2" {
  vpc_id      = aws_vpc.myvpc.id
  name        = "jinju-tf-study-SG-RDS"
  description = "jinju T101 Study SG - RDS"
}

resource "aws_security_group_rule" "rdssginbound" {
  type              = "ingress"
  from_port         = 0
  to_port           = 3389
  protocol          = "tcp"
  cidr_blocks       = ["0.0.0.0/0"]
  security_group_id = aws_security_group.mysg2.id
}

resource "aws_security_group_rule" "rdssgoutbound" {
  type              = "egress"
  from_port         = 0
  to_port           = 0
  protocol          = "-1"
  cidr_blocks       = ["0.0.0.0/0"]
  security_group_id = aws_security_group.mysg2.id
}
EOT
# 백엔드 적용 및 VPC 등 배포 terraform init -force-copy && terraform plan && terraform apply -auto-approve terraform state list엥? 잘 나가다 갑자기 다음과 같은 오류가 출력되었다. - 참고
현재 위치에 존재하는 .terraform 폴더를 지우고 다시 init을 실행하니 정상 작동 및 배포되었다.│ Error: Error inspecting states in the "s3" backend: │ S3 bucket does not exist. │ │ The referenced S3 bucket must have been previously created. If the S3 bucket │ was created within the last minute, please wait for a minute or two and try │ again. │ │ Error: NoSuchBucket: The specified bucket does not exist │ status code: 404, request id: C0H87VKBF2VB3VPF, host id: PMCX2qmljtcSCUV5BznEppG6LAhLv7UDvsFEJEPsElN3FQbaY6IVq+qPMwSmOELh7/h1s1toQD4= │ │ │ Prior to changing backends, Terraform inspects the source and destination │ states to determine what kind of migration steps need to be taken, if any. │ Terraform failed to load the states. The data in both the source and the │ destination remain unmodified. Please resolve the above error and try again.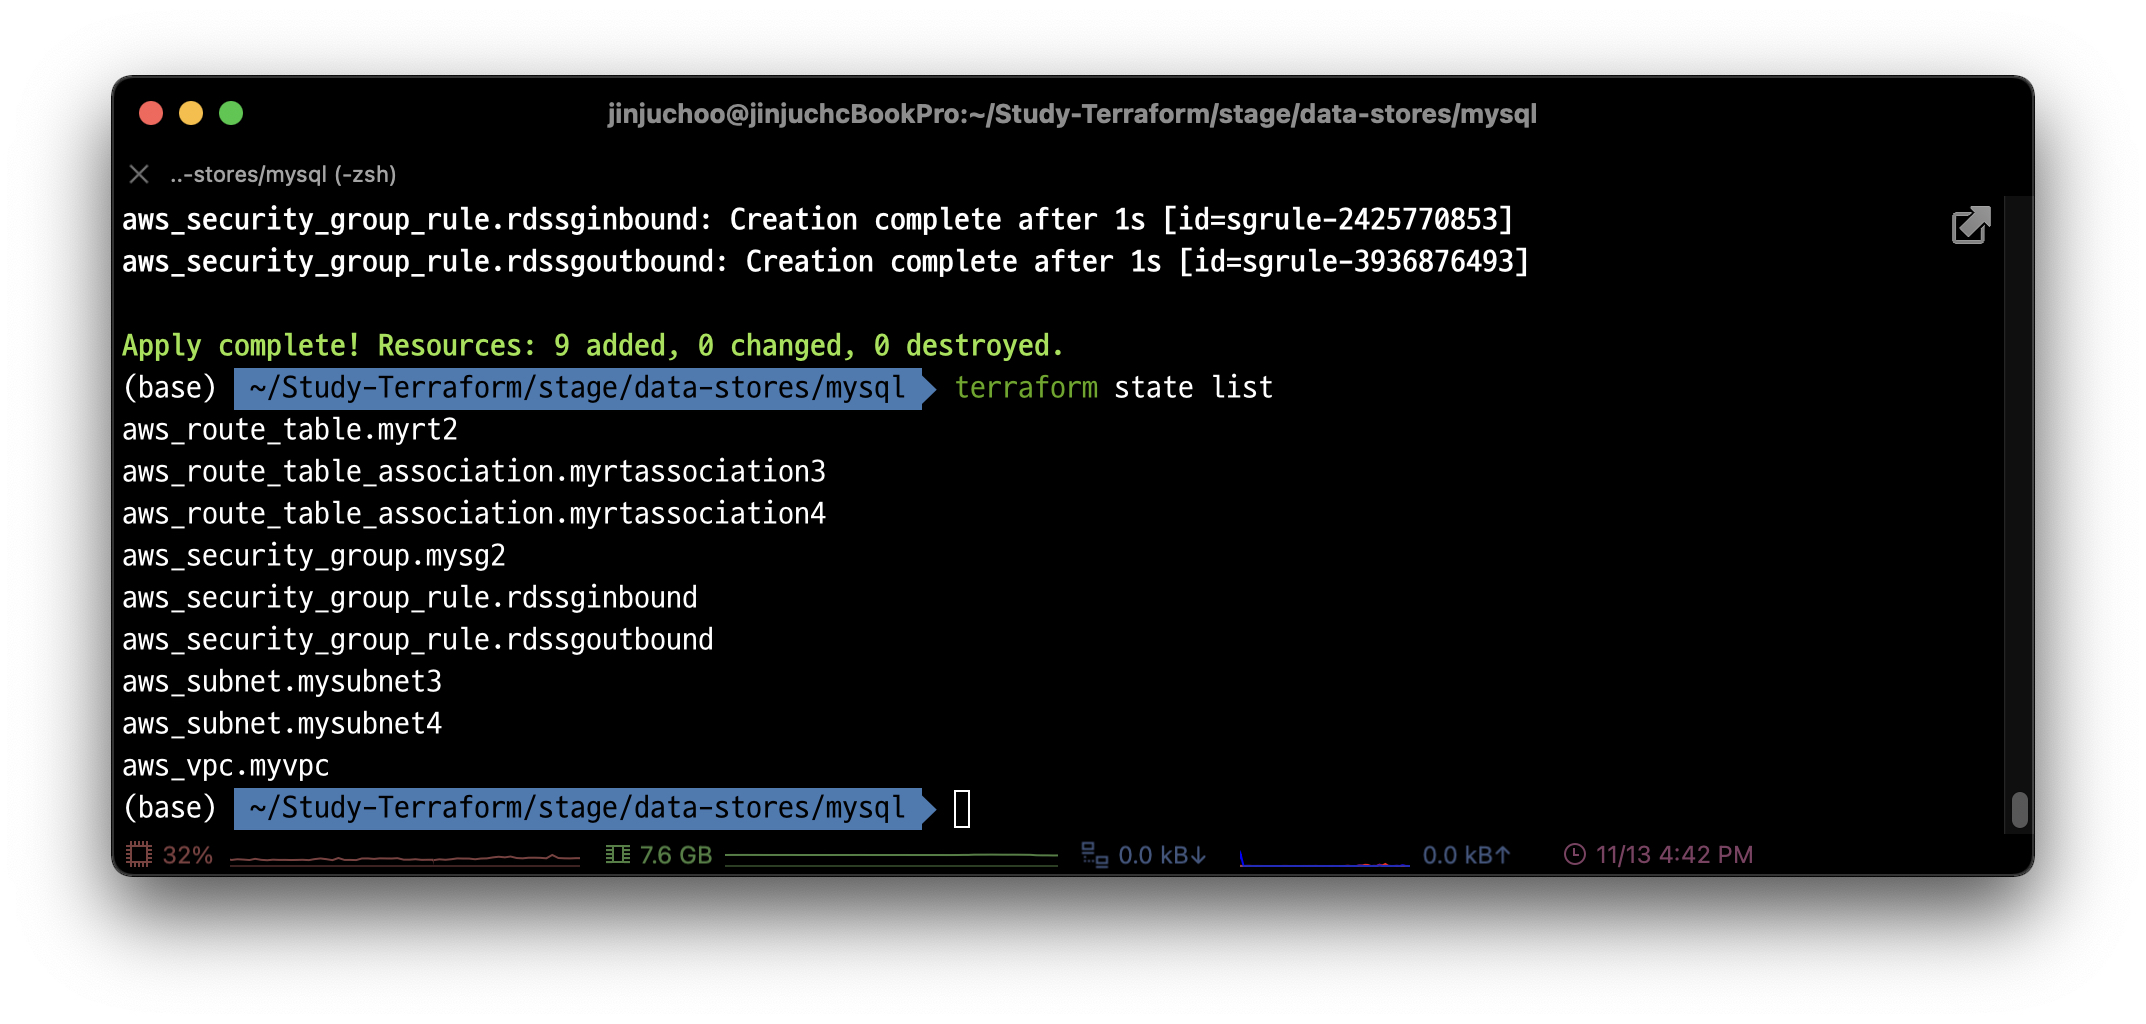
RDS 코드 파일 생성
-
main.tf
cat <<EOT > main.tf
resource "aws_db_subnet_group" "mydbsubnet" {
  name       = "jinjudbsubnetgroup"
  subnet_ids = [aws_subnet.mysubnet3.id, aws_subnet.mysubnet4.id]

  tags = {
    Name = "Jinju DB subnet group"
  }
}

resource "aws_db_instance" "myrds" {
  identifier_prefix      = "jinju"
  engine                 = "mysql"
  allocated_storage      = 10
  instance_class         = "db.t2.micro"
  db_subnet_group_name   = aws_db_subnet_group.mydbsubnet.name
  vpc_security_group_ids = [aws_security_group.mysg2.id]
  skip_final_snapshot    = true

  db_name                = var.db_name
  username               = var.db_username
  password               = var.db_password
}
EOT
output 코드 파일 생성
-
outputs.tf
cat <<EOT > outputs.tf
output "address" {
  value       = aws_db_instance.myrds.address
  description = "Connect to the database at this endpoint"
}

output "port" {
  value       = aws_db_instance.myrds.port
  description = "The port the database is listening on"
}

output "vpcid" {
  value       = aws_vpc.myvpc.id
  description = "Jinju VPC Id"
}
EOT
변수 코드 파일 생성
-
variables.tf
cat <<EOT > variables.tf
# ---------------------------------------------------------------------------------------------------------------------
# REQUIRED PARAMETERS
# You must provide a value for each of these parameters.
# ---------------------------------------------------------------------------------------------------------------------

variable "db_username" {
  description = "The username for the database"
  type        = string
  sensitive   = true
}

variable "db_password" {
  description = "The password for the database"
  type        = string
  sensitive   = true
}

# ---------------------------------------------------------------------------------------------------------------------
# OPTIONAL PARAMETERS
# These parameters have reasonable defaults.
# ---------------------------------------------------------------------------------------------------------------------

variable "db_name" {
  description = "The name to use for the database"
  type        = string
  default     = "tstudydb"
}
EOT
RDS 배포
# MacOS 로컬 변수 입력
export TF_VAR_db_username='cloudneta'
export TF_VAR_db_password='cloudnetaQ!'
export | grep TF_VAR 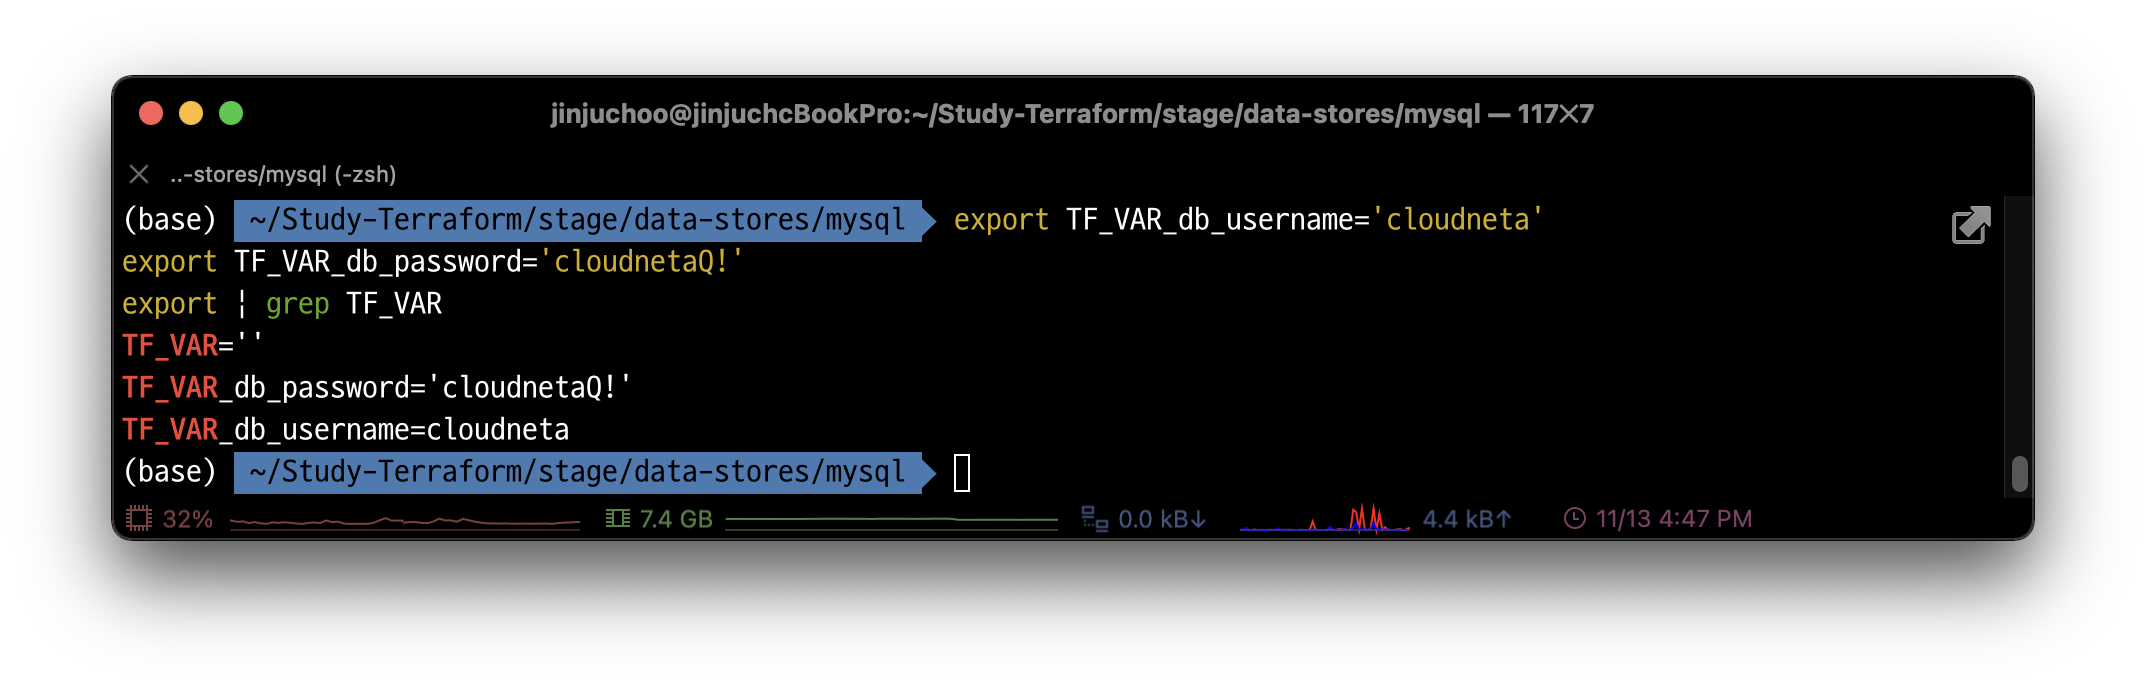 로컬의 환경 변수를 통해 시크릿 값을 테라폼에 전달하는 방법이다.
이 외에도 테라폼 데이터 소스를 사용하여 AWS 시크릿 매니저와 같은 시크릿 저장소에서 정보를 읽을 수도 있다.
- RDS 배포(최대 약 6분 소요)
terraform plan && terraform apply -auto-approve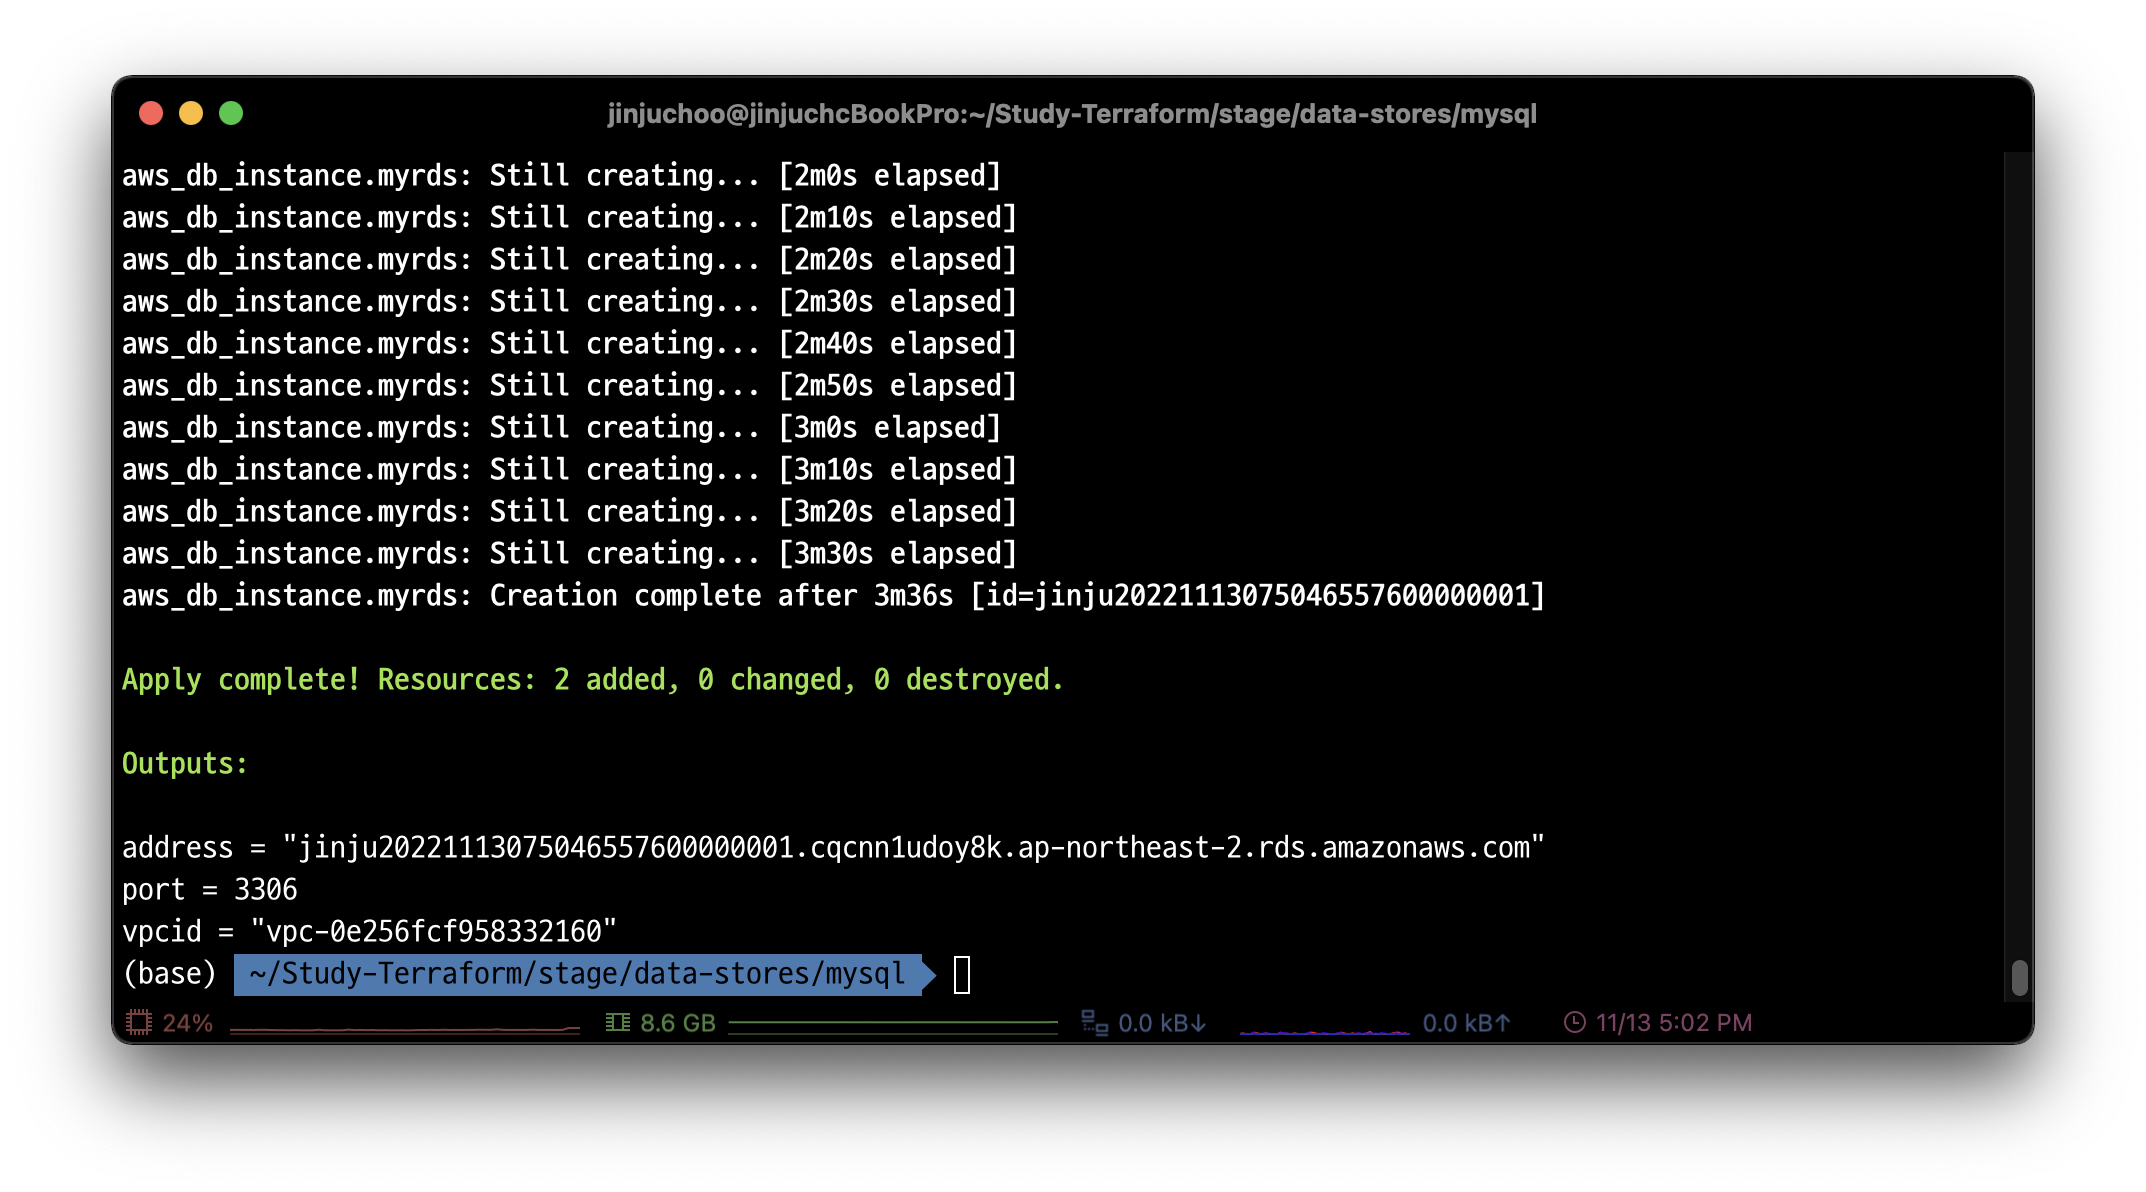
# 이전 디렉터리로 이동
cd ../../..
웹 서버 클러스터 생성
-
stage/services/webserver-cluster/main.tf ..
# 디렉터리 생성 및 이동 mkdir -p stage/services/webserver-cluster && cd stage/services/webserver-cluster -
terraform_remote_state 데이터 소스를 사용할 수 있게 설정 및 백엔드 설정과 EC2가 사용할 서브넷을 생성: main.tf
cat <<EOT > main.tf
terraform {
  backend "s3" {
    bucket = "jinju-s3-tfstate-week3-files"
    key    = "stage/services/webserver-cluster/terraform.tfstate"
    region = "ap-northeast-2"
    dynamodb_table = "jinju-terraform-locks-week3-files"
  }
}

provider "aws" {
  region  = "ap-northeast-2"
}

data "terraform_remote_state" "db" {
  backend = "s3"
  config = {
    bucket = "jinju-s3-tfstate-week3-files"
    key    = "stage/data-stores/mysql/terraform.tfstate"
    region = "ap-northeast-2"
  }
}

resource "aws_subnet" "mysubnet1" {
  vpc_id     = data.terraform_remote_state.db.outputs.vpcid
  cidr_block = "10.10.1.0/24"

  availability_zone = "ap-northeast-2a"

  tags = {
    Name = "jinju-tf-study-subnet1"
  }
}

resource "aws_subnet" "mysubnet2" {
  vpc_id     = data.terraform_remote_state.db.outputs.vpcid
  cidr_block = "10.10.2.0/24"

  availability_zone = "ap-northeast-2c"

  tags = {
    Name = "jinju-tf-study-subnet2"
  }
}

resource "aws_internet_gateway" "myigw" {
  vpc_id = data.terraform_remote_state.db.outputs.vpcid

  tags = {
    Name = "jinju-tf-study-igw"
  }
}

resource "aws_route_table" "myrt" {
  vpc_id = data.terraform_remote_state.db.outputs.vpcid

  tags = {
    Name = "jinju-tf-study-rt"
  }
}

resource "aws_route_table_association" "myrtassociation1" {
  subnet_id      = aws_subnet.mysubnet1.id
  route_table_id = aws_route_table.myrt.id
}

resource "aws_route_table_association" "myrtassociation2" {
  subnet_id      = aws_subnet.mysubnet2.id
  route_table_id = aws_route_table.myrt.id
}

resource "aws_route" "mydefaultroute" {
  route_table_id         = aws_route_table.myrt.id
  destination_cidr_block = "0.0.0.0/0"
  gateway_id             = aws_internet_gateway.myigw.id
}

resource "aws_security_group" "mysg" {
  vpc_id      = data.terraform_remote_state.db.outputs.vpcid
  name        = "jinju-tf-study-SG"
  description = "tf Study SG"
}

resource "aws_security_group_rule" "mysginbound" {
  type              = "ingress"
  from_port         = 8080
  to_port           = 8080
  protocol          = "tcp"
  cidr_blocks       = ["0.0.0.0/0"]
  security_group_id = aws_security_group.mysg.id
}

resource "aws_security_group_rule" "mysgoutbound" {
  type              = "egress"
  from_port         = 0
  to_port           = 0
  protocol          = "-1"
  cidr_blocks       = ["0.0.0.0/0"]
  security_group_id = aws_security_group.mysg.id
}
EOT
# 백엔드 설정 및 plan & apply terraform init -force-copy && terraform plan && terraform apply -auto-approve # 리소스 확인 terraform state list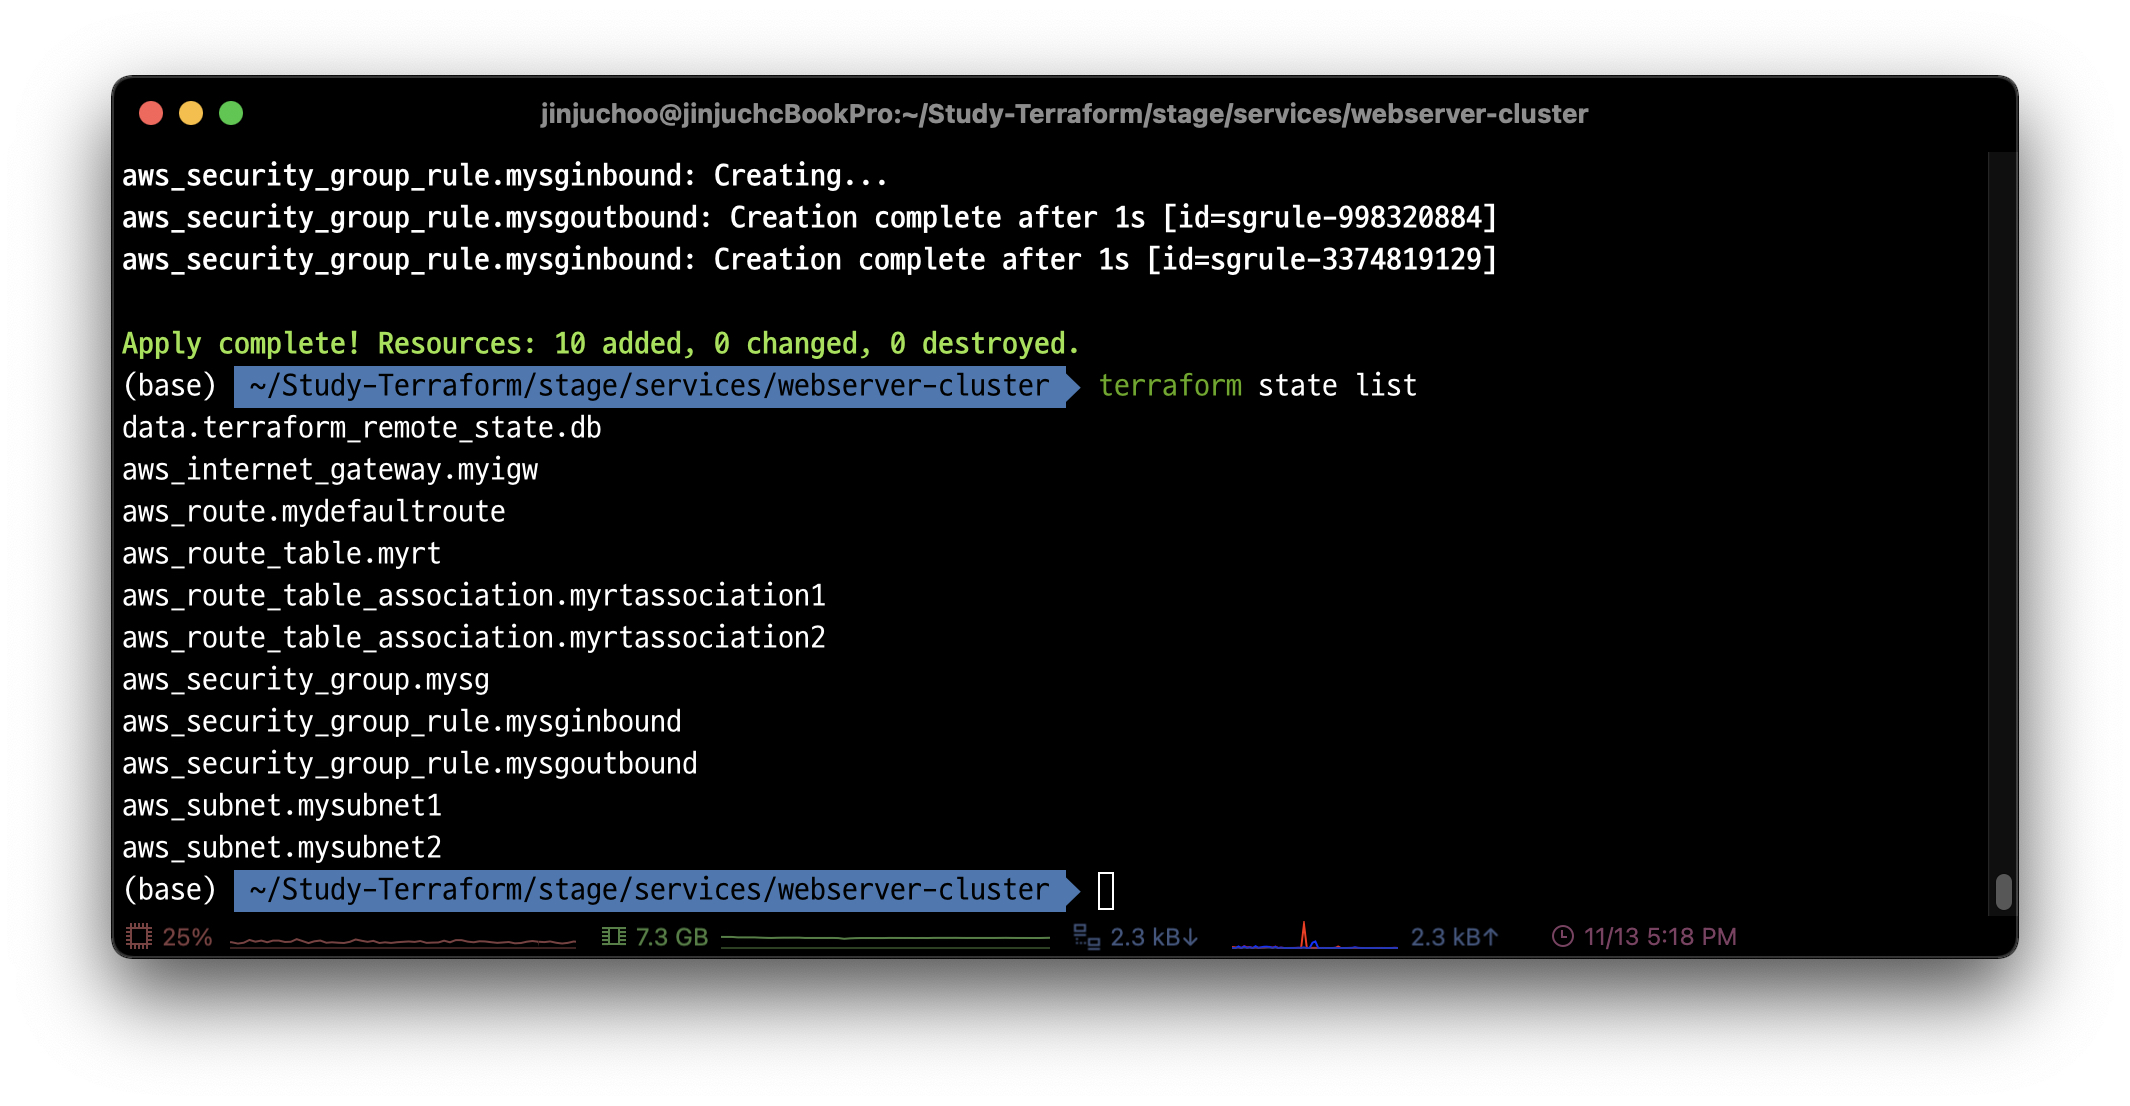
# User data 파일 생성
cat <<EOT > user-data.sh
#!/bin/bash
wget https://busybox.net/downloads/binaries/1.31.0-defconfig-multiarch-musl/busybox-x86_64
mv busybox-x86_64 busybox
chmod +x busybox

cat > index.html <<EOF
<h1>JINJU TF Study</h1>
<p>My RDS DB address: \${db_address}</p>
<p>My RDS DB port: \${db_port}</p>
EOF
nohup ./busybox httpd -f -p \${server_port} &
EOT
# 오토 스케일링 그룹 코드 내용 추가 cat <<EOT >> main.tf data "template_file" "user_data" { template = file("user-data.sh") vars = { server_port = 8080 db_address = data.terraform_remote_state.db.outputs.address db_port = data.terraform_remote_state.db.outputs.port } } data "aws_ami" "my_amazonlinux2" { most_recent = true filter { name = "owner-alias" values = ["amazon"] } filter { name = "name" values = ["amzn2-ami-hvm-*-x86_64-ebs"] } owners = ["amazon"] } resource "aws_launch_configuration" "mylauchconfig" { name_prefix = "jinju-lauchconfig-" image_id = data.aws_ami.my_amazonlinux2.id instance_type = "t2.micro" security_groups = [aws_security_group.mysg.id] associate_public_ip_address = true # Render the User Data script as a template user_data = templatefile("user-data.sh", { server_port = 8080 db_address = data.terraform_remote_state.db.outputs.address db_port = data.terraform_remote_state.db.outputs.port }) # Required when using a launch configuration with an auto scaling group. lifecycle { create_before_destroy = true } } resource "aws_autoscaling_group" "myasg" { name = "jinjuasg" launch_configuration = aws_launch_configuration.mylauchconfig.name vpc_zone_identifier = [aws_subnet.mysubnet1.id, aws_subnet.mysubnet2.id] min_size = 2 max_size = 10 tag { key = "Name" value = "jinju-tf-study-asg" propagate_at_launch = true } } EOT# 배포 및 확인 terraform init -upgrade terraform plan && terraform apply -auto-approve# ALB 코드 내용 추가 cat <<EOT >> main.tf resource "aws_lb" "myalb" { name = "jinju-tf-study-alb" load_balancer_type = "application" subnets = [aws_subnet.mysubnet1.id, aws_subnet.mysubnet2.id] security_groups = [aws_security_group.mysg.id] tags = { Name = "jinju-tf-study-alb" } } resource "aws_lb_listener" "myhttp" { load_balancer_arn = aws_lb.myalb.arn port = 8080 protocol = "HTTP" # By default, return a simple 404 page default_action { type = "fixed-response" fixed_response { content_type = "text/plain" message_body = "404: page not found" status_code = 404 } } } resource "aws_lb_target_group" "myalbtg" { name = "jinju-tf-study-alb-tg" port = 8080 protocol = "HTTP" vpc_id = data.terraform_remote_state.db.outputs.vpcid health_check { path = "/" protocol = "HTTP" matcher = "200-299" interval = 5 timeout = 3 healthy_threshold = 2 unhealthy_threshold = 2 } } resource "aws_lb_listener_rule" "myalbrule" { listener_arn = aws_lb_listener.myhttp.arn priority = 100 condition { path_pattern { values = ["*"] } } action { type = "forward" target_group_arn = aws_lb_target_group.myalbtg.arn } } output "myalb_dns" { value = aws_lb.myalb.dns_name description = "The DNS Address of the ALB" } EOT# ASG 코드 내용 중간에 직접 아래 내용 2줄 추가 # 코드 파일 편집 vi main.tf --------------------- resource "aws_autoscaling_group" "myasg" { health_check_type = "ELB" target_group_arns = [aws_lb_target_group.myalbtg.arn] ...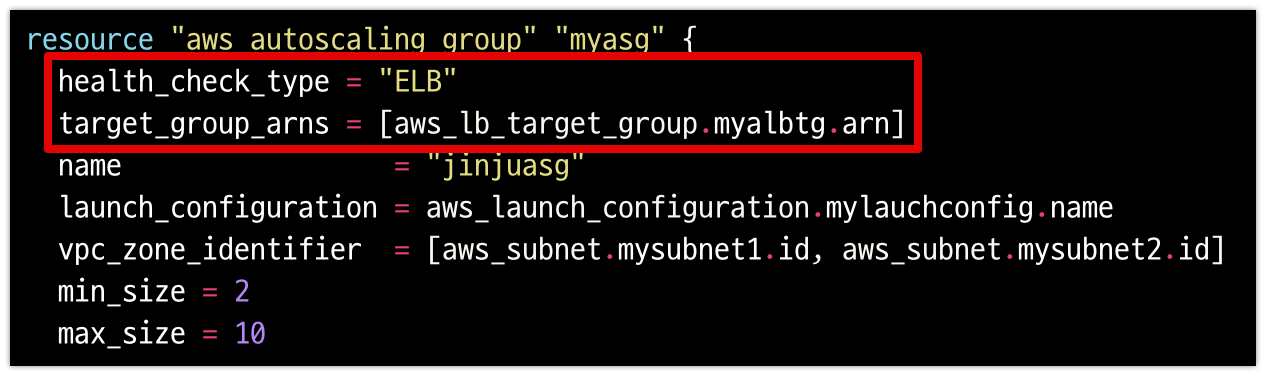
# 배포 및 접속 확인: curl 혹은 웹 브라우저에서 접속 확인
terraform plan && terraform apply -auto-approve

# ALB DNS주소로 curl 접속 확인
ALBDNS=$(terraform output -raw myalb_dns)
while true; do curl --connect-timeout 1  http://$ALBDNS:8080 ; echo; echo "------------------------------"; date; sleep 1; done
curl -s http://$ALBDNS:8080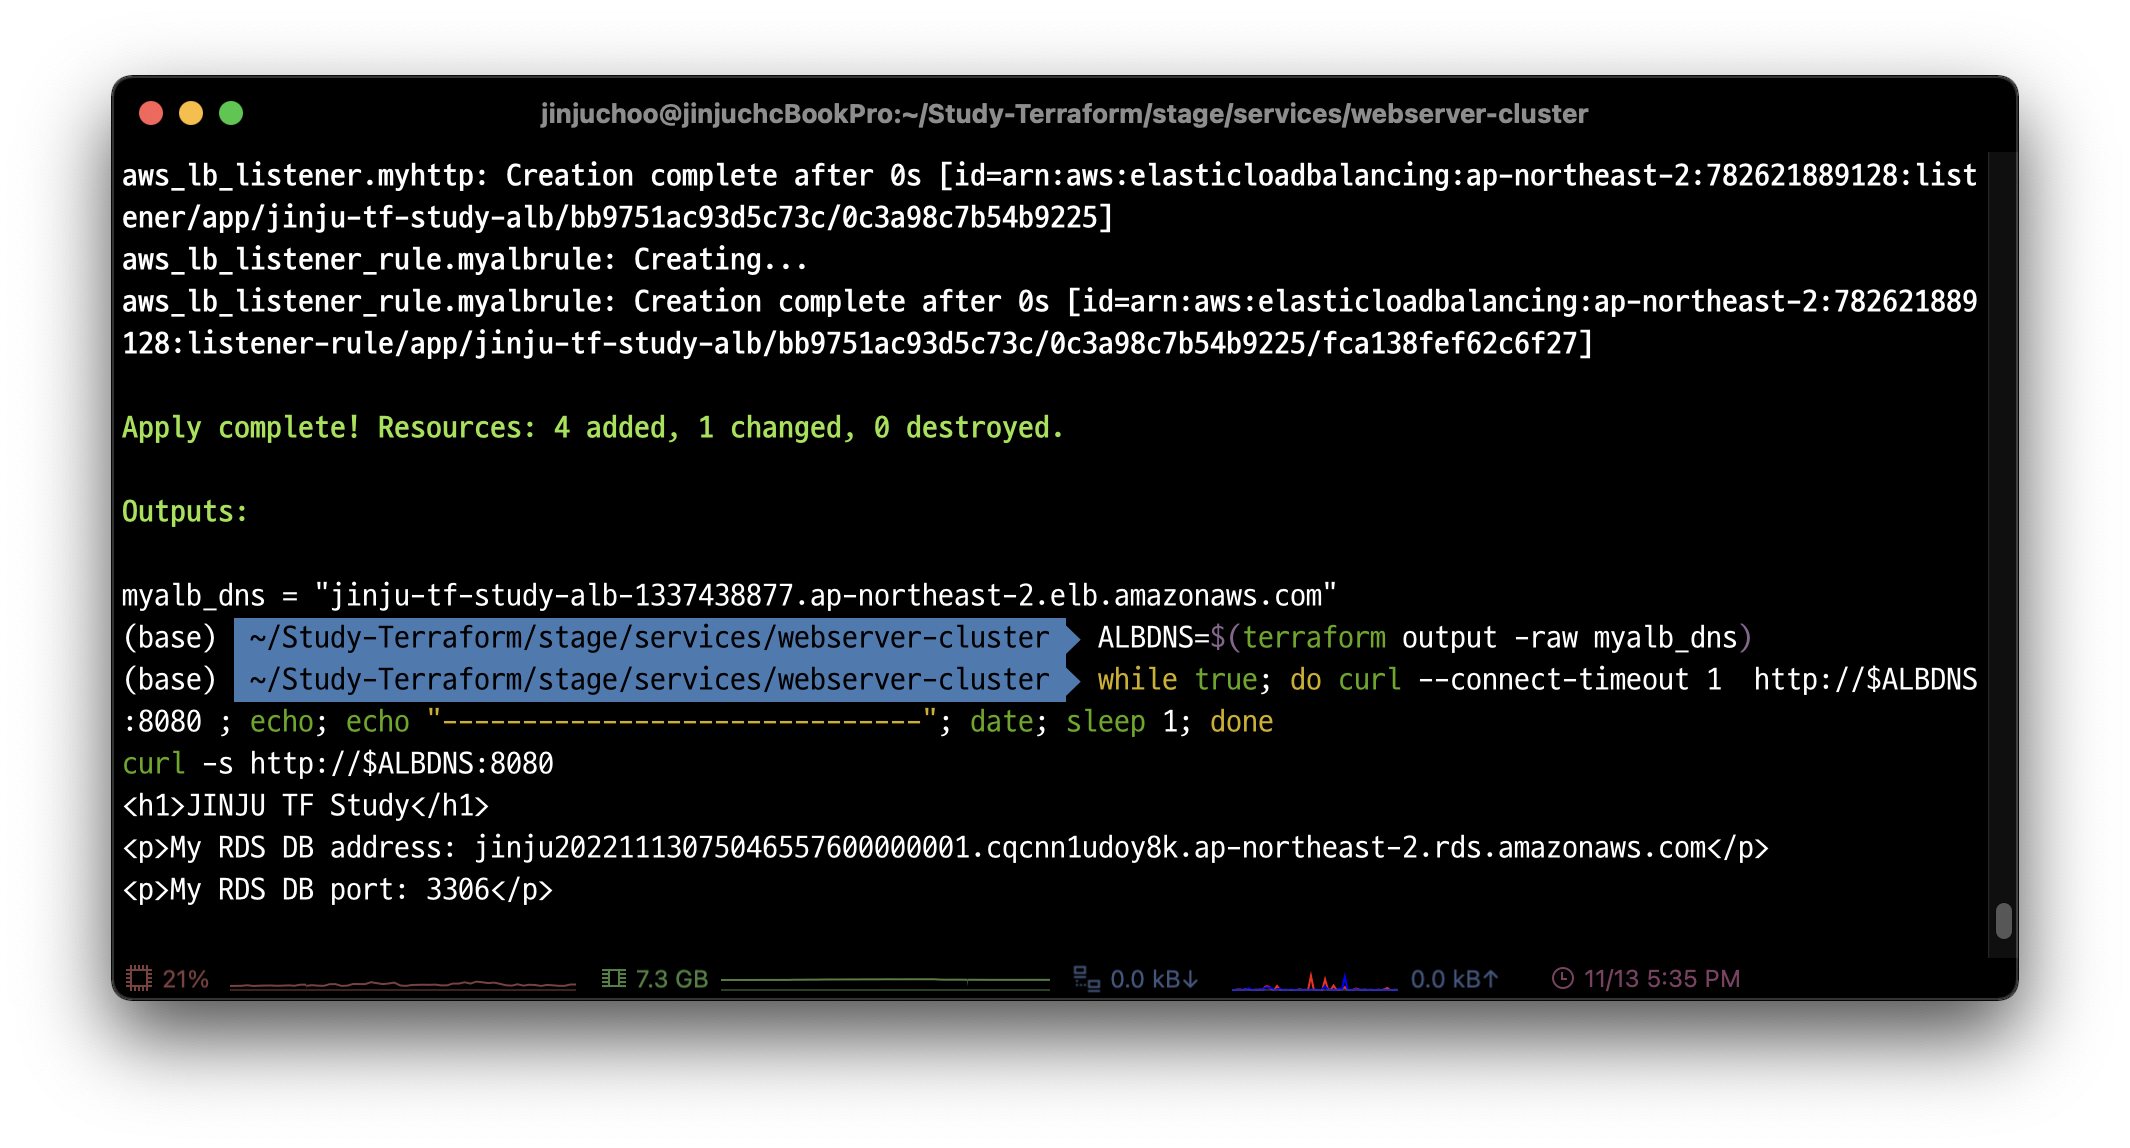
리소스 삭제
# 각 폴더에서 리소스 삭제
$ cd ~/Study-Terraform/stage/services/webserver-cluster && terraform destroy -auto-approve
$ cd ~/Study-Terraform/stage/data-stores/mysql && terraform destroy -auto-approve

# S3 버킷에 객체 삭제
aws s3 rm s3://jinju-s3-tfstate-week3-files --recursive

# S3 버킷에 버저닝 객체 삭제
aws s3api delete-objects \
    --bucket jinju-s3-tfstate-week3-files \
    --delete "$(aws s3api list-object-versions \
    --bucket "jinju-s3-tfstate-week3-files" \
    --output=json \
    --query='{Objects: Versions[].{Key:Key,VersionId:VersionId}}')"

# S3 버킷에 삭제마커 삭제
aws s3api delete-objects --bucket jinju-s3-tfstate-week3-files \
    --delete "$(aws s3api list-object-versions --bucket "jinju-s3-tfstate-week3-files" \
    --query='{Objects: DeleteMarkers[].{Key:Key,VersionId:VersionId}}')"

# 백엔드 리소스 삭제
$ cd ~/Study-Terraform/global/s3 && terraform destroy -auto-approve

# 관련 디렉터리 삭제
$ cd ~/Study-Terraform && rm -rf *