Network Programming 강의 요약본입니다.
목표
-
스레드는 어떻게 실행되며, 어느 코드를 실행시키는가?
-
스레드는 어떤 상태에 놓일 수 있으며, 어떻게 스레드의 상태를 바꿀 수 있는가?
-
스레드간의 정보 교환은 어떤 방법으로 이루어지는가?
배경 : 네트워크 프로그램의 문제점
- 서버와 클라이언트의 연결을 프로세스를 사용하여 실행하면 과도한 자원을 사용한다.
- 가령 100개의 클라이언트와의 연결을 100개의 프로세스로 처리하는 경우
- 결과 :
- 서버 성능 저하
- 해결 방안 1 : 프로세스 재사용
- 방법
- 서버가 동작을 시작할 때 일정 개수의 프로세스만을 생성
- 서비스 요청은 큐에 저장해 두고 프로세스는 큐의 요청을 순차적으로 처리- 프로세스 재사용의 장점
- 일정 개수의 프로세스만 동작하여 서버의 성능 한계를 초과하지 않게 할 수 있음
- 프로세스를 생성하고 종료하는 오버헤드 X
- 동일한 자원을 이용하여 더 높은 성능 제공
- 일정 개수의 프로세스만 동작하여 서버의 성능 한계를 초과하지 않게 할 수 있음
- 프로세스 재사용의 장점
- 해결 방안 2 : 스레드 사용
- 방법
- 프로세스의 경우 매 프로세스마다 독립적인 메모리 블록을 할당
- 스레드는 메모리를 공유하여 리소스를 절약 (무거운 프로세스 / 가벼운 스레드)- Tradeoff
- Performance Gain & Program Complexity : 성능 향상. 그러나 프로그램이 복잡해진다.
- 스레드의 문제점
- 하나 뿐인 메모리를 여러 스레드들이 공유
- 공유 자원에 배타적으로 접근해야 하므로 프로그램 구성이 복잡해짐
- 데드락 등 서버 안정성에 문제 발생 위험 커짐
- 하나 뿐인 메모리를 여러 스레드들이 공유
- Tradeoff
스레드를 어떻게 시작시키는가?
- 자바의 스레드는 3군데에서 나누어 지원한다.
- java.lang.Thread Class : 대부분의 스레드 관련 지원- java.lang.Object Class
- Java language / Java Virtual Machine
start()
- 스레드를 실행시키려면 Thread 객체의 start() 메소드를 호출한다.
- 스레드는 JVM 또는 운영체제의 일부인 Thread Scheduler 라는 시스템 코드에 등록된다. 스케줄러는 여러 스레드 중 CPU 를 차지할 스레드를 결정한다.- start() 메소드 호출이 스레드를 즉시 실행시키는 것이 아니다. 실행 후보가 되는 것이다. 스레드는 CPU를 차지하기 위해 다른 모든 스레드와 경쟁해야 한다. 장차 모든 것이 잘 진행되면 스케줄러는 스레드의 실행을 허용한다.
스레드는 무슨 일을 수행하는가?
- 스레드는 run() 메소드의 몸체를 실행한다.
- 어느 객체에 속한 run() 메소드를 실행하는가?
- 두 가지의 선택지가 있다.
- Thread 자신의 run() 메소드
- 별도 객체의 run() 메소드
Thread 자신의 run() 메소드를 실행시키는 방법
- run() 메소드 작성 방법
- Thread class 를 상속하여 하위 클래스 구성- run() 메소드를 재정의해 스레드가 실행할 일을 제시
- 실행 방법
- Thread class 로부터 객체를 생성하여 start() 메소드를 호출하면 run() 메소드 실행을 시작한다.
    MyThread t = new MyThread();
    t.start();
    // or
    new MyThread().start();
예제 1 :
public class CountUp extends Thread {
  public void run() {
    for (int i = 0; i < 10; i++) {
      System.out.println("Counting: " + (i + 1) );
    }
   }
   public static void main(String[] args){
      new CountUp().start();
   }
}
예제 2 :
class QuickSlow extends Thread {
	String 	say;
	int	delay;
	QuickSlow(String whatToSay, int delayTime) {
		say = whatToSay;
		delay = delayTime;
	}
	public void run(){
		try {
		        for(;;) {
	                              System.out.println(say + " ");
	                              sleep(delay);
	                        }
		} catch (InterruptedException e) {
			return;	// 스레드 실행 끝
		}
	}
	public static void main(String[] args){
		new QuickSlow("Quick", 33).start();	// 1/30 초
		new QuickSlow("Slow", 100).start(); 	// 1/10 초
	}
}
예제 3.1 DigestThread :
-
각 파일에 대해 SHA 메시지 다이제스트를 계산하는 스레드
-
실행 방법 :
- D:\Xxxxx>java DigestThread *.java
예제 3.2 DigestRunnable :
import java.io.*;
import java.security.*;
import javax.xml.bind.*; // for DatatypeConverter

public class DigestThread extends Thread {

  private String filename;

  public DigestThread(String filename) {
   this.filename = filename;
  }

  public void run() {
    try {
      FileInputStream in = new FileInputStream(filename);
      MessageDigest sha = MessageDigest.getInstance("SHA-256");
      DigestInputStream din = new DigestInputStream(in, sha);
      while (din.read() != -1) ;
      din.close();
      byte[] digest = sha.digest();

      StringBuilder result = new StringBuilder(filename);
      result.append(": ");
      result.append(DatatypeConverter.printHexBinary(digest));
      System.out.println(result);
    } catch (IOException ex) {
      System.err.println(ex);
    } catch (NoSuchAlgorithmException ex) {
      System.err.println(ex);
    }
  }

  public static void main(String[] args) {
    for (String filename : args) {
      Thread t = new DigestThread(filename);
      t.start();
    }
  }
}
public void run()
- 스레드의 임무는 run() 메소드의 코드를 수행하는 것이다.
- 스레드를 통하여 수행되는 모든 로직은 run() 메소드에 정의됨
- run() 메소드의 실행이 끝나면 스레드는 죽고 다시 살아나지 않는다.
- 애플리케이션의 main()과 유사 : 단일 스레드 프로그램은 main() 메소드가 리턴되면 종료- 멀티 스레드 프로그램은 main() 메소드와 모든 스레드의 run() 메소드가 리턴하면 종료
- 이 메소드는 매개변수와 반환값이 없다.
- 스레드에 정보를 전달하기도 어렵고 스레드로부터 정보를 전달받기도 어렵다.
스레드의 성질
- 스레드의 동작은 매우 비규칙적, 비동기적이다.
별도 객체의 run() 메소드를 실행시키는 방법
- 차이점은 Thread 객체를 생성할 때 run() 메소드를 가진 객체를 제시해 주어야 한다. 그러려면 다음의 Thread 생성자를 호출해야 한다.
- public Thread(Runnable target)- 스레드가 수행할 일을 Runnable 인터페이스를 구현한 클래스의 run()에 표현하는 방법으로 이 클래스의 객체를 Thread 생성자에 넘겨 주어 스레드 객체를 생성하고 스레드 객체의 start()를 호출한다.
인터페이스 Runnable
- Runnable 인터페이스에는 단 하나의 메소드가 정의되어 있다.
public interface Runnable {
    public void run();
}
- 이런 인터페이스를 기능적 인터페이스(Functional Interface)라 한다.
- Runnable 인터페이스를 구현한 객체를 Thread 생성자의 인자로 제공한다.Target Object
- 스레드를 생성할 때 Thread 생성자에 넘겨주는 Runnable 객체를 말한다.
// Target Object = new MyRunnableObject()

Thread t = new Thread(new MyRunnableObject());
t.start();- Target 객체를 생략하면 this 객체를 사용하라는 의미이며 스레드는 생성자가 속한 클래스의 run()을 실행하게 된다.
예 1 :
public class CountDown implements Runnable {
   public void run() {
      System.out.println("Counting Down" + " ");
      for (int i = 0; i < 10; i++) {
         System.out.print(10 - i + " ");
      }
      System.out.println("\nShot");
   }

   public static void main(String[] args) {
      new Thread(new CountDown()).start();
   }
}
예 2 (Lambda 식 이용) :
public class CountDownLambda {
   public static void main(String[] args) {
      Thread t = new Thread( () -> {
           System.out.println("Counting Down" + " ");
           for (int i = 0; i < 10; i++) {
               System.out.print(10 - i + " ");
           }
           System.out.println("\nShot");
      });
      t.start();
   }
}
자바의 단일상속 문제 해결
- Runnable 인터페이스를 구현하는 방법은 Thread 상속으로 인한 문제가 해소된다.
- (자바는 다중 상속이 불가능)
- 예
- 만약 어떤 클래스가 JComponent 이면서 Thread 이어야 한다면 자바의 단일 상속 제약 때문에 Subclassing 방법으로는 불가능하다. 이럴 때는 Runnable 인터페이스를 사용할 수 밖에 없다.
예제 3.2 : DigestRunnable (implement Interface)
import java.io.*;
import java.security.*;
import javax.xml.bind.*; // for DatatypeConverter

public class DigestRunnable implements Runnable {

  private String filename;

  public DigestRunnable(String filename) {
   this.filename = filename;
  }

  @Override
  public void run() {
    try {
      FileInputStream in = new FileInputStream(filename);
      MessageDigest sha = MessageDigest.getInstance("SHA-256");
      DigestInputStream din = new DigestInputStream(in, sha);
      while (din.read() != -1) ;
      din.close();
      byte[] digest = sha.digest();

      StringBuilder result = new StringBuilder(filename);
      result.append(": ");
      result.append(DatatypeConverter.printHexBinary(digest));
      System.out.println(result);
    } catch (IOException ex) {
      System.err.println(ex);
    } catch (NoSuchAlgorithmException ex) {
      System.err.println(ex);
    }
  }

  public static void main(String[] args) {
    for (String filename : args) {
      DigestRunnable dr = new DigestRunnable(filename);
      Thread t = new Thread(dr);
      t.start();
    }
  }
}
문제 : 다음의 코드가 있을 때 어떻게 실행시킬 수 있는가
class MyRunnable implements Runnable {
    public void run() {
        System.out.print("1 line print");
    }
}
답 :
public class MyRunnable implements Runnable {
    public void run() {
        System.out.print("1 line print");
    }

    public static void main(String [] args) {
        new Thread(new MyRunnable()).start();
    }
}
스레드 실행은 언제 끝나는가
dead
-
run() 메소드가 return 하면 스레드는 임무를 마치게 되고 이 때 스레드가 죽었다(dead)고 말한다.
-
스레드는 dead 상태로부터 다른 상태로 바뀌지 않는다.
- 다시 start 될 수 없다.- 스레드의 임무를 재차 실행시키려면 스레드 객체를 다시 생성하여 start 시켜야 한다.
- 죽었더라도 스레드 객체는 여타의 객체와 같이 존재한다. 여전히 그 객체의 데이터에 접근할 수 있고 메소드를 호출할 수 있다.
-
정리
- 죽은 스레드는 restart 시킬 수 없다.- 죽은 스레드의 메소드는 실행시킬 수 있다.
스레드 이름
스레드 이름 짓기
- 스레드 이름을 정하는 Thread 생성자
- public Thread(String name)- public Thread(Runnable target, String name)
- Thread class 를 확장하는 경우
public class MyThread extends Thread {

    public MyThread(String name) {
        super(name);
    }

    public void run() {}

    public static void main(String [] args) {
        Thread t = new MyThread("Worker Thread");
        t.start();
    }
}- Runnable 을 구현한 경우
public class MyRunnable implements Runnable {
    public void run(){}
    public static void main(String [] args) {
        Thread t = new Thread(new MyRunnable(), "Worker Thread");
        t.start();
    }
}
스레드 이름 정하기 / 얻기
- 스레드 생성 후에는 setName() 메소드로 이름을 정한다.
- setName(String name) : 스레드 객체에 이름을 붙일 수 있게 하는 Thread class 의 메소드- 예
Worker w = new Worker();
Thread t = new Thread(w);
t.setName("Worker Thread");- 붙여진 스레드 이름은 getName 메소드로 얻는다
- String getName()
현재 실행 중인 스레드 알아내기
currentThread()
- public static native Thread currentThread()
- Thread class 의 정적 메소드- 여러 개의 스레드가 수행되고 있는 상황에서는 하나 이상의 스레드가 특정 메소드에 들어와 문장을 수행할 수 있다.
- 이 메소드를 활용하여 그 코드를 수행 중인 스레드의 참조를 알아낼 수 있다.
- 코드의 특정 위치를 수행하고 있는 스레드의 이름을 알고 싶을 때
- 확인하고 싶은 메소드 내에서 다음과 같이 스레드 객체 t를 얻어 getName() 을 호출한다.- 예
Thread t = Thread.currentThread();
System.out.print(t.getName());
예 : 생성자와 메소드를 어느 스레드가 호출하는가?
public class Example{
	public static void main(String[] args) {
		Worker w = new Worker();
		Thread t = new Thread(w, "Able");
		t.start();
		for ( int i = 0; i < 3; i++ ) w.namePrint();
	}
}
class Worker implements Runnable{
	public Worker() {
		Thread maker = Thread.currentThread();
		System.out.println(maker + " has created " + this);
	}
	public void run() {
		for ( int i = 0; i <3; i++ ) {
			namePrint();
		}
	}
	public void namePrint() {
		Thread t = Thread.currentThread();
		System.out.println("namePrint() called by " + t.getName());
	}
}
결과 :
Thread[main,5,main] has created Worker@12498b5
namePrint() called by main
namePrint() called by main
namePrint() called by main
namePrint() called by Able
namePrint() called by Able
namePrint() called by Able
- 목표 객체의 생성자 코드 내에서 Thread.currentThread()를 호출하면 생성자를 호출한 스레드, 즉 목표 객체를 생성하고 있는 스레드의 이름을 확인할 수 있다. 그것은 당연히 main 스레드이다.
- main 스레드는 자바 가상 기계가 기본적으로 생성하여 실행시키는 스레드
- 스레드 객체의 namePrint() 메소드는 main 스레드와 새로이 생성된 스레드 Worker 둘 다 호출한다.
Executor
- Task
- 다른 Task의 상태, 처리 결과, side-effect 에 영향을 받지 않는 독립적인 일의 단위- 독립적이므로 병행 처리 (Concurrency) 가 가능하다.
- Executor
- java 5에서 도입- java.util.concurrent 패키지의 인터페이스
- Task를 Runnable 등으로 표현하여 Task 제출과 Task 실행을 분리하는 스레드 실행의 표준 방법
예 1 : 여러 개의 일을 하나의 스레드로 처리
public class ExecutorEx001 {
public static void main(String[] args) {
for (int i = 0; i < 100; i++) {
	unitTask();
}
}

private static void unitTask() {
System.out.println(Thread.currentThread().getName() + " 1회의 일 처리");
}

}
예 2 : 여러 개의 일을 각각 스레드로 처리
public class ExecutorEx002 implements Runnable {
public void run() {
	unitTask();
}

private void unitTask() {
	System.out.println(Thread.currentThread().getName()+ " 1회의 일 처리");
}

public static void main(String[] args) {
	for (int i = 0; i < 100; i++) {
		new Thread(new ExecutorEx002()).start();
	}
}
}
Executor Interface
public interface Executor {
    void execute(Runnable command);
}- Executor 인터페이스 구현 객체는 execute() 메소드를 통해 Runnable 객체를 전달받아 작업을 수행한다.
ExecutorService Interface
-
Executor 를 확장한 인터페이스로 프로그래머가 직접 스레드를 생성하는 대신 필요할 때 스레드 생성을 대행해 주며 한편으로 Executor의 생애를 관리하는 메소드를 포함하고 있다.
-
ExecutorService의 사용 순서
- ExecutorService 객체를 생성한다.- ExecutorService 객체의 execute()에 Runnable 작업을 제출한다.
- 작업이 실행된다.
- 간접적 방법으로 작업의 결과를 얻는다.
Executor 객체 생성
- Factory 클래스인 Executors 를 이용하여 Executor 객체를 생성한다.
- Executors 는 java.util.concurrent 패키지 소속된 클래스
- Executor 객체 만들기 예
- Executor ex = Executors.newSingleThreadExecutor();
Executor 에 Runnable 작업 제출
- r이 Runnable 객체이고 ex가 Executor 객체라고 가정함
- Thread를 사용하는 기존의 코드
- new Thread(r).start();- Executor 를 사용하는 코드
- ex.execute(r);
- Executor 를 사용하는 코드
예 : Executor 사용
//
// Using Executor
// Executor.execute(Runnable)
//

import java.util.concurrent.Executor;
import java.util.concurrent.Executors;

public class ExecutorEx003 implements Runnable {
private static Executor ex = Executors.newSingleThreadExecutor();

public void run() {
	unitTask();
}

private void unitTask() {
	System.out.println(Thread.currentThread().getName()
		+ " Doing work once");
}

public static void main(String[] args) {
	for (int i = 0; i < 10; i++) {
		ex.execute(new ExecutorEx003());
	}
}

}
Task 위임
Task 위임 방법
- 실행을 위해 ExecutorService에 Task 를 맡기는 다양한 방법
- void execute(Runnable)- Future <?> submit(Runnable)
- Future submit(Callable)
- invokeAny(...)
- invokeAll(...)
submit() / execute()
-
스레드를 실행시키기 위해서는 ExecutorService 에 Task를 execute() 또는 submit() 로 넘겨야 한다.
-
void execute(Runnable)
- 인자로 Runnable 객체를 취한다.- 리턴 타입이 void 이라서 실행시킨 스레드의 처리 결과를 직접 얻을 수 없다.
- fire-and-forget
-
Future<?> submit(Runnable), Future submit(Callable)
- 인자로 Runnable 또는 Callable 객체를 취한다.
- 리턴 타입이 Future 이라서 Task 의 처리 결과를 얻을 수 있다.
- Runnable 을 인자로 사용할 때는 아무 것이나 사용해도 무방하다.
- submit() 는 Task의 완료 여부를 확인할 수 있는 Future 객체를 반환하므로 결과를 추적해야 할 때는 submit()을 사용한다. 따라서 submit() 을 사용하는 경우가 더 흔하다.
결과 얻기
Future
-
java.util.concurrent 소속 인터페이스
-
ExecutorService 에 submit()가 리턴하는 Future 객체에는 다음 메소드가 정의되어 있다.
- Task 의 처리 결과를 인수하는 메소드
- Task 완료 / 취소 여부를 확인할 수 있는 메소드
- Task 를 취소하는 메소드
Future 의 메소드
- boolean isDone() : Task 가 완료되었으면 true, Task가 취소되었으면 예외 발생
- boolean isCancelled() : 정상적으로 완료되기 전에 Task 가 취소되었으면 true return
- boolean cancel() : Task 를 취소시킨다.
- V get() : Task 의 결과를 취한다. 결과가 아직 만들어지지 않았으면 한 없이 기다린다.
- V get(long timeout, TimeUnit unt) : Task 의 결과를 취한다. 제시된 시간만큼 기다려도 결과가 아직 만들어지지 않으면 TimeoutException을 던진다.
예제 : 결과 얻기
import java.util.concurrent.ExecutionException;
import java.util.concurrent.ExecutorService;
import java.util.concurrent.Executors;
import java.util.concurrent.Future;
import java.util.concurrent.TimeUnit;
import java.util.concurrent.TimeoutException;

public class ExecutorFuture01 {
	private static int count = 0;

	public static void main(String[] args) throws InterruptedException, ExecutionException {
		ExecutorService executorService = null;
		try {
			executorService = Executors.newSingleThreadExecutor();
			Future<?> future = executorService.submit(() -> {

				for (int i = 0; i < 500; i++)
					ExecutorFuture01.count++;
				return Integer.valueOf(count);

			});
			// future.get(10, TimeUnit.SECONDS);
			System.out.println("future.get() = " + future.get(10, TimeUnit.SECONDS));
			System.out.println("도달함");
		} catch (TimeoutException e) {
			System.out.println("시간내 미치지 못함");
		} finally {
			executorService.shutdown();
		}
	}
}
Callable
Callable Interface
- 함수형 인터페이스 (Functional Interface) Callable
public interface Callable<V> {
    V call() throws Exception;
}-
스레드의 작업 표시 방법
- 결과가 없는 작업은 Runnable로 표현 (void)
- 결과가 있는 작업은 Callable로 표현 -
예외
- Runnable 의 run() 은 예외를 던지지 않지만 Callable 의 call() 은 검증 예외를 던진다.
Callable 작업
-
스레드 생성을 대행해 줄 ExecutorService 객체를 생성한다.
-
ExecutorService 의 submit() 으로 Callable 작업을 제출한다.
-
작업이 실행된다.
-
각 작업마다 Future 을 되돌려 받는다.
-
마지막으로, 작업의 결과는 Future 에 질의하여 얻는다.
예 : Future을 이용해 결과 얻기.
람다식 이용
import java.util.concurrent.Callable;
import java.util.concurrent.ExecutorService;
import java.util.concurrent.Executors;
import java.util.concurrent.Future;

public class ExecutorEx006 {

	public static void main(String[] args) throws Exception {
		ExecutorService executorService = Executors.newSingleThreadExecutor();
		Future<String> future = executorService.submit(new Callable<String>() {
			public String call() throws Exception {
				System.out.println("Asynchronous Callable");
				return "Callable Result";
			}
		});
		System.out.println("future.get() = " + future.get());
		executorService.shutdown();
	}
}
일반적 사용
import java.util.concurrent.Callable;
import java.util.concurrent.ExecutorService;
import java.util.concurrent.Executors;
import java.util.concurrent.Future;

public class ExecutorEx007 implements Callable<String> {
	public String call() throws Exception {
		return "Callable Result";
	}

	public static void main(String[] args) throws Exception {
		ExecutorService executorService = Executors.newSingleThreadExecutor();
		Future<String> future = executorService.submit(new ExecutorEx007());
		System.out.println("Result = " + future.get());
		executorService.shutdown();
	}

}
Thread Pool
ExecutorService 객체의 생성
- Thread Pool을 구현한 Executor 구현 객체 만들기 예제 :
- ExecutorService es1 = Executors.newFixedThreadPool(10);
- ExecutorService es2 = Executors.newScheduledThreadPool(10);
예 : Thread Pool + Executor 을 이용한 일 처리
//
// Using ExecutorService.execute(Runnable)
//

import java.util.concurrent.ExecutorService;
import java.util.concurrent.Executors;

public class ExecutorEx004 implements Runnable {
public void run() {
	unitTask();
}

private void unitTask() {
	System.out.println(Thread.currentThread().getName()
	+ " 1회의 일 처리");
}

public static void main(String[] args) {
	ExecutorService executorService = Executors.newFixedThreadPool(10);
	for (int i = 1; i <= 100; i++) {
		executorService.execute(new ExecutorEx004());
	}
	executorService.shutdown();

}

}
람다 식 사용 예제 :
//
// Using ExecutorService.execute(Runnable)
//

import java.util.concurrent.ExecutorService;
import java.util.concurrent.Executors;

public class ExecutorEx004 implements Runnable {
public void run() {
	unitTask();
}

private void unitTask() {
	System.out.println(Thread.currentThread().getName()
	+ " 1회의 일 처리");
}

public static void main(String[] args) {
	ExecutorService executorService = Executors.newFixedThreadPool(10);
	for (int i = 1; i <= 100; i++) {
		executorService.execute(new ExecutorEx004());
	}
	executorService.shutdown();

}

}
예제 3-9 : 실행할 Callable 작업 구성
실행할 Callable 작업을 구성한다
import java.util.concurrent.Callable;

class FindMaxTask implements Callable<Integer> {

  private int[] data;
  private int start;
  private int end;

  FindMaxTask(int[] data, int start, int end) {
    this.data = data;
    this.start = start;
    this.end = end;
  }

  public Integer call() {
    int max = Integer.MIN_VALUE;
    for (int i = start; i < end; i++) {
      if (data[i] > max) max = data[i];
    }
    return max;
  }
}
예제 3-10 : 작업 제출과 실행 결과 인수
작업 제출과 실행 결과 인수
import java.util.concurrent.*;

public class MultithreadedMaxFinder {

  public static int max(int[] data) throws InterruptedException, ExecutionException {

    if (data.length == 1) {
      return data[0];
    } else if (data.length == 0) {
      throw new IllegalArgumentException();
    }

    // split the job into 2 pieces
    FindMaxTask task1 = new FindMaxTask(data, 0, data.length/2);
    FindMaxTask task2 = new FindMaxTask(data, data.length/2, data.length);

    // spawn 2 threads
    ExecutorService service = Executors.newFixedThreadPool(2);

    Future<Integer> future1 = service.submit(task1);
    Future<Integer> future2 = service.submit(task2);

    return Math.max(future1.get(), future2.get());
  }
}
Executor 의 실행
-
실행
- 3-9 와 3-10 을 실행
- 실행 방법 :
- java MultithreadedMaxFinderInterface -
코드 :
import java.util.concurrent.ExecutionException;
public class MultithreadedMaxFinderInterface {
	public static void main(String[] args)throws InterruptedException, ExecutionException{
		int[] ints = {2, 11, 7, 3, 13, 5, 17};
		int a = MultithreadedMaxFinder.max(ints);
		System.out.println(a);
	}
}
문제 : 다음 코드의 처리 결과는??
ExecutorService service = Executors.newSingleThreadExecutor();
service.submit( () -> { Thread.sleep(1000); return null; } );
service.submit( () -> { Thread.sleep(2000);} );
답 :
ExecutorService service = Executors.newSingleThreadExecutor();
service.submit( () -> { Thread.sleep(1000); return null; } ); // OK
service.submit( () -> { Thread.sleep(2000);} ); // INVALID-
Thread.sleep() 은 InterruptedException 을 던진다.
-
첫 람다식은 return type 을 가지므로 컴파일러가 Callable 로 취급한다. 두 번째 람다식은 값을 return 하지 않으므로 Runnable 객체로 취급한다.
-
Runnable 은 검증 예외를 취급하지 않으므로 컴파일 에러가 발생한다.
스레드에서 정보 얻기
스레드에서 정보 얻기의 어려움
-
스레드를 실행하는 start() 메소드와 run() 메소드는 어떠한 값도 return 하지 않는다.
-
스레드의 실행 결과를 얻기 위해서 필드에 실행 결과를 저장하고 해당 필드에 접근하는 Getter 메소드를 이용해 본다.
-
문제점
- 스레드가 언제 종료할 지 모르기 때문에 실행 오류가 발생할 가능성이 있음.
예제 3-3 : ReturnDigest.java
- 결과를 얻기 위해 접근 메소드 (Accessor Method)를 사용하는 스레드
- 다이제스트를 계산하여 private 필드인 digest 에 저장한다.
- digest 는 접근 메소드인 getDigest() 를 통해 접근 가능
import java.io.*;
import java.security.*;
public class ReturnDigest extends Thread {
	private String filename;
	private byte[] digest;
	public ReturnDigest(String filename) {
		this.filename = filename;
	}
	public void run() {
		try {
			FileInputStream in = new FileInputStream(filename);
			MessageDigest sha = MessageDigest.getInstance("SHA-256");
			DigestInputStream din = new DigestInputStream(in, sha);
			while (din.read() != -1)
				; // read entire file
			din.close();
			digest = sha.digest();
			System.out.println("Digest Calculation finished");
		} catch (IOException ex) {
			System.err.println(ex);
		} catch (NoSuchAlgorithmException ex) {
			System.err.println(ex);
		}
	}
	public byte[] getDigest() {
		return digest;
	}
}
예제 3-4 : 3-3 을 실행시키는 메인 프로그램
import javax.xml.bind.*; // for DatatypeConverter

public class ReturnDigestUserInterface {

  public static void main(String[] args) {
    for (String filename : args) {
      // digest를 계산하기 위해 스레드를 발진시킨다
      ReturnDigest dr = new ReturnDigest(filename);
      dr.start();

      // 이제 결과를 인쇄한다
      StringBuilder result = new StringBuilder(filename);
      result.append(": ");
      byte[] digest = dr.getDigest();
      result.append(DatatypeConverter.printHexBinary(digest));
      System.out.println(result);
    }
  }
}-
메인 프로그램
- ReturnDigest 스레드는 실행결과를 digest 필드에 저장
- main 메소드에서 Thread 를 실행하고 나서 Getter 메소드를 통해 이 필드를 불러들임
- Working thread 인 ReturnDigest 의 실행 종료 여부를 확인하지 않고 결과를 인쇄하도록 구성되어 있다. -
실행방법
- java ReturnDigestUserInterface *.txt -
결과
- java.lang.NullPointerException at ReturnDigestUserInterface .main(ReturnDigestUserInterface.java:19) Exception in thread "main"- 위 프로그램은 ReturnDigest 스레드가 digest 를 산출하여 byte[] digest 에 저장하기 전에 main thread 에서 이 값의 인쇄를 시도할 가능성이 있어 NullPointerException이 발생할 수 있다.
경쟁 (Race Conditions)
-
한 가지 해결책은 경쟁
- 스레드의 결과가 저장된 필드를 읽는 코드를 스레드 실행 시점에서 가장 먼 곳에 기술
- 스레드의 getDigest() 호출 부분을 main() 의 뒷 부분에 놓는다.
- 배열을 이용하여 스레드를 발진시키는 부분과 결과를 얻는 부분을 분리한다.- 불완전한 방법 - 행운이 따르면 결과를 얻을 수도 있으나 보장되지는 않는다. - 각 스레드의 getDigest() 메소드가 호출되기 전에 ReturnDigest 의 실행이 종료되어야 결과를 얻을 수 있다. - Race Condition이란 하나의 자원을 여러 스레드가 경쟁적으로 접근 하고 있는 상황 - 여기서는 바이트 배열 digest 에 main 스레드와 Ex0303 스레드가 경쟁하고 있다.
예제 : 경쟁
import java.io.*;
import javax.xml.bind.DatatypeConverter;
public class ReturnDigestUserInterfaceA {
	public static void main(String[] args) {
		ReturnDigest[] thread = new ReturnDigest[args.length];
		for (int i = 0; i < args.length; i++) {
			System.out.println("Calculate the digest of " + i + "th file");
			thread[i] = new ReturnDigest(args[i]);
			thread[i].start();
		}
		for (int i = 0; i < args.length; i++) {
			System.out.println(“Print the digest of " + i + "th file");
			StringBuffer result = new StringBuffer(args[i]);
			result.append(": ");
			byte[] digest = thread[i].getDigest();
			result.append(DatatypeConverter.printHexBinary(digest));
			System.out.println(result);
		}
	}
}
Polling
-
또 다른 해결책
-
메시지의 다이제스트가 산출되었는가 검사하는 로직을 일정한 간격(Interval) 을 두고 처리하는 무한 루프에 포함시킨다.
- 예 :
while(true) {
	byte[] digest = digests.getDigest();
     Thread.sleep(1000);  // sleep으로 1초의 처리 간격 확보
	if(digest != null){
		//스레드가 일한 결과를 활용
	}
}- 문제점
- 루프를 통해 필요 이상의 자원을 낭비하므로 비효율적
예제 : Polling
while(true) {
	byte[] digest = digests.getDigest();
     Thread.sleep(1000);  // sleep으로 1초의 처리 간격 확보
	if(digest != null){
		//스레드가 일한 결과를 활용
	}
}
실행 결과 :
……
……
Digest is --> null
Digest is --> null
Digest is --> null
Digest Calculation finished
Digest is --> [B@4e25154f
data01.txt: 7E620A47FEFACCE11228C1014A47933F68EF7A5A58AF8084B62B7ABCA4AEB6A6
Print 4th file digest
Digest is --> [B@70dea4e
data02.txt: 09F8D14DA3D4FE04A2E58D863B8CCDF1E2B0F41FE944731FE91F56B90A76301E
Print 5th file digest
Digest is --> [B@5c647e05
f.txt: 98722E2EBED8ED3D3652E11E4181F0DCCC1CE7D192D8F1DB370AF8EC4A4E174A
Print 6th file digest
Digest is --> [B@33909752
handMade.txt: E0BEBD22819993425814866B62701E2919EA26F1370499C1037B53B9D49C2C8A
Print 7th file digest
Digest is --> [B@55f96302
hangeul.txt: 1B58BE9B583675C84136BB98F602B06999D10C43350E6C0AA9452535BE2B6D90
Print 8th file digest
Digest is --> [B@3d4eac69
k.txt: DBF25B3C90333E533D1F5BC10D8730E9D6D59B56651E41A667E692F6A73C7721
Print 9th file digest
Digest is --> [B@42a57993
myFile.txt: 205D603ED38566904412747024E1D3DA55786164CB987414AC2647D4DBA92151
정적 메소드를 사용하는 Callback
- Working 스레드가 일을 마치면 자신을 발진시켰던 스레드의 메소드를 호출하여 일 처리 결과를 인계하는 방식
- 결과를 인계하는 시점에서 Caller 와 Callee 가 서로 바뀐다.
- 호출한 스레드는 호출된 스레드가 일처리를 종료하기를 기다리는 동안 sleep 상태로 있으면서 CPU time 을 절약한다.
- 정적 메소드이므로 스레드의 run() 메소드에서 클래스명 + .(dot) + 메소드명을 통해 호출
- CallbackDigestUserInterface.receiveDigest(digest, filename);
예제 3-5
import java.io.*;
import java.security.*;

public class CallbackDigest implements Runnable {

  private String filename;

  public CallbackDigest(String filename) {
   this.filename = filename;
  }

  public void run() {
    try {
      FileInputStream in = new FileInputStream(filename);
      MessageDigest sha = MessageDigest.getInstance("SHA-256");
      DigestInputStream din = new DigestInputStream(in, sha);
      while (din.read() != -1) ; // read entire file
      din.close();
      byte[] digest = sha.digest();
      CallbackDigestUserInterface.receiveDigest(digest, filename);
    } catch (IOException ex) {
      System.err.println(ex);
    } catch (NoSuchAlgorithmException ex) {
      System.err.println(ex);
    }
  }
}
예제 3-6 :
import javax.xml.bind.*; // for DatatypeConverter; requires Java 6 or JAXB 1.0
public class CallbackDigestUserInterface {
	public static void receiveDigest(byte[] digest, String name) {
		StringBuilder result = new StringBuilder(name);
		result.append(": ");
		result.append(DatatypeConverter.printHexBinary(digest));
		System.out.println(result);
	}
	public static void main(String[] args) {
		for (String filename : args) {
			System.out.println("Calculate the digest of " + filename);
			CallbackDigest cb = new CallbackDigest(filename);
			Thread t = new Thread(cb);
			t.start();
		}
	}
}
실행 결과 :
Calculate the digest of alphabet.txt
Calculate the digest of b.txt
Calculate the digest of boolean.txt
Calculate the digest of data01.txt
Calculate the digest of data02.txt
Calculate the digest of f.txt
Calculate the digest of handMade.txt
Calculate the digest of hangeul.txt
Calculate the digest of k.txt
Calculate the digest of myFile.txt
b.txt: DAD05A36AF2C7A6F1D1FFD27C1DDBF112E0E95710F29D6486F020E9148FBCCFD
hangeul.txt: 1B58BE9B583675C84136BB98F602B06999D10C43350E6C0AA9452535BE2B6D90
k.txt: DBF25B3C90333E533D1F5BC10D8730E9D6D59B56651E41A667E692F6A73C7721
f.txt: 98722E2EBED8ED3D3652E11E4181F0DCCC1CE7D192D8F1DB370AF8EC4A4E174A
myFile.txt: 205D603ED38566904412747024E1D3DA55786164CB987414AC2647D4DBA92151
handMade.txt: E0BEBD22819993425814866B62701E2919EA26F1370499C1037B53B9D49C2C8A
alphabet.txt: 88A748D6E3ACF5B60136B6598F8C5108D69085774173929EA5FBCB0B9399CD60
boolean.txt: 47DC540C94CEB704A23875C11273E16BB0B8A87AED84DE911F2133568115F254
data02.txt: 09F8D14DA3D4FE04A2E58D863B8CCDF1E2B0F41FE944731FE91F56B90A76301E
data01.txt: 7E620A47FEFACCE11228C1014A47933F68EF7A5A58AF8084B62B7ABCA4AEB6A6
예제 3-7 :
import java.io.;
import java.security.;
public class InstanceCallbackDigest implements Runnable {
private String filename;
private InstanceCallbackDigestUserInterface callback;
public InstanceCallbackDigest(String filename,
InstanceCallbackDigestUserInterface callback) {
this.filename = filename;
this.callback = callback;
}
@Override
public void run() {
try {
FileInputStream in = new FileInputStream(filename);
MessageDigest sha = MessageDigest.getInstance("SHA-256");
DigestInputStream din = new DigestInputStream(in, sha);
while (din.read() != -1) ; // read entire file
din.close();
byte[] digest = sha.digest();
callback.receiveDigest(digest);
} catch (IOException | NoSuchAlgorithmException ex) {
System.err.println(ex);
}
}
}
- 결과를 인계하기 위해 callback 하는 스레드는 결과를 인수할 객체에 대한 참조를 가져야 한다.
	- 참조는 thread 생성자에게 인자 형태로 넘겨진다.
	- 그 후 스레드의 run() 이 끝날 무렵에 스레드를 발진시킨 객체의 메소드를 호출하게 함으로써 처리 결과를 넘겨 받는 목적을 달성한다.

### 예제 3-8 :
```java
import javax.xml.bind.*; // for DatatypeConverter

public class InstanceCallbackDigestUserInterface {

  private String filename;
  private byte[] digest;

  public InstanceCallbackDigestUserInterface(String filename) {
    this.filename = filename;
  }

  public void calculateDigest() {
    InstanceCallbackDigest cb = new InstanceCallbackDigest(filename, this);
    Thread t = new Thread(cb);
    t.start();
  }

  void receiveDigest(byte[] digest) {
    this.digest = digest;
    System.out.println(this);
  }
   public String toString() {
    String result = filename + ": ";
    if (digest != null) {
      result += DatatypeConverter.printHexBinary(digest);
    } else {
      result += "digest not available";
    }
    return result;
  }

  public static void main(String[] args) {
    for (String filename : args) {
      // Calculate the digest
      InstanceCallbackDigestUserInterface d
          = new InstanceCallbackDigestUserInterface(filename);
      d.calculateDigest();
    }
  }
}
예제 3-8 실행 결과 :
boolean.txt: 47DC540C94CEB704A23875C11273E16BB0B8A87AED84DE911F2133568115F254
f.txt: 98722E2EBED8ED3D3652E11E4181F0DCCC1CE7D192D8F1DB370AF8EC4A4E174A
handMade.txt: E0BEBD22819993425814866B62701E2919EA26F1370499C1037B53B9D49C2C8A
hangeul.txt: 1B58BE9B583675C84136BB98F602B06999D10C43350E6C0AA9452535BE2B6D90
alphabet.txt: 88A748D6E3ACF5B60136B6598F8C5108D69085774173929EA5FBCB0B9399CD60
b.txt: DAD05A36AF2C7A6F1D1FFD27C1DDBF112E0E95710F29D6486F020E9148FBCCFD
k.txt: DBF25B3C90333E533D1F5BC10D8730E9D6D59B56651E41A667E692F6A73C7721
myFile.txt: 205D603ED38566904412747024E1D3DA55786164CB987414AC2647D4DBA92151
data02.txt: 09F8D14DA3D4FE04A2E58D863B8CCDF1E2B0F41FE944731FE91F56B90A76301E
data01.txt: 7E620A47FEFACCE11228C1014A47933F68EF7A5A58AF8084B62B7ABCA4AEB6A6-
InstanceCallbackDigestUserInterface 의 main() 에서는 단순히 InstanceCallbackDigestUserInterface 객체를 만들어 그 객체 내의 calculateDigest() 를 호출한다.
-
calculateDigest() 에서는 각각의 파일에 대하여 InstanceCallbackDigest 객체를 만들어, 자신의 reference 를 인자로 스레드를 생성하여 이를 발진시킨다.
-
InstanceCallbackDigest 스레드가 수행되고 그 결과의 인수인계는 InstanceCallbackDigest 스레드가 호출하는 callback routine 인 receiveDigest() 에서 이루어진다.
보충 문제
-
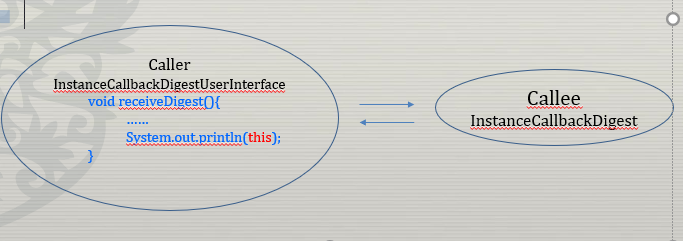
여기에서 Caller 스레드는 InstanceCallbackDigestUserInterface 이고 Callee 스레드는 InstanceCallbackDigest 이다.
-
callback 을 위해 스레드 Callee 가 자신을 실행시킨 Callee 의 receiveDigest() 메소드를 호출하는 상황에서 이 메소드에 다음과 같이 this 를 포함시키면 this는 Callee 와 Caller 중 어느 것을 가리키는가?
void receiveDigest() {
    .....
    System.out.println(this);
답
- Caller 이다.
- 메소드 호출 (Method Invocation) 은 메소드가 속해 있는 객체의 동작을 야기시킨다.
- 호출하는 객체 속으로 메소드가 불러 들여 와서 수행되는 것이 아니다.
- 호출을 받아 실행되는 메소드는 특정 객체에 위치하고 있고 그 객체의 변수를 대상으로 실행된다.
보충 문제 2
- 콜백 메소드인 receiveDigest() 에 다음의 인쇄문을 포함시키면 무엇이 인쇄될까??
void receiveDigest() {
    ......
    System.out.println(Thread.currentThread().getName());
}
답
- Callee 가 인쇄된다.
보충 문제 3 :
- Callee 가 콜백 메소드를 호출하여 자신이 일한 결과를 Caller 에게 넘겨 주는 실제적인 방법은 무엇인가?
답
- 메소드를 호출할 때 인자 (Actual Argument) 를 통해서 전달한다.
정적 메소드보다 객체 메소드가 유리한 점
-
생성자를 통해 main class (InstanceCallbackDigestUserInterface) 객체 하나와 파일 하나를 묶음으로써 다른 특별한 자료구조 없이 파일에 관한 정보를 관리할 수 있다.
- 경우에 따라서는 digest 에 대한 재계산도 할 수 있어 유연성이 확보된다. -
calculateDigest() 를 별도로 둔 이유
- 생성자에서는 스레드를 발진시키지 않아야 한다.
- 논리적으로는 InstanceCallbackDigestUserInterface 클래스의 생성자에서 start()로 InstanceCallbackDigest 스레드를 발진시켜도 무방할 것으로 생각되지만 위험하다. 특히 결과를 callback 하는 스레드에서는 더욱 그러하다.- 생성자가 완료되어 객체가 충분히 초기화되기도 전에 callback 이 수행되는 Race Condition의 우려도 있다.
동기화 (Synchronization)
-
스레드들은 자원을 공유함
- 자원 공유를 통하여 자원의 효율성을 높일 수 있다. -
그러나 여러 개의 스레드가 하나의 자원을 공동으로 사용할 때는 충돌이 발생할 우려가 있음
-
동기화란?
- "스레드들이 질서 있게 자원을 공유하게 함"
- 한 스레드만 자원을 독점하여 사용하게 하고 나머지 스레드는 사용 순서가 될 때까지 대기하게 한다.
예 : 인쇄 내용이 섞이지 않게
- Example 3-1 의 run()
      FileInputStream in = new FileInputStream(filename);
      MessageDigest sha = MessageDigest.getInstance("SHA-256");
      DigestInputStream din = new DigestInputStream(in, sha);
      while (din.read() != -1) ;
      din.close();
      byte[] digest = sha.digest();

      StringBuilder result = new StringBuilder(filename);
      result.append(": ");
      result.append(DatatypeConverter.printHexBinary(digest));
      System.out.println(result);
- digest 를 하나의 문자열로 합하여 단번에 프린트 한다.
- 스레드 스케줄링을 예측할 수 없어, 출력되는 행의 순서는 예측할 수 없으나 각각의 행은 완전하게 출력된다.- 그러나, (잘못된 예제)
      FileInputStream in = new FileInputStream(filename);
      MessageDigest sha = MessageDigest.getInstance("SHA-256");
      DigestInputStream din = new DigestInputStream(in, sha);
      while (din.read() != -1) ;
      din.close();
      byte[] digest = sha.digest();
      System.out.print(filename +": ");
      System.out.print(DatatypeConverter.printHexBinary(digest));
System.out.println();- 이처럼 여러 차례에 걸쳐 인쇄하는 식으로 구성하면 결과가 뒤섞이게 된다. 서로 다른 파일의 다이제스트가 섞여 어느 것이 어느 파일에 속하는 것인지 분간하기 어렵게 될 것이다.
이유와 해결책
-
이유는 System.out 이라는 자원이 공유되었기 때문이다.
- 명령행 인자로 제공되는 파일당 하나씩 생성되는 스레드들이 자원을 공유
- 하나의 스레드가 System.out.print() 로 콘솔에 쓰기를 시작하여 마치지 않은 도중에 다른 스레드가 끼어들어 자신의 결과를 썬허기 시작하기 때문이다.
- 따라서 Output 이 어떻게 될 것인가 불확실하고 실행할 때마다 약간씩 결과가 달라지게 된다. -
해결 방법
- "공유 자원" 에 대한 독점적 사용권을 하나의 thread 에게 부여해야 한다.
동기화 블록
-
Synchronized
- 블록 앞에 키워드 synchronized 를 붙여 동기화 블록을 만든다.
- 자바에서 객체에 대한 독점적 접근을 허용하는 keyword
- 하나의 객체를 이용할 수 있는 배타적인 권한을 부여
- 하나의 문장이 아니고 한 데 묶여서 (Atomic : 원자적으로) 실행되어야 할 문장들로 이루어진 블록이다. -
동기화 블록은 자원의 독점 시간과 대상을 자바 문장으로 표현한 것
- 어느 자원에 대한 독점을 허용할 것인가?
- 얼마 동안 독점을 허용할 것인가?
동기화 블록의 형식
synchronized (mutex) {
    // block of code
}

- mutex
	- 객체의 참조로서 블록에 들어 서기 전에 이 객체에 대한 락을 얻게 된다.
	- this 가 아닌 어떤 객체여도 무방하다.

- 블록 속에는 락을 얻고 실행할 명령어를 포함시킨다.
	- 블록 내의 문장이 마치 lock 으로 잠긴 객체상의 synchronized method 인 것처럼 동작된다.

- 동기화 메소드 방법을 피해 간편하게 객체에 락을 걸 수 있는 방법이다.

- 주의 : 블록 내의 문장에서 반드시 잠긴 객체를 사용해야 하는 것은 아니다.

### 예 :
```java
 synchronized(System.out)
	// 스레드가 이 블록을 실행하는 동안 콘솔 출력을 독점한다.
    {
    System.out.print(input+ ":");
    for(int i = 0; i < digest.length; i++) {
    System.out.print(digest[i]+ " ");
    }

	System.out.println();
	}
예제 3-11 LogFile :
- 필요성
- 웹 서버는 처리내역을 기록한 로그 파일을 유지 관리한다.
- 웹 서버는 클라이언트로부터 들어오는 연결을 스레드로 처리한다.
- 로그 파일은 하나의 내장된 파일만 사용하며 따라서 모든 스레드가 공유하여 사용한다.
- 로그 파일은 LogFile 클래스의 객체를 사용한다.
- 로그 파일에는 날짜, 시간, 메시지를 기록한다.
- 이러기 위해서는 한 스레드가 자료를 기록하고 있을 때 다른 스레드가 방해할 수 없도록 동기화 시킬 필요가 있다.
import java.io.*;
import java.util.*;

public class LogFile {

  private Writer out;

  public LogFile(File f) throws IOException {
    FileWriter fw = new FileWriter(f);
    this.out = new BufferedWriter(fw);
  }

  public void writeEntry(String message) throws IOException {
    Date d = new Date();

// 문제가 생길 가능성이 있는 부분 (밑의 write)
    out.write(d.toString());
    out.write('\t');
    out.write(message);
    out.write("\r\n");
  }

  public void close() throws IOException {
    out.flush();
    out.close();
  }
}
해결책 1 :
-
동기화란 자원 공유의 문제를 해결하기 위한 것이고 그 자원은 보통 객체이다. 두 스레드가 한 객체에 대한 참조를 동시에 가지고 있을 때 문제가 된다.
-
그렇다면 무엇을 동기화 할 것인가?
- 먼저 LogFile 객체의 일부분인 Writer out 을 동기화 할 수 있다.
- out 을 synchronized 로 묶고 4개의 out.write() 을 블록으로 묶으면 된다.
public void writeEntry(String  message) throws IOException {
	synchronized (out) {
		Date d = new Date();
		out.write(d.toString());
		out.write('\t');
		out.write(message);
		out.write('\r\n');
	}
}
해결책 2 :
- LogFile 객체 자체(this) 를 동기화 시킨다.
public void writeEntry(String message) throws IOException {
	synchronized (this) {
		Date d = new Date();
		out.write(d.toString());
		out.write('\t');
		out.write(message);
		out.write('\r\n');
	}
}
Synchronized Method
-
동기화 메소드란?
- synchronized 라는 keyword 를 메소드 헤더에 포함하는 메소드
- 메소드 몸체 전체를 동기화시켜야 할 때 사용
- 동기화 메소드의 동기화 대상 객체는 this -
예
public synchronized void writeEntry(String message) throws IOException {
	Date d = new Date( );
	out.write(d.toString( ));
	out.write('\t');
	out.write(message);
	out.write("\r\n");
}- 문제점
- 극심한 성능 저하
- 데드락 발생 확률이 높고 보호하지 않아도 될 자원을 대상으로 엉뚱한 보호를 하고 있는 경우가 있다.
동기화의 대안
-
Field 대신 Local Variable 을 사용하면 두 개의 다른 스레드가 사용할 가능성이 없다.
-
Call by Value 로 처리되도록 메소드 인자로 기본 타입을 사용
- 자바는 메소드의 인자로 레퍼런스 대신 값을 넘김 -
String 타입의 인자는 불변하기 때문에 안전
-
생성자는 Thread Safety 문제에서 제외
- 생성자가 리턴하기까지 그 어떤 스레드도 그 객체에 대한 참조변수를 가지고 있찌 않아 충돌될 가능성이 없다. -
모든 필드를 private field 로 선언하여 클래스 자체를 immutable 로 만들어 thread safety 한다.
Deadlock
-
발생 원인
- 동기화는 데드락의 원천
- 두 개의 스레드가 각각 동일한 자원의 집합을 배타적으로 엑세스 권한을 가지고 있을 경우 데드락이 발생 -
데드락 발생
- 데드락이 산발적으로 일어나면 발견하기 어려운 버그 -
데드락 방지
- 필요하지 않을 경우 동기화를 사용하지 않는다.
- 객체가 Immutable (불변) 이면 스레드의 안전을 보장
- 객체의 로컬 카피와 같은 다른 방법 이용
- 가능하면 동기화 블록을 작게 만든다.
- 두 개 이상의 객체를 대상으로 동기화하지 않는다.
- 여러 객체가 동일한 리소스 집합을 공유한다면/ 그 리소스를 사용하는 순서가 같다면 데드락이 발생하지 않는다.
스레드 상태
-
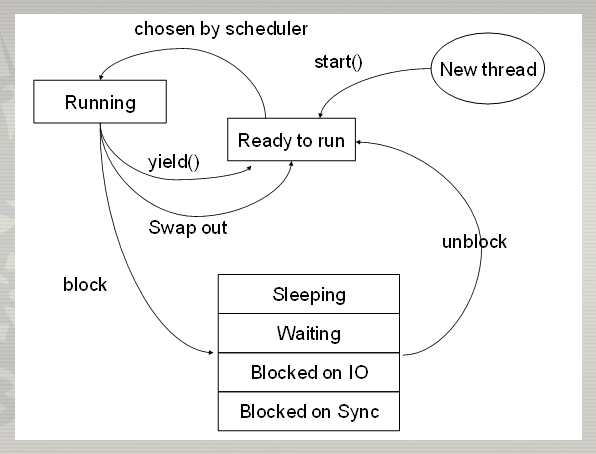
스레드 객체는 다음 중 하나의 상태를 가진다.
- Running
- The state that all threads aspire to
- 어느 순간에도 한 스레드 객체만 CPU 를 점유할 수 있다.- Various waiting states - Waiting - Sleeping - Suspended - Blocked - Ready - Not waiting for anything except the CPU - Dead - All done
스레드 우선 순위
Thread Scheduling
-
스레드 스케줄링의 의미
- 스레드가 동시에 실행중이라면 스레드의 실행 순서를 결정하는 인자를 설정하여 cpu 효율을 높일 수 있다.- 여러 개의 thread 가 있을 경우에는 가장 높은 priority 를 가진 thread 를 수행한다. - 모든 thread 는 1 ~ 1- 범위의 정수 우선순위를 가지며 default priority = 5 이다. - 값이 클수록 높은 우선 순위 (Unix는 반대 : 적은 CPU time 배당) 를 얻는다. - 스레드는 생성될 때 자신을 생성하는 스레드와 동일한 우선순위를 갖는다. 이것은 나중에 setPriority 를 통해 바뀔 수 있다. -
우선순위 관련 상수
- public static final int MIN_PRIORITY = 1;
- public static final int NORM_PRIORITY = 5;
- public static final int MAX_PRIORITY = 10;
예제 : Thread Priority 설정
public void calculateDigest( ) {
	ListCallbackDigest cb = new ListCallbackDigest(input);
	cb.addDigestListener(this);
	Thread t = new Thread(cb);
	t.setPriority(8);
	t.start( );
}-
Thread Scheduler 는 Pre-emptive 형과 Cooperative 형의 2가지
- Preemptive : 자신 몫의 CPU time 을 다 사용한 스레드를 포착해 그 스레드의 수행을 중단시키고 다른 스레드에게 사용권을 넘긴다. Time-Slice 의 결정은 우선순위 등을 참고한다.- Cooperative : 스레드가 다른 스레드에게 사용권을 넘기는 방식 - 수행 중인 스레드가 CPU 를 양보하거나 종료 시점에 도달해야 다음 스레드가 수행 가능 - 대기 상태의 스레드는 양보받을 때까지 무작정 대기 - 우선순위가 높은 스레드의 독점 우려가 있고 기아 상태를 유발할 가능성이 더 높다.
Pre-emption
- 자바 가상머신은 선점형 스레드 스케줄링 이용
- 우선순위가 높은 스레드가 우선순위가 낮은 스레드의 cpu time 을 선점
- 스레드가 멈추는 10가지 경우
- 입/출력 때문에 block
- 동기화한 객체 때문에 block
- 양보 (Yield)
- sleep 상태에 빠질 때
- 다른 스레드에 join
- 다른 스레드를 wait 할 때
- 끝날 때
- 우선순위가 높은 스레드가 선점될 때
- suspend 될 때
- 멈출 때 (....?)
스레드 컨트롤
스레드 컨트롤이란
-
한 상태로부터 다른 상태로 바꾸는 것, 상태 전이를 일으키는 것
-
예
- Yielding
- Suspending 후 Resuming
- Sleeping 후 Waking up
- Blocking 후 Continuing
- Waiting 후 Being notified (통보받음)
Blocking
-
자발적인 CPU 포기로서 스레드가 자신이 가지지 못한 자원을 얻기 위해 수행을 멈추고 기다리는 것
- 네트워크의 I/O 때문에 blocking 되어 Thread 가 자발적으로 CPU 제어권을 넘기는 경우
- 스레드가 동기화 블록 (Synchronized Block) 이나 동기화 메소드 (Synchronized Method)를 실행해야 할 때 -
블록과 락은 무관
- I/O 나 동기화 코드로 인해 블록되더라도 스레드가 이미 가지고 있는 락을 반환하지는 않는다.
Yield (양보)
- 스레드가 명시적으로 cpu 의 소유권을 포기하는 경우
- Thread 클래스에 속한 메소드 yield() 를 호출
- 실행 준비가 끝난 다른 스레드를 실행하라는 신호를 가상 머신에 보냄
- 스레드의 락은 반환하지 않는다.- 예제
public void run() {
    while(true) {
        // Do the thread's work...
        Thread.yield();
    }
}
예 : Thread -> Yield
class Babble extends Thread{
  	static int times;
  	static boolean doYield;
	private String word;
	Babble(String word){this.word = word;}
	public void run(){
   		for (int i=0;i<times;i++){
      			System.out.println(word);
           		if(doYield) yield(); // 다른 스레드에 기회를 준다
  		}
	}
	public static void main(String[] args){
   		times = Integer.parseInt(args[1]);
       		doYield = new Boolean(args[0]).booleanValue();
   		Thread cur = currentThread();
   		cur.setPriority(Thread.MAX_PRIORITY);
   		for (int i=2;i<args.length;i++){
      			new Babble(args[i]).start();
			}
  	}
}
실행 결과 :
C:\>java Babble false 3 did didnot     (Without yielding)
	did
	did
	did
	didnot
	didnot
	didnot
C:\> java Babble true 3 today yesterday tomorrow         (With yielding)
	today
	yesterday
	tomorrow
	today
	yesterday
	tomorrow
	today
	yesterday
tomorrow- 시스템에 따라서 위의 예는 몇 차례 지나고 나서야 양보가 진행되는 수도 있다. (이 때는 횟수를 3이 아닌 20 정도 주어야 한다.)
Sleeping
-
잠자기
- Yield() 보다 강력한 형태
- 스레드가 다른 스레드의 준비 여부와 상관없이 멈춤
- 메소드
- public static void sleep(long milliseconds) throws InterruptedException
- public static void sleep(long milliseconds, int nanoseconds) throws InterruptedException- 예제
public void run( ) {
	while (true) {
		if (!getPage("http://www.ibiblio.org/"))
			 mailError("webmaster@ibiblio.org");
		try {
			Thread.sleep(300); // 300milliseconds
		} catch (InterruptedException e) {
			break;
		}
	}
}
Interrupt()
- 스레드 깨우기
- sleep, join, wait 중인 스레드 객체의 interrupt() 를 호출한다.
- 즉, 다른 스레드가 sleep, join, wait 중에 있는 스레드 객체의 interrupt() 를 호출하여 InterruptedException 을 경험하게 한다.
- sleep, join, wait 중에 있던 스레드는 InterruptedException 과 함께 깨어나 catch 블록을 실행하게 된다.
join()
- 스레드 조인
- 스레드가 다른 스레드의 결과물을 기다리기 위하여 대기
- 관련 메소드
- public final void join() throws InterruptedException
- public final void join(long milliseconds) throws InterruptedException
- public final void join(long milliseconds, int nanoseconds) throws InterruptedException
joining thread / joined thread
-
joining thread
- 다른 스레드의 join() 메소드를 호출하는 스레드 -
joined thread
- 다른 스레드에 의해 자신의 join() 메소드가 호출되는 스레드
- 이 메소드를 가지고 있다가 다른 스레드가 자신에게 join 하길 기다린다.
예 : join
Thread t = new MyThread();
t.start();
try{
    t.join();
    System.out.println("thread finished");
}catch(InterruptedException e) {}- 스레드 t를 시작시키고 join() 을 통해 스레드 t가 실행을 종료하기를 기다린다.
- join 하는, 즉 join() 을 호출하며 자신의 수행을 멈추는 스레드에 대한 reference 가 보이지 않으며 인자로 join() 메소드에 넘겨지지도 않는다. 여기서는 main() 메소드 속에서 이루어졌다.
Joining thread 는 interrupt 될 수 있다.
- joining thread 는 sleeping thread 처럼 다른 스레드가 자신의 interrupt() 메소드를 호출하면 interrupt 될 수 있다.
- 스레드는 InterruptedException 예외로 이 호출을 경험하게 되며 이 예외를 잡는 catch 블록에서 수행을 재개한다.
- public final void join() throws InterruptedException 을 호출하여 join
- Joining thread 가 인터럽트를 받을 수 있다.
- joined thread 가 InterruptedException 을 던지는 것이 아니다. joined thread 는 오직 일을 수행하고 정상적으로 끝나는 수밖에 없다.
- join() 실행 중에, 즉 sleep() 에서처럼 호출 후 실행을 중지하고 대기 상태에 있을 때 제 3의 스레드가 joining thread 의 interrupt() 를 호출하여 스레드의 join 상태에 인터럽트를 걸 수 있다.
예 : 100개의 난수를 발생시켜 평균을 구하는 스레드 -> join 통해 결과를 전달받음
class JoinEx01 {
	public static void main(String[] args) {
		CalcThread calc = new CalcThread();
		calc.start();
		doSomethingElse();
		try {
			calc.join();
			System.out.println("Result is " + calc.getResult());
		} catch (InterruptedException e) {
			System.out.println("조인 중 인터럽 됨");
		}
	}
	static void doSomethingElse() {
		int sum = 0;
		for (int k = 0; k < 100; k++)
			sum += k;
	}
}
class CalcThread extends Thread {
	private double result;
	public void run() {
		double sum = 0;
		for (int k = 0; k < 100; k++)
			sum += Math.random();
		result = sum / 100;
	}
	public double getResult() {
		return result;
	}
}
예제 3-12 :
- 경쟁 산출 스레드에 join 하여 경쟁 조건이 만들어지는 것을 피한다.
import javax.xml.bind.DatatypeConverter;

public class JoinDigestUserInterface {

  public static void main(String[] args) {

    ReturnDigest[] digestThreads = new ReturnDigest[args.length];

    for (int i = 0; i < args.length; i++) {
      // Calculate the digest
      digestThreads[i] = new ReturnDigest(args[i]);
      digestThreads[i].start();
    }

    for (int i = 0; i < args.length; i++) {
      try {
        digestThreads[i].join();
        // Now print the result
        StringBuffer result = new StringBuffer(args[i]);
        result.append(": ");
        byte[] digest = digestThreads[i].getDigest();
        result.append(DatatypeConverter.printHexBinary(digest));
        System.out.println(result);
      } catch (InterruptedException ex) {
        System.err.println("Thread Interrupted before completion");
      }
    }
  }
}
스레드 간 신호의 필요성
-
동기화를 이용하면 스레드는 공유된 변수의 값을 안전하게 변경할 수 있다.
-
다른 스레드가 그 변수의 값이 변경되었다는 것을 어떻게 알 수 있는가?
-
한 가지 방법
- 몇 초에 한 번씩 값을 검사하며 기다린다.
- while(getValue() != desiredValue)
- Thread.sleep(5000);
- 좋은 방법이 아니다. -
이런 상황에 대한 자바의 해결책은 wait/notify 이다.
wait/notify 를 이용한 스레드 사이의 통신
-
한 스레드가
- 객체를 차지한다.
- 조건을 검사한다.
- 만족 상태이면 객체를 사용하여 해야 할 일을 수행한다.
- 만족 상태가 아니면 객체의 wait() 메소드를 호출하여 기다린다. 이 때 객체에 대한 락을 푼다.
- 다른 스레드가 이 조건을 만족시킨 후 통지해 주기를 기다림
- 기다리는 스레드가 사용하는 자원의 양은 0 이다.- 다른 스레드는 - 객체에 대한 락을 얻기 위해 대기한다. - 객체에 대한 락을 얻는다 - 어떤 방법을 사용하여 객체를 변경하고 notify() 또는 notifyAll() 호출하여 기다리고 있는 스레드에게 통지한다.
참고
-
Waiting 은 대기하는 스레드나 통보하는 스레드 모두 상대방 스레드를 실행시키기 위해 자신이 실행을 종료해야 하는 의무가 없다는 점에서 Joining 과 다르다.
- Waiting 은 객체나 자원이 어떤 상태에 도달할 때까지 수행을 멈추는 것이고,
- Joining 은 스레드가 종료될 때까지 수행을 멈추는 것이다. -
그렇지만 Waiting 은 Thread 클래스에 속한 메소드를 사용하지 않기 때문에 스레드를 잠시 중지시키는 방법으로는 쓰이지 않는다.
waiting
-
java.lang.Object 에 속한 메소드
- public final void wait() throws InterruptedException
- public final void wait(long milliseconds) throws InterruptedException
- public final void wait(long milliseconds, int nanoseconds) throws InterruptedException
- 위의 메소드들은 Thread 클래스에 속한 메소드가 아니다. -
스레드는 자신이 락을 얻은 객체의 wait 메소드 (앞의 세 wait() 중 하나) 를 호출하여 기다리기 시작하고 다음 조건 중 하나가 일어나기 전까지 sleep 상태에 빠짐
(InterrupedException 이 발생할 수 있으므로 반드시 try - catchj 블록 내에서 호출해야 함) -
wait 상태는 다음 3가지 방법 중 하나로 끝남
- 타임아웃 시간이 경과하는 경우
- 인터럽트 되는 경우
- 객체가 변경되었다고 다른 스레드가 알려 줄 경우 (notify)
notifying
- public final void notify()
- 객체를 기다리고 있는 스레드 중 무작위로 하나를 깨움 - public final void notifyAll()
- 객체를 기다리는 모든 스레드 깨움
wait() 와 notify() 는 반드시 동기화 코드에서 호출되어야 한다.
-
객체에 대한 락을 확보하지 못한 상태에서 wait() 나 notify() 를 호출할 경우 IllegalMonitorStateException 이라는 예외가 발생한다.
-
동기화 코드는 다음 중 하나
- 동기화 메소드
- 동기화 블록
- 또는 이들 속에서 호출한 비동기화 메소드
동기화 코드의 예
- lockedObject 를 공유 객체로 동기화 블록 내에서 호출
synchronized (lockedObject) {
....
try{
    wait();
    } catch (InterruptedException e) {
        System.out.println("Interrupted");
    }
}-
- lockedObject 객체 내의 동기화 메소드에서 호출
-
- 객체에 대한 락이 확보되는 동기화 블록이나 동기화 메소드가 호출하는 비동기화 메소드에서 호출
synchronized void Notifying() {  // synchronized method
...
    doNotify();
    ....
}
void doNotify() { // non-synchronized method
....
    notify();
    ....
}
간단한 wait/notify 의 예
-
간단하게 wait/notify 구조를 구성하려면 최소한 2개의 스레드와 동기화 Lock 을 걸 공유 객체 하나가 필요하다.
- 객체 하나를 공유함으로써, 프로그램 내에 notify() 를 기다리는 여러 개의 스레드가 있을 때, 이 객체의 notify() 호출에 의해서는 이 객체의 wait() 호출하고 있는 스레드만 영향을 받게 된다. - 즉 두 스레드가 모두 공유 객체의 wait() 나 notify() 를 호출하도록 하여 공유 객체가 두 스레드를 묶는 접착제 같은 역할을 한다. -
WaitNotify 라는 목표 객체를 공동으로 수행하는 두 스레드 중 WAIT 스레드가 단순히 NOTIFY 스레드의 통지를 기다린다.
public class ExampleSimple {
	public static void main(String[] args) {
		WaitNotify wn = new WaitNotify();
		Thread t1 = new Thread(wn, "WAIT");
		Thread t2 = new Thread(wn, "NOTIFY");
		t1.start();
		t2.start();
	}
}
class WaitNotify implements Runnable {
	private Object lockObject = new Object();
	public void run() {
		if((Thread.currentThread().getName()).equals("WAIT"))
			sun();
		if((Thread.currentThread().getName()).equals("NOTIFY"))
			moon();
	}
	public void sun() {
		synchronized (lockObject) {
			try {
				System.out.println(“1 sun() ");
				lockObject.wait();
				System.out.println(“2 sun() ");
			} catch (InterruptedException e) {
				System.out.println(“3 sun() ");
			}
		}
	}
	public void moon() {
		synchronized (lockObject) {
			System.out.println(“A moon() ");
			lockObject.notify();
			System.out.println(“B moon() ");
		}
	}
}
결과 :
1 sun()
A moon()
B moon()
2 sun()
보충 문제
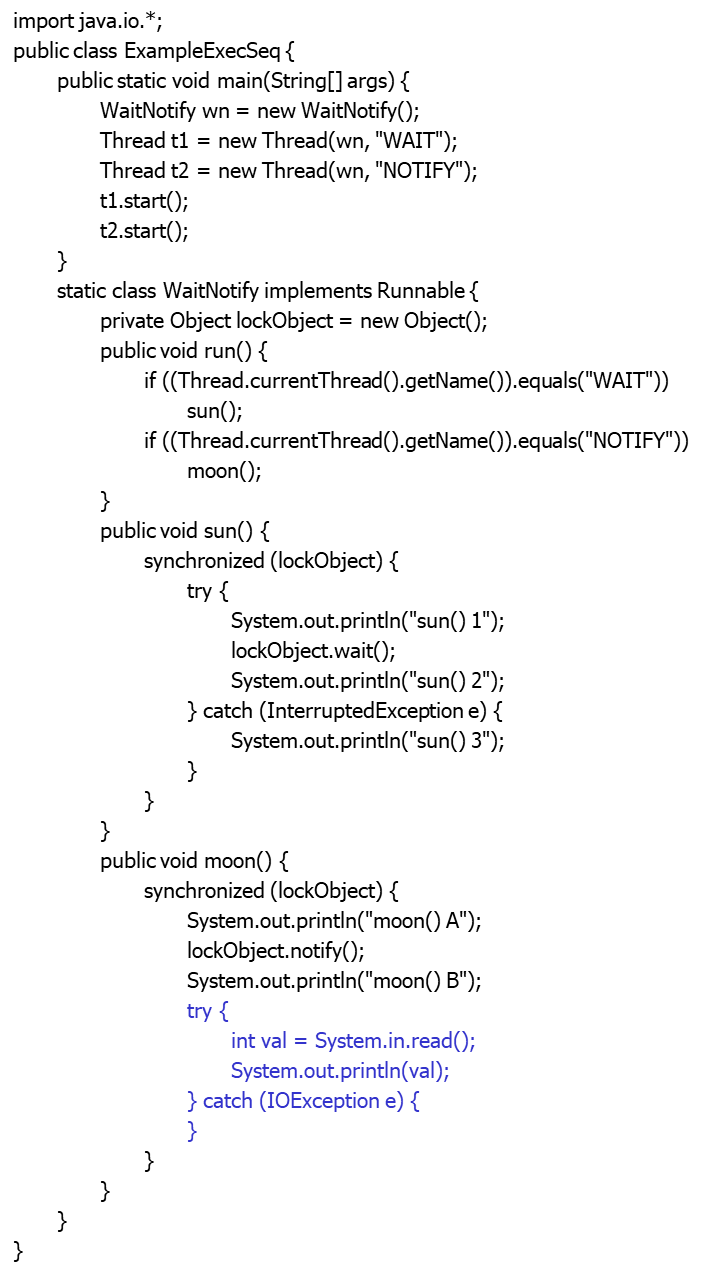
- 위의 프로그램에서 "NOTIFY" 스레드가 notify() 를 호출하는 즉시 "WAIT" 스레드의 락이 풀려 wait() 문 다음 문장이 실행되는가 아니면 notify() 호출이 들어 있는 동기화 블록의 실행이 완전히 끝나야 풀리는가??
import java.io.*;
public class ExampleExecSeq {
	public static void main(String[] args) {
		WaitNotify wn = new WaitNotify();
		Thread t1 = new Thread(wn, "WAIT");
		Thread t2 = new Thread(wn, "NOTIFY");
		t1.start();
		t2.start();
	}
	static class WaitNotify implements Runnable {
		private Object lockObject = new Object();
		public void run() {
			if ((Thread.currentThread().getName()).equals("WAIT"))
				sun();
			if ((Thread.currentThread().getName()).equals("NOTIFY"))
				moon();
		}
		public void sun() {
			synchronized (lockObject) {
				try {
					System.out.println("sun() 1");
					lockObject.wait();
					System.out.println("sun() 2");
				} catch (InterruptedException e) {
					System.out.println("sun() 3");
				}
			}
		}
		public void moon() {
			synchronized (lockObject) {
				System.out.println("moon() A");
				lockObject.notify();
				System.out.println("moon() B");
				// try block 이 실행되기 전까지는 wait() 상태가 끝나지 않는다.
				try {
					int val = System.in.read();
					System.out.println(val);
				} catch (IOException e) {
				}
			}
		}
	}
}- 처리를 지연시키기 위해 notify() 호출문 바로 다음에 키보드로부터 정수 하나를 읽어 들이는 코드를 삽입하여 wait() 실행까지의 과정을 살펴본다.
보충 문제 2
- 위의 프로그램을 고쳐서 기다리는 스레드와 통지하는 스레드가 각각 별도의 목표 객체를 실행하도록 고치시오. (두 스레드의 run() 메소드를 별도로 구성)
public class Example {
	public static void main(String[] args) {
		Integer integer = new Integer(100);
		Wait wait = new Wait(integer);
		Notify notify = new Notify(integer);
		Thread t1 = new Thread(wait, "WAIT");
		Thread t2 = new Thread(notify, "NOTIFY");
		t1.start();
		t2.start();
	}
}
class Wait implements Runnable {
	private Object lockObject;
	public Wait(Object obj){
		lockObject = obj;
	}
	public void run() {
		synchronized (lockObject) {
			try {
				System.out.println(Thread.currentThread().getName() + "-  1");
				lockObject.wait();
				System.out.println(Thread.currentThread().getName() + "-  2");
			} catch (InterruptedException e) {
				System.out.println("Sun() 3");
			}
		}
	}
}
class Notify implements Runnable {
	private Object lockObject;
	public Notify(Object obj){
		lockObject = obj;
	}
	public void run() {
		synchronized (lockObject) {
			System.out.println(Thread.currentThread().getName() + "-  A");
			lockObject.notify();
			System.out.println(Thread.currentThread().getName() + "-  B");
		}
	}
}
일반적인 wait/nofity
- 대부분의 경우에 있어서
- 기다리는 스레드는 어떤 필드의 값을 검사하여 조건에 맞지 않으면 대기한다.
- 통지를 담당하는 스레드는 필드값을 변경하여 조건을 만족시킨 후 통지한다. - 위의 행위는 모두 동기화 코드 속에서 진행되어야 한다.
- 이 형식을 구성하기 위해서는 다음이 필요
- 2개의 스레드
- 동기화를 위한 객체 하나
- 두 스레드가 공유하는 필드 하나
예제 : 필드 값 조건의 만족에 따라 notify() 한다는 점.
public class Example {
	public static void main(String[] args) {
		WaitNotify wn = new WaitNotify();
		Thread t1 = new Thread(wn, "WAIT");
		Thread t2 = new Thread(wn, "NOTIFY");
		t1.start();
		t2.start();
	}
}
class WaitNotify implements Runnable {
	private Object lockObject = new Object();
	private boolean OK = false;
	public void run() {
		if((Thread.currentThread().getName()).equals("WAIT"))
			sun();
		if((Thread.currentThread().getName()).equals("NOTIFY"))
			moon();
	}
	public void sun() {
		synchronized (lockObject) {
			try {
				System.out.println(Thread.currentThread().getName() + "- 1");
				while(OK != true)
					lockObject.wait();
				System.out.println(Thread.currentThread().getName() + "- 2");
			} catch (InterruptedException e) {
				System.out.println("sun() 3");
			}
		}
	}
	public void moon() {
		synchronized (lockObject) {
			System.out.println(Thread.currentThread().getName() + "- 1");
			OK = true;
			lockObject.notify();
			System.out.println(Thread.currentThread().getName() + "- 2");
		}
	}
}
실행 결과
Sun() 1
Moon() A
Moon() B
Sun() 2
- 이 프로그램은 앞의 예제와 거의 같지만 다음이 다르다.
- 기다리는 스레드는 그 필드의 값이 원하는 값이 될 때까지 wait() 를 반복하여 호출하여 기다린다.
보충 문제 3
- 앞의 예제를 동기화 메소드를 이용하는 wait/notify 로 고치시오
- 동기화 블록 대신 동기화 메소드를 사용한다는 의미는 동기화를 위해 매개용 객체를 따로 두지 않고 this 객체를 사용한다는 것이다.
public class Example {
	public static void main(String[] args) {
		WaitNotify wn = new WaitNotify();
		Thread t1 = new Thread(wn, "WAIT");
		Thread t2 = new Thread(wn, "NOTIFY");
		t1.start();
		t2.start();
	}
}
class WaitNotify implements Runnable {
	private boolean OK = false;
	public void run() {
		if((Thread.currentThread().getName()).equals("WAIT"))
			try{
				sun();
			}catch(InterruptedException e) {}
		if((Thread.currentThread().getName()).equals("NOTIFY"))
			moon();
	}
	public synchronized void sun() throws InterruptedException{
			System.out.println(Thread.currentThread().getName() + " 1");
			while(OK == false)
				wait();
			System.out.println(Thread.currentThread().getName() + " 2");
	}
	public synchronized void moon(){
			System.out.println(Thread.currentThread().getName() + "-  A");
			OK = true;
			notify();
			System.out.println(Thread.currentThread().getName() + "-  B");

	}
}
실행 결과 :
sun() 1
moon() A
moon() B
sun() 2
sun() 3
- this 객체 전체에 락이 걸리므로 이 예제에서는 이전 예제에 포함되어 있던 다음 코드는 불필요하다.
- private Object lockObject = new Object();
보충 문제 4
- 한 스레드가 배열의 평균을 구하고 다른 스레드는 이 평균을 얻어 인쇄하도록 구성
public class WaitNotifyAverage {
    public static void main(String[] args) {
        Mean mean = new Mean();
        Waiter waiter = new Waiter(mean);
        Server server = new Server(mean, new int[] { 1, 2, 3, 4, 5 });
        Thread t1 = new Thread(waiter);
        Thread t2 = new Thread(server);
        t1.start();
        try {
            Thread.sleep(1000);
        } catch (InterruptedException e) {
            System.out.println("Interrupted !");
        }
        t2.start();
    }
}

class Waiter implements Runnable {
    private Mean avr;
    public Waiter(Mean a) {
        avr = a;
    }
    public void run() {
        synchronized (avr) {
            try {
               avr.wait();
               System.out.println("average = " + avr.getAverage());
            } catch (InterruptedException e) {
               System.out.println("Interrupted !");
            }
        }
    }
}
class Server implements Runnable {
    private Mean avr;
    private int[] array;

    public Server(Mean a, int[] data) {
        avr = a;
        array = data;
    }

    public void run() {
        synchronized (avr) {
            double sum = 0;
            for (int i = 0; i < array.length; i++) {
                 sum += array[i];
            }
            avr.setAverage(sum / array.length);
            avr.notify();
        }
    }
}

class Mean {
    private double average;
    void setAverage(double d) {
        average = d;
    }
    double getAverage() {
        return average;
    }
}
wait/notify 의 응용
-
공유된 자원은 특정 스레드가 일정 시간동안 점유할 수 있도록 보장되어야 함
-
스레드의 보편적인 동작은 다음과 같은 식으로 구성됨
- 비공유 자원 사용
- 공유 자원 사용
- 비공유 자원 사용
- ..... -
이 코드 중 공유 자원을 사용하는 부분인 위험 영역 (Critical Region) 을 배타적으로 실행할 수 있도록 보장해야 함
wait/notify 의 응용 : Switch
- 다음과 같은 스위치를 만들어 위험 영역에 들어 갈 때 on() 을 호출하고 끝나면 off() 를 호출하게 하면 간단하게 동기화가 가능해진다.
class Switch{
	private boolean inUse = false;
	public synchronized void on() {
		while(inUse) {
			try{
				wait();
			}
			catch(InterruptedException e){};
		}
		inUse = true;
	}
	public synchronized void off() {
		inUse = false;
		notify();
	}
}
설명
-
on(), off() 모두 this 락의 지배를 받는 동기화 메소드이다. 따라서 상대방이 this 에 대한 락을 푸는 행위가 있어야 실행에 들어설 수 있다.
-
on() 은 다른 스레드가 inUse 를 끄는 것과 notify, 동기화 메소드 실행 종료 등 3가지를 모두 완료해 주지 않으면 계속 대기 상태이다.
-
off() 는 on()을 실행하는 스레드가 wait 상태로 들어 서며 this 에 대한 락을 풀어 놓지 않으면 실행에 들어갈 수 없다.
-
진행은 wait 가 선행되고 notify 가 다음 순서로 일어 나야 한다. (역순이면 Miss-notify 상황이 발생하게 된다.)
Digital Clock
- 위의 Switch를 이용하여 Digital Clock 을 만들 수 있다.
- 초시계와 분시계가 하나의 스위치를 공유하도록 한다.
- 초시계가 실행되면서 1분이 되면 분시계에게 통지해 주고
- 분시계는 1분에 1회씩 가동되게 하여 초와 분을 디스플레이한다.
public class DigitalClockSM{
   public static void main(String[] args) {
      Switch swtch = new Switch();
      Second second = new Second(swtch);
      Thread t1 = new Thread(second);
      Minute minute = new Minute(swtch);
      Thread t2 = new Thread(minute);
      t1.start();
      t2.start();
   }
}
class Switch{
   private boolean inUse = true;
   public synchronized void on() {
      while(inUse) {
         try{
            wait();
         }
         catch(InterruptedException e){};
      }
      inUse = true;
   }
   public synchronized void off() {
      inUse = false;
      notify();
   }
}
class Second implements Runnable {
   private int seconds = 0;
   private Switch swtch;
   public Second(Switch swtch){
      this.swtch = swtch;
   }
   public void run() {
      while(true) {
         try{
            Thread.sleep(1000);
         }catch (InterruptedException e){}
         if(seconds == 59){
            swtch.off();
            seconds = 0;
         }
         else {
            seconds ++;
            System.out.println(seconds);
         }
      }
   }
}
class Minute implements Runnable {
   private int minutes = 0;
   private Switch swtch;
   public Minute(Switch swtch){
      this.swtch = swtch;
   }
   public void run() {
      while(true) {
         swtch.on();
         if(minutes ==59)
            minutes = 0;
         else {
            minutes ++;
            System.out.println(minutes + " minutes");
         }
      }
   }
}
설명
-
초시계
- 초 값이 59초가 아니면 초 값 1 증가와 1초 잠자기를 거듭해서 반복
- 초 값이 59일 때는
- notify 하여 분시계가 일할 기회를 주고
- 초 값을 0으로 클리어 한다. -
분시계
- 대부분의 시간을 기다리며 보내게 된다. 그러다 통지를 받으면 아주 짧은 시간 동안 일한다.
- 그리고 다시 스위치의 on()을 실행하여 기다림으로 들어 간다.
보충 문제
- 분시계가 깨어 나서 일하는 짧은 시간 동안 초시계는 멈추어 있는가? / 동작을 계속하는가?
보충 문제 2
-
위의 예제에 시시계를 추가하여 시, 분, 초를 표시하는 디지털 시계를 구성하시오.
-
(힌트)
- 분시계에 시시계와의 동기화를 위한 스위치를 하나 더 추가한다.
public class DigitalClockSM{
   public static void main(String[] args) {
      Switch swtch = new Switch();
      Second second = new Second(swtch);
      Thread t1 = new Thread(second);
      Minute minute = new Minute(swtch);
      Thread t2 = new Thread(minute);
      t1.start();
      t2.start();
   }
}
class Switch{
   private boolean inUse = true;
   public synchronized void on() {
      while(inUse) {
         try{
            wait();
         }
         catch(InterruptedException e){};
      }
      inUse = true;
   }
   public synchronized void off() {
      inUse = false;
      notify();
   }
}
class Second implements Runnable {
   private int seconds = 0;
   private Switch swtch;
   public Second(Switch swtch){
      this.swtch = swtch;
   }
   public void run() {
      while(true) {
         try{
            Thread.sleep(1000);
         }catch (InterruptedException e){}
         if(seconds == 59){
            swtch.off();
            seconds = 0;
         }
         else {
            seconds ++;
            System.out.println(seconds);
         }
      }
   }
}
class Minute implements Runnable {
   private int minutes = 0;
   private Switch swtch;
   public Minute(Switch swtch){
      this.swtch = swtch;
   }
   public void run() {
      while(true) {
         swtch.on();
         if(minutes ==59)
            minutes = 0;
         else {
            minutes ++;
            System.out.println(minutes + " minutes");
         }
      }
   }
}