바닐라 자바스크립트로 슬라이더 만들기
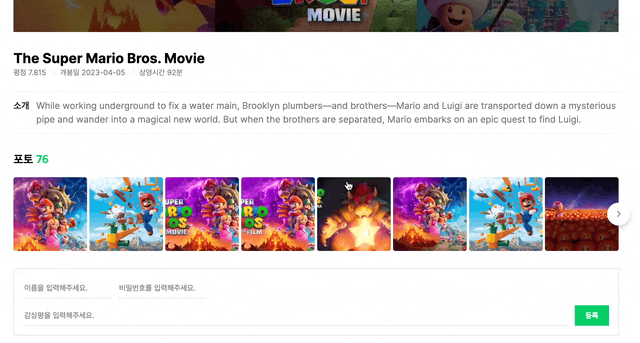
바닐라 자바스크립트를 통해 영화검색 사이트를 만들던 중, 상세페이지에서 영화와 관련된 이미지를 슬라이더 형식으로 표시하는 부분이 있으면 좋을 것 같아 만들어 보았습니다.
페이지네이션
먼저 슬라이더 형식을 구현하려면 슬라이더가 몇 페이지이며, 현재 페이지는 어디인지 그리고 페이지를 컨트롤할 수 있어야 합니다.
// Pagination.js
export class Pagination {
  constructor(totalCount, pageCount) {
    this._currentPage = 0;
    this._maxPage = Math.ceil(totalCount / pageCount) - 1;
  }

  get currentPage() {
    return this._currentPage;
  }

  set currentPage(page) {
    if (page >= 0 && page <= this._maxPage) {
      this._currentPage = page;
    }
  }

  nextPage() {
    this.currentPage = this._currentPage + 1;
  }

  prevPage() {
    this.currentPage = this._currentPage - 1;
  }

  isLastPage() {
    return this._currentPage === this._maxPage;
  }

  isFirstPage() {
    return this._currentPage === 0;
  }
}
위 클래스를 통해서 페이지를 관리하게 됩니다. 슬라이더뿐만 아니라 페이징 처리를 할 때에도 쓸 수 있도록 분리시켜 봤습니다.
스타일관리
슬라이더를 보면 좌우에 버튼이 있어 해당 버튼을 통해 슬라이더 페이지를 컨트롤하고 있습니다.
좌우 버튼은 첫 페이지에서는 이전 버튼이 숨겨져야 하고, 마지막 페이지에서는 다음 버튼이 숨겨져야 합니다.
이 컨트롤을 display속성을 통해서 관리하였는데, 이 관리를 편하게 도와줄 클래스를 만들었습니다.
// StyleHelper.js
export class StyleHelper {
  constructor() {
    this.styles = new Map();
  }

  save(element, property) {
    const style = getComputedStyle(element)[property];
    this.styles.set(element, { [property]: style });
  }

  restore(element, property) {
    const originStyle = this.styles.get(element);
    if (originStyle && property in originStyle) {
      element.style[property] = originStyle[property];
    }
  }

  toggle(element, property, value, trigger) {
    if (trigger) {
      this.save(element, property);
      element.style[property] = value;
    } else {
      this.restore(element, property);
    }
  }
}
위 코드를 통해 해당 요소가 가진 원래 속성값을 백업하고 복구시킬 수 있게 되었습니다.
원래 속성값이 아닌 개발자가 display의 속성값을 직접 문자열로 컨트롤 하게 되면, 해당 요소가 가진 원래 속성값을 알고 있어야 하기에 작업할 때 불편함이 있을 것이라 생각해 도입했습니다.
슬라이더
이제 준비가 모두 끝났습니다. 위에서 만든 Pagination과 StyleHelper를 활용해 Slider를 만들어 봅시다.
export class Slider {
  constructor(prevButtonElement, nextButtonElement, slideListElement, slideItemCount) {
    this._slideListElement = slideListElement;
    this._prevButtonElement = prevButtonElement;
    this._nextButtonElement = nextButtonElement;

    this._sliderPage = new Pagination(slideListElement.childElementCount, slideItemCount);
    this._styleHelper = new StyleHelper();
  }

  get sliderPage() {
    return this._sliderPage;
  }

  set sliderPage(newPage) {
    this._sliderPage = newPage;
    this.updateSlidePosition();
    this.setButtonDisplay();
  }

  connect() {
    this.setButtonDisplay();
    this._prevButtonElement.addEventListener("click", this.prevPage.bind(this));
    this._nextButtonElement.addEventListener("click", this.nextPage.bind(this));
  }

  setButtonDisplay() {
    this._styleHelper.toggle(this._prevButtonElement, "display", "none", this.sliderPage.isFirstPage());
    this._styleHelper.toggle(this._nextButtonElement, "display", "none", this.sliderPage.isLastPage());
  }

  prevPage() {
    this.sliderPage.currentPage = this.sliderPage.currentPage - 1;
  }

  nextPage() {
    this.sliderPage.currentPage = this.sliderPage.currentPage + 1;
  }

  updateSlidePosition() {
    const gap = parseInt(getComputedStyle(this._slideListElement)["gap"]);
    const translatePos = this.sliderPage.currentPage * -(this._slideListElement.clientWidth + gap);

    this._slideListElement.style.transform = `translateX(${translatePos}px)`;
  }
}
완성된 코드는 위와 같습니다. 이전, 다음 버튼과 리스트 요소를 전달받아 이벤트를 연결하고 통제하고 있습니다.
setButtonDisplay 메소드를 통해 display속성을 컨트롤하고 있으며, updateSlidePosition을 통해 슬라이더의 위치를 통제하고 있습니다.
여기서 좌표를 통제할 때, left가 아닌 translate속성을 사용하였는데, translate는 reflow, repaint모두 발생하지 않기 때문에 성능장 이점이 있습니다.
// DetailPage.js
const photoSlider = document.querySelector(".photo-slider");
const prevButton = document.querySelector(".prev-button");
const nextButton = document.querySelector(".next-button");

const slider = new Slider(prevButton, nextButton, photoSlider, 8);
slider.connect();
이제 Slider를 생성해 connect하기면 하면 Slider가 작동하게 됩니다.
리액트로 개발을 할 때, 클래스를 이용할 일이 별로 없었는데, 바닐라 자바스크립트로 개발을 할 때에는 클래스를 자주 찾게되는 것 같습니다.