백만년만에 블로그를 쓰는거 같다. 운좋게 1년전부터 프론트엔드 개발자로 일하게 되어 열심히 직장생활을 하구있다...
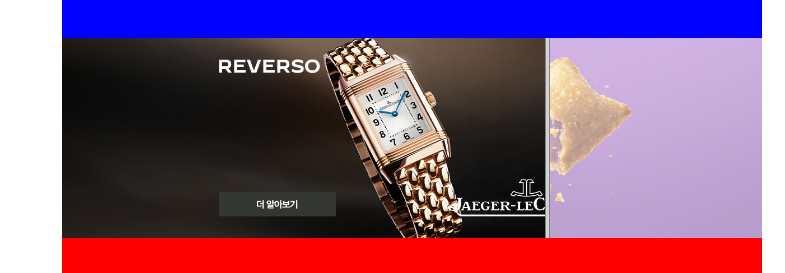
네이버를 사용하다보면 이런 광고 스타일(?)이 많이 보였는데 (전문용어로 뭔지는 모르겠다 쩝)
멋있어보여서 만들어보았다.

전체 코드
import { useRef, useEffect, useState } from "react";
import styled from "styled-components";
import Banner1 from "../../assets/banner1.jpg";
import Banner2 from "../../assets/banner2.jpg";

const THRESHOLD_HEIGHT = window.innerHeight / 1.25;

const Scroll = () => {
	const imageWrapperRef = useRef<HTMLDivElement>(null);
	const [slideWidth, setSlideWith] = useState(1);

	useEffect(() => {
		const handleScroll = () => {
			if (imageWrapperRef.current) {
				const imageRect = imageWrapperRef.current.getBoundingClientRect();
				if (imageRect.top + imageRect.height / 2 <= THRESHOLD_HEIGHT) {
					setSlideWith((window.scrollY - imageRect.top) * 0.6);
				}
			}
		};

		window.addEventListener("scroll", handleScroll);

		return () => {
			window.removeEventListener("scroll", handleScroll);
		};
	}, []);

	return (
		<Container>
			<Section1 />
			<ImageWrpper ref={imageWrapperRef}>
				<Divider style={{ left: Math.min(700, Math.max(0, slideWidth)) }} />
				<Image1 src={Banner1} />
				<Blinder width={slideWidth}>
					<Image2 src={Banner2} $iszIndex={slideWidth > 50} />
				</Blinder>
			</ImageWrpper>
			<Section2 />
		</Container>
	);
};

export default Scroll;

const Container = styled.div`
	width: 700px;
	display: flex;
	flex-direction: column;
`;

const ImageWrpper = styled.div`
	position: relative;
	height: 200px;
	overflow: hidden;
`;

const Divider = styled.div`
	position: absolute;
	height: 200px;
	width: 5px;
	background-color: black;
	z-index: 5;
`;

const Blinder = styled.div<{ width: number }>`
	position: absolute;
	width: ${(props) => props.width}px;
	height: 200px;
	overflow: hidden;
`;

const Image1 = styled.img`
	position: absolute;
	width: 700px;
	height: 200px;
	z-index: 1;
`;

const Image2 = styled.img<{ $iszIndex: boolean }>`
	position: absolute;
	width: 700px;
	height: 200px;
	z-index: ${(props) => props.$iszIndex && 2};
`;

const Section1 = styled.div`
	background-color: blue;
	height: 130vh;
`;

const Section2 = styled.div`
	background-color: red;
	height: 130vh;
`;
코드 설명
const THRESHOLD_HEIGHT = window.innerHeight / 1.25;해당 상수는 동작이 트리거 되어야 하는 넘버 값이다
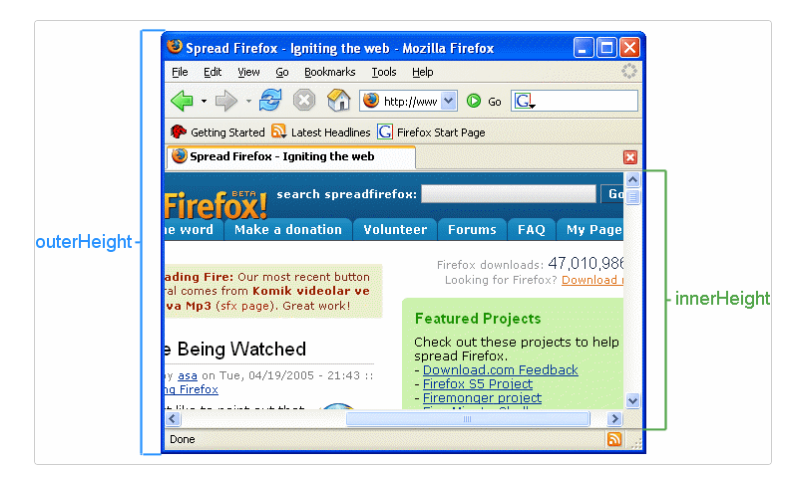
출처 : https://developer.mozilla.org/en-US/docs/Web/API/Window/innerHeight
innerHeight의 딱 절반값으로 떨어지게 하지 않고 조금더 여유를 주었다
사용한 컴포넌트
<ImageWrpper ref={imageWrapperRef}>디바이더, 이미지 2개 등을 가지고 있는 부모 엘리먼트이다. getBoundingClientRect() 메서드 사용을 위해 ref를 걸어주었다
/* 그냥 막대기다 */
const Divider = styled.div`
	position: absolute;
	height: 200px;
	width: 5px;
	background-color: lightgray;
	z-index: 3;
	border-left: 1px solid gray;
	border-right: 1px solid gray;
`;

/* 이미지2를 잠깐 가려주는 (?) 컴포넌트이다. 계산된 어떤 값에 의해 width가 점점 늘어날것이다
자식 컴포넌트인 Image2는 부모의 overflow: hidden 속성에 의해 고정 px 값이지만 보이지 않을것
*/
const Blinder = styled.div<{ width: number }>`
	position: absolute;
	width: ${(props) => props.width}px;
	height: 200px;
	overflow: hidden;
`;

const Image1 = styled.img`
	position: absolute;
	width: 700px;
	height: 200px;
	z-index: 1;
`;

/* boolean props $iszIndex가 true가 되면 z-index 값 2를 가지며 Image1위로 올라올것!!
아직은 Image1뒤에 숨겨져 있는 상태일 것이다.
*/
const Image2 = styled.img<{ $iszIndex: boolean }>`
	position: absolute;
	width: 700px;
	height: 200px;
	z-index: ${(props) => props.$iszIndex && 2};
`;
이벤트 리스너 함수
useEffect(() => {
		const handleScroll = () => {
			if (imageWrapperRef.current) {
				const imageRect = imageWrapperRef.current.getBoundingClientRect();
				if (imageRect.top + imageRect.height / 2 <= THRESHOLD_HEIGHT) {
					setSlideWith((window.scrollY - imageRect.top) * 0.6);
				}
			}
		};

		window.addEventListener("scroll", handleScroll);

		return () => {
			window.removeEventListener("scroll", handleScroll);
		};
	}, []);
useEffect를 사용해 페이지가 최초 렌더링 되었을때 handleScroll 이벤트 리스너 함수를 등록해준다
const imageRect = imageWrapperRef.current.getBoundingClientRect();getBoundingClientRect() 메서드를 사용해 엘리먼트의 크기와 뷰포트에 상대적인 위치 정보를 제공하는 DOMRect 객체를 가져온다
참고 : https://developer.mozilla.org/ko/docs/Web/API/Element/getBoundingClientRect
if (imageRect.top + imageRect.height / 2 <= THRESHOLD_HEIGHT) {
	setSlideWith((window.scrollY - imageRect.top) * 0.6);
}
imageRect.top은 뷰포트의 위쪽에서 요소의 위쪽 까지의 거리이기 때문에 스크롤을 내릴수록 점점 값이 줄어든다
또한 DOMRect 객체가 제공하는 height 값을 통해절반 height 값 (100)까지 더해주면서 값을 계산해본다
앞서 정했던 상수값 THRESHOLD_HEIGHT 보다 작아지는 경우 내가 원하는 뷰포트에 도달했다는 의미이며 내가 스크롤한 픽셀수를 활용(window.scrollY), imageRect.top와 함께 적절한 숫자값을 계산해 state에 담아준다
스크롤을 쭉내려 ImageWrpper가 사라지고 다시 스크롤을 올릴때 경우를 생각할 필요가 없는게
imageRect.top의 값은 해당 엘리먼트가 사라지면 음수값이 되고 다시 나타날경우 뷰포트의 위쪽에서 요소의 위쪽 까지의 거리가 작아지다가 점점 커지기 때문에 조건문에서 다시 필요한 값을 계산해준다.
<Divider style={{ left: Math.min(700, Math.max(0, slideWidth)) }} />인라인 스타일을 통해 계산된 slideWidth로 left값을 넣어준다 (0 ~ 700만 가지도록)
<Image2 src={Banner2} $iszIndex={slideWidth > 50} />또한 slideWidth가 50을 넘어가면 불리언 값을 통해 해당 컴포넌트의 z-index 값을 2로 지정해준다. (50은 내맘대로 넣은거다 ㅎㅎ)
<Blinder width={slideWidth}>
	<Image2 src={Banner2} $iszIndex={slideWidth > 50} />
</Blinder>
slideWidth로 Blinder의 width값도 스크롤 할때마다 점점 늘려준다. width가 점점 늘어날수록 Image2가 서서히 보이게 될것
but overflow: hidden 속성에 의해 Blinder의 width값까지만 이미지가 보인다.
추가 : 이미지에 opacity 주기
잘보면 스크롤을 내렸다 올렸을때 먼저 보이는 배너(Image1)의 투명도가 변한다
const [imageOpacity, setImageOpacity] = useState(1);이미지 Opacity 수치를 조정할 state 값이다.
첫 진입시는 다 보여야 하므로 초기값은 1로 둔다
useEffect(() => {
	setImageOpacity(1 - slideWidth / 1000);
}, [slideWidth]);
useEffect안에서 계산되고 있는 slideWidth의 값을 이용해 1 ~ 0 사이에서 적절히 놀도록
imageOpacity의 값을 계산해준다
<OpacityWrapper style={{ opacity: imageOpacity }}>
	<Image1 src={Banner1} />
</OpacityWrapper>

const OpacityWrapper = styled.div`
	position: absolute;
	width: 700px;
	height: 200px;
	background-color: black;
	z-index: 2;
`;
그리고 인라인 스타일로 계산되고 있는 Opacity 수치를 넣어주기만 하면 끝이다~~
참고
직전에 구한 Opacity 수치 처럼 값이 심하게 자주 바뀌는 녀석들은 인라인 스타일로 넣어주는게 좋다
<Blinder width={slideWidth}>
	<Image2 src={Banner2} $iszIndex={slideWidth > 50} />
</Blinder>

const Blinder = styled.div<{ width: number }>`
	position: absolute;
	width: ${(props) => props.width}px;
	height: 200px;
	overflow: hidden;
`;
이 녀석은 styled-component내 props를 전달해서 width 값을 넘겨주고 있다.
보이는것 처럼 클레스 네임이 계속 바뀌면서 컴포넌트가 다시 생성되고 있다.
지금은 가벼운 코드라 별 문제는 없지만 복잡도가 높은 코드가 계산되고 브라우저에 부담이 많이되는 스크롤 이벤트도 들어간다면 성능상 치명적일 것이다.
결론
내가 짜 놓고도 어 이게 되네 느낌이라 더 좋은 방법이 있다면 연구해보고 싶다ㅎㅎ
읽어주셔서 감사합니다 꾸벅