지난번 포스팅 에서 update (혹은 delete) 시
redis와 Mysql 간의 동기화 문제가 있는 것을 확인할 수 있었습니다!
오늘은 이에 대한 포스팅을 진행하도록 하겠습니다
Write Through 방식으로 해결하기
동기화를 해주는 방식 중 생각할 수 있는 것의 첫번째는
값을 update 할 때 redis에도 업데이트 한 값을 함께 저장해주는 것입니다
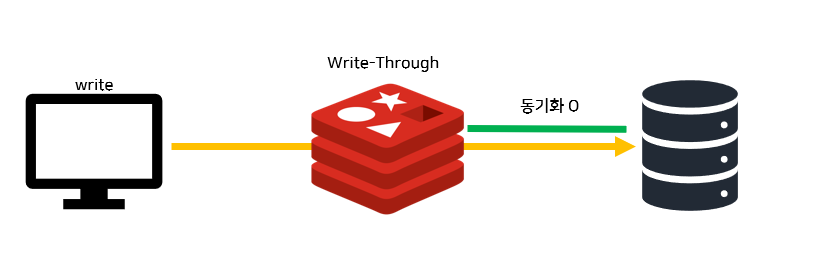
이를 Write-Through 방식이라고 합니다!

참고로 기존에 사용하던 Jedis 는 Write-through 방식이 적용되지 않으므로 저는 Redisson을 이용해서 진행을 해보도록 하겠습니다
Write Through 방식 코드
pom.xml
<!--        <dependency>-->
<!--            <groupId>org.springframework.data</groupId>-->
<!--            <artifactId>spring-data-redis</artifactId>-->
<!--            <version>2.3.3.RELEASE</version>-->
<!--        </dependency>-->

<!--        <dependency>-->
<!--            <groupId>redis.clients</groupId>-->
<!--            <artifactId>jedis</artifactId>-->
<!--            <version>3.3.0</version>-->
<!--            <type>jar</type>-->
<!--        </dependency>-->
        <dependency>
            <groupId>org.springframework.boot</groupId>
            <artifactId>spring-boot-starter-data-redis</artifactId>
        </dependency>
        <dependency>
            <groupId>org.redisson</groupId>
            <artifactId>redisson</artifactId>
            <version>3.13.1</version>
        </dependency>
        <dependency>
            <groupId>org.springframework.session</groupId>
            <artifactId>spring-session-data-redis</artifactId>
</dependency>- 지난번에 추가한 spring-data-redis, jedis 는 주석처리를 해주었습니다
- 만일 주석처리를 하지 않을 경우 NoSuchMethodError가 발생합니다
- redisson과 spring-session-data-redis dependency를 추가해줍니다
SpringbootApplication 부분
@SpringBootApplication
public class RedisPracticeApplication {

    public static void main(String[] args) {
        SpringApplication.run(RedisPracticeApplication.class, args);
    }

    @Bean
    public RedissonClient redissonClient(){

        Config config = new Config();
        config.useSingleServer().setAddress("redis://192.168.0.20:6379");
        return Redisson.create(config);

    }
}
- RedissonClient를 등록하기 위해 @SpringbootApplication annotation 부분에 bean을 등록합니다
- RedissonClient에 redis 서버의 정보를 등록합니다
- redis 서버의 주소는 "redis://host:port" 형식으로 되어있습니다
- Config(org.redisson.config.Config)를 이용해 주소 정보 이외에도 connection pool size 등 많은 부분에 대해 설정할 수 있습니다
RedisConfig.java
@Configuration
@EnableCaching
public class RedisConfig{

    private StudentRepository studentRepository;
    private RedissonClient redissonClient;

    public RedisConfig(StudentRepository studentRepository, RedissonClient redissonClient) {
        this.studentRepository = studentRepository;
        this.redissonClient = redissonClient;
    }

    @Bean
    public RMapCache<String, Student> studentRMapCache(){
        final RMapCache<String, Student> studentRMapCache
                = redissonClient.getMapCache("Student", MapOptions.<String, Student>defaults()
                .writer(getStudentMapWriter())
                .writeMode(MapOptions.WriteMode.WRITE_BEHIND));


        return studentRMapCache;
    }

    private MapWriter<String, Student> getStudentMapWriter(){
        return new MapWriter<String, Student>(){
            @Override
            public void write(Map<String, Student> map) {
                map.forEach((k, v) -> {
                    studentRepository.save(v);
                });
            }

            @Override
            public void delete(Collection<String> keys) {
                keys.stream().forEach(key -> {
                    studentRepository.deleteById(key);
                });
            }
        };
    }
}
- 이전에 작성해놓은 JedisConnectionFactory, RedisTemplate은 주석처리를 했습니다(Redisson 이용을 위해)
- RMapCache는 캐시의 TTL(time to live)를 설정할 수 있도록 해줍니다
- MapWriter<키값의 타입, 저장할 타입>을 override하여, 캐시에 값을 write 하거나 delete 할 때 할 행동을 지정해줍니다
- 이 때 저는 캐시에 저장하는 값이 DB에도 저장이 되도록 했습니다
- 또한 캐시에서 삭제요청을 하면 DB에서도 삭제가 되도록 했습니다
- writeMode를 MapOptions.WriteMode.WRITE_BEHIND로 하여 write-behind 방식으로 캐시 저장이 되도록 했습니다
- cf ) .writeMode(MapOptions.WriteMode.WRITE_THROUGH));
StudentService.java
@Service
public class StudentService {

    private StudentRepository studentRepository;
    private RMapCache<String, Student> studentRMapCache;

    @Autowired
    public StudentService(StudentRepository studentRepository, RMapCache<String, Student> studentRMapCache) {
        this.studentRepository = studentRepository;
        this.studentRMapCache = studentRMapCache;
    }

    public Student save(Student student){
        studentRMapCache.put(student.getId(), student);
        return student;

    }

    public Student findById(String id){
        return this.studentRMapCache.get(id);
    }

    public void update(String id, String name) throws Exception {
        Student student = studentRMapCache.get(id);
        student.setName(name);
        studentRMapCache.put(id, student);
    }

    public void delete(String id){

        studentRMapCache.remove(id);

    }

}- 값을 조작하는 StudentService를 구현했습니다
- 새로운 값을 insert/update 할 때 RMapCache.put(id, 저장할 값)과 같이 캐시에 대한 부분만 조작합니다(그럼 db에도 함께 들어가게 됩니다)
- 값을 insert 할 때 TTL도 함께 지정해줄 수 있습니다
그럼 이제 Test를 진행해보겠습니다
Redisson.Test
@SpringBootTest
@TestInstance(TestInstance.Lifecycle.PER_CLASS)
public class RedissonTest {

    StudentService studentService;
    RedissonClient redissonClient;
    StudentRepository studentRepository;

    @Autowired
    public RedissonTest(StudentService studentService, RedissonClient redissonClient
            , StudentRepository studentRepository) {
        this.studentService = studentService;
        this.redissonClient = redissonClient;
        this.studentRepository = studentRepository;
    }


    @Test
    @Order(1)
    void saveTest(){
        Student student1 = new Student("1", "zzarbttoo1", Student.Gender.FEMALE, 1);
        Student student2 = new Student("2", "zzarbttoo2", Student.Gender.FEMALE, 2);
        Student student3 = new Student("3", "zzarbttoo3", Student.Gender.FEMALE, 3);
        Student student4 = new Student("4", "zzarbttoo4", Student.Gender.FEMALE, 4);
        Student student5 = new Student("5", "zzarbttoo5", Student.Gender.FEMALE, 5);

        studentService.save(student1);
        studentService.save(student2);
        studentService.save(student3);
        studentService.save(student4);
        studentService.save(student5);

    }

    @Test
    @Order(2)
    void selectTest(){

        long start1 = System.currentTimeMillis();

        System.out.println(studentService.findById("1").toString());
        System.out.println(studentService.findById("2").toString());
        System.out.println(studentService.findById("3").toString());
        System.out.println(studentService.findById("4").toString());
        System.out.println(studentService.findById("5").toString());

        long end1 = System.currentTimeMillis();
        System.out.println(end1 - start1);

        long start2 = System.currentTimeMillis();

        System.out.println(studentService.findById("1").toString());
        System.out.println(studentService.findById("2").toString());
        System.out.println(studentService.findById("3").toString());
        System.out.println(studentService.findById("4").toString());
        System.out.println(studentService.findById("5").toString());

        long end2 = System.currentTimeMillis();

        System.out.println(end2 - start2);

        long start3 = System.currentTimeMillis();

        System.out.println(studentService.findById("1").toString());
        System.out.println(studentService.findById("2").toString());
        System.out.println(studentService.findById("3").toString());
        System.out.println(studentService.findById("4").toString());
        System.out.println(studentService.findById("5").toString());

        long end3 = System.currentTimeMillis();

        System.out.println(end3 - start3);


    }

    @Test
    @Order(3)
    void updateTest() throws Exception {

        studentService.update("1", "updated Name");

        Student selectStudent = studentRepository.findById("1").get();
        System.out.println(selectStudent.toString());

        Student redisStudent = studentService.findById("1");
        System.out.println(redisStudent.toString());

    }

    @Test
    @Order(4)
    void deleteTest(){

        System.out.println(studentService.findById("4"));
        studentService.delete("4");
        Assertions.assertNull(studentService.findById("4"));

    }
}
테스트 코드는 위와 같이 작성했습니다
먼저 select의 결과를 보면
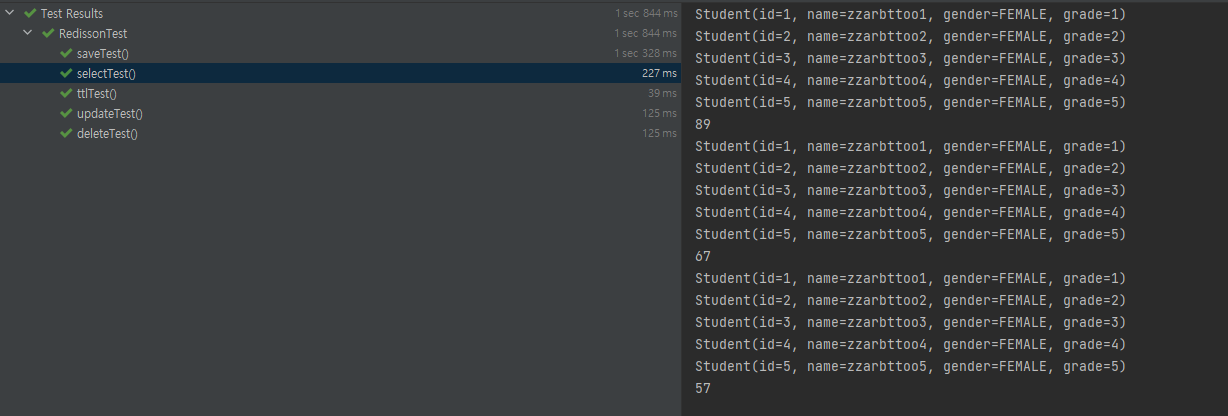
cache와 db에 동시 저장을 하기 때문에 첫번째 실행과 그 이후의 실행의 속도 차가 이전만큼 크지 않은 것을 확인할 수 있었습니다

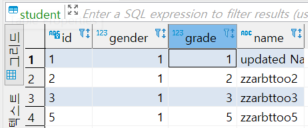
update의 경우에는 동기화가 된 것을 볼 수 있었습니다
 delete의 경우 cache의 값만 삭제해도 db의 값까지 null이 되는 것을 확인할 수 있었습니다
Write Through 방식의 문제점
위와 같은 방식으로 진행을 하면 동기화는 바로바로 된다고 볼 수 습니다
하지만 write/update 시 모든 정보를 redis 저장하게 되다 보니 저장소 두개에 모두 저장을 해야하고,
불필요하게 캐싱 처리 되는 경우가 있습니다
(사실상 20% 미만의 정보만 재사용된다는 사실)
이를 위해서는 데이터의 TTL(Time To Live)를 지정해줘 불필요한 데이터를 삭제해줘야합니다
또한 write 를 할 때마다 DB를 사용하기 때문에 속도도 느리다는 단점이 있습니다
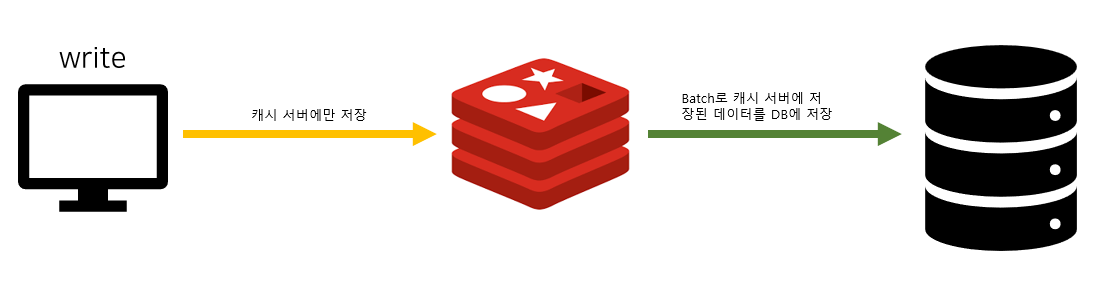
Write Back 방식으로 해결하기
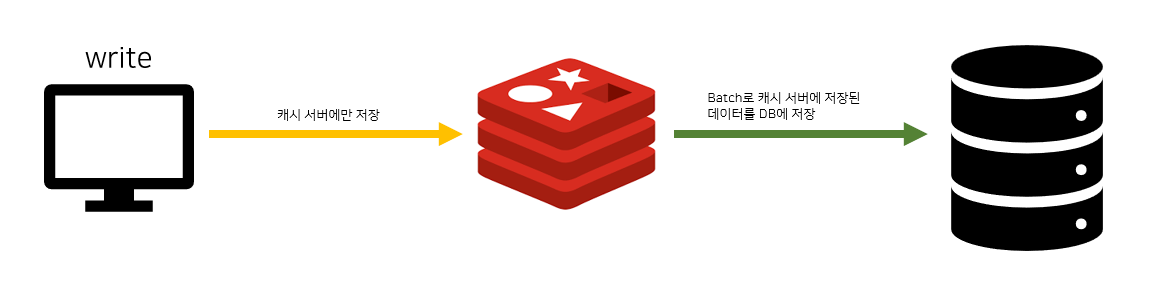
write back은 모든 write 작업을 redis에 한 후 일정 간격으로 batch를 해서
redis 서버에 저장되어 있는 데이터를 DB로 옮기는 작업을 하는 방식을 말합니다
insert 시 여러 건을 한번에 처리하기 때문에 속도가 빠르다는 장점이 있습니다
반면에 캐시 서버에만 데이터를 저장한채로 장애가 날 경우 데이터가 모두 날아갈 수 있다는 단점이 있습니다
보통 Log 데이터를 저장할 때 사용을 하며,
Write-Through 방식과 마찬가지로 TTL을 이용해 불필요한 데이터를 삭제해줘야 합니다
Write-Back 방식의 코드
write-through 코드와 달라진 점은 크게 없습니다
RedisConfig.java
@Configuration
@EnableCaching
public class RedisConfig{

    private StudentRepository studentRepository;
    private RedissonClient redissonClient;

    public RedisConfig(StudentRepository studentRepository, RedissonClient redissonClient) {
        this.studentRepository = studentRepository;
        this.redissonClient = redissonClient;
    }

    @Bean
    public RMapCache<String, Student> studentRMapCache(){
        final RMapCache<String, Student> studentRMapCache
                = redissonClient.getMapCache("Student", MapOptions.<String, Student>defaults()
                .writer(getStudentMapWriter())
                .writeMode(MapOptions.WriteMode.WRITE_BEHIND)
                .writeBehindBatchSize(5000)
                .writeBehindDelay(1000)
        );
                //.writeMode(MapOptions.WriteMode.WRITE_THROUGH));

        return studentRMapCache;
    }

    private MapWriter<String, Student> getStudentMapWriter(){
        return new MapWriter<String, Student>(){
            @Override
            public void write(Map<String, Student> map) {
                map.forEach((k, v) -> {
                    studentRepository.save(v);
                });
            }

            @Override
            public void delete(Collection<String> keys) {
                keys.stream().forEach(key -> {
                    studentRepository.deleteById(key);
                });
            }
        };
}- MapWriter 부분은 Write-Through 구현 했을 때와 같습니다
- RMapCache 구현을 할 때 writeMode를 MapOptions.WriteMode.WRITE_BEHIND로 설정해줬습니다
- writeBehindDelay(1000)으로 설정해 1초 간격으로 배치가 이루어지게 했습니다(default가 1000)
그럼 이제 Test를 진행
@SpringBootTest
@TestInstance(TestInstance.Lifecycle.PER_CLASS)
public class RedissonTest {

    StudentService studentService;
    RedissonClient redissonClient;
    StudentRepository studentRepository;

    @Autowired
    public RedissonTest(StudentService studentService, RedissonClient redissonClient
            , StudentRepository studentRepository) {
        this.studentService = studentService;
        this.redissonClient = redissonClient;
        this.studentRepository = studentRepository;
    }

    @Test
    @Order(1)
    @Rollback(false)
    void saveTest(){
        Student student1 = new Student("1", "zzarbttoo1", Student.Gender.FEMALE, 1);
        Student student2 = new Student("2", "zzarbttoo2", Student.Gender.FEMALE, 2);
        Student student3 = new Student("3", "zzarbttoo3", Student.Gender.FEMALE, 3);
        Student student4 = new Student("4", "zzarbttoo4", Student.Gender.FEMALE, 4);
        Student student5 = new Student("5", "zzarbttoo5", Student.Gender.FEMALE, 5);

        studentService.save(student1);
        studentService.save(student2);
        studentService.save(student3);
        studentService.save(student4);
        studentService.save(student5);

    }

    @Test
    @Order(2)
    void selectTest(){

        long start1 = System.currentTimeMillis();

        System.out.println(studentService.findById("1").toString());
        System.out.println(studentService.findById("2").toString());
        System.out.println(studentService.findById("3").toString());
        System.out.println(studentService.findById("4").toString());
        System.out.println(studentService.findById("5").toString());

        long end1 = System.currentTimeMillis();
        System.out.println(end1 - start1);

        long start2 = System.currentTimeMillis();

        System.out.println(studentService.findById("1").toString());
        System.out.println(studentService.findById("2").toString());
        System.out.println(studentService.findById("3").toString());
        System.out.println(studentService.findById("4").toString());
        System.out.println(studentService.findById("5").toString());

        long end2 = System.currentTimeMillis();

        System.out.println(end2 - start2);

        long start3 = System.currentTimeMillis();

        System.out.println(studentService.findById("1").toString());
        System.out.println(studentService.findById("2").toString());
        System.out.println(studentService.findById("3").toString());
        System.out.println(studentService.findById("4").toString());
        System.out.println(studentService.findById("5").toString());

        long end3 = System.currentTimeMillis();

        System.out.println(end3 - start3);


    }

    @Test
    @Order(3)
    @Rollback(false)
    void updateTest() throws Exception {

        studentService.update("1", "updated Name");
        Thread.sleep(1000);

    }

    @Test
    @Order(4)
    @Rollback(false)
    void deleteTest() throws InterruptedException {

        System.out.println(studentService.findById("4"));
        studentService.delete("4");
        Assertions.assertNull(studentService.findById("4"));

        Thread.sleep(1000);

    }
}
- @Rollback(false)를 이용해 test 이후 결과가 DB에 남아있도록 했습니다
- Thread.sleep(1000)으로 배치가 이루어질 때 까지 대기하도록 했습니다

이렇게 작업이 잘 이루어지는 것을 확인할 수 있습니다
https://github.com/skshukla/SampleCacheWebApp
https://www.baeldung.com/redis-redisson
https://redisson.org/feature-comparison-redisson-vs-jedis.html
https://www.programcreek.com/java-api-examples/?api=org.redisson.api.RMapCache
https://www.javadoc.io/doc/org.redisson/redisson/3.7.2/org/redisson/api/RMapCache.html
https://www.javadoc.io/doc/org.redisson/redisson/3.6.0/org/redisson/api/MapOptions.html
https://www.javadoc.io/doc/org.redisson/redisson/3.4.4/org/redisson/api/map/MapWriter.html
https://stackoverflow.com/questions/51992484/caused-by-java-lang-nosuchmethoderror-org-springframework-data-redis-connectio
https://github.com/redisson/redisson/wiki/7.-distributed-collections#712-map-persistence
https://www.youtube.com/watch?v=mPB2CZiAkKM
https://waspro.tistory.com/697
https://dzone.com/articles/database-caching-with-redis-and-java