🐗 전역 상태 관리의 필요성
일반적으로 React에서는 데이터는 부모로부터 props를 통해 전달된다. 그러나 컴포넌트를 나누다보면 하나의 어플리케이션 안에 여러 컴포넌트에 전달해줘야 하는 경우 props-drilling 현상이 나타나기도 한다. props로 계속해서 자식 컴포넌트에 전달하면 코드가 지저분해진다.
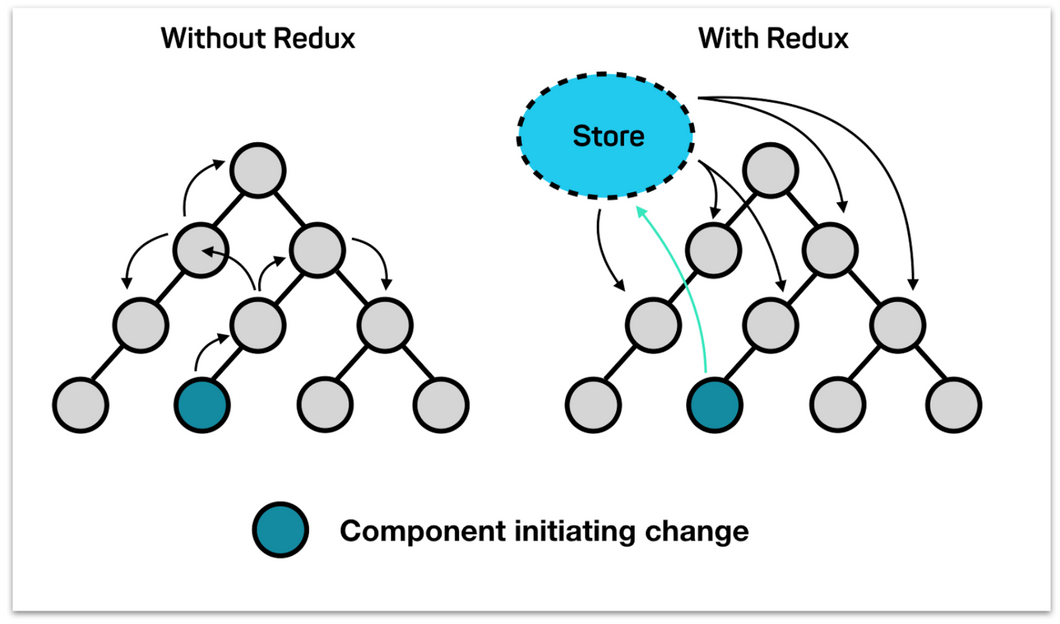
🐺 Redux VS Context API
리덕스는 자바스크립트 라이브러리로 상태 컨테이너의 역할을 하며 리액트에서는 전역 상태 관리 도구로 많이 활용된다. 리액트 context는 상태 관리 훅과 조합하여 사용되었을 때 상태 관리 도구로 활용할 수 있으나 Context와 Redux는 다른 도구이며 다른 목적을 가진다.
- Context 자체는 그 상태관리 도구의 기능을 하지 않으며 상태관리는 useState나 useReducer와 함께 사용했을 때 가능하다.
- Redux는 자바스크립트 라이브러리로 상태 관리를 가능케 한다.
🐤 Choosing right tool
도구를 사용할 때에는 자신의 상황을 먼저 생각한 뒤 그에 맞게 써야한다.
- Redux를 사용해야 할 때
- UI 레이어와 분리된 복잡한 상태 관리 로직 작성이 필요할 때
- Redux 미들웨어 기능을 활용하거나 복잡한 비동기 작업으로 액션 전달에서 추가적인 로직이 필요할 때
- 여러 위치에 대량의 상태 값이 존재하고 업데이트 로직이 복잡하거나 거대한 코드베이스를 여러 사람이 작업할 때
- side effect, memoization, data serialization 등 강력한 기능이 필요할 때
- Context API를 사용해야 할 때
- 단순 prop-drilling을 피하는 것이 목적일 때
- 적당히 복잡한 컴포넌트에서 단순 값을 전달하는 파이프가 필요할 때
- 리액트 컴포넌트 트리 안에서 전역 데이터를 공유해야할 때
그외에도 recoil, mobX가 있다.
🐔 Context API를 사용하기 전 고려해야할 것
- Context를 사용하면 컴포넌트를 재사용하기 어려워지므로 생각 잘 해야한다.
- 여러 레벨에 걸쳐 props를 넘기는 걸 대체하는 데에 Context보다는 컴포넌트 합성이 더 간단한 해결책일 수 있다.
- Context를 생성한다는 것은 Wrapping Provider를 만들고 consumer도 따로 작성해야한다는 뜻으로 복잡성이 증가한다. 또한 컴포넌트 유닛테스트도 복잡해진다. 즉 단순히 특정 컴포넌트의 상태로 관리될 수 있는지 아닌지 고려해보아야 한다.
🐴 Context 생성하기
1. Creating Context
리액트에서 제공되는 createContext를 활용해 어플리케이션에 사용될 Context 객체를 만든다. 어플리케이션에서 테마(다크모드, 라이트모드)와 사용자 정보를 Context로 생성해보면
context.js
import { createContext } from "react";

export const ThemeContext = createContext("dark");
export const UserContext = createContext({ name: "Guest" })
createContext 함수에 들어가는 매개변수는 적절한 Provider를 찾지 못했을 때만 쓰이는 값으로 이 기본값은 컴포넌트를 독립적으로 테스트할 때 유용하다. 즉 Provider에서 값을 제공한다면 굳이 인자를 주지 않아도 된다. 그럼 Provider를 생성해보면
2. Providing Context
contextName.Provider라는 컴포넌트는 모든 자식 컴포넌트에게(얼마나 깊은 컴포넌트인가와 무관하게) ContextName에 해당하는 context를 provider해준다. 이 때, 반드시 value라는 이름의 prop으로만 context를 넘겨줄 수 있다.
- App.js
import React from "react";
import { ThemeContext, UserContext } from './context'

export default function Main() {
  return (
    <ThemeContext.Provider value="light">
      <UserContext.Provider value={{ name: "Lee" }}>
				<MyComponent />
      </UserContext.Provider>
    </ThemeContext.Provider>
  );
}
Provider에서 초깃값을 제공했기 때문에 createContext에 인자를 주지 않아도 context의 초기값을 알 수 있다. 물론 인자를 주어도 노상관이다.
- context.js
import { createContext } from "react";

export const ThemeContext = createContext();
export const UserContext = createContext();
3. Consuming Context
이제 컴포넌트에서 context를 consuming해보면, 크게 두 가지 방법이 있는데 첫 번째는ContextName.Consumer를 활용하는 방법이고, 두 번째는 useContext를 활용하는 방법이다. 여기서는useContext를 활용한다.
위 App.js에서 Provider의 자식 컴포넌트로 존재하는 MyComponent 코드를 보면
MyComponent.js
import { useContext } from "react";
import { ThemeContext, UserContext } from "./context";

const THEMES = {
  light: {
    backgroudColor: "#EEEEEE",
    color: "black",
  },
  dark: {
    backgroundColor: "#333333",
    color: "white",
  },
};

function MyComponent() {
  const themeType = useContext(ThemeContext);
  const { name } = useContext(UserContext);

	// Layout과 Title은 styled components 입니다.
  return (
    <Layout
      backgroudColor={THEMES[themeType].backgroundColor}
      color={THEMES[themeType].color}
    >
      <Title>{`환영합니다 ${name}님!`}</Title>
    </Layout>
  );
}
4. Context 흐름 정리

🦄 Context 변경하기
1. Custom Provider Component 만들기
Custom Provider Component를 만든다. 위 기생성된 Provider 컴포넌트를 분리한다.
// context.js
export function ContextProvider({ children }) {
  return (
    <ThemeContext.Provider value="dark">
      <UserContext.Provider value={{ name: "Guest123" }}>
        {children}
      </UserContext.Provider>
    </ThemeContext.Provider>
  );
}

// App.js
export function Main() {
  return (
    <ContextProvider>
      <MyComponent />
    </ContextProvider>
  );
}
2. context 업데이트하기
앞서 말한대로 context는 그 자체만으로 상태가 될 수 없다. 따라서 useState나 useReducer와 같은 상태 관리 훅을 활용해 context를 업데이트할 것이다. 물론 useState를 활용해서도 상태변경을 할 수 있다. 그러나 useReducer라는 훅을 활용한 context를 업데이트하는 코드를 보면
context.js
import { createContext, useReducer } from "react";

const initialTheme = "dark";
const initialUser = { name: "Guest" };

export const ThemeContext = createContext();
export const ThemeDispatchContext = createContext();
export const UserContext = createContext();
export const UserDispatchContext = createContext();

function themeReducer(state, action) {
  switch (action.type) {
    case "TOGGLE":
      return state === "light" ? "dark" : "light";
    case "DARK":
      return "dark";
    case "LIGHT":
      return "light";
    default:
      throw new Error(`Unknown action type: ${action.type}`);
  }
}

function userReducer(state, action) {
  switch (action.type) {
    case "LOGOUT":
      return { ...state, name: initialUser.name };
    case "NAME_UPDATE":
      return { ...state, name: action.newUserName };
    default:
      throw new Error(`Unknown action type: ${action.type}`);
  }
}

export function GlobalContextProvider({ children }) {
  const [theme, themeDispatch] = useReducer(themeReducer, initialTheme);
  const [user, userDispatch] = useReducer(userReducer, initialUser);

  return (
    <ThemeContext.Provider value={theme}>
      <ThemeDispatchContext.Provider value={themeDispatch}>
        <UserContext.Provider value={user}>
          <UserDispatchContext.Provider value={userDispatch}>
            {children}
          </UserDispatchContext.Provider>
        </UserContext.Provider>
      </ThemeDispatchContext.Provider>
    </ThemeContext.Provider>
  );
}useReducer부터 보면, useState의 경우 state를 변경하는 함수를 통해 바로 상태를 변경할 수 있다. useReducer는 useState의 대체함수로 새로운 것이 아니다. useReducer의 경우 반환 값이 [state, dispatch]의 형태인 것을 알 수 있다. state의 경우 useState의 경우와 같이 상태값이다. 그리고 dispatch가 그 상태를 특정 방식으로만 변경하는 함수를 의미한다.
dispatch는 액션을 발생시키는 함수로 dispatch({ type: "NAME_UPDATE", newUserName: "KIM" })과 같은 형태로 사용한다. 즉 useReducer로 생성한 상태는 개발자가 정의한 특정 action 방식으로만 상태를 변경할 수 있는 것이다. 예를 들어 위 theme의 경우 오직 "TOGGLE", "DARK", "LIGHT"라는 세 가지 액션 밖에 없다.
App.js
export default function Main() {
  return (
    <GlobalContextProvider>
      <MyComponent />
    </GlobalContextProvider>
  );
}

const THEMES = {
  light: {
    backgroudColor: "#EEEEEE",
    color: "black",
    togglerColor: "#333333",
  },
  dark: {
    backgroundColor: "#333333",
    color: "white",
    togglerColor: "orange",
  },
};

function MyComponent() {
  const themeType = useContext(ThemeContext);
  const { name } = useContext(UserContext);
  const themeDispatch = useContext(ThemeDispatchContext);
	const userDispatch = useContext(UserDispatchContext);

  return (
    <Layout
      backgroudColor={THEMES[themeType].backgroundColor}
      color={THEMES[themeType].color}
    >
      <ThemeToggler
        togglerColor={THEMES[themeType].togglerColor}
        onClick={() => themeDispatch({ type: "TOGGLE" })}
      />
      <Title
        onClick={() =>
          userDispatch({ type: "NAME_UPDATE", newUserName: "lucas" })
        }
      >
        {`안녕하세요 ${name}님!`}
      </Title>
    </Layout>
  );
}
결과

themeDispatch와 userDispatch의 사용법에 유의하며 봐야한다. ThemeToggler를 클릭하면 테마가 토글되는데, Title을 클릭하면 "lucas"라는 이름으로 이름이 변경된다. 이 예시에서는 컴포넌트는 하나의 간단한 컴포넌트라 복잡하지 않다. context나 useReducer를 사용하여 코드를 복잡하게 만드는 것이 불필요하게 느껴지는 상황이라면 단순히 컴포넌트의 상태인지 의심하거나 useState를 사용하는 것이 좋을 수도 있다.
좀 더 복잡한 과정을 예상해보면
- 오직 context를 구독하여 context의 값만 필요하여 값이 변할 때 다시 랜더링이 되어야 하는 컴포넌트
- context의 값을 변경시키는 컴포넌트