
함수(function)
- 하나의 특별한 작업(기능을) 수행하도록 설계된 독립적인 영역
ex)
function 함수명(매개변수1, 매개변수2, ...) {
... 매개변수를 활용하여 실행할 기능
}function sum(a, b) { return a+b; }함수 안에서 return → 값을 반환(함수 내 기능을 실행한게 결과 값으로 나온다.) 따라서 반환 값을 저장하여
- 자바스트립트에서는 함수도
하나의 값이다. 따라서 함수를 변수에 대입할 수 있다. 다른 함수 내에 중첩되어 정의할 수 있다.
매개변수
함수를 실행할 때 함수의 인자를 전달받아(매개체) 사용할 수 있게 한다.
함수 선언 방법
function 함수명(매개변수1,매개변수2,...){
    		실행할 문장;
            return 리턴값;
    	}
<!DOCTYPE html>
<html>
<head>
<meta charset="EUC-KR">
<title>3_function1</title>
</head>
<body>
</body>
<script>
// 함수 선언방식은 선이 밑에 있어도 위에서 f();을 사용해서 먼저 호출이 가능하다.
// 함수 선언은 호이스팅이 되니까 가장 먼저 위로 올려줘서 사용가능하다.
// 선언들은 호이스팅이 된다.
// 호이스팅(hoisting) : 인터프리터가 변수와 함수의 메모리 공간을 선언 전에 미리 할당하는 것을 의미한다.
// 변수의 선언과 초기화를 분리한 후, 선언만 코드의 최상단으로 옮기는 것. 따라서,
// 변수를 정의하는 코드보다 사용하는 코드가 앞서 등장할 수 있다.
// 다만 선언과 초기화를 함께 수행하는 경우 선언 코드까지 실행해야 변수가 초기화된 상태가
// 된다.
f();
f();
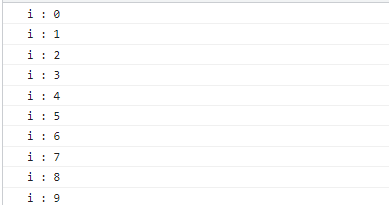
function f(){
for (var i = 0; i < 10; i++) {
console.log("i : " +i);
}
}
// 선언과 동시에 호출도 가능하다.
(function f2(){
alert("우와 신기하다!");
})();
</script>
</html>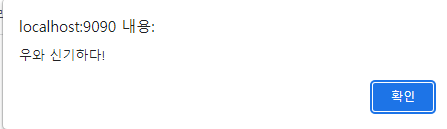
<!DOCTYPE html>
<html>
<head>
<meta charset="EUC-KR">
<title>4_function2</title>
</head>
<body>
</body>
<script>
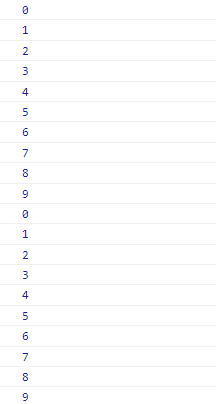
// 익명 함수를 변수에 담아준다.
// 할당이 먼저 되는 것이 아니라 먼저 공간을 확보해준다.
// 그래서 아무 값도 담겨있지 않는데 f()를 먼저 써주면
// 값이 없어서 오류가 발생한다.
let f = function(){
for (var i = 0; i < 10; i++) {
console.log(i);
}
}
// 표현식에서는 변수에 담아줘야지만 f();를 사용할 수 있다.
f();
// 위에서 f(0,1,2,3,4,5,6,7,8,9)를 만들어 줬고 밑에서 f2(f)를 통해서 받아왔다.
// f2(callback)에서 'callback = f'가 된 것이다. 그래서 callback();했을때
// (0,1,2,3,4,5,6,7,8,9)가 출력이 된 것이다.
// 이런것을 콜백함수라고 한다.
function f2(callback) {
callback();
}
f2(f);
// 지금같은 경우는 callback에 익명함수를 넣어줘서 출력을 해주는 거다.
f2(function(){
alert("콜백함수 호출!");
});
</script>
</html>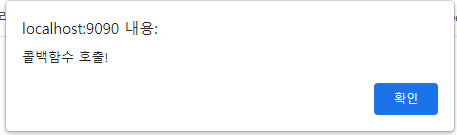
<!DOCTYPE html>
<html lang="en">
    <head>
        <meta charset="UTF-8" />
        <meta http-equiv="X-UA-Compatible" content="IE=edge" />
        <meta name="viewport" content="width=device-width, initial-scale=1.0" />
        <title>자판기</title>
    </head>
    <body>
        <script>
            function chages(coin, price) {
                return coin - price;
            }
            function err() {
                console.log("금액이 부족합니다.");
            }

            function printResult(product, change) {
                console.log(
                    `주문하신 ${product}이/가 나왔습니다. 잔돈은 ${change}`
                );
            }
            function 자판기(coin, product) {
                if (coin < 300)
                    return console.log("금액을 잘못 투입했습니다.", coin);
                let productObj = { 솔의눈: 300, 비타500: 500, 마운틴듀: 1000 };
                let change;
                let selectPrice = productObj[product];

                if (!(product in productObj))
                    return console.log("존재하지 않는 상품입니다.");

                if (coin < selectPrice) return err();
                change = chages(coin, selectPrice);
                if (change === 0) return console.log(product);
                return printResult(product, change);
            }

            자판기(300, "솔의눈");
        </script>
    </body>
</html>
중첩 함수
함수 내부에 정의된 중첩 함수 또는 내부 함수라 한다. 그리고 중첩함수를 포함하는 함수는 외부 함수라 부른다. 중첨 함수는 외부 함수 내부에서만 호출할 수 있다. 일반적으로 중첩함수는 자신을 포함하는 외부 함수를 돕는 헬퍼 함수의 역할을 한다.
            // 중첩 함수
            function outer() {
                let x = 1;

                // 중첩함수
                function inner() {
                    let y = 2;
                    // 외부 함수의 변수를 참조할 수 있다.
                    console.log(x + y); // 3
                }
                inner();
            }
            outer();
지역 변수
함수(범위, 블럭) 내에서 선언
해당 범위 블럭 안에서만 사용 가능, 그영역을 벗어나면 메모리에서 사라진다.
전역 변수
블럭 외부에서 사용된 전체 블럭에서 선언 및 사용하는 변수
전역 변수는 프로그램의 어느 영역에서나 접근 할 수 있으며 웹페이지가 닫혀야만 메모리에서 삭제
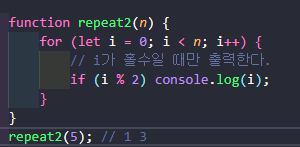
콜백 함수
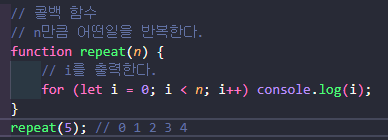
repeat 함수는 매개변수를 통해 전달받은 숫자만큼 반복한다. 이 때 console.log(i)에 강하게 의존하고 있어 다른 일을 할 수 없다. 만약 repeat 함수의 반복문 내부에서 다른 일을 하고 싶다면 함수를 새롭게 정의해야 한다.
실습에 연관됨
	<!DOCTYPE html>
<html>
<head>
<meta charset="EUC-KR">
<title>5_function_task</title>
</head>
<body>
	<p id="test">테스트 문자열</p>
	<!-- onclick에는 자바스크립트의 함수를 쓰면 된다. -->
	<!-- onclick에 함수를 넣고 그 함수에 바꾸기를 설정해 놓는다면
		 버튼을 눌렀을 때 바뀐다. -->
	<input type ="button" onclick ="f();" value="바꾸기">
</body>
<script>
	function f() {
		//document.getElementById("아이디명") : id 속성 값이 넘겨준 문자열인 태그객체 가져오기
		const pTag = document.getElementById("test");

		// 태그객체.innerHTML = "바뀐문자열" → 내용 바꾸기
		pTag.innerHTML = "바뀐 문자열";
		// 태그객체.style.background = "값" → 배경색 바꾸기
		pTag.style.background = "red";
	}
	</script>
</html>
● 바꾸기를 누르면 빨강색으로 배경이 생긴다.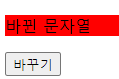
실습

<!DOCTYPE html>
<html>
<head>
<meta charset="EUC-KR">
<title>5_function_task1</title>
</head>
<body>
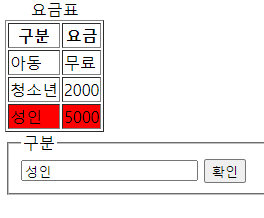
<table border="1">
<caption>요금표</caption>
<thead>
<tr>
<th>구분</th>
<th>요금</th>
</tr>
</thead>
<tbody>
<tr id = "kid">
<td>아동</td>
<td>무료</td>
</tr>
<tr id="teen">
<td>청소년</td>
<td>2000</td>
</tr>
<tr id="adult">
<td>성인</td>
<td>5000</td>
</tbody>
</tr>
</table>
<!-- fieldset : 입력들을 하나의 구역으로 만듬 -->
<fieldset>
<legend>구분</legend>
<input type="text" id="input">
<input type="button" value="확인" onclick="checkValue();">
</fieldset>
</body>
<script>
/* function f() {
//document.getElementById("아이디명") : id 속성 값이 넘겨준 문자열인
태그객체 가져오기
// 태그에 있는 id 속성을 사용하여 해당 태그에 접근하여
하고 싶은 작업을 할 때 쓰는 함수
const pTag = document.getElementById("test");
// 태그객체.innerHTML = "바뀐문자열" → 내용 바꾸기
pTag.innerHTML = "바뀐 문자열";
// 태그객체.style.background = "값" → 배경색 바꾸기
pTag.style.background = "red";
} */
function checkValue(){
const inputTag = document.getElementById("input");
let value = inputTag.value;
let arAge = ["아동","청소년","성인"];
let arId = ["kid","teen","adult"];
for (let i = 0; i < arAge.length; i++) {
if(value == arAge[i]){
let tr = document.getElementById(arId[i]);
tr.style.background="red";
}
else{
let tr = document.getElementById(arId[i]);
tr.style.background="#fff";
}
}
}
</script>
</html>
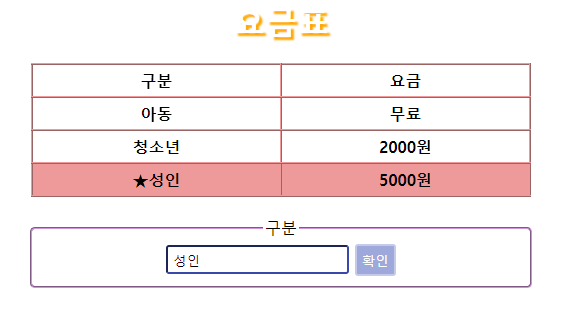
	<!DOCTYPE html>
<html>
<head>
<meta charset="UTF-8">
<title>1_function</title>
<style>
	table{
		margin:0 auto;
		width:500px;
		margin-bottom:20px;
		border-collapse: collapse;
		text-align:center;
	}
	th,td{
		box-sizing:border-box;
		padding:5px 0;
		border:2px inset #ef9a9a;
		font-weight: 600;
		width:250px;
	}
	caption{
		color:white;
		font-weight:bold;
		text-shadow:3px 3px 2px orange;
		font-size:2em;
		margin-bottom:20px;
	}
	fieldset {
		width:30%;
		margin:0 auto;
		text-align:center;
		border-radius:5px;
		border-color:#ce93d8;
	}
	input{
		border-radius:3px;
		padding:5px;
	}
	input[type='text']{
		border-color:#3949ab;
	}

	button{
		-webkit-appearance: none;
		appearance:none;
		padding:5px;
		border:2px solid #c5cae9;
		border-radius:3px;
		background-color:#9fa8da;
		color:#fff;
	}
</style>
</head>
<body>
	<table>
		<caption>요금표</caption>
		<tr>
			<th>구분</th>
			<th>요금</th>
		</tr>
		<tr id="kid">
			<td id="kid-text">아동</td>
			<td>무료</td>
		</tr>
		<tr id="teen">
			<td id="teen-text">청소년</td>
			<td>2000원</td>
		</tr>
		<tr id="adult">
			<td id="adult-text">성인</td>
			<td>5000원</td>
		</tr>
	</table>
	<fieldset>
		<legend>구분</legend>
		<input type="text" id="input">
		<button onclick="confirm()">확인</button>
	</fieldset>
</body>
<script>
	let inputTag = document.getElementById("input");
	let arId = ["kid","teen","adult"];
	let arAge = ["아동","청소년","성인"]


	function confirm(){
		let age = inputTag.value;
		for(let i=0;i<3;i++){
			let tdTag = document.getElementById(arId[i]+"-text");
			if(age === arAge[i]){
				if(tdTag.innerHTML == "★"+age){
					//이미 색칠된 경우 아무것도 안하기
					continue;
				}
				document.getElementById(arId[i]).style.background = '#ef9a9a';
				tdTag.innerHTML = '★'+tdTag.innerHTML;
			}
			else{
				document.getElementById(arId[i]).style.background = "#fff";
				tdTag.innerHTML = tdTag.innerHTML.replace("★","");
			}
		}
	}

</script>
</html>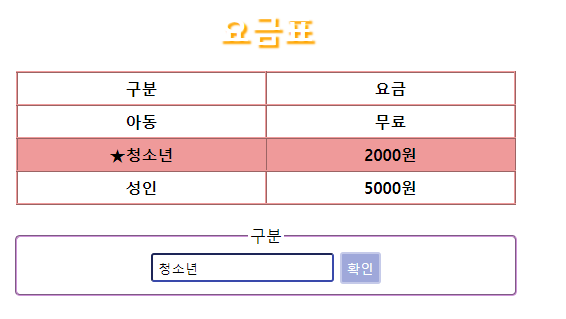
객체
-
추상적인 개념이 실체화된 것
-
프로퍼티들로 이루어진 하나의 집합
-
객체는 0개 이상의 프로퍼티로 구성된 집합으로, 프로퍼티는 key와 value로 구성된다.
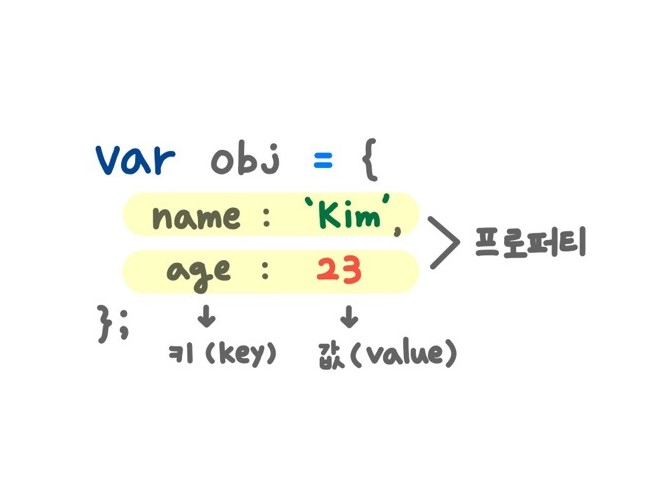
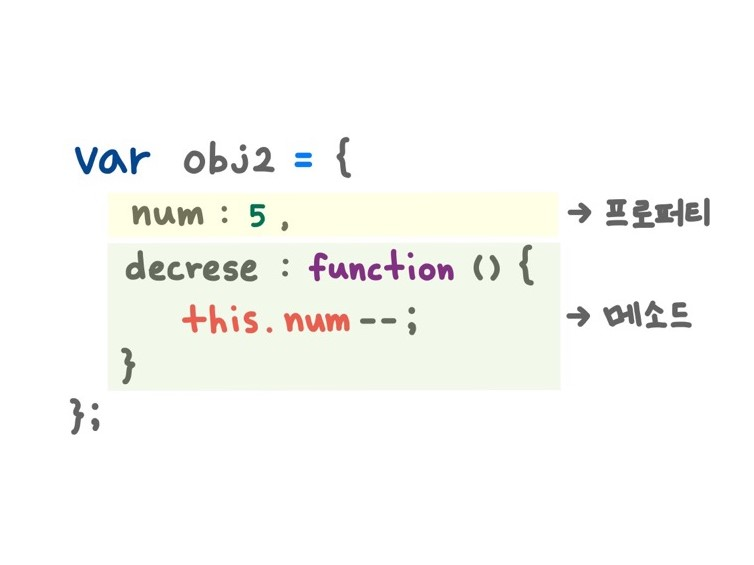
→ 프로퍼티 값이 함수일 경우에는 method라 부른다.프로퍼티(property) : 객체의 상태를 나타내는 값
메서드(method) : 프로퍼티를 참조하고 조작할 수 있는 동작- 객체 리터럴(object lireral)
리터럴은 사람이 이해할 수 있는 문자나 약속된 기호를 사용해 값을 생성하는 표기법을 말하는데,
자바스크립트에서 객체를 생성하는 가장 일반적인 방법이 객체 리터럴을 사용하는 것이다.// object literal var me = { name : 'Kim', intro : function() { console.log(`My name is ${this.name}`); } }; console.log(typeof me); console.log(me); [실행결과] object { name: 'Kim', intro: [Function: intro] }
- 객체 리터럴(object lireral)
객체 리터럴의 중괄호는 코드 불록을 의미하는 것이 아니라 값으로 평가되기 때문에 닫는 괄호 뒤에는 세미콜론(;)을 붙인다.

 ## 객체의 선언
const 객체명 = {
프로퍼티1명:프로퍼티1값,
프로퍼티2명:프로퍼티2값,
...,
메소드명:function(){
    },
    ...
}
```html
<!DOCTYPE html>
<html>
<head>
<meta charset="EUC-KR">
<title>1_Object1</title>
</head>
<body>
</body>
<script>
// 밖에있는 것들이 전역변수이다.
let brand = "k7";
// 리터럴을 통한 객체생성
// 장점 : 객체를 빠르고 간단하게 만들 수 있다.
// 단점 : 비슷한 형태의 객체가 또 필요하다면 오히려 불편하다.
const mycar = {
brand:"Ferrai",
color:"Red",
price:65000,
engineStart:function(){
// 밖에다 따로 만들어주지 않으면 이 안에 만들어놓은 변수를 따르지만
// 밖엗다 따로 만들어주면 밖에 있는걸 사용한다.
// 하지만, 여기서 this를 넣으면 밖에다 생성을 했어도
// 안에 있는 것을 사용한다.
console.log(this.brand + " 시동켜기");
}
}
console.log(mycar);
console.log(typeof(mycar));
console.log(mycar.brand);
mycar.engineStart();
</script>
</html>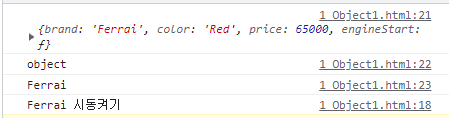
생성자를 이용한 객체 생성
- 자바 class : 붕어빵 틀
- Js 생성자 : 붕어빵 제조법 function 생성자명(매개변수1, 매개변수2, ...) {
this.변수명 = 값1;
this.변수명 = 값2;
...
this.메소드명 = function() {};
}
	<!DOCTYPE html>
<html>
<head>
<meta charset="EUC-KR">
<title>2_object2</title>
</head>
<body>

</body>
<script>
	function Car(brand,color,price){
		this.brand = brand;
		this.color = color;
		this.price = price;

		// 홧살표 함수, 람다식
		// () 이 안에는 함수안에 적용할 매개변수를 쓰면 된다.
		// 이것이 하나의 익명함수가 된다.
		this.engineStart = ()=> {
			console.log(this.brand + " 시동 켜기");
		}
	}

	const mycar = new Car("Ferrari","Red",65000);
	const momcar = new Car("K7","White",4000);

	mycar.engineStart();
	momcar.engineStart();
	console.log(typeof mycar);

	for(let key in mycar) {
		console.log(key + " : " + mycar[key]);
	}

	// 자바스크립트의 객체는 만들어놓고 수정이 가능하는데
	// 이런점을 조심해야 한다.
	mycar.pw = "abcd"
	console.log(mycar);


</script>
</html>
- 람다 함수(람다식)
프로그래밍 언어에서 사용되는 개념이다. 람다 함수를 알기 위해서는 일반함수와 익명함수를 알아야한다.* 일반함수 기본형 function 함수명(){ 함수 로직 }* 익명함수 기본형 function() { 함수로직 }일반함수와 익명함수의 차이는 함수명의 유무차이다. 익명이라는 이름과 같이 메모리를 차지하지 않는다. 따라서 람다로 코딩을 하면, 메모리가 사용되지 않으므로 재사용하지 않고 일회용으로 많이 사용된다. 이러한 이유로 아래와 같이 변수에 담아서 많이 사용한다.
const 변수 = function() {
  함수로직
}
이와 같은 방식이
리터럴 방식이다. 리터럴은 코드 상에서 데이터를 표현하는 방식(let happy =123)으로, 변수를 선언함과 동시에 그 값을 저장해주는 방식이다. 이제화살표함수(람다함수)를 봐보자.// 화살표함수 const hanpy3 = () => { console.log("hi"); }
상속(inheritance)
- 자바스크립트는 객체간의 상속이 일어난다.
- 자바스크립트는 모든 객체는 프로토타입 이라는 객체를 상속받고
있으며, 모든 객체는 프로토타입으로부터 프로퍼티와 메소드를 상속받는다.
프로토타입 기반
	const mycar = new Car();

   	Car.prototype
    	  ↓
        mycar
프로토타입 기반 언어는 클래스라는 개념이 없고, 객체에서 객체를
바로 상속받을 수 있다. 따라서 자바스크립트는 현재 존재하고 있는
객체를 프로토타입으로 사용하며 해당 객체를 복제 후 재사용한다.
window 객체
- 웹 브라우저의 창(window)을 나타내는 객체로, 대부분의 웹 브라우저에서 지원한다.
- 자바스크립트의 모든 객체, 전역함수, 전역변수들은 자동으로 window객체의
프로퍼티는 전역변수가 된다.window.onload
	window.onload = function() {
    	문서가 로딩된 이후에 호출할 문장
    }
스크립트 언어는 위에서 아래로 해석되기 때문에 DOM에서 HTML 요소를 추출할 때 body보다 위에 있다면
해석 순서에서 문제가 생길 수 있다. 이 경우 자바스크립트 문서를 밑으로 옮겨야 하는데, HTML 문서가 길어지면
가독성도 좋지 않고 불편하다. 따라서 문서가 다 준비된 상황 이후에 발동하게끔 하는 역할을 한다.
	<!DOCTYPE html>
<html>
<head>
<meta charset="EUC-KR">
<title>3_window1</title>
</head>
<script>
	// 이 안에 넣어주면 로딩이 다 끝난다음 호출하기 때문에 제대로 된 값이 나온다.
	window.onload = function(){
	// pTag가 다 완성이 되기전에 추출하고 있기 때문에 null이 나온다.
	let pTag - document.getElementById("text");
	console.log(pTag);
	}
</script>
<body>
	<h2>미연 - Drive</h2>
	<p id="text">
		빛을 잃어가는 마음과는 달리<br>
		채워지는 도시의 별은<br>
		하나둘씩 늘어가고<br>
		자리를 찾아가는 퍼즐처럼<br>
		맞춰지는 세상 속을 벗어나고만 싶어<br>
		날 향한 시선에 감추기만 했던<br>
		마음의 목소리를 소리 내 외치면<br>
		스치는 바람을 따라<br>
		더없이 가벼워진 마음은<br>
		내 안의 나를 깨우게 해<br>
		잿빛 세상을 등지고 이 도시를 달려봐<br>
		내 맘 가는 대로 가로질러 가볼래 날 위해<br>
		그곳이 어디든 날개를 펼치고 I’m flying<br>
		저 쏟아지듯 펼쳐진 길 위로<br>
	</p>
</body>

</html>
window.open()
새로운 브라우저 창을 열 수 있으며, 그 창의 세부적인 옵션들도 설정할 수 있다.
	window.open(url,name,specs,replace);

    url		: 열어줄 주소
    name	: 열리는 창의 이름
    		  _blank	: 새 창에서 열림
              _child	: 자식 프레임
              _parent	: 부모 프렝미
              _self		: 현재 창에서 열림
    specs	: 선택적인 값으로 창의 크기, 스크롤 여부, 리사이즈 여부 등등을 지정
    replace	: 히스토리 목록에 새 항목을 만들지, 현재 항목을 대체할지 지정
window.open("https://www.naver.com","_blank","width=600, height=300",true); 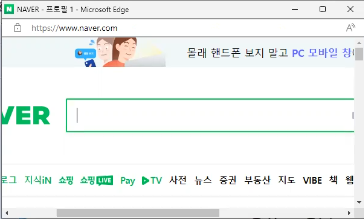
추가 정보
-
typeof
테스트용도undefined : 변수가 정의되지 않거나 값이 없을 때
number : 데이터 타입이 수일 때
string : 데이터 타입이 문자열일 때
boolean : 데이터 타입이 불리언일 때
object : 데이터 타입이 함수, 배열 등 객체일 때
function : 변수의 값이 함수일 때
symbol : 데이터 타입이 심볼일 때 -
inputTag.value / innerHTML / innerText
inputTag.value는 value를 가지고 있는것들에 해당되는 것이다.
value는 입력받는 태그들의 입력받은 값이다. 이것은 입력받거나
선택하는 것인데, input / select / textarea가 해당된다.innerHTML은 태그까지 전체적으로 바꾼다.
덮어씌기를 한다.innerText는 간단하게 내용을 바꾸거나 가져올 때 사용한다.
텍스트에 해당되는 것만 바꾸거나 가져올 수 있다.
덮어씌기를 한다.→ p / a / div 태그들은 글자를 쓰는 태그들이다.→ 이 안에 태그랑 태그 사이에 하얀글씨들이 innertext
→ 그 객체 하위 모든 값을 문자화해서 가져오는 것이 innerHTML
실습
<!DOCTYPE html>
<html>
<head>
<meta charset="UTF-8">
<title>4_function_task</title>
<link href="./function_task.css" rel="stylesheet">
</head>
<body>
<fieldset>
<legend>숫자를 한글로 변경</legend>
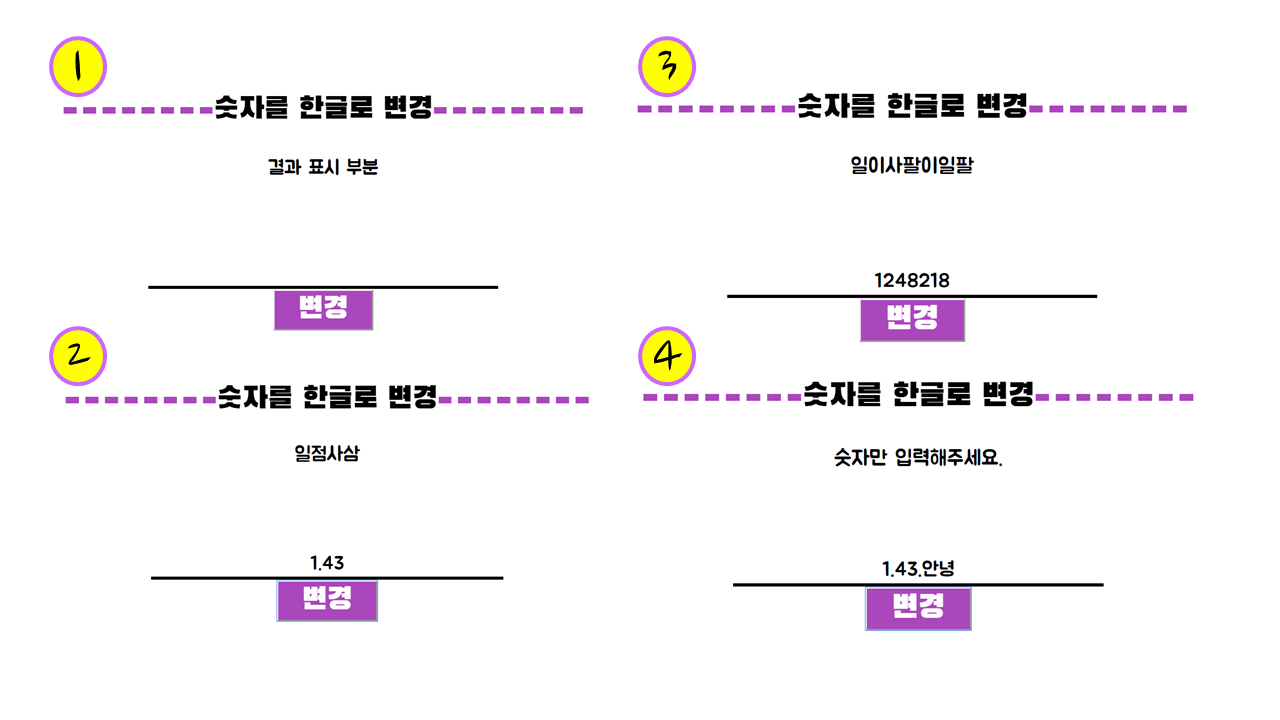
<textarea rows="3" cols="40" id="output">결과 표시 부분</textarea>
<input type="text" placeholder="숫자를 입력해 주세요." id="input"><br>
<button onclick="valueChange();">변경</button>
</fieldset>
</body>
<script>
//document.getElementById("아이디") : 해당 아이디를 가진 태그 객체로 가져오기
//인풋태그객체.value : 태그에 사용자가 입력한 값
//문자열.charAt(idx) : idx번째 글자
//문자열[idx] : idx번째 글자
//문자열.indexOf(값) : 해당 값이 있는 idx번호
//문자열.replace("기존값","새로운값") : "기존값" 대신 "새로운값"으로 변경된 문자열 리턴
/* "123.1"
"1" 일
"2" 이
"3" 삼
"." undefined → .으로 바꿈
"1" 일 */
// 기획
// 1. #input에 숫자 입력
// 2. 변경 버튼 클릭(valueChange() 호출)
// 3. valueChange() 내부로 흐름 이동
// 4. #input 태그 객체 가져와서 value 호출
// 5. 추출한 value 한글로 변경(로직)
// 6. 변경된 한글을 #output 내부에 덮어씌우기
let inputTag = document.getElementById("input");
let textareaTag = document.getElementById("output");
let changeToHangle = function(num){
let hangle="공일이삼사오육칠팔구";
let result = "";
let data = num + ""
for (let i = 0; i < data.length; i++) {
result += hangle[data[i]]
}
result = result.replace("undefined","점");
return result;
}
let valueChange = function(){
let num = inputTag.value;
if(isNaN(num)){
textareaTag.innerHTML = "숫자만 입력해주세요."
}
else{
textareaTag.innerHTML = changeToHangle(num);
}
}
</script>
</html>● 외부 CSS @font-face {
font-family: 'establishRoomNo703OTF';
src: url('https://cdn.jsdelivr.net/gh/projectnoonnu/noonfonts_2112@1.0/establishRoomNo703OTF.woff') format('woff');
font-weight: normal;
font-style: normal;
}
body{
margin:10%;
font-family:'establishRoomNo703OTF';
}
fieldset{
border-top-style:dashed;
border-bottom-style:none;
border-right-style:none;
border-left-style:none;
border-width:10px;
border-top-color:#ab47bc;
width:65%;
height:180px;
margin:30px auto;
padding:15px;
text-align:center;
font-size:3em;
}
textarea{
width:70%;
border:0;
resize:none; /*사이즈 조절 불가*/
outline:none;/* 클릭시 테두리 삭제 */
text-align:center;
margin:20px;
font-size:2rem;
}
input{
text-align:center;
font-size:30px;
width:70%;
outline:none;
border-top-style:none;
border-bottom-style:solid;
border-right-style:none;
border-left-style:none;
border-width:5px;
}
button{
margin:0 auto;
width:20%;
font-size:1em;
color:#fff;
background:#ab47bc;
}- setTimeout(함수,밀리초);
- clearTimeout();
- setInterval(함수,밀리초);
	<!DOCTYPE html>
<html>
<head>
<meta charset="EUC-KR">
<title>3_window2</title>
</head>
<body>

</body>
<script>
	// window.setTimeout(함수, 밀리초) : 해당 밀리초 이후에 넘겨주는 함수 호출
	// 몇초후 세주고 진행을 해야할 때 사용한다.
	// 지금 같은경우는 밀리초를 5000으로 했으니 5초후라는 것이다.
	// setTimeout 객체로 메소드를 호출하면 이 자체가 setTimeout 객체이다.
	let st = window.setTimeout(function(){
		alert("진행됨")
	},5000);

	clearTimeout(st);

	// 위에있는거의 반복문이라고 생각하면 된다.
	let it = window.setInterval(function(){
		console.log("이바보야 진짜아니야~")
	},1000);

  	clearInterval(it);
</script>
</html>
→ setInterval(함수,1000)한 결과 1초에 한개씩 늘어난다.
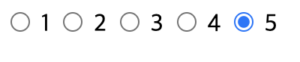
● input type="radio"input 태그에서 radio 타입은 checkbox와 다르게 특정 그룹 내 여러 라디오 버튼 중 하나만 선택할 수 있는 것이 특징입니다.
기본 형태
	<input type="radio" value="1" name="score"> 1
	<input type="radio" value="2" name="score"> 2
	<input type="radio" value="3" name="score"> 3
	<input type="radio" value="4" name="score"> 4
	<input type="radio" value="5" name="score"> 5
form 태그 접근
사용자가 하나의 기능을 사용하기 위해서 여러개 입력을 하고
보내줘야는데 한번에 보내주기 위한 역할
	<form id="joinForm" name="joinForm">
   	<input id="in1" type="text" name="in1>
   </form>
   					// 여기서 joinForm은 name이다.
   let frm = document.joinForm
   let inputTag = frm.in1;
   inputTag.value

   써야는데 비어있는지 한개이상 체크해야는데 안했던지
   사용자가 할 수 있는 실수들을 잡아주기 위한
   유효성 검사 목적으로 접근
<!DOCTYPE html>
<html>
<head>
<meta charset="UTF-8">
<title>4_location1</title>
</head>
<body>
<form name="myForm">
<p>
<!--label 태그는 ○이런식으로 생기며 클릭하는 기능 -->
<label>
네이버<input type="radio" value="naver" name="site">
</label>
</p>
<p>
<label>
다음<input type="radio" value="daum" name="site">
</label>
</p>
<p>
<label>
구글<input type="radio" value="google" name="site">
</label>
</p>
<p>
<label>
야후<input type="radio" value="yahoo" name="site">
</label>
</p>
<p>
<!-- 위에서 체크한것 이동 누르면 그곳으로 가지는 프로그램 -->
<input type="button" onclick="sendit()" value="이동">
</p>
</form>
</body>
<script>
// 1. 사이트 선택(라디오 버튼 선택)
// 2. 이동버튼 클릭
// 3. sendit() 호출
function sendit() {
// 4. 사용자가 선택한 것의 value 확인
let form = document.myForm;
let inputTag = form.site;
switch (inputTag.value) {
case "naver":
break;
case "daum":
break;
case "google":
break;
case "yahoo":
break;
}
}
</script>
</html>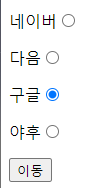
location 객체
현재 브라우저에 표시된 HTML 문서의 주소를 얻거나, 브라우저의
새 문서를 불러올 때 사용할 수 있다. location 객체의 프로퍼티와
함수를 이용하면 현재 문서의 URL 주소를 다양하게 해석하여 처리할 수 있다.
     location.href
     	현재 페이지의 URL 정보가 담겨있는 프로퍼티
     	대입을 통해 새로운 문자열을 넣게 되면 해당 페이지로 이동이 일어난다.

     location.reload()
     	새로고침

     location.assign("URL 주소")
     	현재 URL을 지정한 URL로 바꿔서 이동
        	assign
        A → B → C
        	  ←
     location.replace("URL 주소")
     	현재 URL을 지정한 URL로 대체해서 바꾸고 이동 불가

        	replace
        A → B → C
         ←-------
        	: B에서 C로 가지는게 아니라 B자리에 C가 온다.
             즉, 대체가 되는 것이다.
             그래서 뒤로가기 하면 A로 가진다.
<!DOCTYPE html>
<html>
<head>
<meta charset="UTF-8">
<title>4_location1</title>
</head>
<body>
<form name="myForm">
<p>
<label>
네이버<input type="radio" value="naver" name="site">
</label>
</p>
<p>
<label>
다음<input type="radio" value="daum" name="site">
</label>
</p>
<p>
<label>
구글<input type="radio" value="google" name="site">
</label>
</p>
<p>
<label>
야후<input type="radio" value="yahoo" name="site">
</label>
</p>
<p>
<!-- 위에서 체크한것 이동 누르면 그곳으로 가지는 프로그램 -->
<input type="button" onclick="sendit()" value="이동">
</p>
</form>
</body>
<script>
// 1. 사이트 선택(라디오 버튼 선택)
// 2. 이동버튼 클릭
// 3. sendit() 호출
function sendit() {
// 4. 사용자가 선택한 것의 value 확인
let form = document.myForm;
let inputTag = form.site;
switch (inputTag.value) {
case "naver":
location.href = "https://www.naver.com"
break;
case "daum":
location.href = "https://www.daum.net"
break;
case "google":
location.href = "https://www.google.com"
break;
case "yahoo":
location.href = "https://www.yahoo.com"
break;
}
}
</script>
</html>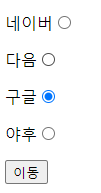
→ 구글 클릭한체로 이동하면
→ 구글 페이지로 이동된다. <!DOCTYPE html>
<html>
<head>
<meta charset="UTF-8">
<title>5_location2</title>
</head>
<body>
<input type="button" value="열기" onclick="openPage()">
<p id="text"></p>
</body>
<script>
function openPage() {
location.assign("4_location1.html");
}
// history.length는 한번도 안들린 페이지를 갔다오면 축척되게 된다.
// 방문한 페이지의 기록
document.getElementById("text").innerHTML = history.length;
</script>
</html>
→ 원래는 1이였지만 열기를 누르면 4_location1으로 가진다.
→ 그리고 뒤로 가기를 누르면 1에서 2로 바뀐다.
<!DOCTYPE html>
<html>
<head>
<meta charset="UTF-8">
<title>5_location2</title>
</head>
<body>
<input type="button" value="열기" onclick="openPage()">
<p id="text"></p>
</body>
<script>
function openPage() {
// location.assign("4_location1.html");
location.replace("4_location1.html");
}
// history.length는 한번도 안들린 페이지를 갔다오면 축척되게 된다.
// 방문한 페이지의 기록
document.getElementById("text").innerHTML = history.length;
</script>
</html>→ assign과 비슷하지만 다른점은 4_location1을 간 후에
돌아올 수 없다.history 객체
브라우저의 히스토리 정보를 문서 상태 목록으로 저장하는 객체
history.go(n)			: n만큼 페이지 이동, 양수면 앞으로 음수면 뒤로 이동
history.back()			: 뒤로가기
history.forward()		: 앞으로 가기
DOM
문서 객체 모델(DOM : Document Object Model)
XML이나 HTML 문서에 접근하기 위한 인터페이스, 문서 내의 모든 요소를 정의하고
각각의 요소에 접근하는 방법을 제공한다.
document 객체
웹 페이지 그 자체를 의미한다.
웹페이지에 존재하는 HTML 요소에 접근하고자 할 때에는 반드시 document 객체부터 시작한다.
웹 페이지에 존재하는 모든 HTML 요소에 접근할 수 있도록 하는 js의 내장 객체
			       ┌head────title...
	document────────html───┤
			       └body──┬─p
				      ├─h2
				      └─...
DOM selector
다양한 html 요소 중 내가 선택하고자 하는 요소에 접근할 수 있도록 하는 document 객체의 함수
→ DOM에 접근하기 위해서는 반드시 document라는 객체로 시작한다.
document 객체의 프로퍼티
1. HTML 요소 선택용
-
getElementById("아이디")
해당 아이디를 가진 요소를 선택해서 객체로 가져오는 함수<div id="banner"></div> document.getElementById("banner"); -
getElementsByTagName("태그명")
해당 태그인 요소들을 선택해서 배열로 가져오는 함수
-
getElementsByClassName("클래스명")
해당 클래스를 가진 요소들을 선택해서 배열로 가져오는 함수<div class="menu"></div> const MENU_DOM = document.getElementByClassName("menu"); for(let i = 0; i < MENU_DOM.length; i++) { .. MENU_DOM[i] ===> }
-
querySelectorAll("CSS선택자")
선택자에 해당하는 요소들을 배열로 가져오는 함수
getElementsByClassName("test") === querySelectorAll(".test")2. HTML 요소 내용 변경
innerHTML 프로퍼티를 이용해서 간단하게 요소의 내용을 변경할 수 있다.
태그객체.innerHTML = 새로운내용● HTML 요소 스타일 변경 태그객체.style.속성명 = 속성값; <!DOCTYPE html>
<html>
<head>
<meta charset="UTF-8">
<title>6_DOM1</title>
</head>
<body>
<ul>
<li class="odd">첫번째 아이템</li>
<li class="even">두번째 아이템</li>
<li class="odd">세번째 아이템</li>
<li class="even">네번째 아이템</li>
<li class="odd">다섯번째 아이템</li>
</ul>
</body>
<script>
/*
[
<li class="odd">첫번째 아이템</li>,
<li class="odd">세번째 아이템</li>,
<li class="odd">다섯번째 아이템</li>
]
*/
let oddItems = document.getElementsByClassName("odd");
let evenItems = document.querySelectorAll("ul li.even");
// 이거는 불가능하다. 그 이유는 문법을 보면
// 태그객체.innerHTML = 새로운 내용
// 근데 여기서 oddItems는 배열이다.
/* oddItems.innerHTML = "홀수번째 아이템" */
for (let i = 0; i < oddItems.length; i++) {
oddItems[i].innerHTML = "홀수번째 아이템";
oddItems[i].style.color ="deeppink";
oddItems[i].style.background = "skyblue";
}
console.dir(evenItems[0]);
for(let li of evenItems) {
li.style.color ="red";
}
</script>
</html>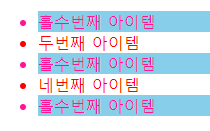
	<!DOCTYPE html>
<html>
<head>
<meta charset="UTF-8">
<title>7_DOM2</title>
<style>
	/* 여기에 미리 속성을 정해 놓음 */
	.hdd{
		display:none;
	}
</style>
</head>
<body>
	<h2 id="h2-text">내가 없어져 볼게</h2>
	<p id="text">내가 없어져볼게</p>
	<input type="button" onlick="doing();" value="없애기">
	<input type="button" onlick="doing2()" value="살리기">
</body>
<script>
	function doing(){
		// classList.add는 클릭시 클래스 추가하는 로직이다.
		document.getElementById("text").classList.add("hdd");
		document.getElementById("h2-text").classList.add("hdd");
	}
	function doing2(){
		// style.display='none'으로 했으면 지울 때 일일이 다 찾아서 지워야 하지만
		// classList.add로 하면 add대신에 remove로 해주면 된다.
		document.getElementById("text").classList.remove("hdd");
		document.getElementById("h2-text").classList.remove("hdd");
	}

</script>
</html>