Android Layout ?
개요
우리는 Android App 개발을 진행하면서 각 Activity 혹은 Fragment 의 화면 디자인 작업을 xml 파일을 통해 진행하게 된다.
주로 기본적으로 사용되는 레이아웃들은 크게 LinearLayout, RelativeLayout, ConstraintLayout이 있다.
물론, 레이아웃은 너무 기본적인 부분이고, 충분히 잘 사용할 수 있다고 생각하지만 어떠한 상황에 어떠한 레이아웃을 사용하면 좋을 지?
이런 부분에 대해서 아직까지 애매모호하기도 하고 어떤 특징들을 가지고 있는 지는 자세히 모르기 때문에 차근차근 천천히 기초부터 심화까지 공부해보려고 한다.
첫 번째 Android Layout 글에서는 LinearLayout에 대해 알아보려고 한다.
Android Studio에서 New Project -> Empty Project를 생성 시, 자동으로 생성되는 MainActivity의 레이아웃 xml파일인 activity_main.xml 코드이다.
<?xml version="1.0" encoding="utf-8"?>
<androidx.constraintlayout.widget.ConstraintLayout
    xmlns:android="http://schemas.android.com/apk/res/android"
    xmlns:app="http://schemas.android.com/apk/res-auto"
    xmlns:tools="http://schemas.android.com/tools"
    android:layout_width="match_parent"
    android:layout_height="match_parent"
    tools:context=".MainActivity">

    <TextView
        android:layout_width="wrap_content"
        android:layout_height="wrap_content"
        android:text="Hello World!"
        app:layout_constraintBottom_toBottomOf="parent"
        app:layout_constraintLeft_toLeftOf="parent"
        app:layout_constraintRight_toRightOf="parent"
        app:layout_constraintTop_toTopOf="parent" />

</androidx.constraintlayout.widget.ConstraintLayout>
기본적으로 ConstraintLayout을 사용하고 있고 "Hello World"를 출력하는 TextView가 하나 배치되어 있음을 여러 프로젝트를 생성해보고 Android를 공부를 해 본 분들이라면(?) 아실 수 있다. 왜 ConstraintLayout이 디폴트 값으로 지정이 되어있는 것일까?
JetBrains 또는 Google에서 권장하는 것 일까 ?
학부과정에서는 거의 LinearLayout을 사용하여 프로젝트들을 진행했었지만, 졸업작품을 진행할 당시에는 친구의 조언으로
ConstraintLayout을 사용한 경험이 있다.
여러가지 레이아웃들이 있는데 이유도 모르고 사용해왔던 적이 있었고,
이 애매모호한 Layout 사용법에 대해 알아보는 시간을 가져보고자 한다.
📌 LinearLayout
- Linear은 "선"을 의미함.
- 주로 본인은 순서대로 위젯을 배치할 때, 많이 사용했던 경험이 있다.
LinearLayout에 사용되는 설정 값
1. Orientation : (전개)방향
방향을 정해, 위젯들이 순서대로 배치될 때, 전개되는 방향을 정할 수 있다. 방향은 horizontal or vertical을 사용하여 수평, 수직 방향으로 설정할 수 있다.
어떻게 사용할까?
ex ) android:orientation="horizontal"
다음과 같이 사용하면, 전개 방향을 수평방향으로 할 수 있다.
horizontal이 아닌 vertical이 된다면 수직방향으로 전개될 것이다.
2. Weight : 가중치
말 그대로, 가중치라고 볼 수 있다. 특정 방향으로 특정 크기의 Layout 영역이 전개되어있다. 그 영역 내에 가중치 합을 weightSum을 사용하여 정한뒤 weight를 통해 각 위젯이 레이아웃 내에 전개될 비율을 정할 수 있는 것이다.
3. Gravity : 중력
뷰 자신을 레이아웃 영역 내에서 특정 위치에 설정하는 옵션.
gravity의 경우, 중력을 뜻하는데 여러 뷰들을 레이아웃안에 선언하게 될 때, 이 뷰들에게 중력(?)을 가해주어 정렬해주는 느낌이라고 볼 수 있다.
어떻게 사용할까?
ex) android:gravity="center" 가운데로 gravity를 주어 가운데로 뷰들을 정렬한다.
실습코드를 통해 사용법을 참조해보자.
<?xml version="1.0" encoding="utf-8"?>
<LinearLayout
    xmlns:android="http://schemas.android.com/apk/res/android"
    xmlns:app="http://schemas.android.com/apk/res-auto"
    xmlns:tools="http://schemas.android.com/tools"
    android:layout_width="match_parent"
    android:layout_height="match_parent"
    tools:context=".MainActivity"
    android:orientation="horizontal"
    android:weightSum="3"
    android:gravity="center"
    >
    <!-- 계층이 깊어진다. -->
    <LinearLayout
        android:id="@+id/blank_layout"
        android:layout_width="wrap_content"
        android:layout_height="50dp">
    </LinearLayout>

    <View
        android:id="@+id/red_view"
        android:layout_weight="1"
        android:layout_width="0dp"
        android:layout_height="50dp"
        android:background="#F44336"
        />
    <View
        android:id="@+id/yellow_view"
        android:layout_weight="1"
        android:layout_width="0dp"
        android:layout_height="50dp"
        android:background="#FFEB3B"
        />
    <View
        android:id="@+id/blue_view"
        android:layout_weight="1"
        android:layout_width="0dp"
        android:layout_height="50dp"
        android:background="#3F51B5"
        />
</LinearLayout>
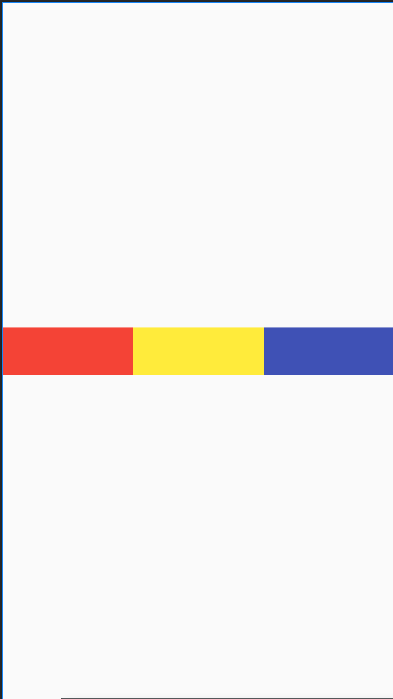
실습코드를 설명하자면, weightSum을 3으로 주어, 전체 레이아웃 가중치 합을 3으로 주었고, 각 위젯인 3개의 View들의 weight을 1로 주어 같은 비율로 레이아웃을 채워주었다.
3개의 View를 제외한 LinearLayout 이 궁금할 수 있는데, 이 LinearLayout은 하위 View 취급을 받으면서 포함되어 있는 형태이다.
이러한 ViewGroup 도 다른 ViewGroup의 하위View로 포함되는 것이 가능함을 알 수 있다. layout_width 가 wrap_content로 되어있지만, 안에 내용이 없으므로, 실질적으로 수평적인 너비를 갖지 않아 수평적인 부모 LinearLayout에서는 모습을 보이지 않는다.
따라서 수평적인 너비를 가진 View들이 일정한 크기를 나눠갖는다. 각 View들의 width가 0dp이지만, weight를 가지고 있으므로,뷰들의 수평 너비는 가중치를 갖는다.
다음과 같이 화면이 보인다.
마치며..
LinearLayout 한계점
다음과 같이 LinearLayout에 대해 알아보았다. 하지만 LinearLayout으로만 사용하여 디자인을 할 때, 계층이 깊어지는 경우가 발생할 수 있다.
우리가 디자인 해야할 화면이 LinearLayout 만을 사용해서 디자인을 하게 되었을 때, 계층이 높아질 것 같은 경우 어플리케이션의 성능 면에서 문제가 생길 수 있으므로, 다른 Layout을 사용해보도록 하자.
다음 시간에는 Android Layout으로는 RelativeLayout에 대해 알아보겠다.
📌 참조