
1. Window, DOM, BOM 객체
📌 Window 객체
- 자바스크립트의 최상위객체이자 전역객체이며 모든 객체가 소속된 객체
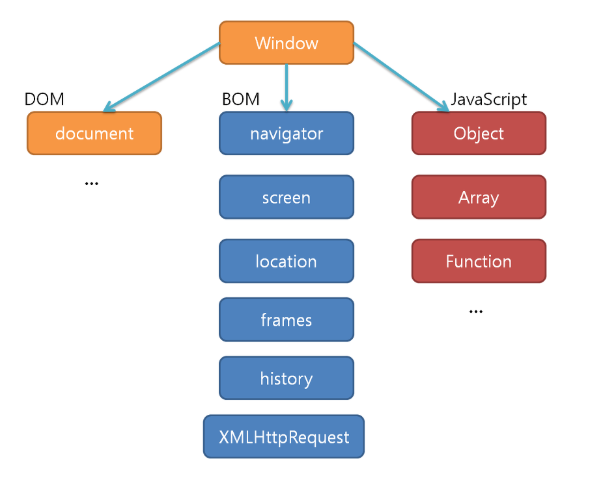
- DOM, BOM, JavaScript는 최상위객체인 Window 객체 밑에 소속되어있으며 서로 계층적 관계로 구조화 되어있다.
📌 DOM(Document Object Model): 문서 객체 모델
-
브라우저가 웹 문서를 이해할 수 있도록 구성된, 문서를 표현하는 형식
-
자바스크립트를 통해 동적으로 변경할 수 있다.
-
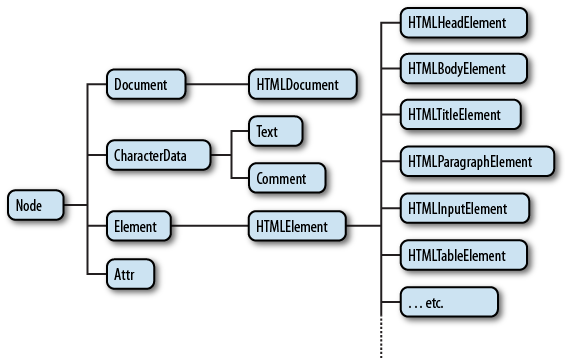
웹 브라우저는 HTML 문서를 로드한 후 해당 문서에 대한 모델을 메모리에 생성한다. 이 때 모델은 객체의 트리로 구성되는데 이것을 DOM tree라고 한다.
-
문서 노드(Document Node): 트리의 최상위에 존재하며 각 요소, 어트리뷰트, 텍스트 노드에 접근하려면 문서 노드를 통해야 함 (DOM tree에 접근하기 위한 시작점 entry point)
-
요소 노드(Element Node): HTML요소를 표현. 중첩에 의해 부자 관계를 가지며 이 관계를 통해 정보를 구조화한다. 어트리뷰트, 텍스트 노드에 접근하려면 먼저 요소 노드를 찾아 접근해야 함.
-
어트리뷰트 노드(Attribute Node): HTML 요소의 어트리뷰트를 표현. 해당 어트리뷰트가 지정된 요소의 자식이 아니라 해당 요소의 일부로 표현된다.
-
텍스트 노드(Text Node): HTML 요소의 텍스트를 표현. 텍스트는 요소 노드의 자식으로 자신의 자식 노드를 가질 수 없는 DOM tree의 최종단이다.
📌 BOM(Browser Object Model): 브라우저 객체 모델
-
자바스크립트가 브라우저와 소통하기 위해서 만들어진 모델로 웹 브라우저에 대한 모든 내용을 담고있는 객체
-
뒤로 가기, 북마크, 웹 브라우저 새 창 띄우기, 히스토리, URL 정보 등을 확인 가능
-
종류 특징 navigator 브라우저명과 버전정보를 속성으로 가짐 window 최상위 객체, 각 프레임별로 하나씩 존재 document 현재 문서에 대한 정보 location 현재 URL에 대한 정보
브라우저에서 사용자가 요청하는 URLhistory 현재 브라우저가 접근했던 URL 히스토리 screen 브라우저의 외부환경에 대한 정보 제공
💡 텍스트 노드
<!DOCTYPE html> <html lang="en"> <head> <meta charset="UTF-8" /> <meta http-equiv="X-UA-Compatible" content="IE=edge" /> <meta name="viewport" content="width=device-width, initial-scale=1.0" /> <title>Document</title> <script> window.onload = function () { var elementNode = document.createElement("p"); // <p></p> 태그 생성 var textMode = document.createTextNode("javascript & node.js"); // javascript & node.js elementNode.appendChild(textMode); document.body.appendChild(elementNode); // body를 먼저 못 읽어서 window.onload 필요 (window.onload는 나중에 실행되기 때문에 전체 다 메모리에 올리고 마지막에 실행된다) }; </script> </head> <body></body> </html>
- 결과

💡 텍스트 노드 외 노드 이용
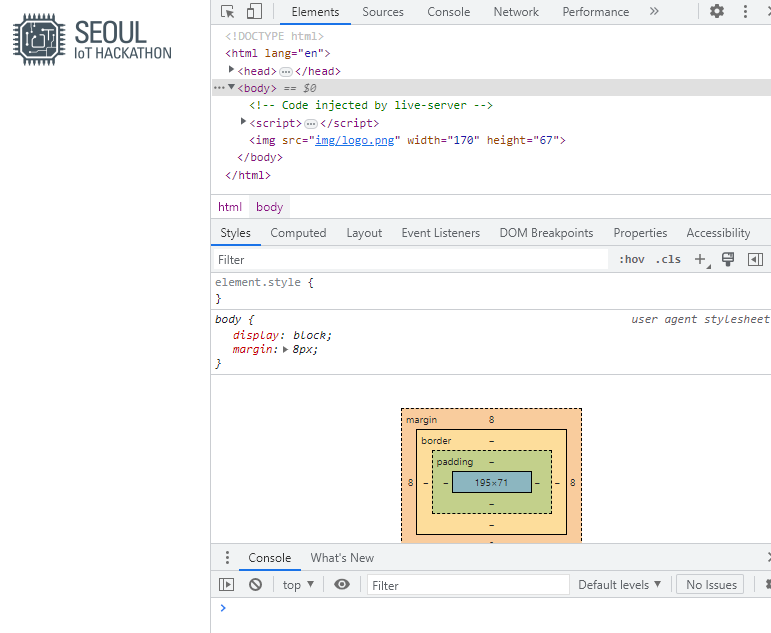
  <!DOCTYPE html>
<html lang="en">
  <head>
    <meta charset="UTF-8" />
    <meta http-equiv="X-UA-Compatible" content="IE=edge" />
    <meta name="viewport" content="width=device-width, initial-scale=1.0" />
    <title>Document</title>
    <script>
      window.onload = function () {
        var imgNode = document.createElement("img");
        imgNode.src = "img/logo.png";
        imgNode.width = "170";
        imgNode.height = "67";

        document.body.appendChild(imgNode);
        // ---------------------------같은 코드---------------------------------
        imgNode.setAttribute("src", "img/logo.png");
        imgNode.setAttribute("width", 170);
        imgNode.setAttribute("height", 67);

        document.body.appendChild(imgNode);
      };
    </script>
  </head>

  <body></body>
</html>
- 결과
// script가 body안에 들어가는 구조로 나옴
💡 window 객체
<script>
    alert("window object");
    window.alert("window object");

    console.log("window object");
    window.console.log("window object");

    window.open("http://www.naver.com", "openWindow", "width=500, height=500");
  </script>
- 결과

💡 onload 함수
- onload가 선언되면, 모든 객체의 호출이 끝나고 난 뒤, 제일 마지막에 실행
<!DOCTYPE html>
<html lang="en">
  <head>
    <meta charset="UTF-8" />
    <meta http-equiv="X-UA-Compatible" content="IE=edge" />
    <meta name="viewport" content="width=device-width, initial-scale=1.0" />
    <title>Document</title>
    <script>
      window.onload = function () {
        console.log("FIRST!");  // 호출된 웹문서가 모두 완료된 후 실행
      };
    </script>
  </head>

  <body>
    <script>
      console.log("SECOND!")
    </script>
  <body>
    <script>
      console.log("THIRD!")
    </script>
  </body>
</html>
- 결과

💡 location 객체
     <script>
     window.onload = function () {
       location.href = "http://www.naver.com"; // 새 페이지로 바로 이동
       // location.assign = "http://www.yahoo.com";
       location.replace = "http://www.naver.com"; // 기존페이지를 새 페이지로 변경
       setTimeout(function () {
         console.log("Location.reload!");
         location.reload();
       }, 3000);
     };
   </script>
- location.href와 location.replace의 비교
- href = 히스토리가 남는다. 변수로 넣어서 문자열 값을 할당
- replace = 히스토리가 남지 않는다. 함수 안에 넣어서 실행
2. 내장 함수
-
자바스크립트에서 기본적으로 제공하는 함수
-
함수 기능 alert() 확인 버튼이 있는 알림 메세지창 생성 prompt() 확인과 취소 버튼이 있고 입력 상자가 있는 메세지창 생성 confirm() 확인, 취소 버튼 메세지창 생성 eval() 문자열로 입력된 수식 계산 후 값 리턴 parseint() 문자열을 정수로 변환 parseFloat() 문자열을 실수로 변환 escape() 모든 문자를 아스키코드 값으로 변환 setTimeout() 일정 시간이 지난 후 지정된 명령 호출 setInterval() 일정 시간마다 지정된 명령 반복 호출
💡 setInterval 활용: 시계
<!DOCTYPE html>
<html lang="en">
  <head>
    <meta charset="UTF-8" />
    <meta http-equiv="X-UA-Compatible" content="IE=edge" />
    <meta name="viewport" content="width=device-width, initial-scale=1.0" />
    <title>Document</title>
  </head>
  <script>
    setInterval(function () {
      var timer = new Date();

      var h = timer.getHours();
      var m = timer.getMinutes();
      var s = timer.getSeconds();

      //document.body.innerHTML = "";
      document.body.innerHTML =
        "<h1>" + String(h) + ":" + String(m) + ":" + String(s) + "</h1>";
      document.write("<h1>" + h + ":" + m + ":" + s + "</h1>");
    }, 1000);
  </script>
  <body></body>
</html>
- 결과

3. 자바스크립트에서 객체 생성하기
- 객체 안에 속성을 넣을 때는 var 생략될 수도 있음
- 객체 안 속성은 객체.속성으로 접근
- 자신이 만든 객체 안 속성을 활용하려면 this.속성으로 접근
💡 객체 생성
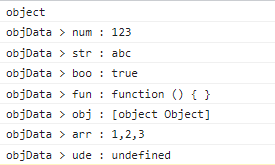
<script>
 var objData = {
            num: 123,
            str: "abc",
            boo: true,
            fun: function () { },
            obj: {},
            arr: [1, 2, 3],
            ude: undefined
        };

        console.log(typeof objData); // object
        console.log("objData > num : " + objData.num);
        console.log("objData > str : " + objData.str);
        console.log("objData > boo : " + objData.boo);
        console.log("objData > fun : " + objData.fun);
        console.log("objData > obj : " + objData.obj);
        console.log("objData > arr : " + objData.arr);
        console.log("objData > ude : " + objData.ude);

</script>
- 결과
💡 객체 내에 속성 추가
  <script>
    var objName = {
      name: "yu min jeong",
      nation: "Korea",
      gender: "women",
      character: "kind",
    };

    var print = "";
    for (var key in objName) {
      print += key + " : " + objName[key] + "\n";
    }
    console.log(print);

    objName.talent = "knitting";
    print = "";
    for (var key in objName) {
      print += key + " : " + objName[key] + "\n";
    }
    console.log(print);

    delete objName.talent;
    print = "";
    for (var key in objName) {
      print += key + " : " + objName[key] + "\n";
    }
    console.log(print);
  </script>
- 결과

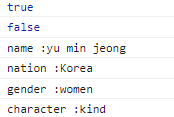
💡 in, with 키워드
console.log("nation" in objName); // in: key 존재의 유무 확인 (true, false 반환)
console.log("age" in objName);

with (objName) {  // with: 객체로의 접근을 간소화하는 키워드
  console.log("name :" + name);
  console.log("nation :" + nation);
  console.log("gender :" + gender);
  console.log("character :" + character);
}
- 결과
4. 생성자를 통한 객체 생성
- 중괄호 : var obj = { };
- new 객체 : var obj = new 생성자함수();
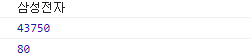
💡 생성자 함수
<script>
    // 생성자 함수 만들기
    function Stock(name, price) {
      this.company = name; // this : 자기 자신
      this.cost = price;
      this.showPrice = function () {
        console.log(this.cost);
      };
    }

    var samsung = new Stock("삼성전자", 43750);
    console.log(samsung.company);
    console.log(samsung.cost);
    </script>
- 결과
💡 생성자 함수를 이용하여 new Grade 만들기
 <script>
      function Grade(kor, eng, math) {
        this.kor = kor;
        this.eng = eng;
        this.math = math;

        this.showSum = function () {
          return this.kor + this.eng + this.math;
        };

        this.showAvg = function () {
          return (this.kor + this.eng + this.math) / 3.0;
        };

        this.showGrade = function () {
          if (this.showAvg() >= 90) {
            return "수 입니다.";
          }
          if (this.showAvg() >= 80) {
            return "우 입니다.";
          }
          if (this.showAvg() >= 70) {
            return "미 입니다.";
          }
          if (this.showAvg() >= 60);
          {
            return "양 입니다.";
          }
          return "가 입니다.";
        };
      }

      var kor = Number(prompt("국어 점수", "입력"));
      var eng = Number(prompt("영어 점수", "입력"));
      var math = Number(prompt("수학 점수", "입력"));
      console.log(kor + "," + eng + "," + math);

      var grade = new Grade(kor, eng, math);
      console.log("총점 : " + grade.showSum());
      console.log("평균 : " + grade.showAvg());
      console.log("학점 : " + grade.showGrade());
  </script>
- 결과


개발 연습장