ConstraintLayout의 이해
우선, 설명하기전에 이 단어에 대해서 알아볼 필요가 있습니다!
<Button android:id="@+id/button1" ...
         app:layout_constraintRight_toRightOf="parent" />
app:layout_constraintRight_toRightOf=”parent” 이게 과연 무슨뜻일까요?
정답은, button1 right의 constraint를 줄건데, 이건 parent의 right이다! 라는 뜻입니다.
즉, parentlayout 속성의 오른쪽으로 배치한다!

여기에서 좌우일렬로 서로 붙어있는 버튼 2개를 배치하고싶을 땐 어떻게 해야할까요?
하나의 버튼에는 바로 위처럼 right를 주고, 다른 하나의 버튼에는 left를 설정해주면 될까요? 한번 해보겠습니다.
<?xml version="1.0" encoding="utf-8"?>
<android.support.constraint.ConstraintLayout xmlns:android="http://schemas.android.com/apk/res/android"
  android:layout_width="match_parent"
  android:layout_height="match_parent"
  xmlns:app="http://schemas.android.com/apk/res-auto">

  <Button
    android:id="@+id/button1"
    android:layout_width="wrap_content"
    android:layout_height="wrap_content"
    app:layout_constraintRight_toRightOf="parent"/>

  <Button
    android:id="@+id/button2"
    android:layout_width="wrap_content"
    android:layout_height="wrap_content"
    app:layout_constraintLeft_toLeftOf="parent"/>

</android.support.constraint.ConstraintLayout>
어라? 두개의 버튼이 서로 떨어져있네요? 우리의 목적은 버튼 두개를 붙여야하는데...
우리는 여기에서 한가지 개념을 더 공부할 필요가있습니다.
바로..
Chains입니다!
Chains
chain내의 뷰간에 공간을 공유하고 사용 가능한 공간을 분할하는 방식을 제어
즉, 뷰 서로서로가 연결되어있다 정도로 이해하면 쉽습니다.
<?xml version="1.0" encoding="utf-8"?>
<android.support.constraint.ConstraintLayout xmlns:android="http://schemas.android.com/apk/res/android"
  xmlns:app="http://schemas.android.com/apk/res-auto"
  android:layout_width="match_parent"
  android:layout_height="match_parent">

  <Button
    android:id="@+id/button1"
    android:layout_width="wrap_content"
    android:layout_height="wrap_content"
    app:layout_constraintRight_toRightOf="parent"
    app:layout_constraintLeft_toRightOf="@+id/button2" />

  <Button
    android:id="@+id/button2"
    android:layout_width="wrap_content"
    android:layout_height="wrap_content"
    app:layout_constraintLeft_toLeftOf="parent"
    app:layout_constraintRight_toLeftOf="@id/button1" />

</android.support.constraint.ConstraintLayout>
이 코드는 위의 코드와 다르게 @id값을 참조하고 있습니다. button1의 왼쪽은 부모대신 button2의 오른쪽에 있고, button2의 오른쪽은 부모대신 button1의 왼쪽에 있게 하는
설정값을 준것입니다.
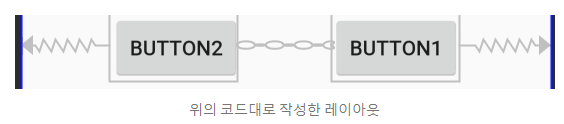
실제로, 두 뷰를 서로 연결해주게 되면, 가운데에 다음과같은 체인모양이 형성됩니다!
하지만 두개의 상호관계를 정해주었긴해도 아직 두 뷰가 붙진 않았습니다..
여기서 chainStyle을 알고가셔야 합니다.
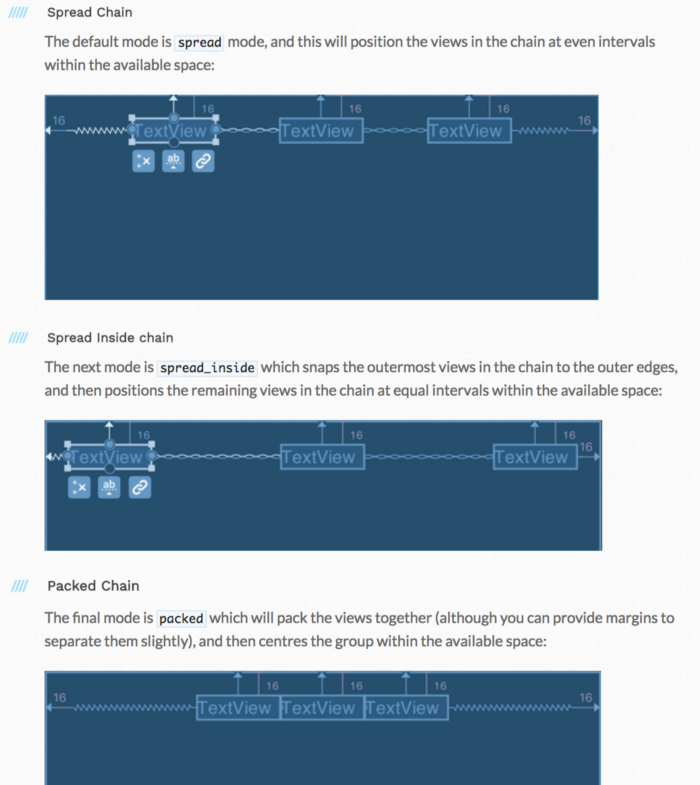
여기서 우리는 버튼을 붙여야 하니까 3번을 선택해줍니다!
<?xml version="1.0" encoding="utf-8"?>
<android.support.constraint.ConstraintLayout xmlns:android="http://schemas.android.com/apk/res/android"
  xmlns:app="http://schemas.android.com/apk/res-auto"
  android:layout_width="match_parent"
  android:layout_height="match_parent">

  <Button
    android:id="@+id/button1"
    android:layout_width="wrap_content"
    android:layout_height="wrap_content"
    android:text="button1"
    app:layout_constraintRight_toRightOf="parent"
    app:layout_constraintLeft_toRightOf="@+id/button2" />

  <Button
    android:id="@+id/button2"
    android:text="button2"
    android:layout_width="wrap_content"
    android:layout_height="wrap_content"
    app:layout_constraintHorizontal_chainStyle="packed"
    app:layout_constraintLeft_toLeftOf="parent"
    app:layout_constraintRight_toLeftOf="@id/button1" />

</android.support.constraint.ConstraintLayout>
우와! 드디어 두개의 버튼이 붙었네요! 하지만 가운데로 정렬이 되어있습니다. 그이유는
각 버튼의 오른쪽과 왼쪽이 parent가 기준으로 되어있기 때문입니다.
이때 왼쪽으로 붙이고싶다면?
app:layout_constraintHorizontal_bias="0" 이라는 코드만 추가하시면 됩니다. default값은 기본적으로 0.5로 설정되어있고
default값보다 작으면 왼쪽, 크면 오른쪽으로 배치됩니다.
Tip
<?xml version="1.0" encoding="utf-8"?>
<android.support.constraint.ConstraintLayout xmlns:android="http://schemas.android.com/apk/res/android"
  xmlns:app="http://schemas.android.com/apk/res-auto"
  android:layout_width="match_parent"
  android:layout_height="match_parent">

  <TextView
    android:id="@+id/text1"
    android:text="button2button2button2button2"
    android:layout_width="wrap_content"
    android:layout_height="wrap_content"
    android:maxLines="1"
    app:layout_constrainedWidth="true"
    app:layout_constraintHorizontal_weight="1"
    app:layout_constraintHorizontal_bias="0"
    app:layout_constraintHorizontal_chainStyle="packed"
    app:layout_constraintStart_toStartOf="parent"
    app:layout_constraintEnd_toStartOf="@id/button1" />

  <Button
    android:id="@+id/button1"
    android:layout_width="wrap_content"
    android:layout_height="wrap_content"
    android:text="button1"
    app:layout_constraintEnd_toEndOf="parent"
    app:layout_constraintStart_toEndOf="@id/text1" />

</android.support.constraint.ConstraintLayout>
dth를 0dp로 설정하고 weight를 1로 설정해도 버튼이 계속 사라지는 문제
android:layout_width=”wrap_content”와 app:layout_constrainedWidth=”true” 으로 해결