Fragment Shader에 noise를 추가하는 법에 대해 알아볼것이다.
먼저 우리는 noise를 추가하기 위해선 noise전 렌더링할 모델의 좌표, 즉 texture이 필요하게 된다.
그렇기에 우리는 이 챕터에선 여러개의 pass 와 FBO을 사용함을 명심하자
Noise 모델 사용
- Perlin function
noise를 생성하려면 우린 glm::perlin function 을 사용하게 된다.
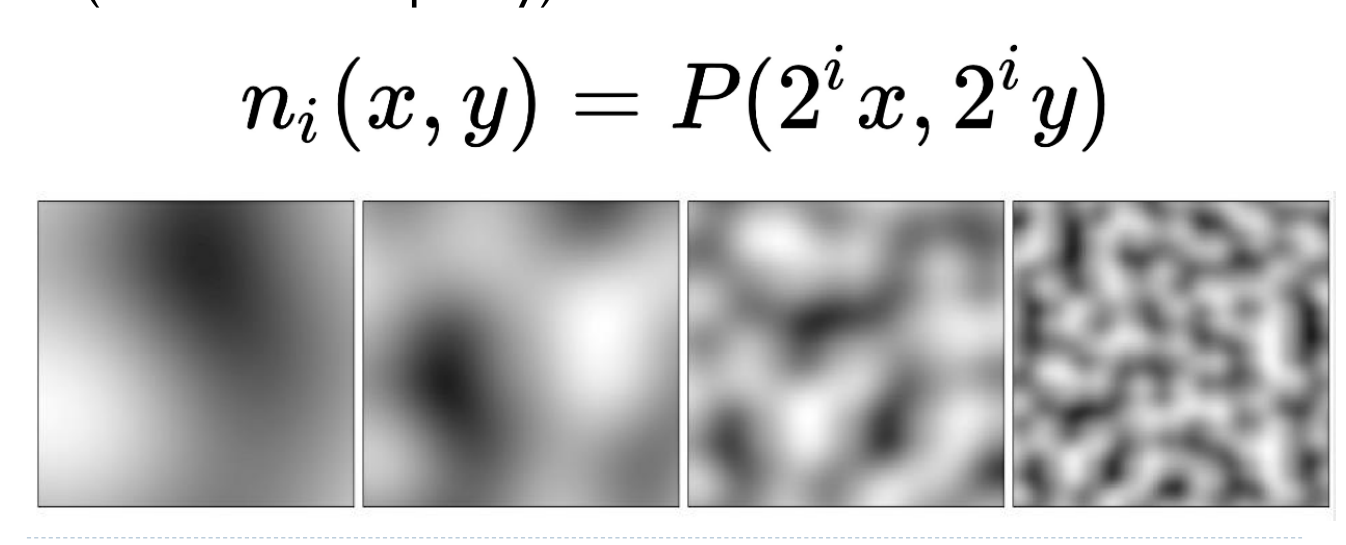
이런 식을 가지며, i값이 작을 수록 scale값이 커지며 i값이 커질수록 i값이 커진다.. 2의 제곱근의 뜻을 잘 파악하자!
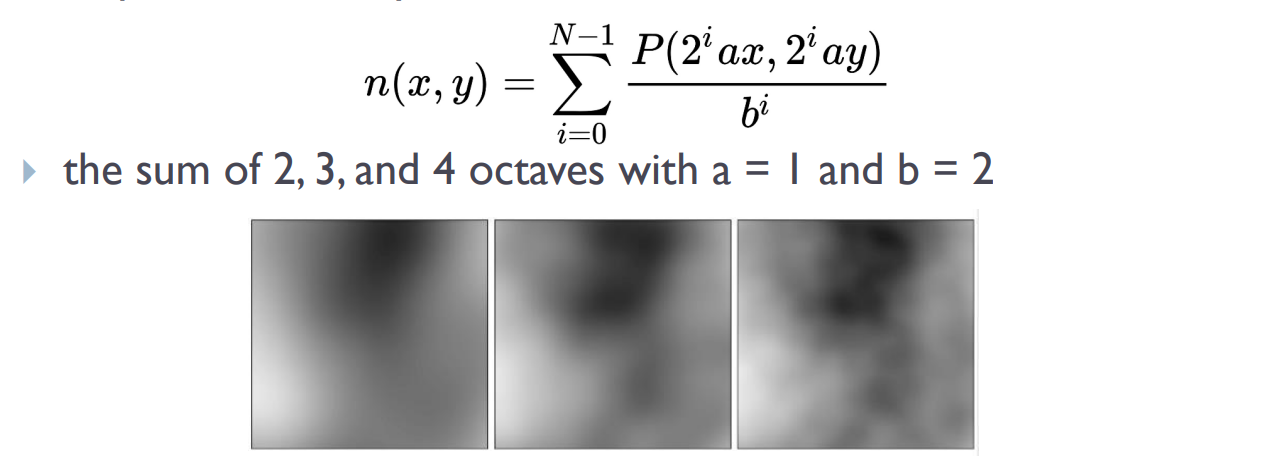
a는 texture를 몇개 더할 것인지 , freq 주파수값
b는 주기성을 어떡할 것인지에 , 주기값에 해당한다.
이렇게 frequency 값이 더 많이 더 할수록 high frequency 값이 보이게 된다.
여기서 영상처리 수업에서 배운 것을 기억하자! 연결되는 부분이 많으니 연결해서 생각해보도록.
이제 코드를 분석해볼 것인데
우리는 #include<glm/gtc/noise.hpp> 를 이용하여 noise 함수를 사용할 것이다.
	  float x = xFactor * col;
      float y = yFactor * row;
      float sum = 0.0f;
      float freq = baseFreq; // a에 해당하는 주파수
      float persist = persistence; // b에 해당하는 주기성
      for( int oct = 0; oct < 4; oct++ ) {
        glm::vec2 p(x * freq, y * freq);

        float val = 0.0f;
        if (periodic) { // 경계 없애기
        // 뒤에 vec2(Freq)를 해줌으로써 주기값을 줌.. 경계가 사라짐
          val = glm::perlin(p, glm::vec2(freq)) * persist;
        } else { //경계가 보이게 됨
          val = glm::perlin(p) * persist;
        }

        sum += val;

        float result = (sum + 1.0f) / 2.0f;

        // Clamp strictly between 0 and 1
        result = result > 1.0f ? 1.0f : result;
        result = result < 0.0f ? 0.0f : result;

        // Store in texture
        data[((row * width + col) * 4) + oct] = (GLubyte) ( result * 255.0f );
        freq *= 2.0f;
        persist *= persistence;
이걸 전체 화면에서 반복해줘야한다. row, col 을 이중반복문으로 선언해주면 되겠지!
int generate2DTex(float baseFreq, float persistence, int w, int h, bool periodic) {

  int width = w;
  int height = h;

  printf("Generating noise texture...");

  GLubyte *data = new GLubyte[ width * height * 4 ];

  float xFactor = 1.0f / (width - 1);
  float yFactor = 1.0f / (height - 1);

  for( int row = 0; row < height; row++ ) {
    for( int col = 0 ; col < width; col++ ) {
      float x = xFactor * col;
      float y = yFactor * row;
      float sum = 0.0f;
      float freq = baseFreq;
      float persist = persistence;
      for( int oct = 0; oct < 4; oct++ ) {
        glm::vec2 p(x * freq, y * freq);

        float val = 0.0f;
        if (periodic) {
          val = glm::perlin(p, glm::vec2(freq)) * persist;
        } else {
          val = glm::perlin(p) * persist;
        }

        sum += val;

        float result = (sum + 1.0f) / 2.0f;

        // Clamp strictly between 0 and 1
        result = result > 1.0f ? 1.0f : result;
        result = result < 0.0f ? 0.0f : result;

        // Store in texture
        data[((row * width + col) * 4) + oct] = (GLubyte) ( result * 255.0f );
        freq *= 2.0f;
        persist *= persistence;
      }
    }
  }

  int texID = NoiseTex::storeTex(data, width, height);
  delete [] data;

  printf("done.\n");
  return texID;
}
위의 noise 정보가 담긴 texture 저장하기 위한 함수 선언
int NoiseTex::storeTex( GLubyte * data, int w, int h ) {
  GLuint texID;
  glGenTextures(1, &texID);

  glBindTexture(GL_TEXTURE_2D, texID);
  glTexStorage2D(GL_TEXTURE_2D, 1, GL_RGBA8, w, h);
  glTexSubImage2D(GL_TEXTURE_2D,0,0,0,w,h,GL_RGBA,GL_UNSIGNED_BYTE,data);
  glTexParameteri(GL_TEXTURE_2D, GL_TEXTURE_MAG_FILTER, GL_LINEAR);
  glTexParameteri(GL_TEXTURE_2D, GL_TEXTURE_MIN_FILTER, GL_LINEAR);
  glTexParameteri(GL_TEXTURE_2D, GL_TEXTURE_WRAP_S, GL_REPEAT);
  glTexParameteri(GL_TEXTURE_2D, GL_TEXTURE_WRAP_T, GL_REPEAT);

  return texID;
}
texID 에 noiseTex 값이 저장되게 된다.
  int texID = NoiseTex::storeTex(data, width, height);
  delete [] data;
이렇게 noise texture을 생성하고 이를 fbo에 보내기 위한 함수를 작성하였다.
이제 다양한 noise형태를 가지는 함수를 알아보자!
- 구름 noise
- 나무 나이테 noise
- disIntefration Effect
우리는 fragment shader값만 바꿔줄 것이기에 이부분에만 집중하도록 하겠다.
1. 구름 noise
구름 noise 생성하기 위해선
먼저, noise texture 정보를 담은 texture 변수와,
sky Color uniform 변수,
Cloud Color uniform 변수가 필요하다.
#define PI 3.14159265

uniform vec4 Color;

uniform sampler2D NoiseTex;

uniform vec4 SkyColor = vec4( 0.3, 0.3, 0.9, 1.0 );
uniform vec4 CloudColor = vec4( 1.0, 1.0, 1.0, 1.0 );

in vec2 TexCoord;

layout ( location = 0 ) out vec4 FragColor;

void main()
{
    vec4 noise = texture(NoiseTex, TexCoord);
    float t = (cos( noise.a * PI ) + 1.0) / 2.0;
    vec4 color = mix( SkyColor, CloudColor, t );

    FragColor = vec4( color.rgb , 1.0 );
}
전체 코드이며 이제 분석을 해보겠다.
float t = (cos( noise.a * PI ) + 1.0) / 2.0;noise값을 읽어들여 이를 cos 함수 형태로 취한다. (구름 효과를 위한)
그런다음 mix 함수를 이용해 color를 t값에 따라 다양한 값의 cos 함수 형태로 취하게 한다.
2. 나이테 효과
이것을 생성하기 위해선 원통형의 log를 만든후, ring 형태의 나이태를 주고, 이를 y면을 기준으로 잘라 직사각형으로 만들게 해야한다.
texture의 s값은 x를, t값은 y를 뜻함을 알아두자.
여기서 필요한 준비물은,
1. noise texture 유니폼 변수
2. light wood color 변수
3. dark wood color 변수
4. slice 단면 이 필요하다.
uniform sampler2D NoiseTex;

uniform vec4 DarkWoodColor = vec4( 0.8, 0.5, 0.1, 1.0 );
uniform vec4 LightWoodColor = vec4( 1.0, 0.75, 0.25, 1.0 );
uniform mat4 Slice;

in vec2 TexCoord;

layout ( location = 0 ) out vec4 FragColor;

void main()
{
    // Transform the texture coordinates to define the
    // "slice" of the log.
    // 반전이 되도록 하게 함
    vec2 tc = TexCoord;
    if( tc.s > 0.5 ) tc.s = 1.0 - tc.s;
    // slice를 기준으로한 원통을 만든다.
    vec4 cyl = Slice * vec4( tc, 0.0, 1.0 );

    // The distance from the log's y axis
    // y축 기준으로 거리값 계산
    float dist = length(cyl.xz);

    // Perturb the distance using the noise texture.
    // texture값을 읽어들여 noise을 값 알아내기 -> 아래에 집중
    vec4 noise = texture(NoiseTex, tc);
    dist += noise.b * 2.5;

    // Determine the color as a mixture of the light and
    // dark wood colors
    // noise값에 따른 거리를 계산한다 fract()는 소수를 가져오는 함수로,
    // t값은 0.0 부분에서만 엄청 진하게, 양쪽은 대칭이 되면서 색이 섞이게 된다.
    float t = 1.0 - abs( fract( dist ) * 2.0 - 1.0 );
    t = smoothstep( 0.2, 0.5, t );
    vec4 color = mix( DarkWoodColor, LightWoodColor, t );

    FragColor = vec4( color.rgb , 1.0 );
}- rust 효과
in vec3 ReflectDir;
in vec2 TexCoord;

uniform samplerCube CubeMapTex;
uniform sampler2D NoiseTex;

uniform float ReflectFactor;
uniform vec4 MaterialColor;

layout( location = 0 ) out vec4 FragColor;

uniform float Threshold = 0.58;

void main() {
    // Access the noise texture
    float noise = texture( NoiseTex, TexCoord ).a;
    //noise는 0 아니면 1로 결정하게 된다.
    float scale = floor( noise + (1 - Threshold) );

    // Access the cube map texture
    // 원래의 color값 읽어오기
    vec3 cubeMapColor = texture(CubeMapTex, ReflectDir).rgb;

    // Gamma correct
    // 감마 보정 을 이용해서 보다 색대비 있게
    cubeMapColor = pow(cubeMapColor, vec3(1.0/2.2));

//rust 값 결정,, 이는 noise값에 따라
    vec3 rustColor = mix( MaterialColor.rgb, vec3(0.01), noise );

// 0.0 이면 본연의 색에서, 1.0 이면 rust color
    FragColor = vec4( mix( cubeMapColor, rustColor, scale), 1);
}
이분법적으로 frag하였다고 생각하면 될듯하다.