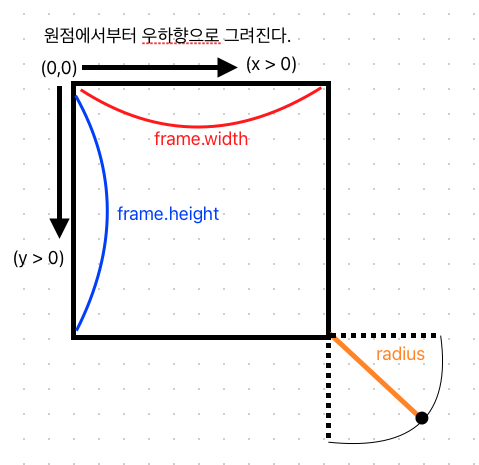
결과물
- 카메라 preview 는 있다고 가정
사전 지식
UIBezierPath
https://developer.apple.com/documentation/uikit/uibezierpath
- A path that consists of straight and curved line segments that you can render in your custom views
- 코드로 직접 곡선을 그리고 싶을 때 사용하는 클래스
move(to:)
- moves the path's current point to the specified location
- 그리기 시작점 옮기고 싶을 때 사용함
addLine(to:)
- appends a straight line to the path
- 직선 그리기
addArc(withCenter:radius:startAngle:endAngle:clockwise:)
func addArc(
    withCenter center: CGPoint,
    radius: CGFloat,
    startAngle: CGFloat,
    endAngle: CGFloat,
    clockwise: Bool
)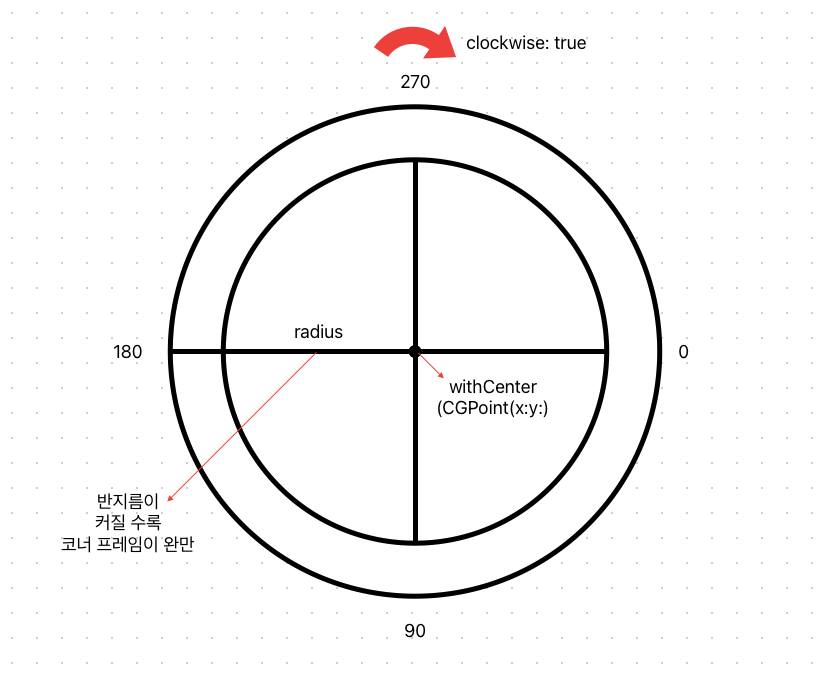
- 원 위에서 startAngle ~ endAngle 까지의 호를 그린다
addQuadCurve(to:controlPoint:)
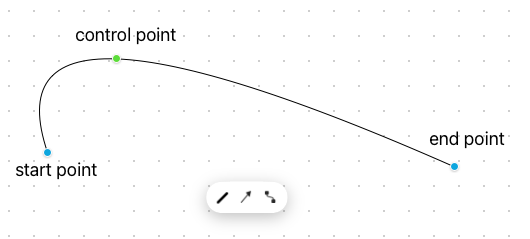
addCurve(to:controlPoint1:controlPoint2:)
- control point가 2개이니 물결을 그릴 수 있겠다.
소스 코드
UIView
import UIKit

class CameraFocusFrame: UIView {

    var color = UIColor.black {
        didSet {
            setNeedsDisplay()
        }
    }

    // 호의 반지름 길이 -> 커질 수록 곡선이 완만해질 것
    var radius: CGFloat = 5 {
        didSet {
            setNeedsDisplay()
        }
    }

    // 두께
    var thickness: CGFloat = 2 {
        didSet {
            setNeedsDisplay()
        }
    }

    // 프레임의 길이
    var length: CGFloat = 30 {
        didSet {
            setNeedsDisplay()
        }
    }

     // 들여쓰기
    var padding: CGFloat = 0 {
        didSet {
            setNeedsDisplay()
        }
    }

    override func draw(_ rect: CGRect) {
        // sets the color of subsequent stroke and fill operations to the color that the receiver represents
        color.set()
        let path = UIBezierPath()

        // Top left 뼈대 만들기
        path.move(to: CGPoint(x: padding, y: length + radius + padding)) // 반지름 + 프레임 길이만큼 아래에 점 찍기
        path.addLine(to: CGPoint(x: padding, y: radius + padding)) // 프레임 길이만큼 시작점에서 위로 그리기
        path.addArc(withCenter: CGPoint(x: radius + padding, y: radius + padding), radius: radius, startAngle: CGFloat.pi, endAngle: CGFloat.pi * 3 / 2, clockwise: true) // 반지름만큼 안쪽에 점을 찍어 원점으로 두고 180~270 만큼의 호 그리기
        path.addLine(to: CGPoint(x: length + radius + padding, y: padding)) // 호의 끝에서 코너 길이 만큼 오른쪽으로 그리기

        // Top right 뼈대 만들기
        path.move(to: CGPoint(x: frame.width - padding, y: length + radius + padding))
        path.addLine(to: CGPoint(x: frame.width - padding, y: radius + padding))
        path.addArc(withCenter: CGPoint(x: frame.width - radius - padding, y: radius + padding), radius: radius, startAngle: 0, endAngle: CGFloat.pi * 3 / 2, clockwise: false)
        path.addLine(to: CGPoint(x: frame.width - length - radius - padding, y: padding))

        // Bottom left 뼈대 만들기
        path.move(to: CGPoint(x: padding, y: frame.height - length - radius - padding))
        path.addLine(to: CGPoint(x: padding, y: frame.height - radius - padding)) // length 만큼 아래로 그리기
        path.addArc(withCenter: CGPoint(x: radius + padding, y: frame.height - radius - padding), radius: radius, startAngle: CGFloat.pi, endAngle: CGFloat.pi / 2, clockwise: false)
        path.addLine(to: CGPoint(x: length + radius + padding, y: frame.height - padding))

        // Bottom right 뼈대 만들기
        path.move(to: CGPoint(x: frame.width - padding, y: frame.height - length - radius - padding))
        path.addLine(to: CGPoint(x: frame.width - padding, y: frame.height - radius - padding))
        path.addArc(withCenter: CGPoint(x: frame.width - radius - padding, y: frame.height - radius - padding), radius: radius, startAngle: 0, endAngle: CGFloat.pi / 2, clockwise: true)
        path.addLine(to: CGPoint(x: frame.width - length - radius - padding, y: frame.height - padding))

        path.lineWidth = thickness // 두께
        path.stroke() // draws a line along the path usin the current drawing properties

    }

}
ViewController
override func viewDidLoad() {
 super.viewDidLoad()
 self.drawCameraFocusLine(isHidden: false)
}

 private func drawCameraViewFrame(isHidden: Bool) {
        if isHidden {
            return
        }

        // view 생성
        if let cameraLayer = self.cameraView {
            self.cornerFrame = CameraFocusFrame(frame: CGRect(x: 0, y: 0, width: cameraLayer.frame.width, height: cameraLayer.frame.height))
        }

        // view 붙이기
        if let corner = self.cornerFrame {
            corner.color = .black
            corner.thickness = 10
            corner.radius = 10
            corner.padding = 5
            corner.backgroundColor = .clear
            self.view.addSubview(corner)
        }
    }

override func viewWillAppear(_ animated: Bool) {
        super.viewWillAppear(animated)
        // corner frame 위치 조정
        if let cornerFrame = self.cornerFrame {
            cornerFrame.translatesAutoresizingMaskIntoConstraints = false
            cornerFrame.centerXAnchor.constraint(equalTo: self.view.centerXAnchor, constant: 0).isActive = true
            cornerFrame.centerYAnchor.constraint(equalTo: self.view.centerYAnchor, constant: 0).isActive = true
            cornerFrame.widthAnchor.constraint(equalToConstant: self.cameraView.frame.width).isActive = true
            cornerFrame.heightAnchor.constraint(equalToConstant: self.cameraView.frame.height).isActive = true
        }
}
참고 자료
[심화] https://almostengineer.medium.com/uibezierpath-lesson-how-to-draw-cuphead-on-layers-d164fd23cf61

느려도 한 걸음 씩 끝까지