
0. 고민
- 카테고리별 elasticsearch의 인덱스로 분리해서 저장하기
초기에는 kafka connect를 이용해서 kafka-elasticsearch 파이프라인을 구축했기 때문에 SMT를 이용해서 필드의 값을 인덱스로 설정하려고했다.
하지만 아래 문제의 parent-child관계는 SMT방식으로 한계가 있다고 판단해서
kafka - logstash - elasticsearch 로 파이프라인을 변경했다.
output과정에서 index_name필드를 그대로 인덱스로 지정하면 되기 때문에 훨씬 간단하게 해결가능했다.
- 상품 상세 조회시 가격 추이 그래프를 제공하기 위해서 제목, 링크 등의 기본 정보와 시간별 가격 정보를 분리해서 저장시켜야 했다.
함께 저장할 시 최대 5분마다 업데이트가 진행되는데 가격외에 고정적인 정보까지 같이 접근되기 때문에 따로 저장하기로 했다.
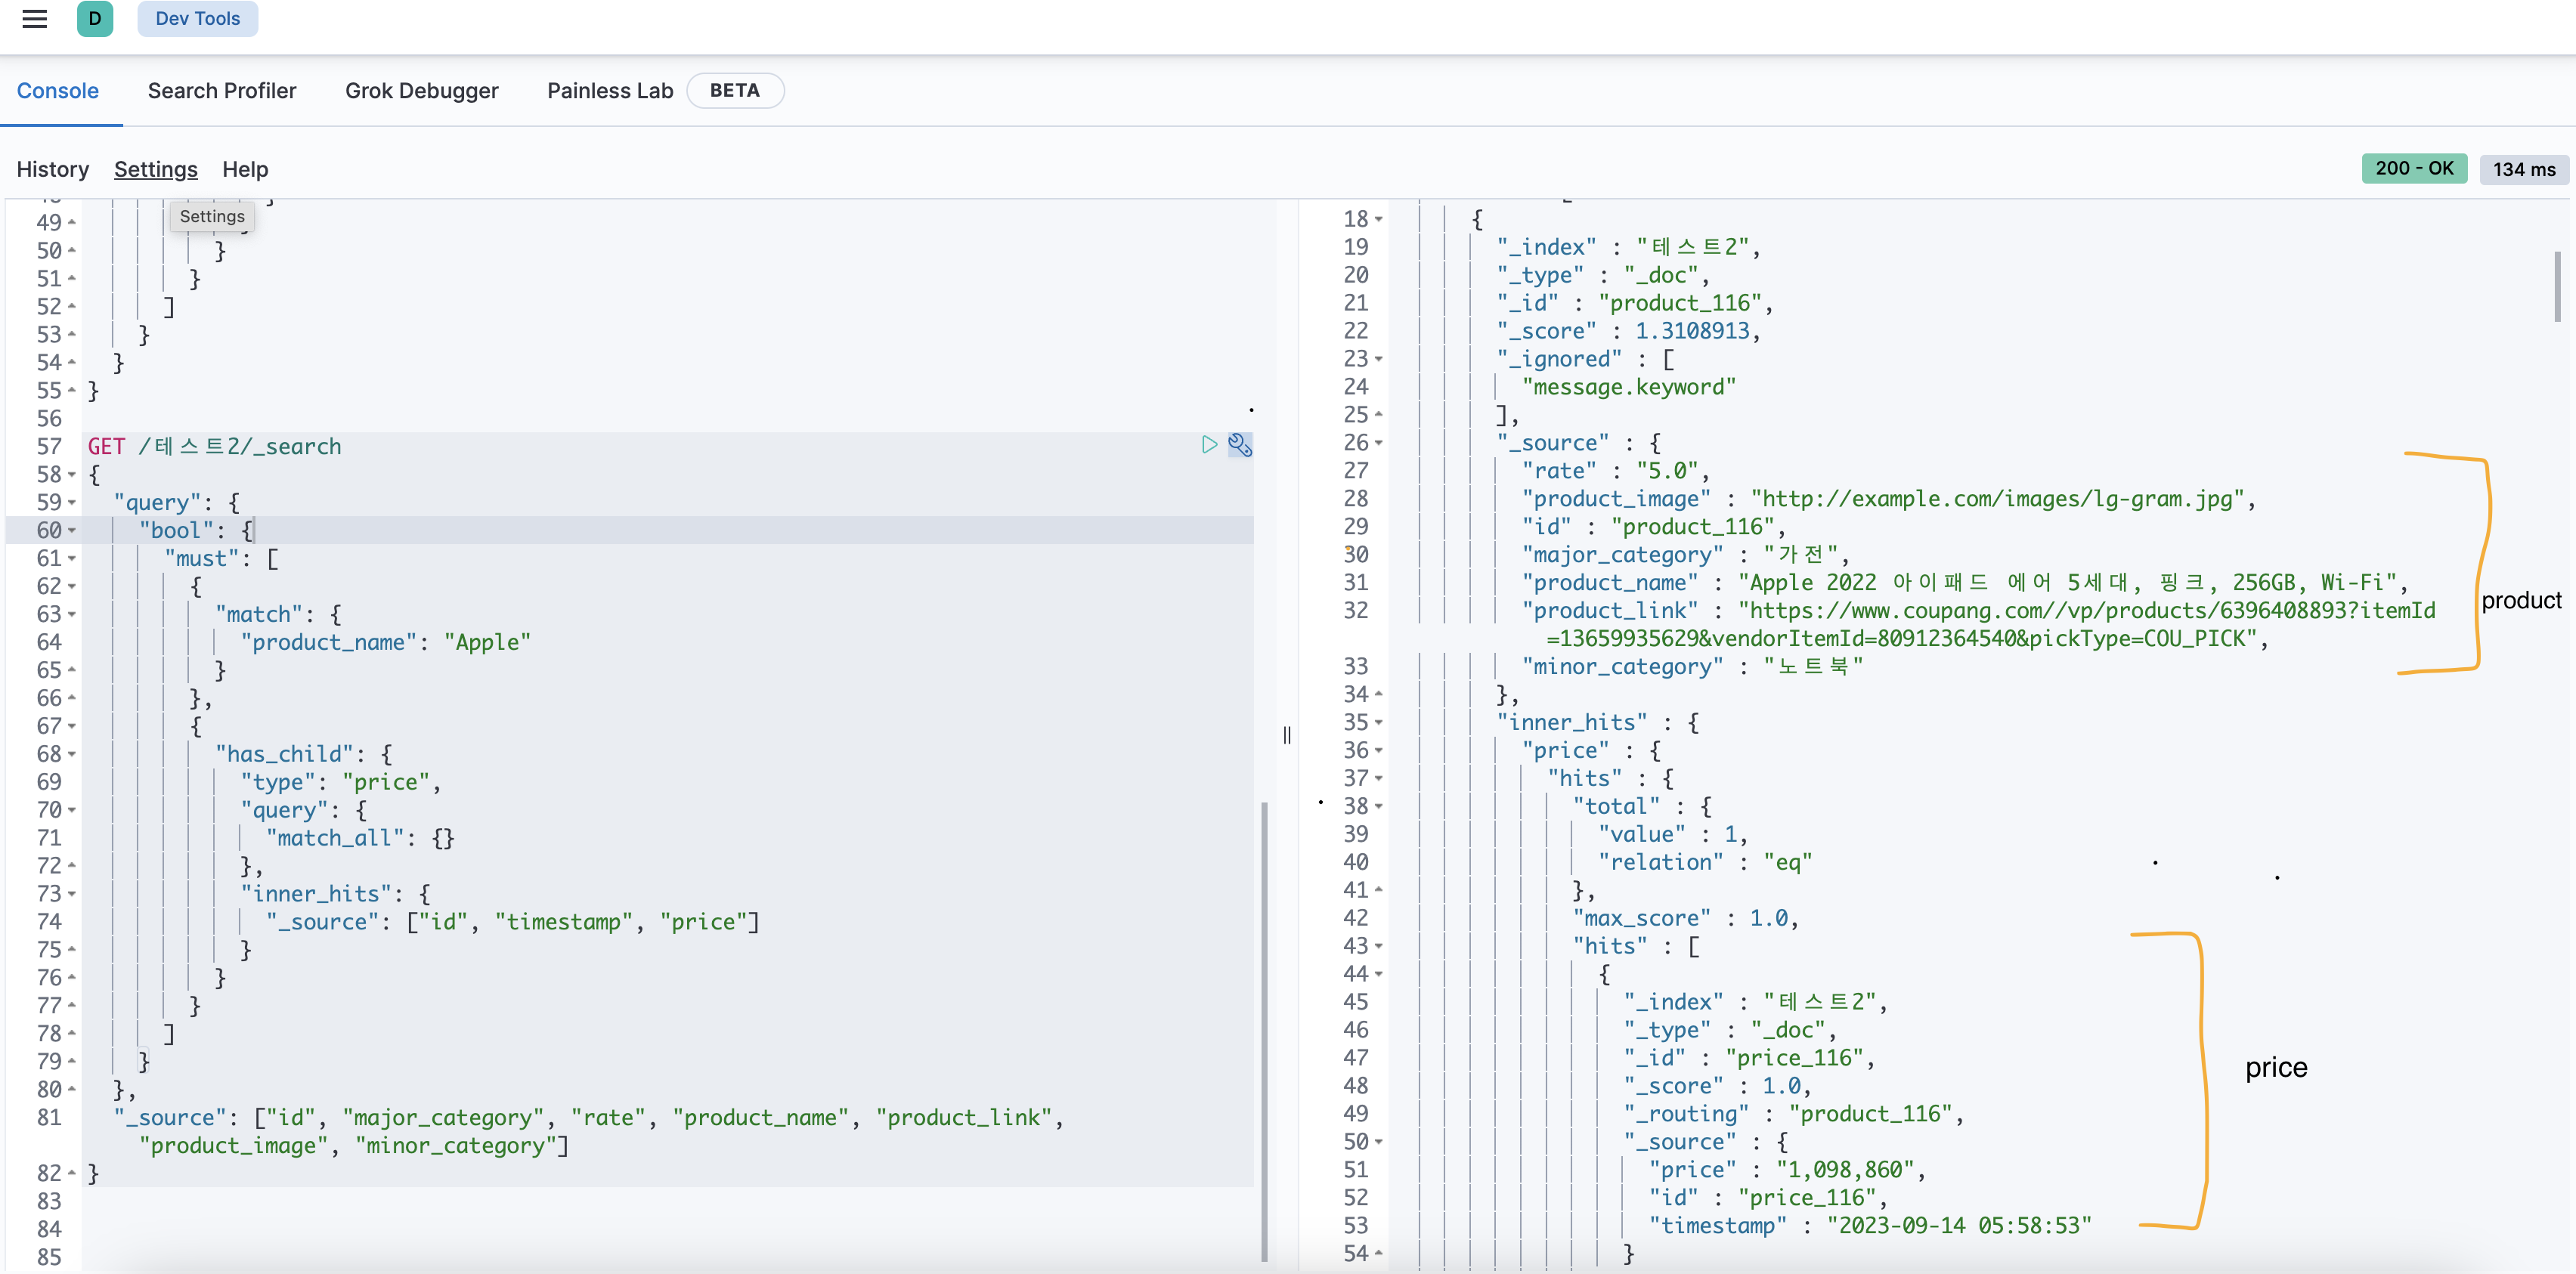
그래서 찾은 방법은 기본 정보와 가격 정보를 parent-child관계로 엘라스틱서치에 저장하는것
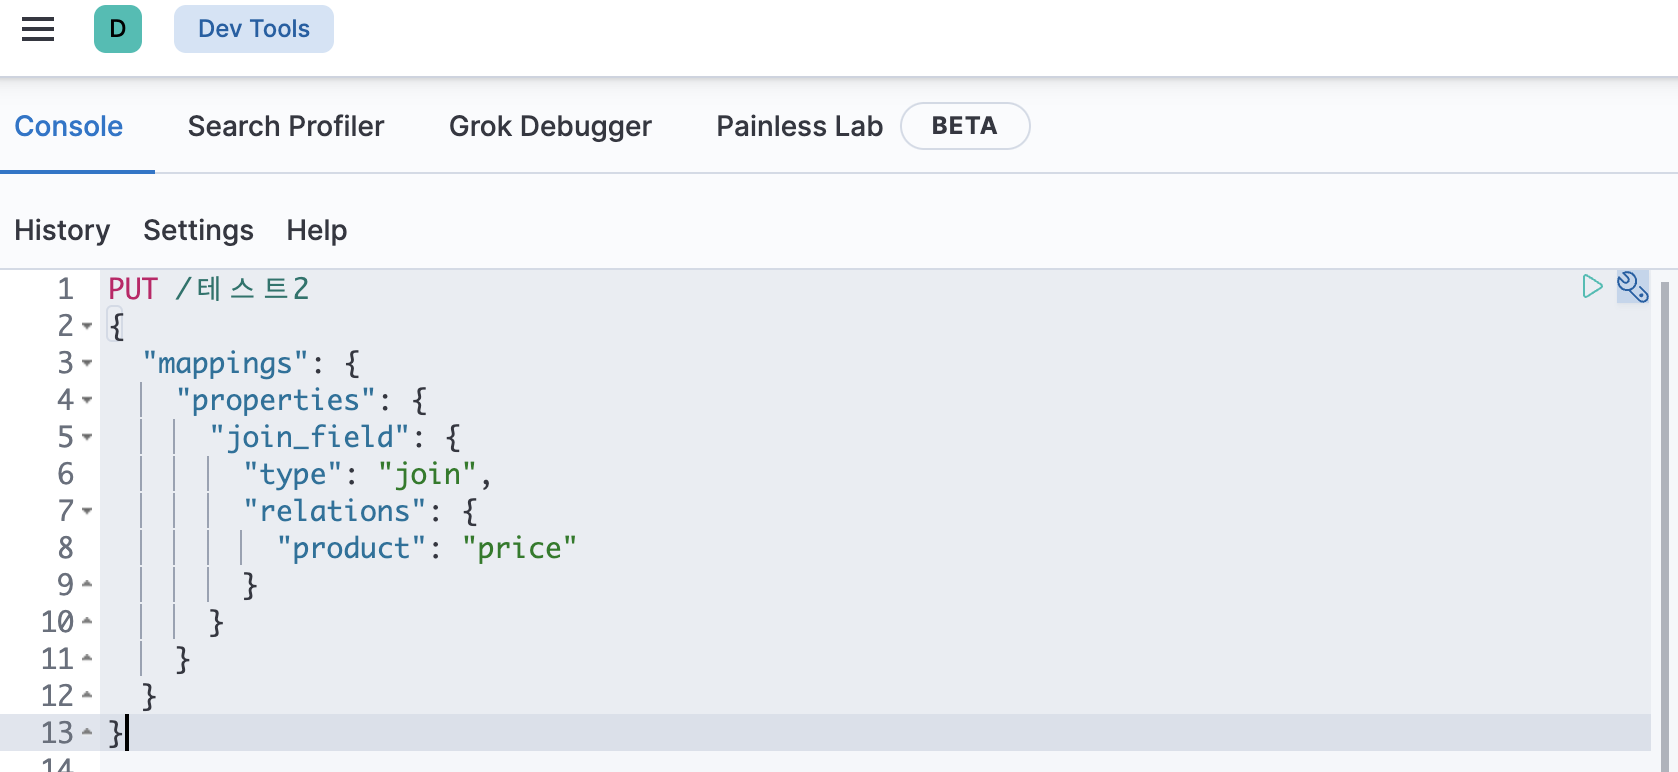
join_field를 사용해서{ "mappings": { "properties": { "join_field": { "type": "join", "relations": { "product": "price" } } } } }elasticsearch에 이렇게 매핑시켜주게 되면 product를 부모로, price를 자식으로 인식하게 된다.
1. 크롤링
import requests
import re
from bs4 import BeautifulSoup
import json
from kafka import KafkaProducer
from datetime import datetime
import time
def on_send_success(record_metadata):
print(f"Record sent to topic {record_metadata.topic} partition [{record_metadata.partition}] offset [{record_metadata.offset}]")
def on_send_error(excp):
print(f"I am an errback: {excp}")
# Kafka 설정
producer = KafkaProducer(
bootstrap_servers=['{ip주소}:9092'],
value_serializer=lambda v: json.dumps(v).encode('utf-8'), # json으로 파싱
key_serializer=lambda v: json.dumps(v).encode('utf-8')
)
HEADERS = {
"User-Agent": "...",
"Accept-Language": "ko-KR,ko;q=0.8,en-US;q=0.5,en;q=0.3"
}
SEARCH_PRODUCT_CLASS = re.compile("^search-product")
# 페이지 범위 설정
page_range = range(1, 4)
id = 200
for i in page_range:
url = f"https://www.coupang.com/np/search?component=&q=%EC%95%84%EC%9D%B4%ED%8C%A8%EB%93%9C+%EC%97%90%EC%96%B4+5&channel=auto"
try:
res = requests.get(url, headers=HEADERS)
res.raise_for_status()
except requests.RequestException as e:
print(f"Request failed: {e}")
continue
soup = BeautifulSoup(res.text, "html.parser")
items = soup.find_all("li", attrs={"class": SEARCH_PRODUCT_CLASS})
current_time = datetime.utcnow().strftime('%Y-%m-%d %H:%M:%S')
for item in items:
ad_badge = item.find("span", attrs={"class": "ad-badge-text"})
if ad_badge:
continue
original_name = item.find("div", attrs={"class": "name"}).get_text()
name = original_name.strip()
price_tag = item.find("strong", attrs={"class": "price-value"})
if price_tag:
price = price_tag.get_text()
else:
print("가격 정보를 찾을 수 없습니다.")
continue
rate = item.find("em", attrs={"class": "rating"})
if rate:
rate = rate.get_text()
else:
continue
rate_cnt = item.find("span", attrs={"class": "rating-total-count"})
if rate_cnt:
rate_cnt = rate_cnt.get_text()[1:-1]
else:
continue
link = item.find("a", attrs={"class": "search-product-link"})["href"]
if float(rate) >= 3 and int(rate_cnt) >= 10:
print(f"제품명 : {name}")
#Product 메시지
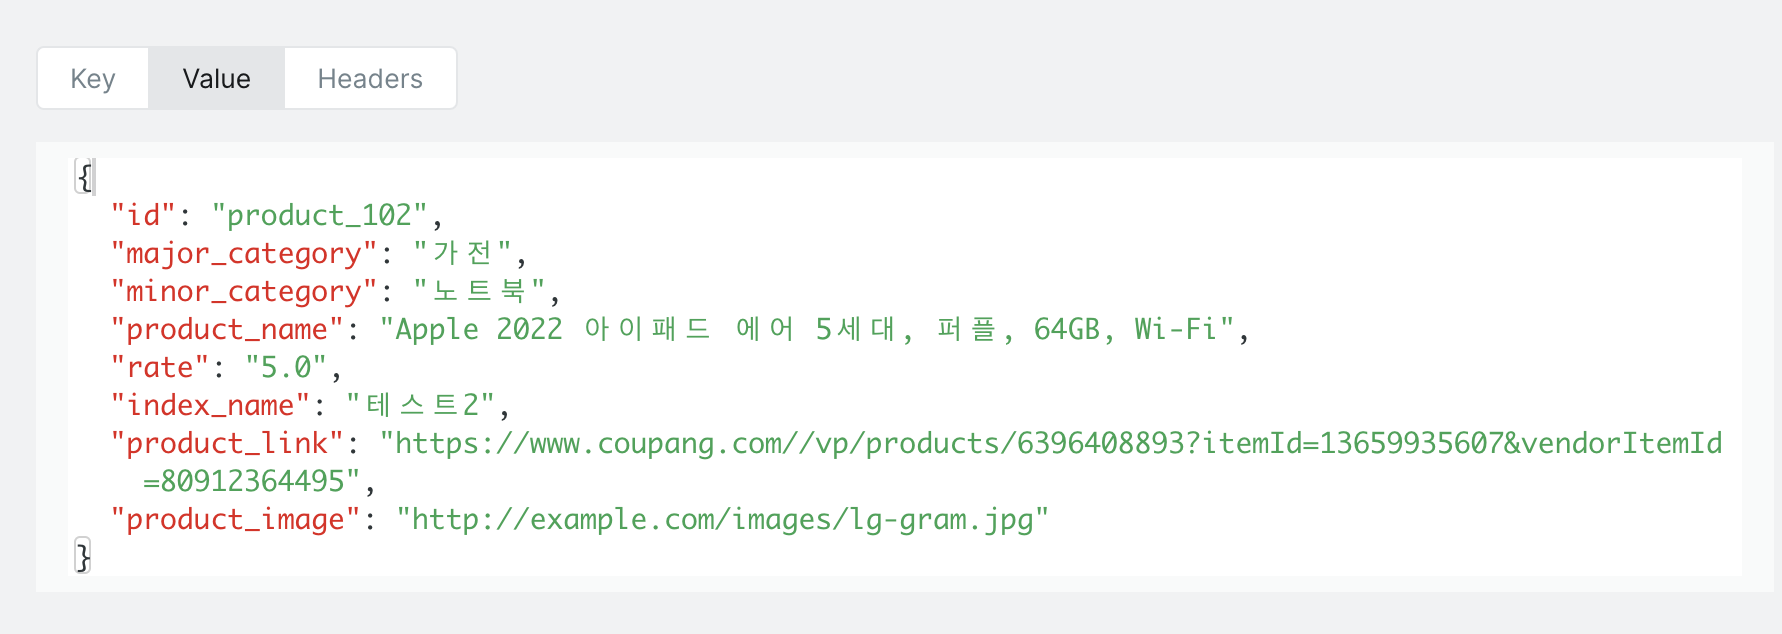
product_message = {
"id": f"product_{id}",
"major_category": "가전",
"minor_category": "노트북",
"product_name": name,
"rate": rate,
"index_name": "테스트2",
"product_link": f"https://www.coupang.com/{link}",
"product_image": "http://example.com/images/lg-gram.jpg"
}
producer.send('aaa', key=f"product_{id}", value=product_message).add_callback(on_send_success).add_errback(on_send_error)
# Price 메시지
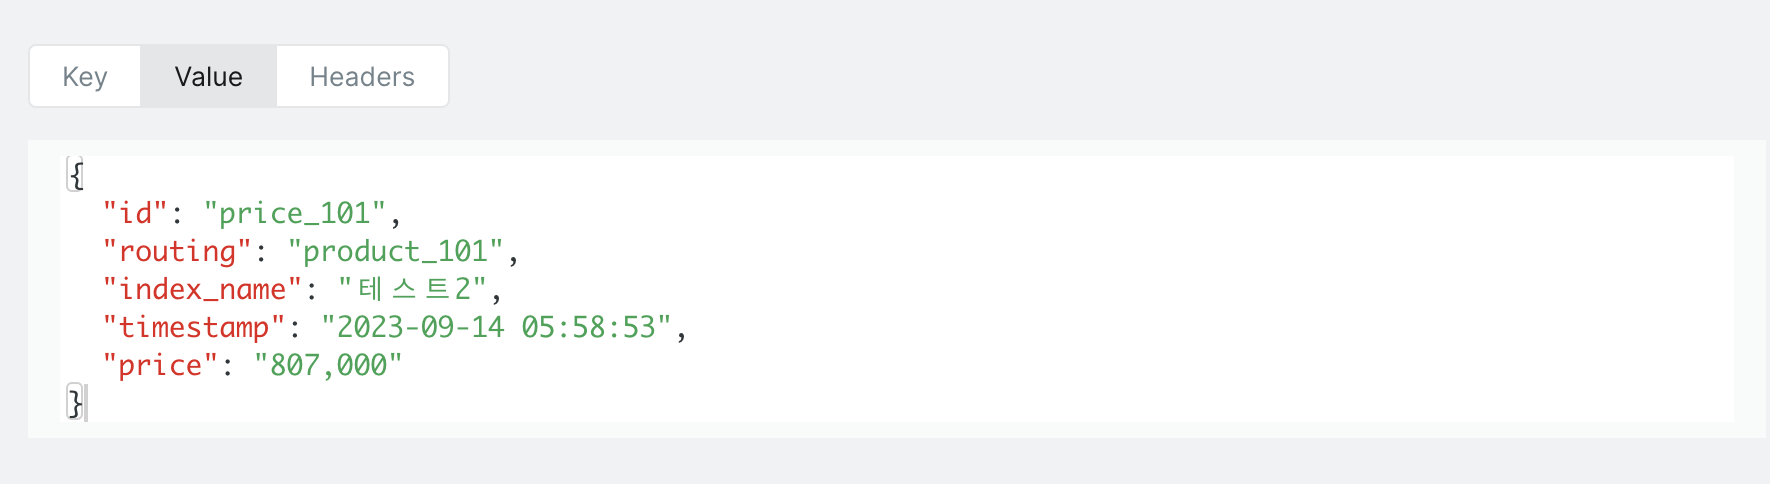
price_message = {
"id": f"price_{id}",
"routing": f"product_{id}",
"index_name": "테스트2",
"timestamp": current_time,
"price": price
}
#producer.send('electronic', key=f"product_{id}".encode('utf-8'), value=json.dumps(product_message).encode('utf-8')).add_callback(on_send_success).add_errback(on_send_error)
producer.send('aaa', key=f"price_{id}", value=price_message).add_callback(on_send_success).add_errback(on_send_error)
id += 1
# Kafka Producer를 flush하여 모든 메시지가 전송
producer.flush()크롤링한 뒤 기본 정보와 가격 정보를 따로 kafka로 전송
2. Kafka
kafka 클러스터는 이전에 이미 구축해놓았기 때문에 자세한 내용은 생략
3개의 브로커로 구성했고, 도커 컴포즈로 실행했다
---
version: '3.8'
services:
  zookeeper-1:
    image: confluentinc/cp-zookeeper:5.5.1
    environment:
      ZOOKEEPER_CLIENT_PORT: 2181
      ZOOKEEPER_TICK_TIME: 2000
    volumes:
      - /var/lib/zookeeper/data:/var/lib/zookeeper/data
      - /var/lib/zookeeper/log:/var/lib/zookeeper/log


  kafka-1:
    image: confluentinc/cp-kafka:5.5.1
    ports:
      - '9092:9092'
    extra_hosts:
      - "localhost:0.0.0.0"
    depends_on:
      - zookeeper-1
    environment:
      KAFKA_BROKER_ID: 1
      KAFKA_ZOOKEEPER_CONNECT: zookeeper-1:2181
      KAFKA_LISTENER_SECURITY_PROTOCOL_MAP: INTERNAL:PLAINTEXT,EXTERNAL:PLAINTEXT
      KAFKA_INTER_BROKER_LISTENER_NAME: INTERNAL
      KAFKA_ADVERTISED_LISTENERS: INTERNAL://kafka-1:29092,EXTERNAL://{ip주소}:9092
      KAFKA_DEFAULT_REPLICATION_FACTOR: 3
      KAFKA_NUM_PARTITIONS: 3

  kafka-2:
    image: confluentinc/cp-kafka:5.5.1
    ports:
      - '9093:9093'
    extra_hosts:
      - "localhost:0.0.0.0"
    depends_on:
      - zookeeper-1
    environment:
      KAFKA_BROKER_ID: 2
      KAFKA_ZOOKEEPER_CONNECT: zookeeper-1:2181
      KAFKA_LISTENER_SECURITY_PROTOCOL_MAP: INTERNAL:PLAINTEXT,EXTERNAL:PLAINTEXT
      KAFKA_INTER_BROKER_LISTENER_NAME: INTERNAL
      KAFKA_ADVERTISED_LISTENERS: INTERNAL://kafka-2:29093,EXTERNAL://{ip주소}:9093
      KAFKA_DEFAULT_REPLICATION_FACTOR: 3
      KAFKA_NUM_PARTITIONS: 3


  kafka-3:
    image: confluentinc/cp-kafka:5.5.1
    ports:
      - '9094:9094'
    extra_hosts:
      - "localhost:0.0.0.0"
    depends_on:
      - zookeeper-1
    environment:
      KAFKA_BROKER_ID: 3
      KAFKA_ZOOKEEPER_CONNECT: zookeeper-1:2181
      KAFKA_LISTENER_SECURITY_PROTOCOL_MAP: INTERNAL:PLAINTEXT,EXTERNAL:PLAINTEXT
      KAFKA_INTER_BROKER_LISTENER_NAME: INTERNAL
      KAFKA_ADVERTISED_LISTENERS: INTERNAL://kafka-3:29094,EXTERNAL://{ip주소}:9094
      KAFKA_DEFAULT_REPLICATION_FACTOR: 3
      KAFKA_NUM_PARTITIONS: 3
kafka-ui를 통해 모니터링
2-1. kafka topic관리
docker exec -it {컨테이너명} /bin/bash
# topic 삭제
kafka@84beaf5e1414:/# kafka-topics --bootstrap-server localhost:9092 --delete --topic {삭제할 토픽명}
# consumer 삭제
kafka@84beaf5e1414:/# kafka-consumer-groups --bootstrap-server localhost:9092 --delete --group {삭제할 consumer}
2-2. kafka 메시지
- product 메시지
- price 메시지
3. Logstash
# logstash.conf
input {
  kafka {
    bootstrap_servers => "{kafka ip주소}:9092"
    topics => ["{감시할 topic명}"]
    group_id => "logstash" # consumer 이름 지정
    consumer_threads => 3
  }
}

filter {
  # elasticsearch에서 인식하기 위해 json으로 변환
  json {
    source => "message"
  }
    # parent id 추출
  if [id] =~ /^price_/ {
    grok {
      match => { "id" => "price_(?<actual_id>.*)"}
    }
    mutate {
      add_field => { "[join_field][parent]" => "product_%{actual_id}" }
    }
  }

  # join_field 설정
  if [id] =~ /^product_/ {
    mutate {
      add_field => { "[join_field][name]" => "product" }
    }
  } else if [id] =~ /^price_/ {
    mutate {
      add_field => { "[join_field][name]" => "price" }
    }
  }
}

output {
  # routing 설정
  if [join_field][name] == "price" {
    elasticsearch {
      hosts => ["{elasticsearch ip주소}"]
      # 인덱스 필드를 elastcsearch의 인덱스이름으로 사용
      index => "%{[index_name]}"
      # id 필드를 도큐먼트 id로 사용
      document_id => "%{[id]}"
      # 같은 샤드로 담기 위해 routing 설정
      routing => "%{[routing]}"
    }
  } else {
    elasticsearch {
      hosts => ["{elasticsearch ip 주소}"]
            index => "%{[index_name]}"
      document_id => "%{[id]}"
    }
  }
}
도커 컴포즈 파일의 logstash부분에 설정파일 볼륨 추가
  logstash:
    image: docker.elastic.co/logstash/logstash:7.14.0
    ports:
      - 5044:5044
    environment:
      - ELASTICSEARCH_HOSTS=http://elasticsearch:9200
      - "LS_JAVA_OPTS=-Xmx512m -Xms512m"
    networks:
      - esnet
    depends_on:
      - elasticsearch
      - elasticsearch2
      - elasticsearch3
    volumes:
      - logstash-data:/usr/share/logstash/data
- /home/ubuntu/ELK/logstash/logstash.conf:/usr/share/logstash/pipeline/logstash.conf # 추가 내용- join_field에서 child의 경우 parent를 지정해야 하는데, grok으로 price메시지의 숫자부분을 actual_id에 저장해놓고 필드추가할때 사용
- parent의 경우 join_field에 name 추가, child의 경우 name, parent추가
=> 지정한 kafka topic에서 메시지를 가져와서 변환 후 elasticsearch로 전송
4. Elasticsearch
elasticsearch에 데이터를 넣기 전 join mapping 설정을 해놓아야한다.
kibana로 접속 후 Dev tools에서 REST API 형태로 요청 가능
요청하면 해당 인덱스가 자동으로 생성되는것을 stack management - index management에서 확인 가능
Index Patterns에서 인덱스를 추가해준뒤 Discover로 이동해서 데이터 삽입 확인
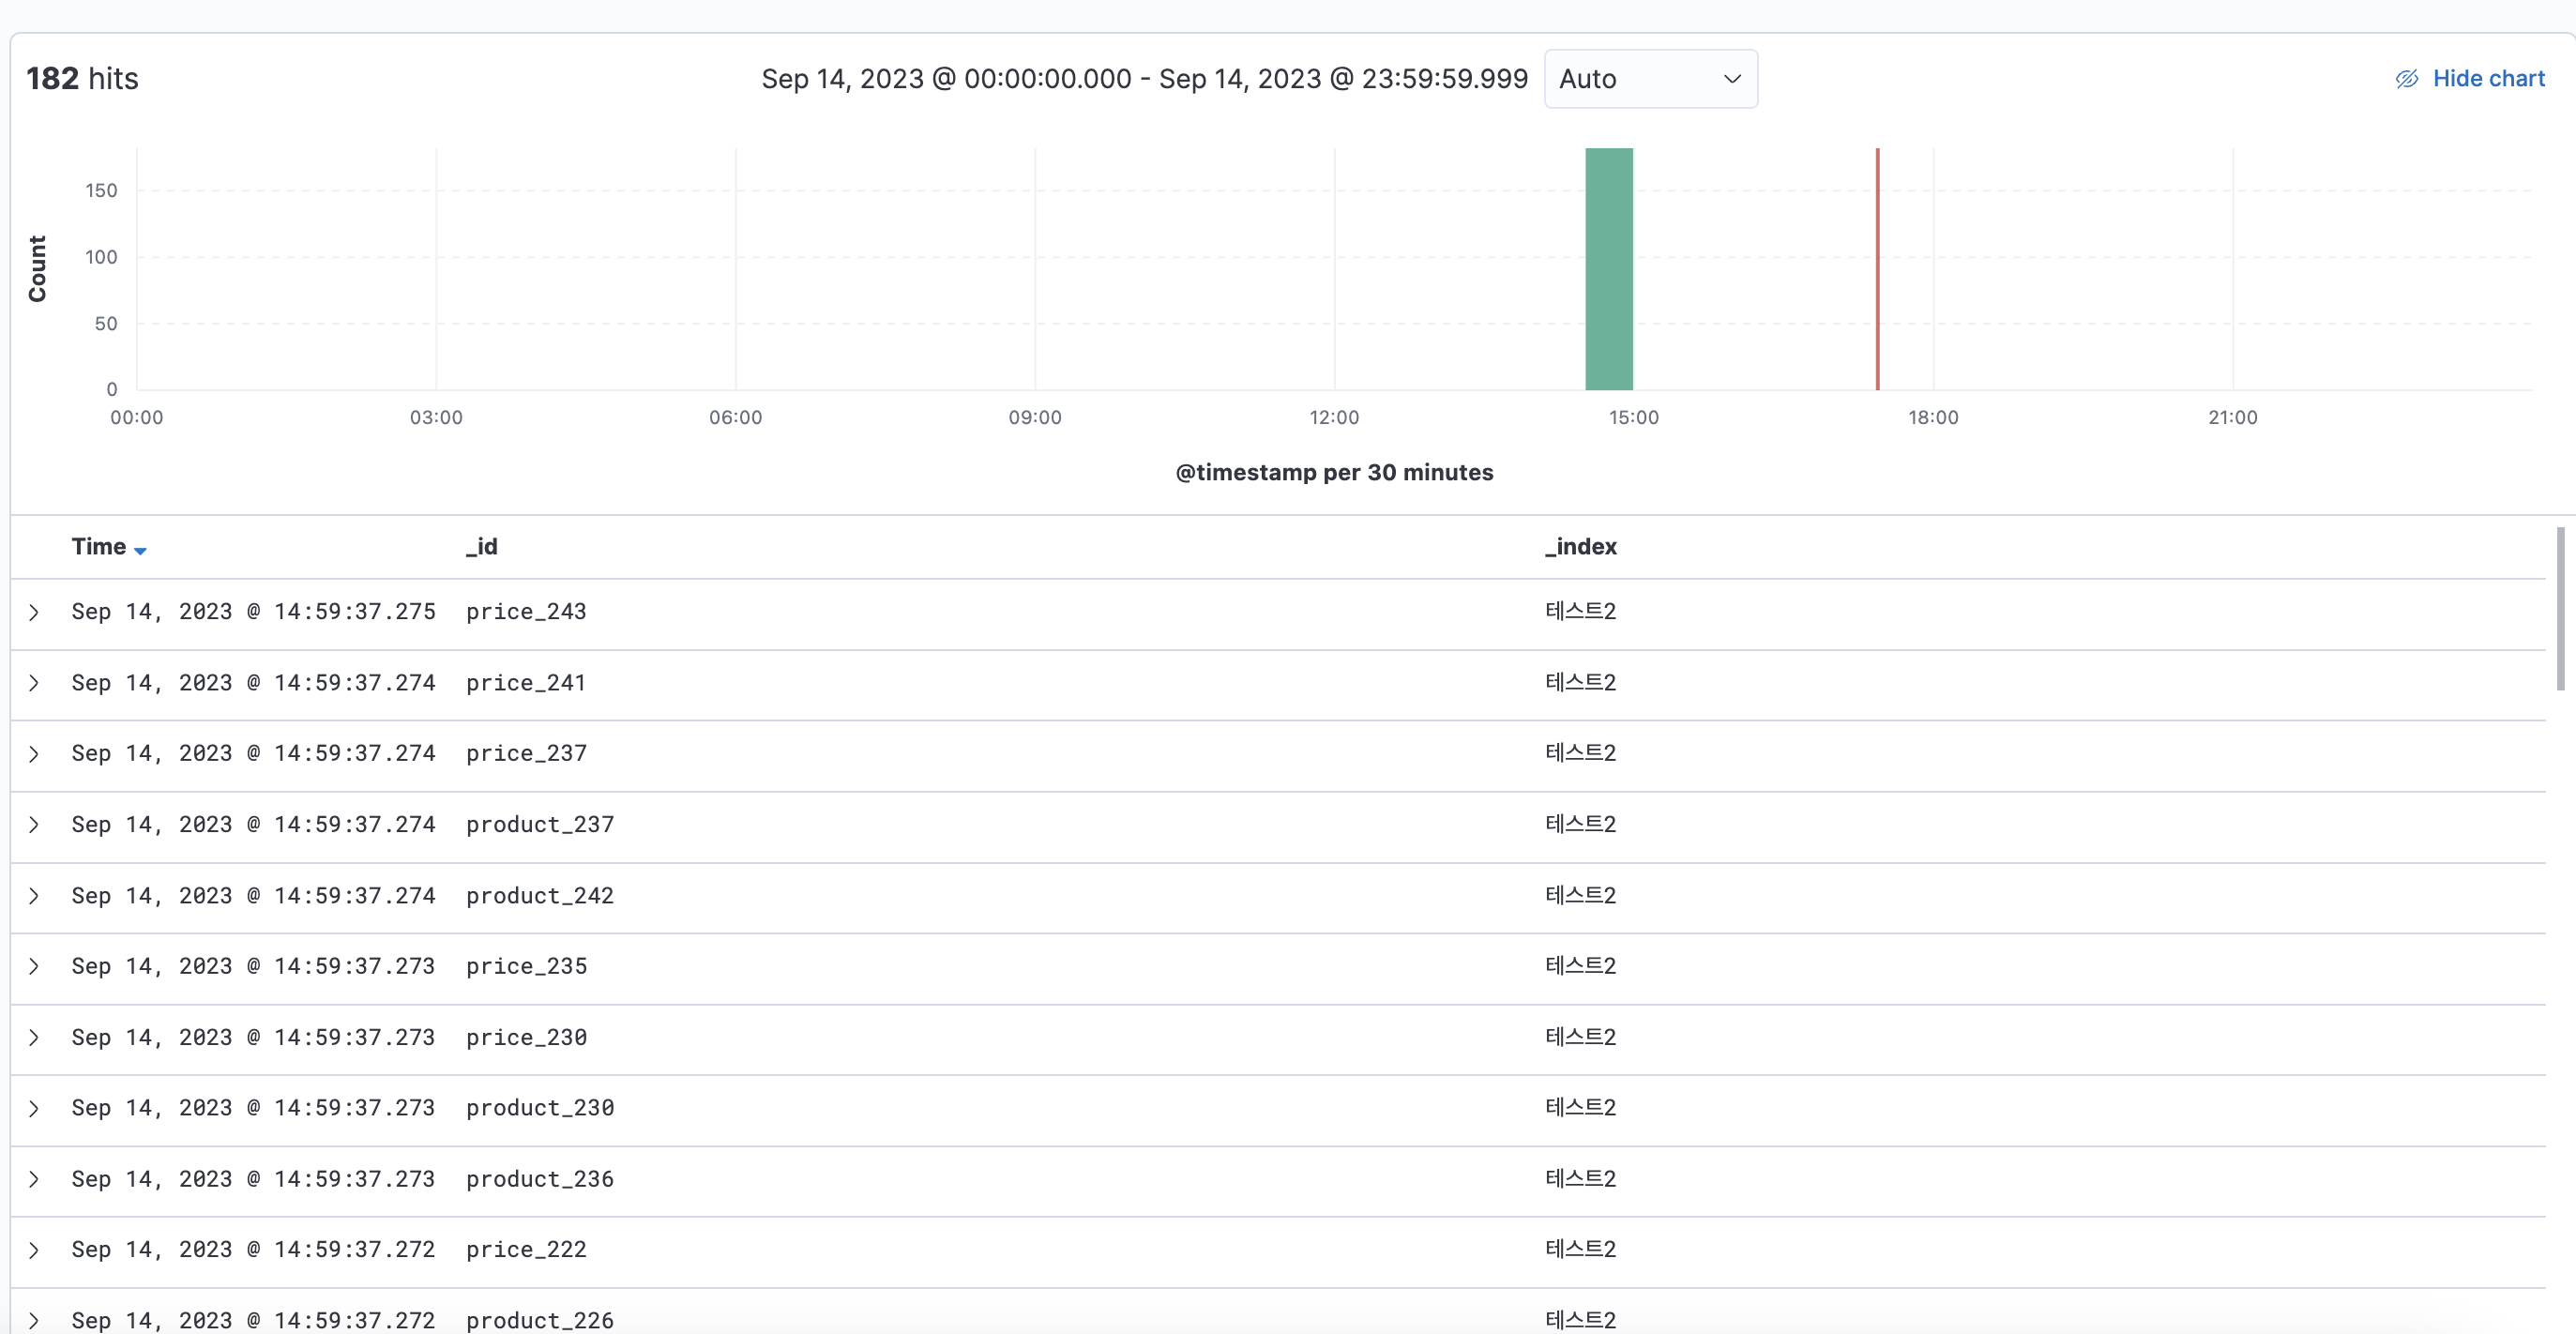
Dev tools에서 join 관계 잘 설정 되었는지 확인해보자
4-1. 가격 업데이트
output {
  elasticsearch {
    hosts => ["http://localhost:9200"]
    index => "테스트"
    document_id => "%{[id]}"  # Kafka 메시지에서 id 필드를 가져옴
    action => "update"
    doc_as_upsert => true  # 해당 문서가 없으면 새로 생성
    script => "ctx._source.timestamp = params.timestamp; ctx._source.price = params.price;"
    script_params => { "timestamp" => "%{[timestamp]}", "price" => "%{[price]}" }
  }
}
추후 위의 코드를 logstash.conf에 추가하여 가격 정보를 추가할 수 있다.

나의 개발기록