
Container 서비스 개요
모델 요약
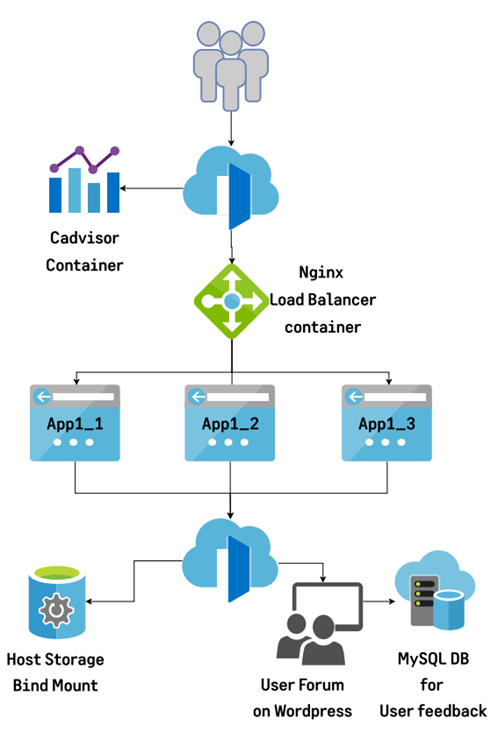
- Front-Back-DataBase의 3tier 모델을 구축합니다.
- Cadvisor를 사용해 리소스를 모니터링합니다.
- App 실행시 유저가 보낸 이미지를 Bind Mount를 통해 Host 내의 저장소에 저장하여 모델 재학습에 활용할 수 있도록 설계 하였습니다.
- WordPress를 통해 유저들의 피드백을 분석하기 용이하게 MySQL DB에 수집합니다.
- Nginx LoadBalancer를 통해 서버의 부하를 분산합니다.
- Linux(ubuntu20.04) 환경에서 구현하였습니다.
설계도
Docker Compose 구조
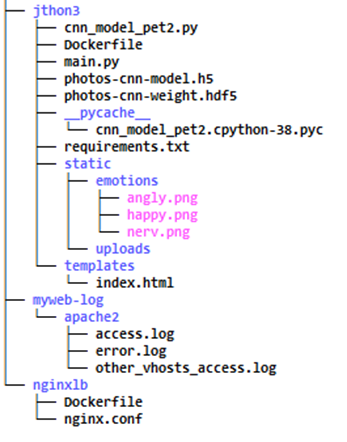
Tree로 본 Directory 구조

-
각각 tensorflow로 구현한 합성곱 신경망(CNN: convolution Neural Network)과 파이썬의 Flask를 이용해 만든 각각의 웹앱을 Dockerfile을 이용해바로 빌드합니다
-
기존 static/uploads에 저장되던 사용자가 업로드한 이미지를
서비스가 종료된 이후에도 남겨, 추후에 재활용 되도록, host 내 LABs/saves 내로 Bind Mount 합니다. -
Wordpress와 MySQL도 게시판과 DB의 데이터가 유지될 수 있도록 Volume을 설정합니다.
IaC (infrastructure as code)
코드
Jthon.py
(Load balancing 을위해 3개구현, 코드는 전부 같습니다.)
import cnn_model_pet2
from flask import Flask, render_template, request, session, escape, jsonify
import requests
import json, os
from flask import *
from PIL import Image
from tensorflow.keras.models import load_model
import numpy as np

# 테스트 이미지 변형을 위한 변수 선언
im_rows = 32 # 이미지의 높이
im_cols = 32 # 이미지의 너비
im_color = 3 # 이미지의 색공간
in_shape = (im_rows, im_cols, im_color) # 입력 이미지 차원
nb_classes = 3 # 클래스 수

LABELS = ["분노한 상태", "행복한 상태", "불안한 상태"] # 감정 레이블
Feeling = ["반려견의 공격성은 스스로 힘든 시간을 보내고 있다는 의미입니다. 공격적인 행동이 지속되고 교정이 되지 않는다면 전문가의 도움을 받는 것이 필요합니다.",
           "반려견과 충분히 행복한 시간을 보내고 계시네요! 더 행복한 집사생활을 위하여 반려견과 함께 떠나는 여행 어떠신가요?",
           "반려견과 충분한 산책을 즐기는 것이 어떨까요? 반려견 앞에서 하품을 크게 하는 것도 도움이 된답니다."] # 각 레이블별 대응방법

# WEB URL 리스트
WEB_URL1 = ["https://korean.mercola.com/sites/articles/archive/2020/10/03/%EB%B6%88%EC%95%88%ED%95%B4-%ED%95%98%EB%8A%94-%EA%B0%9C%EB%A5%BC-%EC%A7%84%EC%A0%95%EC%8B%9C%ED%82%A4%EB%8A%94-%EB%B0%A9%EB%B2%95.aspx",
            "https://korean.visitkorea.or.kr/detail/rem_detail.do?cotid=a074bcc0-cee0-4b22-a9f5-372bf19f2309&temp=",
       "https://m.post.naver.com/viewer/postView.naver?volumeNo=28296152&memberNo=40087179"] # URL 첫번째
WEB_URL2 = ["https://www.youtube.com/watch?v=OfiTjMBS6_s",
           "https://www.mangoplate.com/top_lists/1291_pets_allowed",
           "https://interbalance.org/%EA%B0%95%EC%95%84%EC%A7%80%EC%8A%A4%ED%8A%B8%EB%A0%88%EC%8A%A4-%EC%A6%9D%EC%83%81-%EC%9D%B4%EB%A0%87%EA%B2%8C-%ED%95%B4%EC%86%8C%ED%95%B4-%EC%A3%BC%EC%84%B8%EC%9A%94/"]
            # URL 두번쨰
WEB_URL3 = ["https://www.animal.go.kr/front/awtis/shop/hospitalList.do?menuNo=6000000002",
           "https://www.mangoplate.com/search/%EB%B0%98%EB%A0%A4%EA%B2%AC%20%EB%8F%99%EB%B0%98%20%EC%B9%B4%ED%8E%98",
           "https://www.youtube.com/watch?v=GKSnzQpuAaM"] # URL 세번째

# 기타 URL 리스트
OTHER_URL1 = ["https://ban-life.com/content/view?id=150",
            "https://www.youtube.com/watch?v=2obdCGhD7gE"]
             # 프로견주테스트 넣어보기
             # 반려견 수면유도 음악
OTHER_URL2 = ["https://www.biteme.co.kr/",
            "https://dogpre.com/?gclid=Cj0KCQjw3v6SBhCsARIsACyrRAlp3QHd3JRuJe5UzBUjkwZ59jU4WBlwes5mNBN3hzwUC9sBffKlOMkaAlHeEALw_wcB"]
             # 장난감 추천
             # 간식추천
OTHER_URL3 = ["http://192.168.50.28:8888"]

# 웹 & 영상 링크 이름 리스트
LInk_name1 = ["원인", "반려견 동반 여행지 추천", "원인"] # 분노 , 행복, 불안 순에 따른 링크 이름
LInk_name2 = ["해소법", "반려견 동반 식당 추천", "해소법"]
LInk_name3 = ["혹시 반려견이 아픈 건 아닐까요?", "반려견 동반 카페 추천", "혹시 반려견에게 분리불안이 있나요?"]

OTHER_LInk_name = ["프로견주테스트", "반려견 수면유도 음악","장난감 추천","간식 추천", "후기 남기기"] # 기타 링크 이름

def solution(filename):
    # 학습된 CNN 모델과 가중치 불러오기
    model = load_model('./photos-cnn-model.h5')
    model.load_weights('./photos-cnn-weight.hdf5')

    # 이미지 읽어 들이기
    print(filename)
    img = Image.open("./"+filename)
    img = img.convert("RGB") # 색공간 변환하기
    img = img.resize((im_cols, im_rows)) # 크기 변경하기

    # 3차원으로 데이터 변환하기
    x = np.asarray(img)
    x = x.reshape(-1, im_rows, im_cols, im_color)
    x = x / 255

    # 예측하기
    pre = model.predict([x])[0]
    print(pre)
    idx = pre.argmax()
    per = round(float(pre[idx] * 100),3)

    return idx, per

# app 서버
app = Flask(__name__)

app.config['UPLOAD_FOLDER'] = 'static/uploads'

@app.route('/')
@app.route('/index')
def index():
    return render_template('index.html')

@app.route('/upload', methods = ['POST'])
def upload():
    List = []
    file = request.files['file']
    filename = file.filename
    file.save(os.path.join(app.config['UPLOAD_FOLDER'], filename))
    img_src = url_for('static', filename = 'uploads/' + filename)

    img_emote1 = url_for('static', filename = 'emotions/angly.png')
    img_emote2 = url_for('static', filename = 'emotions/happy.png')
    img_emote3 = url_for('static', filename = 'emotions/nerv.png')
    List = [img_emote1, img_emote2, img_emote3]

    label, prob = solution(img_src)

    pred = LABELS[label]
    feel = Feeling[label]
    feel = str(feel)
    prob = str(round(prob, 2)) + "%"
    url_s1 = WEB_URL1[label]
    url_s2 = WEB_URL2[label]
    url_s3 = WEB_URL3[label]
# 기타 URL 변수 설정
    url_other1 = OTHER_URL1[0] # 프로견주테스트
    url_other2 = OTHER_URL1[1] # 반려견 수면유도 음악
    url_other3 = OTHER_URL2[0] # 장난감 추천
    url_other4 = OTHER_URL2[1] # 간식 추천
    url_other5 = OTHER_URL3[0]

    url_link_name1 = LInk_name1[label] # 비디오 & 웹 링크
    url_link_name2 = LInk_name2[label]
    url_link_name3 = LInk_name3[label]
    other_link_name1 = OTHER_LInk_name[0] # 기타 링크
    other_link_name2 = OTHER_LInk_name[1]
    other_link_name3 = OTHER_LInk_name[2]
    other_link_name4 = OTHER_LInk_name[3]
    other_link_name5 = OTHER_LInk_name[4]
    list = List[label]

    return render_template('index.html', filename=img_src, label=pred, probability=prob, feel=feel ,
                           url1=url_s1, url2=url_s2 , url3=url_s3, url_other1 = OTHER_URL1[0], url_other2 = OTHER_URL1[1],
                           url_other3 = OTHER_URL2[0], url_other4 = OTHER_URL2[1], url_other5 = OTHER_URL3[0], url_link_name1 = url_link_name1,
                           url_link_name2 = url_link_name2, url_link_name3 = url_link_name3,
                            other_link_name1 = other_link_name1, other_link_name2 = other_link_name2,
                           other_link_name3 = other_link_name3, other_link_name4 = other_link_name4, other_link_name5 = other_link_name5, feel_name = list)

if __name__=='__main__':
    app.run(host='0.0.0.0', port='8008')
Jthon Dockerfile
FROM python:3.7
EXPOSE 8008
ENV FLASK_APP=main
WORKDIR /
COPY . /
RUN pip install -r requirements.txt
ENTRYPOINT ["python"]
CMD ["./main.py"]
Requirements.txt
Flask==2.1.1
requests==2.27.1
fastjsonschema==2.15.3
jsonschema==4.4.0
aiosignal==1.2.0
tensorflow==2.8.0
numpy==1.21.5
Pillow==9.0.1
Nginx Dockerfile
FROM nginx
RUN rm /etc/nginx/nginx.conf
COPY nginx.conf /etc/nginx/nginx.conf
Nginx.conf
events { worker_connections 1024; }

http{
	upstream backend-alb {
	server 172.17.0.1:8008;
	server 172.17.0.1:8009;
	server 172.17.0.1:8010;
	}

	server {
		listen 80;
		listen [::]:8000 default_server;

		location / {

			proxy_pass http://backend-alb;
		}
	}
다음과 같이 코드들을 구현하였으며, nginx의 외부연결을위해
아래 명령어를 실행했습니다.
$~ sudo snap install ngrok
$~ ngrok config \ add-authtoken \ 개인 토큰 # 개인토큰 등록
$~ ngrok http 8080
위와 같은 파일들을 YAML코드를 사용하여 IaC를 구현 하였습니다.
Docker-compose.yml
version: '3'
services:
  nginx:
    build:
      context: ./nginxlb
      dockerfile: Dockerfile
    ports:
    - "8080:80"
    depends_on:
      - jthon1
      - jthon2
      - jthon3
    networks:
    - back-net
    - front-net

  jthon1:
    build:
      context: ./jthon
      dockerfile: Dockerfile
    ports:
    - "8008:8008"
    networks:
    - back-net
    volumes:
    - /home/kevin/LABs/saves:/static/uploads #차후 재학습을 위한 bind mount

  jthon2:
    build:
      context: ./jthon2
      dockerfile: Dockerfile
    ports:
    - "8009:8009"

# 이하 jthon 1과 동일

jthon3:
    build:
      context: ./jthon3
      dockerfile: Dockerfile
    ports:
    - "8010:8010"

# 이하 jthon 1과 동일

  cadvisor:
    image: google/cadvisor:latest
    ports:
    - "9559:8080"
    volumes:
    - /:/rootfs:ro
    - /var/run:/var/run:rw
    - /sys:/sys:ro
	#host 내 동기화를 위한 bind mount
    restart: always
    container_name: cadvisor
    networks:
    - front-net

  mydb:
    image: mysql:5.7
    container_name: mysql_app
    restart: always
    ports:
      - '3306:3306'
    volumes:
      - mydb_data:/var/lib/mysql	#volume을 통해서 db 유지
    environment:
      MYSQL_ROOT_PASSWORD: wordpress
      MYSQL_DATABASE: wordpress
      MYSQL_USER: wordpress
      MYSQL_PASSWORD: wordpress
    networks:
      - back-net

  myweb:
    depends_on:
      - mydb
    image: wordpress:latest
    container_name: wordpress_app
    ports:
      - "8888:80"
    networks:
      - front-net
      - back-net
    volumes:
      - myweb_data:/var/www/html
      - ${PWD}/myweb-log:/var/log
	#volume을 통해 재시동 시, 게시판 설정 유지
	#volume을 통해서 웹데이터 로그를 현 디렉터리 내 적재, 모니터링
    restart: always
    environment:
      WORDPRESS_DB_HOST: mydb:3306
      WORDPRESS_DB_USER: wordpress
      WORDPRESS_DB_PASSWORD: wordpress
      WORDPRESS_DB_NAME: wordpress


networks:
  front-net: {}
  back-net: {}

volumes:
  mydb_data: {}
myweb_data: {}
마무리
미니 프로젝트로 진행해본 Docker-compose를 이용한 Iac였습니다.
이틀동안 좋은 팀원들과 재밌게 작업했습니다.
굉장히 유익하고, 배워가는게 더많은 프로젝트였습니다!
THANKS TO 재, 덕, 철! <3 <3 <3

DeepLearning, MLOps