추상클래스 - Sub class(자식 클래스) 제어
1. 추상화 작업
2. 메소드에 body { } 가 없는 메소드를 추상메소드라고 한다.
추상메소드에는 abstract 라는 키워드를 써야 한다.
추상메소드는 { } body 없이 ;를 써야한다3. 추상메소드가 있는 클래스는 반드시 추상클래스이어야 한다.
4. 추상메소드가 없는 추상클래스를 의미상의 추상클래스라고 한다.
의미상의 추상클래스의 메소드는 모두 빈body로 되어 있다.
5. 추상클래스는 자신의 클래스로 메모리 생성을 할 수 없다
=> 생성하려면
가. Sub Class를 이용 (반드시 Sub Class가 추상메소드를 Override 해야 한다)
나. 메소드를 이용6. 추상메소드는 반드시 Sub Class에서 Override 꼭 해 주어야 한다. Override를 안하면 Sub Class 마저도 abstract 가 되어야 한다.
return형 메소드명(인수형 인수, 인수형 인수,.....){
명령어;
명령어;
....
}
호출
객체 . 메소드명(값1, 값2...)
클래스 . 메소드명(값1, 값2..)
추상 메소드
return형 abstract 메소드명(인수형 인수, 인수형 인수,....)
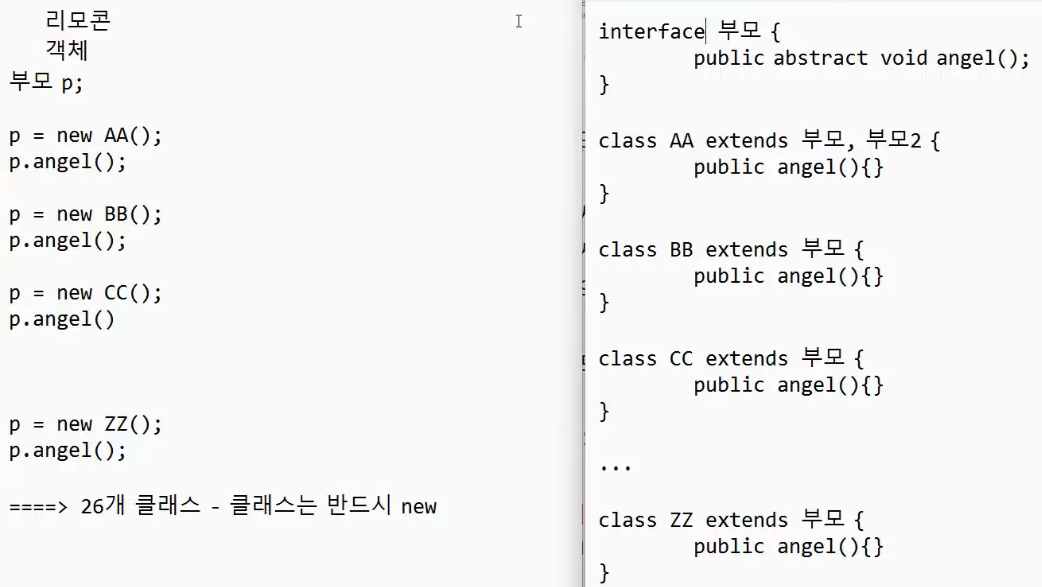
상속을 2개 받고 싶으면 인터페이스를 받아야된다.

숙제.
package abstract_;

import java.util.Calendar;
import java.util.GregorianCalendar;
import java.util.Scanner;

class CalendarEx1 {

private int year;
private int month;
private int week;
private int lastDay; //28, 29, 30, 31

public CalendarEx1() {
	Scanner scan = new Scanner(System.in);

	System.out.print("년도 입력 : ");
	this.year = scan.nextInt();
	System.out.print("월 입력 : ");
	this.month = scan.nextInt();
}
public void calc() {

//      시스템 날짜를 기준으로 생성된다.

Calendar cal = new GregorianCalendar(); // sub class 생성

//    	Calendar cal = Calendar.getInstance(); 메소드를 이용

//    	cal.set(Calendar.YEAR, year);
//    	cal.set(Calendar.MONTH, month-1);
//    	cal.set(Calendar.DAY_OF_MONTH, lastDay); //24

	cal.set(year, month-1, 1);

	week = cal.get(Calendar.DAY_OF_WEEK); // 1일에 해당하는 요일, 일-1, 월-2, 화-3
	lastDay = cal.getActualMaximum(Calendar.DAY_OF_MONTH); // 28, 29, 30, 31
}
public void display() {
	System.out.println("일\t월\t화\t수\t목\t금\t토");

	 for(int i=1; i<week; i++) {
		 System.out.print("\t");
	 }

	for(int i=1; i<=lastDay; i++) {
		System.out.print(i + "\t");

		if(week%7 == 0) System.out.println();
		week++;

        }
    }
}


//-----------------------------------------


public class CalendarMain_T {

public static void main(String[] args) {
	CalendarEx1 c = new CalendarEx1();
	c.calc();
	c.display();
    }
}
interface (is~a 관계) 틀
1. 표준명세서 (틀) 의 역활
2. 상수와 추상메소드만 존재(추상 메소드만을 틀안에 넣을 수 있음)
public static final는 생략가능
abstract는 생략가능3. interface를 implements 한 클래스는 반드시 추상 메소드를 Override(재구현)해주어야 한다.
4. Override(재구현) 할때 반드시 public를 붙여야 한다.
5. 다중상속이 가능
6. 상속과 같이 쓰일때는 extends, implements 순서로 쓴다.
[형식]
interface 인터페이스명 {
..... }
class 클래스명 implements 인터페이스명{
... }
[문제] 맞는 문장을 모두 고르시오.
class A{ }
interface InterA{ }
1. class B extends A { O }
2. class B implements InterA { O }
3. class B implements A { X }
4. class B extends InterA { X } -> 클래스가 오면 클래스가와야됨
5. interface InterB extends A { X }
6. interface InterB implements InterA { X }
7. interface InterB implements A { X }
8. interface InterB extends InterA { O }-> extends가 오면 앞뒤가 같은 종류가 와야함.
-> implements는 반드시 앞에 class가 뒤는 Interface가 와야함
(반드시 Override를 사용해야 하기때문에)

package interface_;

//public class InterMain implements InterA, InterB, InterC{
public class InterMain implements InterC{
    // implements한 클래스는 반드시 모든 메소드를 오버라이딩을 해주겠다는 말이다.
@Override
public void aa() {}

@Override
public void bb() {}

@Override
public void cc() {}

@Override
public void dd() {}

public static void main(String[] args) {

    }
}

-------------------------------------------------


public interface InterA {
    public static final String NAME = "홍길동"; // 상수
    public int AGE = 25; // 상수

public abstract void aa();
public void bb();
// 인터 페이스는 끝났음 위에는 상수를 지정해 줬고 밑에 틀을 만들어 놨음
}

-------------------------------------------------
public interface InterB {
    public void cc();
    public void dd();

	}
-------------------------------------------------
public interface InterC extends InterA, InterB{

}- 인터페이스 끼리는 (다중)상속이 가능하다. 클래스는 안됨.
- InterC가 Inter A와 B를 다중 상속 받고 있기 때문에 저렇게 사용 가능하다.
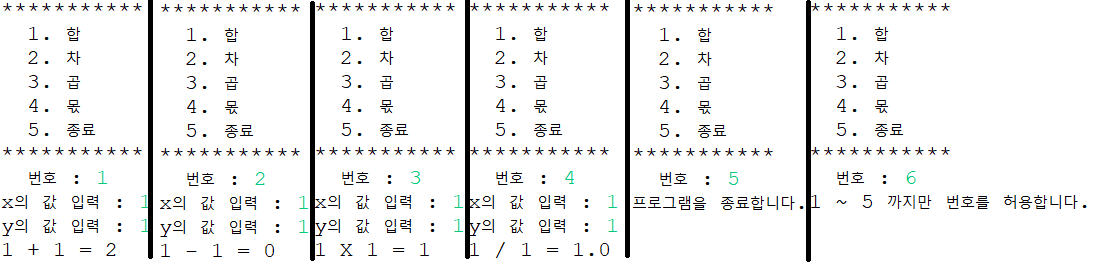
연습 문제 1)

//	***********
//		1. 합
//		2. 차
//		3. 곱
//		4. 몫
//		5. 종료
//	***********
//		번호 :

----------------------------------------------------------

package interface_;

public interface Compute {

public void disp();
Compute interface에서 추상메소드 하나 잡음.
----------------------------------------------------------

package interface_;

import java.util.Scanner;

public class Sum implements Compute{
    private int x, y;

public Sum() {
	Scanner scan = new Scanner(System.in);

	System.out.println("x의 값 입력 : ");
	x = scan.nextInt();
	System.out.println("y의 값 입력 : ");
	y = scan.nextInt();
}

@Override
public void disp() {
	System.out.println(x + " + " + y + " = " + (x+y));
    }
}

----------------------------------------------------------

public class Sub implements Compute{
private int x, y;

public Sub() {
	Scanner scan = new Scanner(System.in);

	System.out.println("x의 값 입력 : ");
	x = scan.nextInt();
	System.out.println("y의 값 입력 : ");
	y = scan.nextInt();
}

@Override
public void disp() {
	System.out.println(x + " - " + y + " = " + (x-y));
    }
}

----------------------------------------------------------

public class Mul implements Compute{
private int x, y;

public Mul() {
	Scanner scan = new Scanner(System.in);

	System.out.println("x의 값 입력 : ");
	x = scan.nextInt();
	System.out.println("y의 값 입력 : ");
	y = scan.nextInt();
}

@Override
public void disp() {
	System.out.println(x + " X " + y + " = " + x*y);
    }
}

----------------------------------------------------------

public class Div implements Compute{
private int x, y;

public Div() {
	Scanner scan = new Scanner(System.in);

	System.out.println("x의 값 입력 : ");
	x = scan.nextInt();
	System.out.println("y의 값 입력 : ");
	y = scan.nextInt();
}

@Override
public void disp() {
	System.out.println(x + " / " + y + " = " + (double)x/y);
    }
}

----------------------------------------------------------

public class ComputeService {

public void menu() {
	Scanner scan = new Scanner(System.in);
	Compute com = null;
	int num;

	while(true) {

	System.out.println();
	System.out.println("***********");
	System.out.println("  1. 합");
	System.out.println("  2. 차");
	System.out.println("  3. 곱");
	System.out.println("  4. 몫");
	System.out.println("  5. 종료");
	System.out.println("***********");
	System.out.print  ("  번호 : ");
	num = scan.nextInt();

	if(num==5) break; // while문을 벗어나라

	if(num==1) {
    	com = new Sum();

// Sum sum = new Sum();
// 객체를 잡을 때 객체를 클래스 명과 똑같이 잡는데 소문자로 작성 = 약속
// 앞에가 부모 => 부모 = 자식
// 1:1 관계는 별로 임, 결합도 100%

	}else if(num==2) {
//	Sub sub = new Sub();
		com = new Sub();


	}else if(num==3) {
//	Mul mul = new Mul();
		com = new Mul();


	}else if(num==4) {
//  Div div = new Div();
		com = new Div();


	}else {
		System.out.println("1 ~ 5 까지만 번호를 허용합니다.");
		continue;
        // continue를 써서 반복문으로 돌아가라 => 쓰지 않으면 com.disp()로 감
	}
	com.disp();
    // 모두(모든 조건들, else if~~) 사용하기 때문에 밖으로 빼버림 -> 초기화 시켜야 해서 위에 null값 추가

    }//while
  }//menu()
}

----------------------------------------------------------

public class ComputeMain {

public static void main(String[] args) {
	ComputeService cs = new ComputeService();
	cs.menu();
	System.out.println("프로그램을 종료합니다.");

    }
}
배열
- 동일한 자료형의 모임
- 절대 크기 조정을 할 수 없음.
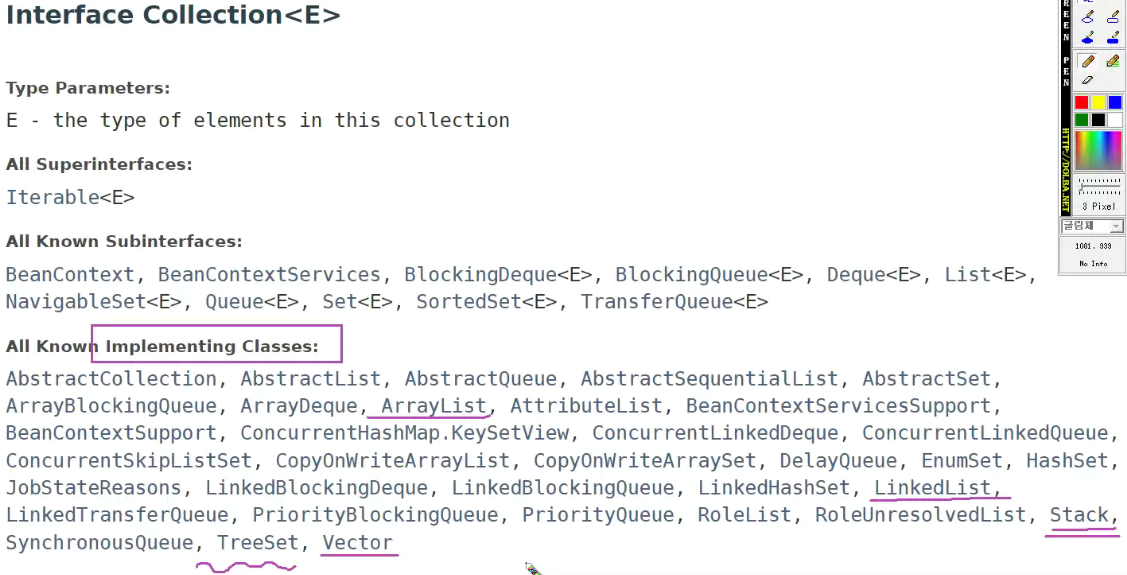
컬렉션
- 객체를 담아주는 저장 창고
- 객체 타입에 상관없이 저장 가능
- 크기 조절 가능
- Enumeration ( Vector, Hashtable 등은 Enumeration )
- Iterator ( ArrayList, HashSet 등은 Iterato )
Generic
-
데이터의 타입(data type)을 일반화한다(generalize)는 것을 의미합니다.
-
클래스나 메소드에서 사용할 내부 데이터 타입을 컴파일 시에 미리 지정하는 방법
-
제네릭은 동적으로 타입을 결정하지 않고 컴파일 시 타입이 결정되므로 보다 안전한 프로그래밍이 가능하다
-
실행 중에 타입 충돌 문제를 방지할 수 있다
-
프로그램 개발 시 타입 캐스팅 절차가 필요 없어지고 ClassCastException을 방지 할 수 있다
-
클래스 생성 시 타입을 명시해 준다 :
<T> <E> <K> <V>4개의 문자로 표시한다.<T>Type (데이터형)
<E>Element (요소, 항목)
<K>Key
<V>Valuepackage collection; class GenericTest<T>{ T a; public T getA() { return a; } public void setA(T a) { this.a = a; } }
//---------------------------------
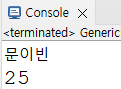
public class GenericMain {
public static void main(String[] args) {
GenericTest<String> aa = new GenericTest<String>();
// String 타입으로 만 쓸 수 있게 규정함.
aa.setA("문이빈");
System.out.println(aa.getA());
// aa.setA(25); - error
GenericTest<Integer> bb = new GenericTest<Integer>();
bb.setA(25);
System.out.println(bb.getA());
}
}
interface
- implements 모든 추상메소드를 Override를 해줘야 한다.
- 대신 Override하는 클래스를 찾아서 생성한다.
- 메소드
모든 추상메소드를 대신 implements 했다.
인덱스가 부여가 된다.

package collection;

import java.util.ArrayList;
import java.util.Collection;
import java.util.Iterator;

public class CollectionMain {

public CollectionMain() {
	Collection coll = new ArrayList(); // 앞이 부모 두에가 자식   형태) 부모 = 자식
	coll.add("호랑이");
	coll.add("사자");
	coll.add("호랑이"); // 중복을 허용한다, 순서
	coll.add(25);
	coll.add(43.8);
	coll.add("기린");
	coll.add("코끼리");
// 		문자열 정수 실수 다 들어간다.

//		Iterator it = new 절대 생성불가
    Iterator it = coll.iterator(); // 메소드를 이용하여 인터페이스 생성

//		it.hasNext();  만약에 항목이 있으면 T, 없으면 F
//		it.next();  현재 위치에서 항목을 꺼내 저장하고 다음으로 이동

	while(it.hasNext()) {
		System.out.println(it.next());
	}// while
}
public static void main(String[] args) {

	new CollectionMain();
    }
}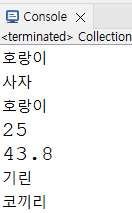
위 코드는 Java 컬렉션 프레임워크를 이용하여 간단한 컬렉션을 생성하고, 그 내용을 Iterator를 사용하여 출력하는 예시이다
- ArrayList 클래스를 이용하여 col이라는 Collection 객체를 생성합니다.
- col 컬렉션에 여러 항목들을 추가합니다. 문자열, 정수, 실수를 혼합하여 저장할 수 있습니다.
- Iterator를 이용하여 col 컬렉션을 순회하면서 각 항목들을 출력합니다.
- Iterator는 컬렉션의 각 항목에 접근하여 순차적으로 처리할 때 사용되는 인터페이스입니다.
- iterator( ) 메서드를 호출하여 Iterator 객체를 얻어와서 컬렉션의 항목들을 순회합니다.
- 출력 결과는 col 컬렉션에 추가한 항목들을 순서대로 출력합니다.
★ 주의할 점은, col 컬렉션에 추가된 항목들은 추가한 순서대로 출력되지 않을 수 있습니다.
이는 ArrayList의 특성으로 인해 추가 순서와 실제 저장 순서가 다를 수 있기 때문입니다.
package collection;
import java.util.ArrayList;
public class CollectionMain2 {
public CollectionMain2() {
ArrayList<String> list = new ArrayList<String>(); // 앞이 부모 두에가 자식 형태) 부모 = 자식
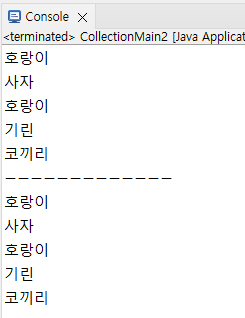
list.add("호랑이");
list.add("사자");
list.add("호랑이"); // 중복을 허용한다, 순서
// list.add(25);
// list.add(43.8);
list.add("기린");
list.add("코끼리");
for(int i=0; i<list.size(); i++) {
System.out.println(list.get(i));
}
System.out.println("-------------");
for(String str : list) {
System.out.println(str);
}
}
public static void main(String[] args) {
new CollectionMain2();
}
}
package collection;

import java.util.HashSet;
import java.util.Iterator;
import java.util.Set;

public class SetMain {

   public SetMain() {
      Set<String> set = new HashSet<String>();
      set.add("호랑이");
      set.add("사자");
      set.add("호랑이");  // 중복 허용X , 순서X
      set.add("기린");
      set.add("코끼리");

      Iterator<String> it = set.iterator();
      while (it.hasNext()) {
         System.out.println(it.next());
      }
   }

   public static void main(String[] args) {
      new SetMain();
   }
}
package collection;
public class PersonDTO {
private String name;
private int age;
public PersonDTO() {} // 기본 생성자
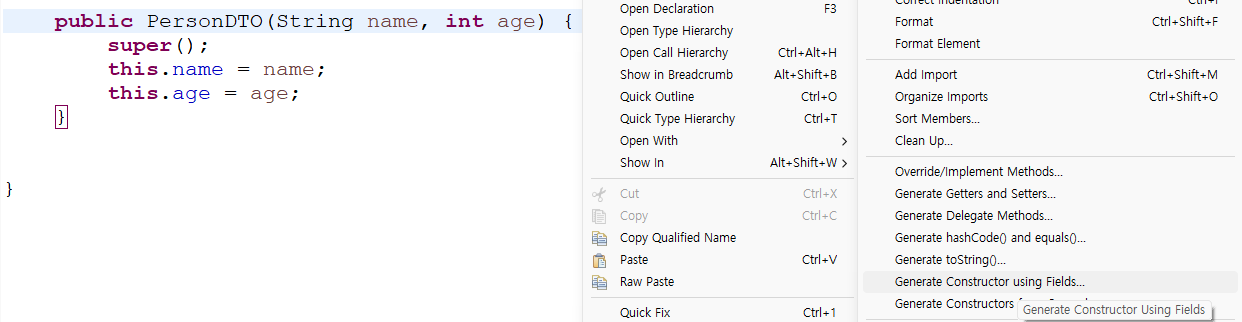
public PersonDTO(String name, int age) {
super();
this.name = name;
this.age = age;
}
public String getName() {
return name;
}
public void setName(String name) {
this.name = name;
}
public int getAge() {
return age;
}
public void setAge(int age) {
this.age = age;
}
}
package collection;
import java.util.ArrayList;
public class PersonMain {
public ArrayList<PersonDTO> init() {
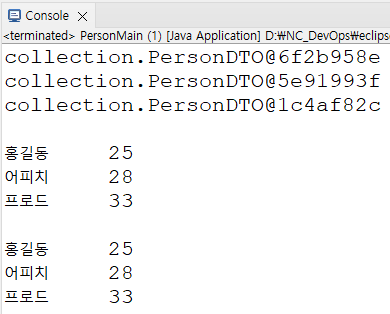
PersonDTO aa = new PersonDTO("홍길동", 25);
PersonDTO bb = new PersonDTO("어피치", 28);
PersonDTO cc = new PersonDTO("프로드", 33);
ArrayList<PersonDTO> list = new ArrayList<PersonDTO>();
list.add(aa);
list.add(bb);
list.add(cc);
return list;
}
public static void main(String[] args) {
PersonMain pm = new PersonMain();
ArrayList<PersonDTO> list = pm.init();
System.out.println(list.get(0));
System.out.println(list.get(1));
System.out.println(list.get(2));
System.out.println();
System.out.println(list.get(0).getName() + "\t" + list.get(0).getAge());
System.out.println(list.get(1).getName() + "\t" + list.get(1).getAge());
System.out.println(list.get(2).getName() + "\t" + list.get(2).getAge());
System.out.println();
for(PersonDTO dto : list) {
System.out.println(dto.getName() + "\t" + dto.getAge());
}
}
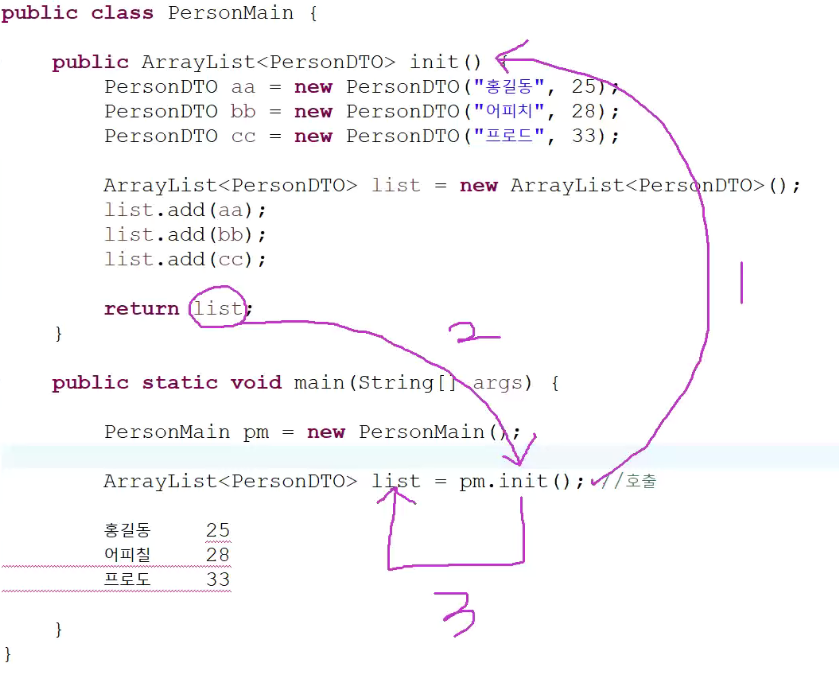
}PersonDTO라는 클래스를 사용하여 PersonMain 클래스에서 사람들의 정보를 담은 리스트를 생성하는 리스트의 내용을 출력하는 코딩.
PersonDTO 클래스:
-
PersonDTO 클래스는 사람의 이름과 나이를 저장하기 위한 클래스입니다.
getName() 메서드와 getAge() 메서드로 이름과 나이를 가져올 수 있습니다. -
init() 메서드:
init() 메서드는 PersonDTO 객체들을 생성하고, 그 객체들을 담은 ArrayList를 생성하여 반환합니다.
PersonDTO 객체들은 각각 "홍길동", "어피치", "프로드"라는 이름과 각각 25, 28, 33이라는 나이로 초기화됩니다.
이후 생성된 ArrayList에 객체들이 추가되고, 최종적으로 ArrayList가 반환됩니다. -
main() 메서드:
main() 메서드에서는 PersonMain 클래스의 객체를 생성하고, init() 메서드를 호출하여 ArrayList를 얻어옵니다.
ArrayList의 get() 메서드를 이용하여 리스트 내의 요소를 가져와 출력합니다.
또한, Enhanced for loop를 사용하여 ArrayList의 내용을 순회하며, 각 객체의 이름과 나이를 출력합니다.
PersonDTO 클래스의 내용은 주어지지 않았지만, 해당 클래스는 사람의 이름과 나이를 저장하는 기능을 가지고 있으며, init() 메서드에서는 이러한 PersonDTO 객체들을 생성하고 리스트에 추가하여 사용하고 있습니다. 그리고 main() 메서드에서는 생성된 리스트를 활용하여 정보를 출력하는 부분이 구현되어 있습니다.
return을 사용하기 위해 void를 public ArrayList<PersonDTO> init()로 바꿈
3가지 방법..
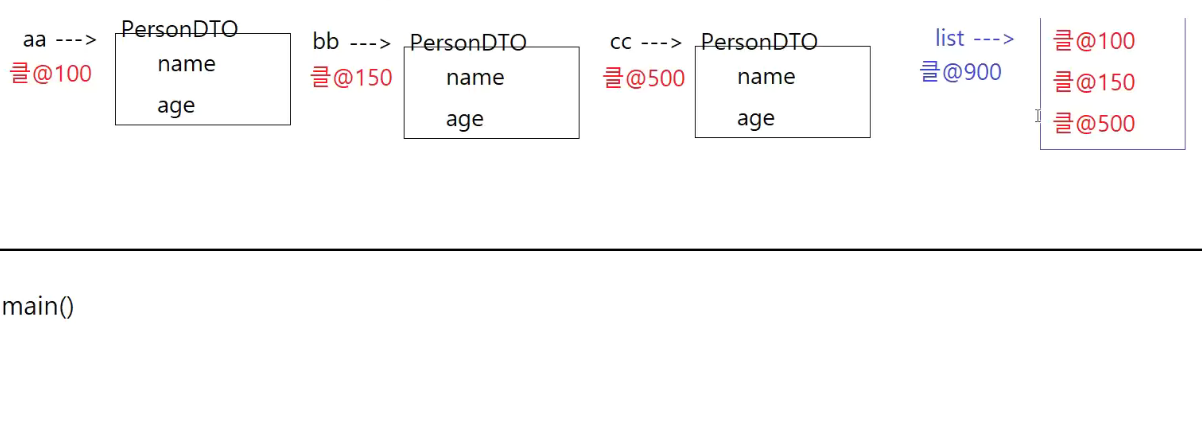
주소만을 가지고 가서 알려주는 것임 연결됐다고 할 수 없음.
숙제
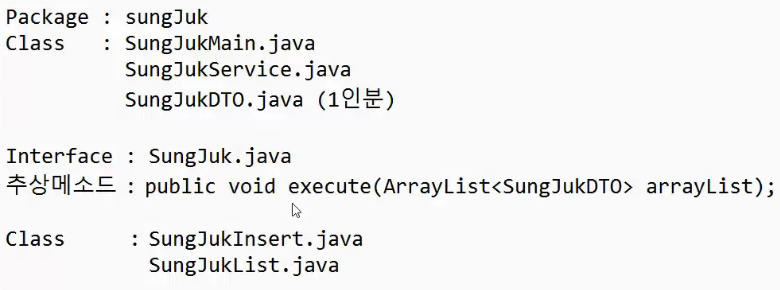
[문제] 성적 처리

[조건]
1. SungJukDTO.java
필드   : no(번호), 이름, 국어, 영어, 수학, 총점, 평균
메소드 : 생성자를 이용하여 데이터 얻기
       setter / getter
       calc() - 총점, 평균하는 계산

2. SungJukService.java
- menu() 를 작성한다.

3. SungJukInsert.java
- 번호, 이름, 국어, 영어, 수학를 입력하여 총점과 평균을 계산한다.
- 번호를 중복해서 입력하지 않는다.

번호 입력 :
이름 입력 :
국어 입력 :
영어 입력 :
수학 입력 :

입력되었습니다

4. SungJukList.java
- ArrayList에 저장된 모든 데이터를 출력한다.
- 소수이하 2째자리까지 출력한다.

번호		이름		국어		영어		수학 		총점		평균
감사합니다. 이런 정보를 나눠주셔서 좋아요.