jQuery
이미지 슬라이더
<%@ page language="java" contentType="text/html; charset=UTF-8"
    pageEncoding="UTF-8"%>
<!DOCTYPE html>
<html>
<head>
<meta charset="UTF-8">
  <meta name="viewport" content="width=device-width, initial-scale=1.0">
<title>이미지 슬라이더</title>
  <script src="https://ajax.googleapis.com/ajax/libs/jquery/3.7.0/jquery.min.js"></script>
    <script type="text/javascript">
      $().ready(function() {
    	  // 변수를 선언
    	  const w = 460; // const 변경하지 않는 변수 선언,(=지역 변수)
    	  const h = 300;
    	  let current = 0; // 지역변수, 변경가능

    	  // 함수 선언
    	  const movTo = function(){
    		  $('.images').animate({left: -current*w},1000);
    	  };
    	  // 슬라이더 내부의 이미지 개수를 확인
    	  const imgLength = $('.slider').find('.image').length;

    	  // 슬라이더 버튼 추가(슬라이더 개수만큼 만들기)
    	  for(let i=0; i<imgLength; i++){
    		  $('<button></button>')
    		  .attr('data-position', i)
    		  .text(i+"번")
    		  .click(function(){
    			  current = $(this).attr('data-position');
    			  movTo();
    		  })
    		  .insertBefore('.slider');  // 상위에서 버튼을 추가 (이기는 이전)
    	  }
    	  // 슬라이더 스타일을 설정합니다.
    	  $('.slider').css({
    		 position: "relative",
    		 width: w,
    		 height: h,
    		 overflow: "hidden"
    	  });
    	  $('.images').css({
    		 position: "absolute",
    		 width: w*imgLength
    	  });
    	  $('.image').css({
    		 margin: 0,
    		 padding: 0,
    		 width: w,
    		 height: h,
    		 display: "block",
    		 float: "left"
    	  });
    	  // 3초마다 슬라이드를 이동시킵니다.
    	  setInterval(function(){
    		  current = current + 1;
    		  current = current % imgLength;
    		  movTo();
    	  }, 3000);
      });
    </script>
</head>
<body>
  <div class="slider">
    <div class="images">
        <img alt="" class="image" src="http://placehold.it/460x300?text=image_0">
        <img alt="" class="image" src="http://placehold.it/460x300?text=image_1">
        <img alt="" class="image" src="http://placehold.it/460x300?text=image_2">
        <img alt="" class="image" src="http://placehold.it/460x300?text=image_3">
      <div class="image">
        <h1>이미지가 아닌 것</h1>
        <p>Lorem ipsum dolor sit amet.</p>
      </div>
    </div>
  </div>
</body>
</html>
$().ready(function() { });로 시작하는 부분은 문서가 로드될 때 실행될 함수를 정의합니다.const movTo = function(){$('.images').animate({left: -current*w},1000);슬라이더를 이동시키는 함수입니다. 해당 코드 라인은 .images 요소의 left 속성을 변경하여 이미지를 이동시키고, 이를 1초 동안 애니메이션 효과와 함께 적용합니다.

3초마다 사진이 바뀌고, 번호를 클릭해도 사진이 바뀐다.
Ajax
Ajax(Asynchronous Javascript And XML) 통신
비동기 자바 스크립트와 Xml을 활용
- 자바 스크립트를 이용해 서버와 브라우저가 비동기 방식으로 데이터를 교환할 수 있는 통신 방식
- 클라이언트와 서버간 XML 데이터를 주고 받는 기술
- XML이 무거운 통신이라서 JSON이라는 텍스트 형태의 전송박식을 사용한
- JSON은 키와 값의 형태를 가지고 있고 맵(Map)과 유사한 형태를 갖고 있음
비동기통신이란
웹페이즈를 리로드(reLoad)하지 않고 데이터를 불러오는 방식
웹페이지에서 기타 코드를 요청할 경우, 웹페이지를 리로드하면서 불필요한 리소스가 낭비되는데
비동기방식을 이용하면 필요한 데이터만 불러오기 때문에 리소스 낭비를 줄일 수 있다.
Ajax통신은 XMLHttpRequest객체를 통해서 request합니다.
Json이나 XML형태로 필요한 데이터만 받아서 갱신해 주기 때문에 자원과 시간을 줄일 수 있다.
Ajax 통신의 장점
- 웹페이지 속도향상
- 서버 처리가 완료 될 때까지 지연없이 바로 처리 가능
- 기존 웹에서 불가능했던 UI 가능하게 해줌
Ajax 통신의 단점
- 페이지 이동 없는 통신으로 보안상 문제가 발생할 수도 있어서 이때 보안상 문제되는 데이터는 전송하지 않게 함
- 연속으로 데이터 요청을 하면 서버의 부하를 증가 시킬 수도 있음(너무 많은면)
- 히스토리 관리가 안돼서 문제점을 찾을 때 어려움이 존재 함
- Script로 작성되어서 디버깅이 용이하지 않음
- jQuery 이용한 Ajax방식
- Json은 Key, value형태인데 value에 다시 Json형태로 값을 지정할수도 있음
$.ajax({
  type: ''// (get, post, put 등과 같은 전송 방식 RestAPI 전송방식 중에서 빠르게 처리하는 서비스 형식)
  url: ./AjaxResponse.jsp // 비동기로 요청할 페이지, 처리를 할 페이지
  async: tru, // 비동기여부(Default: true)
  header: {
    "Content-type":"application/json", // json형태
    "X-HTTP-Method-Override":"POST"
  },
  dataType:'text' // (html, xml, json, text, objet 등이 들어올 수 있음)
  data: JSON.stringify({ //보낼 데이터 Object, String, Array
    "no":no,
    "name":name,
    "nick":nick
  }),
  success: function(result){ // 처리 결과가 성공했을 때 실행할 함수를 정의
    //consol.log(result);
    //alert(result);
  },
  error: function(request, status, error){ // 처리 결과가 실패했을 때 실행할 함수를 정의
  }
})
<%@ page language="java" contentType="text/html; charset=UTF-8"
    pageEncoding="UTF-8"%>
<!DOCTYPE html>
<html>
<head>
<meta charset="UTF-8">
<title>Ajax 연습</title>
  <script src="https://ajax.googleapis.com/ajax/libs/jquery/3.7.0/jquery.min.js"></script>
    <script type="text/javascript">
      $(document).ready(function(){
    	  //id="listButton"인 태그에 click하면 function getMemberList()실행
    	  $('#listButton').click(getMemberList);
      });
      function getMemberList(){
    	  $.ajax({
    		  url:"./list.jsp",                     //list.jsp에 Ajax요청
    		  success:function(data){ // 잘 갔다왔다면 성공
    			  alert(1);
    		  }
    	  });
      }
    </script>
</head>
<body>
  <a href="#" id="listButton">회원리스트</a><br/>
</body>
</html>$('#listButton').click(getMemberList);: id가 "listButton"인 태그가 클릭되었을 때 getMemberList 함수가 실행됩니다.$('#listButton')는 jQuery를 사용하여 id가 "listButton"인 요소를 선택합니다.function getMemberList() { ... }: getMemberList 함수는 회원 리스트를 가져오기 위한 AJAX 요청을 수행합니다.$.ajax()를 사용하여 AJAX 요청을 생성합니다.success: function(data) { ... }: AJAX 요청이 성공적으로 완료된 경우 실행되는 콜백 함수입니다.
success 속성에 함수를 정의하여 AJAX 요청이 성공했을 때 실행될 동작을 구현합니다.
여기서는 alert(1)을 실행하여 간단한 경고 창을 띄우는 동작을 수행합니다.<a href="#" id="listButton">회원리스트</a><br/>:<a>태그를 사용하여 "회원리스트"라는 링크를 생성합니다. id 속성이 "listButton"으로 지정되어 있습니다.
해당 링크를 클릭하면 getMemberList 함수가 실행됩니다.

<body>
<!--   <a href="#" id="listButton">회원리스트</a><br/> -->
<input type="text" id="listButton">
</body>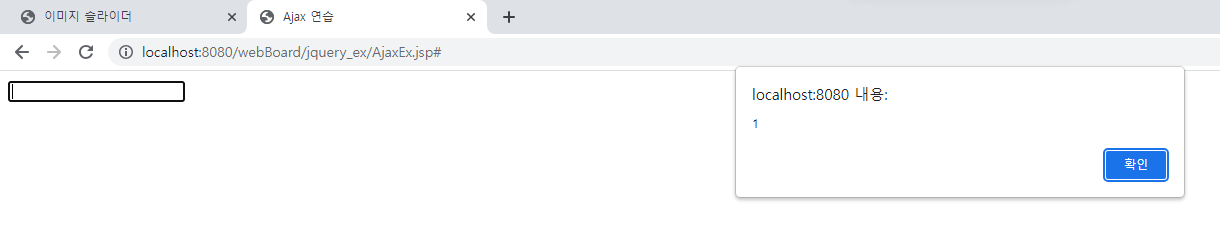
    <script type="text/javascript">
      $(document).ready(function(){
    	  //id="listButton"인 태그에 click하면 function getMemberList()실행
    	  $('#listButton').click(getMemberList);
      });
      function getMemberList(){
    	  $.ajax({
    		  url:"/list.jsp",                     //list.jsp에 Ajax요청
    		  success:function(data){ // 잘 갔다왔다면 성공
    			  alert(1);
    		  },
    		  error:function(request, status, error){
    			  alert(2+"::::"+status);
    		  }
    	  });
      }
    </script>
일부러 url:"/list.jsp" 틀리게 주었다.

JSP
유효성 검사
<%@ page language="java" contentType="text/html; charset=UTF-8"
    pageEncoding="UTF-8"%>
<!DOCTYPE html>
<html>
<head>
<meta charset="UTF-8">
  <script src="https://ajax.googleapis.com/ajax/libs/jquery/3.7.0/jquery.min.js"></script>
<script type="text/javascript">
  $().ready(function(){
	  $('#submit1').click(function(){
// 		  var f = $('#form2');           // id로 가져오기
          var f = $('form[name=form1]'); // 이름으로 가져오기
		  var n = $('input[name=name]').val();
		  if(n.length==0){
			alert('이름을 입력하시오')
		  }
		  else{
			  f.submit();
		  }
	  });
  });
</script>
<title>유효성 검사</title>
</head>
<body>
  <form name="form1" id="form2" action="">
    <p>이름: <input type="text" name="name"></p>
      <input type="submit" value="전송" id="submit1">
  </form>
</body>
</html>
$('#submit1').click(function() { ... });: id가 "submit1"인 요소가 클릭되었을 때 실행되는 함수를 정의합니다.$('#submit1')는 jQuery를 사용하여 id가 "submit1"인 요소를 선택합니다.
var f = $('form[name=form1]');: 변수 f에 이름이 "form1"인 폼 요소를 선택합니다.
$('form[name=form1]')는 jQuery를 사용하여 이름이 "form1"인 폼 요소를 선택합니다.
var n = $('input[name=name]').val();: 변수 n에 이름이 "name"인 input 요소의 값(value)을 가져옵니다.
$('input[name=name]')는 jQuery를 사용하여 이름이 "name"인 input 요소를 선택합니다.
if (n.length == 0) { ... } else { ... }:가져온 이름(input 요소의 값)의 길이를 확인하여 유효성을 검사합니다. n.length가 0이면 이름이 입력되지 않은 경우로 간주합니다.
이름이 입력되지 않은 경우에는 경고 창을 띄웁니다.
f.submit();:폼이 유효하다고 판단되면, 선택한 폼을 제출합니다.
f.submit()은 JavaScript에서 폼을 제출하는 메소드입니다.
이름을 입력하지 않고 전송을 누르면

유효성 체크
해당되는 것을 누르면 값이 나오게
<%@ page language="java" contentType="text/html; charset=UTF-8"
    pageEncoding="UTF-8"%>
<!DOCTYPE html>
<html>
<head>
<meta charset="UTF-8">
  <script src="https://ajax.googleapis.com/ajax/libs/jquery/3.7.0/jquery.min.js"></script>
<script type="text/javascript">
$().ready(function(){
	// id가 submit1이 클릭이 되면 checkForm이라는 함수를 실행하게 하고
	// 함수에서는 alert(id 와 passwd를 출력)
	$('#submit1').click(checkForm);
)};
  function checkForm(){
	  var id = $('input[name=id]').val();
	  var passwd = $('input[name=passwd]').val();
	  //추가로, id와 passwd값이 입력되지 않았다면 입력하라는 메시지 출력
	  if(id.length==0){
		  alert("아이디를 입력하시오")
		    id.focus();
		    return false;
		  }
  }else if (passwd==0){
	  alert("패스워드를 입력하시오")
	  passwd.focus();
      return false;
  }
  alert(id+"\n"+passwd);
  return true;
}
</script>
<title>유효성 체크</title>
</head>
<body>
  <form name="frm" style="text-align: center;" action="/webBoard/hello" method="post">
    <p>아 이 디 :<input type="text" name="id"></p>
    <p>비밀번호 :<input type="password" name="passwd"></p>
    <p><input type="submit" value="전송" id="submit1"></p>
  </form>
</body>
</html>
checkForm함수는 폼 입력 값의 유효성을 검사하고 경고창을 띄우는 역할을 합니다.
var id = $('input[name=id]').val();: 변수 id에 이름이 "id"인 input 요소의 값(value)을 가져옵니다.
$('input[name=id]')는 jQuery를 사용하여 이름이 "id"인 input 요소를 선택합니다.var passwd = $('input[name=passwd]').val();: 변수 passwd에 이름이 "passwd"인 input 요소의 값(value)을 가져옵니다.
$('input[name=passwd]')는 jQuery를 사용하여 이름이 "passwd"인 input 요소를 선택합니다.if (id.length == 0) { ... } else if (passwd.length == 0) { ... }: 가져온 id와 passwd의 길이를 확인하여 유효성을 검사합니다.
id.length가 0인 경우, 즉 id가 입력되지 않은 경우 경고창을 띄우고 해당 input 요소에 포커스를 설정합니다.
passwd.length가 0인 경우, 즉 passwd가 입력되지 않은 경우 경고창을 띄우고 해당 input 요소에 포커스를 설정합니다.
alert(id + "\n" + passwd);: 입력된 id와 passwd 값을 경고창을 통해 출력합니다.
return true;: 폼 유효성 검사가 모두 통과되었을 때 true를 반환하여 폼 제출이 가능하도록 합니다.
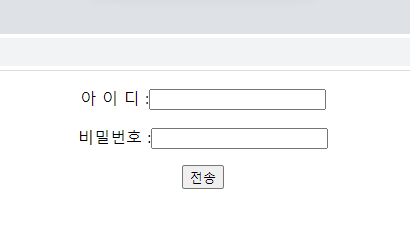
<body><form name="frm" style="text-align: center;" action="/webBoard/hello"></body> 수정하고(action="/webBoard/hello"추가)
밑에 서블릿에
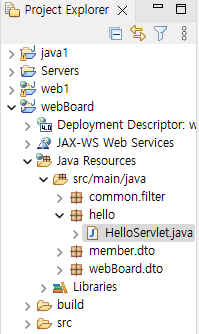
package hello;
import java.io.IOException;
import javax.servlet.ServletException;
import javax.servlet.annotation.WebServlet;
import javax.servlet.http.HttpServlet;
import javax.servlet.http.HttpServletRequest;
import javax.servlet.http.HttpServletResponse;
/**
* Servlet implementation class HelloServelt
*/
@WebServlet("/hello")
public class HelloServlet extends HttpServlet {
private static final long serialVersionUID = 1L;
/**
* @see HttpServlet#HttpServlet()
*/
public HelloServlet() { //생성자
super();
// TODO Auto-generated constructor stub
}
/**
* @see HttpServlet#doGet(HttpServletRequest request, HttpServletResponse response)
*/
protected void doGet(HttpServletRequest request,
HttpServletResponse response) throws ServletException, IOException {
// 주소에서 호출하는 경우 이 메소드를 실행함
// 이전 페이지에서 method='get'으로 호출하면 이 메소드 실행함
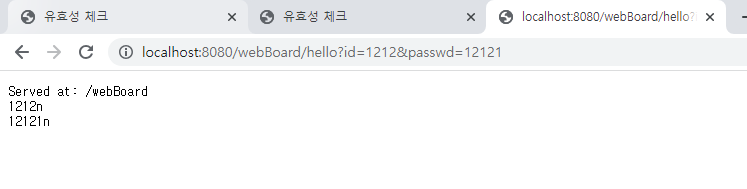
response.getWriter().append("Served at: ").append(request.getContextPath());
// getContextPath() 해당프로젝트의 웹 상의 이름
String id = request.getParameter("id");
String passwd = request.getParameter("passwd");
response.getWriter().append("\n"+id+"n");
response.getWriter().append("\n"+passwd+"n");
}
/**
* @see HttpServlet#doPost(HttpServletRequest request, HttpServletResponse response)
*/
protected void doPost(HttpServletRequest request,
HttpServletResponse response) throws ServletException, IOException {
// 메뉴, 파일내에서 호출할 때 이 메소드 실행
// 이전 페이지에서 method='post'로 호출하면 이 메소드 실행함
doGet(request, response);// post로 들어와도 doGet()을 호출하라고 함
}
} String id = request.getParameter("id");
String passwd = request.getParameter("passwd");
response.getWriter().append("\n"+id+"n");
response.getWriter().append("\n"+passwd+"n");추가
기본 유효성 검사
글자를 ~자 내로 입력하세요
<%@ page language="java" contentType="text/html; charset=UTF-8"
    pageEncoding="UTF-8"%>
<!DOCTYPE html>
<html>
<head>
<meta charset="UTF-8">
  <script src="https://ajax.googleapis.com/ajax/libs/jquery/3.7.0/jquery.min.js"></script>
<title>기본 유효성 검사</title>
</head>
  <script type="text/javascript">
    function checkForm(){
    	if (document.frm.name.value.length<6 || document.frm.name.value.length>12){
    		alert("이름을 6~12자 이내로 입력해주세요.");
    		document.frm.name.select();
    	}
    }
  </script>
<body>
  <form name="frm" action="">
    <p> 이름 : <input type ="text" name="name">
      <input type="submit" value="전송" onclick="checkForm()">
  </form>
</body>
</html>
document.frm.name.value: document 객체를 사용하여 폼 요소에 접근합니다.
frm이라는 이름을 가진 폼(form)의 name이라는 이름을 가진 요소(element)의 값을 가져옵니다.
document.frm.name.value.length: 가져온 요소의 값의 길이를 확인합니다.
.length 속성을 사용하여 문자열의 길이를 얻을 수 있습니다.
if (document.frm.name.value.length < 6 || document.frm.name.value.length > 12) { ... }:
가져온 이름(input 요소의 값)의 길이를 확인하여 유효성을 검사합니다.
이름의 길이가 6자 미만이거나 12자 초과인 경우 조건식이 참(true)이 됩니다.

이것을 jQuery로 바꿔보자
    <script type="text/javascript">
    $().ready(function(){
    	$('submit1').click(checkFrom);
    });
    function checkForm(){
    	var name = $('input[name=name]').val();
    	if(name.length<6 || name.length>12){
    		alert("이름을 6~12자 이내로 입력해주세요.");
    		return false;
    	}
    	return true;
    }
  </script>
var name = $('input[name=name]').val();: 변수 name에 이름이 "name"인 input 요소의 값(value)을 가져옵니다.
$('input[name=name]')는 jQuery를 사용하여 이름이 "name"인 input 요소를 선택합니다.if (name.length < 6 || name.length > 12) { ... }:가져온 이름(input 요소의 값)의 길이를 확인하여 유효성을 검사합니다.
name.length가 6자 미만이거나 12자 초과일 경우 경고 창을 띄우고, return false를 반환합니다.
Java
람다식
람다식 외부에서 선언된 변수와 동일한 이름의 변수를 람다식에서 선언할 수 없다.
람다식에 사용된 지역변수는 final이다.
final을 변수에 사용하면 한번만 저장하고 수정불가
final을 class에 사용하면 상속 불가
final을 메소드에 사용하면 오버라이드 불가
따라서 상수를 선언할 때 final static 변수명(대문자로) = 값;
package sec02.lamda;
interface UseThis{
void use();
}
public class UseThisDemo {
public void lamda() {
String hi = "Hi!";
// class 어떤 이름 implements UseThis{use()메소드를 반드시 구현}
UseThis u1 = new UseThis(){ // 무명클래스 기법으로 interface 구현하는 객체 만들기
public void use() {
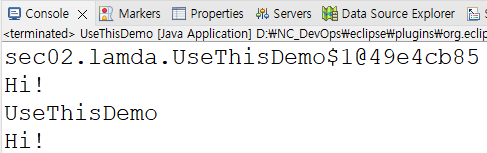
System.out.println(this); // 외부에서 호출했을 때, 자기자신을 출력
System.out.println(hi);
// hi = hi+"Lamda."; 지역변수는 final이므로 수정 불가
}
};
u1.use();
// lamda 식으로 선언 use 바로 구현
UseThis u2 = () ->{ // use 메소드를 구현했는데 이름이 없는 클래스 구현. 람다식으로 함
System.out.println(this);
System.out.println(hi);
//hi = hi+"Lamda."; 지역변수는 final이므로 수정 불가
};
u2.use();
}
@Override
public String toString() {
return "UseThisDemo";
}
public static void main(String[] args) {
int one = 1;
new UseThisDemo().lamda();
// 람다식의 매개변수는 one은 그 변수를 포함한 지역에서 다시 선언할 수 없다.
// Comparator<String> c = (one,two) -> one.length() - two.length();
}
}
UseThis u1 = new UseThis() { ... };: UseThis 인터페이스를 구현하는 무명 클래스의 인스턴스를 생성합니다. use() 메소드를 구현하여 특정 동작을 수행합니다. 이때, 무명 클래스 내부에서 this는 무명 클래스 자체를 가리킵니다.
UseThis u2 = () -> { ... };: 람다 표현식을 사용하여 UseThis 인터페이스를 구현하는 익명 객체를 생성합니다. use() 메소드를 구현하여 특정 동작을 수행합니다. 람다 표현식 내부에서 this는 UseThisDemo 클래스 인스턴스를 가리킵니다.
@Override public String toString() { ... }: toString() 메소드를 오버라이딩하여 UseThisDemo 클래스의 문자열 표현을 반환합니다.
public static void main(String[] args) {new UseThisDemo().lamda();}: main() 메소드에서 UseThisDemo 클래스의 인스턴스를 생성하고 lambda() 메소드를 호출합니다. 람다식에서는 one 변수를 사용할 수 없습니다.
package sec02.lamda;
import java.util.Arrays;
import java.util.List;

public class Car {
	private String model;
	private boolean gasoline;
	private int age;
	private int mileage;
	public Car(String model, boolean gasoline, int age, int mileage) {
		this.gasoline = gasoline;
		this.age = age;
		this.mileage = mileage;
	}
	public String getModel() {
		return model;
	}
	public boolean isGasoline() {
		return gasoline;
	}
	public int getAge() {
		return age;
	}
	public int getMileage() {
		return mileage;
	}
	public String toString() {
		return String.format("Car(%s, %s, %d, %d", model, gasoline, age, mileage);
	}
	public static final List<Car> cars = Arrays.asList(
			new Car("소나타", true,  18, 210000),
			new Car("코란도", false, 15, 200000),
			new Car("그랜저", true,  12, 150000),
			new Car("산타페", false, 10, 220000),
			new Car("아반테", true,  10,  70000),
			new Car("에쿠스", true,   6, 100000),
			new Car("그랜저", true,   5,  80000),
			new Car("소나타", true,   2,  35000),
			new Car("쏘렌토", false,  1,  10000),
			new Car("아반테", true,   1,   7000));
}

----------CarConsumer file----------

package sec02.lamda;

public interface CarConsumer {
	void apply(Car car);
}

----------CarPredicate file----------

package sec02.lamda;

public interface CarPredicate {
   boolean test(Car car);
}

----------CarDemo file----------

package sec02.lamda;

import java.util.ArrayList;
import java.util.List;

public class CarDemo {

	public static void main(String[] args) {
		List<Car> dieselCars = findCars(Car.cars, c -> !c.isGasoline());
		System.out.println("디젤 자동차 = " + dieselCars);

		List<Car> oldCars = findCars(Car.cars, c -> c.getAge() > 10);
		System.out.println("오래된 자동차 = " + oldCars);

		List<Car> oldDieselCars = findCars(Car.cars, c -> c.getAge()>10 && !c.isGasoline());
		System.out.println("오래된 디젤 자동차 = " + oldDieselCars);

		System.out.println("디젤 자동차 = ");
		printCars(dieselCars, c -> System.out.printf("%s(%d) ", c.getModel(), c.getAge()));

		System.out.print("\n오래된 자동차 = ");
		printCars(oldCars, c -> System.out.printf("%s(%d, %d) ", c.getModel(), c.getAge(), c.getMileage()));


	}
	// 메인 메소드에서 사용하는 메소드로 static이 붙어 있음
	private static List<Car> findCars(List<Car> all, CarPredicate cp) { // 메소드 선언
		List<Car> result = new ArrayList<>();
		for (Car car : all) {
			// 구현체에서 보낸 c -> !c.isGasoline()를 사용함, 2번째는 c -> !c.getAge() > 10 테스트
			if(cp.test(car))
				result.add(car);
		}
		return result;
	}

	public static void printCars(List<Car> all, CarConsumer cc) { // 메소드 선언
		for(Car car : all) {
			cc.apply(car);
		}
	}
}
List<Car> dieselCars = findCars(Car.cars, c -> !c.isGasoline());: findCars() 메소드를 사용하여 Car.cars 리스트에서 디젤 자동차를 검색합니다.c -> !c.isGasoline()은 람다 표현식으로 디젤 자동차를 필터링하는 조건을 정의합니다.
List<Car> oldCars = findCars(Car.cars, c -> c.getAge() > 10);: findCars() 메소드를 사용하여 Car.cars 리스트에서 오래된 자동차를 검색합니다.c -> c.getAge() > 10은 람다 표현식으로 오래된 자동차를 필터링하는 조건을 정의합니다.
List<Car> oldDieselCars = findCars(Car.cars, c -> c.getAge() > 10 && !c.isGasoline());: findCars() 메소드를 사용하여 Car.cars 리스트에서 오래된 디젤 자동차를 검색합니다.c -> c.getAge() > 10 && !c.isGasoline()은 람다 표현식으로 오래된 디젤 자동차를 필터링하는 조건을 정의합니다.
System.out.println("디젤 자동차 = ");: 디젤 자동차를 출력하기 위한 준비 단계로 출력할 내용을 알리는 문자열을 출력합니다.
printCars(dieselCars, c -> System.out.printf("%s(%d) ", c.getModel(), c.getAge()));: printCars() 메소드를 사용하여 디젤 자동차 리스트를 출력합니다.c -> System.out.printf("%s(%d) ", c.getModel(), c.getAge())은 람다 표현식으로 디젤 자동차의 모델과 연식을 출력하는 동작을 정의합니다.
System.out.print("\n오래된 자동차 = ");: 오래된 자동차를 출력하기 위한 준비 단계로 출력할 내용을 알리는 문자열을 출력합니다.
printCars(oldCars, c -> System.out.printf("%s(%d, %d) ", c.getModel(), c.getAge(), c.getMileage()));: printCars() 메소드를 사용하여 오래된 자동차 리스트를 출력합니다.c -> System.out.printf("%s(%d, %d) ", c.getModel(), c.getAge(), c.getMileage())은 람다 표현식으로 오래된 자동차의 모델, 연식, 주행 거리를 출력하는 동작을 정의합니다.
private static List<Car> findCars(List<Car> all, CarPredicate cp) { ... }: findCars() 메소드는 주어진 Car 객체들의 리스트에서 CarPredicate를 이용하여 특정 조건에 맞는 자동차를 검색하여 리스트로 반환합니다.
public static void printCars(List<Car> all, CarConsumer cc) { ... }: printCars() 메소드는 주어진 Car 객체들의 리스트를 CarConsumer를 이용하여 자동차를 출력합니다.

package sec03.lamda;
import java.util.function.BiPredicate;
import java.util.function.IntPredicate;
import java.util.function.Predicate;
public class PredicateDemo {
public static void main(String[] args) {
IntPredicate even = x -> x%2 == 0; // test()[메소드]의 구현
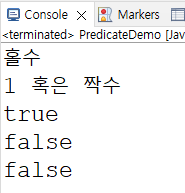
System.out.println(even.test(3) ? "짝수" : "홀수");
IntPredicate one = x -> x==1; // test()[메소드]의 구현
IntPredicate oneOrEven = one.or(even);// default 메소드 실행함
System.out.println(oneOrEven.test(1) ? "1 혹은 짝수" : "1이 아닌 홀수");
// 자바의 특성상 앞에가 참이면 바로 참으로 응답함.
Predicate<String> p = Predicate.isEqual("Java Lambda");
System.out.println(p.test("Java Lambda"));
System.out.println(p.test("JavaFX"));
BiPredicate<Integer, Integer> bp = (x,y) -> x > y; // test()[메소드]의 구현
System.out.println(bp.test(2, 3));
}
}
IntPredicate even = x -> x%2 == 0;: even은 IntPredicate 인터페이스를 구현한 람다 표현식입니다.
이는 주어진 정수가 짝수인지를 판별하는 test() 메소드를 구현합니다.
System.out.println(even.test(3) ? "짝수" : "홀수");: even의 test() 메소드를 사용하여 3이 짝수인지 판별하고, 결과에 따라 "짝수" 또는 "홀수"를 출력합니다.
IntPredicate one = x -> x==1;: one은 IntPredicate 인터페이스를 구현한 람다 표현식입니다.
이는 주어진 정수가 1인지를 판별하는 test() 메소드를 구현합니다.
IntPredicate oneOrEven = one.or(even);: oneOrEven은 one.or(even)을 통해 생성되었습니다.
이는 one 또는 even 중 하나의 조건을 만족하는 test() 메소드를 구현합니다.
System.out.println(oneOrEven.test(1) ? "1 혹은 짝수" : "1이 아닌 홀수");: oneOrEven의 test() 메소드를 사용하여 1이 "1 혹은 짝수"인지를 판별하고, 결과에 따라 "1 혹은 짝수" 또는 "1이 아닌 홀수"를 출력합니다.
Predicate<String> p = Predicate.isEqual("Java Lambda");: p는 Predicate 인터페이스를 구현한 람다 표현식으로, "Java Lambda"와 같은지를 판별하는 test() 메소드를 구현합니다.
System.out.println(p.test("Java Lambda"));: p의 test() 메소드를 사용하여 "Java Lambda"와 같은지를 판별하고, 결과를 출력합니다. 이 경우, 결과는 true가 됩니다.
System.out.println(p.test("JavaFX"));: p의 test() 메소드를 사용하여 "JavaFX"와 같은지를 판별하고, 결과를 출력합니다. 이 경우, 결과는 false가 됩니다.
BiPredicate<Integer, Integer> bp = (x,y) -> x > y;: bp는 BiPredicate 인터페이스를 구현한 람다 표현식으로, 주어진 두 정수 중에서 첫 번째 정수가 두 번째 정수보다 큰지를 판별하는 test() 메소드를 구현합니다.
System.out.println(bp.test(2, 3));: bp의 test() 메소드를 사용하여 2가 3보다 큰지를 판별하고, 결과를 출력합니다. 이 경우, 결과는 false가 됩니다.