Nextra란?
Nextra is a framework on top of Next.js, that lets you build content focused websites.
It has all the great features from Next.js, plus extra power to create Markdown-based content with ease.
Next.
JS와 MDX를 합쳐놓은 프레임워크으로 콘텐츠 중심 웹사이트를 구축할 수 있다.
테마를 이용해 빠르게 시작하기
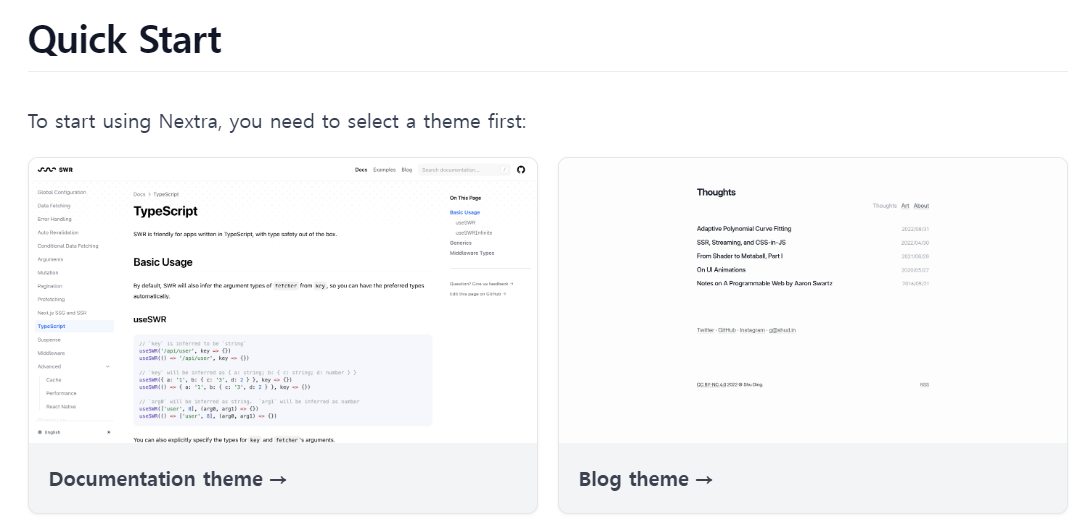
nextra에서는 현재 Documentation과 Blog 두 개의 테마를 제공하고 있다.
이 중 Blog 테마를 이용하였다.
Install
Next.js , React , Nextra 및 Nextra Blog Theme 를 설치한다.
yarn add next react react-dom nextra nextra-theme-blogNext.js 구성 추가
프로젝트 루트 디렉터리에 next.config.js를 만든다.
const withNextra = require("nextra")({
  theme: "nextra-theme-blog",
  themeConfig: "./theme.config.jsx",
});
module.exports = withNextra();
// If you have other Next.js configurations, you can pass them as the parameter:
// module.exports = withNextra({ /* other next.js config */ })
블로그 테마 구성 만들기
프로젝트 루트 디렉터리에 theme.config.jsx 파일을 만든다.
해당 파일은 Nextra 블로그 테마를 구성하는데 사용된다.
const YEAR = new Date().getFullYear();
export default {
  footer: (
    <small style={{ display: "block", marginTop: "8rem" }}>
      <time>{YEAR}</time> © Yewon-Noh.
      <a href="/feed.xml">RSS</a>
      <style jsx>{`
        a {
          float: right;
        }
        @media screen and (max-width: 480px) {
          article {
            padding-top: 2rem;
            padding-bottom: 4rem;
          }
        }
      `}</style>
    </small>
  ),
};
준비 완료!
이제 yarn start 명령어를 통해 시작할 수 있다.
해당 명령어를 사용하기 위해서는 package.json에 아래와 같이 설정을 추가해야한다.
"scripts": {
    "dev": "next dev",
    "build": "next build",
    "start": "next start",
    "lint": "next lint"
}
여기까지 수행하면 Nextra를 사용하기 위한 기본 구성을 마칠 수 있다.
이제 간단한 글을 올려볼 수 있다.
Navbar Items
pages 폴더에 _meta.json를 생성하여 페이지에 대한 구성을 정의할 수 있다.
"type": "page"를 사용하면 사이드바가 아닌 내비케이션 바에 특수 페이지로 표시된다.
즉, 여러 개의 하위문서 또는 연락처와 같은 특수 페이지나 링크를 가질 수 있게 된다.
About과 Posts 두 개의 메뉴를 갖도록 구성할 수 있다.
{
  "index": {
    "title": "About",
    "type": "page"
  },
  "posts": {
    "title": "Posts",
    "type": "page"
  }
}
About 글 작성
Nextra를 사용하면 pages 디렉토리 안의 모든 파일이 MDX로 렌더링 된다.
즉 페이지에 표시될 글은 .mdx 파일에 Markdown으로 작성하면 된다.
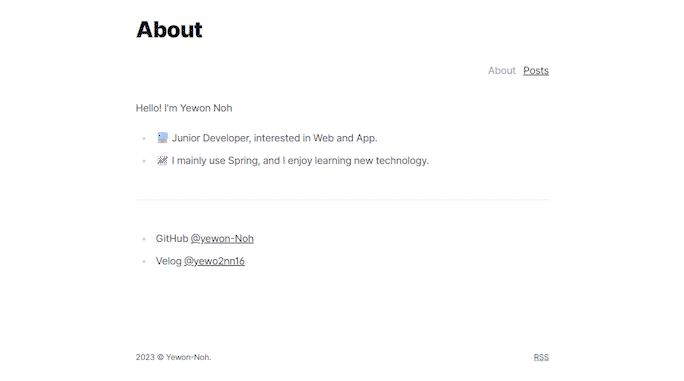
예로 About 페이지에 띄울 글을 아래와 같이 작성할 수 있다.
---
type: page
title: About
date: 2023-02-07
---
# Your Name
Hello! I'm Yewon Noh
- 💻 Junior Developer, interested in Web and App.
- 📈 I mainly use Spring, and I enjoy learning new technology.
---
- GitHub [@yewon-Noh](https://github.com/yewon-Noh)
- Velog [@yewo2nn16](https://velog.io/@yewo2nn16)
Posts 글 작성
여러 개의 하위 문서를 가질 수도 있다.
posts 폴더 아래에 MDX 파일을 추가하면 된다.
---
title: Hello!
date: 2023/02/07
description: Hello!
tag: hello, nextra
author: You
---
# Hello!
Hello, Nextra!
글의 목록을 띄우기 위해서는 posts 폴더에 index.mdx를 추가해주면 된다.
---
type: posts
title: Posts
date: 2023-02-07
---
# Posts
이렇게 Nextra를 이용해 간단하게 블로그를 만들 수 있다.
자세한 내용은 아래의 글을 참고할 수도 있다.
SEO 적용하기
next-seo를 사용하여 손쉽게 seo를 구현할 수 있다.
Install
next-seo 를 설치한다.
yarn add next-seoDefaultSeo 설정
_app.jsx에 DefaultSeo를 설정할 수 있다.
속성에 대해서는 여기서 확인할 수 있다.
import { DefaultSeo } from "next-seo";
const DEFAULT_SEO = {
    title: "yewonlog",
    description: "yewon-Noh's Tech Blog",
    canonical: "https://www.carrotins.com",
    openGraph: {
      type: "website",
      locale: "ko_KR",
      url: "https://yewonlog.vercel.app/",
      title: "yewonlog - Yewon-Noh's Tech Blog",
      siteName: "yewonlog",
      images: [
        {
          url: "/images/image.png",
          width: 285,
          height: 167,
          alt: "이미지"
        }
      ]
    },
    twitter: {
        handle: '@handle',
        site: '@site',
        cardType: 'summary_large_image',
    },
  };
export default function Nextra({ Component, pageProps }) {
    return (
        <>
            <DefaultSeo {...DEFAULT_SEO} />
        </>
    )
}검색 엔진에 등록하기
블로그를 만들면 바로 검색 엔진에 표시되는 것이 아니라 크롤링을 요청해야 한다.
소유권을 확인하기 위한 방법으로는 두가지가 있다.
- 제공되는 HTML 파일을 프로젝트에 넣는다.
- 사이트 홈페이지에 메타태그를 추가한다.
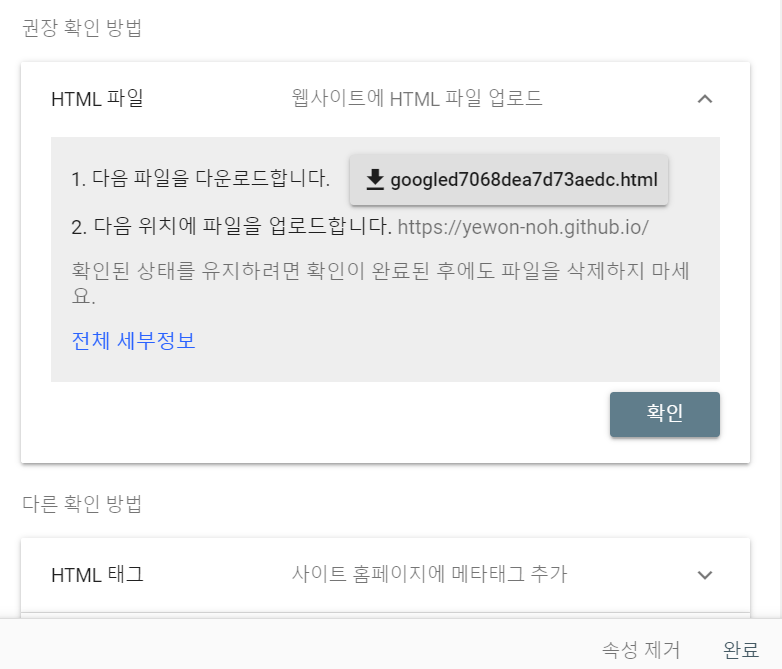
권장하는 방법인 1번 방법을 사용해서 설정했다.
HTML 파일을 다운로드 받아 public 폴더 아래에 추가해주었다.
소유권 확인을 마치고 하루 이틀 정도 지나면 Google에서 검색 결과로 확인할 수 있다.
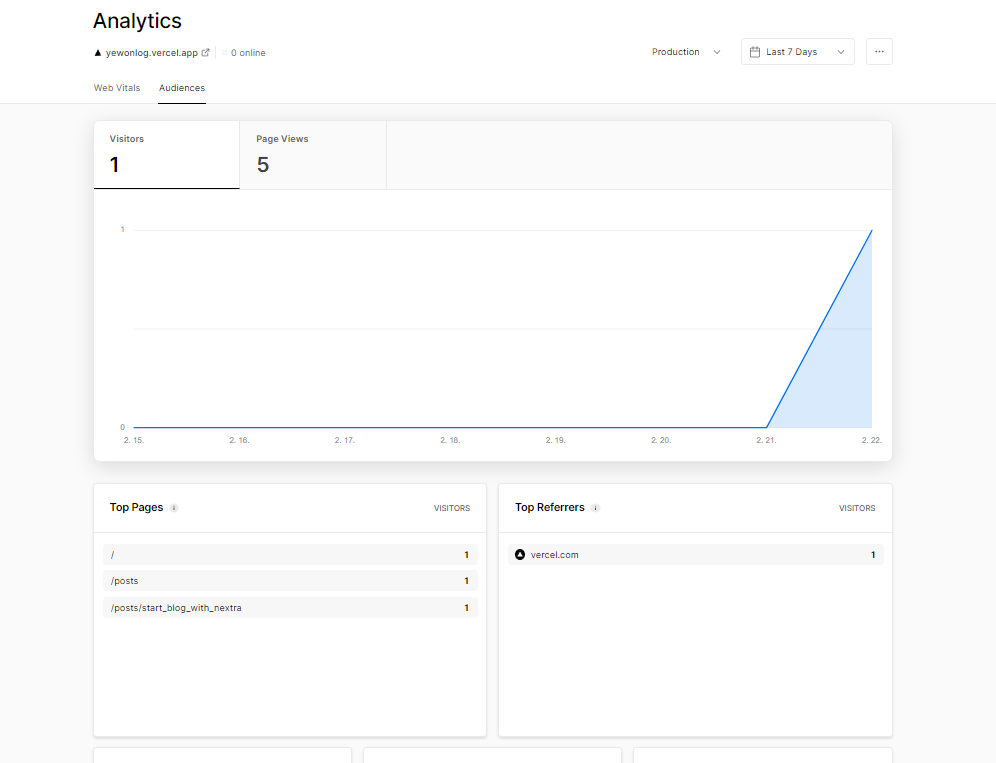
Vercel Analytics로 방문자 수 집계하기
이 블로그는 vercel를 이용해 배포하고 있다.
구글 애널리틱스와 같이 방문자 수를 집계하기 위한 설정을 해주었다.
Install
@vercel/analytics 패키지를 설치한다.
yarn add @vercel/analyticsApp에 Analytics 컴포넌트 추가
pages/_app.jsx 파일에 아래를 추가해준다.
import { Analytics } <from '@vercel/analytics/react';
export default function Nextra({ Component, pageProps }) {
    return (
        <>
            ...
            <Component {...pageProps} />
            <Analytics />
        </>
    )
}
수정한 코드를 배포하면 Vercel의 Analytics 탭에서 확인할 수 있다.
공식문서 봐도 잘 모르겠던데 너무 좋은 글 감사합니다ㅠ