실제 개발시 AOP 는 XML 설정을 더 좋아함 왜일까?
어노테이션으로 수정하려면 다시 컴파일해야되기 때문에. . .
어차피 뭐로 할 지 회사가면 PM이 정해준다고(?)한다.
그러니 편한 어노테이션 설정뿐만 아니라 앞전에 실습했던 XML 설정도 계속해서 익혀두자
1. @Annotation
1) 종류
Spring 시리즈 AOP(1) 을 참고하면, 각 어노테이션의 동작 방식을 자세하게 알 수 있다.
@Pointcut
- AOP 를 적용시킬 지점을 설정
// @Pointcut( 룰 설정 ( 적용시킬 주소 ) )
@Pointcut("execution(* com.example.aop.controller..*.*(..))")
private void cut(){}
@Before
- 메서드 실행하기 전에
// cut()이 실행되는 지점의 @Before 에서 해당 메소드(before()) 를 실행
@Before("cut()")
public void before(JoinPoint joinPoint) { . . . } // JoinPoint 지점 정보
@After
- 예외 상관 없이, 메서드 실행된 후에
@AfterReturing
- 메서드 호출 성공 시
// cut()이라는 지점의 반환 값
@AfterReturning(value = "cut()", returning = "returnObj")
public void afterReturn(JoinPoint joinPoint, Object returnObj) { . . . } // JoinPoint 지점 정보, Object 반환 값
@AfterThrowing
- 메서드 호출 실패 시 예외 발생
@Around
- 메서드 실행 전후 모두 제어(Befor/After)
@Aspect
- AOP 프레임워크에 포함
- AOP 를 정의하는 클래스에 할당
2) 📌예제📌
- ParameterAop.java 클래스
// AOP 사용 + Component 로 Spring 에서 관리
@Aspect
@Component
public class ParameterAop {

    // @Pointcut( 룰 설정 ( 적용시킬 주소 ) )
    @Pointcut("execution(* com.example.aop.controller..*.*(..))")
    private void cut(){}

    // cut()이 실행되는 지점의 @Before 에서 해당 메소드(before()) 를 실행
    @Before("cut()")
    public void before(JoinPoint joinPoint) { // JoinPoint 지점 정보

        // method 이름(get,post) JointPoint 에서 가져오기
        MethodSignature methodSignature = (MethodSignature) joinPoint.getSignature();
        Method method = methodSignature.getMethod();
        System.out.println(method.getName());

				// mehtod 에 담긴 정보 가져오기
        Object[] args = joinPoint.getArgs(); // method 의 매개변수의 배열
        for(Object obj : args) {
            System.out.println("type : " + obj.getClass().getSimpleName()); // method 타입
            System.out.println("value : " + obj); // method 값
        }
    }

    // cut()이라는 지점의 반환 값
    @AfterReturning(value = "cut()", returning = "returnObj")
    public void afterReturn(JoinPoint joinPoint, Object returnObj) { // JoinPoint 지점 정보, Object 반환 값
        System.out.println("return obj");
        System.out.println(returnObj);
    }
}
@Aspect, @Component
- AOP 를 사용하여 Component로 Spring에서 관리하는 Controller 파일을 한 번에 해결할 수 있음
@Pointcut
-
룰을 설정하는 어노테이션
-
적용시킬 주소를 속성으로 넣음
-
연산자의 종류가 매우 다양함
-
cut 지점을 설정하는 주소가 들어감
-
cut 지점의 실행 전은
@Before, 실행 후는@After어노테이션으로 설정
before
JointPoint- 지점 정보가 담기는 객체
MethodSignature- 메서드 이름을 가져올 수 있는 객체
- 현. GET 메서드 POST 메서드가 담겨 있음
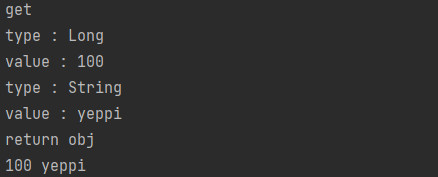
joinPoint.getArgs()메서드에 담겨 있는 정보를 가져옴- GET 메서드인 경우 → type은 Long, String , value 는 100, yeppi
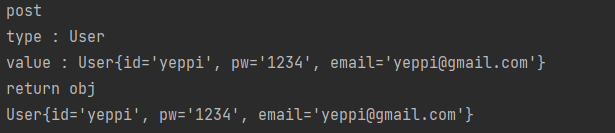
- POST 메서드인 경우 → type 은 User, value 는 User{key=’value’, . . .}
after
@AfterReturning- cut 지점, 해당 지점의 정보를 속성으로 지정
Object returnObj- 지점 정보(value)를 반환
- GET 메서드인 경우 → 100 yeppi
- POST 메서드인 경우 → User{key=’value’, . . .}
User.java 에는 기본적인 id, pw, email 이 String 형태로 변수 선언
3) 📌예제📌
-
RestApiController.java
-
전 실습에서 했던 것과 유사
-
return 값으로 정보를 반환
-
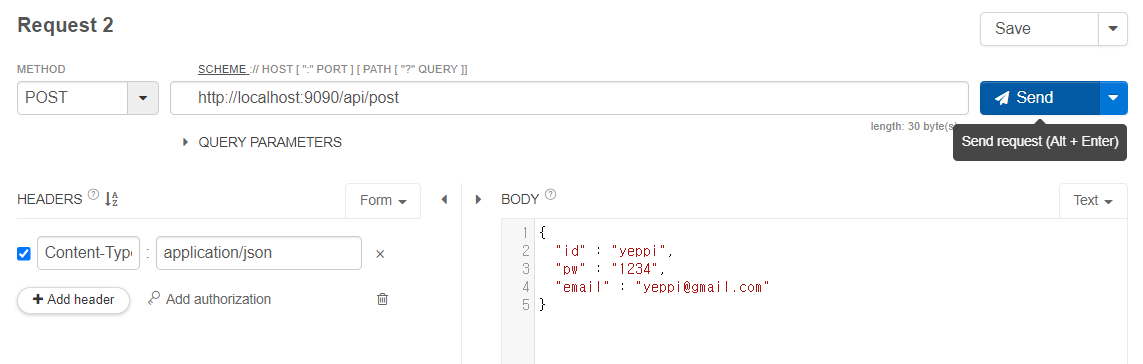
GET 방식인 경우 → id 는 100, name 은 yeppi
POST 방식인 경우 → User{key=’value’, . . .} 즉 User 객체의 전체를 반환@RestController @RequestMapping("/api") public class RestApiController { @GetMapping("/get/{id}") public String get(@PathVariable Long id, @RequestParam String name) { **return id + " " + name;** // input 들어올 때, 값 찍히면 return } @PostMapping("/post") public User post(@RequestBody User user) { **return user;** // 값 반환할 때, 값 찍히면 return } }
-
- 출력 결과
- GET 방식인 경우

- POST 방식인 경우
- GET 방식인 경우
2. 실습
1) 📌어노테이션 직접 만들어 사용하기📌
- 메서드 실행 시간을 구현하는 타이머 기능
- ITimer.java
@Target({ElementType.TYPE, ElementType.METHOD})
@Retention(RetentionPolicy.RUNTIME)
public @interface Timer {
    . . .
}
@Target
- 어노테이션을 붙일 대상을 정함
- 속성 값
- TYPE : 클래스, 인터페이스에 어노테이션 붙이기 가능
- METHOD : 메서드에 어노테이션 붙이기 가능
@Retention
- https://jeong-pro.tistory.com/234 참고
- 라이프사이클
- 언제까지 살아 남아있을 지
- 속성 값
- SOURCE : 소스 코드까지
- CLASS : 클래스 파일 까지
- RUNTIME : 런타임까지 → 안 사라지고 실행하는 동안 계속
@interface
- 어노테이션 인터페이스 만들기
- TimerAop.java
- 전 실습때 사용했던 before, after 메서드는 Timer를 공유할 수 없음
- 따라서
cut()과,enableTimer()둘 다 사용하여 실행 시간을 구하면 됨 StopWatch를 사용하여 프로세스 실행 전과 후의 start, stop을 끊어줌- 실행 시간이 돌아가는 실질적인 메서드 부분은
joinPoint.process()
-
TimerAop.java
@Aspect @Component public class TimerAop { // Timer 동작 AOP // controller 하위의 method 에 **제약 걸기** @Pointcut("execution(* com.example.aop.controller..*.*(..))") private void cut(){} // annotation 패키지 하위의 Timer method 는 **로깅하기** -> 실행 시간이 필요함 @Pointcut("@annotation(com.example.aop.annotation.Timer)") private void enableTimer(){} // **Before, After Method 는 Timer 를 공유할 수 없음** // cut() 과 enableTimer() 를 같이 사용 @Around("cut() && enableTimer()") public void around(ProceedingJoinPoint joinPoint) throws Throwable { // 실행 전 StopWatch stopWatch = new StopWatch(); stopWatch.start(); // joinPoint.proceed() -> 실질적인 method 실행 Object result = joinPoint.proceed(); // 실행 후 stopWatch.stop(); // 총 걸린 시간 (초단위) System.out.println("total time : " + stopWatch.getTotalTimeSeconds()); } }- 이제 위에서 AOP 를 다 만들었으니,
실질적인 로직 처리를 하는 Controller 에서는 각 기능에만 집중하여 메서드를 작성할 수 있음
- 이제 위에서 AOP 를 다 만들었으니,
-
RestApiController.java
@RestController @RequestMapping("/api") public class RestApiController { // 서비스 로직에만 집중하도록 작성 // 반복되는 기능(현. StopWatch)들은 AOP로 처리 @GetMapping("/get/{id}") public String get(@PathVariable Long id, @RequestParam String name) { return id + " " + name; // input 들어올 때, 값 찍히면 return } @PostMapping("/post") public User post(@RequestBody User user) { return user; // 값 반환할 때, 값 찍히면 return } // 직접 만든 annotation @Timer @Timer @DeleteMapping("/delete") public void delete() throws InterruptedException { // db logic **Thread.sleep**(1000 * 2); // 2초 후에 종료 } }- Thread.sleep()
- 서비스가 실행되고 2초후에 종료되도록 함
- Timer는 2초 + 원래의 짧은 실행시간
- Thread.sleep()
- 출력결과


🍑Method 시간 재는 이유?🍑
- 복잡한 로직, 데이터베이스 사용, 외부 기관과 통신 등 연결해서 사용할 때
- 얼마나 걸렸는 지 사용시간 측정
2) 📌Encode ↔ Decode📌
- PUT 방식으로 실습
- Encode → Decode 로, Decod→ Encode로 변환
@Target,@Retention으로 decode 어노테이션을 직접 만들기@Pointcut,@Before,@AfterReturning를 사용하여 AOP 를 생성
- RestApiController.java
.
.
.
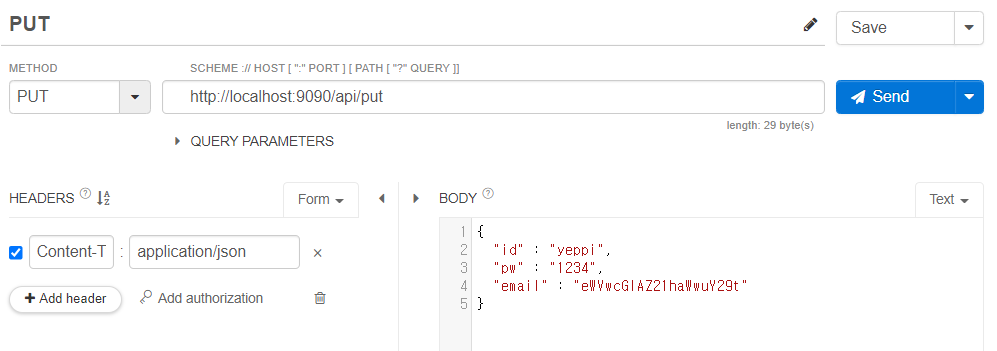
@Decode
@PutMapping("/put")
public User put(@RequestBody User user) {
System.out.println("put");
System.out.println(user);
return user; // 값 반환할 때, 값 찍히면 return
}- Decode.java
// annotation 직접 만들기
@Target({ElementType.TYPE, ElementType.METHOD})
@Retention(RetentionPolicy.RUNTIME)
public @interface Decode {}- DecodeAop.java
@Aspect
@Component
public class DecodeAop {

    // controller 하위의 method 에 제약 걸기
    @Pointcut("execution(* com.example.aop.controller..*.*(..))")
    private void cut(){}

    // annotation 패키지 하위의 Timer method 는 로깅하기  ->  실행 시간이 필요함
    @Pointcut("@annotation(com.example.aop.annotation.Decode)")
    private void enabledecode(){}

    // Before 는 Encode
    @Before("cut() && enabledecode()")
    public void before(JoinPoint joinPoint) throws UnsupportedEncodingException {
        Object[] args = joinPoint.getArgs(); // method 의 파라미터(args) 값 중에 원하는 값 뽑기
        for (Object arg : args) {
            if(arg instanceof User) { // 그 중 '원하는 객체 User' 를 찾았을 때만 값 변경
                User user = User.class.cast(arg); // User 클래스로 형변환
                String base64Email = user.getEmail(); // 기존 encoding 되어있던 email 꺼내기
                String email = new String(Base64.getDecoder().decode(base64Email), "UTF-8"); // base64Email 반환형 byte -> new String 으로 decoding
                user.setEmail(email);
            }
        }
    }

    // After 는 Decode
    @AfterReturning(value = "cut() && enabledecode()", returning = "returnObj")
    public void afterReturn(JoinPoint joinPoint, Object returnObj) {
        if(returnObj instanceof User) {
            User user = User.class.cast(returnObj); // decoding
            String email = user.getEmail();
            String base64Email = Base64.getEncoder().encodeToString(email.getBytes()); // encoding
            user.setEmail(base64Email);
        }
    }
}- AopApplication.java
@SpringBootApplication
public class AopApplication {

    public static void main(String[] args) {
        SpringApplication.run(AopApplication.class, args);

		// 코드 추가
        System.out.println(Base64.getEncoder().encodeToString("yeppi@gmail.com".getBytes()));
    }

}- 출력 결과

3. 트랜잭션 관리
1) 개념
- 굉장히 중요하다
- 트랜잭션 관리를 자동으로 하는 것❗
- commit, rollback
- 분리될 수 없는 작업 단위 = 트랜잭션
- 모두 성공하거나 모두 실패하거나
- ex.
이체() 메서드 { }→ 다른 은행에 출금 + 입금
⇒ 금융권에서 가장 중요한 것은 트랜잭션 관리
- 중복되어 잘못되어 중복 이체 했다고 가정하자
- rollback 기능이 되어서 해당 메서드 전체를 되돌릴 수 있어야함
2) 트랜잭션 설정
-
XML 로 진행한다
<!-- Transaction 설정 -->
    <bean id="txManager" class="org.springframework.jdbc.datasource.DataSourceTransactionManager">
        <property name="dataSource" ref="dataSource"></property>
    </bean>

    <tx:advice id="txAdvice" transaction-manager="txManager">
        <tx:attributes>
            <tx:method name="*" rollback-for="Exception"/>
        </tx:attributes>
    </tx:advice>
DataSourceTransactionManager 트랜잭션 관리자
- commit, rollback 기능을 가지는 메서드가 있음
- protected void doCommit(), doRollback()
- bean 등록을 해서 메모리에 떠있지만 실행은 아직 안된 상태
txManager 를 누군가가 실행/호출해주는 객체가 txAdvice
- txManager 객체를 참조하면서 + 해당 매니저가 가진 메서드를 호출(commit, rollback)
- 지금까지는 Advice 객체를 직접 만들어 사용했지만(AOP 기능),
트랜잭션 Advice 는<tx>가 자동으로 만들어줌
→ 위 xml 처럼 설정만 해주면됨
<tx:method name="*" rollback-for="Exception"/>- 모든 메서드 중에서 예외가 발생하면 rollback
- 예외 발생안하면 자동으로 commit → commit 설정은 따로 안해도됨
- xml 에 Pointcut 과 aspect 설정을 추가 해주면 된다
- 트랜잭션 설정에서만 aspect 설정은 advisor 로
- 나머지에서는 다 aspect 사용
- 왜 aspect 는 사용할 수 없는 가? id는 알지만, method는 알 수가 없기 때문
<aop:config>
        <aop:pointcut id="txPointcut" expression="execution(* com.ssamz.biz..*Impl.*(..))"/>
        <aop:advisor pointcut-ref="txPointcut" advice-ref="txAdvice"/>
</aop:config>
3) 트랜잭션 동작 흐름
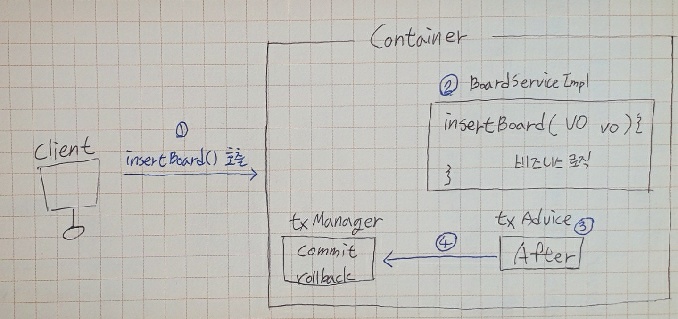
- xml 실행 순간 서비스 매니저인 어드바이스가 메모리에 올라가고
insertBoard를 클라이언트가 호출하면- 예외 발생 시,
txmanager를 이용하여 rollback
정상 수행 시, commit
👉 트랜잭션 설정은 AOP 설정을 내부적으로 사용한다

imaginative and free developer. 백엔드 / UX / DATA / 기획에 관심있지만 고양이는 없는 예비 개발자👋