👨🏫설계도면 보며 백엔드 서버 짤 수 있어야 한다
설계도면은 상황에 따라 다르기 때문에 정답이 많은 경험이 도움이 된다!
[Node.js] 배송 서버 생성
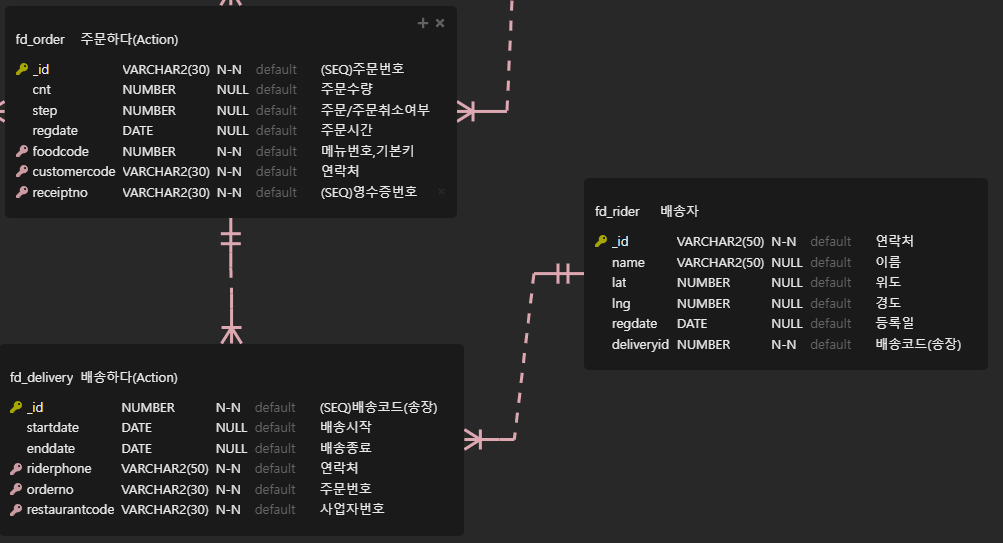
- 배송데이터가 처음 DB에 등록되는 시점에는
주문번호,사업자번호만 채워진 상태로 등록된다.
➡️ 배송자가 정해지지 않았기 때문- 배송자가 정해지면 그떄 나머지 데이터가 배송자(fd_rider)로 부터 들어와 배송데이터의 모든항목이 채워진다
매장 주문건 배송 요청 서버생성
배송자 테이블
fd_rider의 연락처_id를
배송 테이블fd_delivery에 넣으려면
배송 테이블fd_delivery의 배송코드_id를 알아야함
➡️ 몇번주문건의 rider_id를 넣을지 알아야 해당 데이터를 넣을 수 있기 때문
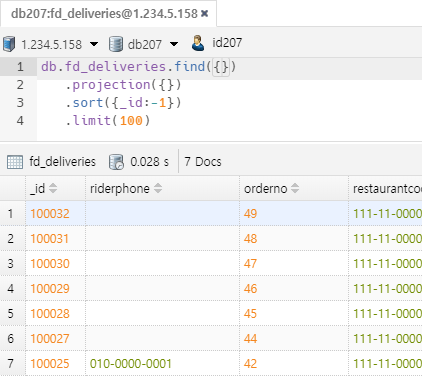
주문요청 서버의 최초 데이터 입력 결과
➡️ fd_delivery DB에 SEQ(시퀀스)로 부여된 배송코드_id가 생성,
riderphone만 비어있는 상태의 데이터가 생성된다
📁 exp_20220711/routes/food/fd_delivery.js
// 매장 => 주문건 배송 요청
// 매장(식당)인증(token)
// 127.0.0.1:3000/api/fd_delivery/insert.json
// {"orderno" : "주문번호" } + 토큰(식당사업자번호)
router.post("/insert.json", auth.checkToken, async function (req, res, next) {
    try {
        // 토큰에서 추출
        const fid = req.body.FID;
        const role = req.body.ROLE;

        if(role === 'RESTAURANT'){

            // 주문정보 저장
            const obj = new Delivery();
            obj.orderno = Number(req.body.orderno);
            obj.restaurantcode = fid;

            const result = await obj.save();
            console.log(result);
            if(result !== null) {
                return res.send({ status: 200, result:result });
            }

        }

         return res.send({ status: 0 });
    }
    catch (e) {
        console.error(e);
        return res.send({ status: -1, result: e });
      }
    });
배송자 배송수락 서버 생성
📁 exp_20220711/routes/food/fd_delivery.js
// 배송자 배송 수락
// 127.0.0.1:3000/api/fd_delivery/update.json
// { riderphone : "배송자의연락처", _id : 배송코드 }
router.put("/update.json", async function (req, res, next) {
    try {
        const query = { _id : Number(req.body._id) }
        const obj = await Delivery.findOne(query);
        obj.riderphone = req.body.riderphone;
        obj.startdate = new Date(); //시작시간 설정

        const result = await obj.save();
        console.log(result);
        if(result !== null) {
            return res.send({ status: 200, result:result });
        }
        return res.send({ status: 0 });

    }
    catch (e) {
        console.error(e);
        return res.send({ status: -1, result: e });
      }
배송자 배송 내역 조회 결과
📁 exp_20220711/routes/food/fd_delivery.js
💡 배송자가 어떤 매장의 어떤 상품을 배송했는지 조회 할 수 있도록
RestaurantOrderFood모델 추가 후
fd_delivery의restaurant code를 역추적하여 데이터를 조회해온다
// 라이더 배송 내역 조회
// 127.0.0.1:3000/api/fd_delivery/select.json?riderphone=배송자연락처
// params로 배송자 연락처 넘겨줌
router.get("/select.json", async function (req, res, next) {
    try {
        const query = { riderphone : req.query.riderphone };
        const result = await Delivery.find(query).sort({startdate : -1});

        console.log('result=>', result);
        if(result !== null) { // 배송정보가 존재한다면

            var arr = [];
            for(let tmp of result) { // 배송정보의 갯수만큼 반복한다
                // 식당 정보
                // query = { _id : tmp.restaurantcode }; //_id : restaurant 테이블의 _id와 result.restaurantcode 가 일치하는 조건
                // const result2 = await Restaurant.findOne(query).select({ name : 1, phone : 1, address : 1 });

                // 식당정보 (위 두줄을 아래 한줄과 같이 작성할 수 있다)
                const result2 = await Restaurant.findOne({ _id : tmp.restaurantcode }).select({ name : 1, phone : 1, address : 1 });
                console.log('result2=>', result2);

                //  주문 정보(주문번호, 주문수량, 주문시간) => 리턴하지 않는다! 4번을 위해 조회하는 정보일 뿐
                const result3 = await Order.findOne({ _id : tmp.orderno }).select({ _id : 1 , cnt : 1 , foodcode : 1 , regdate : 1 });
                console.log('result3=>', result3);

                //  음식 정보(음식이름, 가격정보)
                const result4 = await Food.findOne({_id : result3.foodcode}).select({  name : 1 , price : 1  });
                console.log('result4=>', result4);

                arr.push({ delivery : tmp, restaurant : result2, order : result3, food : result4 })
            }
            return res.send({ status: 200, result: arr });
        }
        return res.send({ status: 0 });
    }
    catch (e) {
        console.error(e);
        return res.send({ status: -1, result: e });
      }
    });
[Vue.js] 관리자 페이지 MQTT/서버 연결
handleDelivery()
- 배송요청 서버에 등록
- MQTT에 신호보내기
📁 fd_restaurant/src/components/restaurant/OrderPage.vue
	const handleDelivery = async( orderno ) => {
		// 1. DB에 추가하기
		const url = `/api/fd_delivery/insert.json`;
		const headers = {
			"Content-Type":"application/json",
			"token" : state.token
		};
		const body = { "orderno" : orderno };
		const { data } = await axios.post(url, body, {headers});

		console.log(data);
		if(data.status === 200) {

		// 2. 신호보내기
		const topic = `/rider/all`;  //rider/all=> 전체라이더 , rider/개인휴대폰 => 개인라이더(개별수신)
		// 보낼내용(type:delivery code:배송코드)
		const payload = JSON.stringify({
				type : 'delivery',
				code : data.result._id
		});
		// 3. qos(quality of service)
		const qos = 0;
		console.log('topic=>',topic);
		console.log('payload=>', payload);
		console.log('qos=>', qos);

		if(state.client !== null){
		// client에게 보냄(topic, paload, qos, error(혹시 에러나면 보낼 에러정보) )
		state.client.publish(topic, payload, qos, error => {
			if(error){
				alert('mqtt오류');
			}
		})}
				alert('주문요청완료')
			}
		}
[Vue.js] 배송자 페이지
배송자 배송요청목록/배송완료목록 페이지 구현
🤯 mappage 주문완료목록에 모든 라이더가 동일한 주문완료목록을 갖는다.. 배달자 본인이 배달 완료한 데이터만 와야 하는데?
💡 배열의 변수를 잘못 입력했다! 알맞은 변수값으로 수정하니 배달자 본인의 배달 완료 데이터만 들어온다😂
📁 fd_restaurant/src/components/rider/MapPage.vue
<template>
...
        <table border="1">
            <thead>
                <tr>
                    <th>배송코드</th>
                    <th>식당이름</th>
                    <th>식당연락처</th>
                    <th>식당위치</th>
                    <th>메뉴</th>
                    <th>주문수량</th>
                    <th>버튼</th>
                </tr>
            </thead>
            <tbody>
                <tr v-for="(tmp) of state.rows2" :key="tmp">
                    <td>{{tmp.delivery._id}}</td>
                    <td>{{tmp.restaurant.name}}</td>
                    <td>{{tmp.restaurant.phone}}</td>
                    <td>{{tmp.restaurant.address}}</td>
                    <td>{{tmp.food.name}}</td>
                    <td>{{tmp.order.cnt}}</td>
                    <td><button @click="handleDeliveryConfirm(tmp.delivery._id)">배송수락</button></td>
                </tr>
            </tbody>
        </table>

        <hr />
        <h3>배송완료목록</h3>

        <table border="1">
            <thead>
                <tr>
                    <th>배송코드</th>
                    <th>식당이름</th>
                    <th>식당연락처</th>
                    <th>식당위치</th>
                    <th>주문수량</th>
                    <th>메뉴</th>
                    <th>가격</th>
                    <th>배송시작시간</th>
                    <th>배송완료시간</th>
                </tr>
            </thead>
            <tbody>
                <tr v-for="(tmp) of state.rows1" :key="tmp">
                    <td>{{tmp.delivery._id}}</td>
                    <td>{{tmp.restaurant.name}}</td>
                    <td>{{tmp.restaurant.phone}}</td>
                    <td>{{tmp.restaurant.address}}</td>
                    <td>{{tmp.order.cnt}}</td>
                    <td>{{tmp.food.name}}</td>
                    <td>{{tmp.food.price}}</td>
                    <td>{{tmp.delivery.startdate}}</td>
                    <td>{{tmp.delivery.enddate}}</td>
                </tr>
            </tbody>
        </table>
    </div>
</template>

...

        const state = reactive({
            rows : null, //배달자정보 받기
            id : route.query._id,
            rows1 : [], //내가 배달한 목록 정보 받기
            rows2 : [], //매장이 배송요청한 목록
            ...
        });
[Node.js] 배송 서버 생성
배송자 주문요청된 내역 조회
📁 exp_20220711/routes/food/fd_delivery.js
// 배송자 배송요청수락 후 배송 완료된 내역 조회
// 127.0.0.1:3000/api/fd_delivery/select1.json
router.get("/select1.json", async function (req, res, next) {
    try {
        var query = { riderphone : '' };
        const result = await Delivery.find(query).sort({startdate : -1});

        console.log('result=>', result);
        if(result !== null) { // 배송정보가 존재한다면

            var arr = [];
            for(let tmp of result) { // 배송정보의 갯수만큼 반복한다
                // 식당 정보
                // query = { _id : tmp.restaurantcode }; //_id : restaurant 테이블의 _id와 result.restaurantcode 가 일치하는 조건
                // const result2 = await Restaurant.findOne(query).select({ name : 1, phone : 1, address : 1 });

                // 식당정보 (위 두줄을 아래 한줄과 같이 작성할 수 있다)
                const result2 = await Restaurant.findOne({ _id : tmp.restaurantcode }).select({ name : 1, phone : 1, address : 1 });
                console.log('result2=>', result2);

                //  주문 정보(주문번호, 주문수량, 주문시간) => 리턴하지 않는다! 4번을 위해 조회하는 정보일 뿐
                const result3 = await Order.findOne({ _id : tmp.orderno }).select({ _id : 1 , cnt : 1 , foodcode : 1 , regdate : 1 });
                console.log('result3=>', result3);

                //  음식 정보(음식이름, 가격정보)
                const result4 = await Food.findOne({_id : result3.foodcode}).select({  name : 1 , price : 1  });
                console.log('result4=>', result4);

                arr.push({ delivery : tmp, restaurant : result2, order : result3, food : result4 })
            }
            return res.send({ status: 200, result: arr });
        }
        return res.send({ status: 0 });
    }
    catch (e) {
        console.error(e);
        return res.send({ status: -1, result: e });
      }
    });
[Vue.js] MQTT 배송자 배송목록 데이터 실시간 반영
여러명의 라이더의 배송요청목록창을 보고있는 상황에서
한명의 라이더가 배송요청목록 중배송수락버튼을 클릭 한 경우
다른 라이더의 주문요청목록도 같이 데이터 변화하도록 구현
[MQTT] 구독/연결
MQTT IMPORT
➡️ import mqtt from 'precompiled-mqtt';
📁 fd_restaurant/src/components/rider/MapPage.vue
1. state에 환경설정
	host : '127.0.0.1', //mqtt broker 서버주소
	port : 1884, //포트번호 web은 1884 , app은 1883으로 설정해두었다
	options : {
    	clean 			: true,  //세션초기화
    	reconnectPeriod : 20000, //재접속시간
    	clientId 		: 'web_cs_' + new Date().getTime(), //접속아이디 고유해야한다=> timestamp사용
        username 		: 'aaa', //아이디
        password 		: 'bbb', //비밀번호
            },
            // 접속했을때 정보 보관 변수
client : null, //접속객체mqttConnection()= MQTT 접속
 // 접속
        const mqttConnection = () => {
            const url = `ws://${state.host}:${state.port}`;
            try {
                state.client = mqtt.connect(url, state.options);

                state.client.on('connect',() => { //접속성공
                    console.log('connect success');
                });

                state.client.on('error', error => { // 접속오류
                console.log('connect error', error);
                });

                state.client.on('message',( topic, message ) => { // 메세지 가 왔을떄
                    console.log(`receive message ${topic} : ${message}`);
              //내가 배송한 목록
            handleDeliveryDone();
            // 배송요청된 주문목록
            handleDeliveryRequest();
                });

            } catch (e) {
                // 오류났을경우
                console.log('mqtt error', e)
            }
};mqttSubscribe()=구독/topic설정
const mqttSubscribe = () => {
		// 접속이 잘 되어있는지 확인
        if(state.client !== null){
           // const topic = `/#` //관리자용(모든사용자 확인가능)

           // 배달자 전체 공지를 위한 topic
           const topic = `/rider/all`
           // 배달자 개별 공지 topic
           const topic1 = `/rider/${state.id}`
           console.log('topic=>',topic)

           state.client.subscribe(topic, {qos:0}, (error, res) => {
           if(error) {
              alert('구독설정 실패');
            }
           console.log('subscribe success', res)
             });


           state.client.subscribe(topic1, {qos:0}, (error, res) => {
              if(error) {
                  alert('구독설정 실패');
               }
           console.log('subscribe success', res)
             });
           }
};- 화면 실행되기 전에 로드 되어야 하니
onMounted위쪽에 위치해둔다
   onMounted( async()=> {
      mqttConnection();
      mqttSubscribe();
      await handleData();
handleDeliveryConfirm(tmp.delivery._id)
tmp.delivery._id = 배송자 아이디를 함수에 넣어 배송수락 서버와 연결
const handleDeliveryConfirm = async( deliverycode ) => {
     const url = `api/fd_delivery/update.json`;
     const headers = {"Content-Type":"application/json"};
     const body = {
          "riderphone" : state.id,
          "_id" : deliverycode
        }

     const {data} = await axios.put(url, body, {headers});
     console.log(data);
       if(data.status === 200) {
       alert(' 배송코드(' + deliverycode + ')배송건이 배정되었습니다!')
          }
        };
💻 실행결과
➡️ 새로고침 하지 않아도 주문요청목록에서 배송수락을 누르면 바로 주문완료로 데이터가 들어간다.
하지만 버튼을 누른 한명의 배송자의 데이터만 변화가 있고
다른 배송자의 페이지에서는 실시간 데이터 반영이 안됨!
            handleDeliveryRequest();
            handleDeliveryDone();
➡️ 버튼을 누른 배송자의 테이터만 실시간 반영해 주는 한계가 있다
[MQTT] 모든 사용자의 데이터 실시간 반영
다른데이터들은 동일하게 유지하고
code : deliverycode만 변경해주면 된다
📁 fd_restaurant/src/components/rider/MapPage.vue
	   // 2. 신호보내기
       // rider/all=> 전체라이더 , rider/개인휴대폰 => 개인라이더(개별수신)
       const topic = `/rider/all`;

       // 보낼내용(type:delivery code:배송코드)
       const payload = JSON.stringify({
              type : 'delivery',
              code : deliverycode
            });
       // 3.qos(quality of service)
               const qos = 0;
               console.log('topic=>',topic);
               console.log('payload=>', payload);
               console.log('qos=>', qos);

               if(state.client !== null){
               // client에게 보냄(topic, paload, qos, error(혹시 에러나면 보낼 에러정보) )
              		 state.client.publish(topic, payload, qos, error => {
               			if(error){
                 			 alert('mqtt오류');
             				  }
       		  })};