[Vue.js] 매장용 MQTT
[매장용] MQTT 접속 코드 추가
| 관리자 topic |
|---|
| restaurant |
| 사용자(매장용계정) topic |
|---|
| restaurant/000-000-0001 |
| restaurant/000-000-0001 |
| restaurant/000-000-0001 |
구독 채널을 열어야 데이터를 받을 수 있음
- 로그인한 사용자의 topic
➡️const topic=`/restaurant/${state.userid}`- 관리자용 topic
➡️const topic=`/#/`
💡 관리자용 topic은 모든 사용자의 정보를 확인 할 수 있다
📁 fd_restaurant/src/components/restaurant/OrderPage.vue
const state = reactive({
            token : sessionStorage.getItem("TOKEN"),
            rows : [],
            menu : route.query.menu,

            host : '127.0.0.1', //mqtt broker 서버주소
            port : 1884, //포트번호 web은 1884 , app은 1883으로 설정해두었다
            options : {
                clean : true,  //세션초기화
                reconnectPeriod : 20000, //재접속시간
                clientId : 'web_cs_' + new Date().getTime(), //접속아이디 고유해야한다=> timestamp사용
                username : 'aaa', //아이디
                password : 'bbb', //비밀번호
            },
            // 접속했을때 정보 보관 변수
            client : null, //접속객체
        })
mqttSubscribe함수의 변수topic에서
`restaurant/사업자번호`를 알아야 하는데 Vue에서는 알 수 없다.
➡️ 백엔드에서 Vue가 사업자 번호 알수있게 토큰확인 서버 생성
📁 fd_restaurant/src/components/restaurant/OrderPage.vue
// 접속
        const mqttConnection = () => {
            const url = `ws://${state.host}:${state.port}`;
            try {
                state.client = mqtt.connect(url, state.options);

                state.client.on('connect',() => { //접속성공
                    console.log('connect success');
                });

                state.client.on('error', error => { // 접속오류
                console.log('connect error', error);
                });

                state.client.on('message',( topic, message ) => { // 메세지 가 왔을떄
                    console.log(`receive message ${topic} : ${message}`);
                    handleData();
                });

            } catch (e) {
                // 오류났을경우
                console.log('mqtt error', e)
            }
        };

        // 구독설정하기
        const mqttSubscribe = () => {
                // 접속이 잘 되어있는지 확인
                if(state.client !== null){
                    // const topic = `/#` //관리자용(모든사용자 확인가능)
                    const topic = `/restaurant/사업자번호`
                    console.log('topic=>',topic)

                    state.client.subscribe(topic, {qos:0}, (error, res) => {
                        if(error) {
                            alert('구독설정 실패');
                        }
                        console.log('subscribe success', res)
                    });
                }

        }
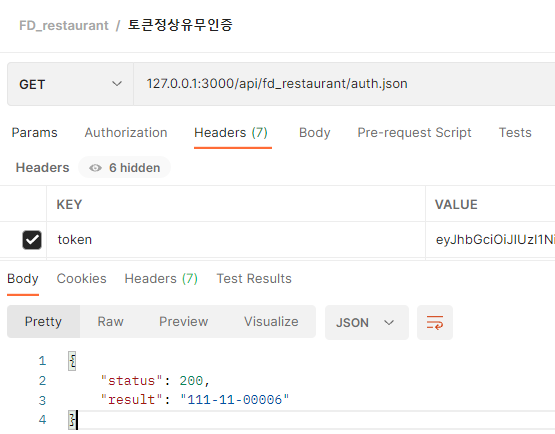
[Node.js] 토큰 인증서버 생성
토큰인증 후 매장 기본키 정보 반환 서버 생성
📁 exp_20220711/routes/food/fd_restaurant/auth.json
router.get("/auth.json", auth.checkToken, async function (req, res, next) {
  try {
    // 토큰 검증은 위의 auth.checkToken 에서 다 하고 오니까
        const fid = req.body.FID;
        const role = req.body.ROLE;

        if(role === 'RESTAURANT'){
          return res.send({ status: 200, result:fid });
        }
        return res.send({ status: 0 });
      } catch (e) {
    //오류 발생시
    console.error(e); // 백엔드에게 알려주는 부분
    return res.send({ status: -1, result: e }); //프론트에게 알려주는 부분
  }
});
[Vue.js] 토큰 인증서버 데이터 받기
[매장용] 토큰 인증서버 이용하여 로그인 사용자의 정보 받기
📁 fd_restaurant/src/stores/index.js 에 추가
state.return
➡️userid : '',추가하여 로그인 한 사용자의 아이디 정보를 받음getUserid에user.id추가 후 리턴getUserid(state) { return state.userid; }
mutations.setUserid에 변경될 변수값setUserid추가setUserid(state, value) { state.userid = value; },
actions에 함수handleAuth추가하여 토큰검증
➡️data.result는userid를 반환함
[Vue.js] 서버 - MQTT 연결
[매장용] 서버와 연결 / MQTT 구독 설정
📁 fd_restaurant/src/components/restaurant/OrderPage.vue
state에 백엔드에서 받아올userid값을 지정userid : computed(() => store.getters.getUserid),
mqttSubscribe함수
mqttSubscribe함수의 변수topic에 사용자번호가 들어갈 자리에 ➡️${state.userid}입력// 구독설정하기 const mqttSubscribe = () => { // 접속이 잘 되어있는지 확인 if(state.client !== null){ // const topic = `/#` //관리자용(모든사용자 확인가능) const topic = `/restaurant/${state.userid}` console.log('topic=>',topic) state.client.subscribe(topic, {qos:0}, (error, res) => { if(error) { alert('구독설정 실패'); } console.log('subscribe success', res) }); } }
onMounted에mqttSubscribe추가onMounted( async ( )=> { // 토큰의 유효성 검사 = actions의 handleAuth호출하기 await store.dispatch('handleAuth'); mqttConnection(); // broker에 접속하기 mqttSubscribe(); // 구독설정 ( 구독설정 되어있어야 데이터 받을 수 있음) handleData(); });
토큰검증시점은 고객이 주문시 토큰검증이 진행되는 것 보다
고객이 로그인할때 토큰확보와 동시에 토큰검증을 진행하는게 좋다store.dispatch('handleAuth');💡
Dispatch()
Vue컴포넌트는 Dispatch(‘[action메소드명]’)를 통해
Vuex store의 Action 그룹에 속한 메서드를 실행시킬 수 있습니다.
- 참고 : http://labs.brandi.co.kr/2018/12/13/kangww.html
// 토큰의 유효성 검사 = actions의 handleAuth호출하기
store.dispatch('handleAuth');
📁 fd_restaurant/src/components/restaurant/OrderPage.vue
state.client.on('message',( topic, message ) => { // 메세지 가 왔을떄
	console.log(`receive message ${topic} : ${message}`);
	handleData();
                });
➡️ console.log출력이 안되면 topic이 안맞기 때문이다
[Node.js] 배달서비스 ERD 설계
📁 exp_20220711/prj2.vuerd.json
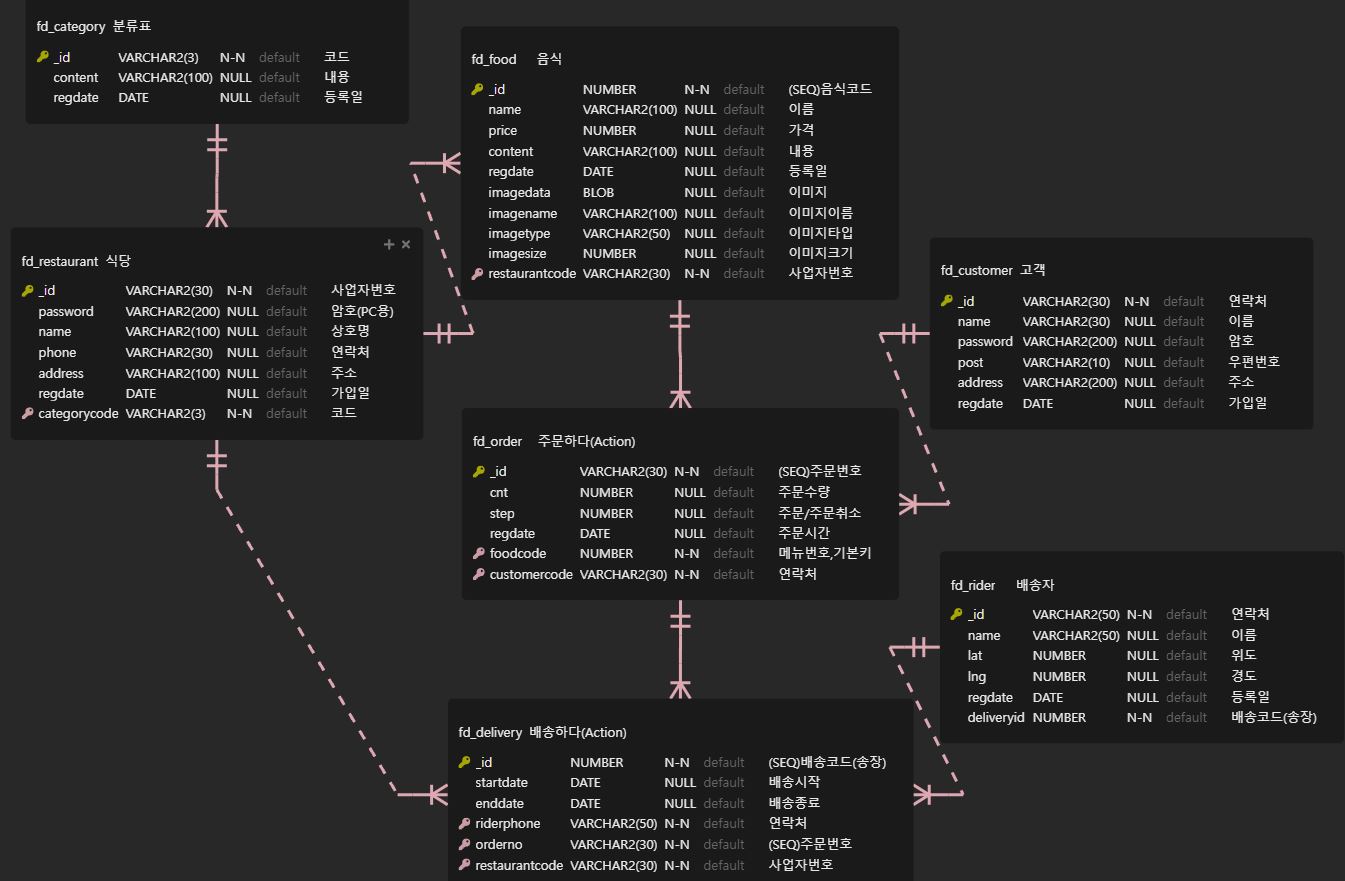
📁exp_20220711/model/fd_ridermodel.js + fd_deliverymodel.js 생성
📁exp_20220711/src/components/rider/
- RiderPage.vue
- RiderJoinPage.vue
- MapPage.vue 생성
📁exp_20220711/routes/index.js에 등록
📁exp_20220711/app.js에 등록
[Vue.js] 배달원 위치확인 서비스
- 카카오 개발자 서비스 > 지도서비스
https://developers.kakao.com/- 위도정보 찾기사이트
https://www.geoplaner.com/
카카오 개발자 지도서비스 이용하기
- 카카오개발자 로그인
- 내 애플리케이션 > 추가 생성
- Web 플랫폼 등록
웹 위치에 대한 플랫폼 >http://localhost:8081도메인 등록
- 💡 도메인 등록이유
➡️ 키를 뺏기거나 유출된 상황에서 타인이 사용불가 하도록
나에게 등록된 도메인만 사용가능하다
카카오 우편번호 검색 서비스와 같은방식으로 입력
script.setAttribute에 스크립트 입력시
중간에autoload=false&입력해준다
📈 축적단계
	const options = {
		center : position,
		level : 5
	}
스크립트 입력전후에 console.log('s', window ); 확인해보면
스크립트 입력 전에는window에kakao탭이 없다가
스크립트 입력 후에는 확인이 가능한것을 알 수 있다
💡 공식 메뉴얼에는 윈도우에 대한 내용은 없다! 본인이 찾아넣어야 함!
➡️ 결제시스템도 비슷한 방식으로 진행되니
스크립트 변형하여 넣는 방법을 많이 사용해보고 탐구해보기
            console.log('s', window );
            const script = document.createElement("script");

            script.setAttribute("src", "//dapi.kakao.com/v2/maps/sdk.js?autoload=false&appkey=e8b7464478bbf21766bb6460feded968");
            document.head.appendChild(script);
            console.log('e', window );
📁exp_20220711/src/components/rider/RiderPage.vue
<template>
    <div v-if="state.rows">
        <h3>배달원정보</h3>
        <!-- {{state}} -->
        {{rows._id}}
        {{rows.name}}

        <hr />
        <div id="map" style="width:500px;height:400px; border:1px solid #cccccc"></div>
    </div>
</template>

<script>
import { onMounted, reactive, toRefs } from '@vue/runtime-core'
import { useRoute } from 'vue-router'
import axios from 'axios';

export default {
    setup () {
        const route = useRoute();

        const state = reactive({
            rows : null,
            id : route.query._id
        });

        onMounted( async()=> {
            await handleData();

            console.log('s', window );
            const script = document.createElement("script");

            script.setAttribute("src", "//dapi.kakao.com/v2/maps/sdk.js?autoload=false&appkey=e8b7464478bbf21766bb6460feded968");
            document.head.appendChild(script);
            console.log('e', window );
            script.onload = () => window.kakao.maps.load(initMap);
        });

        const initMap = () => {
        const div = document.getElementById("map");
        const position = new window.kakao.maps.LatLng( state.rows.lat, state.rows.lng )
        const options = {
            center : position,
            level : 5
        }
        const map = new window.kakao.maps.Map(div, options);
        new window.kakao.maps.Marker({
            map : map,
            position : position
        })};

        const handleData = async() => {
            const url = `/api/fd_rider/selectone.json?_id=${state.id}`;
            const headers = {"Content-Type":"application/json"};

            const {data} = await axios.get(url, {headers});
            console.log(data);
            if(data.status === 200) {
                state.rows = data.result;
            }
        };

        return {
            state,
            ...toRefs(state),
            handleData,
        }
    }
};
</script>