[Node.js] 실시간 주문확인
XMPP / MQTT
🌎 http web
➡️ 버튼을 누르거나 이벤트 발생 = 데이터 요청 시점
프론트에서 사용자 요청시에 데이터 처리 하고 결과 반환
반드시 어떠한 요청을 거쳐야만 데이터 처리과정이 발생함
🔌 socket TCP /IP
온라인게임 등에서 이용
➡️ 사용자가 요청하지 않아도 데이터가 들어옴
🔌 websocket
socket과 원리는 같은데 안드로이드에서 사용불가
웹 화면 전용이며 web채팅 등에서 사용된다
- XMPP ➡️ 라인, 카카오톡 등 채팅서비스에서 사용
- MQTT ➡️ 페이스북, 배민, 배달대행 등에서 사용
( MQTT는 android, 웹 모두 호환가능함 )- MQTT는 사용자가 많으면 서버를 여러개 구축해야 한다!
서버 하나에 몇천명밖에 수용못함
💡 여러개 서버 연결 =브릿지통해서 서버n개를 연결- 각 버전별로 사용하는 언어가 다름
(c버전은 c언어로,java버전은 java로node.js버전은 node.js로 사용 가능 )
QoS (Quality of Service)
데이터의 안정성, 데이터가 도달하는 수준
- qos의 우선순위가 높을수록 전송 데이터 안정화, 데이터 도달수준이 높아지지만 부하가 심해지며 비용도 많이든다
0(전송)= 채팅에서 사용
1(전송 3~4회)
2(전송을 받을때까지 계속전송)= 퀄리티가 높음
[ 한국/부산/부산진구/연락처 ]
- (배달자1)
topic=>한국/부산/부산진구/010-0000-0001 - (배달자2)
topic=>한국/부산/부산진구/010-0000-0011 - (배달자3)
topic=>한국/부산/부산진구/010-0000-0001 - (배달자4)
topic=>한국/부산/부산진구/010-0000-0001
publish= 🙋♀️발행자 ( ex. 식당이 부산진구라고 가정하면 )
- topic 설정
=> 한국/부산/부산진구/#(연락처)로 할경우
➡️ topic 1, 2 만 접근가능- topic 설정 =>
한국/부산/부산진구/로 할경우
➡️ topic 4명 다 접근가능
subscribe= 🙆구독자 ( ex. 배달자 )
- 구독하고싶은 채널을 열어야함 =
topic- 큰범위(ex. 한국)부터 작은범위(ex. 부산진구)까지 설정하는게 일반적
MQTT 브로커 (Aedes) 설치
고객주문시 매장에서 실시간 화면갱신
(node.js버전으로 구현실습)
MQTT 서버와MQTT 브로커의 차이점?
MQTT 브로커는 클라이언트로부터 모든 메시지를 수신한 다음 메시지를 적절한 대상 클라이언트로 라우팅하는 서버MQTT 클라이언트는MQTT 라이브러리를 실행하고 네트워크를 통해MQTT 브로커에 연결하는 모든 장치 (마이크로 컨트롤러에서 본격적인 서버까지)
🛠️ MQTT 브로커(Adeds) 설치
CMD> npm i aedes --save서버 실행 후 routes 생성
📁 exp_20220711/routes/food/fd_broker.js
// CMD > npm i aedes --save
// 인증 설정하기 (id = aaa, pw = bbb)
// 아이디와 암호만 입력 => 암호는 16진수 byte배열로 바꿔져서 옴(보안때문)
// bit(0,1) => byte(01001010101101010101001010101101)
// 서버를 알아도 아이디, 암호로 인증이 안되면 데이터 수신이 불가함
const aedes = require('aedes')({
    // 1. 인증하기
    authenticate : (client, username, password, callback) => {
        // byte배열로 된 암호를 문자열로 변경해줘야함
        var pw = Buffer.from(password);
        callback(null, (username==='aaa' && pw.toString()==='bbb'));
    },

    // 2. 전송가능
    authorizePublish:(client, packet, callback) => {
        callback(null, packet);
    },

    // 3. 수신가능
    authorizeSubscribe:(client, packet, callback) => {
        callback(null, packet);
    }
});
🛠️ 서버 중지 후 웹소켓 설치
cmd npm i websocket-stream --save서버 실행 후 라우트 (WEB, APP서버생성)
📁 exp_20220711/routes/food/fd_broker.js
// 1884나 1883 똑같이 보여준다
// WEB과 APP의 접속경로만 다름
// 서버생성(WEB)
// WEB은 1884로 접속
const httpserver = require('http').createServer();
const ws = require('websocket-stream');
ws.createServer({server:httpserver}, aedes.handle);
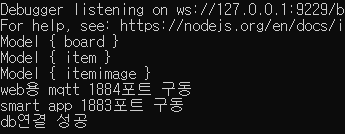
httpserver.listen(1884, function(){
console.log('web용 mqtt 1884포트 구동');
});
// 서버생성(APP)
const tcpServer = require('net').createServer(aedes.handle);
tcpServer.listen(1883, function(){
console.log('smart app 1883포트 구동');
});
📁 exp_20220711/App.js에 등록
➡️ url 사용 안해도 됨! require만 사용
// REST가 아닌 broker
// 추가만 해주면 동작함
require('./routes/food/fd_broker');
💻 결과
📁 exp_20220711/routes/food/fd_broker.js
//모니터링 용
aedes.on('client', function(client){
    console.log(`${client.id} 접속함`);
});

aedes.on('clientDisconnect', function(client){
    console.log(`${client.id} 나감`);
});
[Vue.js] 고객용 주문 페이지
📁 fd_customer/src/stores/index.js
"TOKEN" ➡️ "TOKEN1" 로 변경
모바일용 페이지네이션 (버튼형, 데이터 누적)
CONCAT 함수는 여러 범위 및/또는 문자열의 텍스트를 결합
➡️ 합치기 + handlenext 버튼클릭하면 데이터 누적
📁 fd_customer/src/components/RestaurantPage.vue
const handleData = async() => {
const url = `/api/fd_restaurant/selectcategory.json?cate=${state.cate}&page=${state.page}`;
const headers = { "Content-Type" : "application/json" }
const { data } = await axios.get(url, {headers});
console.log(data);
if(data.status === 200){
// 데이터 누적
// [] + [{},{},{}] => 12
state.rows = state.rows.concat(data.rows);
}
};
const handleNext = () => {
state.page++;
handleData();
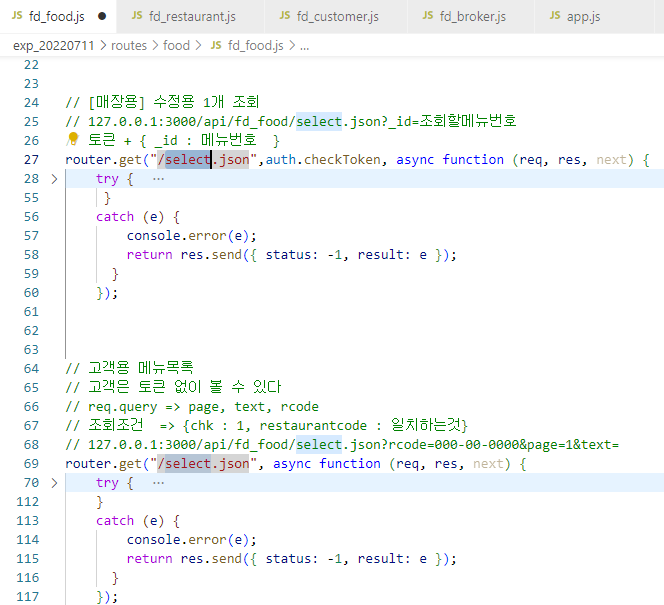
};🤯 페이지 구현중 토큰없음 오류
📁 exp_20220711/routes/fd_food.js 에
같은 주소로 생성된 서버가 있었다
➡️ 같은 주소가 존재하면 먼저 적힌 주소만 실행됨
params로 페이지 이동시 번호 보내기
- foodpage.vue ➡️ orderpage.vue 이동시
handleorder()이용하여 데이터 보낼때query말고params이용하기param은path로 못감
💡 routes/index.js 에서name등록해주고 사용
📁 fd_customer/src/routes/index.js
{path:'/order', name : 'OrderPage', component:OrderPage}📁 fd_customer/src/components/FoodPage.vue
handleorder() 에서 router.push 쓸 때 param 사용
router.push({ name : 'OrderPage', params : { rcode : state.rcode, menu : menu, cnt : 1 }})📁 fd_customer/src/components/orderpage.vue에서
변수 받을때 params로 받기
const state = reactive({
rcode : route.params.rcode,
menu : Number(route.params.menu),
cnt : Number(route.params.cnt),
token : sessionStorage.getItem("TOKEN1")
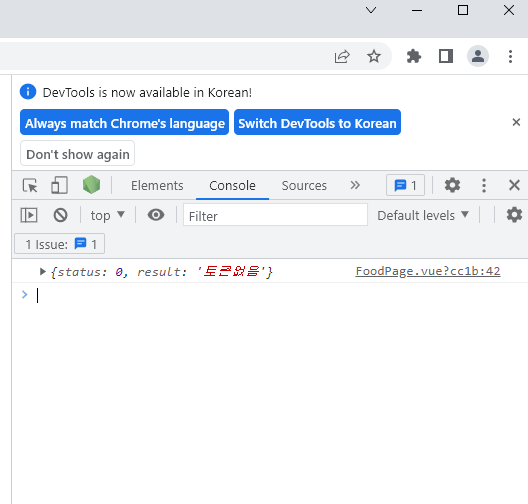
});🤯 params로 넘긴 번호를 받지 못함
body에서 foodcode로 menu를 보냈는데 데이터를 받지 못한다..
쿼리로 줬는데도 foodpage => orderpage 로 번호를 못 넘김 ㅜ
foodpage => handleOrder에서 키값을 memu로 잘못 줌😓그러니안가지
router.push({name:'OrderPage', query : { rcode : state.rcode, memu : menu, }});확인해보니 orderpage에서 url의 키캆도 memu로 되어있었다
오타 수정 후에도 페이지를 다시 로딩해도 바뀌지 않아 서버중지 후 재실행
🙆 url도 수정이 되었고, 수정한 state.menu값도 잘 들어와있었다
[Node.js/Vue.js] 실시간 주문확인
실시간으로 식당으로 주문완료를 전송하도록 구현
MQTT 클라이언트 설치
고객용 Vue
🛠️ MQTT 클라이언트 설치 후 실행
npm i precompiled-mqtt --save서버 실행 후
📁 fd_customer/src/components/orderpage.vue const.state에 코드 추가
	const state = reactive({
		rcode : route.query.rcode,
		menu  : Number(route.query.menu),
		cnt   : 0,
		token : sessionStorage.getItem("TOKEN1"),

		host  	: '127.0.0.1', //mqtt broker 서버주소
		port	: 1884, //포트번호 web은 1884 , app은 1883으로 설정해두었다
		options : {
			clean 	: true,  //세션초기화
			reconnectPeriod : 20000, //재접속시간
			clientId : 'web_cs_' + new Date().getTime(), //접속아이디는 고유해야함 => timestamp사용
			username : 'aaa', //아이디
			password : 'bbb', //비밀번호
		},
		// 접속했을때 정보 보관 변수
		client 	 : null, //접속객체
	});
고객용 orderpage에 데이터전송 코드 작성 완료
매장용에서 데이터 수신 확인
매장용 Vue
🛠️ MQTT 클라이언트 설치 후 서버 실행
cmd > npm i precompiled-mqtt --save
[매장용] 주문내역확인 서버 생성
- 기존에 존재하는 고객용 주문내역 조회 서버에
else if(role === 'RESTAURANT')추가하여 매장 주문내역 확인가능- 주문내용엔 식당내용이 없다
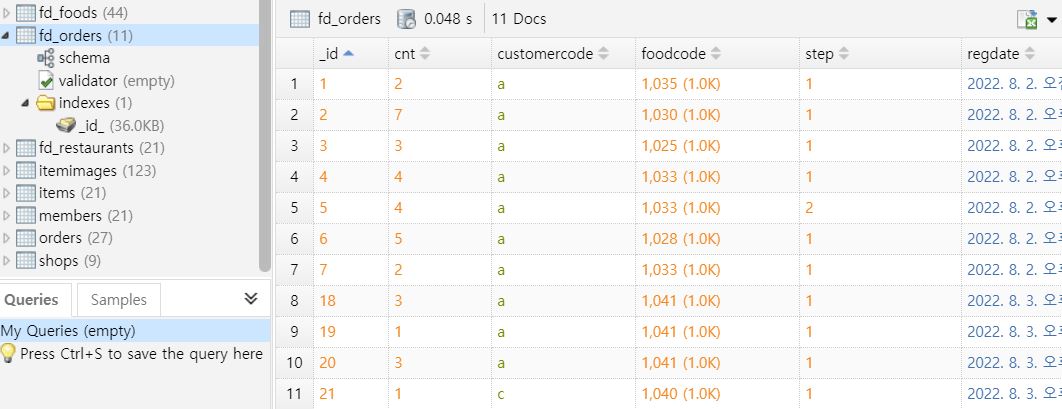
➡️ DB > fd_orders 에서는 메뉴코드밖에 안보임
정보 가져오기
💡 만약 로그인한 사용자의 권한이
RESTAURANT이라면
TOKEN이용해서fd_restaurant의_id(사용자ID,PK)와
fd_food의restaurantcode(사용자ID,FK)와 일치하는 모든 메뉴 가져오기- 가져온 모든 메뉴의
_id(음식코드,PK)정보를 이용하여
fd_order의_id(주문번호,PK)와result._id일치하는 내역만fd_orderDB에서 찾기- 일치하는 데이터
fd_orderDB에서 모두 가져오기
fd_food의 데이터는 배열 형태로 온다 = [ { }, { }, { } ... , { } ]
➡️ 반복문 이용하여 원하는 데이터만 배열로 가져오기// arr = 위에서 찾은 메뉴번호들 // $in = 일치항목조회 const query1 = { foodcode : {$in : arr } };
- 최신주문건이 상단에 오게 정렬
const result1 = await Order.find(query1).sort({regdate:-1});
📁 exp_20220711/routes/food/fd_order.js
// 주문내역확인 (고객용/식당용 else if 사용)
// 토큰 필요
// 127.0.0.1:3000/api/fd_order/select.json
router.get("/select.json", auth.checkToken, async function (req, res, next) {
try {
// 주문한 고객아이디 또는 주문한 매장아이디
const customerID = req.body.FID;
const restaurantID = req.body.FID;
// 고객의 권한확인
const role = req.body.ROLE
// 로그인한 사용자의 권한이 '고객'일 경우
if(role === 'CUSTOMER'){
// '고객'과 일치하는 주문내역 찾기위한 조건
const query = {
customercode : customerID,
};
const result = await Order.find(query).sort({regdate : 1});
console.log('result=>', result); // 주문 DB중 고객'a'가 주문한거
if(result !== null){
// 주문내역 반복
// 주문내역의 foodcode정보를 이용하여 일치하는 Food정보 모두 가져오기
let arr = [];
for(let tmp of result){
const query1 = { _id : tmp.foodcode }; //result의 _id(주문번호)를 tmp.foodcode에 넣기
const project1 = { imagedata : 0, imagename:0, imagetype:0, imagesize:0 };
const result1 = await Food.findOne(query1).select(project1);
console.log('tmp=>', tmp);
console.log('result1=>', result1);
// { order : 모든주문결과, food : 음식1가지 } 의 반복
// 주문된 음식정보와 일치하는 주문결과만 가져와야 함
arr.push({ order : tmp, food : result1 })
}
return res.send({status : 200 , result : arr})
}
}
// 로그인한 사용자의 권한이 '매장(식당)'일 경우
else if(role === 'RESTAURANT'){
// 1. 토큰을 이용해서 식당기본키 정보가 일치하는 모든 메뉴 가져오기
const query = { restaurancode : restaurantID };
const project = {_id : 1, name : 1}
const result = await Food.find(query).select(project).sort({name : 1});
console.log(result);
// [{}, {}, {}... {}] => {}
if(result !== null){
// 등록한 음식 내역 반복
// 가져온 모든 메뉴의 _id(음식코드,기본키)정보를 이용하여
// Order DB정보 내의 foodcode = result._id인 주문내역 찾아 Order에서 모두 가져오기
let arr = [];
for(let tmp of result){
arr.push(tmp._id);
}
// 2. 가져온 메뉴에 해당하는 번호만 주문내역에서 조회
// arr = 위에서 찾은 메뉴번호들
// $in = 일치항목조회
const query1 = { foodcode : {$in : arr } };
// 최신주문건이 상단에 위치하도록 정렬
const result1 = await Order.find(query1).sort({regdate:-1});
console.log('result1=>', result1);
if(result1 !== null){
return res.send( { status : 200, rows : result1 } )
}
}
}
return res.send({ status: 0})
}
catch (e) {
console.error(e);
return res.send({ status: -1, result: e });
}
});[Vue.js] 매장용 주문내역 확인 페이지
📁 fd_restaurant/src/components/restaurant/OrderPage.vue
<template>
    <div class="box">
        <h3>주문확인페이지</h3>

        <hr />

        <table border="1">
            <thead>
                <tr>
                    <th>주문번호</th>
                    <th>주문메뉴</th>
                    <th>주문수량</th>
                    <th>주문시간</th>
                    <th>주문자정보</th>
                    <th>주문상태(정상:1,취소:2)</th>
                </tr>
            </thead>
            <tbody v-for="tmp of rows" :key="tmp">
                <tr>
                    <td>{{tmp._id}}</td>
                    <td>{{tmp.foodcode}}</td>
                    <td>{{tmp.cnt}}</td>
                    <td>{{tmp.regdate}}</td>
                    <td>{{tmp.customercode}}</td>
                    <td>{{tmp.step}}</td>
                </tr>
            </tbody>
        </table>
    </div>
</template>

<script>
import { onMounted, reactive, toRefs } from '@vue/runtime-core'
import axios from 'axios';
export default {
    setup () {
        const state = reactive({
            token : sessionStorage.getItem("TOKEN"),
            rows : [],
        })

        onMounted(()=>{
            handleData();
        });

        const handleData = async() => {
            const url = `/api/fd_order/select.json`;
            const headers = {
                "Content-Type":"application/json",
                "token" : state.token
                };
            const { data } = await axios.get(url, {headers});
            console.log(data);
            if(data.status === 200){
                state.rows = data.rows
            }
        };

        return { state, ...toRefs(state) }
    }
}
</script>

<style lang="css" scoped>
.box{
    width: 800px;
    border: 5px double skyblue;
    padding: auto;
    margin: auto;
}

.lbl {
    display: inline-block;
    width:100px
}

</style>