Table Views란 무엇인가?
관련 공식문서를 읽어보며 친해져보자!🤗
[ Developer] Table Views
[ Developer] Filling a Table with Data
Table Views 개념
1. Container Views 中 1 - Table Views
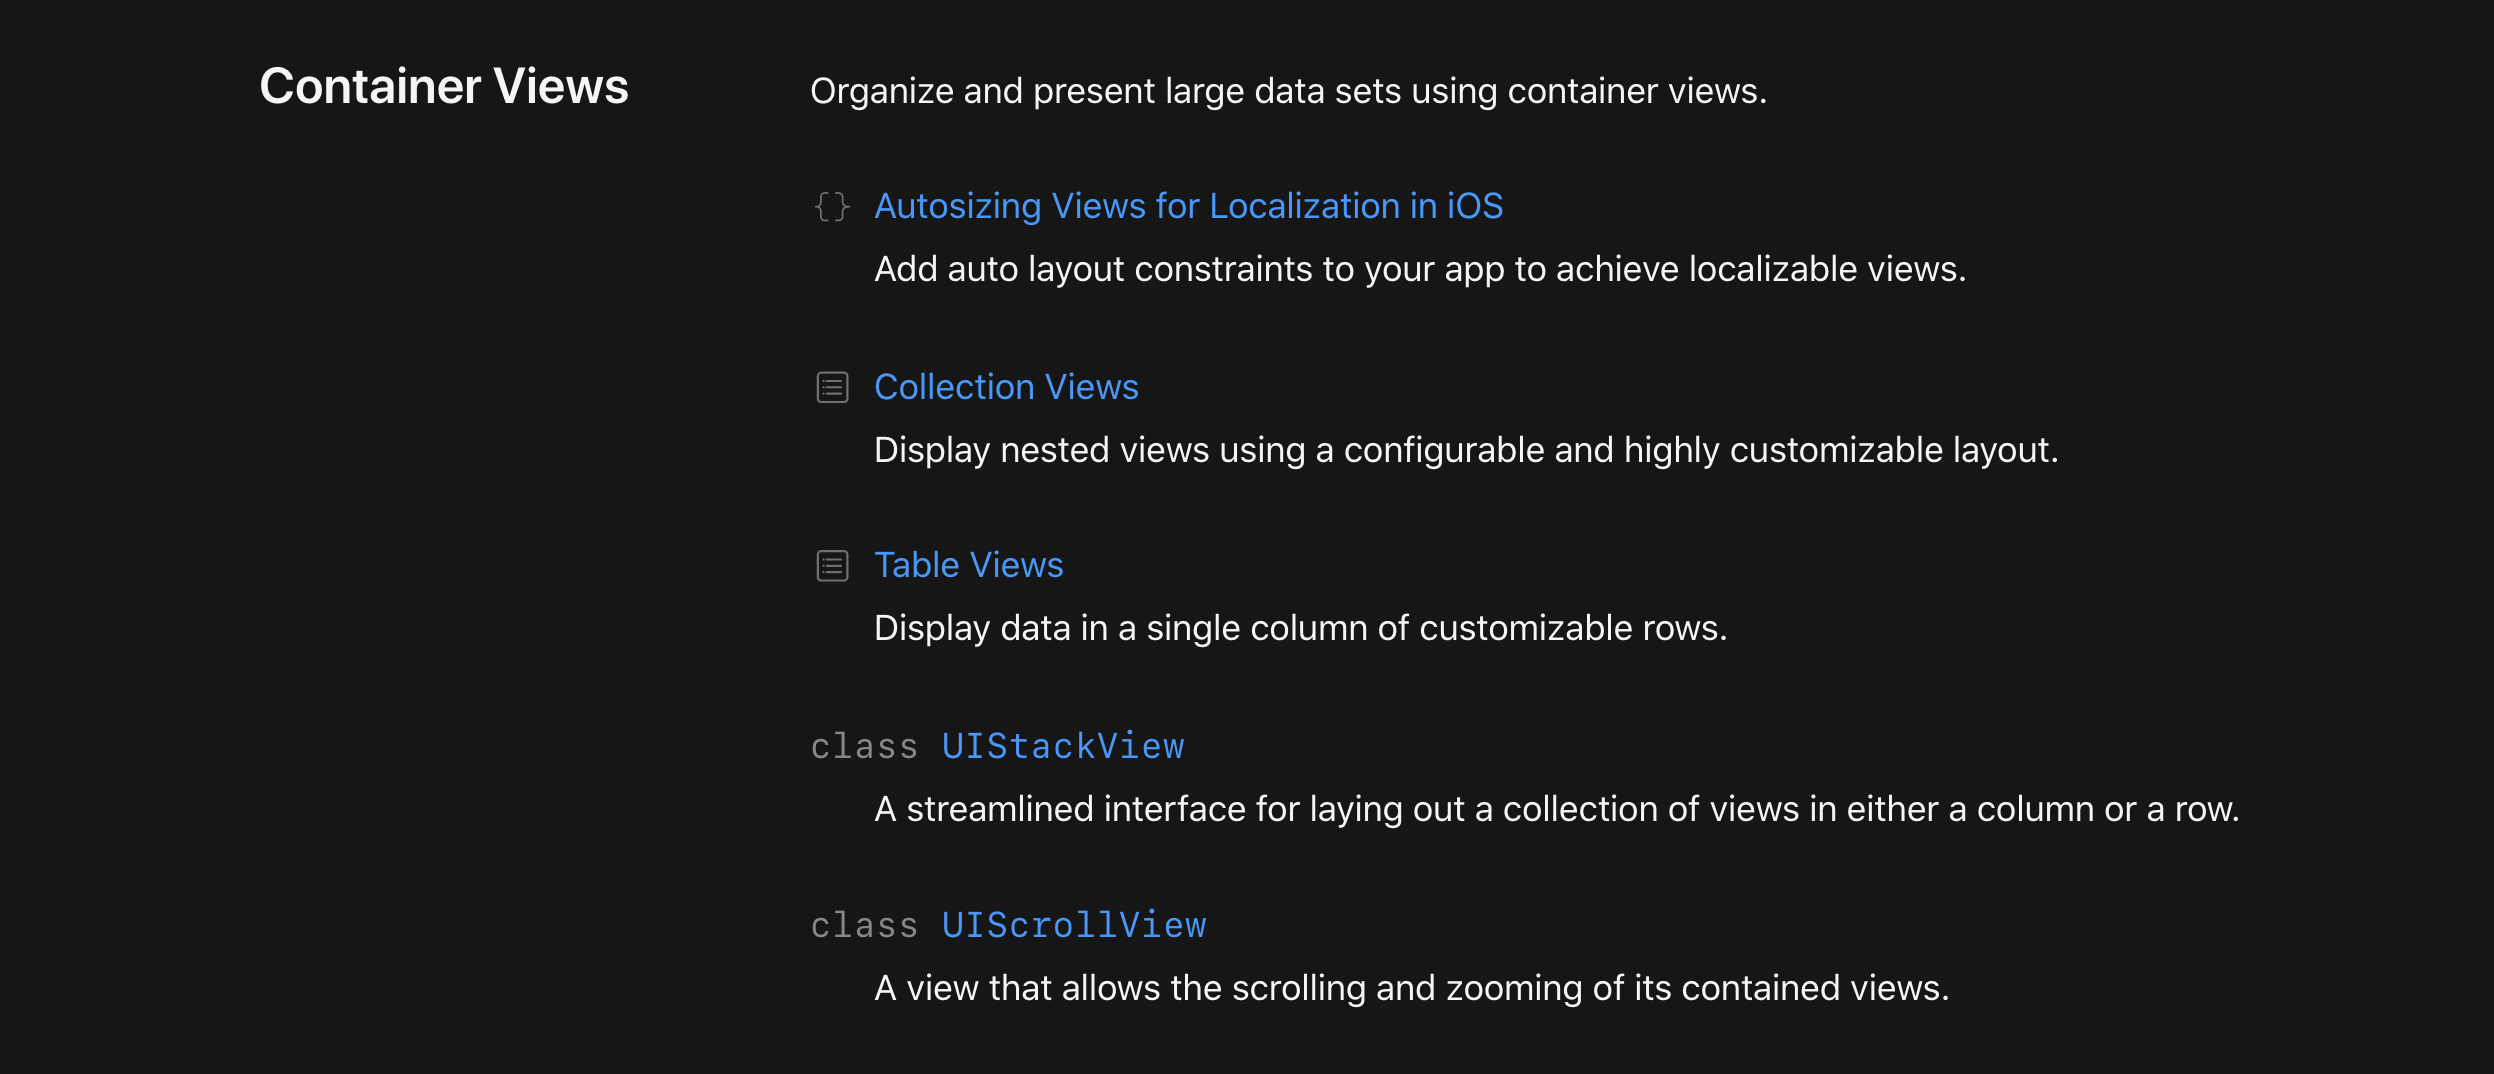
Table Views의 상위 개념은 Container Views이다.
Auto Layout에서 살펴본 UIStackView UIScrollView와 같은 분류이다.
여러 개의 View의 Set or Collection을 담고, 보여주고, 관리해주는 Container View의 일종이라고 이해했다. UIStackView UIScrollView와 같은 하나의 클래스는 아니고, UITableView UITableViewCell같은 클래스로 만들어지는 개념적인 것으로 이해하면 될 것 같다.
organize and present large data sets using container views.
container views를 큰 데이터 세트를 조직하고 보여주는데 사용하라고 한다.
2. Table View의 개념과 구성
Table, 한국어로 하면 "표"이다.
이름에서 유추 할 수 있듯이,
Container Views중에서도 Table View는 데이터를 표의 형식으로 조직하고 보여주고 싶을 때 사용하면 될 것 같다.
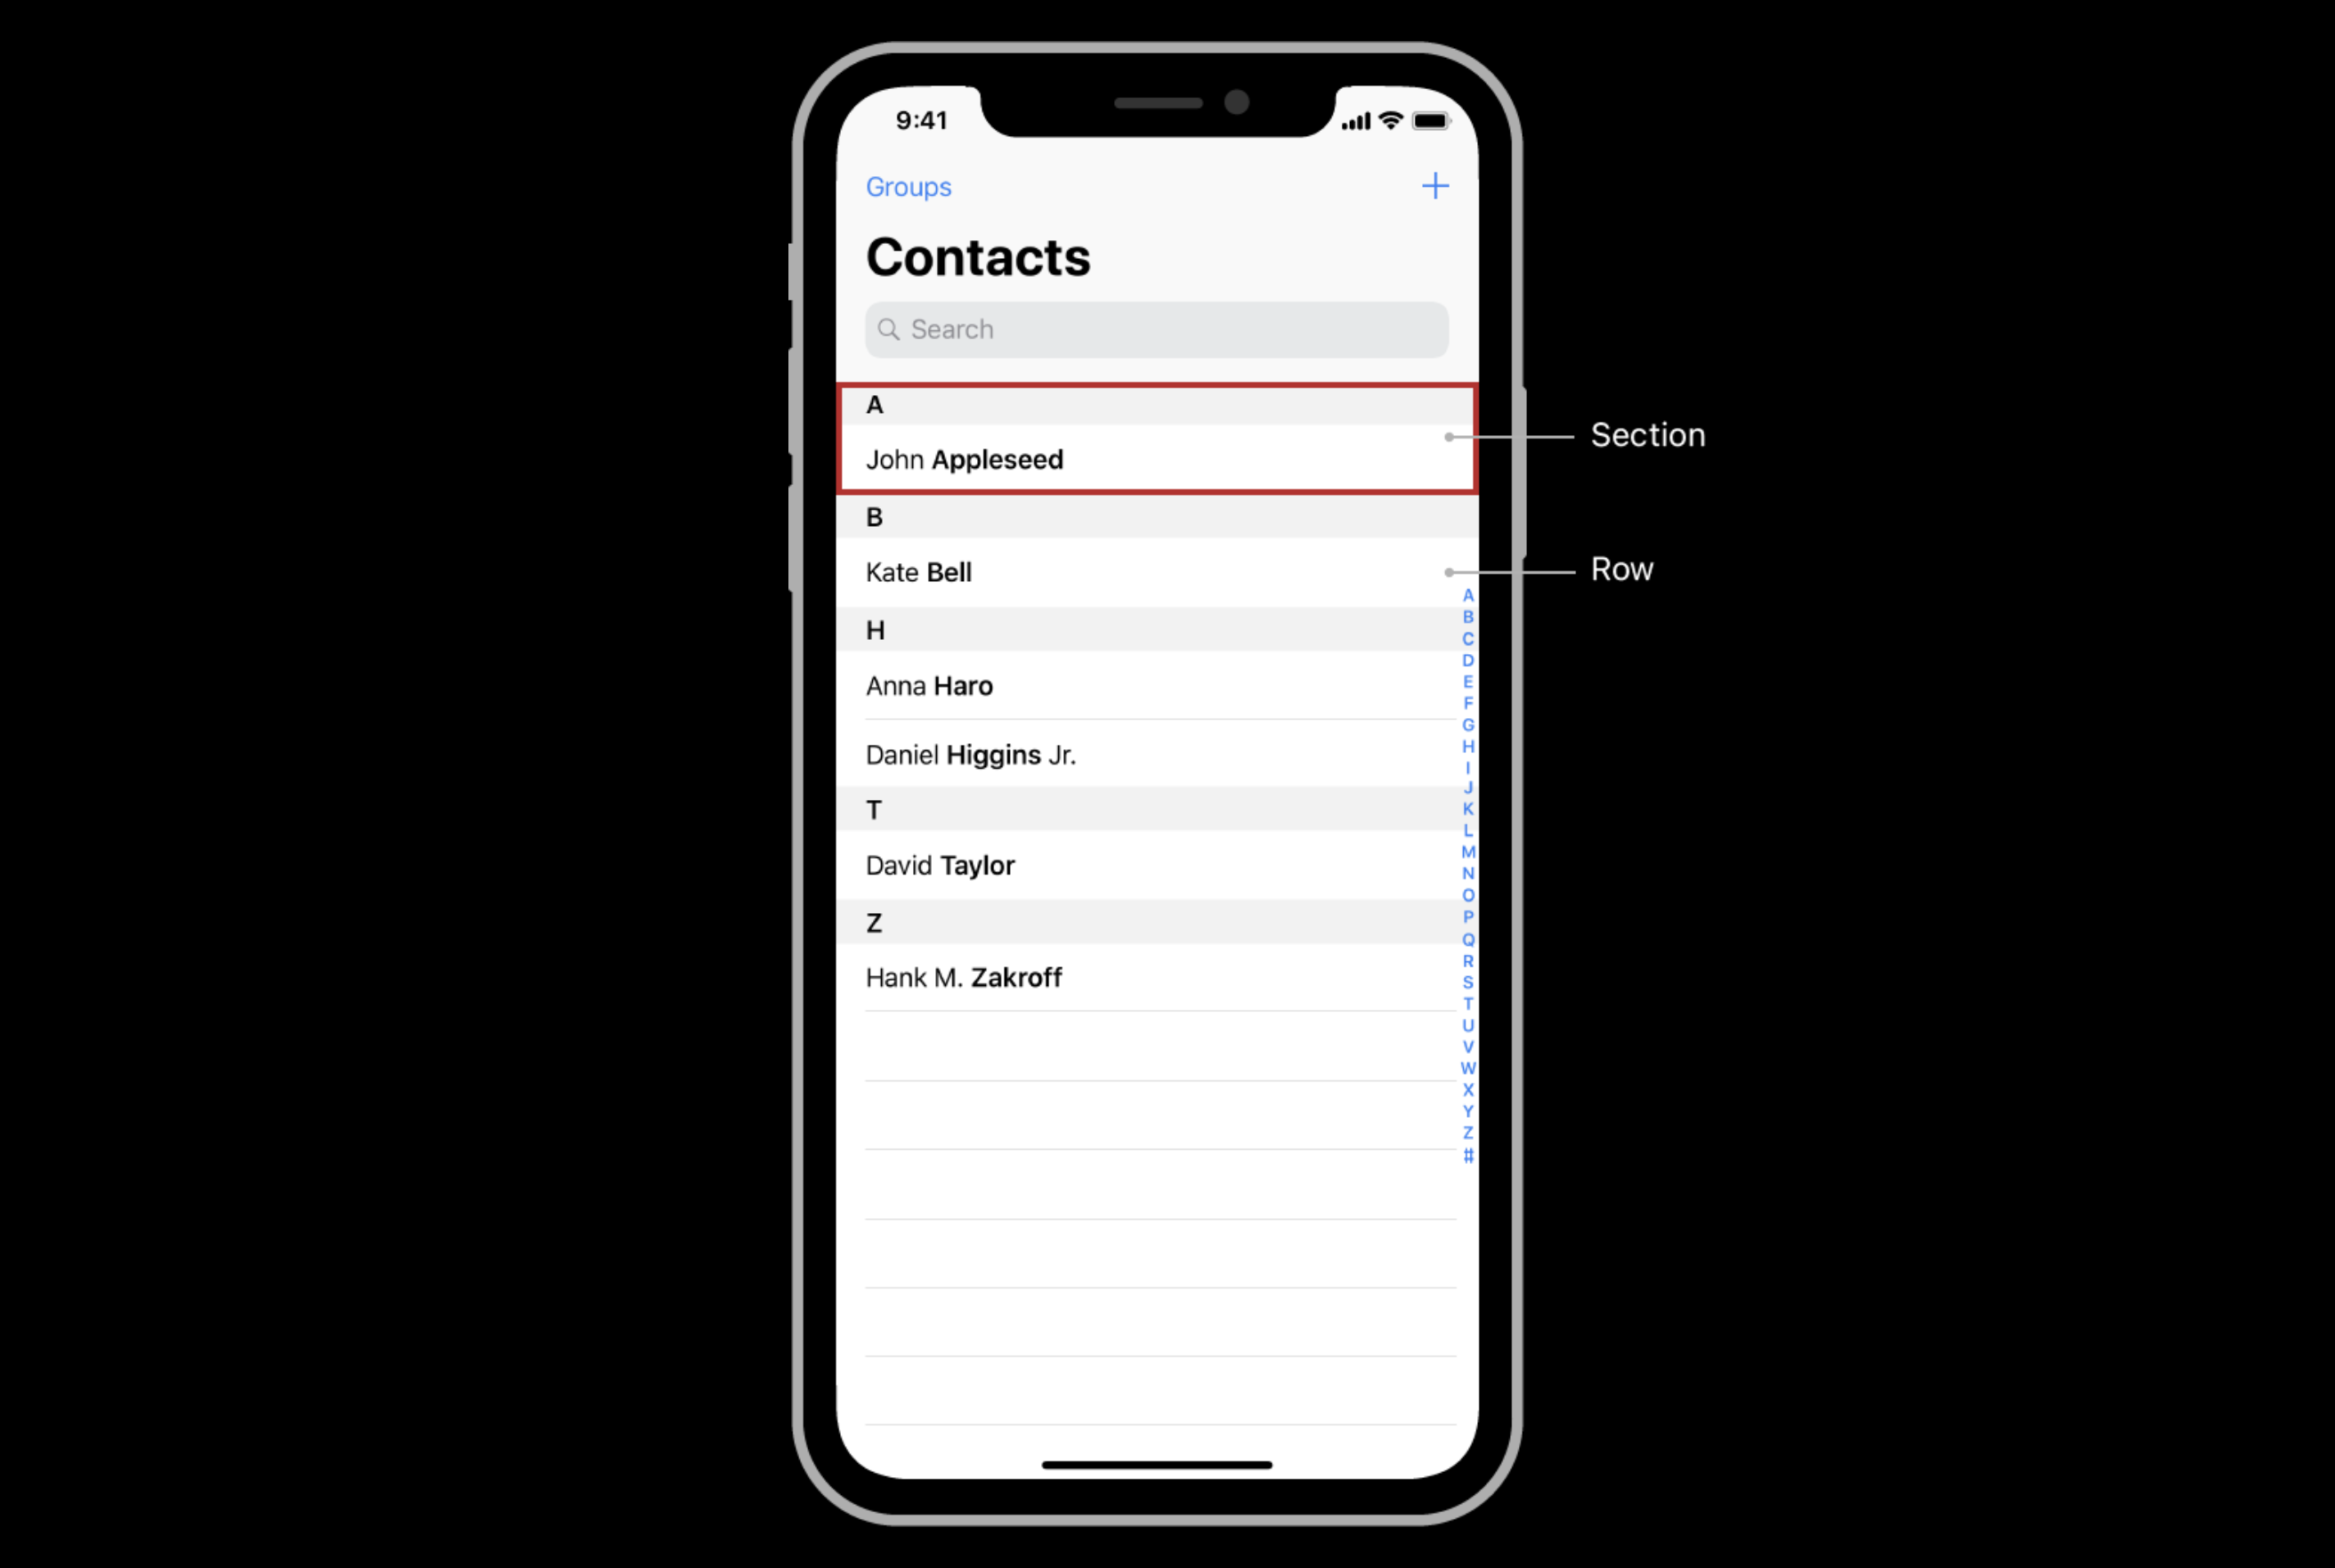
아이폰의 기본 앱중에서는 연락처가 table view를 활용하고 있고,
그 외에도 카카오톡의 친구 탭, 멜론의 재생목록도 table view로 만들어졌다고 생각해보았다.
Display data in a single column of customizable rows.
사용자화한 행들을 하나의 열로 데이터를 보여준다.
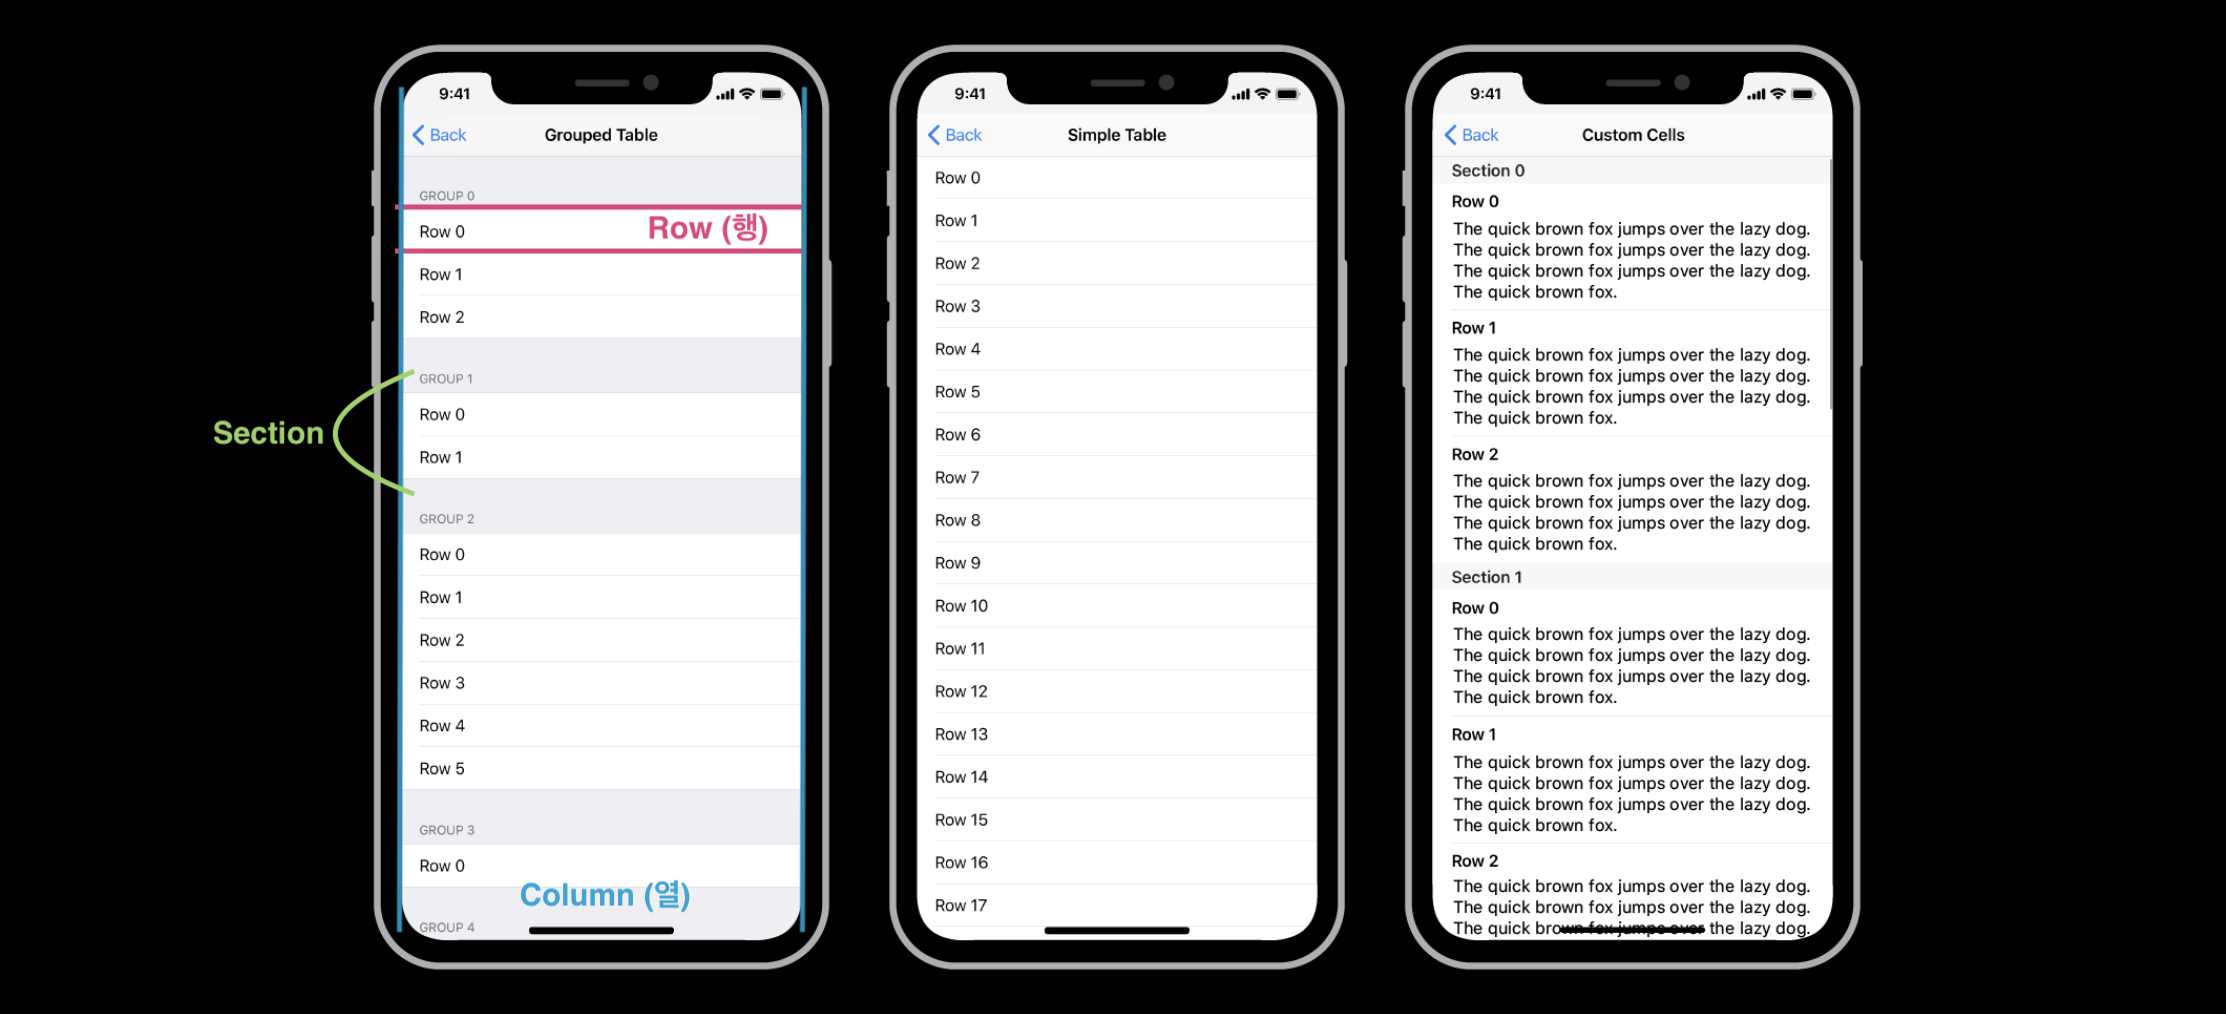
테이블뷰는 수직으로 스크롤되는 컨텐츠를 하나의 열로 보여주는데, row와 section으로 나누어 질 수 있다.
- row : single piece of information.
- section : 연관된 row를 하나의 group으로 묶은 것.
3. Collaboration
Table Views는 다른 객체들과 협력한다.
- Table View Controller
static table view를 관리하기 위해서UITaleViewController를 사용 - Cells
content의 visual representation을 제공UITableViewCell의 객체 - Data Source Object
테이블에 제공될 data source 객체는UITableViewDataSource프로토콜을 채택한다. - Delegate Object
Delegate객체는UITableViewDelegate프로토콜을 채택하며 테이블 뷰 컨텐츠에 대한 사용자 상호작용을 관리한다.
Filling a Table with Data
Create and configure cells for your table
dynamically using a data source object,
or
provide them statically from your storyboard.
table의 cells를 만들고 설계하는 방법엔 크게 두가지가 있다.
- data source object를 사용하여 다이나믹하게, 유동적으로 만드는 방법과
- 스토리보드로 정적으로 만드는 방법
Overview
table view는 data-driven elements이다.
UITableViewDataSource프로토콜을 준수하는 객체(data source object)를 사용해서, 앱의 데이터를 제공한다. table view는 스크린의 뷰를 정렬하고, 데이터를 최신으로 유지시키기위해 data source object와 상호작용한다.
table view는 rows와 sections로 데이터를 구성한다. row는 개별 data items을 보여주고, section은 연관된 rows를 묶어준다. section은 필수는 아니지만, data가 계층구조를 가지고 있다면 데이터를 구성하고 조직하는데 좋은 방법이다.
1. data source object로 dynamic하게 cell만드는 방법
1. Provide the Numbers of Rows and Sections _ numberOfSections ,tableView
table view가 스크린에 보여지기 이전에, table view는 우리에게 행과 섹션의 총 개수를 요구한다.
data source object는 행과 섹션의 총 개수에 대한 정보를 아래 두 메서드로 제공한다.
func numberOfSections(in tableView: UITableView) -> Int  // Optional
func tableView(_ tableView: UITableView, numberOfRowsInSection section: Int) -> Int
위 메서드들을 구현할 때 row와 section의 개수를 최대한 빠르게 얻어서 리턴할 수 있도록 해라. 그렇게 하려면 데이터를 조직화하는게 요구 될 것이다.
예를 들어서 테이블의 데이터를 관리하기 위해 array를 사용하는 것을 고려해보라. Array는 행과 섹션을 조직하기에 적절한 좋은 도구이다. 테이블 뷰의 자연스러운 조직과 잘 어울리기 때문이다.
아래 예제코드는 string을 하나의 row로, [string]을 하나의 section으로 보고 있다.
var hierarchicalData = [[String]]()

// section의 갯수
override func numberOfSections(in tableView: UITableView) -> Int {
   return hierarchicalData.count
}

// 특정 section의 row의 갯수
override func tableView(_ tableView: UITableView,
                        numberOfRowsInSection section: Int) -> Int {
   return hierarchicalData[section].count
}
행과 섹션의 갯수를 제공하는 메서드를 구현하기 전에,
선행되어야 할 것은 데이터를 조직화하는 것일 것 같다.
2. Define the Appearance of Rows _ UITableViewCell
스토리보드 파일에서 cell을 이용하면 table의 row의 모양을 정의 할 수 있다.
cell은 UITableViewCell object이다. 테이블의 row에대한 템플릿을 제공하는 역할을 한다.
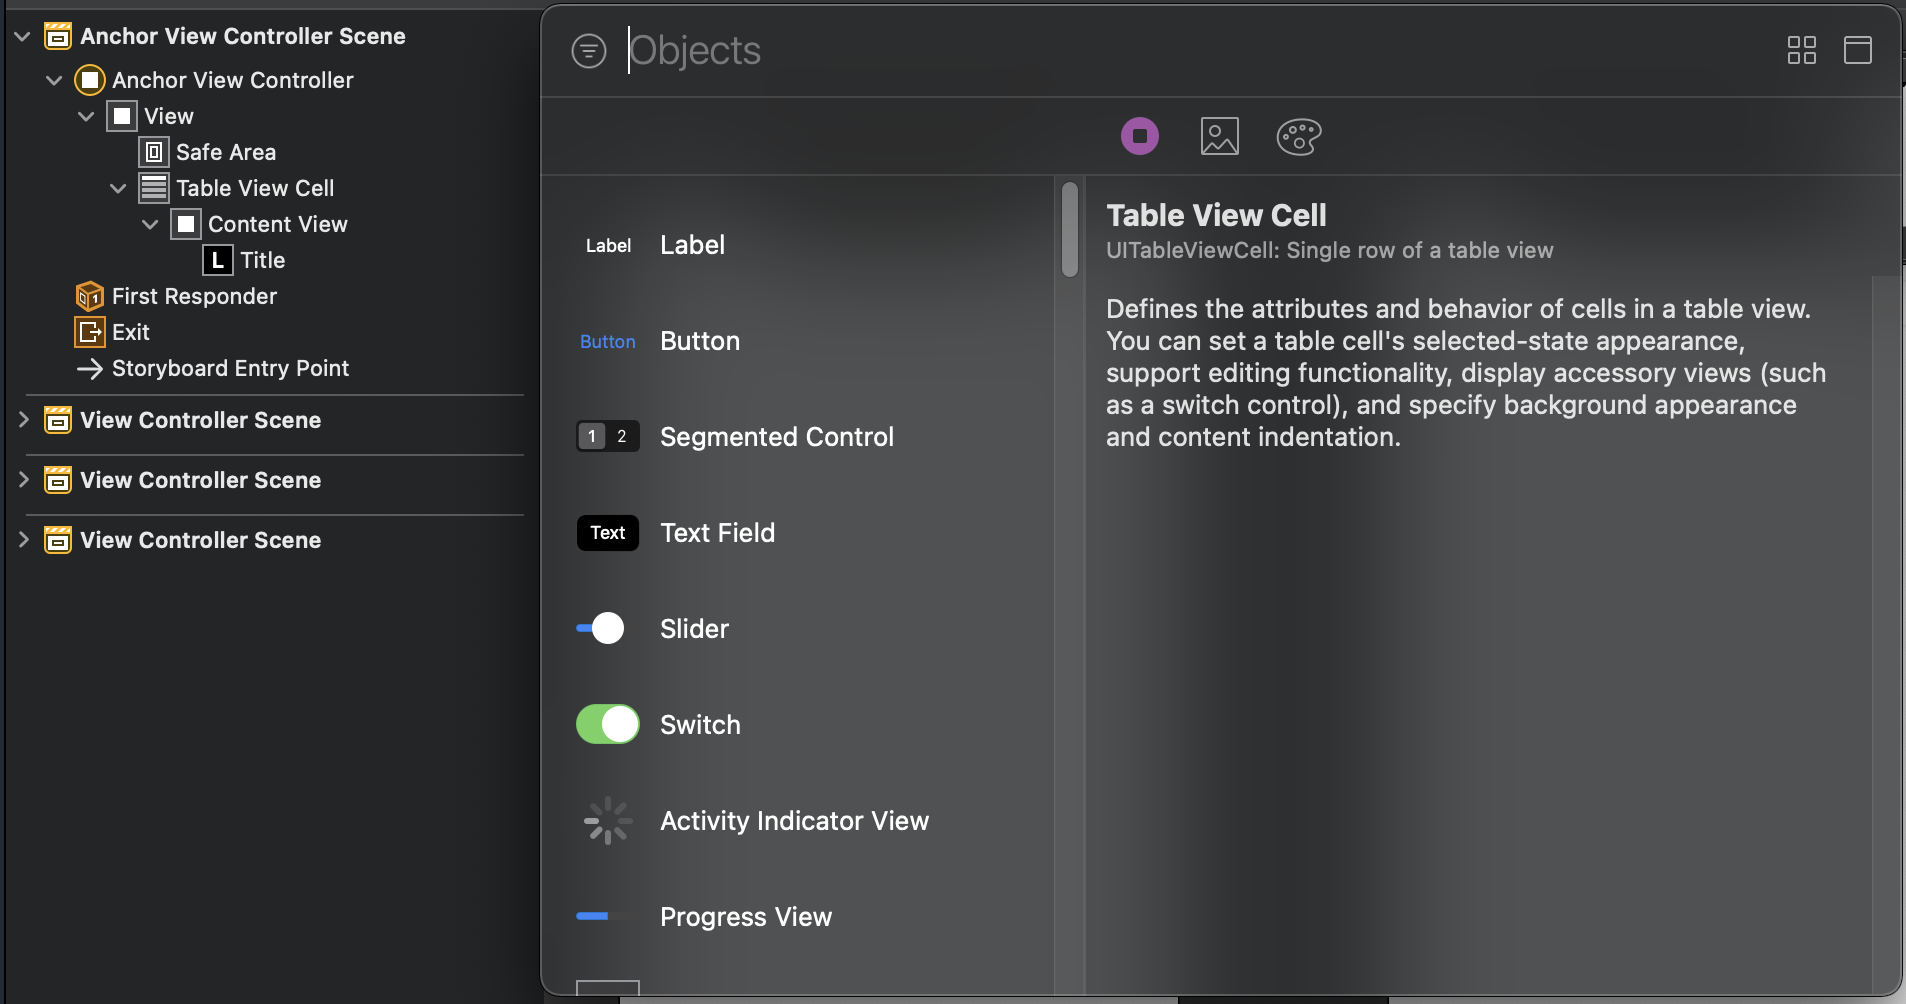
cell은 view이며, content를 보여주기위해 필요한 subview를 포함할 수 있다. content area에 label, image view, other view를 추가할 수 있고, view들을 constraint를 이용해서 정렬할 수도 있다.
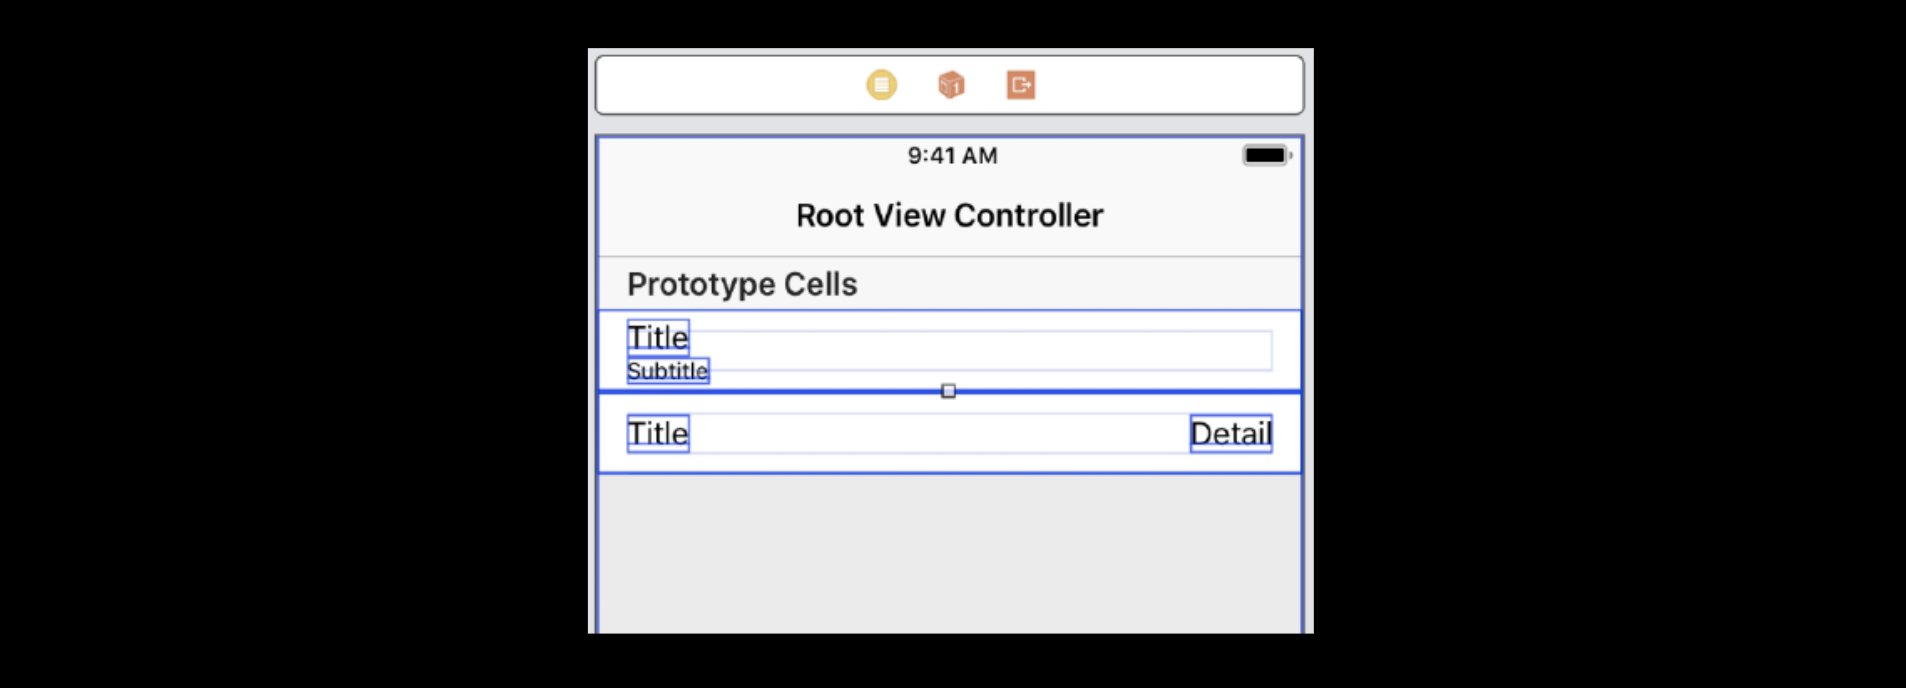
table view를 앱 인터페이스에 추가한다는 것은,
하나의 prototype cell을 설계하는 과정을 포함한다.
더 많은 prototype을 추가하려면, table view를 선택하고 prototype cell attribute를 업데이트 하면된다.
각 prototype cell에는 모양을 결정하는 style이 있는데
- UIKit이 제공하는 standard style을 선택하거나
- custom style을 정의할 수 있다. (custom cell이 됨)
스토리보드 파일에서, 각 prototype cell마다 아래 액션들을 수행하라.
-
Set the cell style to custom, or set it to one of the standard cell styles.
-
Assign a nonempty string to the cell's Identifier attribute.
(뒤에서 어떠한 cell로 row를 만들것인지 결정할 때 식별자로 call함) -
For custom cells, add views and constraints to the cell. (custom cell의 경우)
-
Specify the class of custom cells in the Identity inspector. (custom cell의 경우)
custom view로 cell을 만들 때, view를 관리하기 위해 UITableViewCell의 subclass로 정의하세요.
In your subclass, add outlets for the custom views that display your app’s data, and connect those outlets to the actual views in your storyboard file. You’ll need these outlets to configure the cell at runtime. (IBOutlet을 의미하는 것 같다.)
3. Create and Configure Cells for Each Row
table view가 스크린에 나타나기 전에, data source object에게 row를 만들 cell을 제공하라고 요청한다.
data source object의 tableView(_:cellForRowAt:)메서드가 빠르게 응답하며 UITableViewCell객체를 리턴하게 된다.
즉, tableView(_:cellForRowAt:) 메서드에 cell을 만들기 위한 액션들을 정의해주면 된다. 메서드를 구현하기 위해선 아래의 패턴을 따르면 된다.
-
Call the table view's
dequeueReusableCell(withIdentifier:for:)method to retrieve a cell object.
위 2번에서 정의해둔 style의 cell 객체를 Identifier로 불러와서cell에 할당한다. -
Configure the cell's views with your app's custom data.
cell의 view를 앱의 데이터를 가지고 채워넣는다. -
Return the cell to the table view.
cell을 리턴한다.
override func tableView(_ tableView: UITableView,
                        cellForRowAt indexPath: IndexPath) -> UITableViewCell {
   // Ask for a cell of the appropriate type.
   let cell = tableView.dequeueReusableCell(withIdentifier: "basicStyleCell", for: indexPath)

   // Configure the cell’s contents with the row and section number.
   // The Basic cell style guarantees a label view is present in textLabel.
   cell.textLabel!.text = "Row \(indexPath.row)"
   return cell
}
standard cell style을 사용할 땐, UITableViewCell이 각 style의 view에 대한 property를 포함하고 있기 때문에 (ex.textLabel) 그냥 접근해서 쓰면 된다.
반면, custom cell을 사용할 땐, 위에서 정의해둔 outlet으로 접근하고 디자인하면 된다.
table view는 table의 row에 대한 모든 cell만들지 않는다. 대신 table view는 cell을 lazy하게 만든다. 오직 사용자 눈에 보이는 table 영역에 대한 cell만 만들도록 요청한다. 이러한 방법은 table이 사용하는 메모리를 줄여준다.
즉, 스크롤로 보여지는 table의 영역은 빠르게 빠르게 변할 수 있다. 따라서 data source object는 cell을 빠르게 만들어야한다. tableView(_:cellForRowAt:)에서는 테이블의 데이터를 로드하거나 긴 작업을 수행하면 안된다.
4.Prefetch Data to Improve Performance
table view에서 스크롤링은 핵심이다!
따라서 테이블에 대한 데이터를 fetch(가지고 오는)데 많은 비용과 시간이 든다면, UITableViewDataSourcePrefetching 프로토콜을 채택하는 prefetching data source object를 사용하세요. 그럼 스크롤과 비동기적으로 데이터를 로드해 옵니다.
2. Storyboard로 정적으로 만드는 방법
Specify Data Statically in the Storyboard
table의 content가 절대로 변하지 않을 때 static table을 활용할 수 있다.
storyboard fiel에서 table의 데이터를 모두 명시해주고, data source object는 쓰지 않는다.
스토리보드로 static table 만드는 방법
-
Add a UITableViewController object to your storyboard.
-
Select the table view controller's table view.
-
Change the table view's Content attribute (in the Attributes inspector) to Static Cells.
-
Specify the number of sections for your table using the table view's Sections attribute.
-
Set the Row attribute of each section to the number of rows you want.
-
Configure each cell with the views and content you want.
Table views with static data require a UITableViewController object to manage that data.
UITableViewController와 data source object를 혼용해서 쓰는 건 프로그래머의 오류임!!