Core Data
오프라인 사용을 위한 앱의 영구 데이터를 저장, 임시 데이터 캐시 등의 동작을 수행
단일 iCloud 계정의 여러 장치에서 데이터 동기화를 할 수 있도록 자동으로 스키마를 CloudKit 컨테이너에 미러링 해줍니다.
1. Core Data Stack
Core Data를 사용하기 위해서는 Core Data Stack을 설정해 주어야 한다.
Core Data Stack이 뭐냐면...
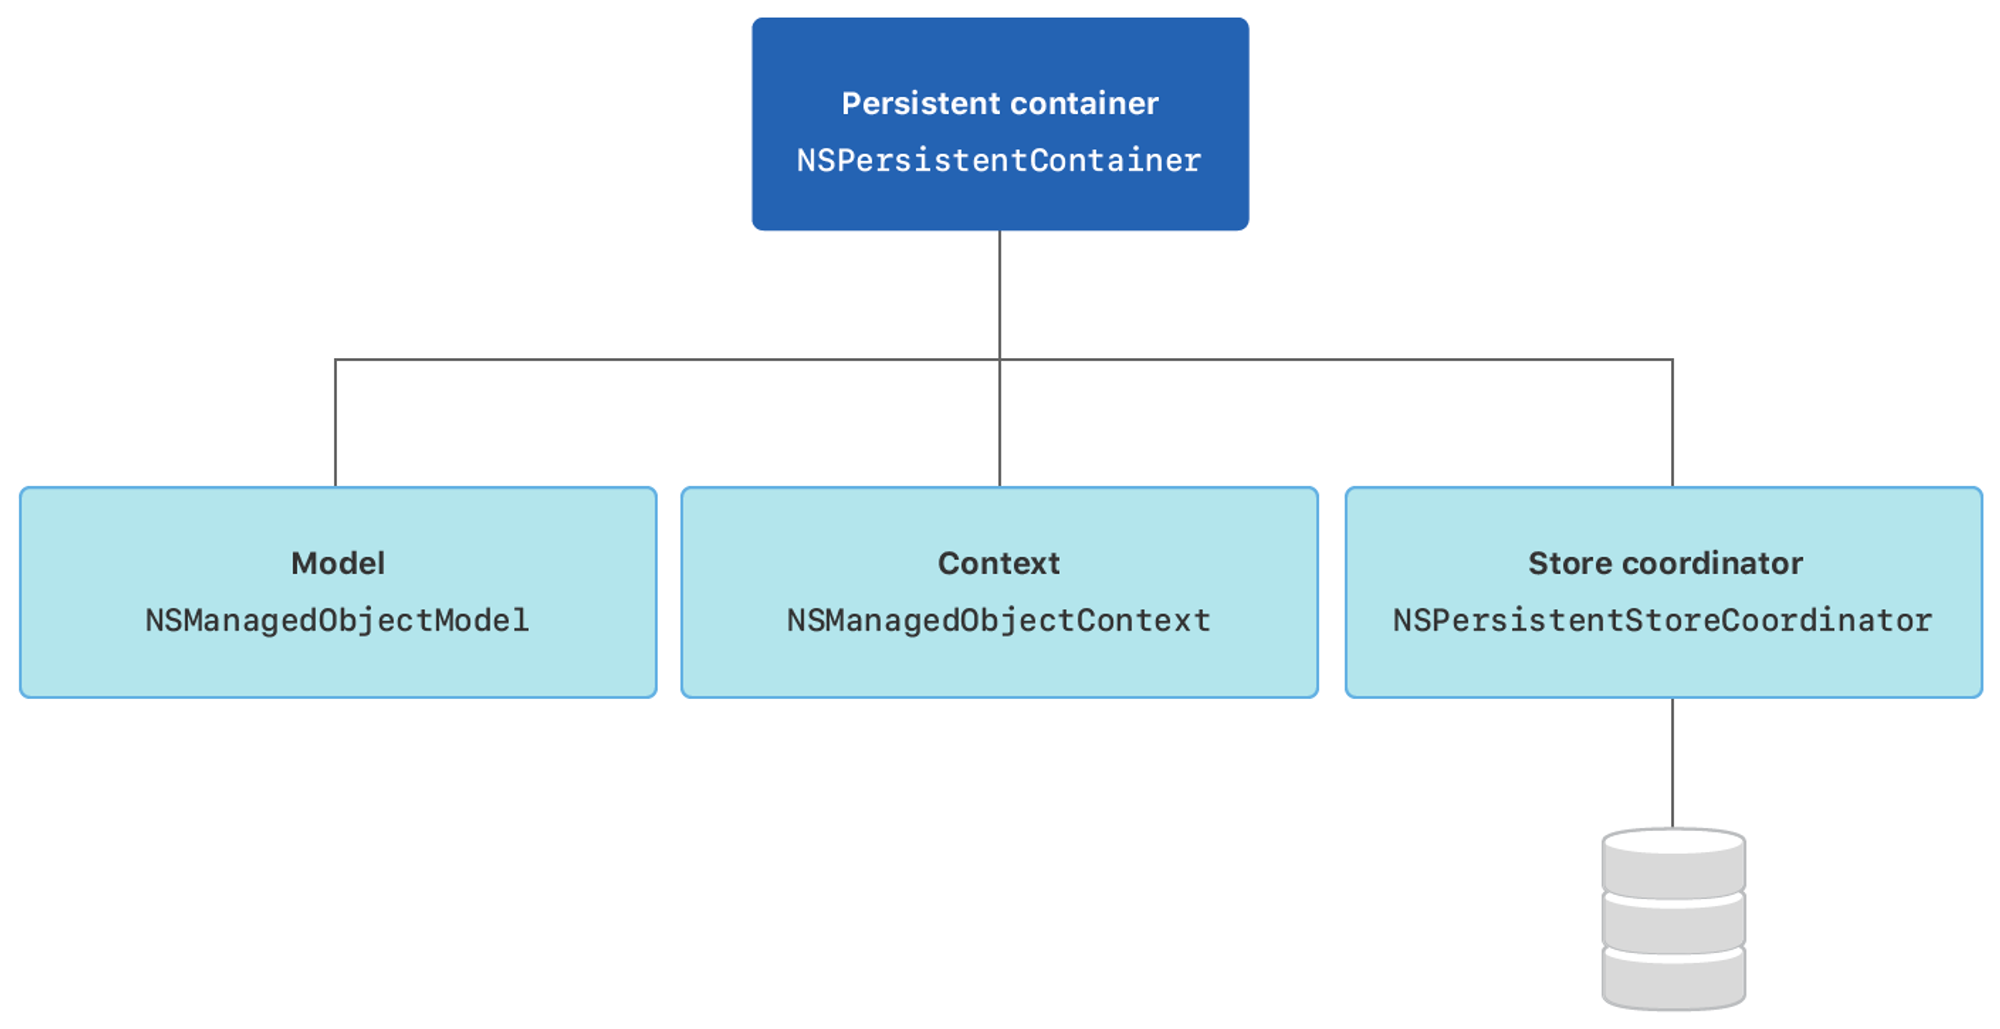
Core Data Stack=Core Data Framework의 핵심 구성 요소들의 집합- Managed Object Model(
NSManagedObjectModel) : 앱의 데이터 모델을 정의하는 객체,Entity와 그들의 속성을 정의 -> 데이터 모델들은 DB Schema에 해당함. - Managed Object Context (
NSManagedObjectContext) : 앱의 데이터를 가져오거나 수정하는 데 사용되는 객체. 주로 메모리에서 데이터를 관리하며 DB와 상호작용함 - Persistent Store Coordinator(
NMPersistentStoreCoordinator) : 영구 저장소를 관리하고 DB와의 통신을 담당하는 객체. SQLite, XML, Binary 등 다양한 DB 유형과의 연결을 관리 - Persistent Store(
NSPersistentStore) : 실제로 데이터를 영구적으로 저장하는데 사용되는 DB파일이나 다른 형태의 저장소
- Managed Object Model(
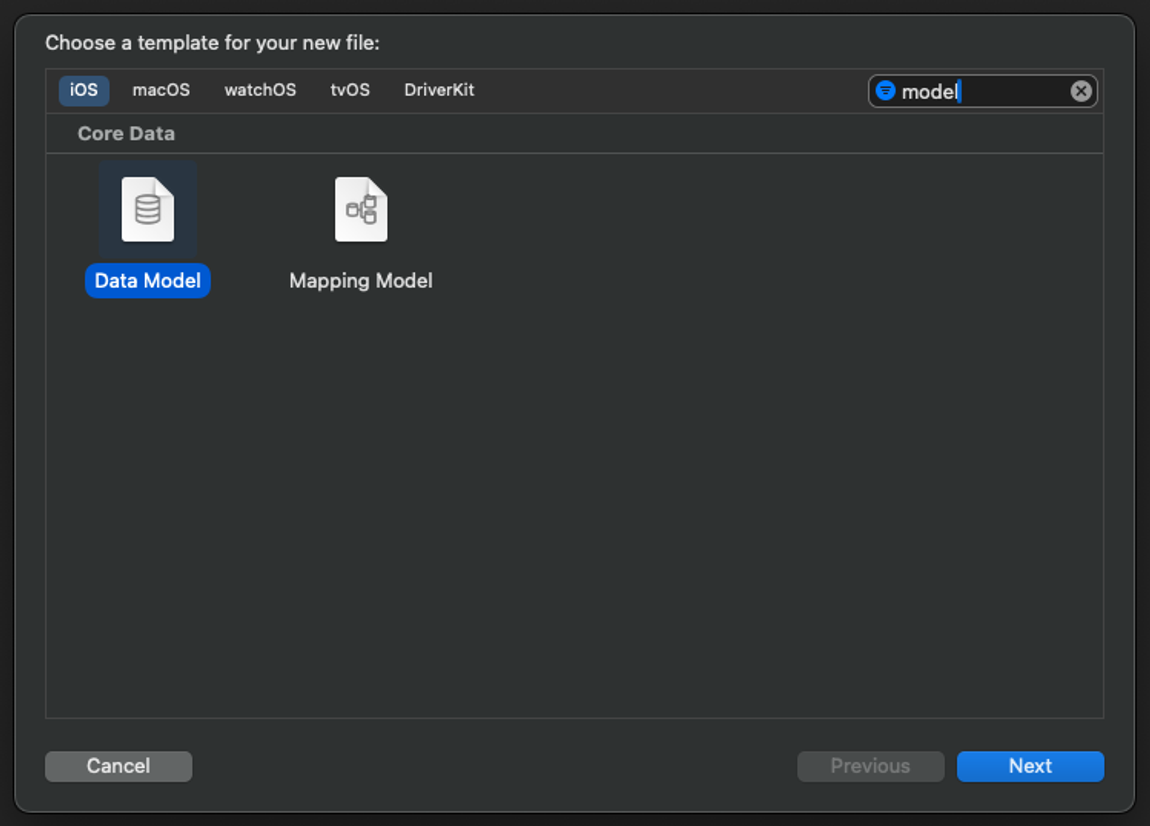
Core Data Stack 설정
- Data Model 형식의 새로운 swift 파일을 만들어줘야 합니다.
AppDelegate.swift파일에서Core Data Stack을 설정합니다.
import CoreData

lazy var persistentContainer: NSPersistentContainer = {
	let container = NSPersistentContainer(name: /* 생성한 DataModel.swift */)
    container.loadPersistentStores(completionHandler: { (storeDescription, error) in
    	if let error = error as NSError? {
        	fatalError("Unresolved error \(error), \(error.userInfo)")
        }
    })
    return container
}()

func saveContext() {
	let context = persistentContainer.viewContext
    if context.hasChanges {
    	do {
        	try context.save()
        } catch {
        	let nserror = error as NSError
            fatalError("Unresolved error \(error), \(error.userInfo)")
        }
    }
}
2. Data Model 파일 구성하기 (데이터 모델링)
Entity
데이터 모델 내에서 객체의 유형을 정의, 해당 객체들이 갖는 속성
- 추가하기 :
Data Model형식의 파일에서 Xcode 창 하단에Add Entity버튼을 눌러Entity를 추가한 후 적절한 이름으로 변경합니다. - 주요 속성
Abstract Entity: 추상적인 엔티티로 해당 엔티티를 설정함, 상속을 통해 확장되며 공통 특성을 가진 여러 엔티티를 효율적으로 관리하는데 사용됨Concrete Entity: DB에 실제적으로 저장되는 엔티티의 형태Parent Entity: 유사한 엔티티가 여럿 있다면, 부모 엔티티를 만들어 상속이 가능함.Class Name: 엔티티의 인스턴스를 만들 때 사용할 클래스 이름, 기본적으로 엔티티의 이름을 가지고 있음Module: 엔티티 클래스가 있는 모듈, 기본적으로Core Data는 전역 네임스페이스에서 클래스 파일을 찾음
Attribute
DB의 column, attribute와 비슷한 개념, 엔티티의 속성
- 추가하기 : 엔티티를 선택한 상태에서 편집기 영역 하단의
Add Attribute버튼을 눌러 추가. - 주요 속성
Attribute Type:Attribute의 데이터 타입을 결정Optional: 해당Attribute의 필수 속성을 선택할 수 있음Validation: 해당Attribute의 유효성 검사 옵션을 지정할 수 있음.Default Value: 데이터가 생성되는 시점에, 해당Attribute의 기본 값을 의미
Relationship
두 개 이상의 엔티티를 정의한 다음에, 추가할 수 있는 엔티티 간의 관계를 의미
- 추가하기 : 엔티티를 선택한 상태에서,
Relationship섹션의 + 버튼을 누르면 새로운Relationship을 생성할 수 있음. - 주요 속성
Optional:Relationship의 필수 속성을 선택할 수 있음Destination: 관계를 설정할 대상 엔티티를 선택Delete Rule:Core Data가 원본 인스턴스를 삭제할 때, 변경 내용이Relationship간에 전파되는 방식을 지정No Action: 원본 인스턴스를 삭제하지만, 수동 업데이트하는 모든 객체 인스턴스 대상으로 해당 객체에 대한 참조를 남겨둠.Nullify: 참조를nil로 설정Cascade: 객체를 연쇄적으로 삭제Deny: 아무Destination을 가리키지 않는 경우에만 원본 객체를 삭제
Type:Relatinoship을 1:1 혹은 1:n 으로 지정할 지 선택.
접근하기
import CoreData

class ViewController: UIViewController {

	// AppDelegate에서 설정한 Core  Data stack에 접근
    var persistentContainer: NSPersistentContainer? {
        (UIApplication.shared.delegate as? AppDelegate)?.persistentContainer
    }

    func createData() {
    	// Core Data stack을 캡슐화한 컨테이너
        guard let context = persistentContainer?.viewContext else { return }

        let newCar = Car(context: context)

        newCar.id = UUID()
        newCar.name = "benz"

        try? context.save()
    }

    func readData() {

        guard let context = persistentContainer?.viewContext else { return }

        let request = Car.fetchRequest() // 비동기적으로 실행되는 fetch request 메소드
        // fetch 메소드는 괄호 안의 조건에 맞는 자료를 리턴해준다.
        let cars = try? context.fetch(request)

        print(cars)
    }

    func updateData() {
        guard let context = persistentContainer?.viewContext else { return }

        let request = Car.fetchRequest()

        guard let cars = try? context.fetch(request) else { return }

        let filteredCars = cars.filter({ $0.name == "benz" })

        for car in filteredCars {
            car.name = "tesla"
        }

        try? context.save()
    }

    func deleteData() {
        guard let context = persistentContainer?.viewContext else { return }

        let request = Car.fetchRequest()

        guard let cars = try? context.fetch(request) else { return }

        let filteredCars = cars.filter({ $0.name == "tesla" })

        for car in filteredCars {
            context.delete(car)
        }

        try? context.save()
    }
}
위의 코드 블럭에서 Core Data에 저장된 Car라는 엔티티에 접근해서 자료를 만들고(Create), 읽고(Read), 갱신하고(Update), 삭제하는(Delete) 방법을 알 수 있다.

iOS 개발자가 되고 싶어요