📕STOMP
이번에는 stomp 프로토콜을 사용해 채팅을 구현해보도록 하자. 자세한 내용은 spring doc 에 나와있습니다.
📗개요
STOMP란? Simple Text Oriented Messaged Protocol 말 그대로 텍스트 지향 프로토콜이다. STOMP는 텍스트 지향 프로토콜 이지만 페이로드는 텍스트 이거나 바이너리 일 수 있는 점..
또한 STOMP는 pub/sub 구조로 메시지를 공급받는 쪽 [pub] 과 메시지를 소비하는 쪽 [sub]이 분리되어 있으며
이 후에 개발할 서버가 broker 역할을 하게된다.
또한 STOMP는 HTTP를 모델로 하는 프레임 기반 프로토콜이다. 이 프레임에 대해 이해하면 이 후에 구현할 때 도움이 된다.
프레임은 다음과 같다.
COMMAND
header1:value1
header2:value2

Body^@
클라이언트는 메시지 내용[message]과 수신 대상[sub]을 설명하는 대상 헤더와 함께 SEND 또는 SUBSCRIBE 명령을 사용하여 메시지를 보내거나 구독할 수 있다.
다음으로 간단하게 client가 구독할 때 서버에 보내는 헤더 내용이다.
SUBSCRIBE
id:sub-1
destination:/topic/price.stock.*

^@
Command 로 SUBSCRIBE을 보내면서 destination 정보를 전달한다. destination은 브로커에게 자신이 수신할[sub] topic을 알려주는 정보라고 이해하면 쉽다. 이 후에 해당 topic으로 pub이 오면 해당 topic을 수신하고 있던 클라이언트 들에게 pub 메시지가 전송된다.
자세한 프로토콜 사양은 프로토콜 사양에서 볼 수 있습니다.
📗사용이유
STOMP를 사용하는 이유는 다음과 같다.
- 이 전에 했던 코드같은 경우, 웹소켓 서버가 한 대인 경우 적용이 가능하나, 여러 대 일 경우 웹소켓 세션 정보를 서로 알 수 없다.
- spring으로 구현할 경우 메모리 브로커를 사용하게 되는데, 이 외에 외부 브로커를 사용할 경우
등등..
📗구현
STOMP에 대한 자세한 내용은 spring doc를 보면 알 수 있기 때문에 이 글에서는 더 이상 설명치않고 구현을 해보도록 하겠습니다.
이 전에 만들던 프로젝트에서 브로커를 사용할 수 있도록 어노테이션을 추가하고, [WebSocketMessageBrokerConfigurer] 를 구현합니다. 구현할 메서드로는 총 3가지로
[registerStompEndpoints, configureClientInboundChannel, configureMessageBroker]를 구현합니다.
@Configuration
@EnableWebSocketMessageBroker
@RequiredArgsConstructor
public class WebSocketBrokerConfiguration implements WebSocketMessageBrokerConfigurer {


    private final WebsocketBrokerInterceptor interceptor;
    @Override
    public void registerStompEndpoints(StompEndpointRegistry registry) {
        registry.addEndpoint("/ws/init") //1
                .setAllowedOrigins("*");
    }

    @Override
    public void configureClientInboundChannel(ChannelRegistration registration) {
        registration.interceptors(interceptor); //2
    }

    @Override
    public void configureMessageBroker(MessageBrokerRegistry registry) {
        registry.enableSimpleBroker("/sub"); //3
        registry.setApplicationDestinationPrefixes("/pub"); //4
    }
}
- 최초 websocket을 연결할 때 보내는 endPoint입니다.
- websocket이 연결되거나, sub/pub/send 등 client에서 메시지를 보내게 될 때 interceptor를 통해 핸들링 하게 됩니다.
- client는 /sub/** 의 형태로 topic을 구독하게 됩니다.
- 반대로 메시지를 보낼때는 /pub 형식으로 보내게 됩니다.
다음 그림은 spring에서 제공하는 메모리 브로커를 사용할 때의 구성요소를 보여줍니다.
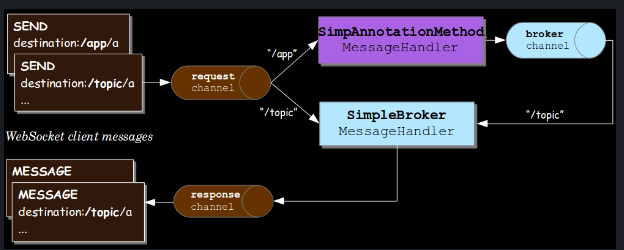
위 사진에서 /app은 /pub에 매칭되고, /topic은 /sub에 매칭됩니다.
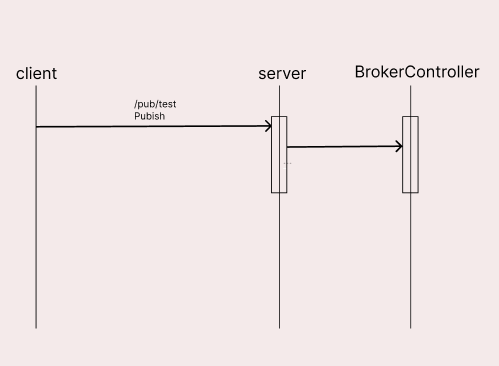
/pub 형식으로 보내는 메시지에 대해서는 일반적인 controller처럼 핸들링이 가능한데 예를 들어
/pub/test 와 같이 destination 정보를 넣어 요청을 할 경우, @MessageMapping("/test") 어노테이션을 가진 컨트롤러에서 핸들링이 가능해집니다.
@Slf4j
@RestController
@RequiredArgsConstructor
public class BrokerController {

    private final SimpMessagingTemplate template;


    @MessageMapping("/test")
    public void test(SimpMessageHeaderAccessor accessor) {
        log.info("### test method {}", accessor);
    }
}
STOMP 테스트를 진행할 때는 APIC 을 이용해야 한다는 점..
여기까지가 큰 흐름이고 이제 자세히 구현을 해보도록 하겠습니다.
다음으로는 간단하게 사용자가 방으로 들어오는 시나리오를 만들어서 구현해보록 하겠습니다.
📘시나리오1
유저가 채팅방을 클릭해서 들어오는 경우
사용자가 방을 클릭 했을 때 방 번호와 함께 /sub 을 요청하게 됩니다.
[ destination = /sub/room/{roomId} ]
서버로의 웹소켓 모든 요청의 경우 위에서 추가한 인터셉터를 타게 됩니다. 해당 인터셉터에서 CommndType을 구별하여 로직을 작성합니다.
@Component
public class WebsocketBrokerInterceptor implements ChannelInterceptor {

    @Override
    public Message<?> preSend(Message<?> message, MessageChannel channel) {
        final StompHeaderAccessor headerAccessor = StompHeaderAccessor.wrap(message);
        final StompCommand commandType = headerAccessor.getCommand();

        if(StompCommand.CONNECT == commandType) {
            //웹소켓 연결 요청 시 유저 인증

        } else if (StompCommand.SEND == commandType) {
            //pub 시 메시지 처리할 경우
        } else if (StompCommand.SUBSCRIBE == commandType) {
            //sub 시 처리할 코드를 여기서 작성
        }
        return message;
    }
}
여기에서는 따로 인증 또는 PUB,SUB 시 따로 로직을 추가하지 않겠습니다.
추가로 방에 있는 유저에게 입장 메시지를 전송하기 위해 다음과 같이 요청합니다.
[ destination = /pub/room/{roomId}/entered]
pub 메시지는 MessageMapping 어노테이션이 있는 컨트롤러에서 처리하게 됩니다.
해당 핸들러에서는 입장 메시지를 생성하여 해당 room에 있는 유저에게 메시지를 보냅니다.
@Slf4j
@RestController
@RequiredArgsConstructor
public class BrokerController {

    private final SimpMessagingTemplate template;

    @MessageMapping("/room/{roomId}/entered")
    public void entered(@DestinationVariable(value = "roomId") String roomId, MessageDto message){
        log.info("# roomId = {}", roomId);
        log.info("# message = {}", message);
        final String payload = message.getWriter() + "님이 입장하셨습니다.";
        template.convertAndSend("/sub/room/" + roomId, payload);
    }
}- MessageDto
@Getter
@NoArgsConstructor
public class MessageDto {

    private String message;
    private String writer;
}
📘시나리오2
방에 들어온 유저가 메시지를 보낼경우
사용자가 방에 들어온 후 메시지를 보낼때는
[ destination = /pub/room/{roomId} ]
과 함께 메시지를 서버에 요청하게 됩니다.
여기에서는 /pub 하는 데이터를 @MemssageMapping한 controller에서 처리하게 됩니다.
    @MessageMapping("/room/{roomId}")
    public void sendMessage(@DestinationVariable(value = "roomId") String roomId, MessageDto message) {
        log.info("# roomId = {}", roomId);
        log.info("# message = {}", message);

        template.convertAndSend("/sub/room/" + roomId, message.getMessage());
    }
이제 APic 으로 테스트를 진행해보도록 하겠습니다.
📘시나리오 테스트
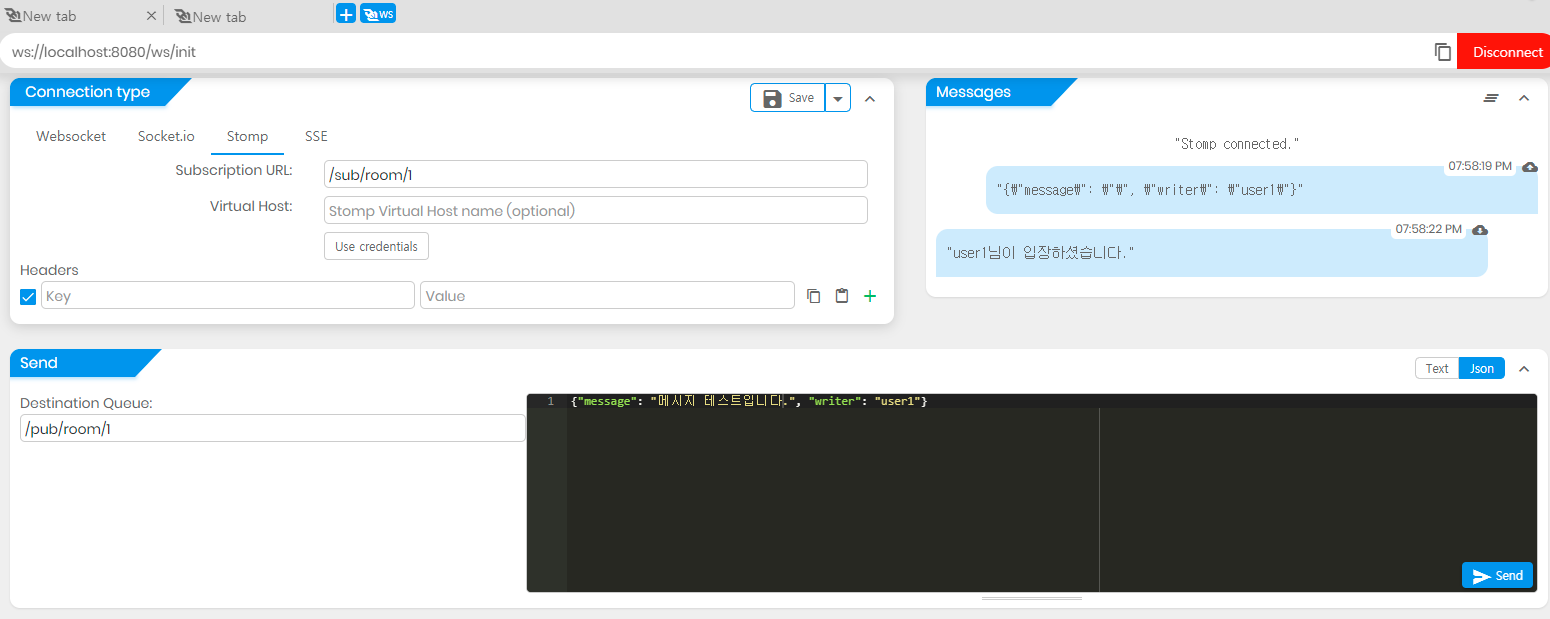
APIC에서 탭 2개를 열고 두 개 모두 연결을 해둔 상태에서 입장 메시지가 잘 오는지,
메시지 전송 시 잘 도착하는지 테스트 해보겠습니다.

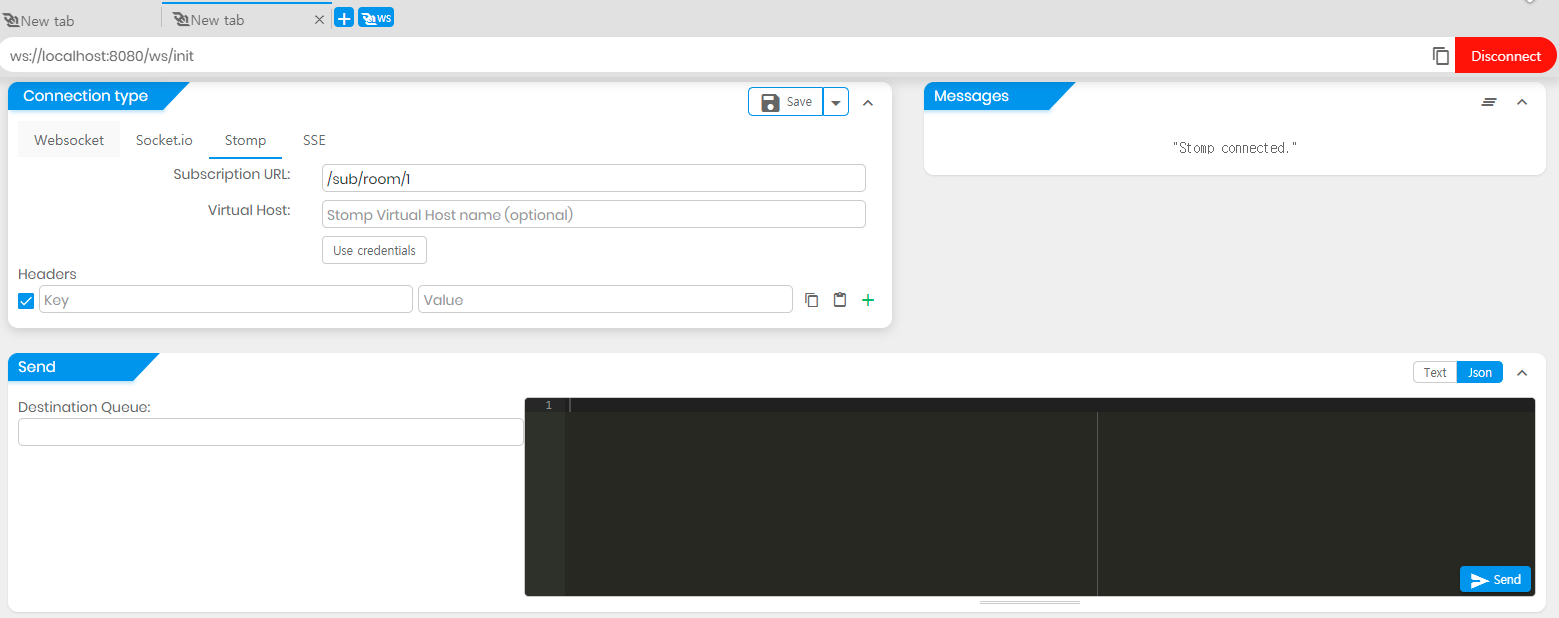
두 개의 웹소켓을 연결해둔 상태에서 첫 탭에서 /pub/room/{roomId}/entered를 보내게되면,
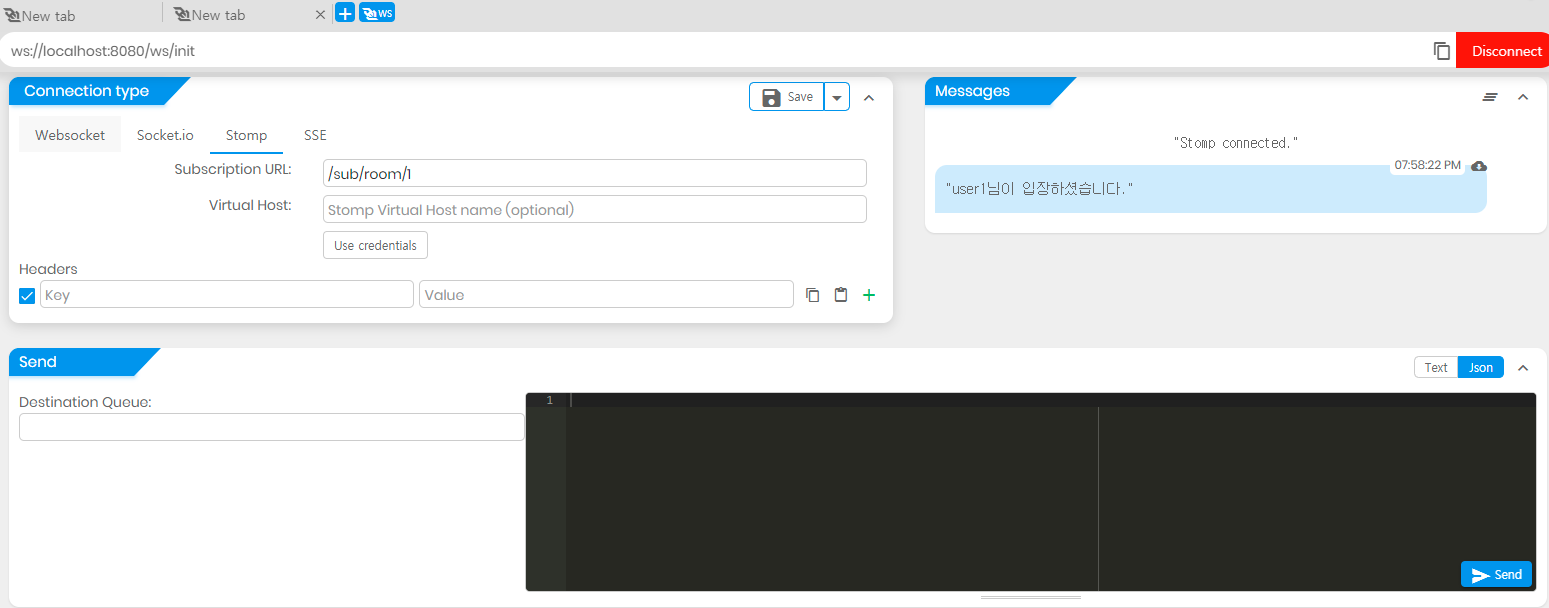
반대편 탭에 도착한 것을 볼 수 있다.
다음으로는 메시지 전송을 테스트 해보자. 메시지 전송 시에는 /pub/room/{roomId} 로 보내며 payload로 message를 같이 보낸다.
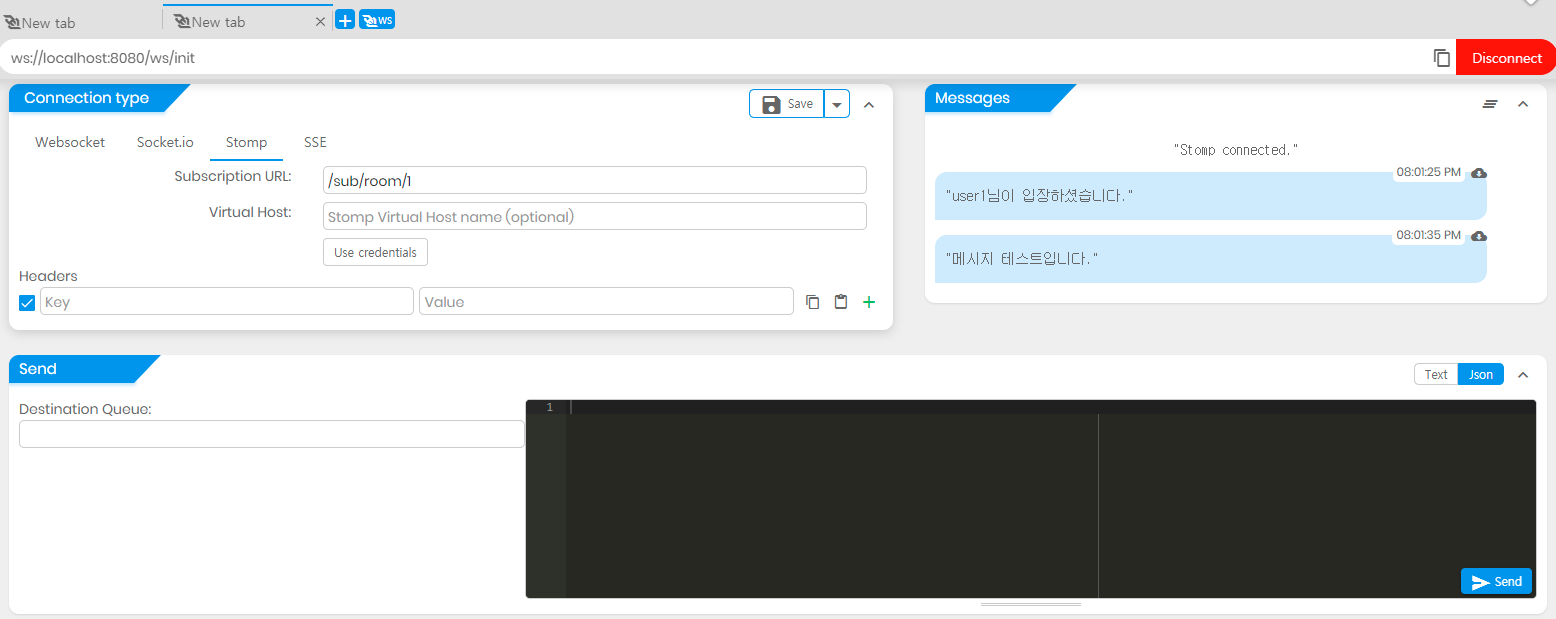
잘 전송되는 것을 확인 할 수 있다.
정리
지금까지 STOMP를 이용해 기본적인 구현과 큰 흐름을 알아봤습니다. 다음에는 엔티티를 추가하고 메모리로 디비를 만들어서 좀더 살을 붙여보겠습니다.
전체 코드는 xxx-sj에서 보실 수 있습니다.
출처:
https://docs.spring.io/spring-framework/reference/web/websocket/stomp/handle-annotations.html
https://brunch.co.kr/@springboot/695