📌 Notice
본 블로깅은 아래의
24단계 실습으로 정복하는 쿠버네티스책을 기준하여 정리하였습니다.
출처 - https://wikibook.co.kr/kubepractice
CloudNetaStudy그룹에서 스터디한 내용입니다.
책의 저자이신이정훈-Jerry님과 함께 스터디 하고 있습니다. 🙏
Gasida님과Jerry님께 다시한번 🙇 감사드립니다.
📌 7주차 과제 수행 결과 입니다.
📌 Assignment 01
목표: 파드에서 EC2 메타데이터의 IAM Role 토큰 정보를 활용하여(boto3), 스터디에서 소개한 것 이외의 다른 AWS 서비스(혹은 Action)를 사용 후 코드나 스샷을 올려주세요
파드(컨테이너) 탈취 후 EC2 메타데이터의 IAM Role 토큰 정보를 활용해 python boto3를 통해 SDK로 AWS 서비스 강제 사용해보는 과정을 실습하였습니다.
👉 Step 01. boto3 실행을 위한 Pod 배포
# boto3 사용을 위한 파드 생성
cat <<EOF | kubectl create -f -
apiVersion: apps/v1
kind: Deployment
metadata:
  name: boto3-pod
spec:
  replicas: 1
  selector:
    matchLabels:
      app: boto3
  template:
    metadata:
      labels:
        app: boto3
    spec:
      containers:
      - name: boto3
        image: jpbarto/boto3
        command: ["tail"]
        args: ["-f", "/dev/null"]
      terminationGracePeriodSeconds: 0
EOF

# 파드 이름 변수 지정
PODNAME=$(kubectl get pod -l app=boto3 -o jsonpath={.items[0].metadata.name})
👉 Step 02. Node 권한 확인
실습에 앞서 Node에 부여된 권한을 확인합니다.
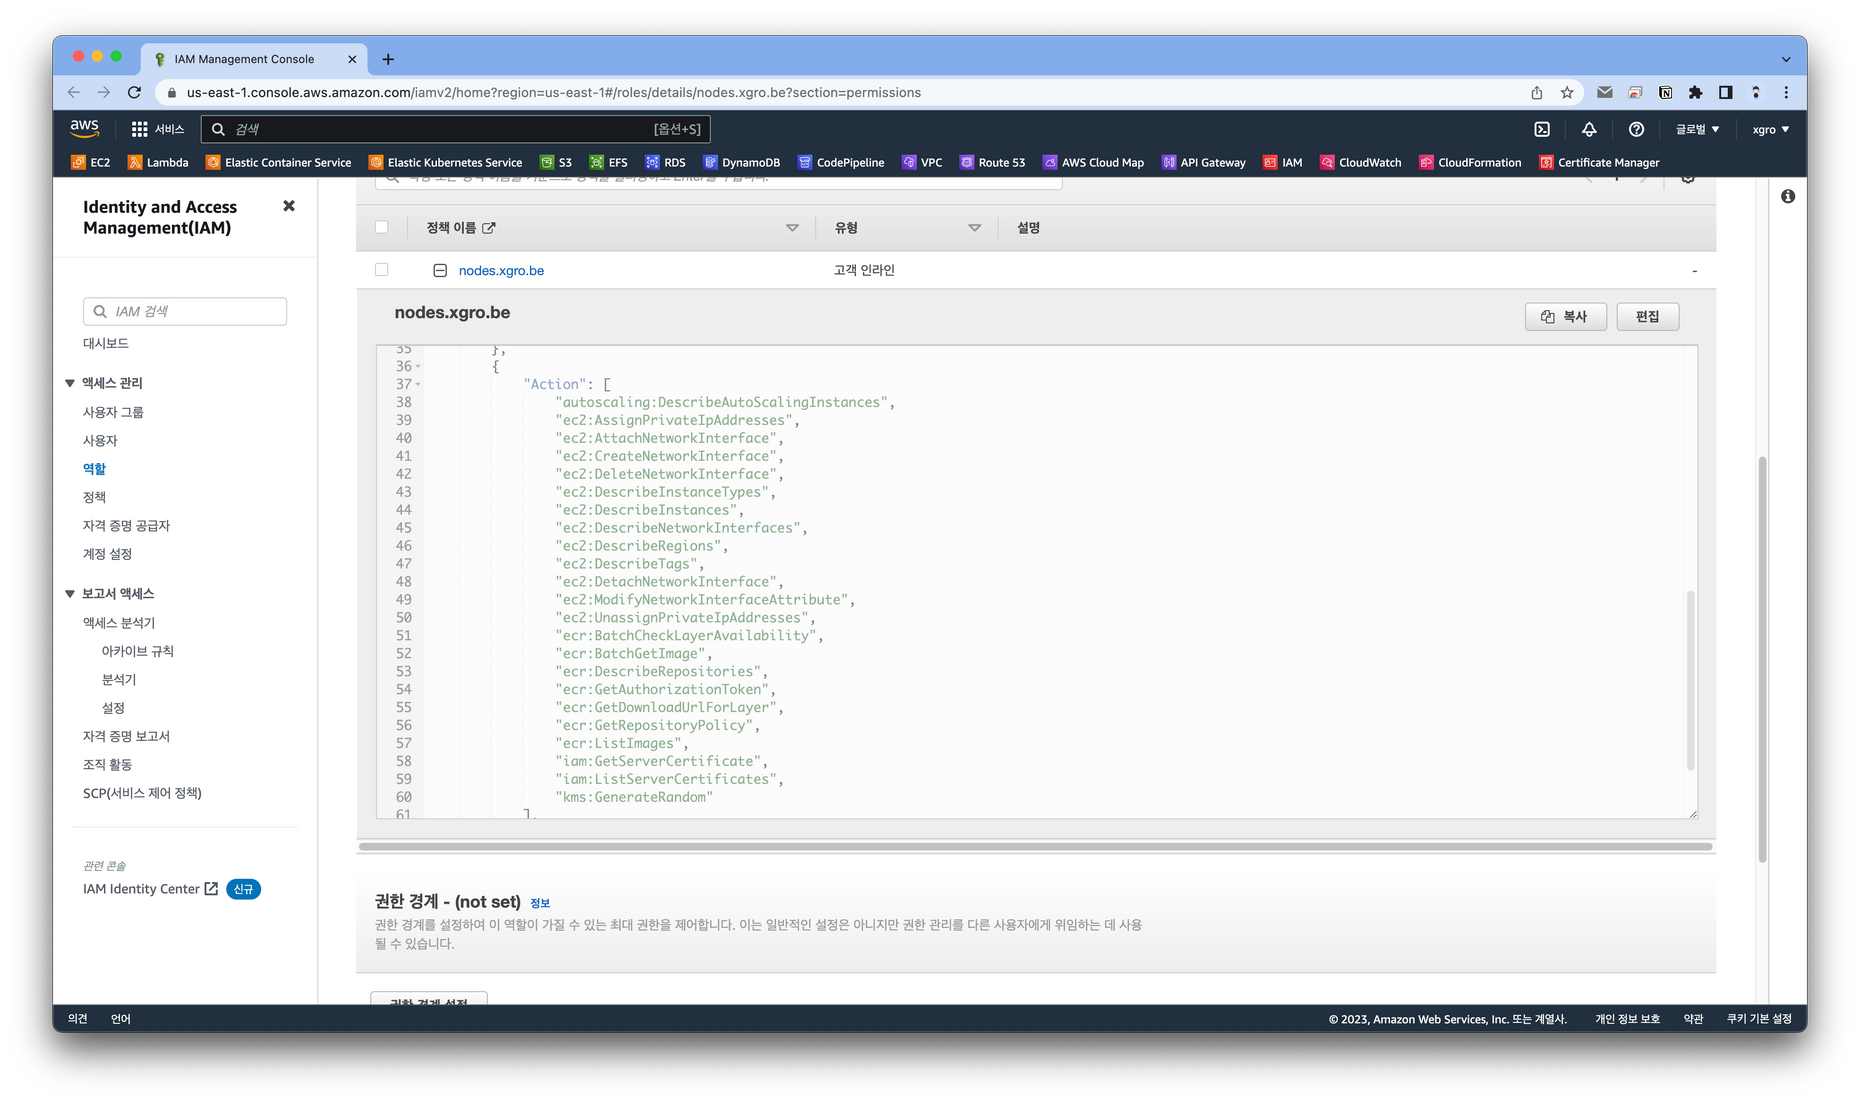
ec2:CreateNetworkInterface 권한을 사용하여 파드에서 네트워크 인터페이스를 생성합니다.
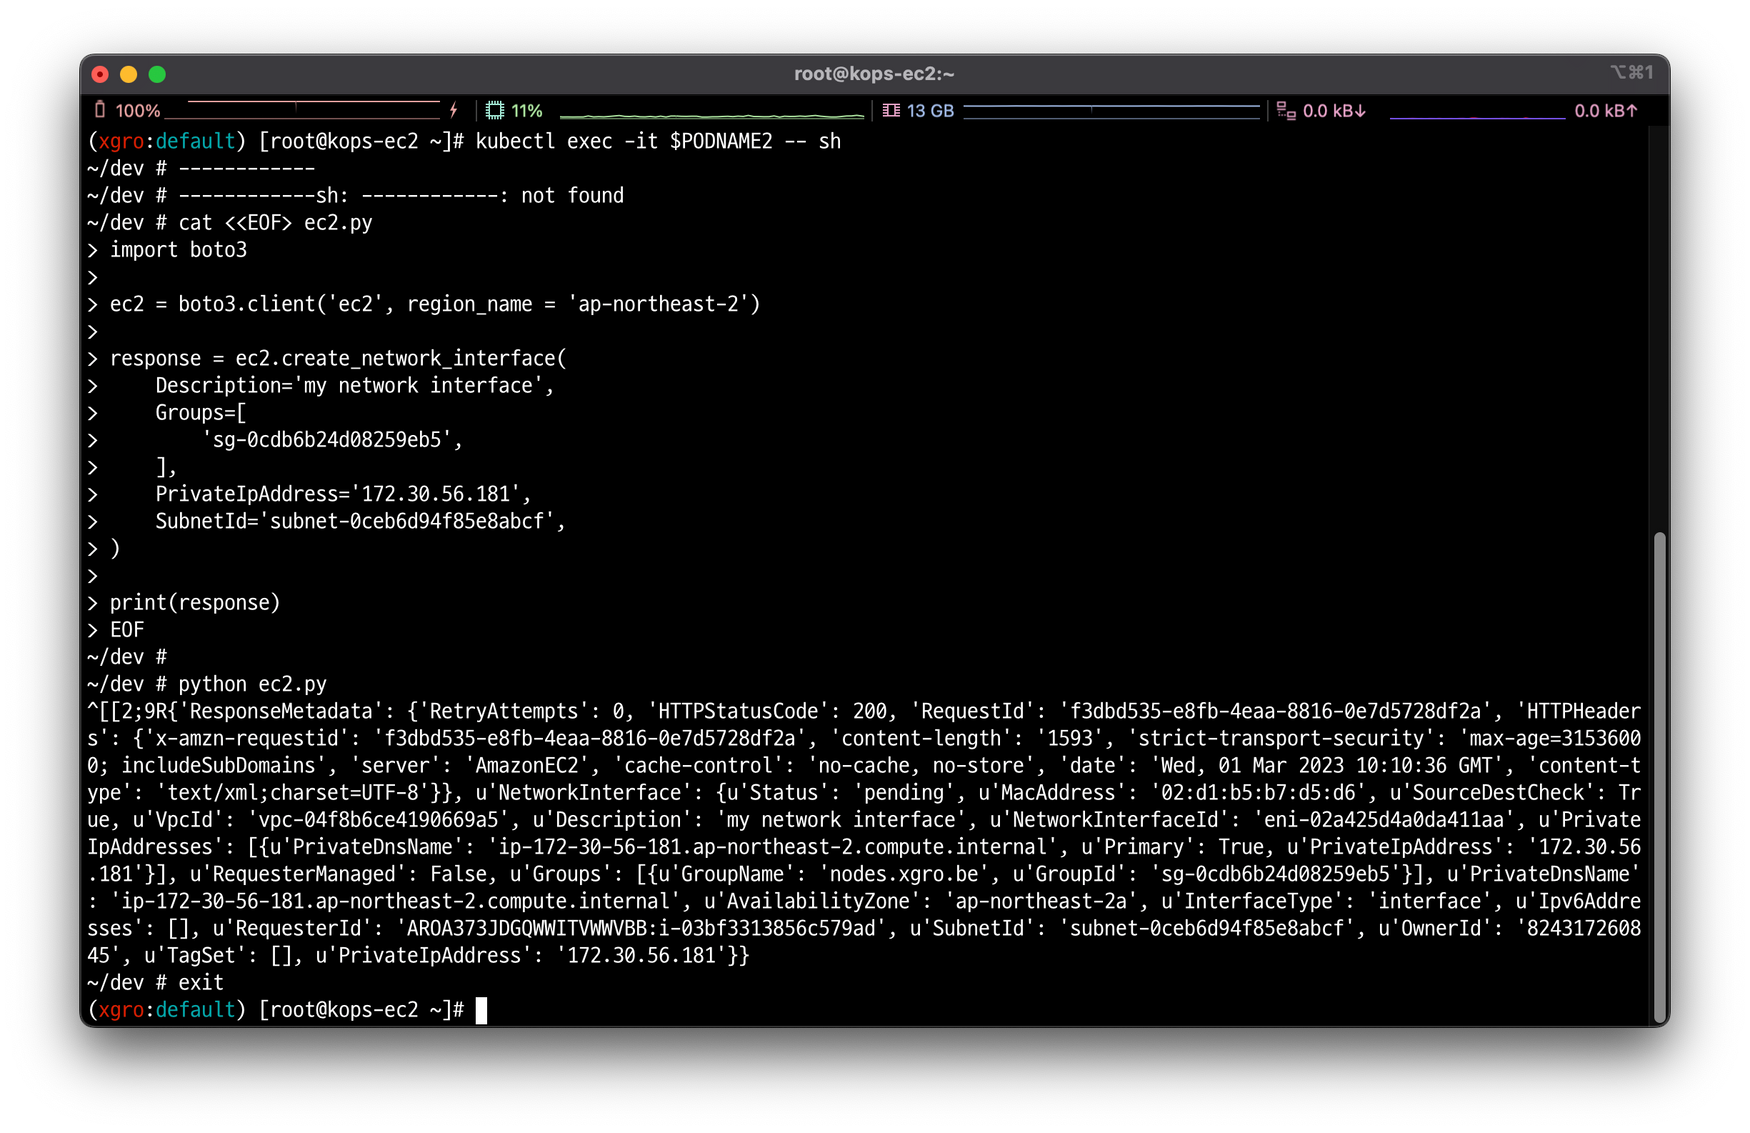
👉 Step 03. boto3 작성
kubectl exec -it $PODNAME -- sh
------------
cat <<EOF> ec2.py
import boto3

ec2 = boto3.client('ec2', region_name = 'ap-northeast-2')

response = ec2.create_network_interface(
    Description='my network interface',
    Groups=[
        'sg-0cdb6b24d08259eb5',
    ],
    PrivateIpAddress='172.30.56.181',
    SubnetId='subnet-0ceb6d94f85e8abcf',
)

print(response)
EOF

python ec2.py
exit
------------
✅ 결과
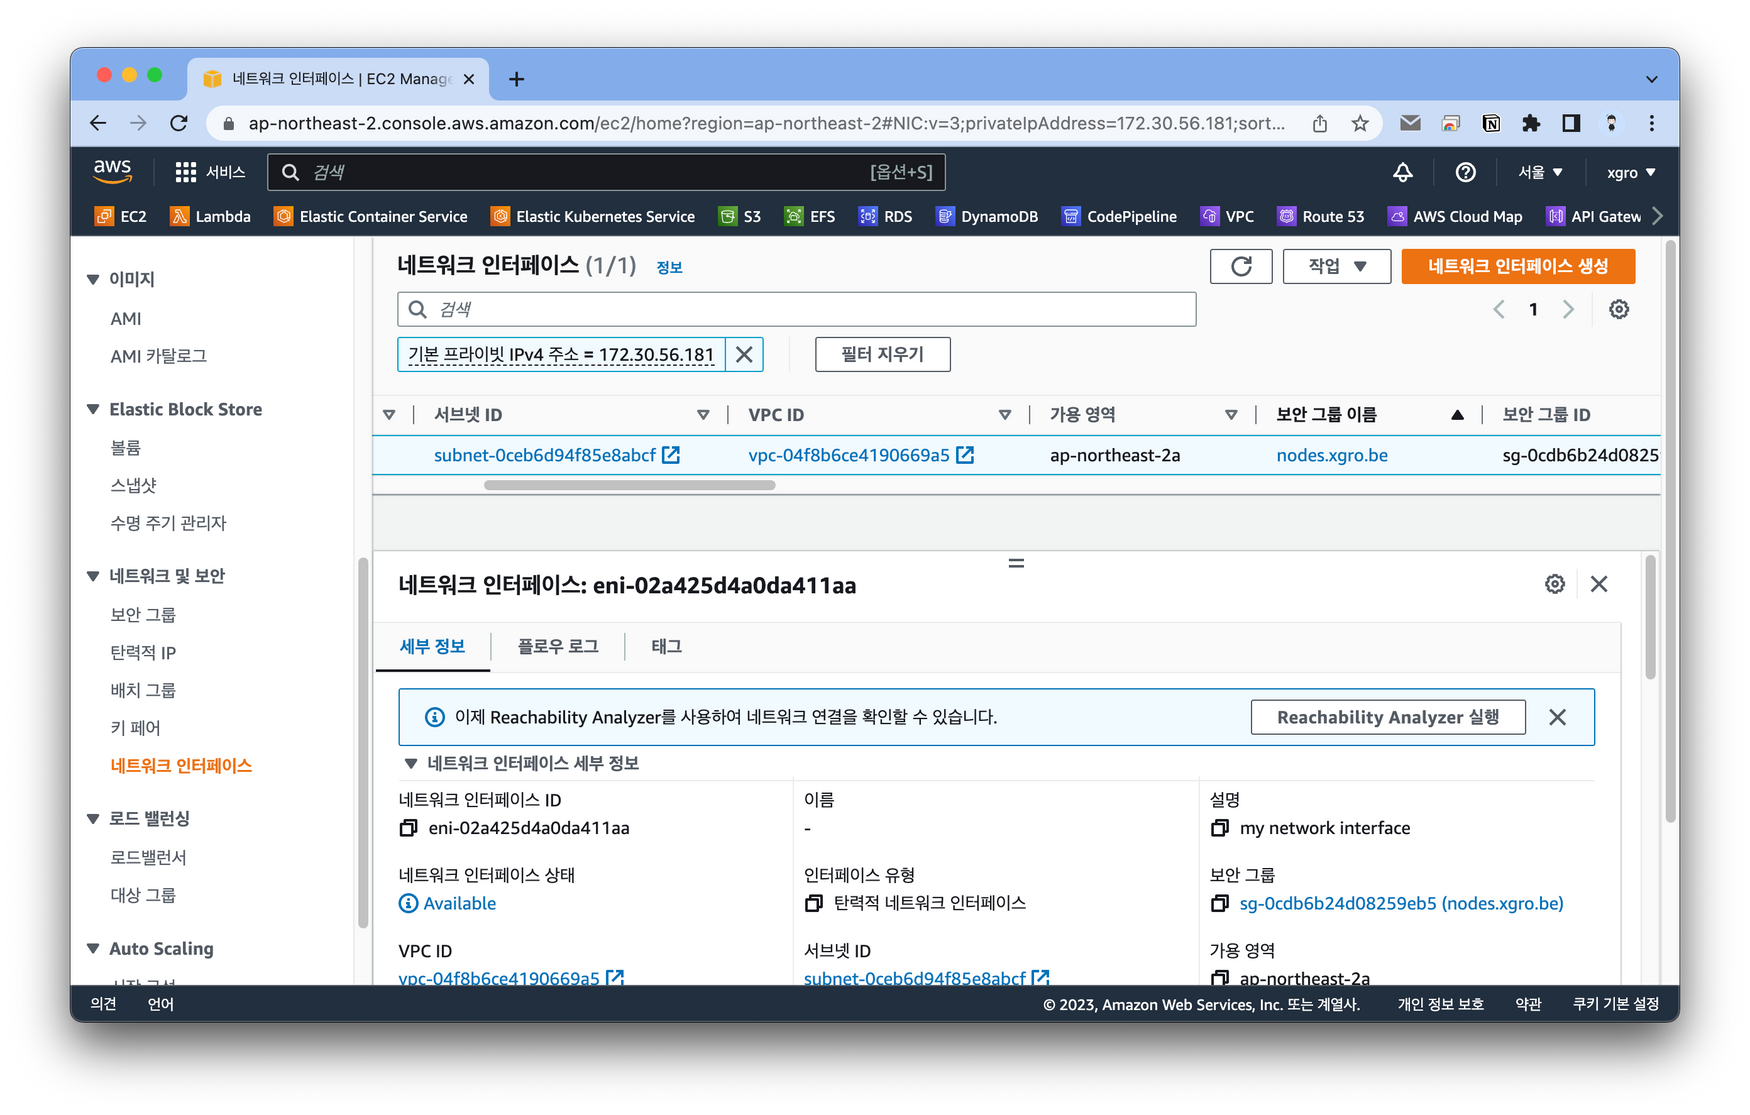
Step 03에서 작성한 내용을 파드로 실행 할 경우 네트워크 인터페이스가 생성됨을 확인할 수 있습니다.
📌 Assignment 02
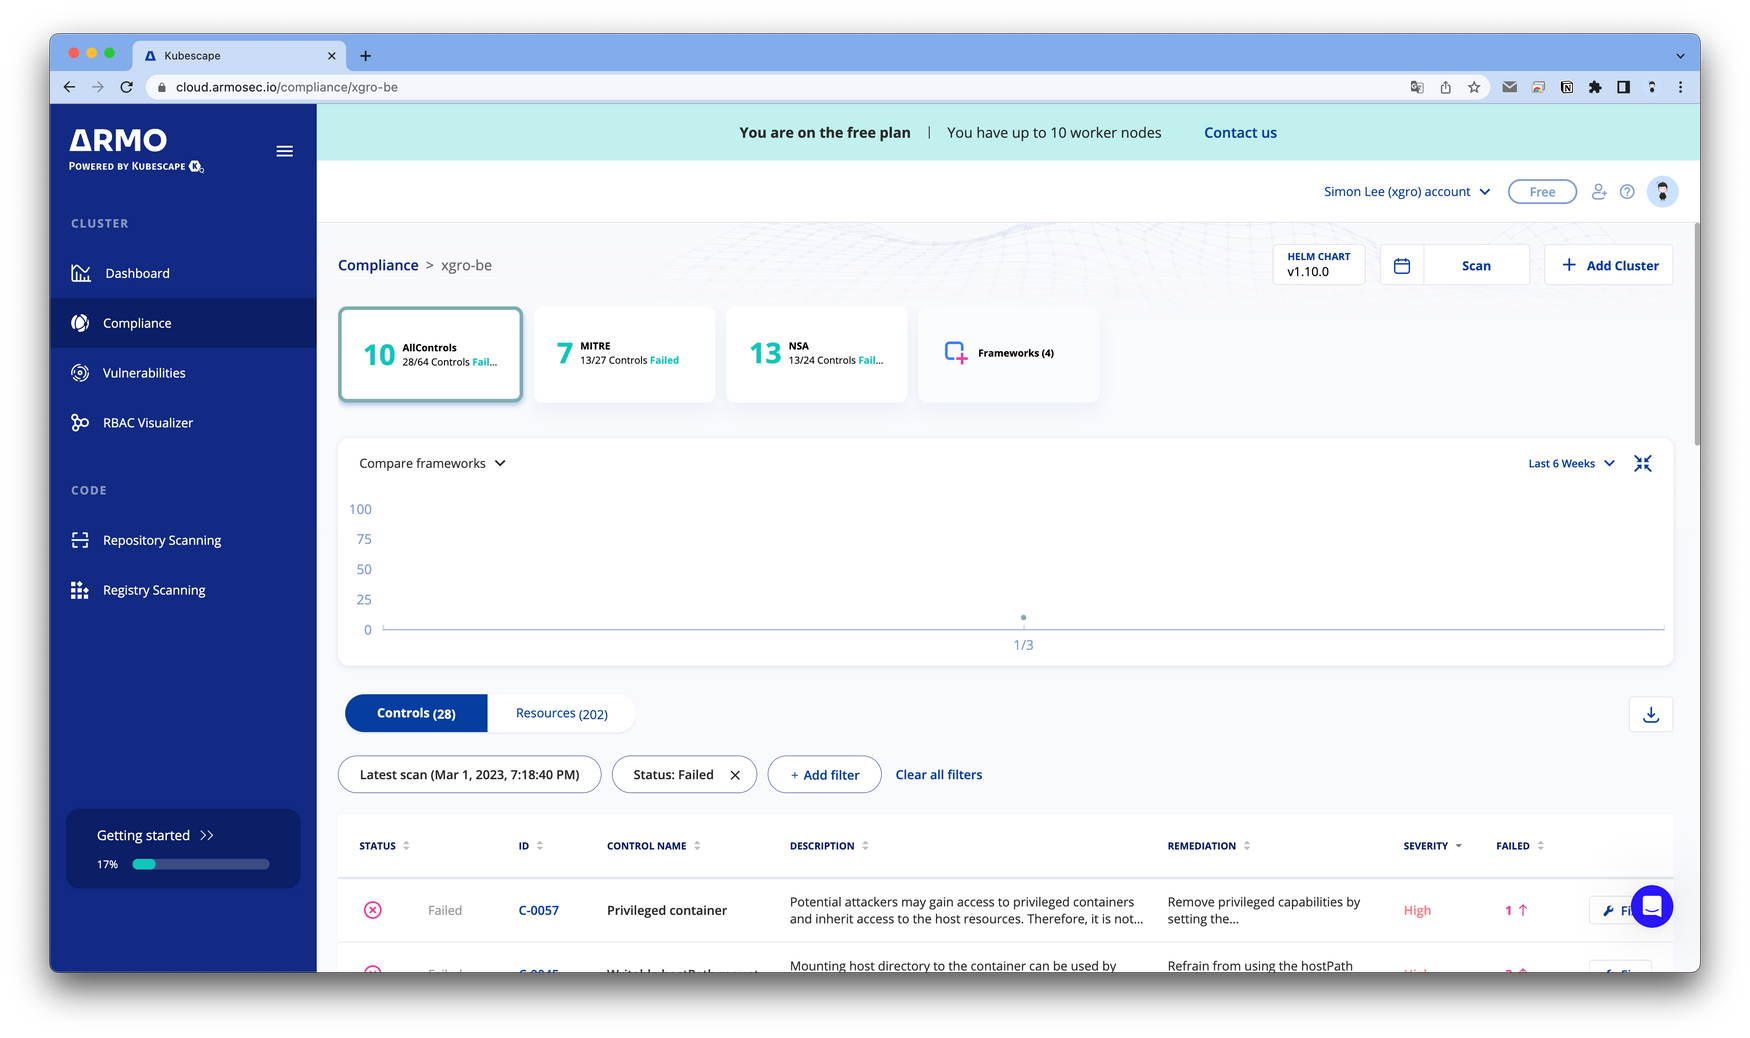
목표: 책 398~400페이지 - kubescape armo 웹 사용 후 관련 스샷을 올려주세요
kubescape는 추가적으로 웹 서비스를 제공합니다.
portal.armo.cloud 주소로 접근하여 회원 가입하고 대시보드로 들어가면 아래와 같은 코드를 입력하라고 설명합니다.
해당 코드를 이용해서 배포를 완료하면 온라인으로 상세 내역을 확인할 수 있습니다.
helm repo add kubescape https://kubescape.github.io/helm-charts/
helm repo update

helm upgrade --install kubescape kubescape/kubescape-cloud-operator -n kubescape --create-namespace --set account=2843***** --set clusterName=`kubectl config current-context`
✅ 결과
📌 Assignment 03
목표: polaris 관련 실습(아무거나) 후 관련 스샷을 올려주세요
netshoot-pod를 이용해서 polaris를 실습합니다.
# netshoot-pod 생성
cat <<EOF | kubectl create -f -
apiVersion: apps/v1
kind: Deployment
metadata:
  name: netshoot-pod
spec:
  replicas: 2
  selector:
    matchLabels:
      app: netshoot-pod
  template:
    metadata:
      labels:
        app: netshoot-pod
    spec:
      containers:
      - name: netshoot-pod
        image: nicolaka/netshoot
        command: ["tail"]
        args: ["-f", "/dev/null"]
      terminationGracePeriodSeconds: 0
EOF
위 소스코드를 이용해서 netshoot 파드를 배포할 경우 폴라리에서 확인하면
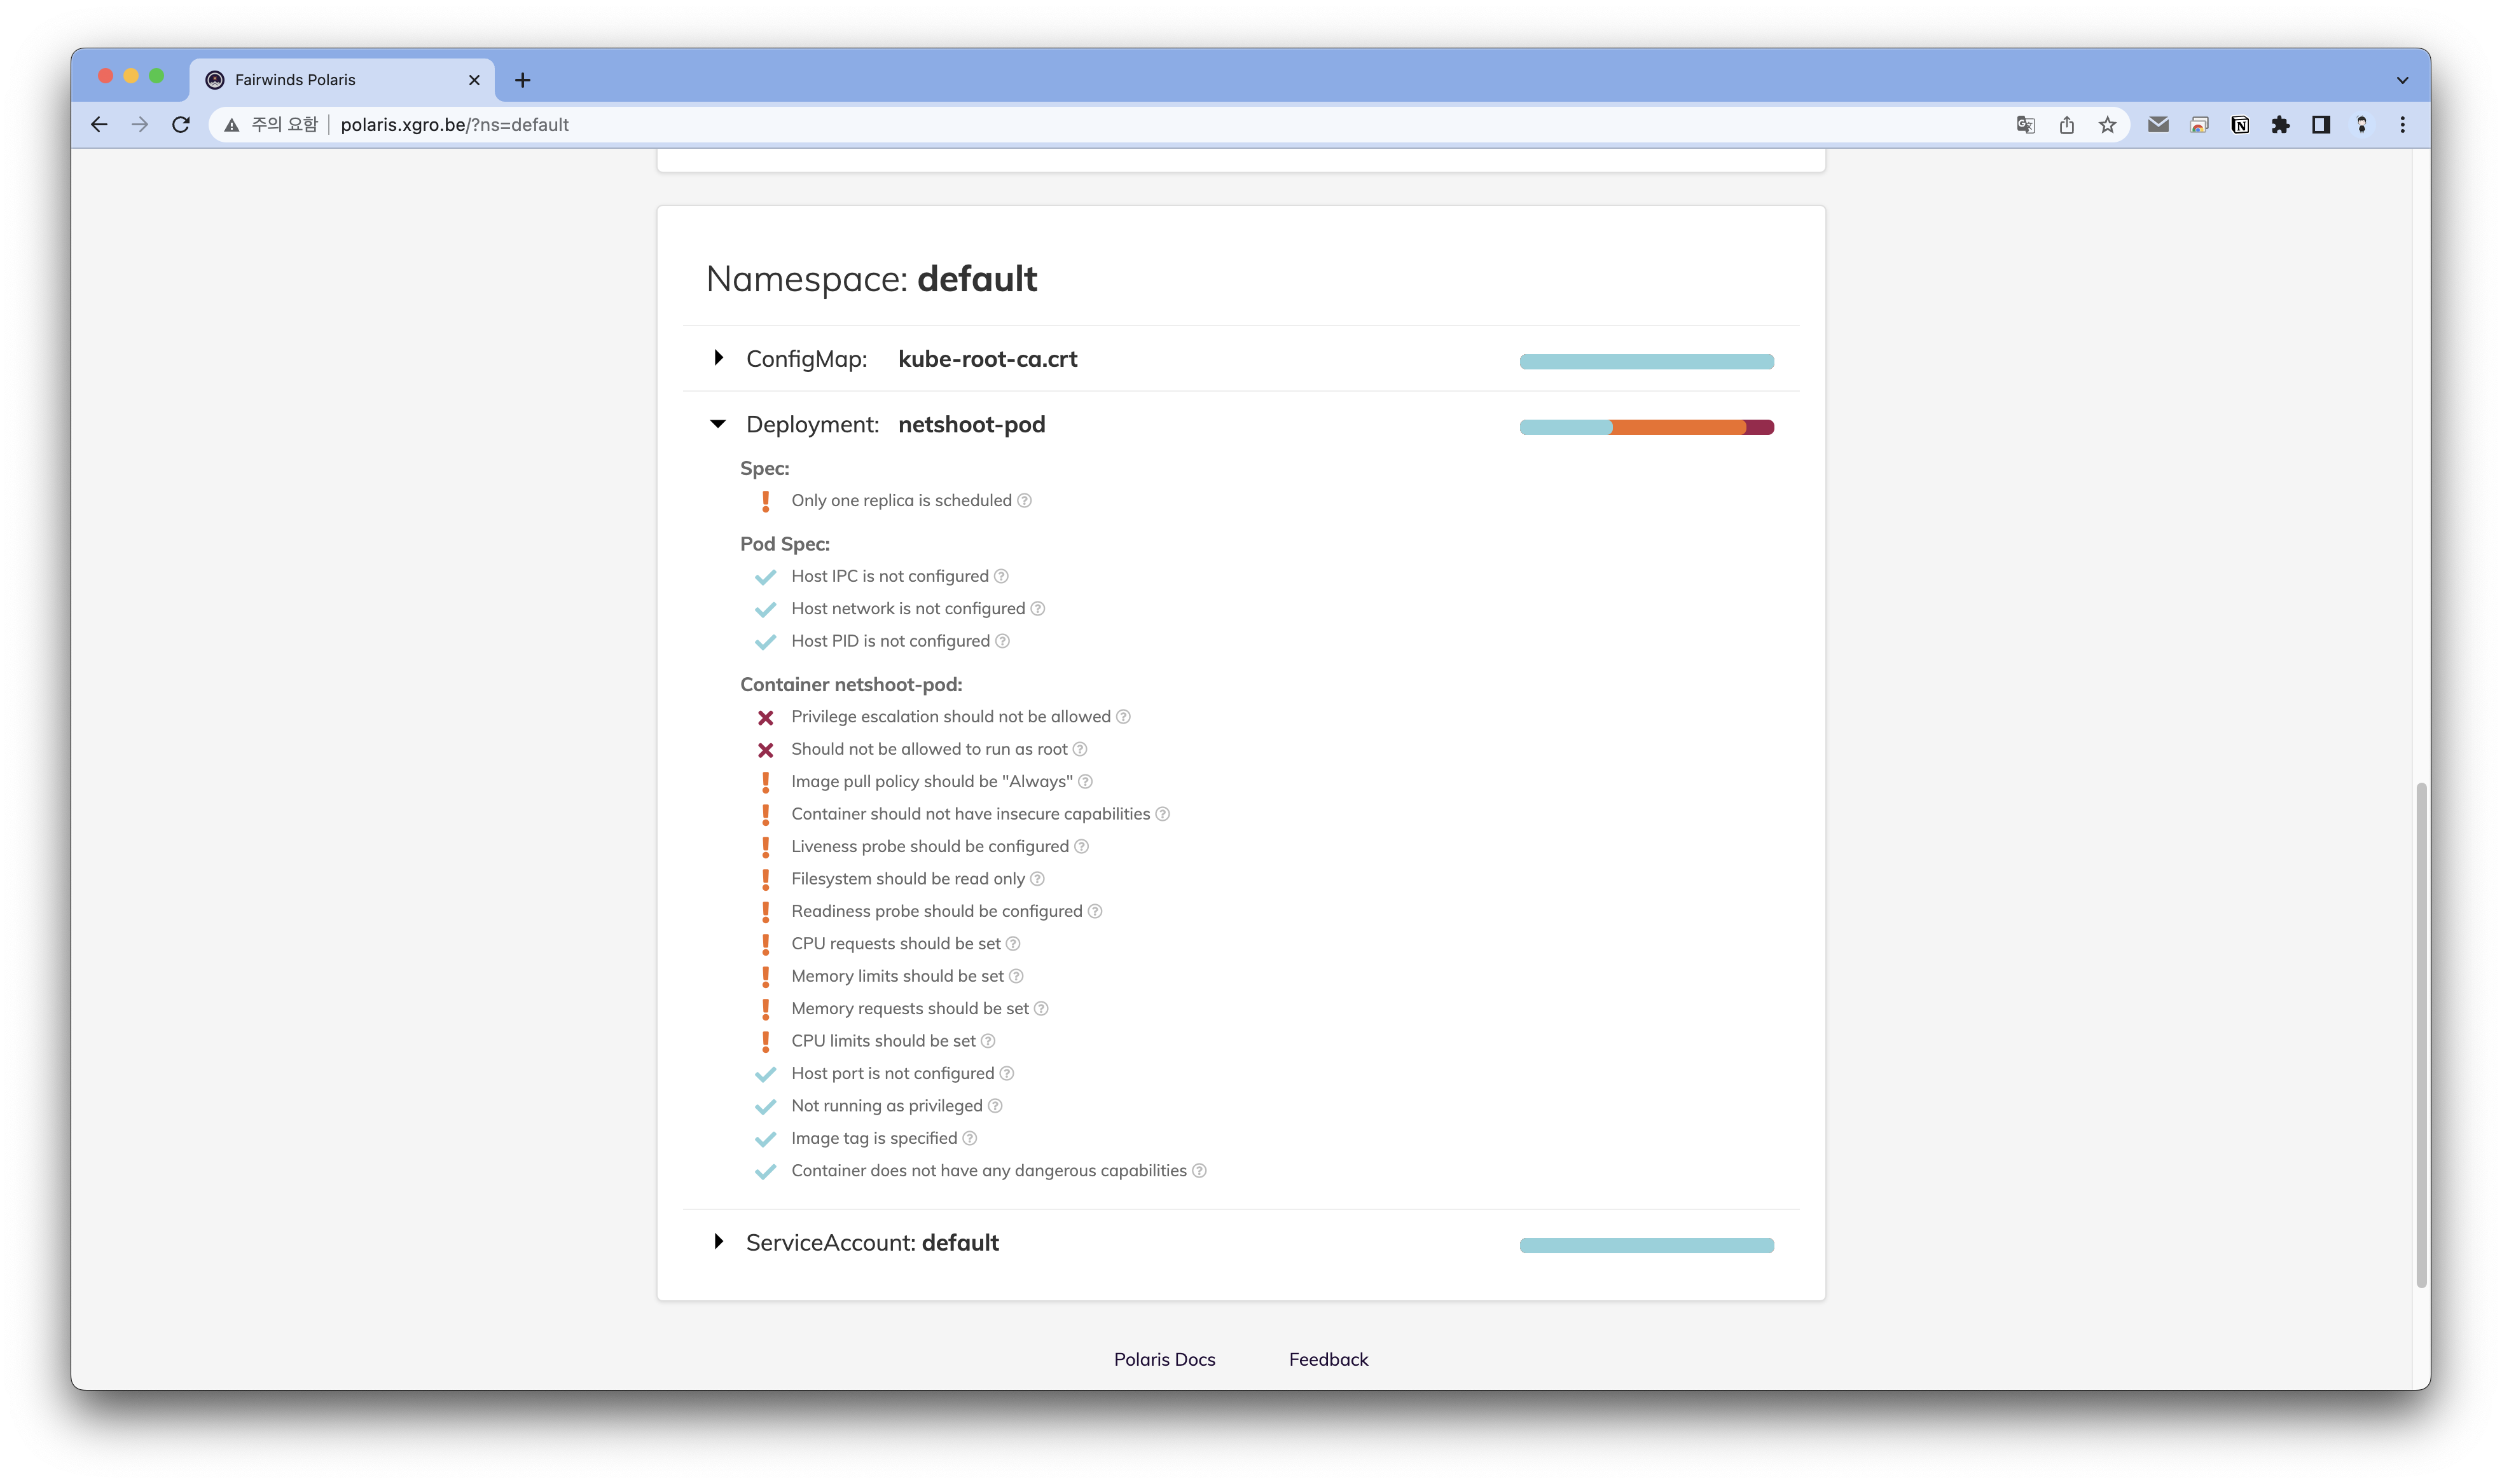
파드 보안관련 상세 내역을 확인할 수 있습니다.
주요한 내용을 점검합니다.
Dangerous
- Privilege escalation should not be allowed
- Should not be allowed to run as root
Warning
- Image pull policy should be "Always"
- Container should not have insecure capabilities
- Liveness probe should be configured
- Filesvstem should be read only
- Readiness probe should be configured
- CPU requests should be set
- Memory limits should be set
- Memory requests should be set
- CPU limits should be set
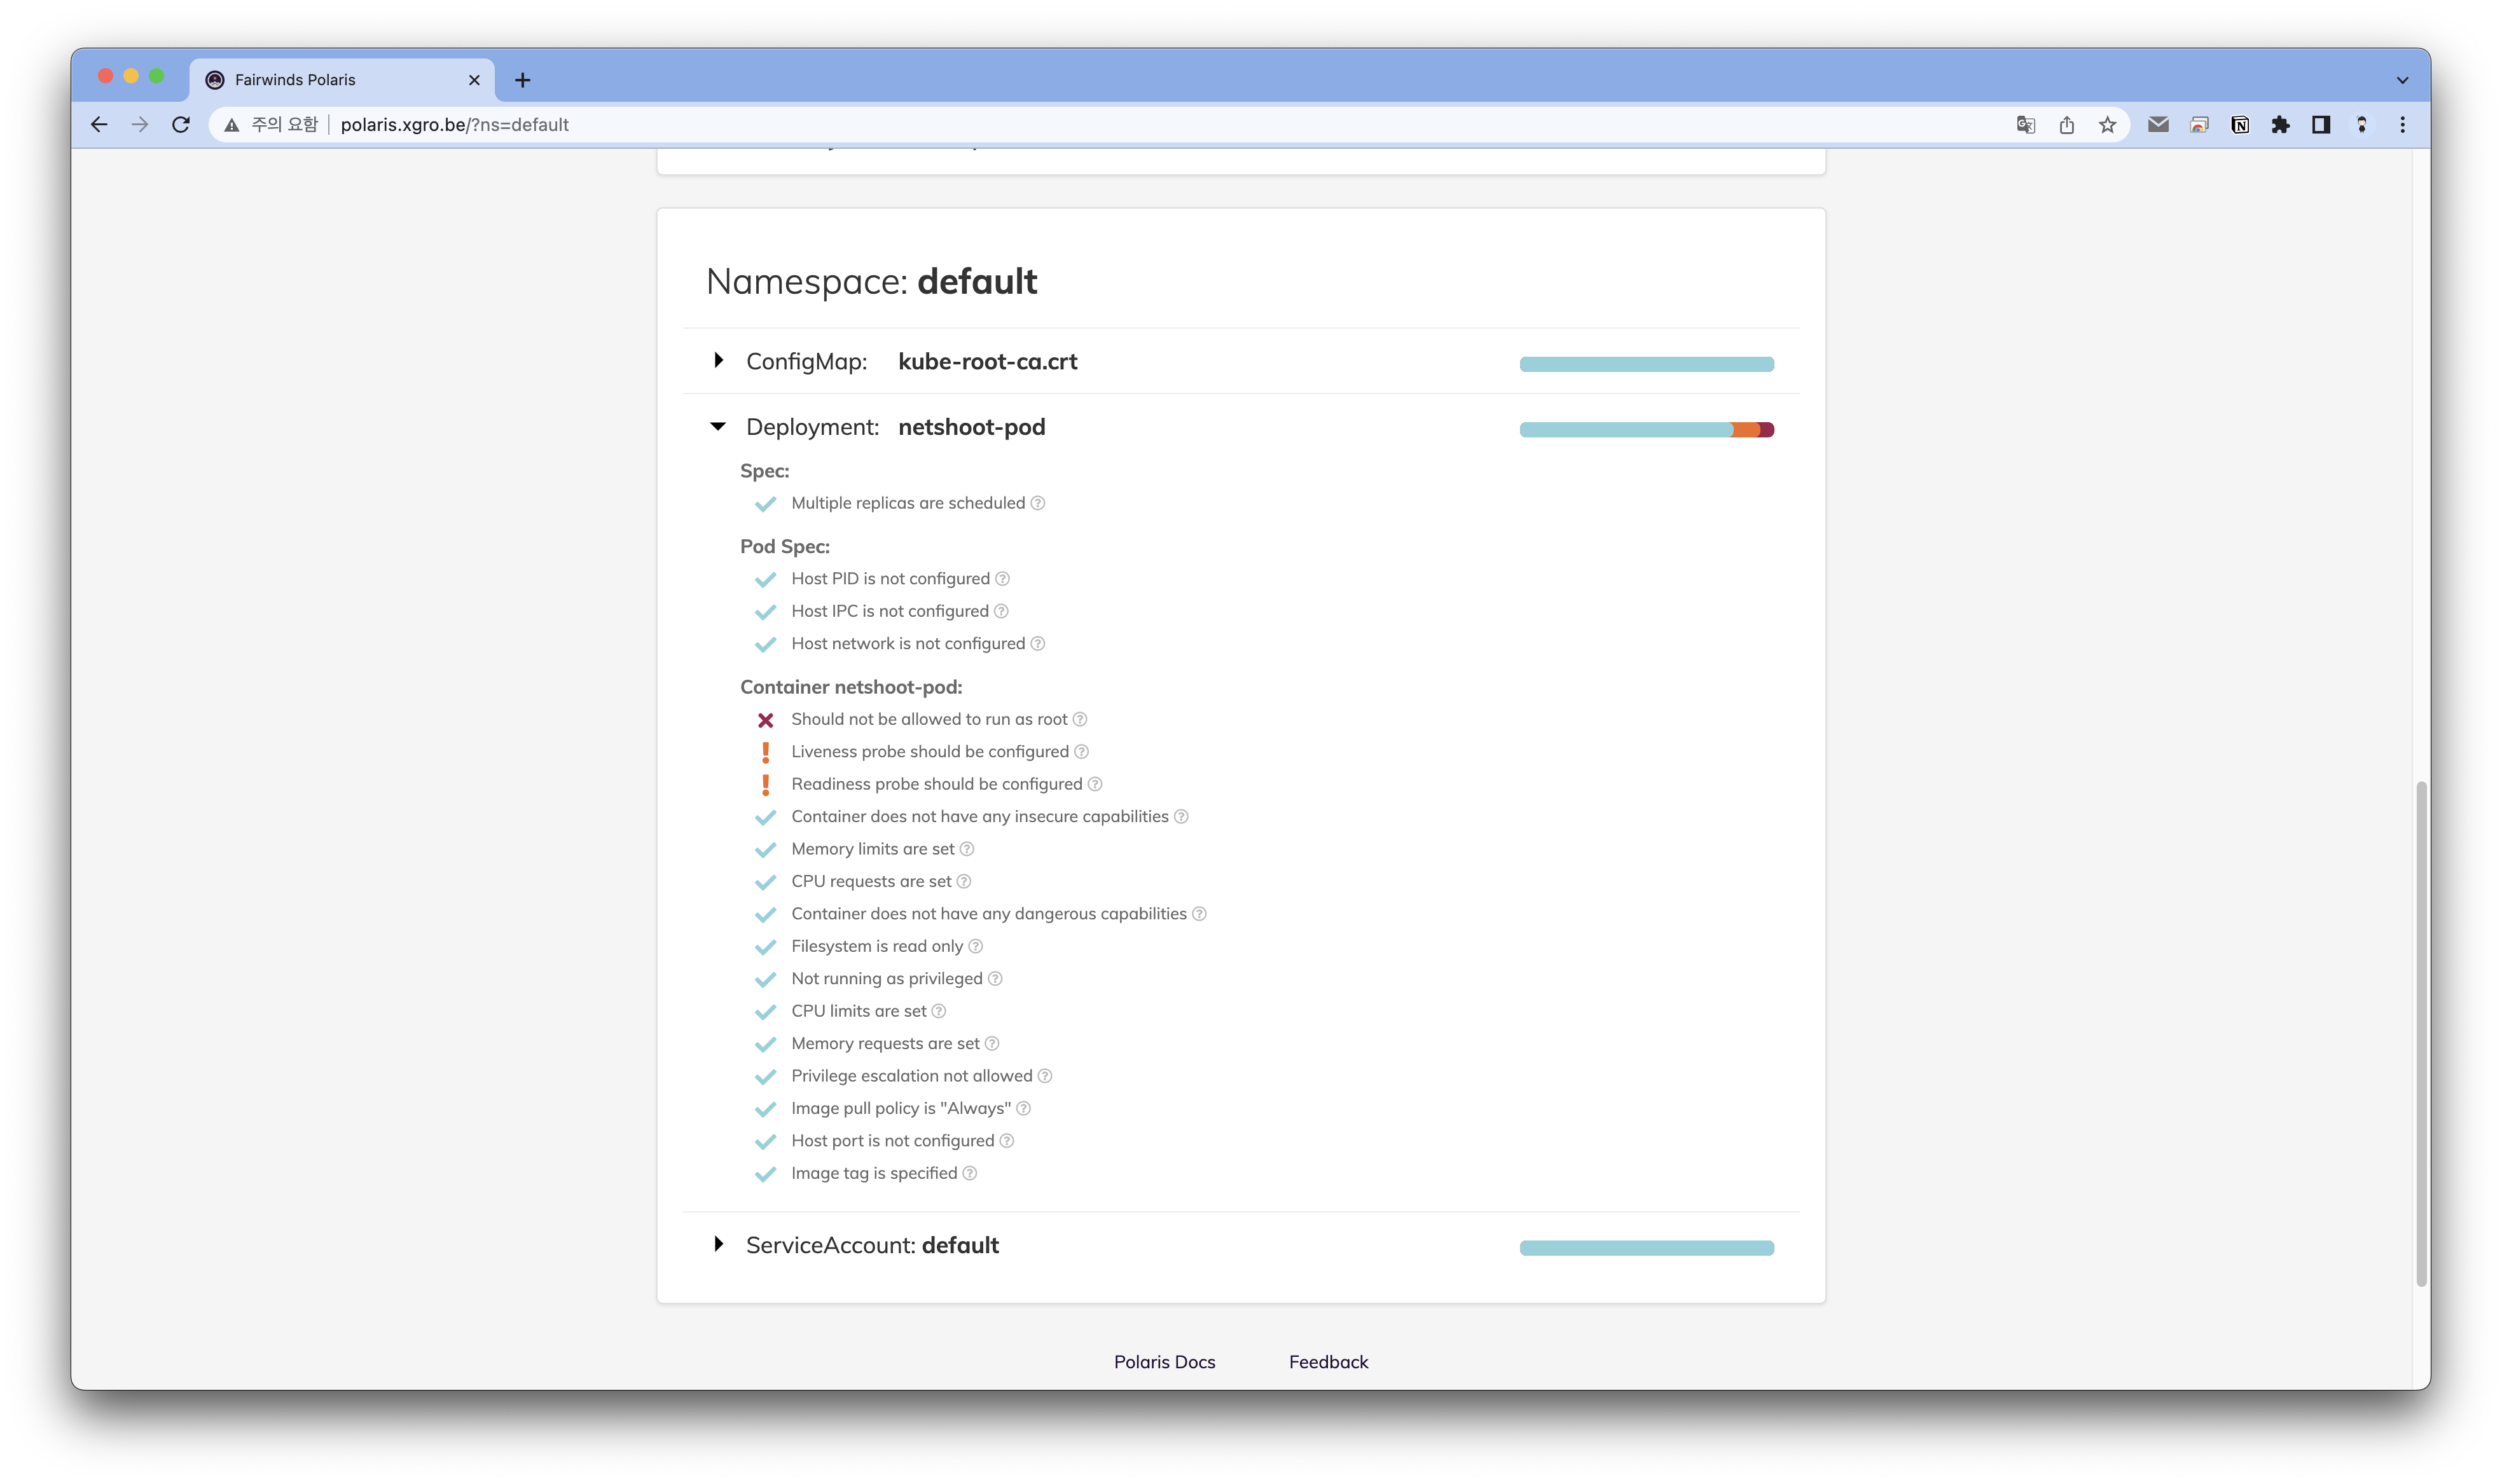
위험 및 경고에 명시된 내용을 바탕으로 파드를 재배포 합니다.
# 기존 파드 삭제
kubectl delete deploy netshoot-pod

# netshoot-pod 생성
cat <<EOF | kubectl create -f -
apiVersion: apps/v1
kind: Deployment
metadata:
  name: netshoot-pod
spec:
  replicas: 2
  selector:
    matchLabels:
      app: netshoot-pod
  template:
    metadata:
      labels:
        app: netshoot-pod
    spec:
      containers:
      - name: netshoot-pod
        image: nicolaka/netshoot:v0.9
        command: ["tail"]
        args: ["-f", "/dev/null"]
        imagePullPolicy: Always
        resources:
          limits:
            cpu: 150m
            memory: 512Mi
          requests:
            cpu: 100m
            memory: 128Mi
        securityContext:
          allowPrivilegeEscalation: false
          capabilities:
            drop:
            - ALL
          privileged: false
          readOnlyRootFilesystem: true
          #runAsNonRoot: true
      terminationGracePeriodSeconds: 0
EOF
✅ 결과
📌 Assignment 04
목표: 신규 서비스 어카운트(SA) 생성 후 '클러스터 수준(모든 네임스페이스 포함)에서 읽기 전용'의 권한을 주고 테스트 후 코드나 스샷을 올려주세요
👉 Step 01. SA(ServiceAccount) 생성
서비스 어카운트(SA)를 생성합니다.
# SA.yaml
apiVersion: v1
kind: ServiceAccount
metadata:
  name: xgro-sa
  namespace: xgro
서비스 어카운트 동작 확인을 위한 디플로이먼트를 배포합니다.
spec 항목에 SA 내용을 선언합니다.
# 확인을 위한 디플로이먼트 배포
# Deployment.yaml
apiVersion: apps/v1
kind: Deployment
metadata:
  name: sa-test
  namespace: xgro
  labels:
    app: sa-test
spec:
  replicas: 1
  selector:
    matchLabels:
      app: sa-test
  template:
    metadata:
      labels:
        app: sa-test
    spec:
      serviceAccountName: xgro-sa #SA 지정
      containers:
        - name: nginx
          image: nginx:latest
          ports:
            - containerPort: 80
👉 Step 02. SA 확인
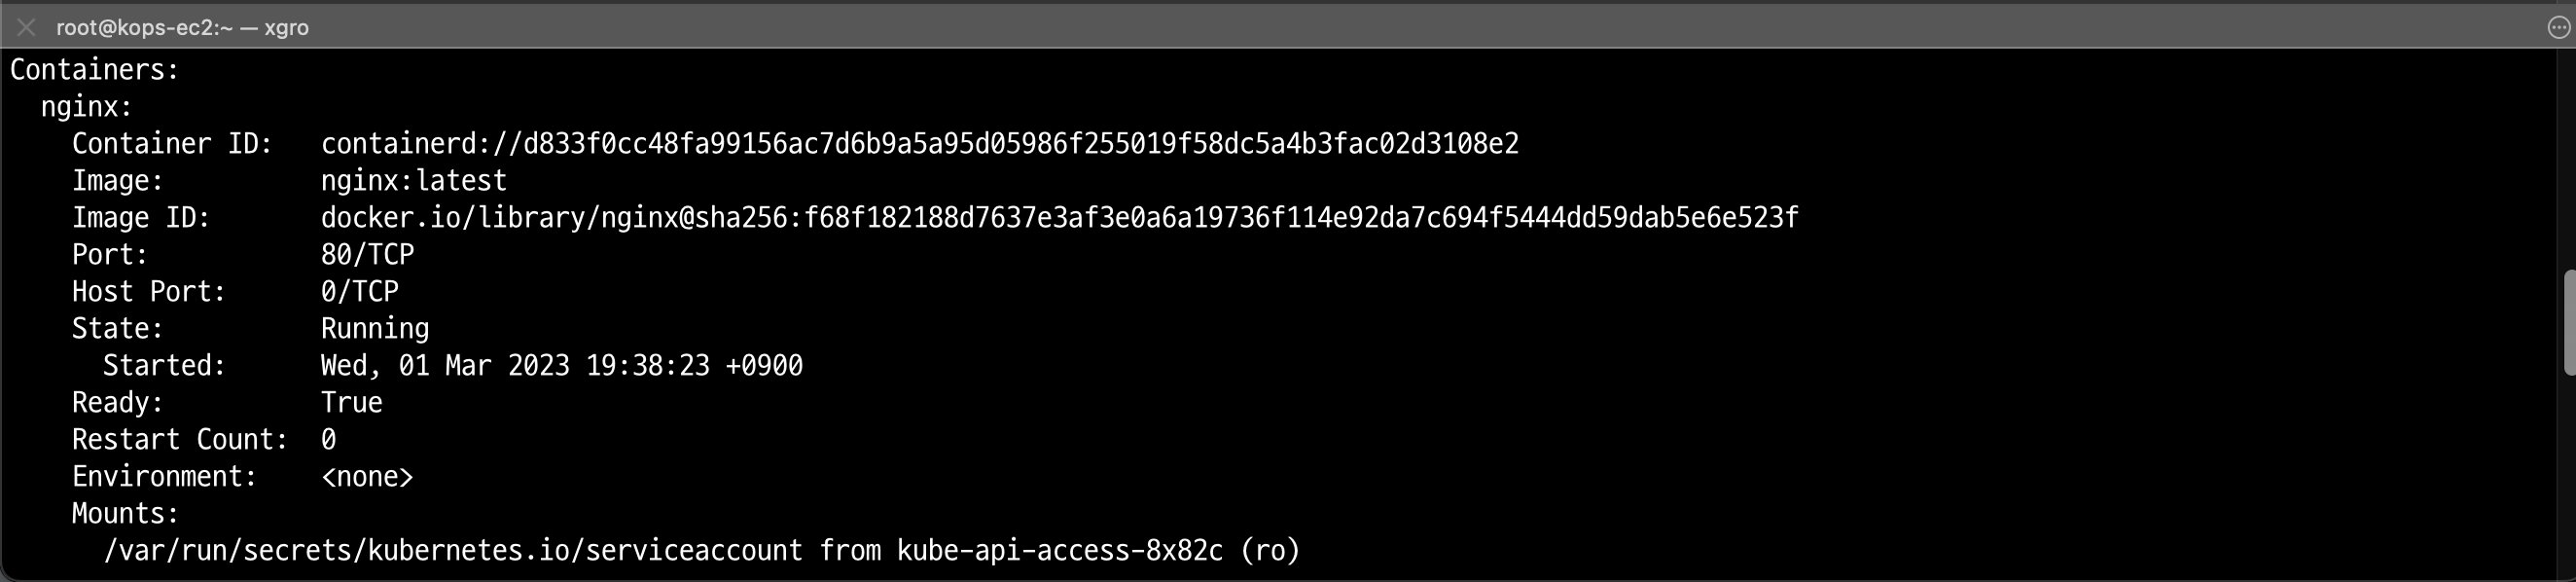
배포가 완료된 파드의 상세를 확인합니다.
kubectl -n xgro describe pod <pod-name>/var/run/secrets/kubernetes.io/serviceaccount 경로가 마운트 되어 있는것을 확인할 수 있습니다.
파드에 접속하여 token을 확인할 수 있습니다.
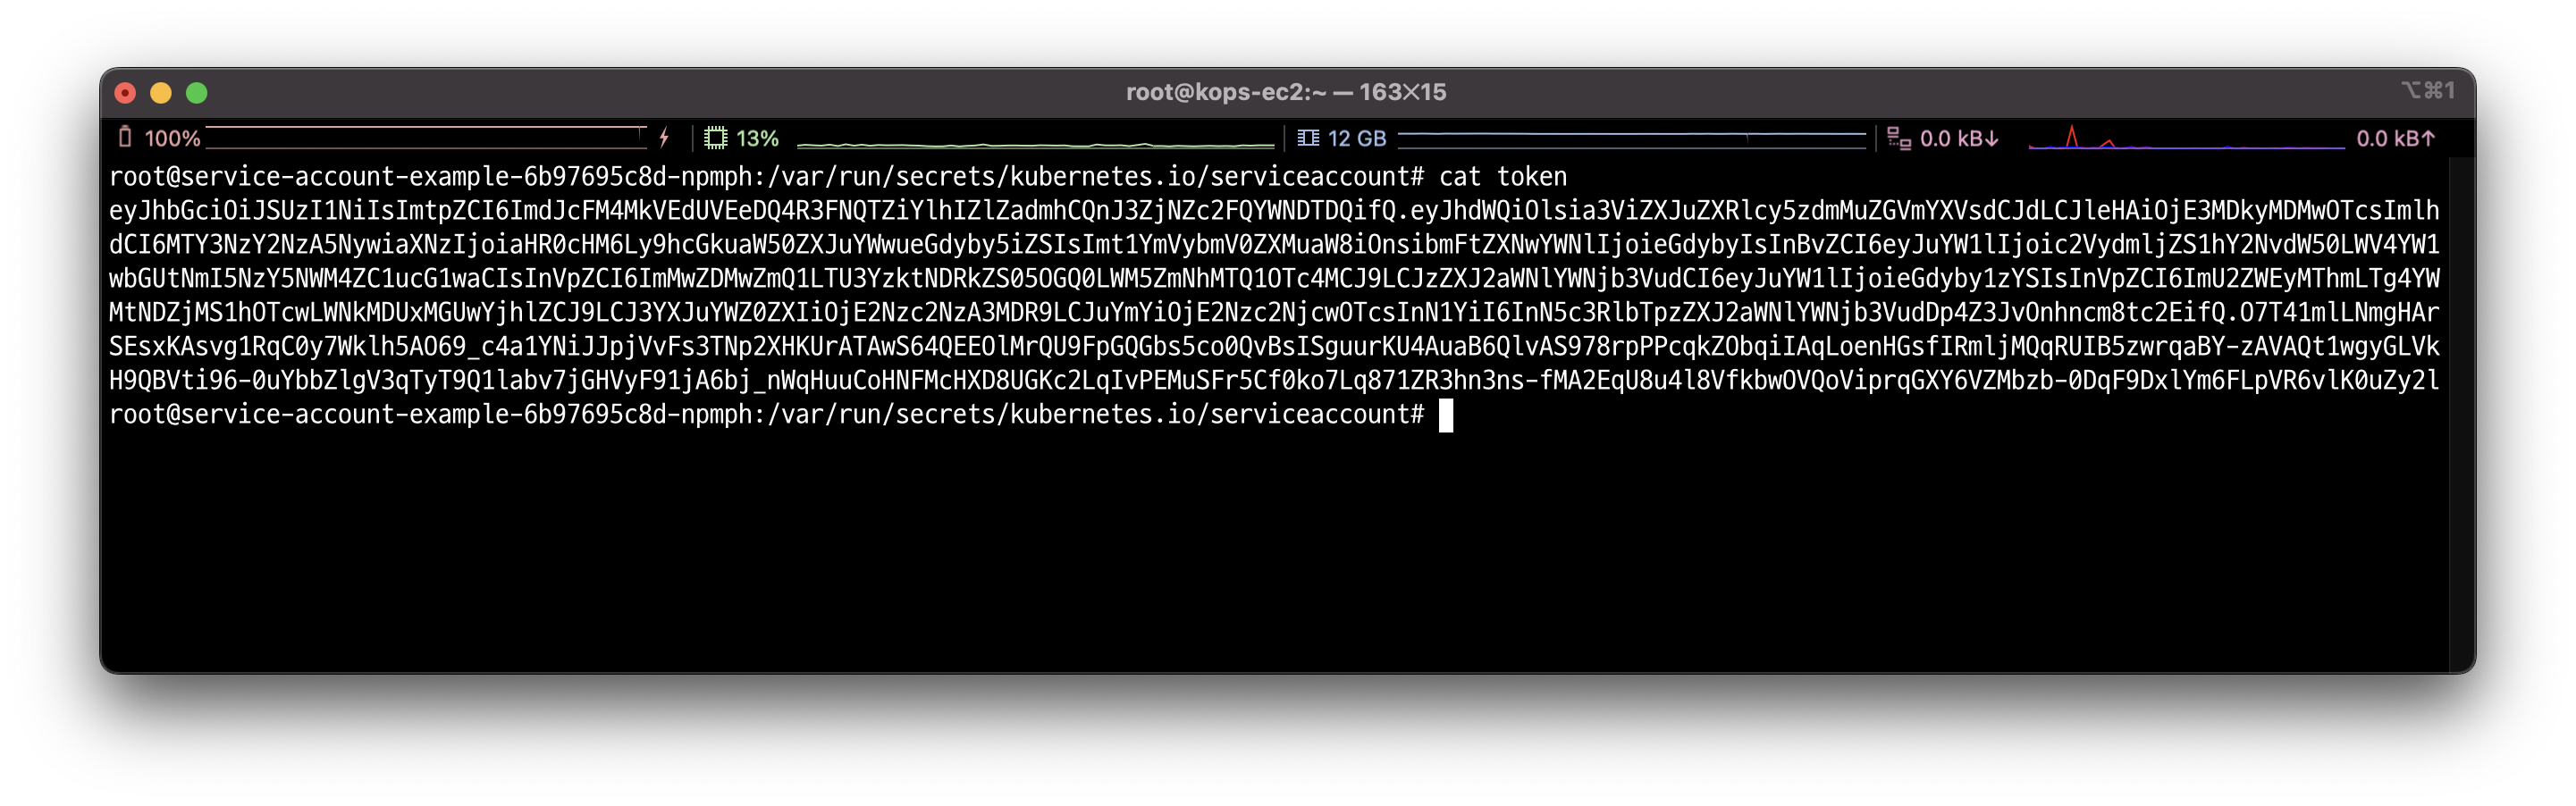
# 토큰 변수 저장
TOKEN=$(cat token)
토큰을 이용하여 파드의 상세를 요청합니다.
# 파드 확인
curl -X GET https://$KUBERNETES_SERVICE_HOST/api/v1/namespaces/default/pods --header "Authorization: Bearer $TOKEN" --insecure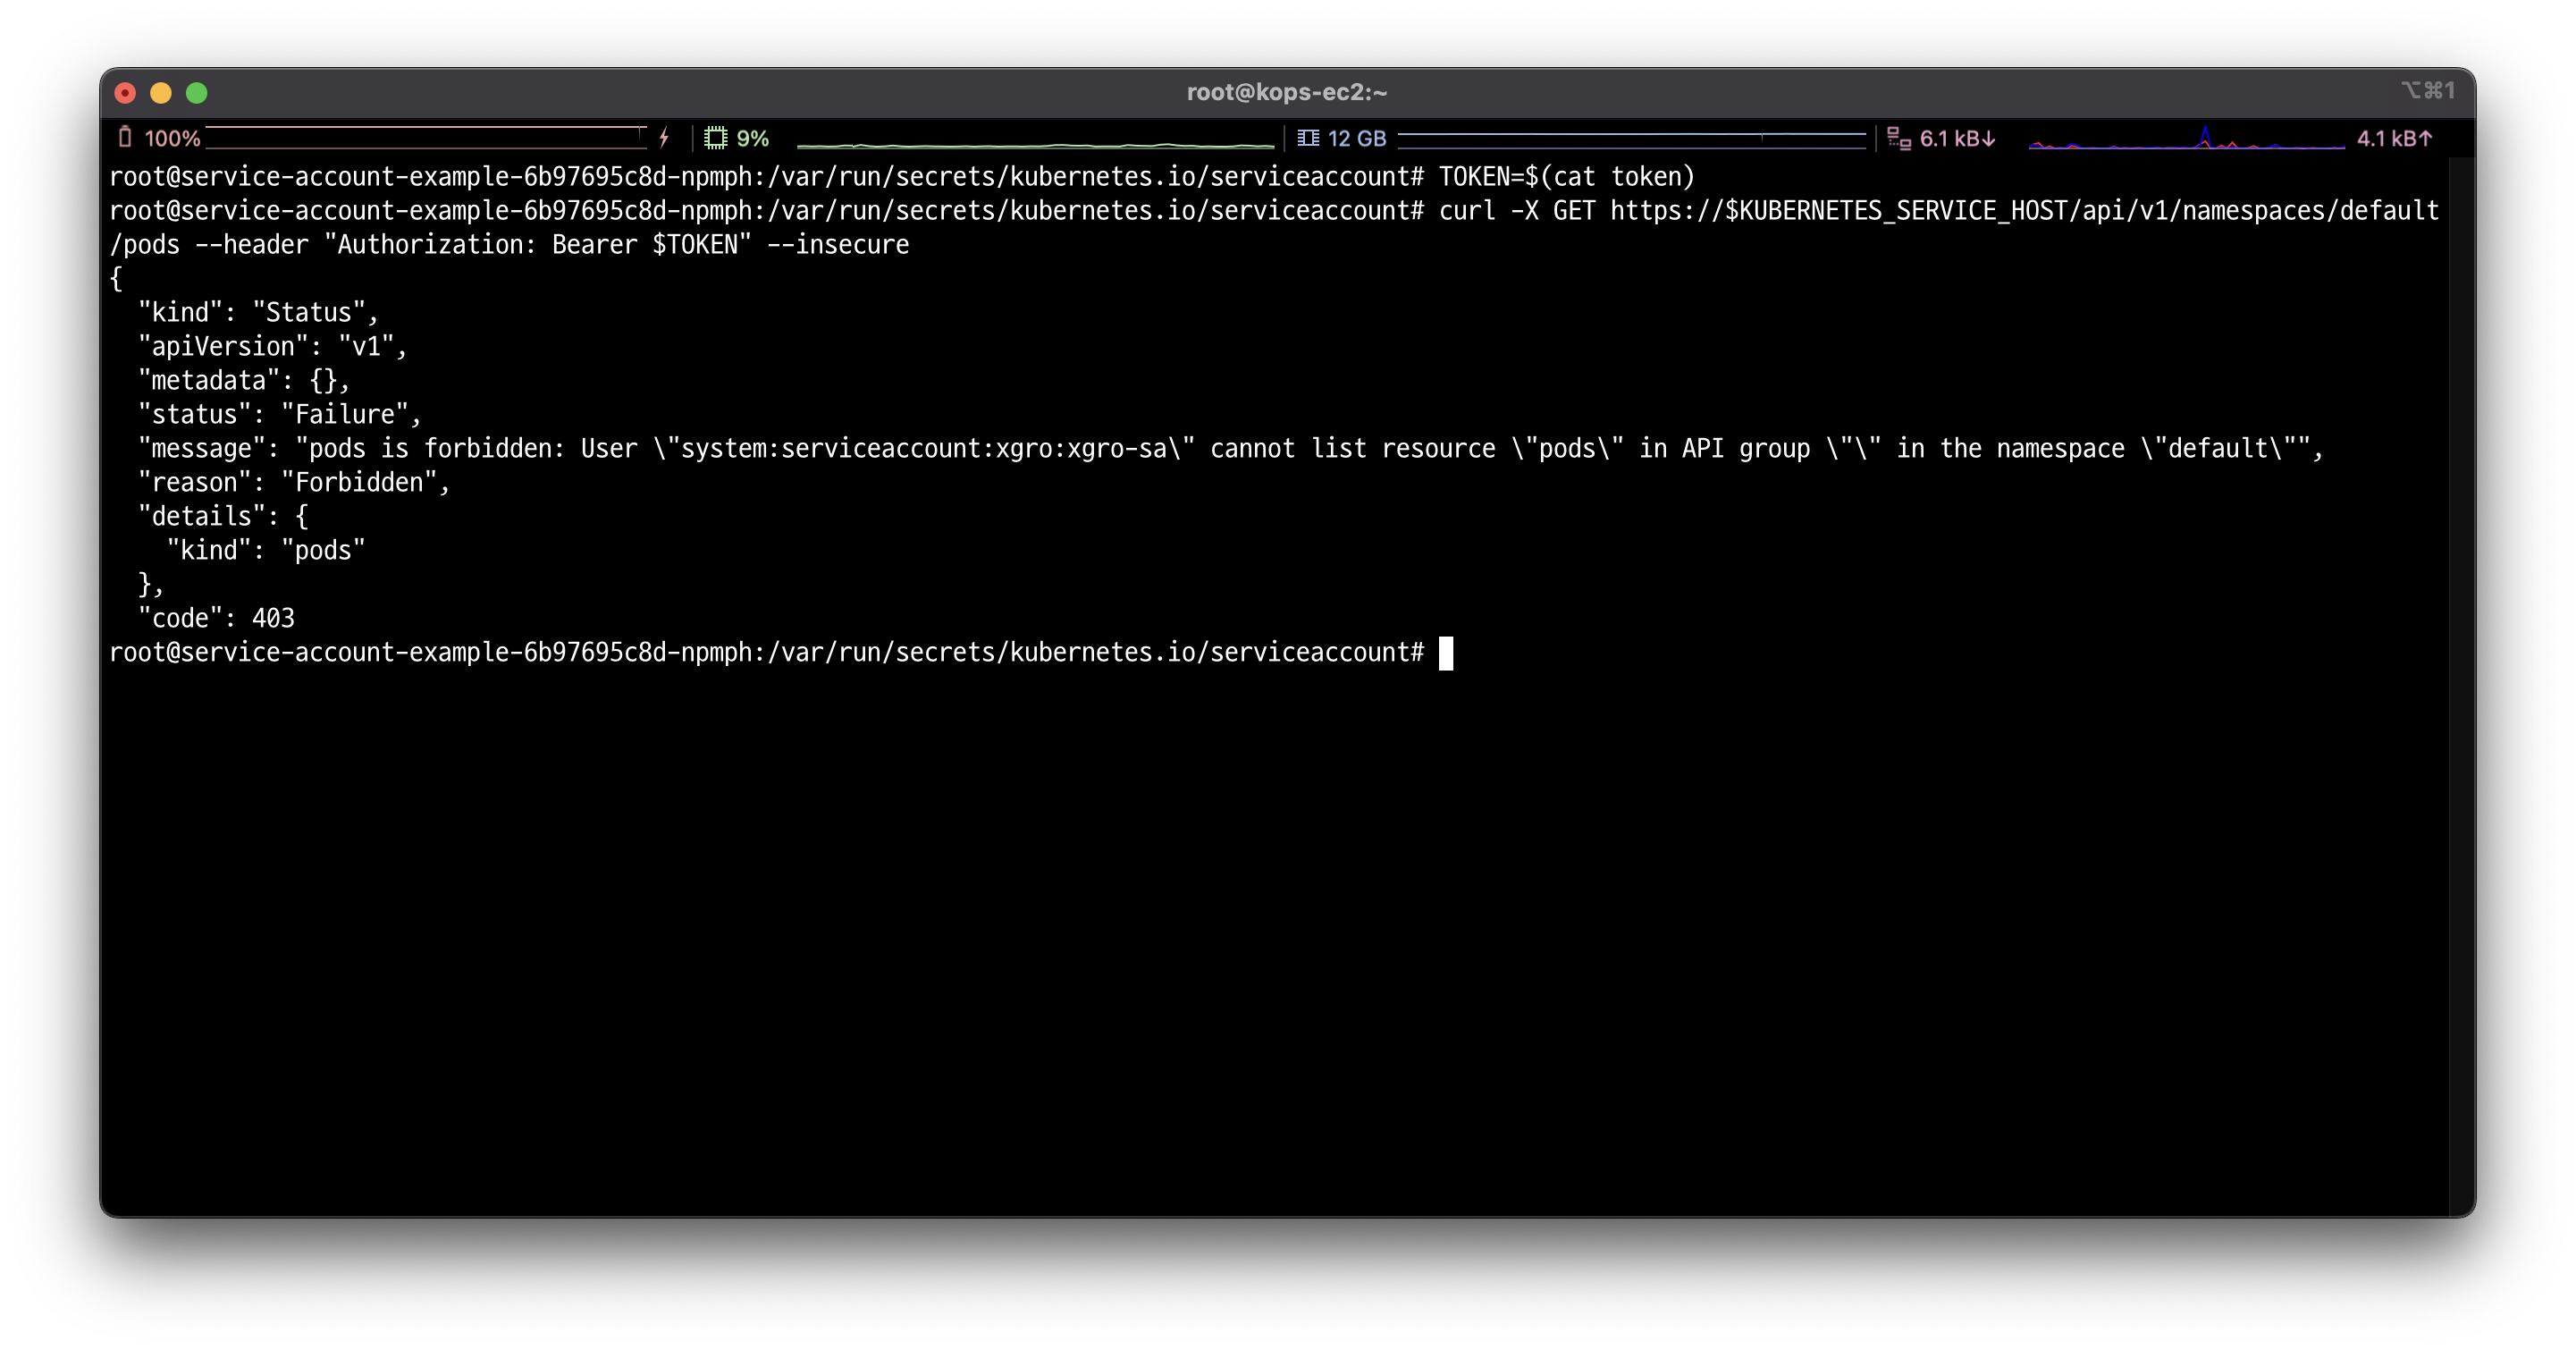
401 (Unauthorized)가 아닌 403 (Forbidden)으로 응답된 것을 확인할 수 있습니다.
👉 Step 03. ClusterRole 생성
서비스 어카운트에 대한 클러스터 역할 및 클러스터 역할 바인딩을 생성하여 권한을 부여할 수 있습니다.
우선 클러스터 역할을 생성합니다.
Pod에 대한 리소스에서 get, watch, list에 대한 권한만 부여합니다.
yaml 파일로 선언하여 생성 하였습니다.
# clusterrole.yaml
apiVersion: rbac.authorization.k8s.io/v1
kind: ClusterRole
metadata:
  name: xgro-cluster-role
  namespace: xgro
rules:
  - apiGroups: [""]
    resources: ["pods"]
    verbs: ["get", "watch", "list"]
---
apiVersion: rbac.authorization.k8s.io/v1
kind: ClusterRoleBinding
metadata:
  name: xgro-cluster-role-binding
  namespace: xgro
subjects:
  - kind: ServiceAccount
    name: xgro-sa
    namespace: xgro
roleRef:
  kind: ClusterRole
  name: xgro-cluster-role
  apiGroup: rbac.authorization.k8s.io
클러스터 역할과 클러스터 역할 바인딩을 생성하여 역할을 연결합니다.
✅ 결과
다시 요청하면, 파드의 상세를 확인할 수 있습니다.

📌 Reference
- 서비스 어카운트 생성 - https://kingofbackend.tistory.com/237