📌 Notice
Database Operator In Kubernetes study (=DOIK)
데이터베이스 오퍼레이터를 이용하여 쿠버네티스 환경에서 배포/운영하는 내용을 정리한 블로그입니다.
CloudNetaStudy그룹에서 스터디를 진행하고 있습니다.
Gasida님께 다시한번 🙇 감사드립니다.EKS 및 KOPS 관련 스터디 내용은 아래 링크를 통해 확인할 수 있습니다.
[AEWS] AWS EKS 스터디
[PKOS] KOPS를 이용한 AWS에 쿠버네티스 배포
📌 Summary
-
K8s의 Operator를 통해 어플리케이션을 패키징-배포-관리할 수 있습니다.
-
데이터베이스 오퍼레이터를 이해하기 위해 반드시 알아야하는 쿠버네티스 관련 지식을 정리합니다.
-
PostgreSQL을 쿠버네티스 환경에서 배포해보며 작동방식에 대해서 알 수 있습니다.
📌 Study
👉 Step 01. PostgreSQL 소개
PostgreSQL 은 Global Development Group 에서 개발하는 오픈소스 RDBMS - 링크
- 국제 표준화 기구 ISO의 SQL 표준(SQL:2016 - Wiki)을 가장 잘 준수 : 179 필수 기능 중 170개 준수 ← 이 정도를 준수하는 다른 어떤 RDBMS도 찾아보기 어렵습니다.
- 트랜잭션 지원 : 트랜잭션의 안전한 수행을 위한 MVCC 와 ACID 속성을 지원합니다.
- 오픈소스 라이선스 : PostgresQL 라이선스를 사용하고 BSD나 MIT 라이선스와 비슷, 복사 사용 연구 수정 배포 등의 제한이 없습니다! - 링크
PostgreSQL 구조
PostgreSQL 데이터베이스 계층 구조
- 클러스터 Cluster : 데이터베이스들의 집합
- 스키마 Schema : 개체들의 논리적인 집합, 개체는 테이블, 뷰, 함수, 인덱스, 데이터 타입, 연산자 등이 있다.
- 데이터베이스 생성 시 자동으로 기본 스키마인 public 스키마가 생성됨
- PostgreSQL 는 테이블의 집합을 스키마의 개념으로 사용한다. 여기서 스키마들의 집합이 데이터베이스가 된다.
- 대표적으로 MySQL 에서는 테이블의 집합이 데이터베이스가 된다.
- 테이블 Table : 가장 기본 구조인 테이블, 표를 테이블이라 부른다고 생각하면 좋다
- 테이블은 가로행(row) 과 세로열(column)로 이루어져 있다.
- 어떤 경우에는 테이블을 ‘릴레이션 relation’ 라고 한다. 테이블과 릴레이션은 데이터간 ‘관계'를 통해 데이터를 관리할 수 있게 한다.
👉 Step 02. CloudNativePG 소개 및 설치
CloudNativePG 소개
쿠버네티스 환경에서 PostgreSQL 워크로드를 관리합니다.
CloudNativePG 는 EDB가 개발 후, Apache License 2.0 공개 및 ‘22.4 CNCF Sandbox 제출함, 오퍼레이터 Level V - Auto Pilot 지원합니다.
본 블로그는 ‘23.10.29 CNPG 버전 : 1.21.x - 쿠버네티스 지원 버전(1.25 ~ 1.28), PostgreSQL 지원 버전(12 ~ 16)을 사용하여 실습을 진행합니다.
지원 기능
- Direct integration with Kubernetes API server for High Availability, without requiring an external tool
- Self-Healing capability, through:
- failover of the primary instance by promoting the most aligned replica
- automated recreation of a replica
- Planned switchover of the primary instance by promoting a selected replica
- Scale up/down capabilities
- Definition of an arbitrary number of instances (minimum 1 - one primary server)
- Definition of the read-write service, to connect your applications to the only primary server of the cluster
- Definition of the read-only service, to connect your applications to any of the instances for reading workloads
- Declarative management of PostgreSQL configuration, including certain popular Postgres extensions through the cluster
spec:pgaudit,auto_explain,pg_stat_statements, andpg_failover_slots- Declarative management of Postgres roles, users and groups
- Support for Local Persistent Volumes with PVC templates
- Reuse of Persistent Volumes storage in Pods
- Separate volume for WAL files
- Rolling updates for PostgreSQL minor versions
- In-place or rolling updates for operator upgrades
- TLS connections and client certificate authentication
- Support for custom TLS certificates (including integration with cert-manager)
- Continuous WAL archiving to an object store (AWS S3 and S3-compatible, Azure Blob Storage, and Google Cloud Storage)
- Backups on volume snapshots (where supported by the underlying storage classes)
- Backups on object stores (AWS S3 and S3-compatible, Azure Blob Storage, and Google Cloud Storage)
- Full recovery and Point-In-Time recovery from an existing backup on volume snapshots or object stores
- Offline import of existing PostgreSQL databases, including major upgrades of PostgreSQL
- Fencing of an entire PostgreSQL cluster, or a subset of the instances in a declarative way
- Hibernation of a PostgreSQL cluster in a declarative way
- Support for Synchronous Replicas
- Support for HA physical replication slots at cluster level
- Backup from a standby
- Backup retention policies (based on recovery window, only on object stores)
- Parallel WAL archiving and restore to allow the database to keep up with WAL generation on high write systems
- Support tagging backup files uploaded to an object store to enable optional retention management at the object store layer Replica clusters for
- PostgreSQL deployments across multiple Kubernetes clusters, enabling private, public, hybrid, and multi-cloud architectures
- Connection pooling with PgBouncer
- Support for node affinity via
nodeSelector- Native customizable exporter of user defined metrics for Prometheus through the
metricsport (9187)- Standard output logging of PostgreSQL error messages in JSON format
- Automatically set
readOnlyRootFilesystemsecurity context for podscnpgplugin forkubectl- Simple bind and search+bind LDAP client authentication
- Multi-arch format container images
- OLM installation
...
정말 다양한 기능들을 지원하는 것을 확인할 수 있습니다.
복제 전략: 스토리지 수준 복제 vs 애플리케이션 수준 복제
- PostgreSQL는 스토리지 수준 복제를 권장하지 않음 : https://youtu.be/99uSJXkKpeI?si=4Shn7hdxmCt4IDnO
- HA 와 Scale 를 위해서 built-in physical replication capabilities based on Write Ahead Log (WAL) shipping
- WAL Write-Ahead Logging : PostgreSQL 에서 데이터를 일관성 있게 유지하기 위해서 WAL 파일을 사용
- 로그 Log : 로그란 DBMS에서 변경되는 모든 작업들을 표시하고 기록하는 개념이다. 로그가 저장되는 곳은 데이터가 손실될 걱정이 없는 영구적 저장소이다.
- WAL 파일 : 데이터를 손실없이 정확하게 저장하기 위해서는 로그를 사용하여 다시 돌아갈 방법을 대비해놓아야 한다.
- 완벽하게 데이터 손실을 방지하기 위해서 로그를 작성하지 않고는 다음 데이터 변경 단계로 넘어갈 수 없게 하는 방법을 사용할 수 있다.
- 이런 원리를 이용해서 데이터 변경을 하기 전에 변경 사항을 미리 기록해두는 파일이 WAL 파일이다.
- 변경사항을 미리 기록하기 때문에 WAL 을 사용한다는 것은 데이터 무결성을 보장함.
- PostgreSQL 는 비동기 혹은 동기 스트리밍 복제를 지원, 복제서버는 Hot Standby 기능으로 읽기 처리가 가능
- PostgreSQL supports both asynchronous and synchronous streaming replication over the network, as well as asynchronous file-based log shipping (normally used as a fallback option, for example, to store WAL files in an object store).
- Replicas are usually called standby servers and can also be used for read-only workloads, thanks to the Hot Standby feature.
- CloudNativePG 는 비동기 혹은 동기 스트리밍 복제 구성의 클러스터를 지원합니다.
- CloudNativePG supports clusters based on asynchronous and synchronous streaming replication to manage multiple hot standby replicas within the same Kubernetes cluster, with the following specifications:
- One primary, with optional multiple hot standby replicas for High Availability
- Available services for applications:
rw: applications connect to the only primary instance of the clusterro: applications connect to the only hot standby replicas for read-only-workloadsr: applications connect to any of the instances for read-only workloads

Read-write workloads: -RW 요청을 프라이머리로 전달합니다.
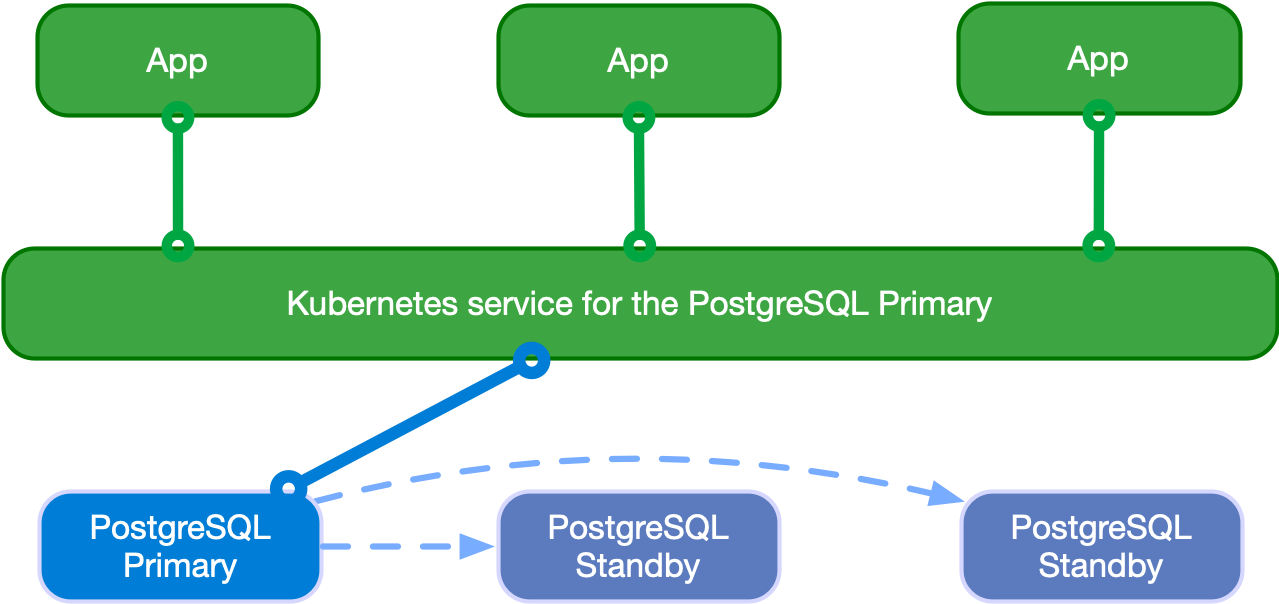
Read-only workloads: -RO 요청을 Standby 로 Round robin 방식으로 전달 , 참고로 -R 요청은 any 전달합니다.

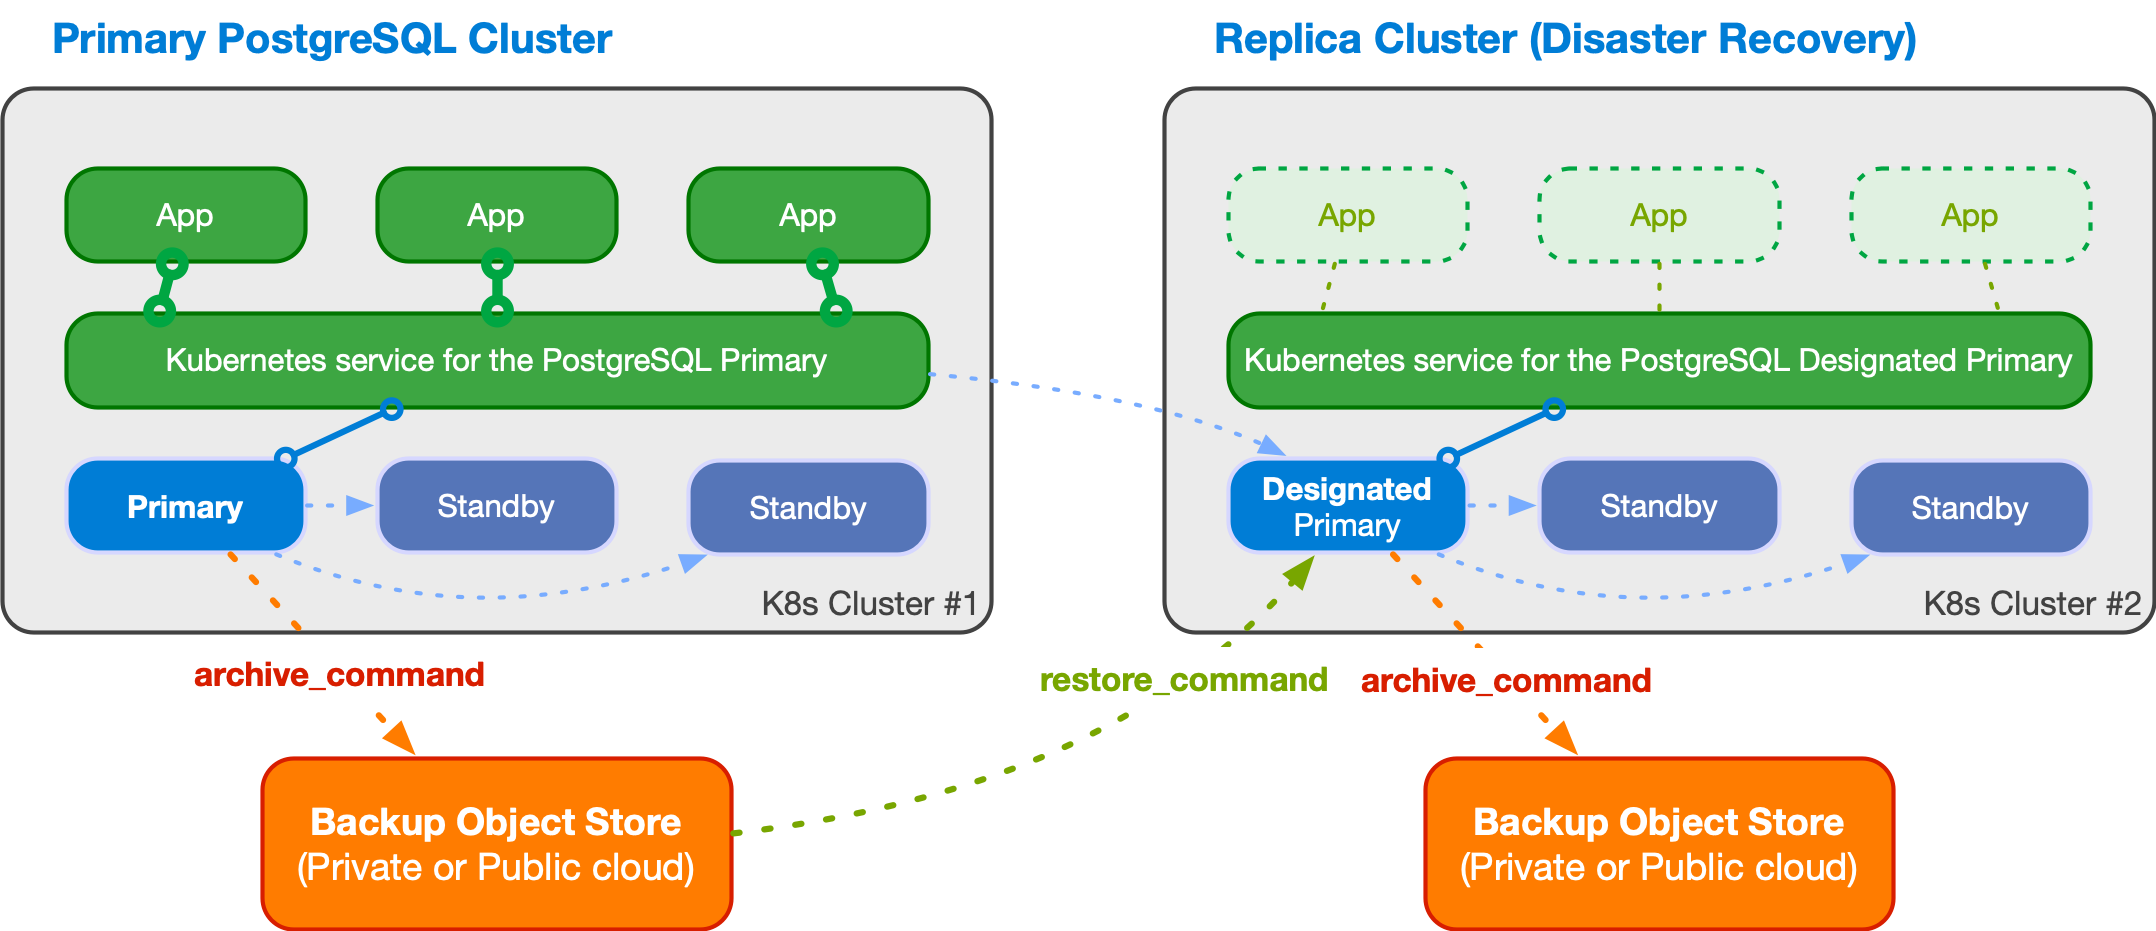
Multi-cluster deployments: 2개의 다른 쿠버네티스 클러스터에서, Replica Cluster 에 Designated Primary 는 Primary 클러스터의 Primary를 복제합니다.
설치
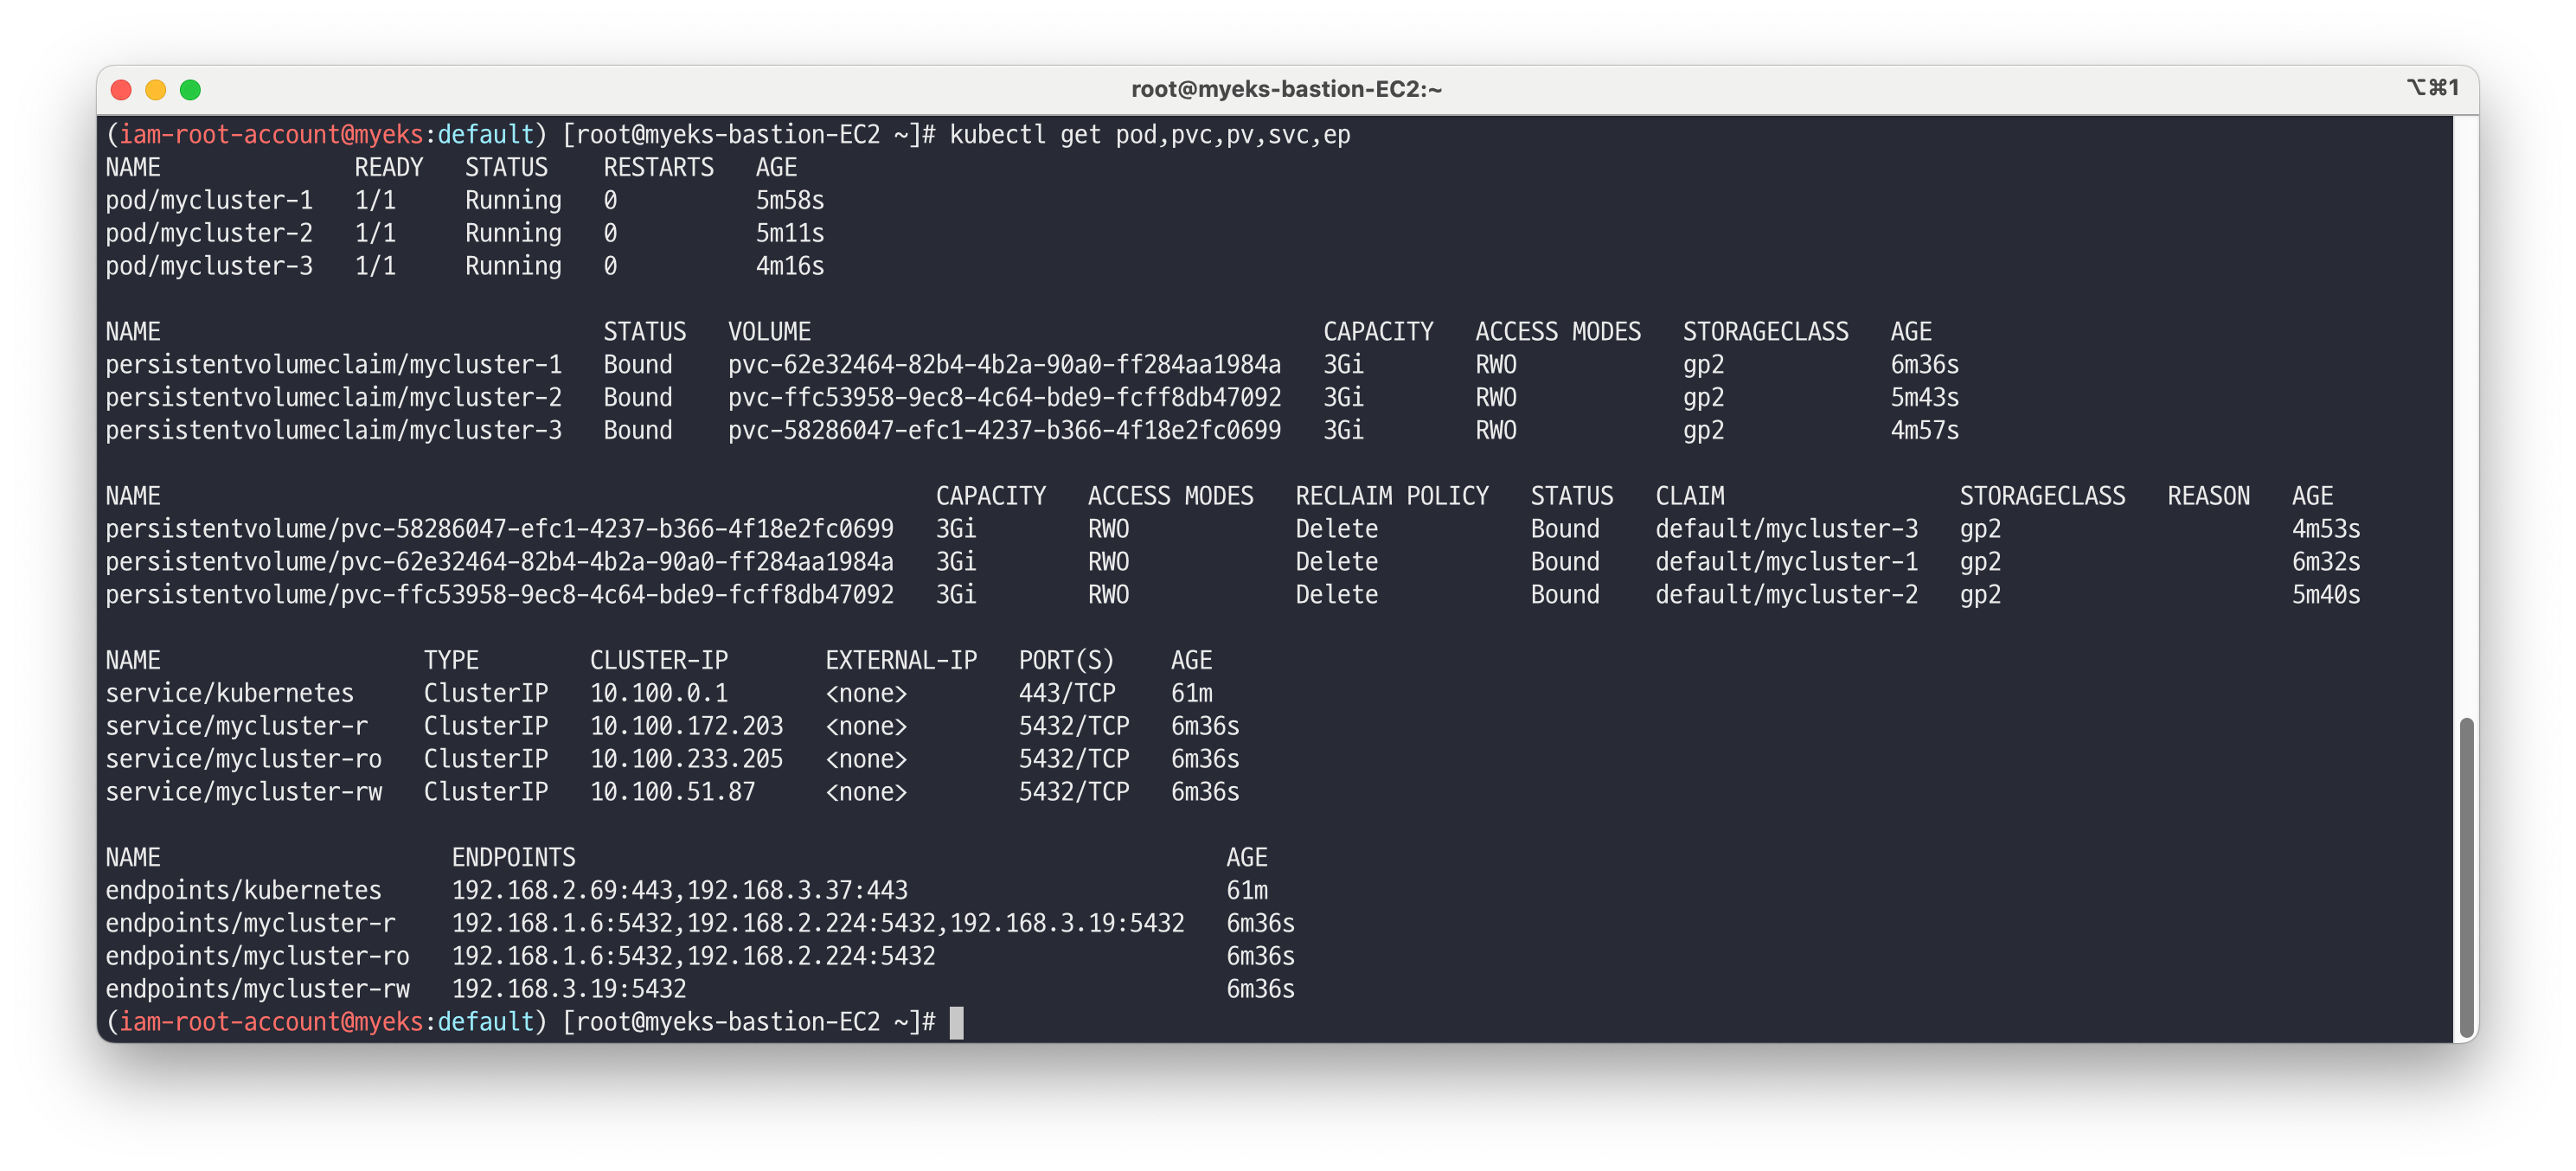
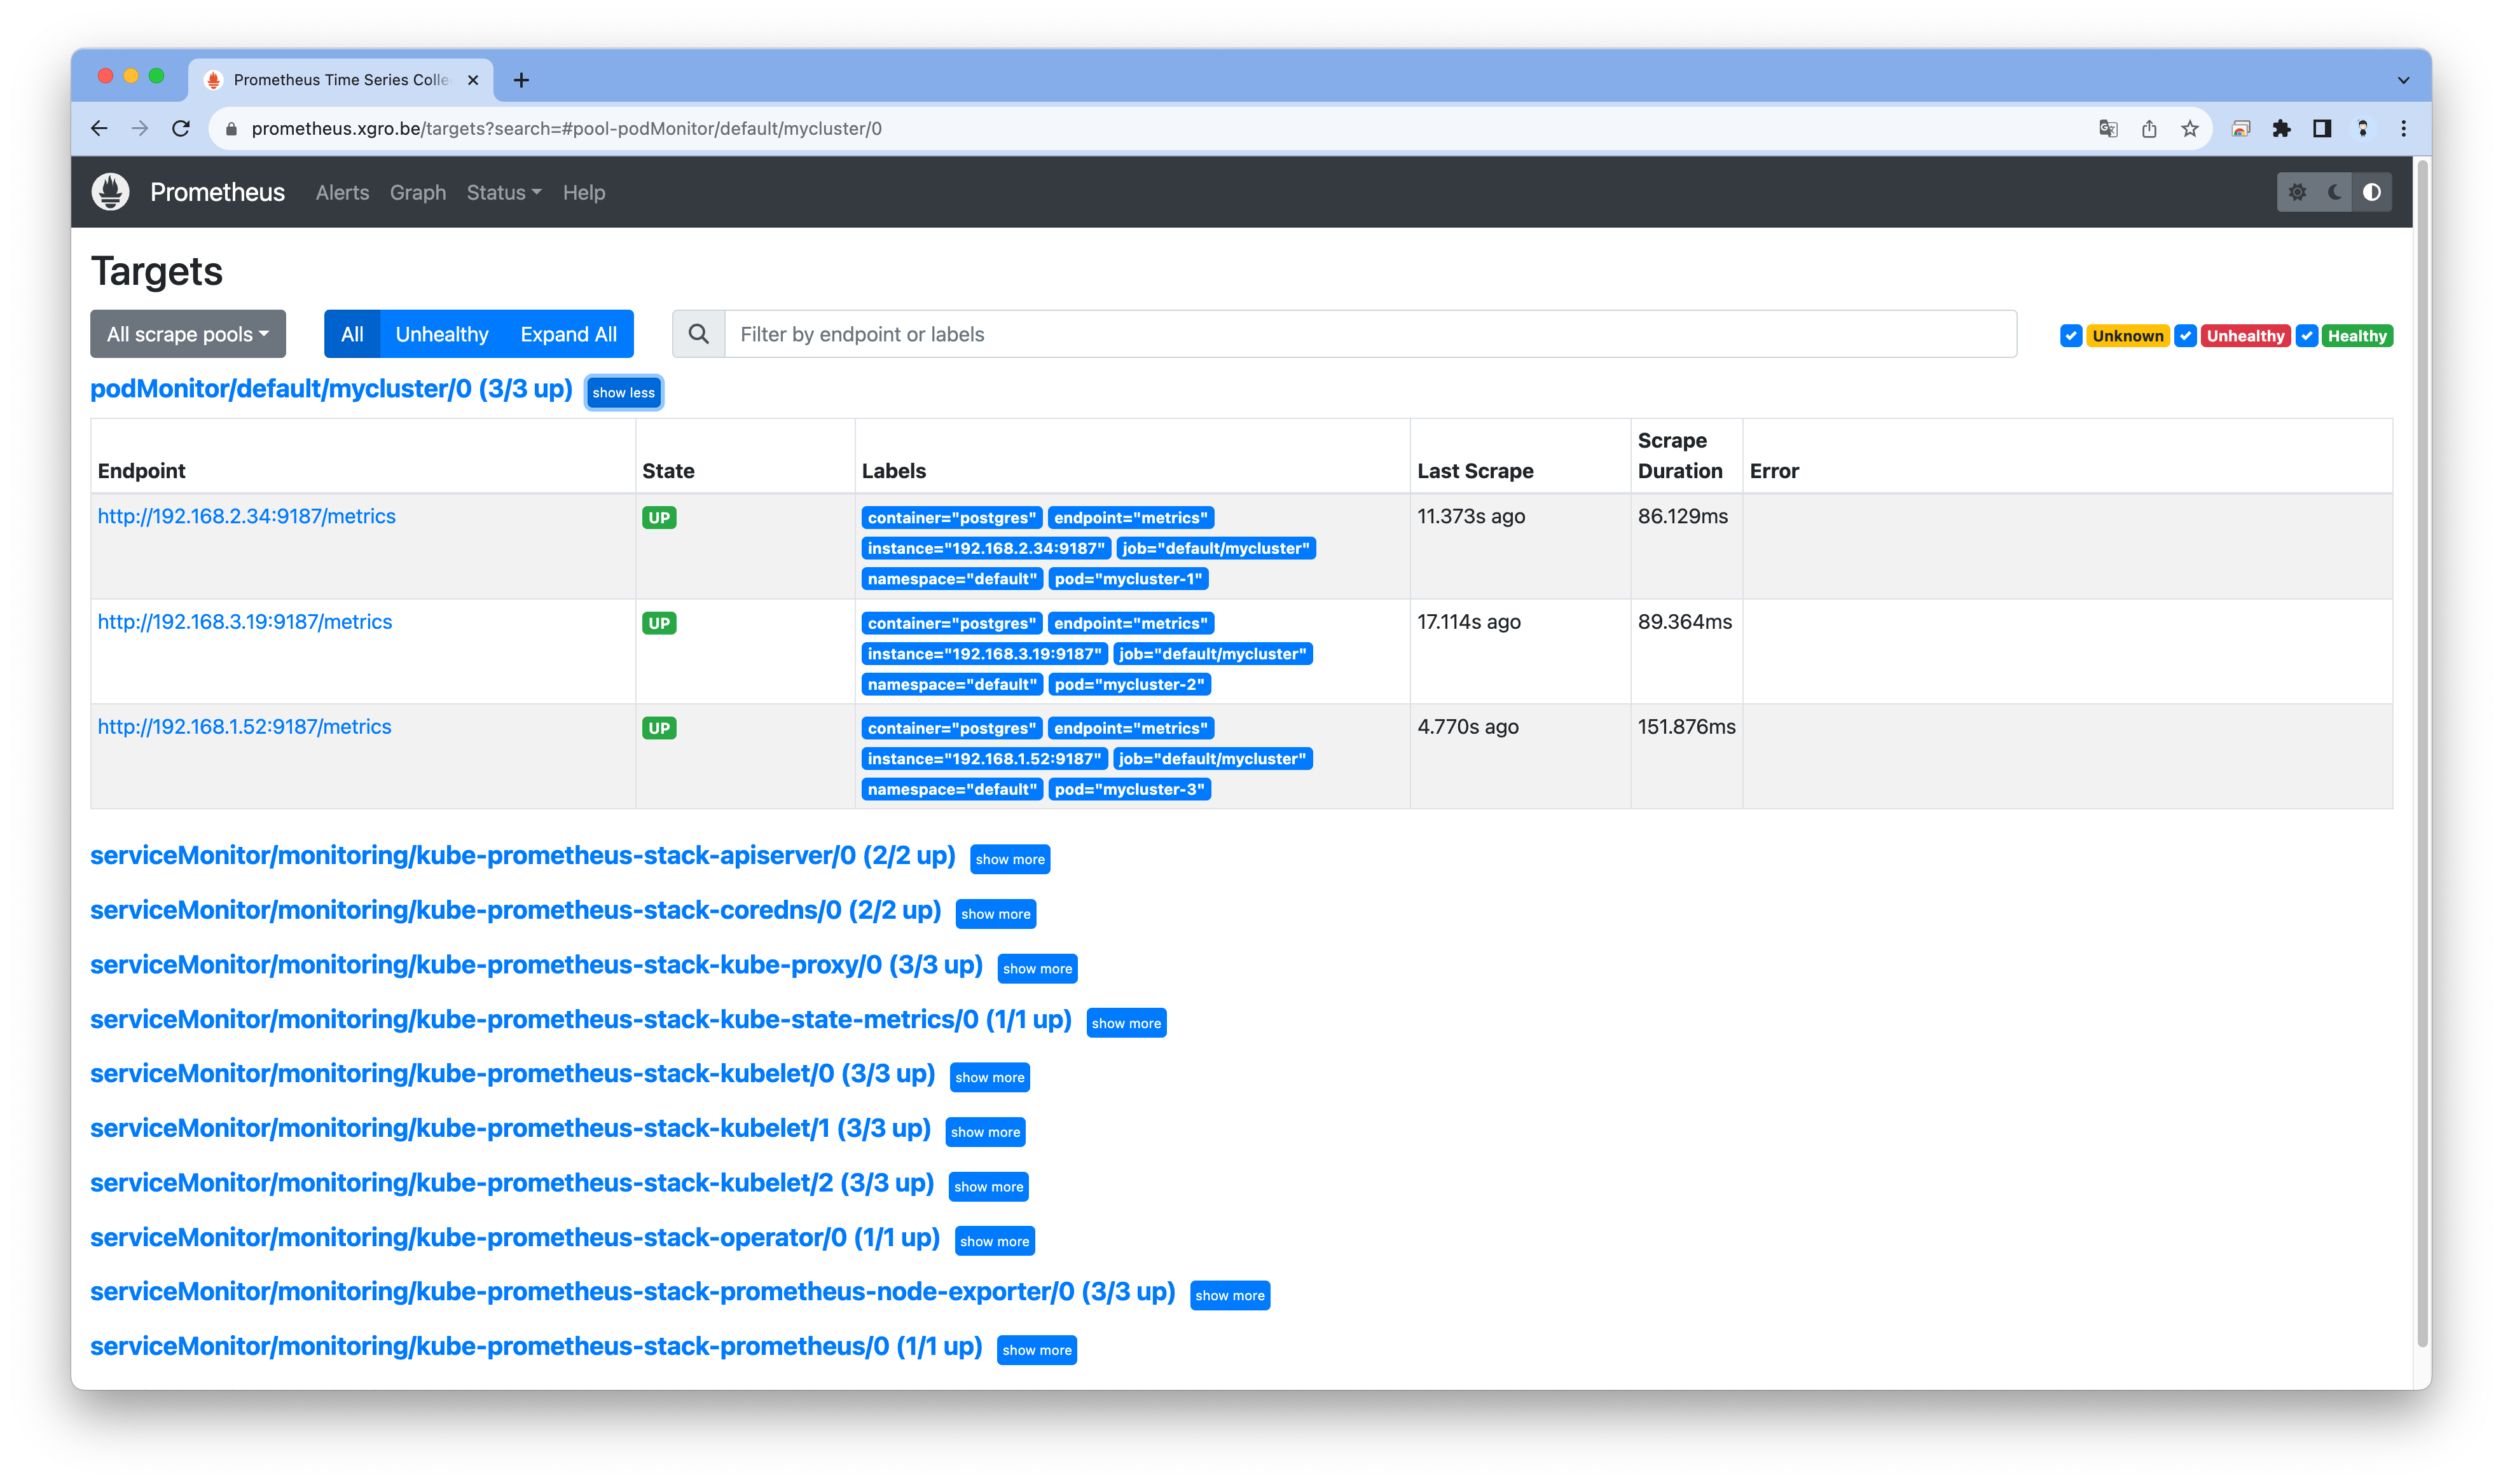
# Install Operator Lifecycle Manager (OLM), a tool to help manage the Operators running on your cluster.
curl -sL https://github.com/operator-framework/operator-lifecycle-manager/releases/download/v0.25.0/install.sh | bash -s v0.25.0
kubectl get ns
kubectl get all -n olm
kubectl get-all -n olm
kubectl get all -n operators
kubectl get-all -n operators | grep -v packagemanifest

# Install the operator by running the following command
# This Operator will be installed in the "operators" namespace and will be usable from all namespaces in the cluster.
curl -s -O https://operatorhub.io/install/cloudnative-pg.yaml
cat cloudnative-pg.yaml | yh
kubectl create -f cloudnative-pg.yaml
kubectl get all -n operators
kubectl get-all -n operators | grep -v packagemanifest
kubectl get crd | grep cnpg
backups.postgresql.cnpg.io                    2023-10-29T02:47:55Z
clusters.postgresql.cnpg.io                   2023-10-29T02:47:56Z
poolers.postgresql.cnpg.io                    2023-10-29T02:47:56Z
scheduledbackups.postgresql.cnpg.io           2023-10-29T02:47:56Z

## api 정보 확인
kubectl explain clusters
kubectl explain backups

# fter install, watch your operator come up using next command.
# To use it, checkout the custom resource definitions (CRDs) introduced by this operator to start using it.
kubectl get clusterserviceversions -n operators # csv = clusterserviceversions 축약
kubectl get csv -A

---------------------------------------
# 클러스터 설치 Deploy a PostgreSQL cluster : 버전 15.3 (추후 15.4 롤링 업데이트 예정)
## 3대 파드 구성(프라이머리 1대, 스탠드바이 2대) , config parameters 설정, pg_hba 설정, bootstrap 설정, 파드 모니터 설정
cat <<EOT> mycluster1.yaml
# Example of PostgreSQL cluster
apiVersion: postgresql.cnpg.io/v1
kind: Cluster
metadata:
  name: mycluster
spec:
  imageName: ghcr.io/cloudnative-pg/postgresql:15.3
  instances: 3
  storage:
    size: 3Gi
  postgresql:
    parameters:
      max_worker_processes: "40"
      timezone: "Asia/Seoul"
    pg_hba:
      - host all postgres all trust
  primaryUpdateStrategy: unsupervised
  enableSuperuserAccess: true
  bootstrap:
    initdb:
      database: app
      encoding: UTF8
      localeCType: C
      localeCollate: C
      owner: app

  monitoring:
    enablePodMonitor: true
EOT

# 설치되는 파드 순서 확인 : job.batch(initdb -> join)
kubectl apply -f mycluster1.yaml && kubectl get pod -w

# 확인
kubectl get pod,pvc,pv,svc,ep
kubectl df-pv
kubectl describe pod -l cnpg.io/cluster=mycluster # TCP 9187 메트릭 제공
kubectl get pod -l cnpg.io/cluster=mycluster -owide
curl -s <파드IP>:9187/metrics
curl -s 192.168.1.84:9187/metrics
# 프로메테우스 ingress 도메인으로 웹 접속
## Targets -> podMonitor/default/cluster-with-metrics 확인
## Graph : cnpg 로 메트릭 확인, 예) cnpg_pg_replication_lag
echo -e "Prometheus Web URL = https://prometheus.$MyDomain"
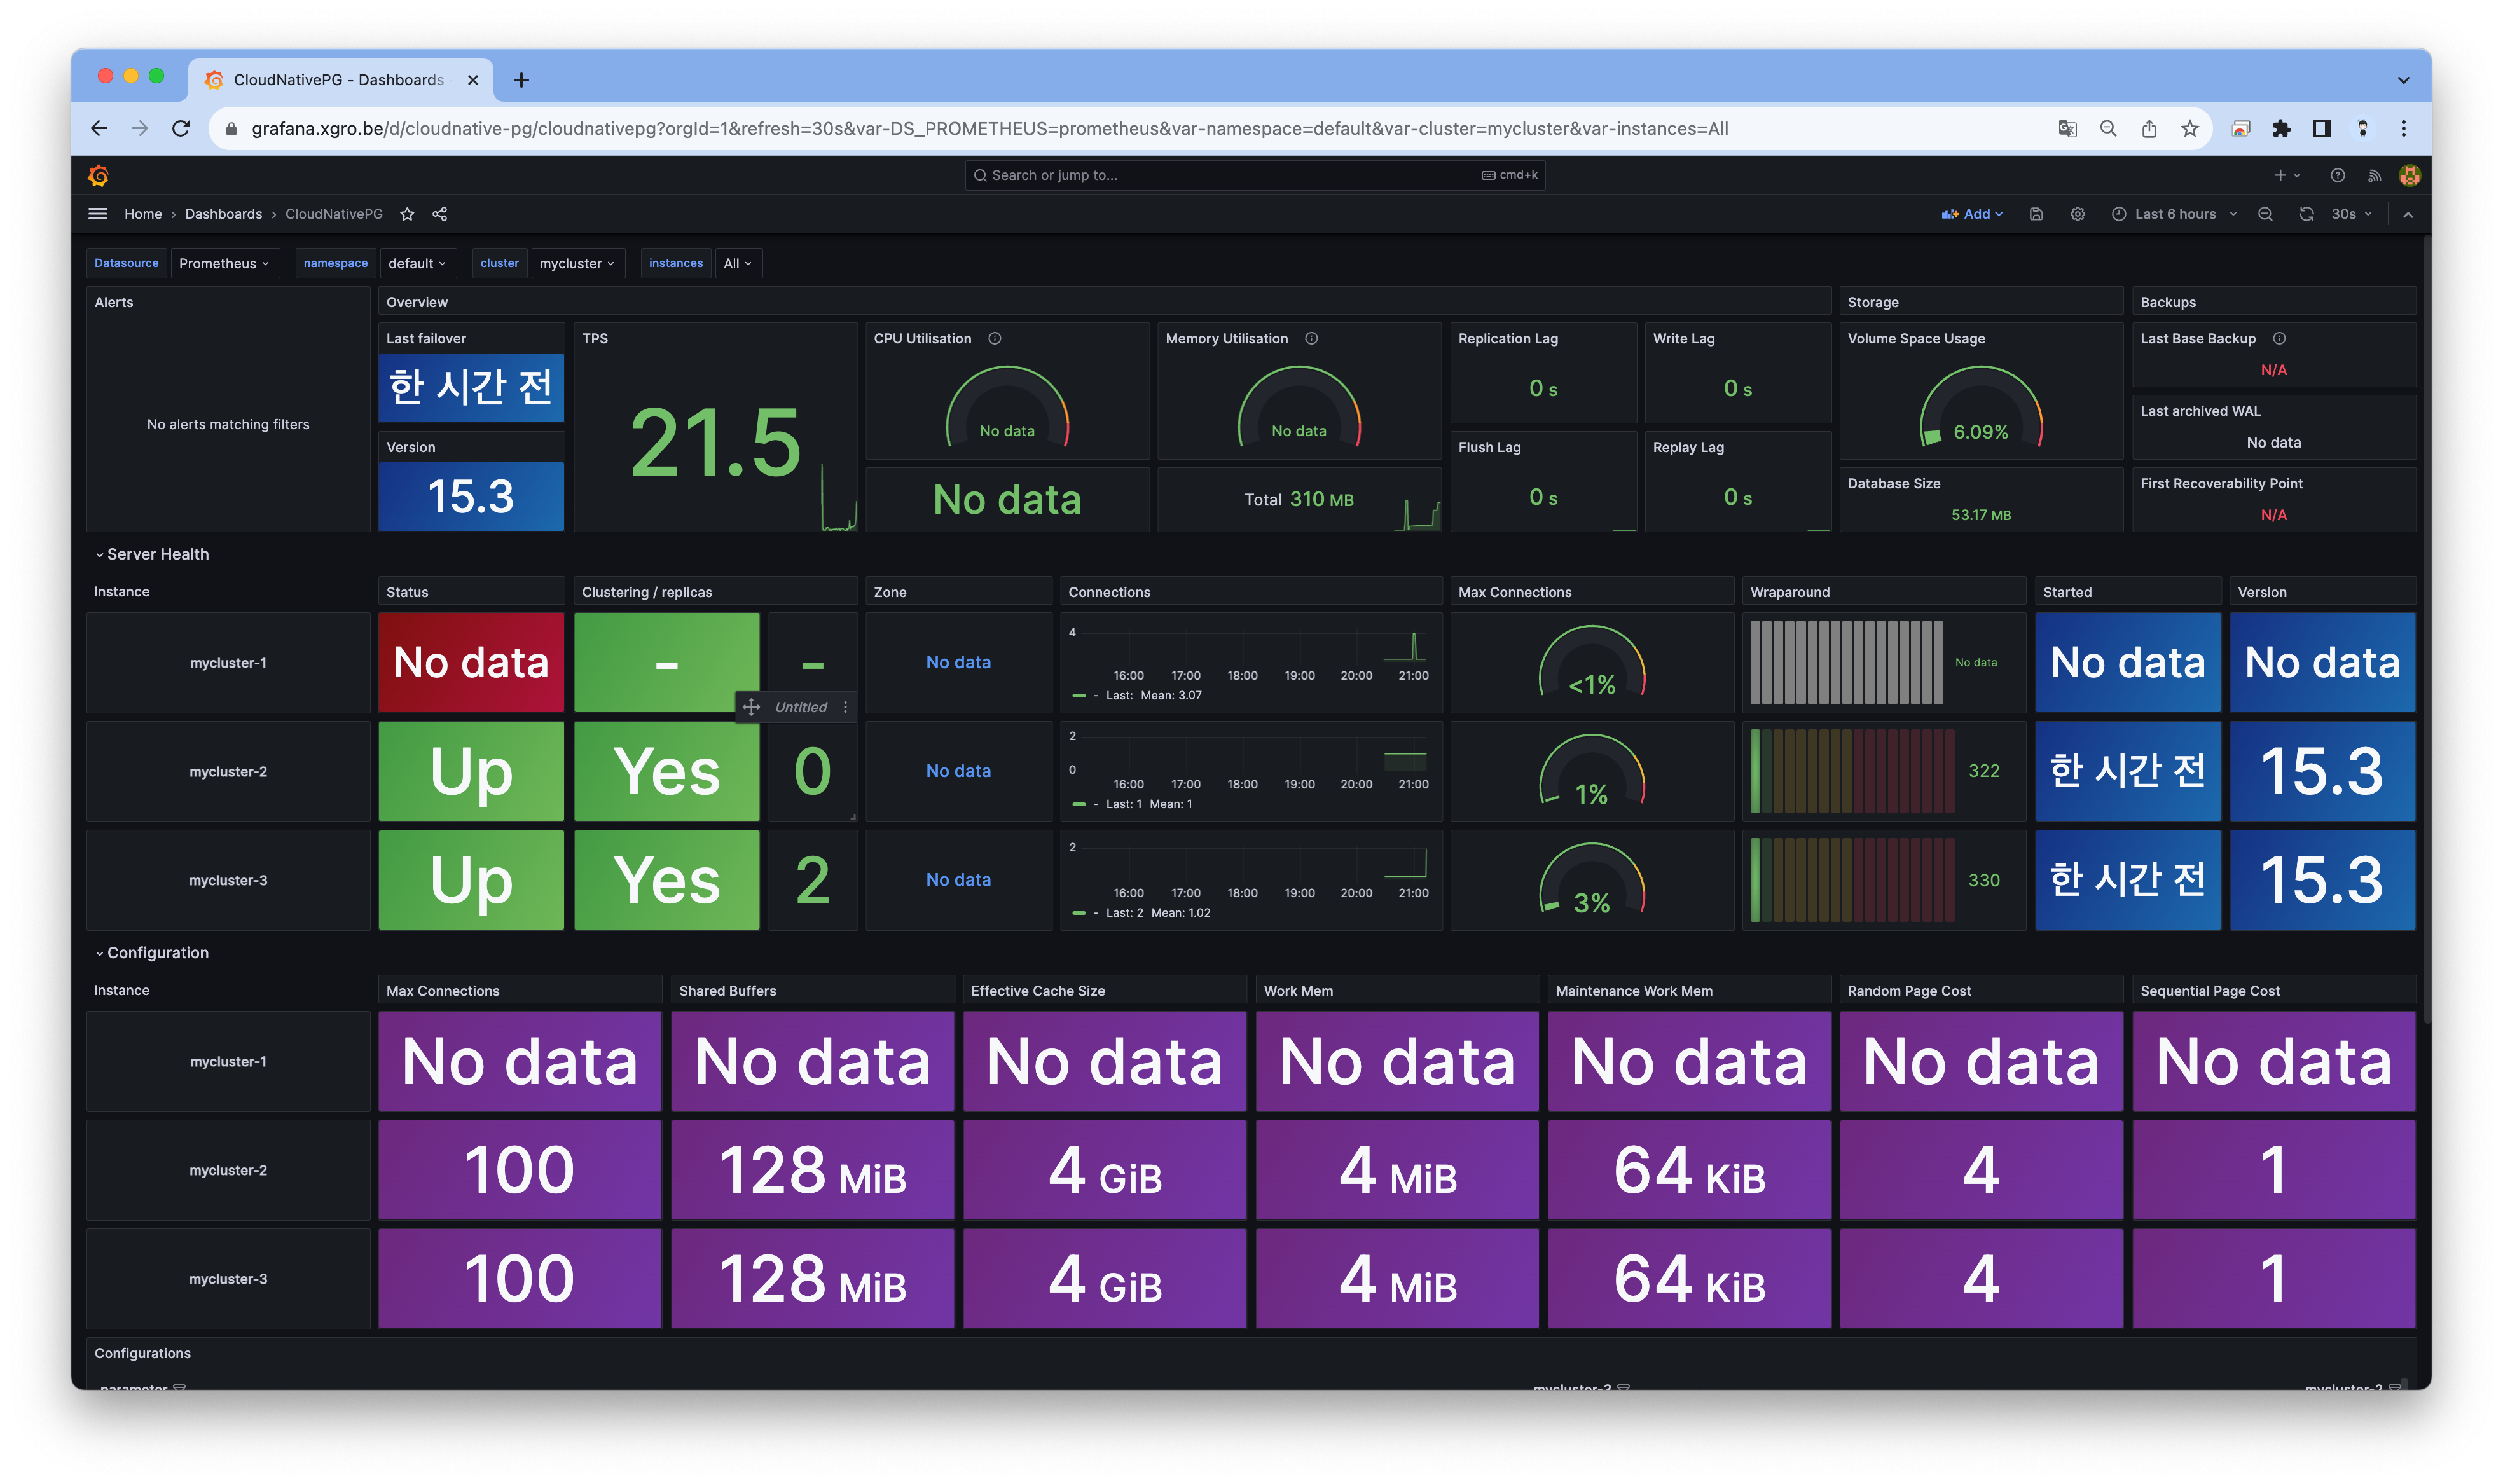
# 그라파나 대시보드 설정 : CloudNativePG 대시보드
kubectl apply -f https://raw.githubusercontent.com/cloudnative-pg/cloudnative-pg/main/docs/src/samples/monitoring/grafana-configmap.yaml

# 그라파나 ingress 도메인으로 웹 접속 : 기본 계정 - admin / prom-operator
echo -e "Grafana Web URL = https://grafana.$MyDomain"
# 설치된 클러스터 확인
kubectl get-all --since 7m
kubectl get cluster
NAME        AGE     INSTANCES   READY   STATUS                     PRIMARY
mycluster   4m32s   3           3       Cluster in healthy state   mycluster-1

# cnpg 플러그인 설치 : 방안1(krew 활용), 방안2(직접 설치)
## (직접설치) curl -sSfL https://github.com/cloudnative-pg/cloudnative-pg/raw/main/hack/install-cnpg-plugin.sh | sudo sh -s -- -b /usr/local/bin
kubectl krew install cnpg
kubectl cnpg status mycluster
Cluster Summary
Name:                mycluster
Namespace:           default
System ID:           7295211024748187666
PostgreSQL Image:    ghcr.io/cloudnative-pg/postgresql:15.3
Primary instance:    mycluster-1
Primary start time:  2023-10-29 03:04:52 +0000 UTC (uptime 1h32m21s)
Status:              Cluster in healthy state
Instances:           3
Ready instances:     3
Current Write LSN:   0/7000000 (Timeline: 1 - WAL File: 000000010000000000000006)

Certificates Status
Certificate Name       Expiration Date                Days Left Until Expiration
----------------       ---------------                --------------------------
mycluster-ca           2024-01-27 02:59:05 +0000 UTC  89.93
mycluster-replication  2024-01-27 02:59:05 +0000 UTC  89.93
mycluster-server       2024-01-27 02:59:05 +0000 UTC  89.93

Continuous Backup status
Not configured

Streaming Replication status
Replication Slots Enabled
Name         Sent LSN   Write LSN  Flush LSN  Replay LSN  Write Lag  Flush Lag  Replay Lag  State      Sync State  Sync Priority  Replication Slot
----         --------   ---------  ---------  ----------  ---------  ---------  ----------  -----      ----------  -------------  ----------------
mycluster-2  0/7000000  0/7000000  0/7000000  0/7000000   00:00:00   00:00:00   00:00:00    streaming  async       0              active
mycluster-3  0/7000000  0/7000000  0/7000000  0/7000000   00:00:00   00:00:00   00:00:00    streaming  async       0              active

Unmanaged Replication Slot Status
No unmanaged replication slots found

Instances status
Name         Database Size  Current LSN  Replication role  Status  QoS         Manager Version  Node
----         -------------  -----------  ----------------  ------  ---         ---------------  ----
mycluster-1  29 MB          0/7000000    Primary           OK      BestEffort  1.21.0           ip-192-168-3-29.ap-northeast-2.compute.internal
mycluster-2  29 MB          0/7000000    Standby (async)   OK      BestEffort  1.21.0           ip-192-168-2-231.ap-northeast-2.compute.internal
mycluster-3  29 MB          0/7000000    Standby (async)   OK      BestEffort  1.21.0           ip-192-168-1-211.ap-northeast-2.compute.internal

kubectl cnpg status mycluster --verbose  # -v , config 설정 적용 확인
...
PostgreSQL HBA Rules
# Grant local access
local all all peer map=local
# Require client certificate authentication for the streaming_replica user
hostssl postgres streaming_replica all cert
hostssl replication streaming_replica all cert
hostssl all cnpg_pooler_pgbouncer all cert
...

# 기본 리소스들 확인 : sts,deploy 사용하지 않음! , 오퍼레이터가 직접 개별 파드를 생성 <- Why?
kubectl get pod,deploy
kubectl get svc,ep,endpointslices -l cnpg.io/cluster=mycluster
kubectl get cm,secret
kubectl get pdb

# PV/PVC 확인
kubectl df-pv
kubectl get pvc,pv

## 아래 AWS EBS를 현재 PV로 사용하고 있는 상태에서, 아래 Node Affinity는 어떤 의미인가?
kubectl describe pv | grep 'Node Affinity:' -A2
Node Affinity:
  Required Terms:
    Term 0:        topology.ebs.csi.aws.com/zone in [ap-northeast-2c]
--
Node Affinity:
  Required Terms:
    Term 0:        topology.ebs.csi.aws.com/zone in [ap-northeast-2a]
--
Node Affinity:
  Required Terms:
    Term 0:        topology.ebs.csi.aws.com/zone in [ap-northeast-2b]

# (참고) 리소스 및 이벤트 YAML 확인
kubectl cnpg report cluster mycluster
unzip ~

# (참고) 로깅 - 링크
kubectl logs mycluster-1 -c bootstrap-controller
kubectl logs mycluster-2 -c bootstrap-controller

kubectl logs mycluster-1 | jq 'select(.logger=="postgres") | .record.message'
kubectl logs mycluster-2 | jq 'select(.logger=="postgres") | .record.message'
kubectl logs mycluster-3 | jq 'select(.logger=="postgres") | .record.message'
...
"entering standby mode"
...

👉 Step 03. CloudNativePG 기본 사용
PostgreSQL 접속
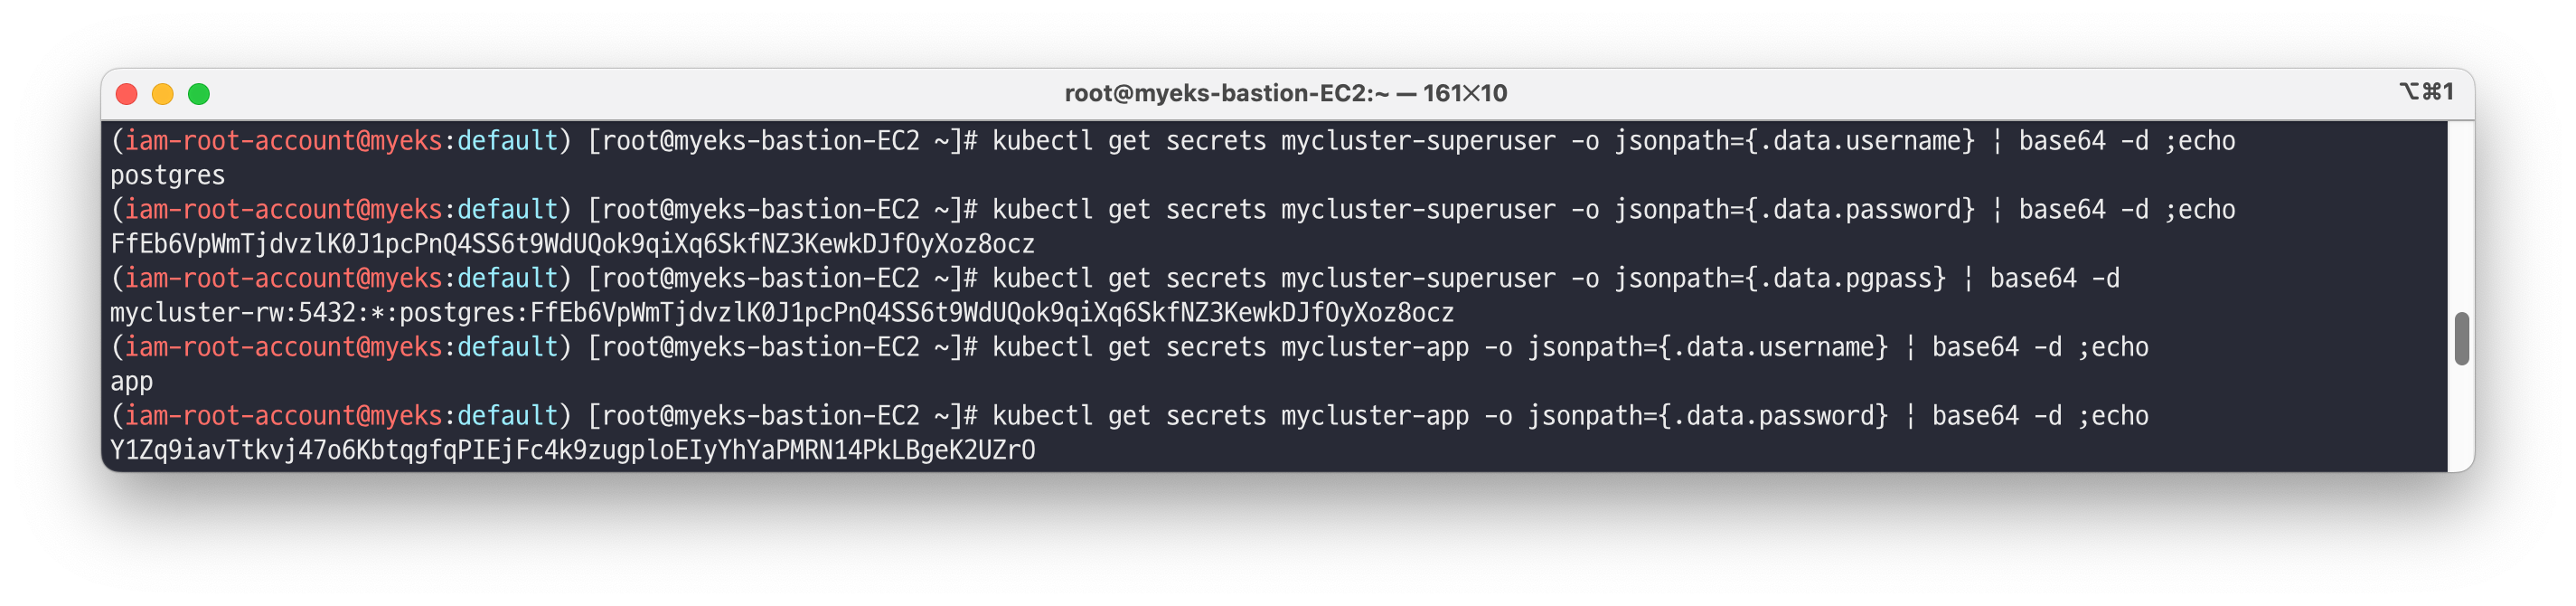
myclient 파드 생성 - Link# 2개의 자격 증명이 저장된 secret 확인 kubectl get secret -l cnpg.io/cluster=mycluster NAME TYPE DATA AGE mycluster-app kubernetes.io/basic-auth 3 109m mycluster-superuser kubernetes.io/basic-auth 3 109m # superuser 계정명 kubectl get secrets mycluster-superuser -o jsonpath={.data.username} | base64 -d ;echo postgres # superuser 계정 암호 kubectl get secrets mycluster-superuser -o jsonpath={.data.password} | base64 -d ;echo FfEb6VpWmTjdvz\K0J1pcPnQ4SS6t9WdUQok9qiXq6SkfNZ3KewkDJf0yXoz80cz kubectl get secrets mycluster-superuser -o jsonpath={.data.pgpass} | base64 -d mycluster-rw:5432:*:postgres:FfEb6VpWmTjdvz\K0J1pcPnQ4SS6t9WdUQok9qiXq6SkfNZ3KewkDJf0yXoz8ocz # app 계정명 kubectl get secrets mycluster-app -o jsonpath={.data.username} | base64 -d ;echo app # app 계정 암호 kubectl get secrets mycluster-app -o jsonpath={.data.password} | base64 -d ;echo Y1Zq9iavTtkvj4706KbtqgfqPIEjFc4k9zugploEIyYhYaPMRN14PkLBgeK2UZr0
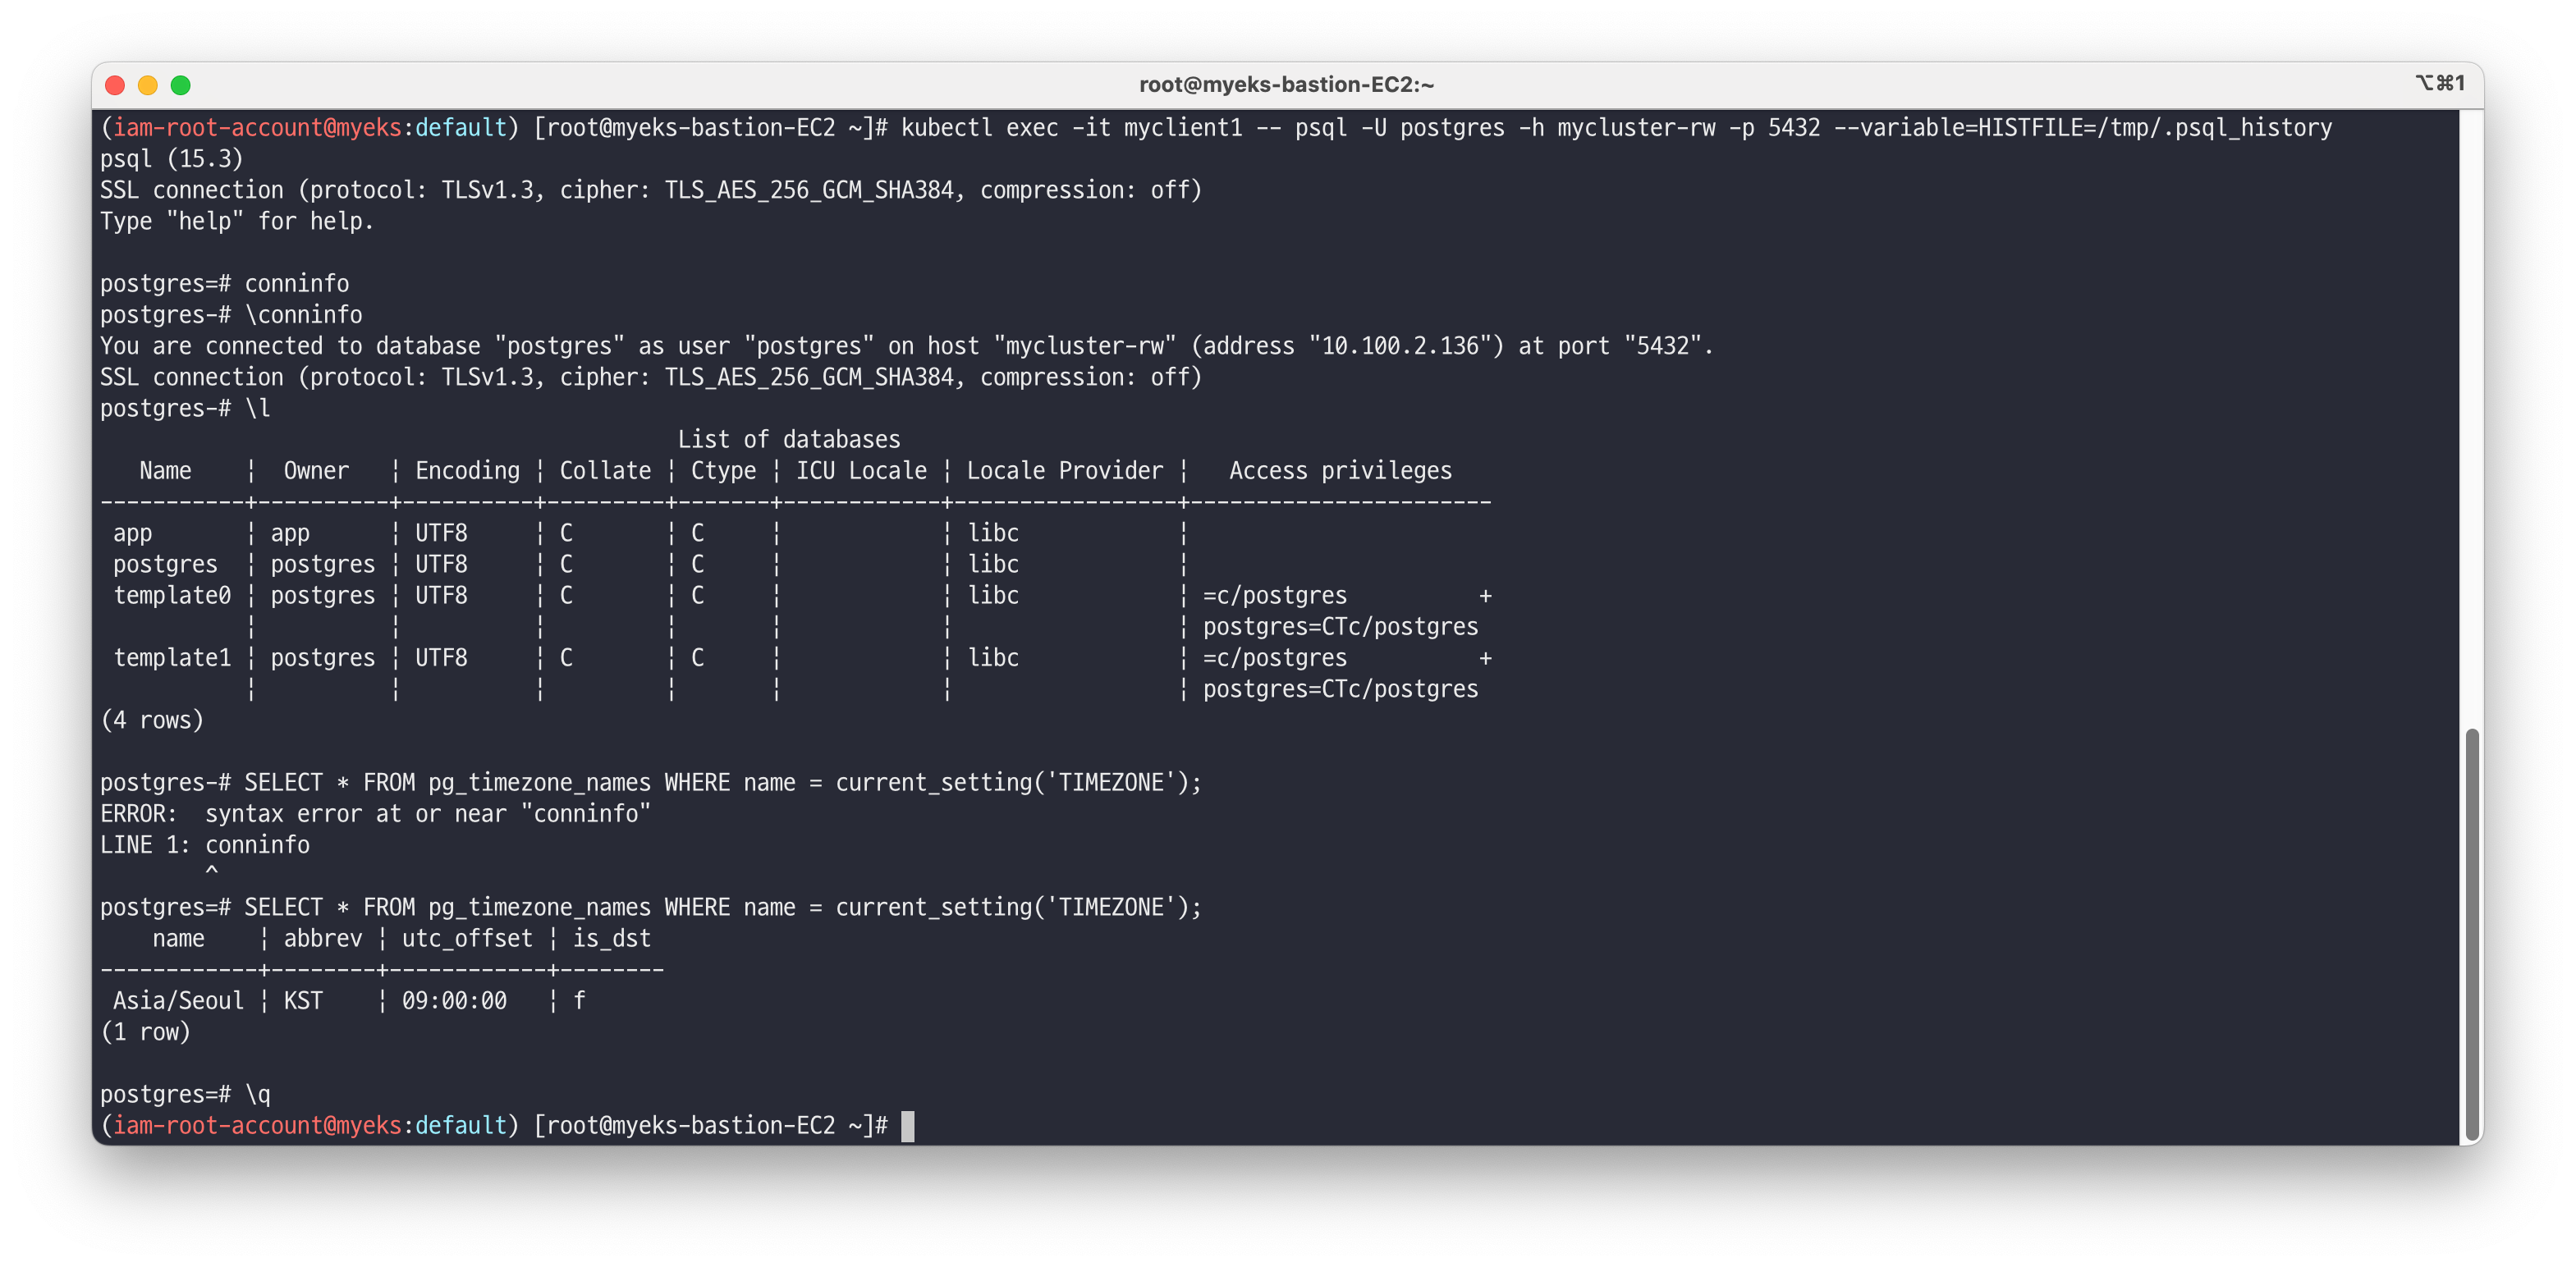
# app 계정 암호 변수 지정
AUSERPW=$(kubectl get secrets mycluster-app -o jsonpath={.data.password} | base64 -d)

# myclient 파드 3대 배포 : envsubst 활용
## PODNAME=myclient1 VERSION=15.3.0 envsubst < myclient.yaml | kubectl apply -f -
curl -s https://raw.githubusercontent.com/gasida/DOIK/main/5/myclient-new.yaml -o myclient.yaml
for ((i=1; i<=3; i++)); do PODNAME=myclient$i VERSION=15.3.0 envsubst < myclient.yaml | kubectl apply -f - ; done

# [myclient1] superuser 계정으로 mycluster-rw 서비스 접속
kubectl exec -it myclient1 -- psql -U postgres -h mycluster-rw -p 5432 --variable=HISTFILE=/tmp/.psql_history
-------------
# 연결 정보 확인
postgres=# \conninfo
You are connected to database "postgres" as user "postgres" on host "mycluster-rw" (address "10.200.1.40") at port "5432".
SSL connection (protocol: TLSv1.3, cipher: TLS_AES_256_GCM_SHA384, bits: 256, compression: off)

# 데이터베이스 조회
postgres=# \l
List of databases
Name    |  Owner   | Encoding | Collate | Ctype |   Access privileges
-----------+----------+----------+---------+-------+-----------------------
app       | app      | UTF8     | C       | C     |
postgres  | postgres | UTF8     | C       | C     |
template0 | postgres | UTF8     | C       | C     | =c/postgres          +
          |          |          |         |       | postgres=CTc/postgres
template1 | postgres | UTF8     | C       | C     | =c/postgres          +
          |          |          |         |       | postgres=CTc/postgres
(4 rows)

# 타임존 확인
postgres=# SELECT * FROM pg_timezone_names WHERE name = current_setting('TIMEZONE');
    name    | abbrev | utc_offset | is_dst
------------+--------+------------+--------
 Asia/Seoul | KST    | 09:00:00   | f
(1 row)

# 빠져나오기
postgres=# \q
-------------
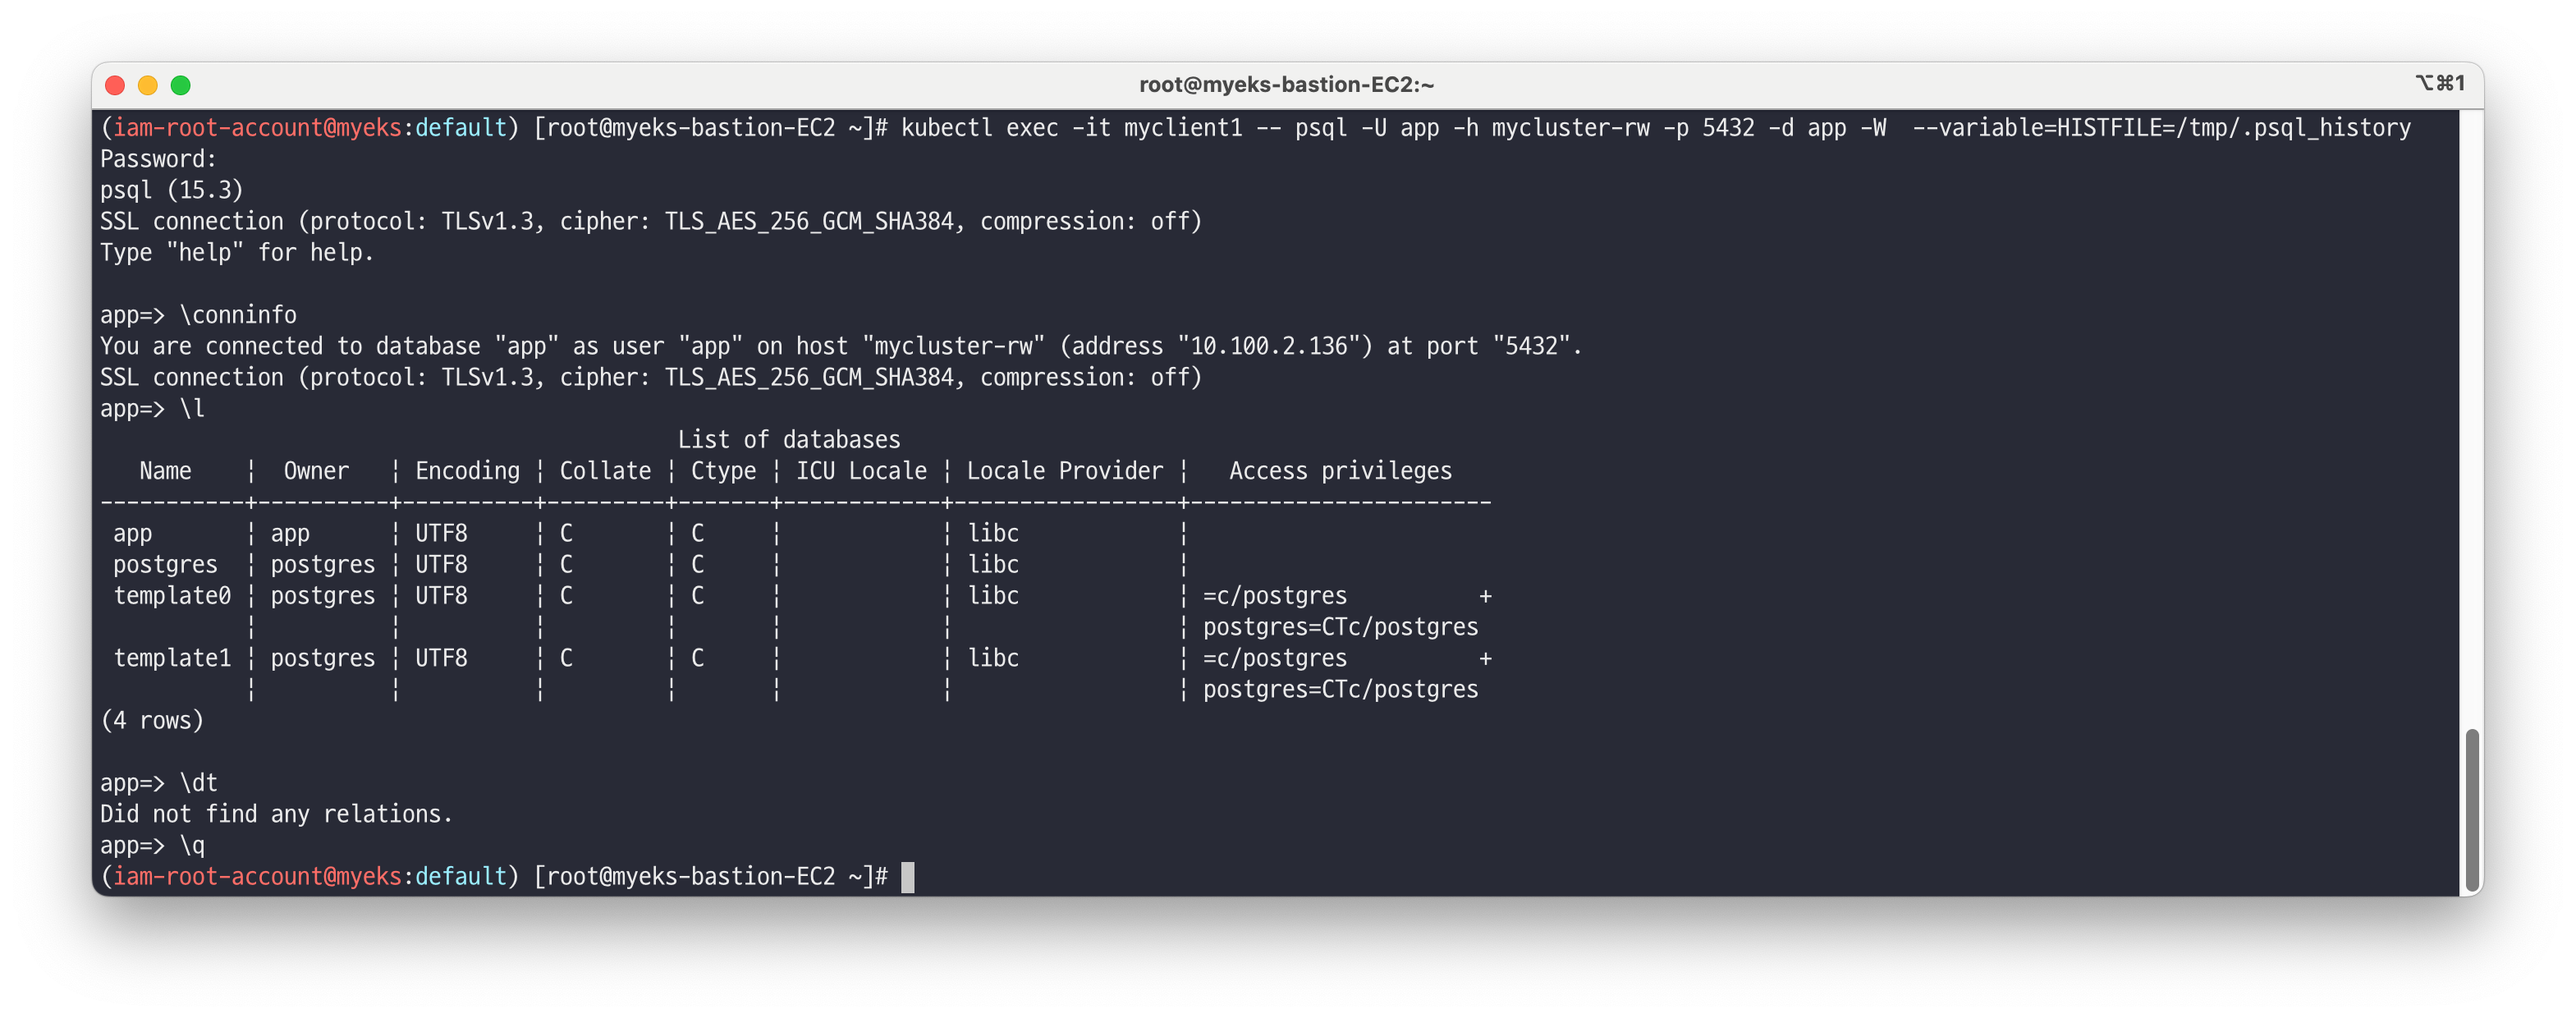
# [myclient1] superuser 계정으로 mycluster-rw 서비스 접속하여 데이터베이스 리스트 조회
kubectl exec -it myclient1 -- psql -U postgres -h mycluster-rw -p 5432 -l

# [myclient1] app 계정으로 mycluster-rw 서비스 접속하여 app 데이터베이스 이동 >> app 계정 암호 직접 입력
kubectl exec -it myclient1 -- psql -U app -h mycluster-rw -p 5432 -d app -W  --variable=HISTFILE=/tmp/.psql_history

(app 비밀번호 입력) Y1Zq9iavTtkvj4706KbtqgfqPIEjFc4k9zugploEIyYhYaPMRN14PkLBgeK2UZr0
-------------
app=> \conninfo
You are connected to database "app" as user "app" on host "mycluster-rw" (address "10.200.1.40") at port "5432".
SSL connection (protocol: TLSv1.3, cipher: TLS_AES_256_GCM_SHA384, bits: 256, compression: off)

app=> \l
app=> \dt
app=> \q
-------------
외부에서 접속 → 보안을 위해서 접속 통제를 하거나, CLB 대신 NLB(보안 그룹, Internal) 설정을 권장
# postgresql psql 툴 설치
yum install postgresql -y

# Service(LoadBalancer)로 외부 노출 설정 : 3~5분 정도 대기 후 아래 접속 시도
kubectl get svc,ep mycluster-rw
kubectl patch svc mycluster-rw -p '{"spec":{"type":"LoadBalancer"}}'
kubectl annotate service mycluster-rw "external-dns.alpha.kubernetes.io/hostname=psql.$MyDomain"

#
psql -U postgres -h psql.$MyDomain
----------------------------------
app=> \conninfo
app=> \l
app=> \q
----------------------------------
✅ Service 서비스별 접속 차이 확인
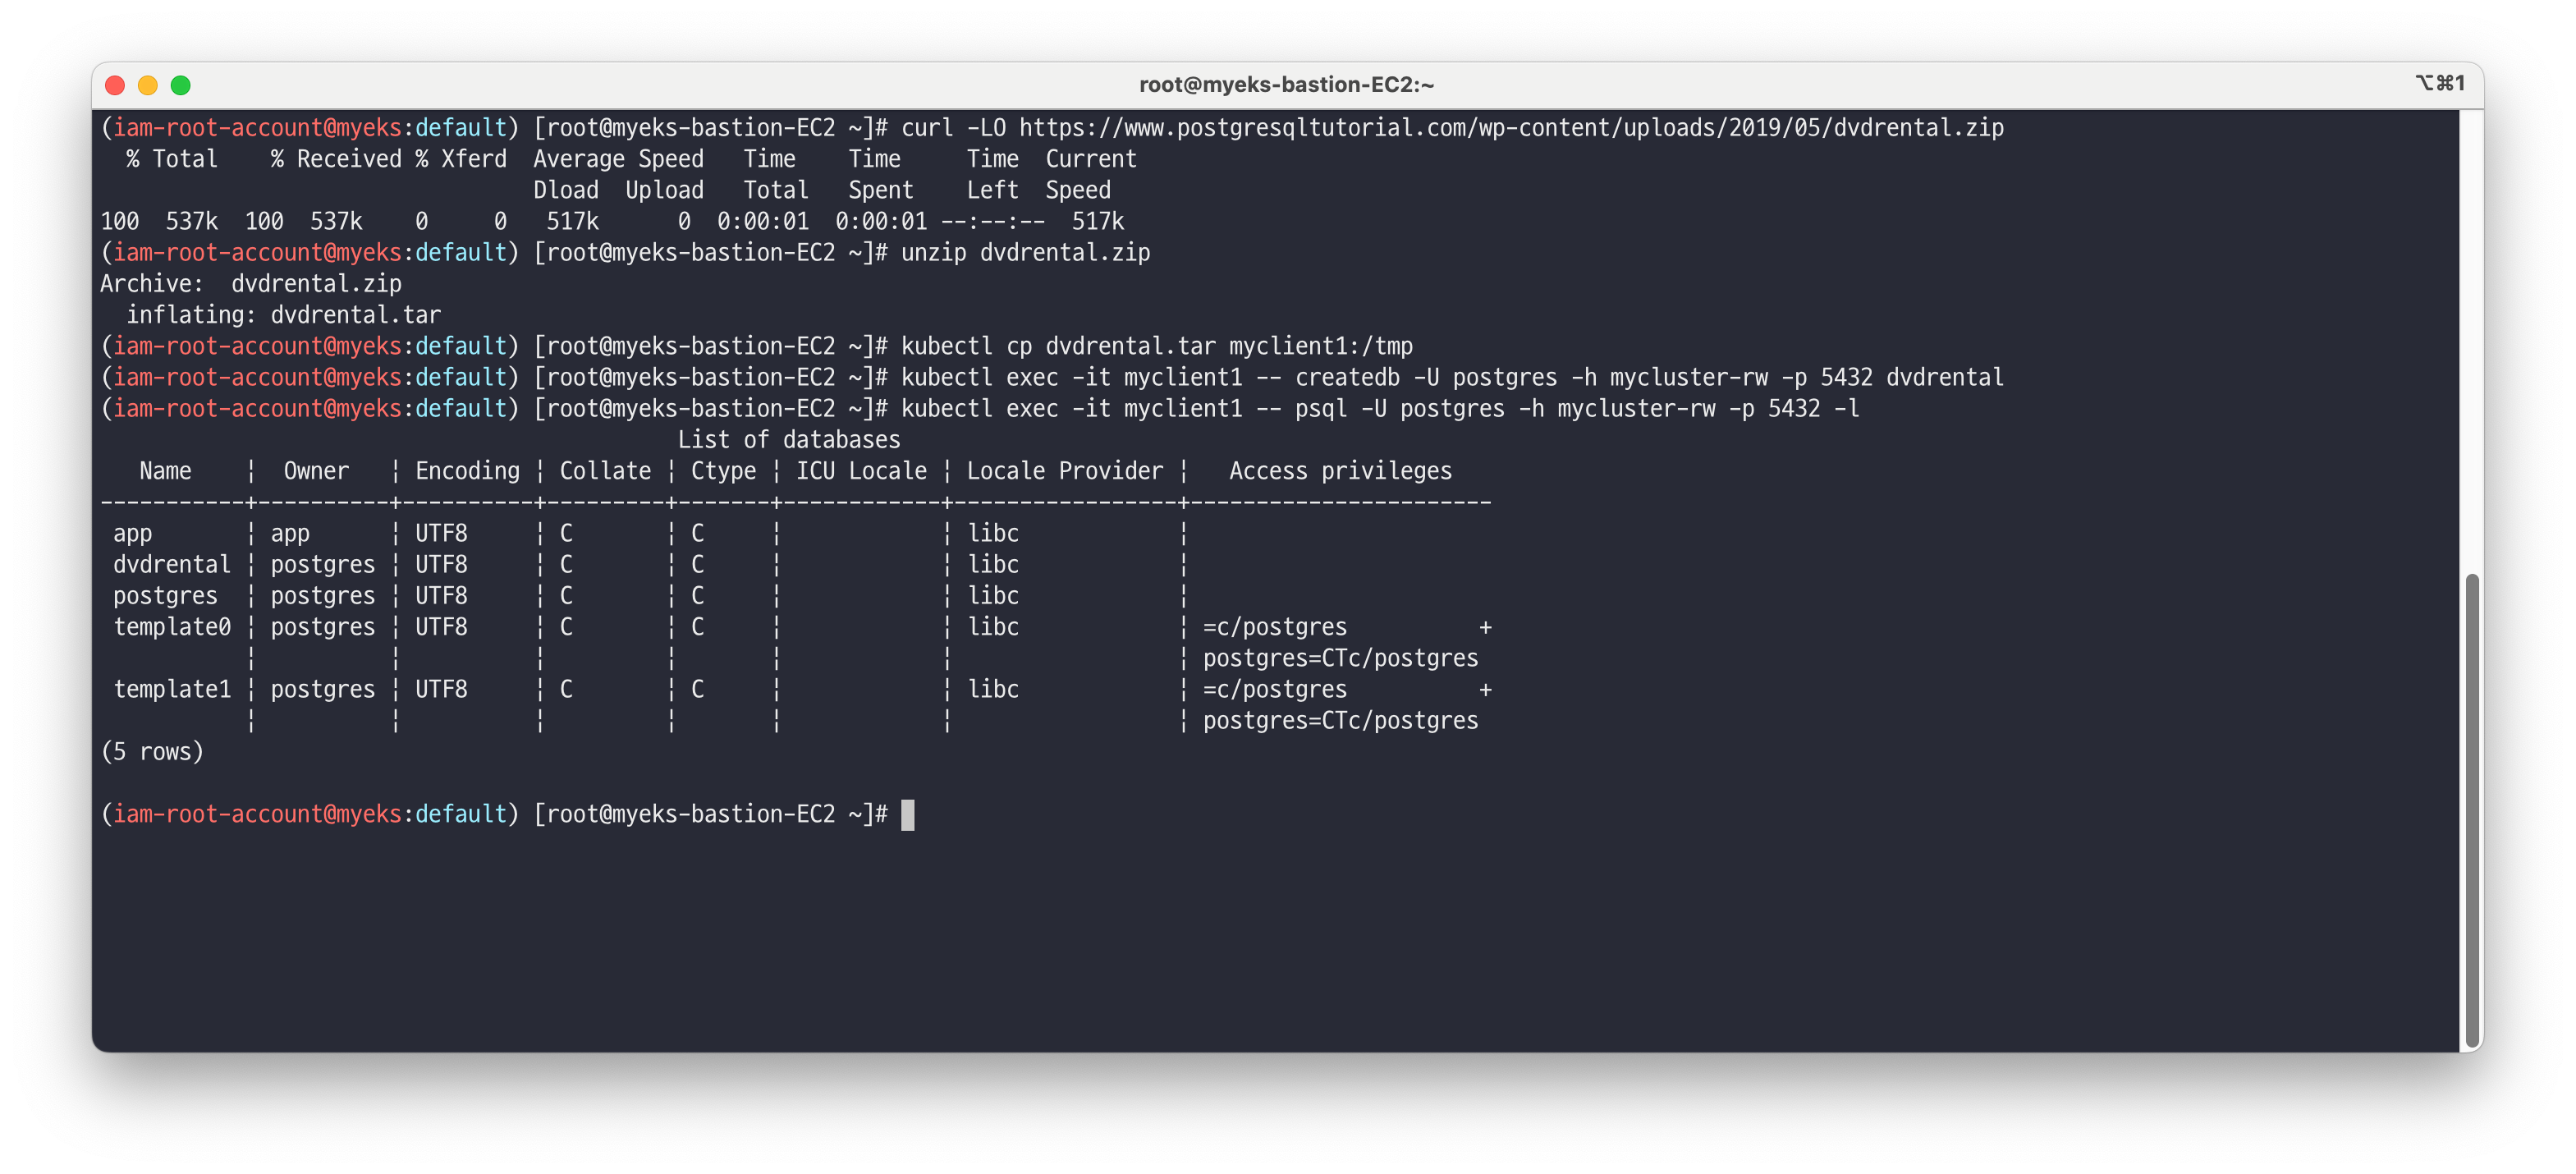
테스트를 위해 DVD Rental Sample Database 불러오기 및 복제 확인 및 Service 서비스별 접속 차이를 확인합니다. - Link
# 다운로드
curl -LO https://www.postgresqltutorial.com/wp-content/uploads/2019/05/dvdrental.zip
unzip dvdrental.zip

# myclient1 파드에 dvdrental.tar 복사
kubectl cp dvdrental.tar myclient1:/tmp

# [myclient1] superuser 계정으로 mycluster-rw 서비스 접속 후 데이터베이스 생성
kubectl exec -it myclient1 -- createdb -U postgres -h mycluster-rw -p 5432 dvdrental
kubectl exec -it myclient1 -- psql -U postgres -h mycluster-rw -p 5432 -l

# DVD Rental Sample Database 불러오기
kubectl exec -it myclient1 -- **pg_restore** -U postgres -d dvdrental **/tmp/dvdrental.tar** -h mycluster-rw -p 5432

# DVD Rental Sample Database 에서 actor 테이블 조회
kubectl exec -it myclient1 -- psql -U postgres -h mycluster-rw -p 5432 -d dvdrental -c "SELECT * FROM actor"
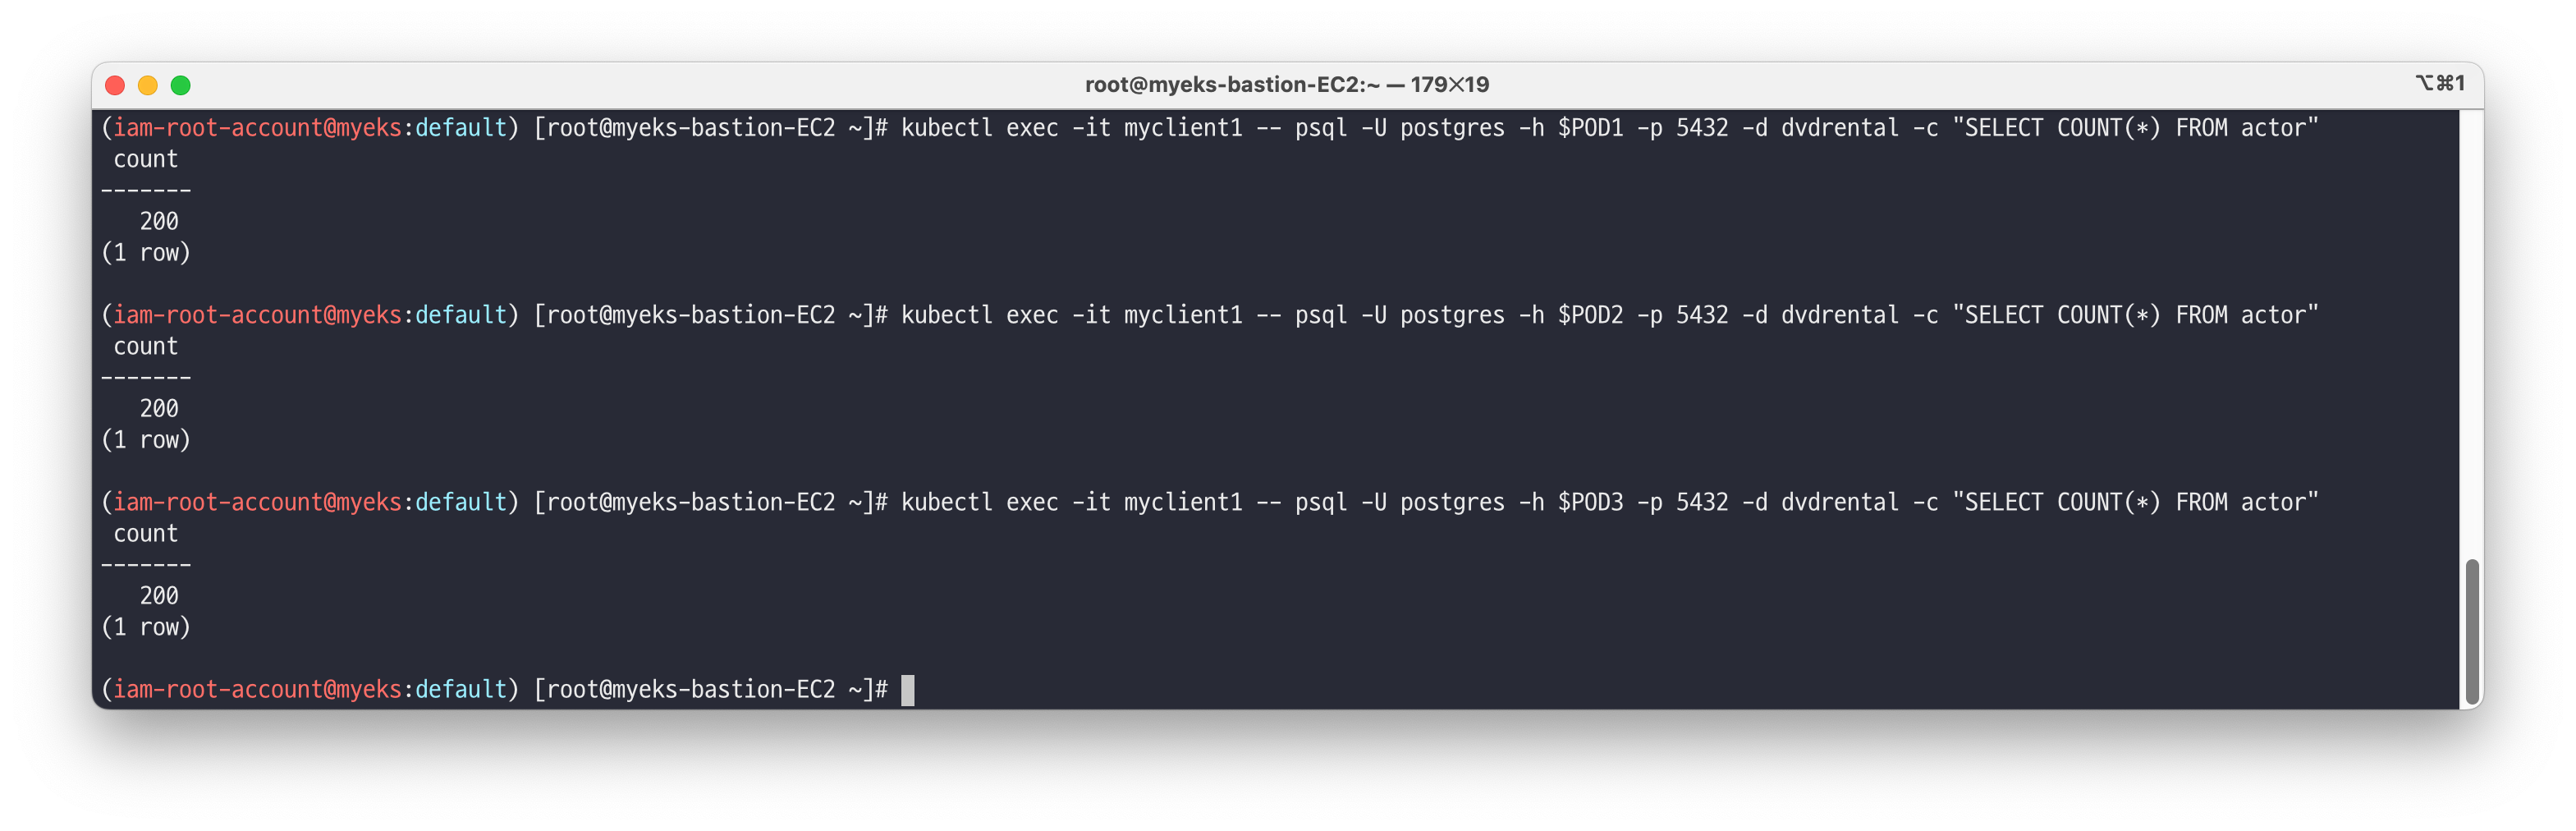
각 파드에 접근해서 DVD Rental Sample Database 복제 동기화 확인합니다.
# 각각 mycluster-ro 와 mycluster-r(mycluster-any) 서비스에 접속해보자
kubectl get svc,ep,endpointslices -l cnpg.io/cluster=mycluster

# 파드IP 변수 지정
POD1=$(kubectl get pod mycluster-1 -o jsonpath={.status.podIP})
POD2=$(kubectl get pod mycluster-2 -o jsonpath={.status.podIP})
POD3=$(kubectl get pod mycluster-3 -o jsonpath={.status.podIP})

# 파드별 actor 테이블 카운트 조회
kubectl exec -it myclient1 -- psql -U postgres -h $POD1 -p 5432 -d dvdrental -c "SELECT COUNT(*) FROM actor"
kubectl exec -it myclient1 -- psql -U postgres -h $POD2 -p 5432 -d dvdrental -c "SELECT COUNT(*) FROM actor"
kubectl exec -it myclient1 -- psql -U postgres -h $POD3 -p 5432 -d dvdrental -c "SELECT COUNT(*) FROM actor"

# (참고) 각 서비스 접근 조회
kubectl exec -it myclient1 -- psql -U postgres -h mycluster-ro -p 5432 -d dvdrental -c "SELECT * FROM actor"
kubectl exec -it myclient1 -- psql -U postgres -h mycluster-rw -p 5432 -d dvdrental -c "SELECT * FROM actor"
kubectl exec -it myclient1 -- psql -U postgres -h mycluster-r  -p 5432 -d dvdrental -c "SELECT * FROM actor"
rw vs ro vs r 차이를 확인합니다.
# rw
kubectl exec -it myclient1 -- psql -U postgres -h mycluster-rw -p 5432 -c "select inet_server_addr();"
for i in {1..30}; do kubectl exec -it myclient1 -- psql -U postgres -h mycluster-rw -p 5432 -c "select inet_server_addr();"; done | sort | uniq -c | sort -nr | grep 192
# ro
kubectl exec -it myclient1 -- psql -U postgres -h mycluster-ro -p 5432 -c "select inet_server_addr();"
for i in {1..30}; do kubectl exec -it myclient1 -- psql -U postgres -h mycluster-ro -p 5432 -c "select inet_server_addr();"; done | sort | uniq -c | sort -nr | grep 192
# r
kubectl exec -it myclient1 -- psql -U postgres -h mycluster-r -p 5432 -c "select inet_server_addr();"
for i in {1..30}; do kubectl exec -it myclient1 -- psql -U postgres -h mycluster-r -p 5432 -c "select inet_server_addr();"; done | sort | uniq -c | sort -nr | grep 192


👉 Step 04. CloudNativePG 장애 테스트
장애 테스트를 위한 준비
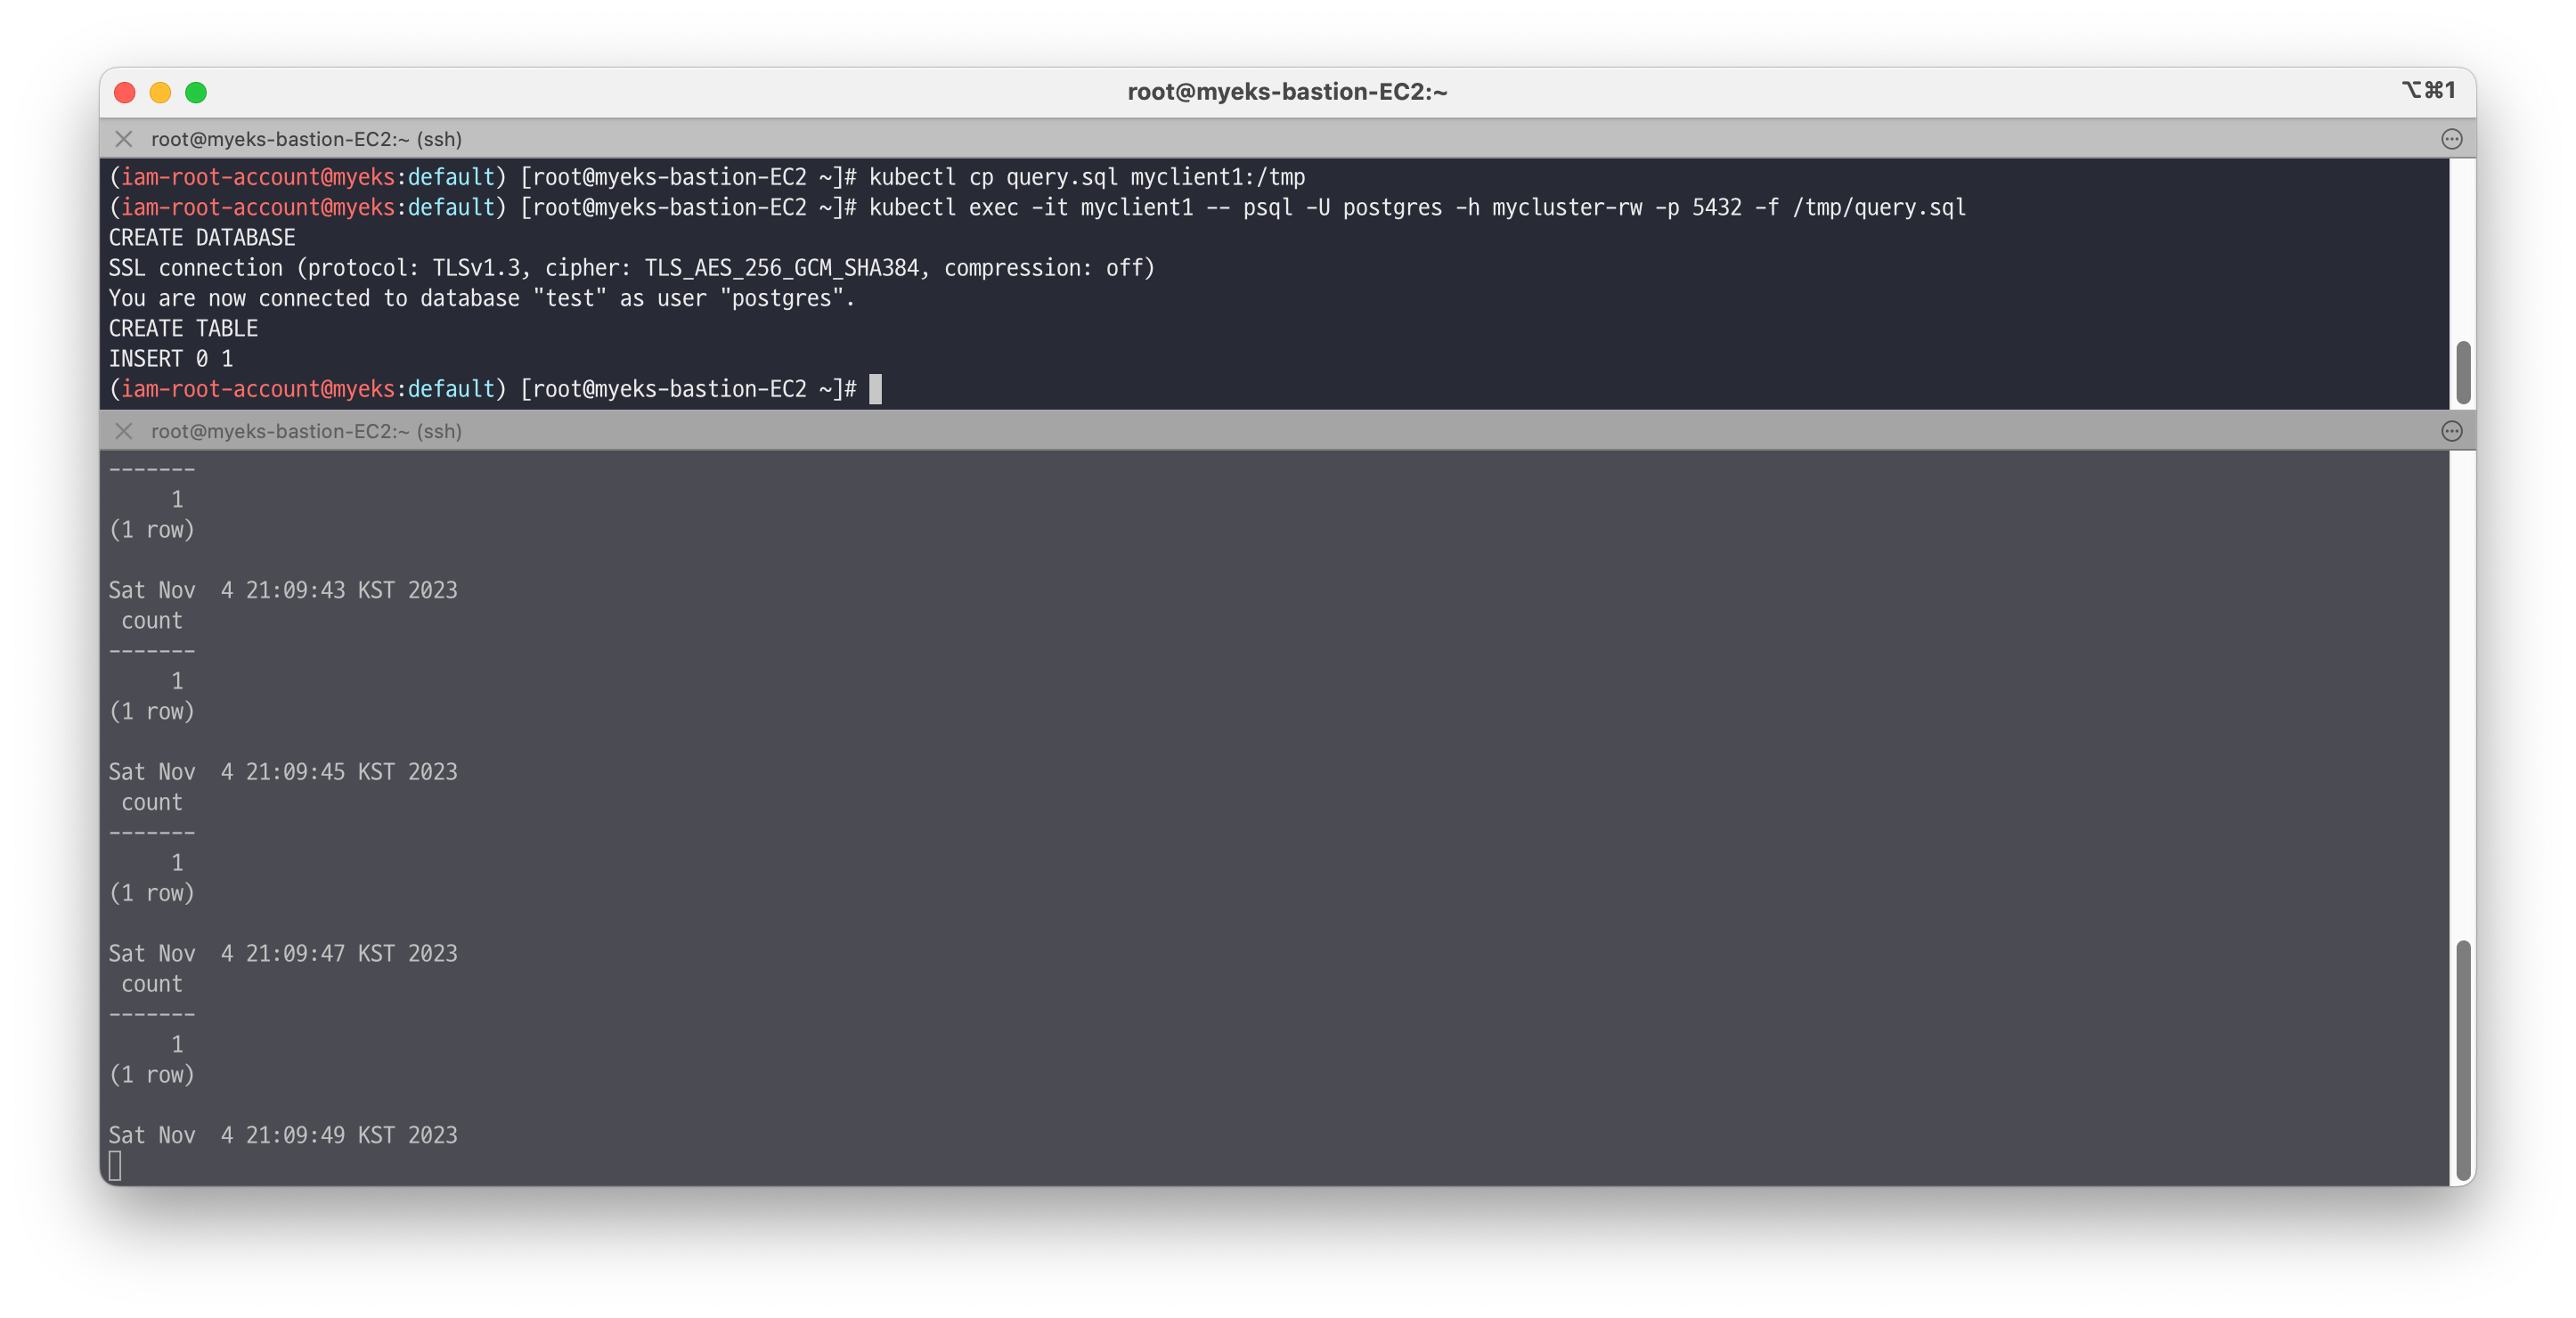
# 파드IP 변수 지정
POD1=$(kubectl get pod mycluster-1 -o jsonpath={.status.podIP})
POD2=$(kubectl get pod mycluster-2 -o jsonpath={.status.podIP})
POD3=$(kubectl get pod mycluster-3 -o jsonpath={.status.podIP})

# query.sql
curl -s -O https://raw.githubusercontent.com/gasida/DOIK/main/5/query.sql
cat query.sql ;echo
CREATE DATABASE test;
\c test;
CREATE TABLE t1 (c1 INT PRIMARY KEY, c2 TEXT NOT NULL);
INSERT INTO t1 VALUES (1, 'Luis');

# SQL 파일 query 실행
~~~~psql -U postgres -h psql.$MyDomain -f query.sql
혹은
kubectl cp query.sql myclient1:/tmp
~~~~kubectl exec -it myclient1 -- psql -U postgres -h mycluster-rw -p 5432 -f /tmp/query.sql

# [터미널2] 모니터링
while true; do kubectl exec -it myclient2 -- psql -U postgres -h mycluster-ro -p 5432 -d test -c "SELECT COUNT(*) FROM t1"; date;sleep 1; done
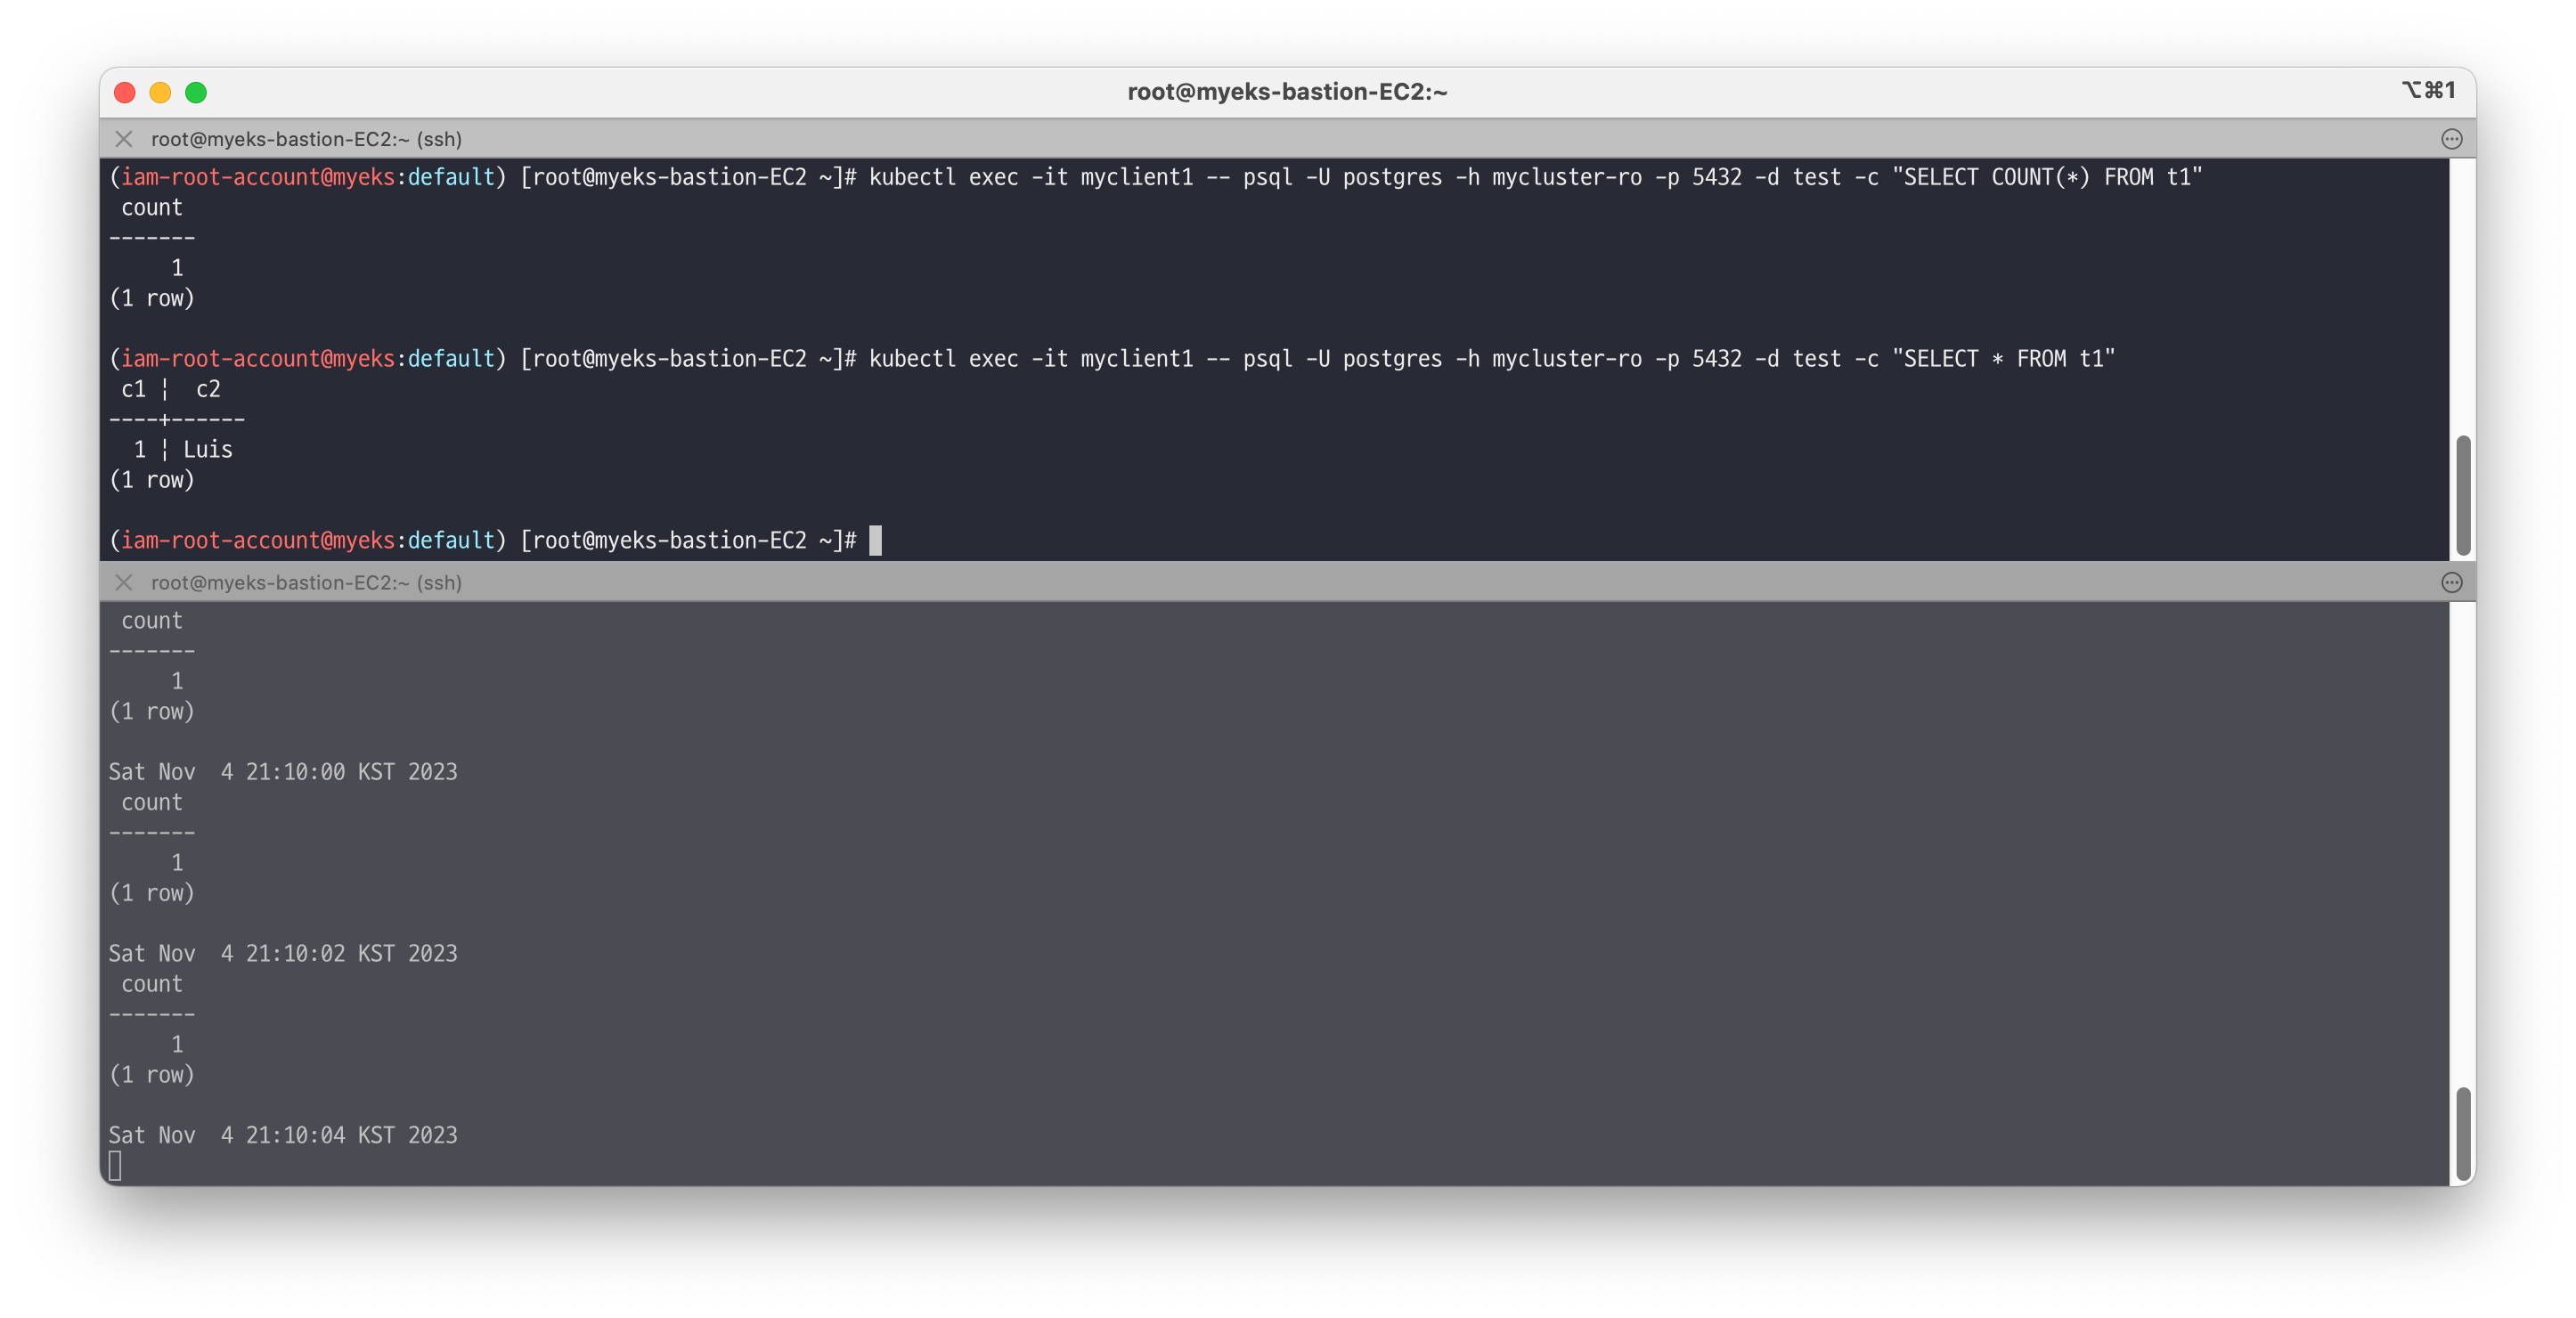
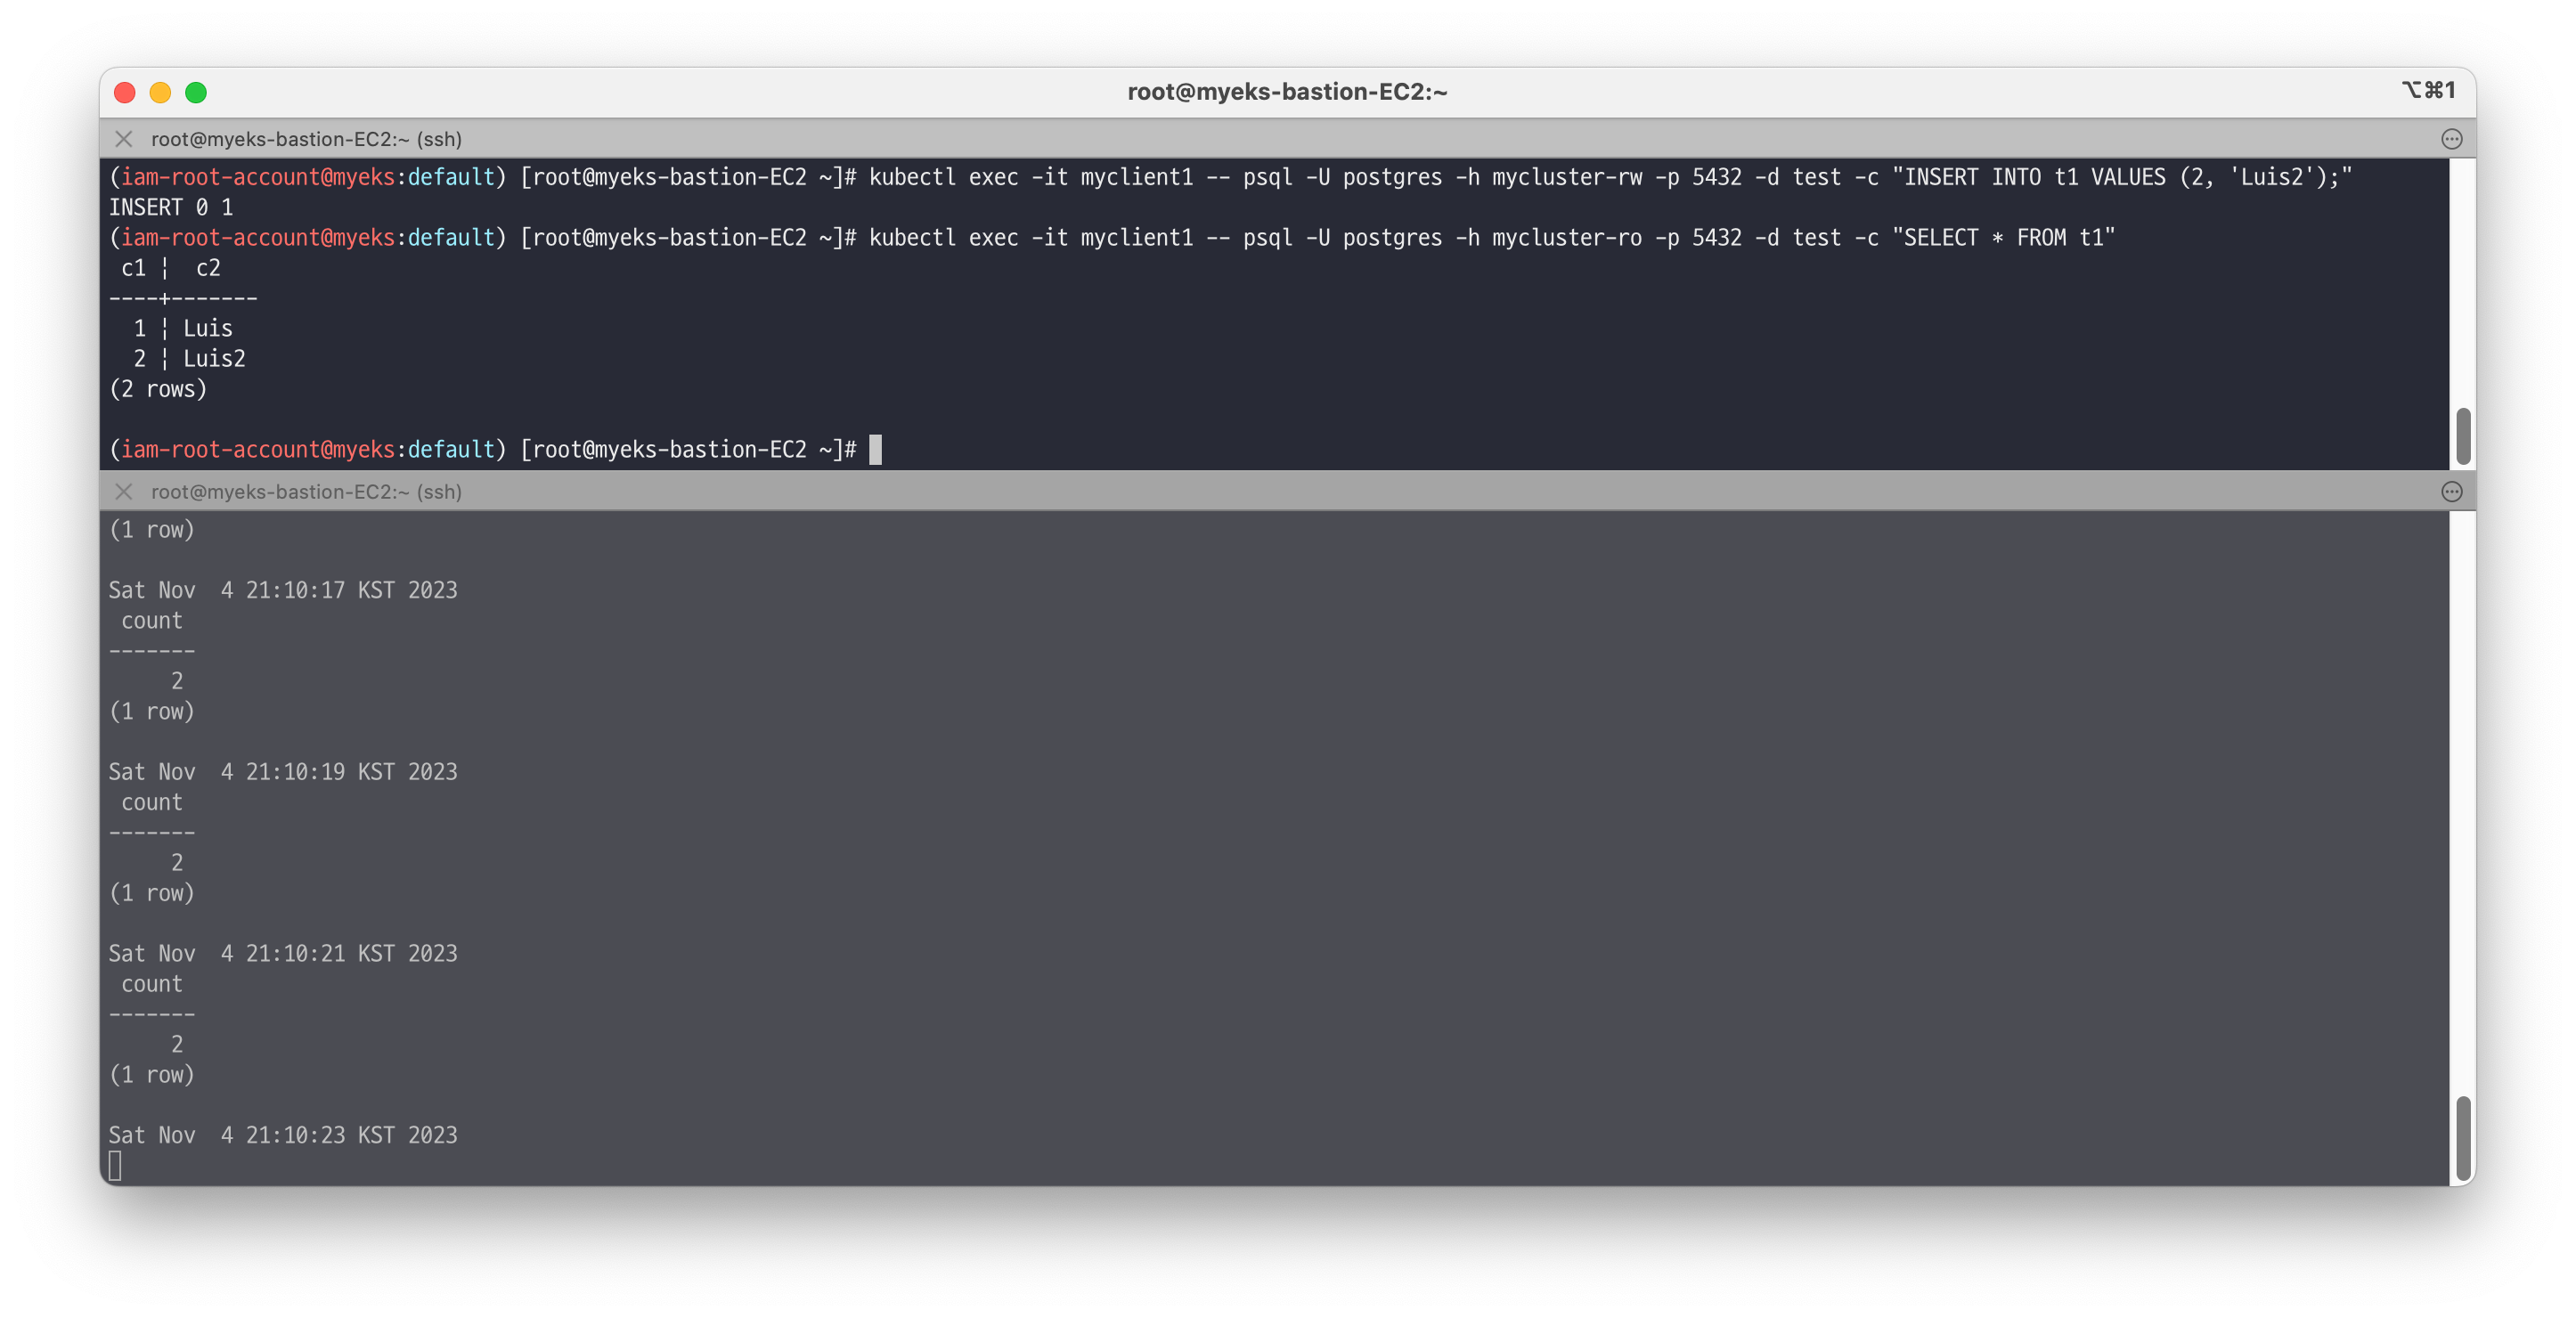
# 확인
kubectl exec -it myclient1 -- psql -U postgres -h mycluster-ro -p 5432 -d test -c "SELECT COUNT(*) FROM t1"
kubectl exec -it myclient1 -- psql -U postgres -h mycluster-ro -p 5432 -d test -c "SELECT * FROM t1"
# INSERT
psql -U postgres -h psql.$MyDomain -d test -c "INSERT INTO t1 VALUES (2, 'Luis2');"
psql -U postgres -h psql.$MyDomain -d test -c "SELECT * FROM t1"
혹은
kubectl exec -it myclient1 -- psql -U postgres -h mycluster-rw -p 5432 -d test -c "INSERT INTO t1 VALUES (2, 'Luis2');"
kubectl exec -it myclient1 -- psql -U postgres -h mycluster-ro -p 5432 -d test -c "SELECT * FROM t1"

# test 데이터베이스에 97개의 데이터 INSERT
#for ((i=3; i<=100; i++)); do psql -U postgres -h $POD1 -p 5432 -d test -c "INSERT INTO t1 VALUES ($i, 'Luis$i');";echo; done
for ((i=3; i<=100; i++)); do kubectl exec -it myclient1 -- psql -U postgres -h mycluster-rw -p 5432 -d test -c "INSERT INTO t1 VALUES ($i, 'Luis$i');";echo; done
kubectl exec -it myclient1 -- psql -U postgres -h mycluster-ro -p 5432 -d test -c "SELECT COUNT(*) FROM t1"
🔥 [장애1] Pod 장애
프라이머리 파드(인스턴스) 1대 강제 삭제 및 동작 확인 - [Link](https://cloudnative-pg.io/documentation/current/failover/)
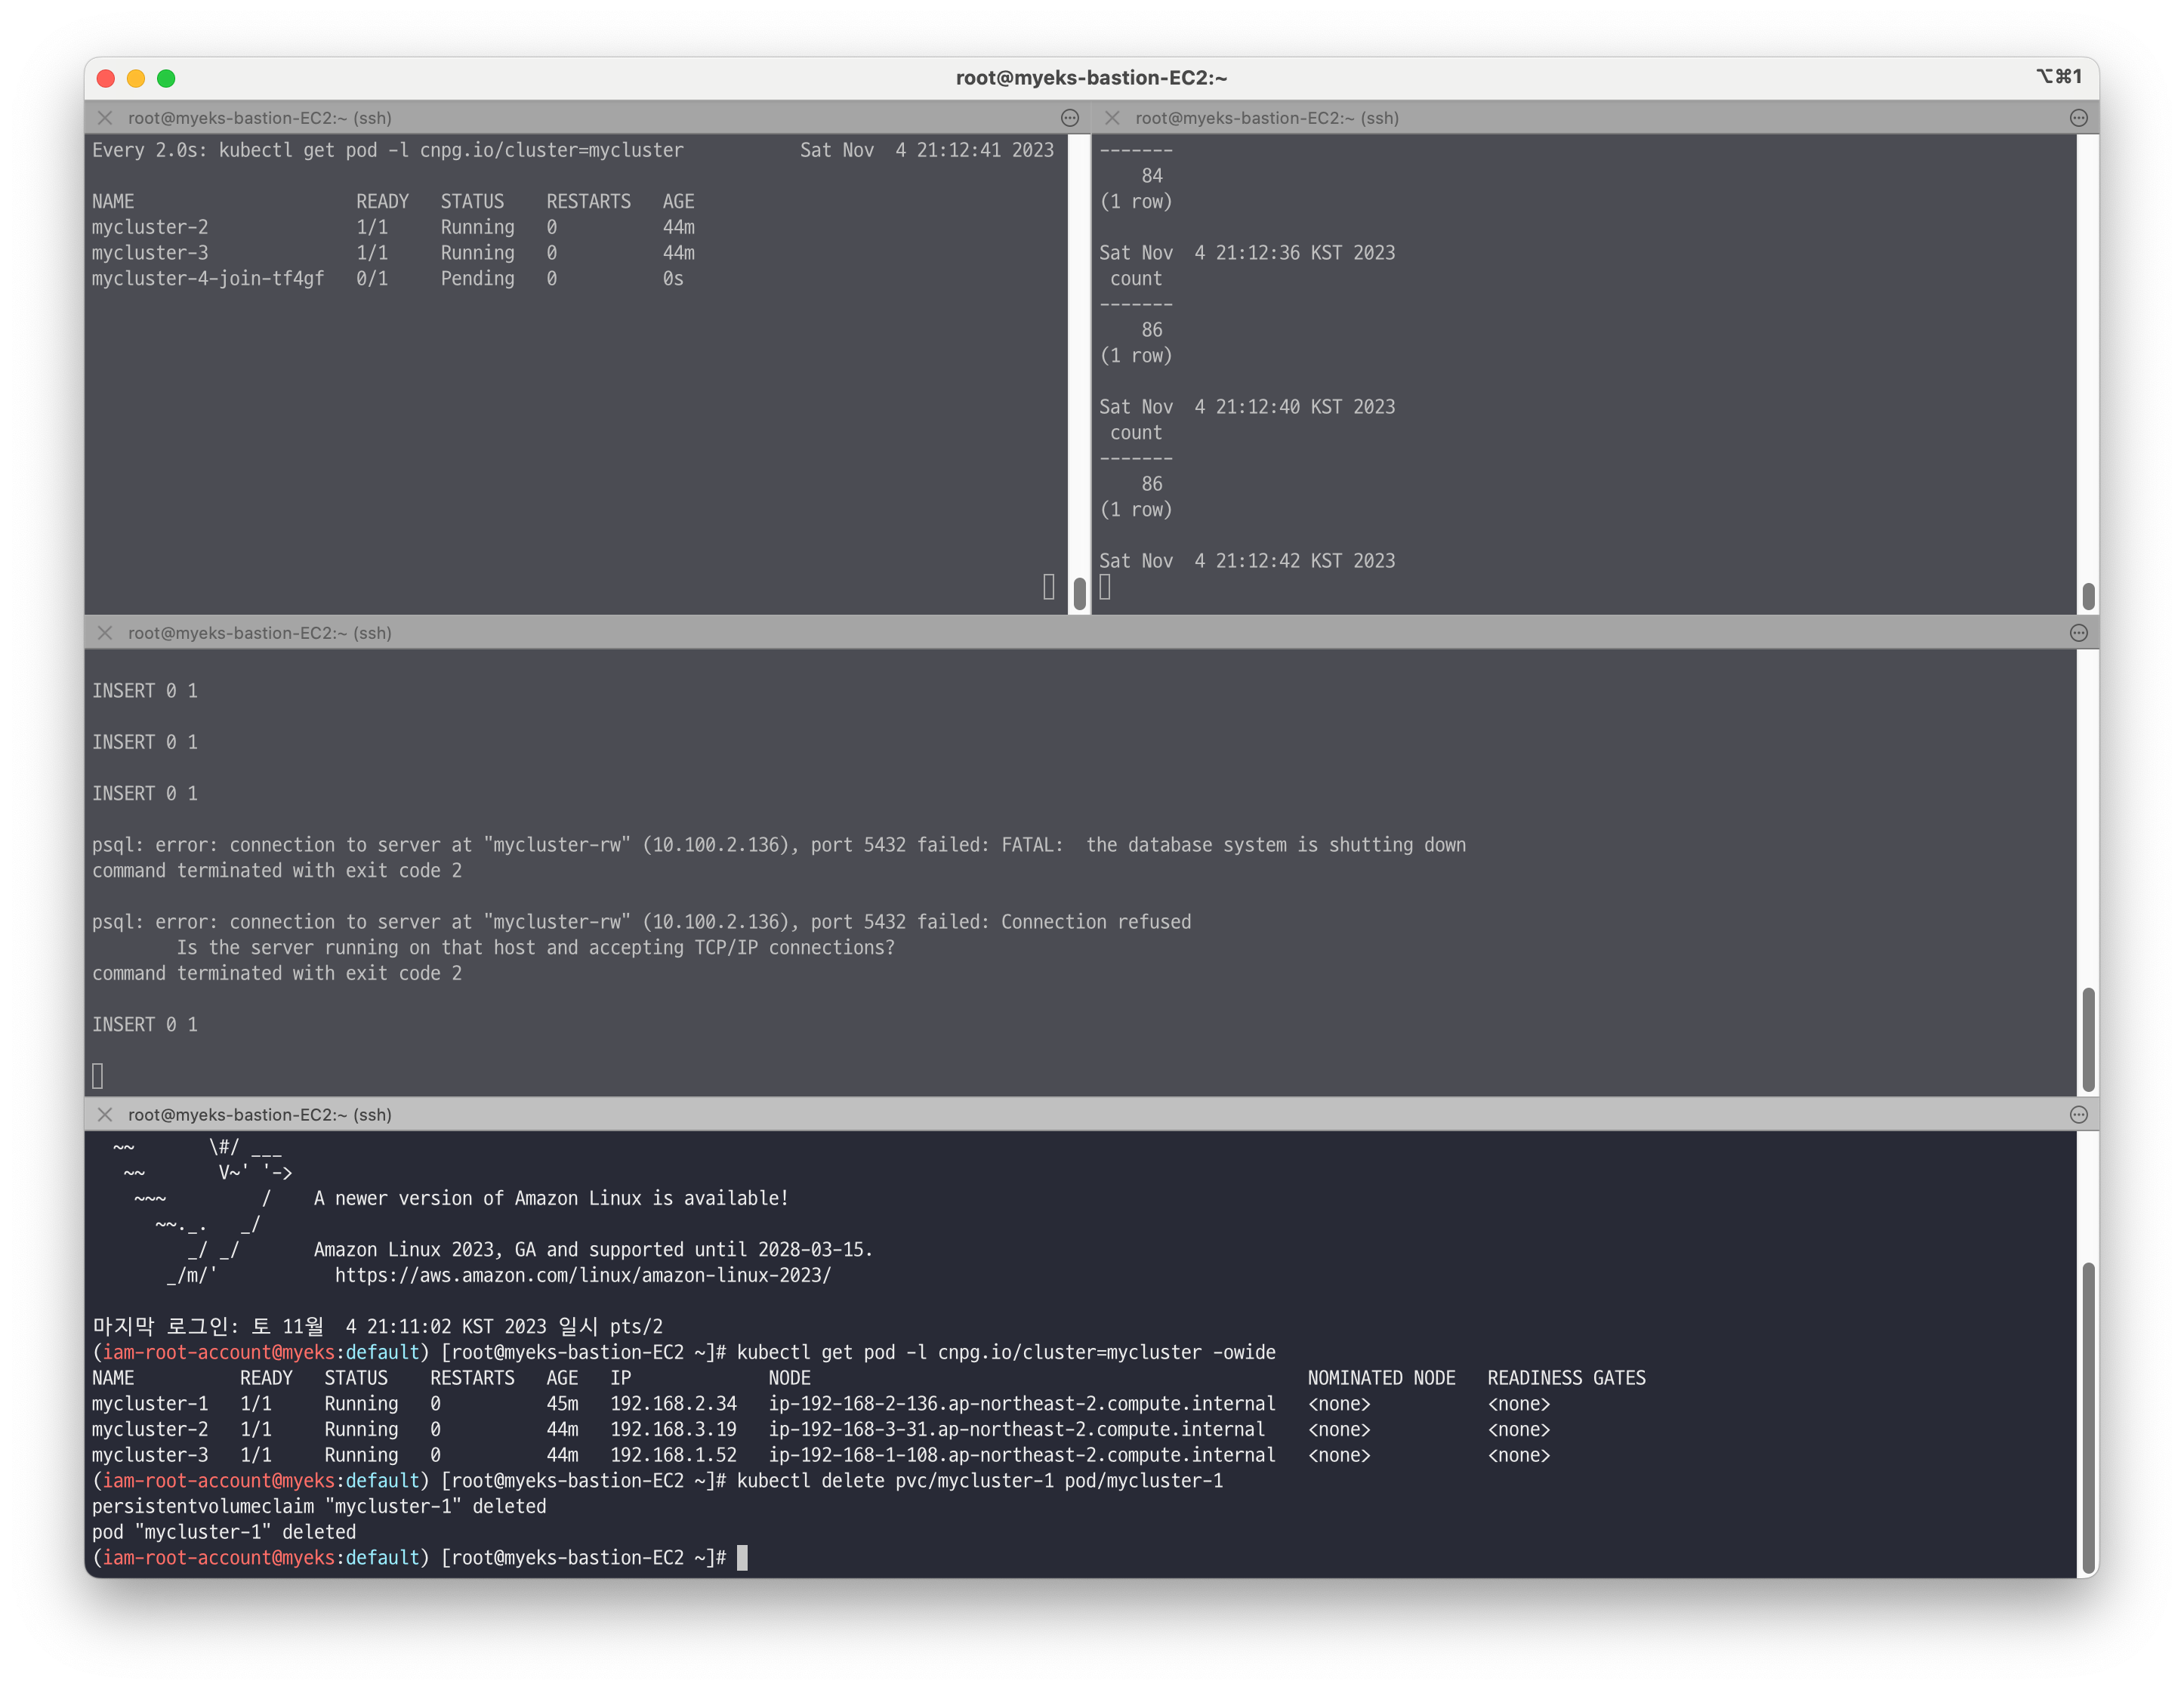
# 프라이머리 파드 정보 확인
kubectl cnpg status mycluster

# [터미널1] 모니터링
watch kubectl get pod -l cnpg.io/cluster=mycluster

# [터미널2] 모니터링
while true; do kubectl exec -it myclient2 -- psql -U postgres -h mycluster-ro -p 5432 -d test -c "SELECT COUNT(*) FROM t1"; date;sleep 1; done

# [터미널3] test 데이터베이스에 다량의 데이터 INSERT
for ((i=301; i<=10000; i++)); do kubectl exec -it myclient2 -- psql -U postgres -h mycluster-rw -p 5432 -d test -c "INSERT INTO t1 VALUES ($i, 'Luis$i');";echo; done
for ((i=10001; i<=20000; i++)); do kubectl exec -it myclient2 -- psql -U postgres -h mycluster-rw -p 5432 -d test -c "INSERT INTO t1 VALUES ($i, 'Luis$i');";echo; done
혹은
for ((i=301; i<=10000; i++)); do psql -U postgres -h psql.$MyDomain -p 5432 -d test -c "INSERT INTO t1 VALUES ($i, 'Luis$i');";echo; done
for ((i=10001; i<=20000; i++)); do psql -U postgres -h psql.$MyDomain -p 5432 -d test -c "INSERT INTO t1 VALUES ($i, 'Luis$i');";echo; done

# [터미널4] 파드 삭제 >> INSERT 가 중간에 끊어지나요?
kubectl get pod -l cnpg.io/cluster=mycluster -owide
kubectl delete pvc/mycluster-1 pod/mycluster-1
kubectl cnpg status mycluster

# 파드 정보 확인 : 파드의 이름과 배치 위치 비교 확인
kubectl get pod -l cnpg.io/cluster=mycluster -owide
kubectl get pod -l cnpg.io/cluster=mycluster
NAME          READY   STATUS    RESTARTS   AGE
mycluster-2   1/1     Running   0          125m
mycluster-3   1/1     Running   0          125m
mycluster-4   1/1     Running   0          2m18s
아주 잠깐의 순단이 발생하지만, 빠르게 복구되어 insert가 재동작하는것을 확인할 수 있습니다.
🔥 [장애2] Node 장애
프라이머리 파드(인스턴스) 가 배포된 노드 1대 drain 설정 및 동작 확인
# (옵션) 오퍼레이터 로그 확인
kubectl get pod -n operators -l app.kubernetes.io/name=cloudnative-pg
kubectl logs -n operators -l app.kubernetes.io/name=cloudnative-pg -f

# 워커노드 drain
*# kubectl drain <<노드>> --ignore-daemonsets --delete-emptydir-data*
kubectl get node
NODE=*<각자 자신의 EC2 노드 이름 지정>*
NODE=*ip-192-168-3-231.ap-northeast-2.compute.internal*
~~*kubectl drain k8s-w1 --delete-emptydir-data --force --ignore-daemonsets && kubectl get node -w*~~
혹은
kubectl drain $NODE --delete-emptydir-data --force --ignore-daemonsets && kubectl get node -w

# 클러스터 정보 확인 : 파드가 Pending 된 주 원인은 무엇일까요? >> 예를 들어 동일AZ에 정상 워커노드가 있었다면 어떻게 될까요?
kubectl get pod -owide
kubectl cnpg status mycluster

# 동작 확인 후 uncordon 설정
kubectl uncordon $NODE
하필 삭제한 노드에 수동으로 생성한 client 파드가 배포되어 있어서 위 자료와 같이 실험이 망가지는 현상이 발생했습니다.

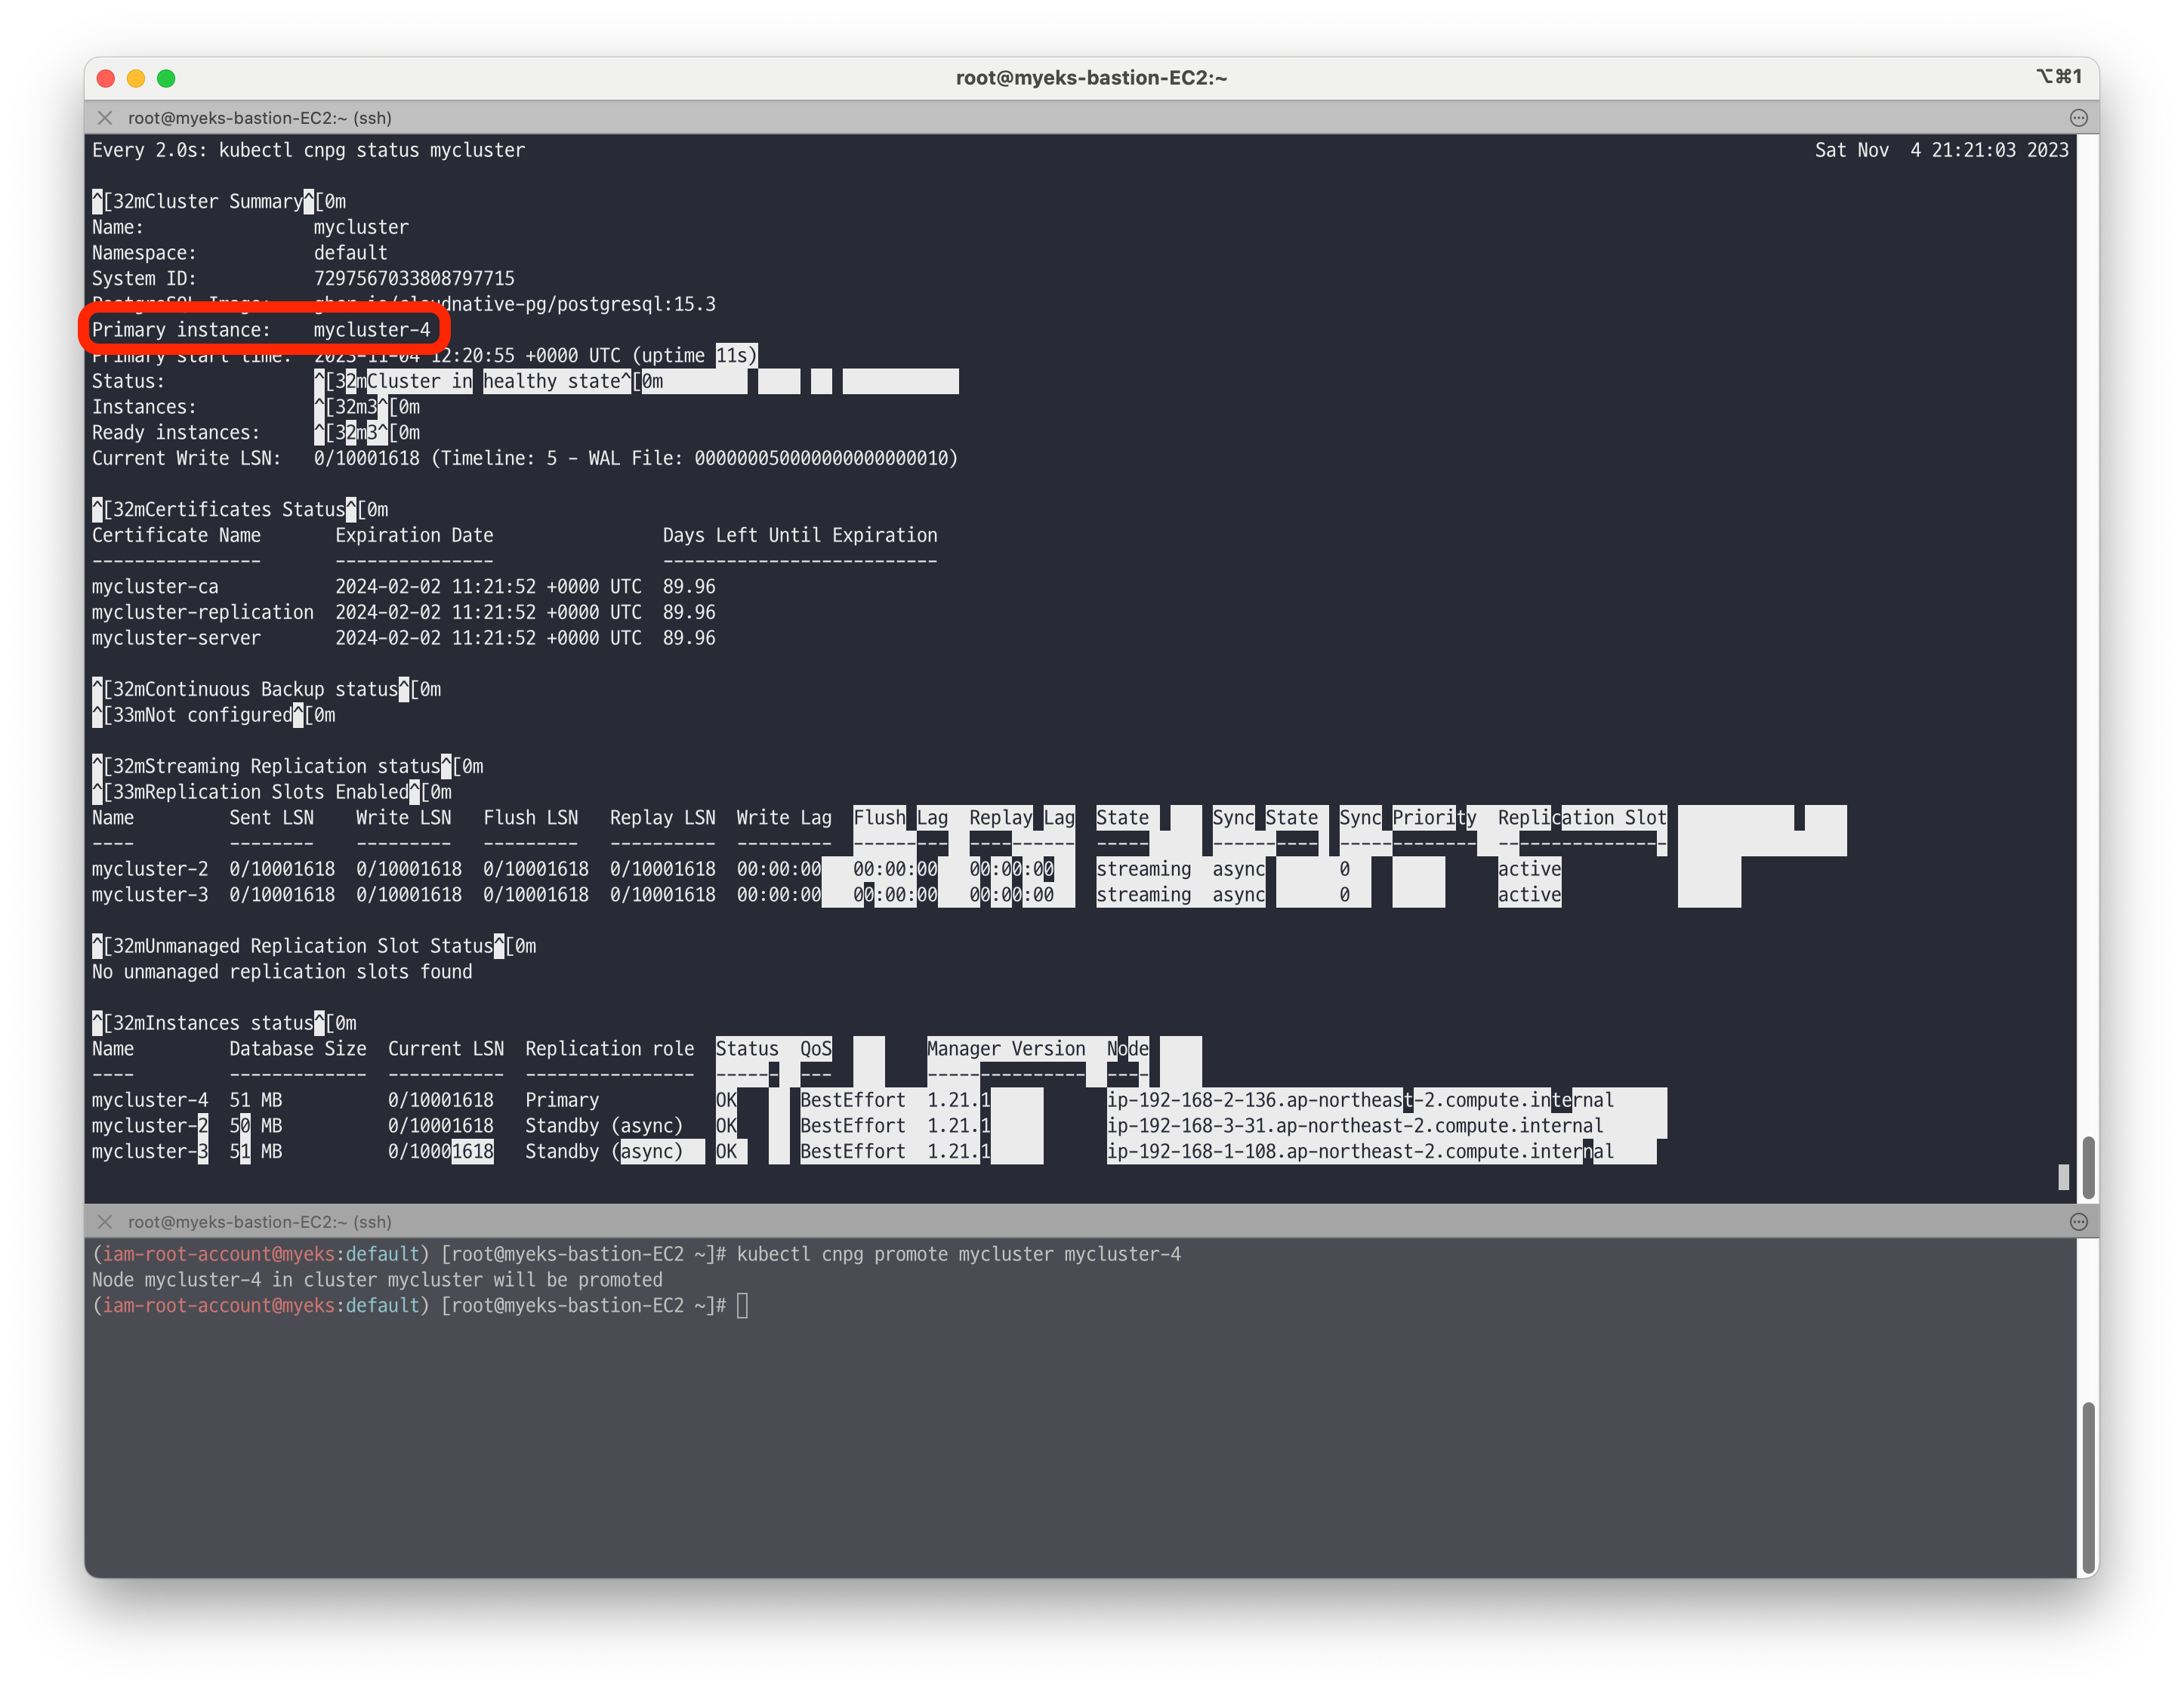
🔥 primary 파드 변경
초기 클러스터 상태
프라이머리 인스턴스가 mycluster-2 인것을 확인할 수 있습니다.
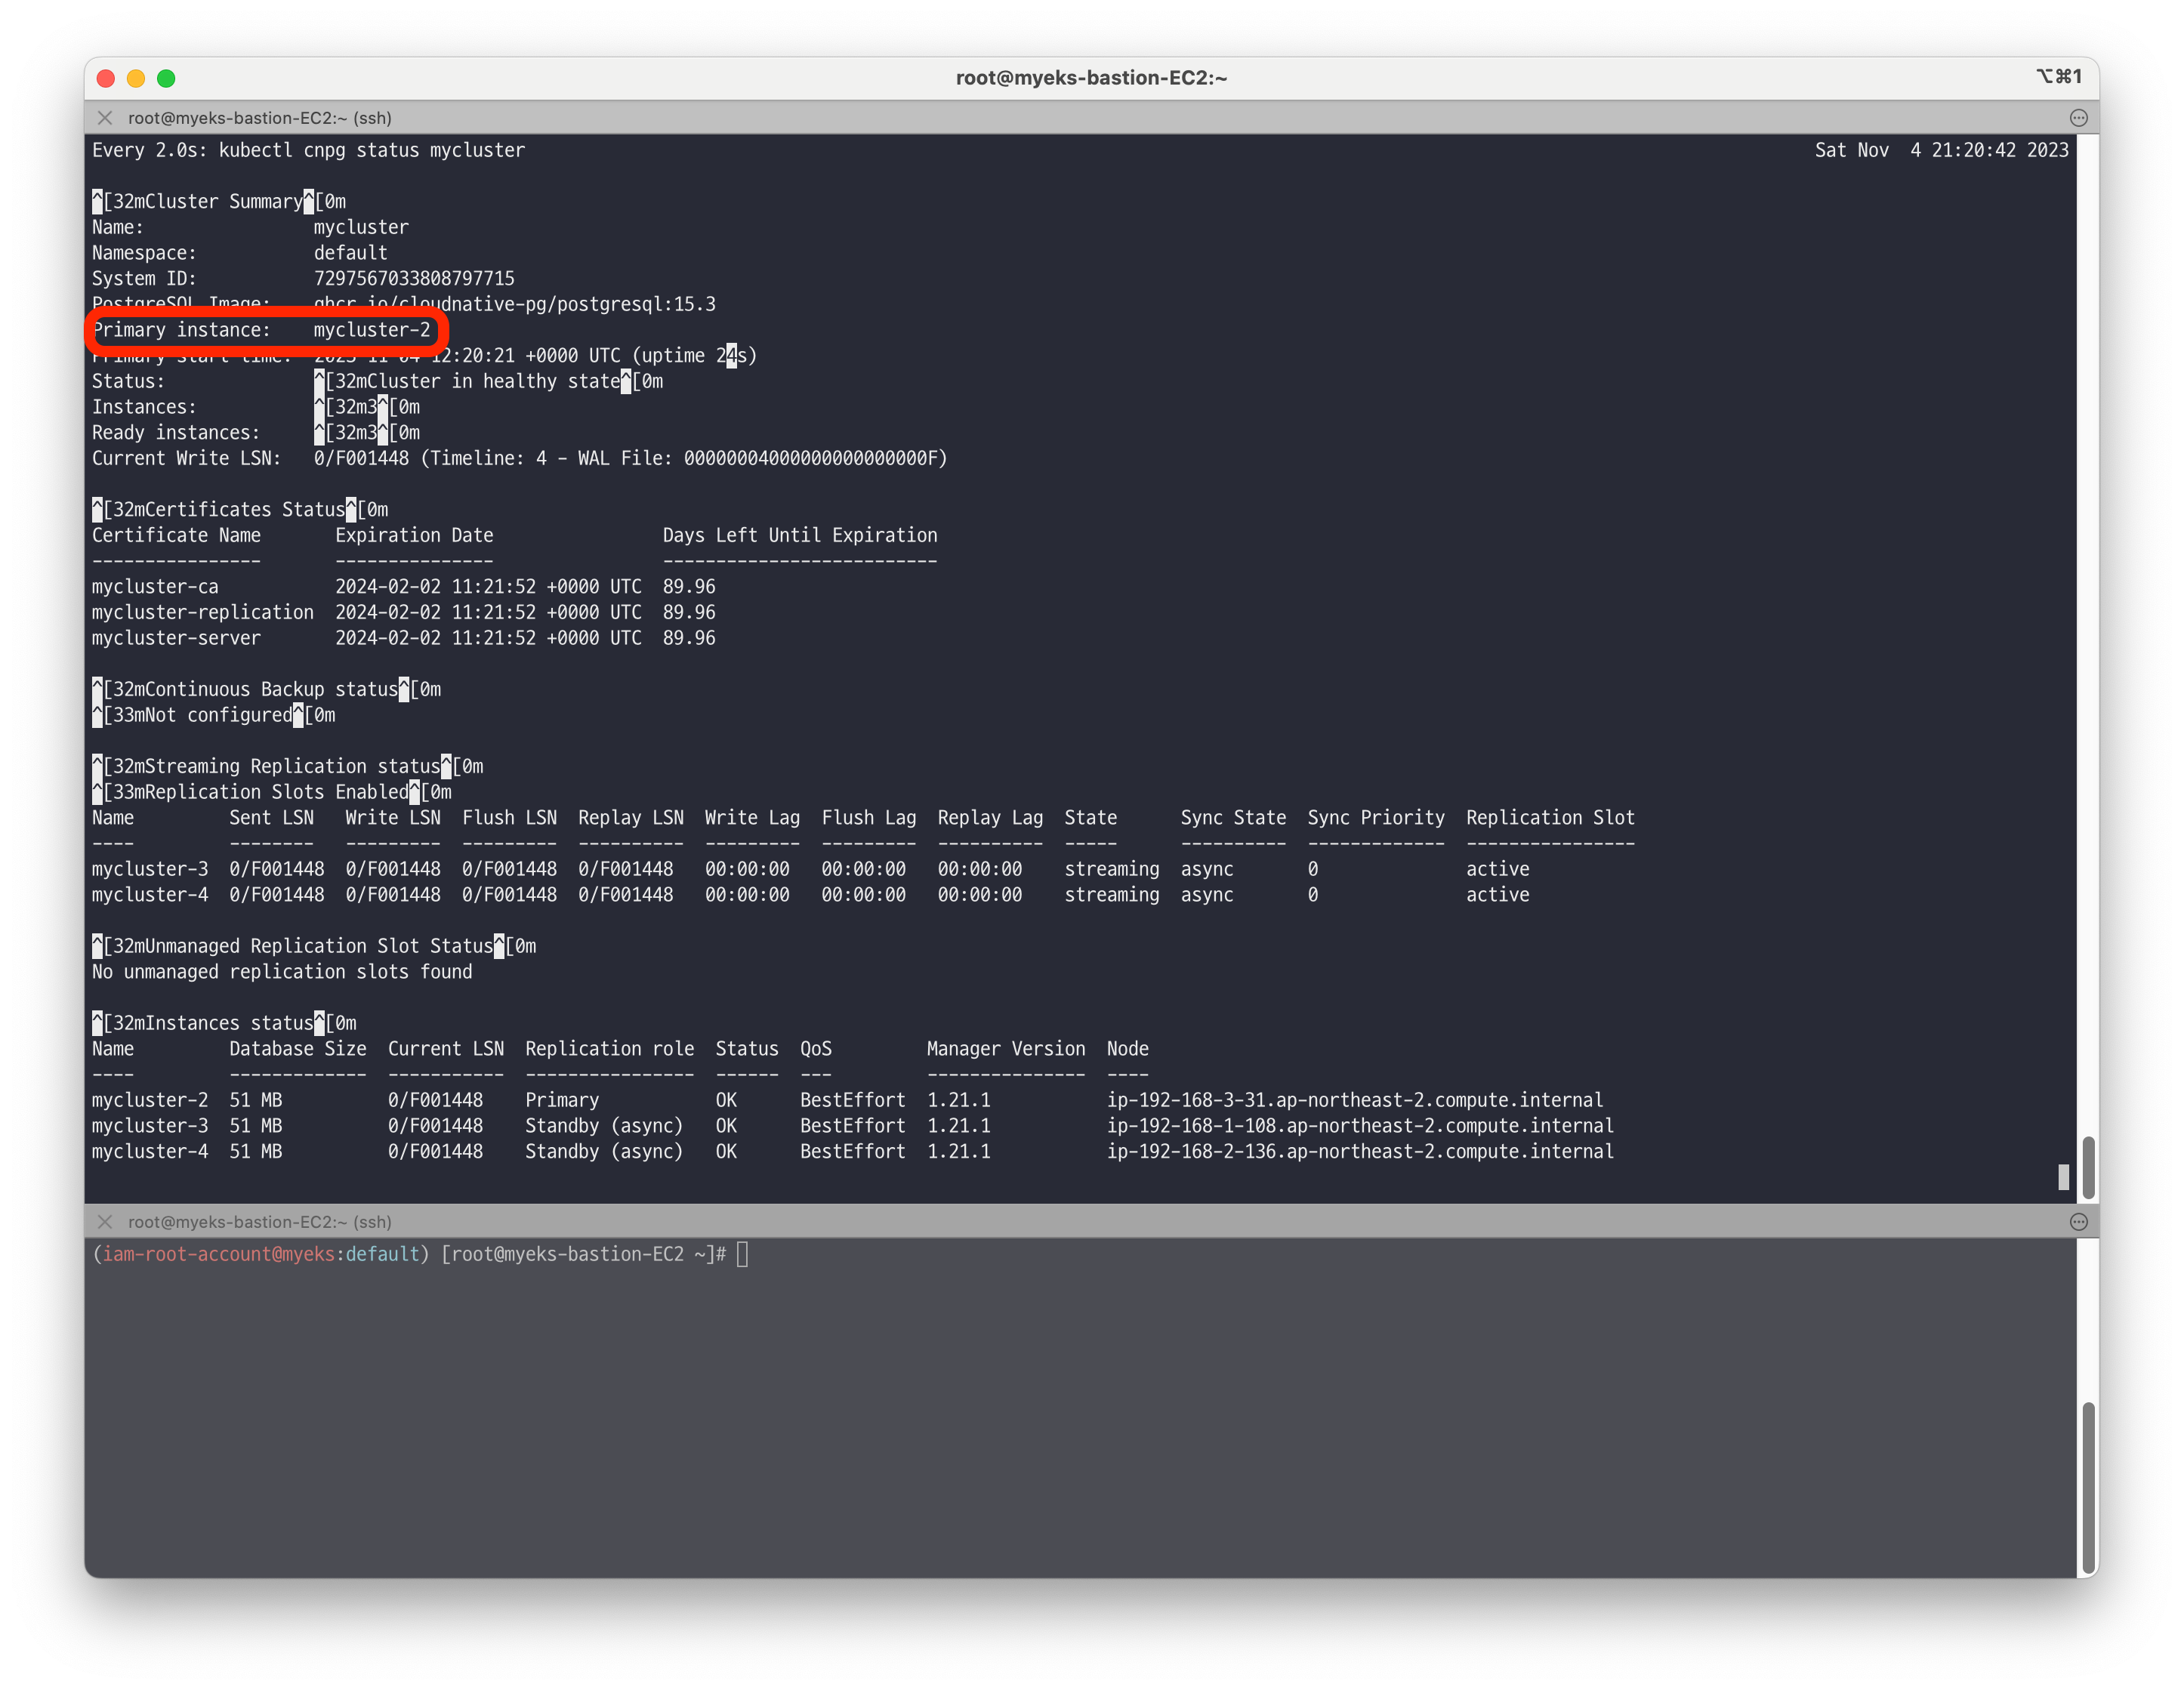
# 모니터링
watch -d kubectl cnpg status mycluster

# primary 파드 변경
kubectl cnpg promote mycluster mycluster-4

# 확인 : rw 서비스 접속 후 확인
kubectl cnpg status mycluster
kubectl exec -it myclient3 -- psql -U postgres -h mycluster-rw -p 5432 -c "select inet_server_addr();"
promote 명령어를 통해 mycluster-4로 변경된것을 확인할 수 있습니다.
👉 Step 05. CloudNativePG Scale & 롤링 업데이트
📚 Scale 테스트
Cluster의 개수를 조정하며 스케일 업/다운시 어떤 현상이 발생하는지 확인합니다.
# 정보 확인
kubectl cnpg status mycluster
kubectl get cluster mycluster
NAME        AGE    INSTANCES   READY   STATUS                     PRIMARY
mycluster   167m   3           3       Cluster in healthy state   mycluster-6

# 모니터링
watch kubectl get pod

# 5대로 증가 : 증가 및 join 완료 후 아래 접속 확인
kubectl patch cluster mycluster --type=merge -p '{"spec":{"instances":5}}' && kubectl get pod -l postgresql=mycluster -w
kubectl get cluster mycluster
kubectl cnpg status mycluster

# any 접속 확인
for i in {1..30}; do kubectl exec -it myclient2 -- psql -U postgres -h mycluster-r -p 5432 -c "select inet_server_addr();"; done | sort | uniq -c | sort -nr | grep 192

# 3대로 감소
kubectl patch cluster mycluster --type=merge -p '{"spec":{"instances":3}}' && kubectl get pod -l postgresql=mycluster -w

📚 롤링 업데이트
롤링 업데이트 : Standby 시작 → Primary 갱신 전
SwitchOver(? 옵션 확인 할것)로 다운타임 최소화 - Updrades Rolling_Updates
# [터미널1] 모니터링
watch kubectl get pod -l cnpg.io/cluster=mycluster

# [터미널2] 모니터링
while true; do kubectl exec -it myclient2 -- psql -U postgres -h mycluster-ro -p 5432 -d test -c "SELECT COUNT(*) FROM t1"; date;sleep 1; done

# [터미널3] test 데이터베이스에 다량의 데이터 INSERT
for ((i=10000; i<=20000; i++)); do kubectl exec -it myclient3 -- psql -U postgres -h mycluster-rw -p 5432 -d test -c "INSERT INTO t1 VALUES ($i, 'Luis$i');";echo; done

# [터미널4] postgresql:15.3 → postgresql:15.4 로 업데이트 >> 순서와 절차 확인
kubectl cnpg status mycluster # Primary 파드와 Image 버전 확인
kubectl patch cluster mycluster --type=merge -p '{"spec":{"imageName":"ghcr.io/cloudnative-pg/postgresql:15.4"}}' && kubectl get pod -l postgresql=mycluster -w

# 확인
kubectl get cluster mycluster
kubectl cnpg status mycluster | grep Image
📌 Reference