로컬 데이터베이스 설정하기
- 계정 생성 및 권한 추가
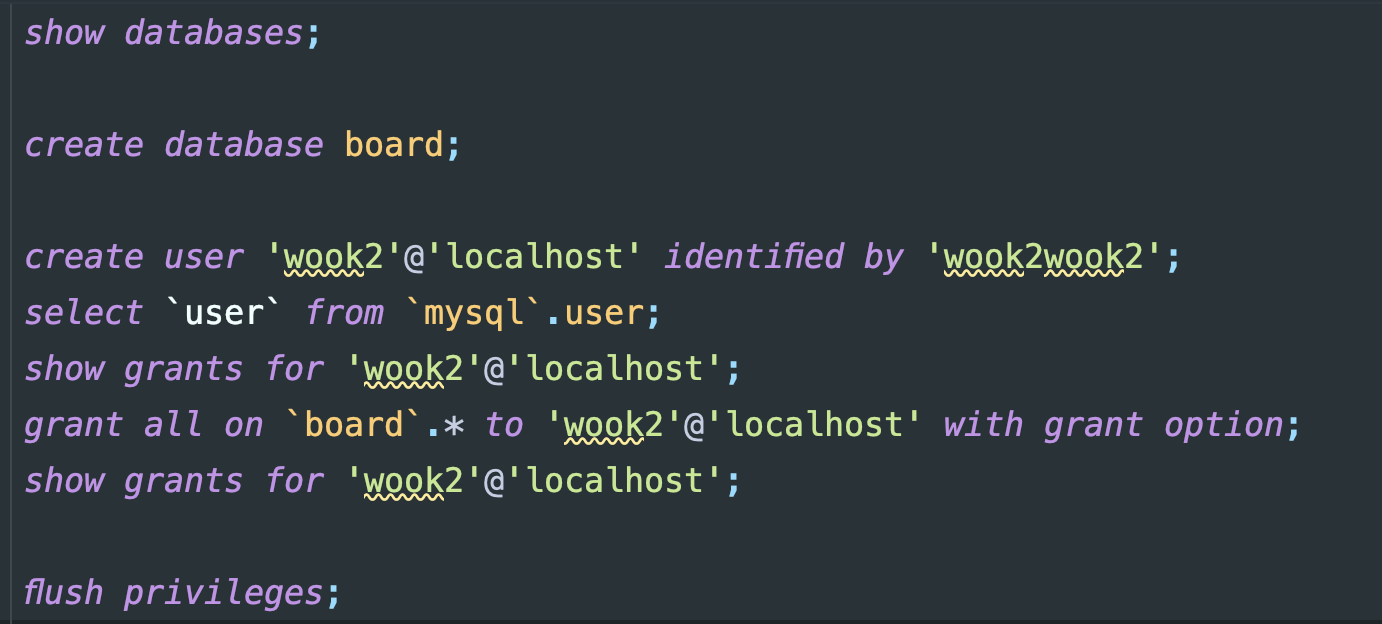
애플리케이션에 접근시 생성한 계정으로 접근하기위해 계정을 생성한다.
application 설정파일 작성하기
- 스프링 부트 디버깅
debug : false 스프링 부트 디버깅을 볼 수 있는 옵션이다. 나오는 결과물이 너무 많기 때문에 false 를 주고 필요한 부분에만 세부 설정을 하는것이 좋다.
- 로깅설정
level : 구체적인 로깅 수준을 설정하는 곳이다.
로깅 수준은 ERROR, WARN, INFO, DEBUG 또는 TRACE 중 하나이다.기본적으로 ERROR, WARN 및 INFO 수준 메시지가 기록된다.
com.wook2.projectboard 에서 발생하는 로그는 debug 레벨,
org.springframework.web.servlet 에서 발생하는 로그 즉, 요청과 응답에 대한 로그는 debug 레벨
org.hibernate.sql : hibernate가 생성하는 sql이 로그를 통해 찍히도록 설정
org.hibernate.type: 실제 들어가는 파라미터 값을 찍어주도록 설정
logging:
  level:
    com.wook2.projectboard: debug
    org.springframework.web.servlet : debug
    org.hibernate.sql : debug
    org.hibernate.type: trace
- DB연결 설정
데이터베이스에 접근시 접근할 DB URL, 이름, 패스워드, 드라이버를 넣어주어야 DB와 연결할 수 있다.
spring:
  datasource:
    url: jdbc:mysql://localhost:3306/board
    username: wook2
    password: wook2wook2
    driver-class-name: com.mysql.cj.jdbc.Driver
- jpa 설정
-
defer-datasource-initialization : 테스트용 DB를 띄울때 미리 초기에 들어갈 SQL을 설정할 수 있다. resources 에 data.sql파일에 작성해야 한다.
-
hibernate ddl-auto: create로 설정하면 작성한 Entity를 기반으로 자동으로 ddl을 만들어주는 옵션이다.
-
show-sql: sql문장을 보여줄지를 설정한다.
-
properties: 현재는 hibernate를 사용하기 때문에 hibernate에 대한 추가 기능을 넣어줄 수 있다. 만약 hibernate가 아닌 다른 구현체에 대한 추가 옵션이나 기능을 추가하려면 이 부분에 넣어주면 된다.
-
hibernate format_sql: true 한줄로 나오는 debug 쿼리문을 포매팅하여 출력해주는 옵션이다.
-
default_batch_fetch_size: 벌크단위로 가져올 시 in절에 최대 몇개까지 할 수 있는지를 설정하는 옵션이다.
-
sql.init.mode : 시작할 때 사용하는 sql문을 어느 환경에서 사용할지 정하는 것이다. always로 설정시 테스트환경 뿐 아니라 실제 운영환경 시작시에도 구문이 실행된다.
spring:
    jpa:
    defer-datasource-initialization: true
    hibernate:
      ddl-auto: create
    show-sql: true
    properties:
      hibernate:
        format_sql: true
        default_batch_fetch_size: 100
     sql.init.mode : always
엔티티 설계하기
- Article 엔티티 구성
Article 엔티티의 필드에는 id, title, content, hashtag, articleComments를 만들어 주었다.
id는 @GeneratedValue의 identity 방식으로, db에 기본키 생성 전략을 auto_increment로 설정하였고,
댓글은 OneToMany의 mappedBy를 이용해 양방향으로 연관관계를 맺어주었다. 이 경우 ManyToOne측의 테이블에서 외래키로 관리하기 때문에 연관관계의 주인은 ArticleComment에 있다.
연관관계 메서드를 통해 두 엔티티의 sync가 맞도록 설정하였다.
@Entity
@Getter
@ToString
@NoArgsConstructor(access = AccessLevel.PROTECTED)
public class Article extends BaseEntity{

    @Id
    @GeneratedValue(strategy = GenerationType.IDENTITY)
    private Long id;

    @Column(nullable = false) private String title;
    @Column(nullable = false) private String content;

    private String hashtag;

    @OneToMany(mappedBy = "article", cascade = CascadeType.ALL)
    @ToString.Exclude
    private final Set<ArticleComment> articleComments = new LinkedHashSet<>();

    private Article(String title, String content, String hashtag) {
        this.title = title;
        this.content = content;
        this.hashtag = hashtag;
    }

    public static Article of(String title, String content, String hashtag){
        return new Article(title,content,hashtag);
    }

    private void addComment(ArticleComment articleComment){
        articleComments.add(articleComment);
        articleComment.setArticle(this);
    }

    private void removeComment(ArticleComment articleComment) {
        articleComments.remove(articleComment);
        articleComment.setArticle(null);
    }


    @Override
    public boolean equals(Object o) {
        if (this == o) return true;
        if (o == null || getClass() != o.getClass()) return false;
        Article article = (Article) o;
        return id != null && id.equals(article.id);
    }

    @Override
    public int hashCode() {
        return Objects.hash(id);
    }
}
- ArticleComment 엔티티
ArticleComment 엔티티 역시 기본 Auditing클래스를 가져왔고, Article과 ManyToOne관계로 연관관계를 설정해 주었다.
@Getter
@Entity
@NoArgsConstructor(access = AccessLevel.PROTECTED)
public class ArticleComment extends BaseEntity{

    @Id
    @GeneratedValue(strategy = GenerationType.IDENTITY)
    private Long id;

    @Setter
    @ManyToOne(fetch = FetchType.LAZY)
    private Article article;
    private String content;

    private ArticleComment(Article article, String content) {
        this.article = article;
        this.content = content;
    }

    public static ArticleComment of(Article article, String content) {
        return new ArticleComment(article,content);
    }

    @Override
    public boolean equals(Object o) {
        if (this == o) return true;
        if (o == null || getClass() != o.getClass()) return false;
        ArticleComment that = (ArticleComment) o;
        return Objects.equals(id, that.id);
    }

    @Override
    public int hashCode() {
        return Objects.hash(id);
    }
}
Data JPA 리포지토리 만들기
data JPA 리포지토리를 만드는 작업은 간단하다. JpaRepository 인터페이스를 상속받는 인터페이스만 생성해주면 된다.
public interface ArticleRepository extends JpaRepository<Article, Long> {
}

---

public interface ArticleCommentRepository extends JpaRepository<ArticleComment, Long> {
}
리포지토리 테스트하기
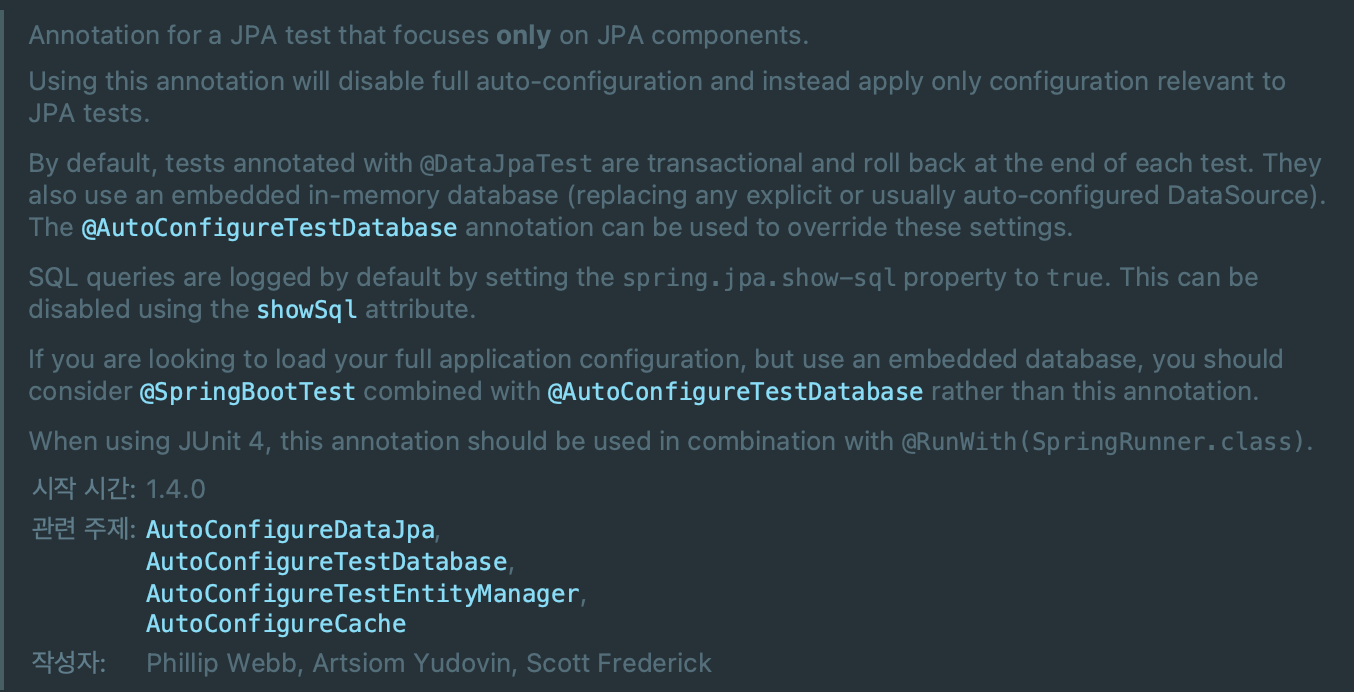
- @DataJpaTest
JPA만을 테스트 하기위한 어노테이션이다. 자동설정을 모두 빼고 오직 JPA와 관련된 테스트만 담는다.
기본적으로 @Transactional과 rollback이 걸려있다.
애플리케이션 설정 모두를 올리고 테스트하고 싶으면 @SpringBootTest를 쓰는 것을 권장한다고 한다.
DataJpaTest 는 자동으로 테스트용DB를 띄운뒤, 그 환경에서 테스트를 진행한다.