props로만 데이터를 넘겨준다면?
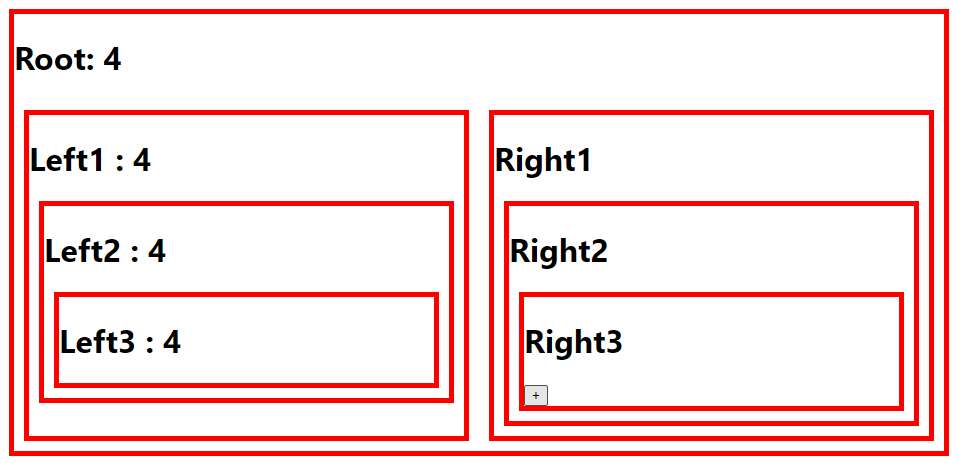
- Right3에서 Left3에 있는 숫자를 변경시키려면?
-
Left3은 Root에서부터 줄줄이 number를 넘겨받아야 하고, Right3은 Root에서부터 줄줄이 onIncrease를 넘겨받아야 함

출처: https://medium.com/humanscape-tech/redux와-미들웨어-thunk-saga-43bb012503e4
-
React Redux
- React용 공식 Redux UI 바인딩 라이브러리
- Redux와 React를 함께 사용할 경우 React Redux를 이용해서 두 라이브러리를 바인딩해주어야 함
Provider
- state를 누구에게 제공할 것인지 정의하는 것
- Provider 안에 있는 컴포넌트는 store를 사용할 수 있음
<Provider store={store}>
  <Left1 />
  <Right1 />
</Provider>
useSelector
- 하위에 있는 컴포넌트에서 store를 사용하려고 할 때 사용
function Left3() {
	// props로 넘겨주지 않아도 상태값 사용 가능
  const number = useSelector(state => state.number);
  return (
    <div>
      <h1>Left3: {number}</h1>
    </div>
  );
}
useDispatch
- 하위에 있는 컴포넌트에서 상태를 변경하려고 할 때 사용
function Right3() {
  const dispatch = useDispatch();
  return (
    <div>
      <h1>Right3</h1>
      <button type="button" onClick={() => dispatch({ type: 'PLUS' })}>+</button>
    </div>
  );
}
function reducer(currentState, action) { if (currentState === undefined) { return { number: 1}; } const newState = {...currentState}; // useDispatch에서 작성한 type을 여기서 사용 if (action.type === 'PLUS') { newState.number++; } return newState; } const store = configureStore({ reducer });
사용 방법
-
설치
$ npm install react-redux @reduxjs/toolkit
$ yarn add react-redux @reduxjs/toolkit
$ npm install redux: redux core 설치$ npm install @reduxjs/toolkit: redux toolkit 설치- redux toolkit : redux core + redux 앱 필수(라고 리덕스 개발자가 생각하는) 패키지
-
Redux Store 만들기
// store/store.js import { configureStore } from '@reduxjs/toolkit'; export default configureStore({ reducer: {}, }); -
리액트에게 Store 제공
// index.js import React from 'react'; import ReactDOM from 'react-dom/client'; import './index.css'; import App from './App'; import store from './store/store'; import { Provider } from 'react-redux' const root = ReactDOM.createRoot(document.getElementById('root')); root.render( <Provider store={store}> <App /> </Provider> ); -
리덕스 State Slice 만들기
// store/number.js import { createSlice } from "@reduxjs/toolkit"; export const numberSlice = createSlice({ name: "number", initialState: {value: 1}, reducers: { plus: (state) => { state.value += 1; }, }, }); // 각 reducer 함수마다 Action creator가 만들어진다. export const { plus } = numberSlice.actions; export default numberSlice.reducer; -
Slice Reducer를 store에 추가
// store/store.js import { configureStore } from '@reduxjs/toolkit'; import numberReducer from './number'; export default configureStore({ reducer: { number: numberReducer }, }); -
리덕스 state와 actions를 컴포넌트에서 사용
import store from './store/store';
import { Provider, useSelector, useDispatch } from 'react-redux';
import { plus } from './store/number';

export default function App() {
  return (
    <div id="container">
      <h1>Root</h1>
      <div id="grid">
          <Left1 />
          <Right1 />
      </div>
    </div>
  );
}

function Left1() {
  return (
    <div>
      <h1>Left1</h1>
      <Left2/>
    </div>
  );
}

function Left2() {
  console.log('Left2');
  return (
    <div>
      <h1>Left2</h1>
      <Left3 />
    </div>
  );
}

function Left3() {
  console.log('Left3');
  const number = useSelector(state => state.number.value);
  return (
    <div>
      <h1>Left3: {number}</h1>
    </div>
  );
}

function Right1() {
  return (
    <div>
      <h1>Right1</h1>
      <Right2 />
    </div>
  );
}

function Right2() {
  return (
    <div>
      <h1>Right2</h1>
      <Right3 />
    </div>
  );
}

function Right3() {
  const dispatch = useDispatch();
  return (
    <div>
      <h1>Right3</h1>
      <button type="button" onClick={() => dispatch(plus())}>+</button>
    </div>
  );
}
상태 관리 도구 사용시 장점
- props를 줄줄이 넘겨주지 않아도 됨. 필요한 곳에서만 코드 작성
- 상태를 사용하고 있는 컴포넌트만 재렌더링 됨 → 퍼포먼스 향상
- 참고
- React Redux Quick Start
- 생활코딩 react-redux
- 화해 기술블로그 Redux Toolkit (리덕스 툴킷)은 정말 천덕꾸러기일까?
- Redux-toolkit으로 상태관리하기!