CSSOM
- CSSOM(CSS Object Model): 자바스크립트에서 CSS를 조작할 수 있도록 하는 API 집합. CSS를 객체화 시켜 모델링한 것이다.
태그의 실제 내용은 태그 자체가 아닌 태그 내부에 있다.
태그 그 자체는 실체가 아닌 일종의 컨테이너 박스같은 것이고, 실제 내용은 태그 안을 파악하는 것이 중요하다.
ex) 예를 들어 <style> 태그 자체에는 sheet라는 실체가 있고 <canvas> 태그의 실체는 getContext로 얻은 canvastocontext에 있다. 이를 DOM에 포함시키려면 반드시 canvas라는 태그로 감싸야만(wrapping) html에 넣을 수 있다.
이러한 태그 내의 내용들을 사용하는 방법은 html 버전마다 각기 다르다. 예를 들어 canvas는 getcontext라는 메소드를 호출해 사용하지만 구형 element들은 속성으로 사용한다.
CSSOM 사용법
Style DOM Element
  ㄴ sheet: CSSStyleSheet
    ㄴ CSSRules: CSSRuleList
      ㄴ Item: CSSStyleRule -> Type, SelectorText, Style(CSSStyleDeclaration), ...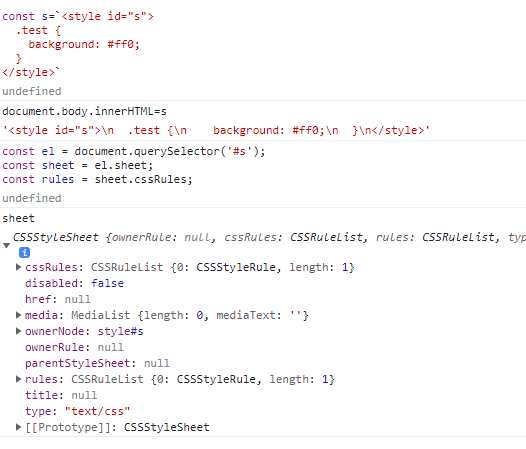
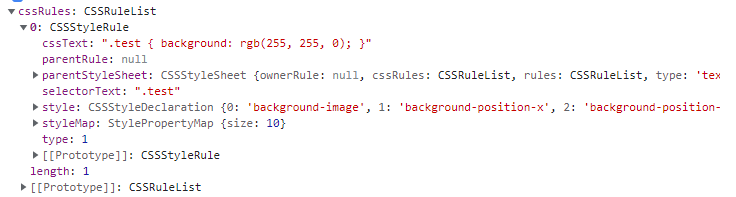
cssom을 간단히 파악하기 위해서 cssRules라는 list를 확인하면서 체크해보자. 이 안에는 여러 rule들이 들어있다. (이는 유사배열로 배열과 비슷한 친구이다. length라는 속성은 있지만 배열 메소드는 먹히지 않는 list이다.)
CSSRule Type
그렇다면 각각 rule들에 들어있는 type 속성은 무엇일까? 이는 CSS 정의에 대한 rule을 의미한다. type에는 굉장히 많은 종류가 있다.
https://developer.mozilla.org/en-US/docs/Web/API/CSSStyleSheet/cssRules
CSSStyleSheet 속성 cssRules는 스타일시트를 구성하는 모든 CSS 규칙의 최신 실시간 목록을 제공하는 라이브 CSSRuleList를 반환한다. 목록의 각 항목은 단일 규칙을 정의하는 CSS 규칙이 있다.
rules의 0번째부터는 rule들이 들어있다. 이 예제에서 rules[0]에는 style 내에서 정의한 .test 내용이 들어가있다. 만약 정의한 style이 여러개였다면 [0], [1], [2], ...에 차례대로 들어있을 것이다.
이렇게 html에서 text로 정의했던 css가 브라우저의 해석과정을 거치고 나면 메모리에 객체 형태로 저장되기 때문에 하나하나에 접근이 가능하다. 이렇게 html의 text로 적어놓은 css가 메모리상의 구조로 바뀌는 과정이 CSSOM이다.
const ruleList = document.styleSheets[0].cssRules;

for (let i=0; i < ruleList.length; i++) {
  processRule(ruleList[i]);
}
동적으로 CSS 추가하기: Insert Rule
sheet.insertRule('스타일', 넣을 index 번호)
insertRule을 사용해 sheet에 추가하면 CSS를 동적으로 추가할 수 있다.
const el = document.querySelector('#s');
const sheet = el.sheet;
const rules = sheet.cssRules;
const rule = rules[0];
// rules의 마지막 부분에 추가하기 위해서 인덱스를 rules.length로 주었다.
sheet.insertRule('.red{background:red}', rules.length);
sheet.insertRule('.blue{background:blue}', rules.length);
console.log(sheet);insertRule을 한 뒤, sheet를 출력해 cssRules를 확인해보면 우리가 지정한 red, blue 항목이 추가된 것을 볼 수 있다. 실제 CSS 스타일에 추가가 되었는지 알아보려면 다음과 같이 html의 body에서 확인한다.
<!-- 실행해보면 CSS가 잘 적용되는 것을 볼 수 있다. -->
<div class="red">red</div>
<div class="blue">blue</div>
cssRules는 순서가 굉장히 중요하기 때문에
insertRule을 할 때 두 번째 인자로 css를 추가할 순서를 지정하는 것을 볼 수 있다. (예를 들어 CSS에서 .test라는 css를 두 번 주는데 먼저 선언된 것은 width:100, 두 번째로 선언된 것은 width:200이라면 아래 선언된 200이 먹힌다.)
만약 insert를 나중에 한다면 어떻게 될까? 나중에 insert하더라도 CSS가 적용되는지 알아보자. onclick을 이용하여 red부분을 클릭할 때마다 insertRule이 작동하게 코드를 작성했다.
const el = document.querySelector('#s');
const sheet = el.sheet;
const rules = sheet.cssRules;
const rule = rules[0];
document.querySelector('.red').onclick = (_) => {
  sheet.insertRule('.red{background:red}', rules.length);
  sheet.insertRule('.blue{background:blue}', rules.length);
};
위 코드를 실행해 red를 클릭하면 CSS가 변화하는 것을 볼 수 있다. 이유는 다음과 같다. document에 등록된 sheet가 변화하면 렌더링을 다시 하기 때문이다.(repaint, reflow까지)
document에 등록된 stylesheet라는 건 어떻게 아는걸까? 이는 우리가 html에 style 태그를 이미 등록했기 때문이다. 등록된 stylesheet는 따로 관리하게 되는데 이는 브라우저에서 확인할 수 있다.
브라우저 콘솔창에서 document.styleSheets를 입력. (❓ 강의에선 CSSStyleSheet가 2개 나오는데 내 결과에선 하나만 나온다) CSSStyleSheet 안에 cssRules를 보면 우리가 insertRule로 추가한 CSS들이 반영돼있는 것을 볼 수 있다. 만약 CSSStyleSheet가 여러개라면 아래에 있는 스타일 태그 일수록 우선순위가 높다.(아래있는 것이 위에 있는 것을 이긴다.)
또한 브라우저 콘솔창에서 우리가 만든 스타일 속성을 끌 수 있다. document.styleSheets[0].disabled = true로 바꾸면 onclick으로 적용했던 CSS가 동작하지 않는 것을 볼 수 있다. (적용했던 스타일시트를 꺼버린 것임)
동적으로 CSS 삭제하기: Delete Rule
deleteRule 을 이용해 CSS를 제거할 수도 있다. 인덱스만 지정해주면 된다. insertRule 코드에 다음 코드를 추가해보자. blue를 한번 클릭하면 마지막으로 추가했던 .blue에 대한 CSS가 삭제될 것이다.
document.querySelector('.blue').onclick = (_) => {
  sheet.deleteRule(rules.length - 1);
};
CSSOM 의 효율성
CSSOM을 다루는 것을 DOM의 style 객체를 다루는 것과 완전히 다르다. CSSOM을 이용하면 stylesheet를 동적으로 조작할 수 있다는 것이다. inline 태그를 건드리는 것보다 좋다. css object(stylesheet) 하나만 건드리면 스타일이 적용되있는 요소들에 일괄적으로 적용되니까 좋은 것! 이 경우엔 성능상의 저하가 없을 것이다. (+ 위 예제처럼 태그에는 미리 class를 지정해놓아도 상관없다) dom은 그대로 두고 cssom를 사용해 클래스나 dom구조에 맞게 cssobject만 바꿔주는 것. 하나하나 dom의 style을 조정하는 것보다 훨씬 빠르다. 예를 들어 red라는 이름을 가진 class가 굉장히 많을 때 cssom를 활용하면 위에서 말한 것처럼 일괄적으로 css 적용할 수 있게된다.
<div class="red red1">red</div>
<div class="blue blue1">blue</div>
<div class="red">red</div>
<div class="blue">blue</div>
<div class="red">red</div>
<div class="blue">blue</div>
<div class="red">red</div>
<div class="blue">blue</div>
<div class="red">red</div>
<div class="blue">blue</div>
<div class="red">red</div>
<div class="blue">blue</div>
<div class="red">red</div>
<div class="blue">blue</div>
<div class="red">red</div>
<div class="blue">blue</div>
<div class="red">red</div>
<div class="blue">blue</div>document.querySelector('.red1').onclick = (_) => {
sheet.insertRule('.red{background:red}', rules.length);
sheet.insertRule('.blue{background:blue}', rules.length);
};
document.querySelector('.blue1').onclick = (_) => {
sheet.deleteRule(rules.length - 1);
};실행해보면 css object를 조정함으로써 css를 일괄적으로 쉽고 빠르게 바꿀 수 있음을 볼 수 있다.
1. Style 만들기
Style이라는 클래스를 만들어보자
const Style = (_ => {
  const prop = new Map, prefix = 'webkt,moz,ms,chrome,o,khtml'.split(',');
  const NONE = Symbol();
  const BASE = document.body.style;
  const getKey = key => {...}; // end of getKey()
  return class{...};
})();prefix: 그전에 vendor prefix 문자열이 필요하다(브라우저에 따라 여러가지 vendor prefix가 있음) split으로 문자열을 쪼개 prefix라는 배열로 가지고 있는다.- 자료형이 Map인
prop: key는 속성(ex.background), value는 해당 브라우저에서 vendor prefix를 포함해 지원하는 진짜 이름이 들어갈 것이다. None: 어떤 속성은 이 브라우저가 지원하지 않는다는 것을 표시하기 위한 장치- 위에서도 설명했듯 어떤 속성이 있는지 없는지는 실행도중에 확인해야한다. (ex. border-radius라는 속성이 있나?) 있는지 없는지를 누구에게 물어볼 것인가? 바로 어떤 브라우저든 반드시 가지고 있는
document.body.style에 물어보면 된다. body에 있는 속성이라면 있는 것이 확정되는 것!
결국, 위에서 언급했던 것처럼
Unsupported Property지원하지 않는 속성은 부드럽게 실패하기 위해NONE을 사용할 것이고- Vendor Prefix를 Runtime에 Fetch하기 위해서
BASE, 즉 body에 있는 style 객체를 사용할 것이다. 라는 것!
코드에서 getKey() 부분
const Style = (_ => {
  // ...
  const getKey = key => {
    if(prop.has(key)) return prop.get(key);
    if(key in BASE) prop.set(key, key);
    else if(!prefix.some(v =>{
      // prefix를 붙인 속성은 존재하는가?
      // ...
    })){
      prop.set(key, NONE);
      key = NONE;
    }
    return key;
  }; // end of getKey()

  return class{...};
})();
강의 내용의 Style 객체 & 전체 코드
const Style = ((_) => {
const prop = new Map(),
prefix = 'webkt,moz,ms,chrome,o,khtml'.split(',');
const NONE = Symbol();
const BASE = document.body.style;
const getKey = (key) => {
if (prop.has(key)) return prop.get(key);
if (key in BASE) prop.set(key, key);
else if (
!prefix.some((v) => {
const newKey = v + key[0].toUpperCase() + key.substr(1);
if (newKey in BASE) {
prop.set(key, newKey);
key = newKey;
return true;
} else return false;
})
) {
prop.set(key, NONE);
key = NONE;
}
return key;
}; // end of getKey()
return class {
constructor(style) {
this._style = style;
}
get(key) {
key = getKey(key);
if (key === NONE) return null;
return this._style[key];
}
set(key, val) {
key = getKey(key);
if (key !== NONE) this._style[key] = val;
return this;
}
};
})();
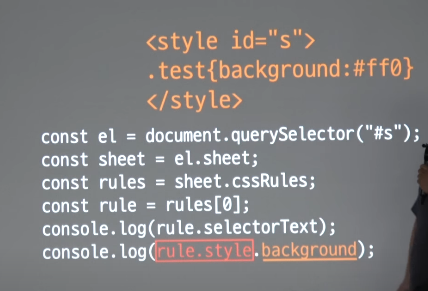
const el = document.querySelector('#s');
const sheet = el.sheet;
const rules = sheet.cssRules;
const rule = rules[0];
const style = new Style(rule.style); // ⭐
style.set('borderRadius', '20px').set('boxShadow', '0 0 0 10px red');
console.log(rule); // js에서 지정한 css 스타일들이 잘 들어가있는 것을 확인할 수 있다.<!DOCTYPE html>
<html>
<head>
<style id="s">
.test {
background: #ff0;
}
</style>
</head>
<body>
<div class="test">abc</div>
<script src="basicTest.js"></script>
</body>
</html>- vendor prefix를 간섭하거나 이에 구애받지 않고 스타일 속성을 지정할 수 있게 되었다.
this를 리턴하도록 했으므로set체이닝이 가능하다.
브라우저 내부에 반영될 때는
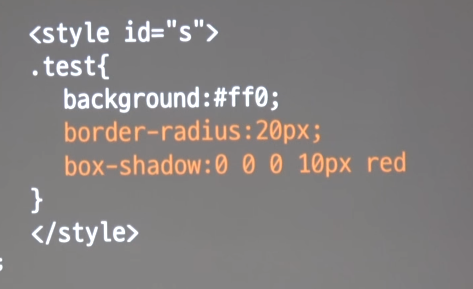
이렇게 반영될 수도,

이렇게 반영될 수도 있는 것이다.
2. Rule 만들기
rule을 구성하는 것들(type, selectortext, style, ...)을 하나하나 구현하는 것이 아니라 rule을 통으로 감싸는 객체를 만들면 된다.
const Style = ((_) => {
  // ... 위에서 만들었던 Style 코드
})();

const Rule = class {
  constructor(rule) {
    this._rule = rule;
    this._style = new Style(rule.style);
  }
  get(key) {
    return this._style.get(key);
  }
  set(key, val) {
    this._style.set(key, val);
    return this;
  }
};

const el = document.querySelector('#s');
const sheet = el.sheet;
const rules = sheet.cssRules;
const rule = new Rule(rules[0]); // 우리가 만든 클래스인 Rule에 rule을 지정한다.
rule.set('borderRadius', '20px').set('boxShadow', '0 0 0 10px red'); // 이렇게 하면 rule안의 style에 알아서 반영이 될 것이다. (rule이 style을 소유하는 구조이다.)- Rule의 생성자에서 rule과 위에서 만들었던
Style객체를 지정한다. get,set도Style의get,set을 쓴다.- rule은
get,set을 할 때 Style 객체에 의존하게 되고, Style 객체는get,set시getKey라는 함수에 의존하게 돼 진짜 이름인지 확인하는 절차를 진행한다. 이로써 보다 더 안전한 방법으로 css를 조작할 수 있게 되었다.
3. Sheet 만들기
rule을 add/remove 하는 것이 Sheet 객체의 주 기능이다. 동적으로 CSS 추가/삭제하기 에서 배웠던 코드를 바탕으로 어떻게 구현해야할지 생각해보자.
const sheet = el.sheet;
const rules = sheet.cssRules;

// 추가 // rules의 length가 필요함을 알 수 있다.
sheet.insertRule('.red{background:red}', rules.length);

// 삭제
sheet.deleteRule(rules.length - 1);
const Style = ((_) => {
// ...
})();
const Rule = class {
constructor(rule) {
this._rule = rule;
this._style = new Style(rule.style);
}
// ...
};
// ⭐
const Sheet = class {
constructor(sheet) {
this._sheet = sheet;
this._rules = new Map();
}
add(selector) {
const index = this._sheet.cssRules.length;
this._sheet.insertRule(`${selector}{}`, index); // selector를 지정하여 빈 rule을 넣는다.
const cssRule = this._sheet.cssRules[index]; // 진짜 cssRule이 담긴다.
const rule = new Rule(cssRule); // 우리가 만든 Rule 객체에 cssRule을 넣는다.
this._rules.set(selector, rule); // key를 selector로 해서 rule을 rules에 저장해놓는다. -> 나중에 selector로 조회할 수도 있음
return rule; // add를 실행하면 이렇게 만들어진 rule이 리턴된다.
}
remove(selector) {
// 이전에 deleteRule은 index를 지정해야만 delete가 가능했다.
// 하지만 우리가 원하는 건 selector로 Rule을 지우는 것이다.(.red, .blue를 특정하여 지우고 싶은 것이다.)
if (!this._rules.contains(selector)) return; // rules에 해당 selector로된 rule이 있다면 그냥 리턴
const rule = this._rules.get(selector)._rule; // Rule 객체에는 _rule이 있다.(위에서 짠 Rule 객체 관련 코드 참고하기)
Array.from(this._sheet.cssRules).some((cssRule, index) => {
// cssRules를 돌면서 rule과 같다면 해당 rule을 삭제
if (cssRule === rule._rule) {
this._sheet.deleteRule(index);
return true; // true를 리턴해 some 함수를 멈춘다.
}
});
}
get(selector) {
return this._rule.get(selector);
}
};
// Sheet 객체를 직접 사용해보자
const sheet = new Sheet(document.styleSheets[0]);
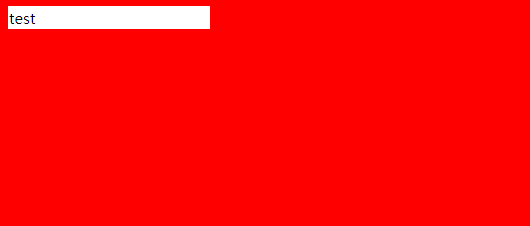
sheet.add('body').set('background', '#f00');
sheet.add('.test').set(
'cssText',
`
width:200px;
border:1px solid #fff;
color: #000;
background: #fff
`
);<!DOCTYPE html>
<html>
<head>
<style></style>
</head>
<body>
<div class="test">test</div>
<script src="test.js"></script>
</body>
</html>cssText를 사용해 여러가지 속성을 한번에 밀어넣을 수 있다. 이때는 자바스크립트 속성명 대신 CSS 이름 그대로 쓸 수 있다는 장점이 있다. 다만 이 예제에서는 이렇게 작성하게 되면 우리가 만든 key-value 시스템이 무의미해진다.
그러나 우리가 지금까지 구현한 것은 CSS rule type 1번을 커버한 것에 불과하다. import 되는 경우는? @font-face 등은 어떻게 할 것인가?
keyframes 다루기
keyframes에는 from, to와 같은 keyframe animation 셀렉터가 들어가있다.(DOM 셀렉터가 아님) 이를 어떻게 객체화 시킬 것인가?
const Style = ((_) => {
  const prop = new Map(),
    prefix = 'webkt,moz,ms,chrome,o,khtml'.split(',');
  const NONE = Symbol();
  const BASE = document.body.style;
  const getKey = (key) => {
    if (prop.has(key)) return prop.get(key);
    if (key in BASE) prop.set(key, key);
    else if (
      !prefix.some((v) => {
        const newKey = v + key[0].toUpperCase() + key.substr(1);
        if (newKey in BASE) {
          prop.set(key, newKey);
          key = newKey;
          return true;
        } else return false;
      })
    ) {
      prop.set(key, NONE);
      key = NONE;
    }
    return key;
  }; // end of getKey()
  return class {
    constructor(style) {
      this._style = style;
    }
    get(key) {
      key = getKey(key);
      if (key === NONE) return null;
      return this._style[key];
    }
    set(key, val) {
      key = getKey(key);
      if (key !== NONE) this._style[key] = val;
      return this;
    }
  };
})();

const Rule = class {
  constructor(rule) {
    this._rule = rule;
    this._style = new Style(rule.style);
  }
  get(key) {
    return this._style.get(key);
  }
  set(key, val) {
    this._style.set(key, val);
    return this;
  }
};

const Sheet = class {
  constructor(sheet) {
    this._sheet = sheet;
    this._rules = new Map();
  }
  add(selector) {
    const index = this._sheet.cssRules.length;
    this._sheet.insertRule(`${selector}{}`, index);
    const cssRule = this._sheet.cssRules[index];
    // ⭐ @keyframes을 처리하기 위한 분기가 생겼다.
    let rule;
    if (selector.startsWith('@keyframes')) {
      rule = new KeyFramesRule(cssRule);
    } else {
      rule = new Rule(cssRule);
    }
    this._rules.set(selector, rule);
    return rule;
  }
  remove(selector) {
    if (!this._rules.contains(selector)) return;
    const rule = this._rules.get(selector)._rule;
    Array.from(this._sheet.cssRules).some((cssRule, index) => {
      if (cssRule === rule._rule) {
        this._sheet.deleteRule(index);
        return true;
      }
    });
  }
  get(selector) {
    return this._rule.get(selector);
  }
};

// ⭐
// KeyFramesRule은 Sheet 객체와 생김새가 똑같다.
// keyframes 내부가 스타일 시트처럼 생겼기 때문이다.
// 유일한 차이점은 rule을 넣을 때 insertRule 대신 appendRule을 써야한다.(w3c 표준)

const KeyFramesRule = class {
  constructor(rule) {
    this._keyframe = rule;
    this._rules = new Map();
  }
  add(selector) {
    const index = this._keyframe.cssRules.length;
    this._keyframe.appendRule(`${selector}{}`);
    const cssRule = this._keyframe.cssRules[index];
    const rule = new Rule(cssRule);
    this._rules.set(selector, rule);
    return rule;
  }
  remove(selector) {
    if (!this._rules.contains(selector)) return;
    const rule = this._rules.get(selector)._rule;
    Array.from(this._keyframe.cssRules).some((cssRule, index) => {
      if (cssRule === rule._rule) {
        this._keyframe.deleteRule(index);
        return true;
      }
    });
  }
};

const sheet = new Sheet(document.styleSheets[0]);
const size = sheet.add('@keyframes size'); // keyframes rule 객체가 리턴됨
size.add('from').set('width', '0'); // Rule 객체가 리턴되므로 set 을 호출할 수 있음
size.add('to').set('width', '500px');- keyframes animation을 동적으로 정의해 쓸 수 있게 되었다.
- 예를 들어 런타임에 애니메이션 정도를 조정해야하는 경우 keyframe을 쓰길 포기하고 자바스크립트 애니메이션을 썼다면 이젠 그러지 않아도 된다!