1. 변수와 가변성
기본 변수는 불변성이다.
안전성과 손쉬운 동시성이라는 장점을 취할 수 있도록 강제하는 요소 중 하나
가변성 변수를 선언하고 싶다면 접두어로 mut을 추가한다.
- 불변성 예시
fn main() {
    let x = 5;
    println!("The value of x is: {}", x);
    x = 6;
    println!("The value of x is: {}", x);
}
error[E0384]: re-assignment of immutable variable `x`
--> src/main.rs:4:5
|
2 | let x = 5;
| - first assignment to `x`
3 | println!("The value of x is: {}", x);
4 | x = 6;
| ^^^^^ re-assignment of immutable variable-
에러가 나타내는 것은 불변셩 변수의 재할당이고, 원인은 불변성 변수
x에 두 번째로 값을 할당했기 때문이다. -
가변성 예시
fn main() {
    let mut x = 5;
    println!("The value of x is: {}", x);
    x = 6;
    println!("The value of x is: {}", x);
}
$ cargo run
Compiling variables v0.1.0 (file:///projects/variables)
Finished dev [unoptimized + debuginfo] target(s) in 0.30 secs
Running `target/debug/variables`
The value of x is: 5
The value of x is: 6- 대규모 데이터 구조체를 다루는 경우 가변한 인스턴스를 사용하는 것이 새로 인스턴스를 할당하고 반환하는 것보다 빠를 수도 있다.
- 데이터 규모가 작을수록 새 인스턴스를 생성하고 함수적 프로그래밍 스타일로 작성하는 것이 더 합리적이고, 그렇기에 약간의 성능 하락을 통해 가독성을 확보할 수 있다면 더 가치 있는 선택이다.
1.1 변수와 상수 간의 차이점들
- 상수에 대해서는
mut을 사용하는 것이 허용되지 않는다. 상수는 기본 설정이 불변성인 것이 아니고 불변성 그 자체이기 때문이다. - 상수를 사용하고자 하면
let키워드 대신const키워드를 사용해야 하고, 값의 유형을 선언해야 한다. - 상수는 전체 영역을 포함하여 어떤 영역에서도 선언될 수 있다.
- 상수는 오직 상수 표현식만 설정될 수 있지, 함수 호출의 결과값이나 그 외에 실행 시간에 결정되는 값이 설정될 수 없다.
// Rust의 상수 명명 규칙에 따라 모든 단어를 대문자로 사용
const MAX_POINTS: u32 = 100_000;- 상수는 자신이 선언되어 있는 영역 내에서 프로그램이 실행되는 시간 동안 항상 유효하다.
- 프로그램 전체에 걸쳐 하드코딩 해야 하는 값을 이름지어 상수로 사용하면 향후 코드를 유지보수 하게 될 사람에게 그 의미를 전달할 수 있고, 해당 값을 변경해야 하는 경우에 상수로 선언된 값 한 곳만 변경하면 되므로 유용하다.
1.2 Shadowing
- 이전에 선언한 변수와 같은 이름의 새 변수를 선언할 수 있고, 새 변수는 이전 변수를 shadows하게 된다.
- 이를 첫 변수가 두 번째에 의해 shadowed 됐다고 표현한다.
let키워드를 사용해서 다음처럼 반복하여 같은 변수명으로 변수를 shadow 할 수 있다.
fn main() {
    let x = 5;
    let x = x + 1;
    let x = x * 2;
    println!("The value of x is: {}", x);
}
// The value of x is: 12- 이와 같은 사용은 변수를
mut으로 선언하는 것과는 차이가 있다. let키워드를 사용하지 않고 변수에 새로 값을 대입하려고 하면 컴파일시에 에러가 발생한다.- 또다른
mut과 shadowing의 차이는let키워드를 다시 사용하여 효과적으로 새 변수를 선언하고, 값의 유형을 변경할 수 있으면서도 동일 이름을 사용할 수 있다는 점이다. - ex) 공백 문자들을 입력받아 얼마나 많은 공백 문자가 있는지 보여주고자 할 때, 실제 저장하고자 하는 것은 공백의 개수이다.
let spaces = "   ";
let spaces = spaces.len();- 이와 같은 구조가 허용되는 이유는 첫
spaces변수가 문자열 유형이고 두 번째spaces변수는 첫 번째 것과 동일한 이름을 가진 새롭게 정의된 숫자 유형의 변수이기 때문이다. - 그러나
mut을 사용하려고 했다면 다음과 같은 에러를 얻게 될 것이다.
let mut spaces = "   ";
spaces = spaces.len();
error[E0308]: mismatched types
--> src/main.rs:3:14
|
3 | spaces = spaces.len();
| ^^^^^^^^^^^^ expected &str, found usize
|
= note: expected type `&str`
found type `usize`2. 데이터 타입들
Rust에서 사용되는 모든 값들은 어떤 타입을 갖는다.
타입은 크게 스칼라와 컴파운드, 둘로 나눌 수 있다.
- Rust는 타입이 고정된 언어이다.
- 따라서 모든 변수의 타입이 컴파일 시에 반드시 정해져 있어야 한다.
String을parse를 사용하여 숫자로 변환하는 것처럼 타입의 선택 폭이 넓은 경우는 반드시 타입의 명시를 첨가해야 한다.
let guess: u32 = "42".parse().expect("Not a number!");error[E0282]: type annotations needed
--> src/main.rs:2:9
|
2 | let guess = "42".parse().expect("Not a number!");
| ^^^^^
| cannot infer type for `_`
| consider giving `guess` a type2.1 스칼라 타입들
- 하나의 값으로 표현되는 타입
- 정수형, 부동소수점 숫자, boolean, 문자
2.1.1 정수형
- 소수점이 없는 숫자
- 부호 있는 타입은 u 대신 i로 시작한다.
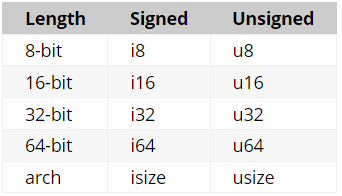
- 각각의 타입은 부호 혹은 미부호이며 명시된 크기를 갖는다.
- 부호 : 숫자가 부호를 가져야 하는 경우
- 미부호 : 오직 양수값만을 가질 것이기에 부호가 없이도 표현할 수 있는 경우
- 부호된 숫자는 2의 보수 형태를 사용하여 저장됨.
- 각 부호 변수는
-(2^(n-1) - 1)~2^(n-1) - 1까지의 값을 포괄한다.- n은 사용되는 타입의 비트 수이다.
- 미부호 타입은
0~2^n - 1까지의 값을 저장할 수 있다. - 확실하게 타입이 정해진 경우가 아니면 Rust의 기본 값인
i32가 일반적으로 좋은 선택이다.- 일반적으로 가장 빠르다. 심지어 64-bit 시스템에서 조차도
2.1.2 부동 소수점 타입
f32와f64가 있으며 각기 32bit와 64bit의 크기를 갖는다.- 기본 타입은
f64이다.
fn main() {
    let x = 2.0; // f64

    let y: f32 = 3.0; // f32
}
2.1.3 수학적 연산들
- 일반적인 기본 수학적 연산은 모든 숫자 타입에 적용된다.
fn main() {
    // addition
    let sum = 5 + 10;

    // subtraction
    let difference = 95.5 - 4.3;

    // multiplication
    let product = 4 * 30;

    // division
    let quotient = 56.7 / 32.2;

    // remainder
    let remainder = 43 % 5;
}
2.1.4 Boolean xkdlq
bool로 명시된다.true와false의 두가지
fn main() {
    let t = true;

    let f: bool = false; // with explicit type annotation
}
2.1.5 문자 타입
char는 가장 근본적인 알파벳 타입- 스트링은 큰따옴표를 쓰는 것에 반하여
char타입은 작은따옴표로 사용
x fn main() { let c = 'z'; let z = 'ℤ'; let heart_eyed_cat = '😻';}- Rust의
char타입은 Unicode Scalar를 표현하는 값이고 이는 ASCII 보다 많은 표현을 가능하게 한다.
2.2 복합 타입들
- 다른 타입의 다양한 값들을 하나의 타입으로 묶을 수 있다.
- 튜플과 배열의 두 개의 기본 타입들을 갖고 있다.
2.2.1 값들을 집합시켜서 튜플화하기
- 튜플은 다양한 타입의 몇 개의 숫자를 집합시켜 하나의 복합 타입으로 만드는 일반적인 방법
fn main() {
    let tup: (i32, f64, u8) = (500, 6.4, 1);
}- 튜플은 단일 요소를 위한 복합계로 고려되었기에 변수
tup에는 튜플 전체가 bind 된다. - 개별 값을 튜플의 밖으로 빼내오기 위해서는, 패턴 매칭을 사용하여 튜플의 값을 구조해체 시키면 된다.
fn main() {
    let tup = (500, 6.4, 1);
    let (x, y, z) = tup; // x: 500, y: 6.4, z: 1
    println!("The value of y is: {}", y);
}- 튜플을 만들고 변수
tup에 bind 시킨다. - 패턴과
let을 통해tup을 세개의 분리된 변수 x, y, z에 이동시킨다.- 구조 해체 : 하나의 튜플을 부분들로 나누기 때문에 구조 해체라 불린다.
- y의 값을 출력할 것이고 이는
6.4이다.
마침표(.)뒤에 접근하길 원하는 값의 색인을 넣는 것으로 튜플의 요소에 직접적으로 접근할 수 있다.
fn main() {
    let x: (i32, f64, u8) = (500, 6.4, 1);
    let five_hundred = x.0;	// 500
    let six_point_four = x.1; // 6.4
    let one = x.2; // 1
}
2.2.2 배열
- 튜플과 다르게 배열의 모든 요소는 모두 같은 타입이어야 한다.
- 배열은 고정된 길이를 갖는다.
- 한번 선언되면, 크기가 커지거나 작아지지 않는다.
fn main() {
    let a = [1, 2, 3, 4, 5];
}- 배열이 유용한 경우는 데이터를 heap보다 stack에 할당하는 것을 원하거나, 항상 고정된 숫자의 요소를 갖는다고 확신하고 싶을 때이다.
- 이들은 벡터 타입처럼 가변적이지 않다.
- 벡터 타입은 유사 집합체로 표준 라이브러리에서 제공되며 확장 혹은 축소가 가능하다.
- 배열이나 벡터 중에 뭘 선택해야 할지 확실하지 않은 상황이라면 벡터를 사용하는 것을 권장한다.
// 변하지 않을 고정된 길이
let months = ["January", "February", "March", "April", "May", "June", "July",
              "August", "September", "October", "November", "December"];
배열 요소에 접근하기
- 배열은 stack에 단일 메모리 뭉치로 할단된다.
- 색인을 통해 배열의 요소에 접근할 수 있다.
fn main() {
    let a = [1, 2, 3, 4, 5];
    let first = a[0];	// first: 1
    let second = a[1];	// second: 2
}
유효하지 않은 배열 요소에 대한 접근
fn main() {
    let a = [1, 2, 3, 4, 5];
    let index = 10;
    let element = a[index];
    println!("The value of element is: {}", element);
}
$ cargo run
Compiling arrays v0.1.0 (file:///projects/arrays)
Finished dev [unoptimized + debuginfo] target(s) in 0.31 secs
Running `target/debug/arrays`
thread '<main>' panicked at 'index out of bounds: the len is 5 but the index is
10', src/main.rs:6
note: Run with `RUST_BACKTRACE=1` for a backtrace.- 컴파일 시에는 아무런 에러도 발생시키지 않았지만, 프로그램의 결과는 실행 중에 에러가 발생했고 성공적으로 종료되지 못했다고 나온다.
- 색인을 사용하여 요소에 접근하려고 하면 Rust는 지정한 색인이 배열 길이보다 작은지 확인한다.
- 색인이 길이보다 길면 Rust는 프로그램이 오류와 함께 종료 될 때 Rust가 사용하는 용어인 패닉(panic)한다.
- 이것은 Rust의 안전 원칙이 동작하는 첫 번째 예이다.
- Rust는 메모리 접근을 허용하고 계속 진행하는 대신 즉시 종료하여 이러한 종류의 오류로부터 사용자를 보호한다.
3. 함수 동작 원리
fn은 새로운 함수의 선언을 가능하게 한다.Rust의 변수나 함수 이름 규칙은 snake_case이다. - 모든 문자는 소문자를 사용하여 밑줄 표시로 단어 구분
fn main() {
    println!("Hello, world!");
    another_function();
}
fn another_function() {
    println!("Another function.");
}
// Hello, world!
// Another function.- Rust에서의 함수 선언은
fn으로 시작하며 함수 이름 뒤에 괄호의 형식으로 되어 있다. - 중괄호는 컴파일러에게 함수의 시작과 종료 지점을 알려주게 된다.
another_function을main함수 앞에 정의해도 된다.- Rust는 함수의 위치를 신경 쓰지 않고, 어디든 정의만 되어 있으면 된다.
3.1 함수 매개변수
- 함수는 매개변수를 갖는 형식으로 선언될 수 있다.
fn main() {
    another_function(5);
}

fn another_function(x: i32) {
    println!("The value of x is: {}", x);
}
// The value of x is: 5another_function의 선언은x로 명명된 하나의 매개변수를 갖는다.x의 타입은i32로 정의된다.5가another_function으로 전달되면println!매크로는 중괄호 짝으로 된 형식 문자열에5를 전달한다.- 함수의 선언부에서 반드시 각 매개변수의 타입을 정의해야 한다.
- 여러 개의 매개변수를 사용하고 싶으면, 매개변수들을 쉼표와 함께 구분해서 사용한다.
fn main() {
    another_function(5, 6);
}
fn another_function(x: i32, y: i32) {
    println!("The value of x is: {}", x);
    println!("The value of y is: {}", y);
}
// The value of x is: 5
// The value of y is: 6another_function은 각각i32타입인 두 개의 매개변수를 갖는 함수이다.- 매개변수는 굳이 같은 타입이 아니어도 된다.
3.2 함수 본문
- 필요에 따라 표현식으로 종결되는 구문의 나열로 구성된다.
- Rust가 표현식에 기반한 언어기 때문
3.3 구문과 표현식
- 구문은 어떤 명령들의 나열로 값을 반환하지 않는 어떤 동작을 수행한다.
- 표현식은 결과 값을 산출해낸다.
fn main() {
    let y = 6;	// 구문
}- 함수 정의는 또 하나의 구문이다.
- 구문은 값을 반환하지 않는다.
- 따라서 다음처럼
let구문을 사용해서는 다른 변수에 값을 대입할 수 없다.
fn main() {
    let x = (let y = 6);
}
$ cargo run
Compiling functions v0.1.0 (file:///projects/functions)
error: expected expression, found statement (`let`)
--> src/main.rs:2:14
|
2 | let x = (let y = 6);
| ^^^
|
= note: variable declaration using `let` is a statementlet y = 6구문은 반환 값이 없으므로x에 bind 시킬 것이 없다.- 표현식은 구문의 부분일 수 있다.
fn main() {
    let x = 5;

    let y = {
        let x = 3;
        x + 1
    };

    println!("The value of y is: {}", y);
}- 이번 경우에 해당 block은
4를 산출합니다. - 이 값은
let구문의 일부로y에 bound됩니다. x + 1줄의 마지막이 세미콜론으로 끝나지 않은 점을 주목하세요. 표현식은 종결을 나타내는 세미콜론을 사용하지 않습니다.- 만약 세미콜론을 표현식 마지막에 추가하면, 이는 구문으로 변경되고 반환 값이 아니게 됩니다. 이후부터 함수의 반환 값과 표현식을 살펴보실 때 이 점을 유의하세요.
3.4 반환 값을 갖는 함수
- 함수는 함수를 호출한 코드에 값을 반환할 수 있다.
- 반환 값의 타입은 화살표(
->)뒤에 선언해야 한다. - Rust에서 반환 값은 함수 본문의 마지막 표현식의 값과 동일하다.
return키워드와 값을 써서 함수로부터 일찍 반환할 수 있지만, 대부분의 함수들은 암묵적으로 마지막 표현식을 반환한다.
fn five() -> i32 {
    5
}
fn main() {
    let x = five();
    println!("The value of x is: {}", x);
}
// The value of x is: 5- 5는
five함수가 반환한 값이고, 이 때문에 반환 타입을i32로 한것이다.
let x = five();줄은 반환 값을 변수의 초기 값으로 사용하는 것을 보여준다. 또한five의 반환 값이5이기 때문에 해당 줄은 다음과 동일하다.
let x = 5;five함수는 매개변수 없이 반환 값에 대한 타입만 정의되어 있지만, 본문에는5만이 세미콜론 없이 있는 이유는 값을 반환하고자 할 때 사용하는 표현식이기 대문이다.
fn main() {
    let x = plus_one(5);
    println!("The value of x is: {}", x);
}
fn plus_one(x: i32) -> i32 {
    x + 1
}
// The value of x is: 6
x + 1 끝에 세미콜론을 추가하여 표현식을 구문으로 변경하면 다음과 같은 에러를 얻는다.
error[E0308]: mismatched types
 --> src/main.rs:7:28
  |
7 |   fn plus_one(x: i32) -> i32 {
  |  ____________________________^
8 | |     x + 1;
  | |          - help: consider removing this semicolon
9 | | }
  | |_^ expected i32, found ()
  |
  = note: expected type `i32`
found type `()`plus_one함수의 정의는i32값을 반환하겠다고 하였으나 구문은 값을 산출하지 않기에()처럼 비어있는 튜플로 표현된다.- 이런 이유로 반환할 것이 없어서 함수가 정의된 내용과 상충하게 되고 이는 에러를 발생시킨다.
4. 주석
프로그래머는 메모를 남기거나 소스코드에 컴파일러는 무시하도록 되어 있는 주석을 사용한다.
Rust에서 주석은 두개의 슬래쉬
//로 시작해야 하고 해당 줄의 끝까지 계속된다.
// Hello, world.// 우리는 여기에 뭔가 복잡한 것을 적어놓고자 하는데, 그를 위해 충분히 긴 여러 줄의 주석이 필요합니다.
// 휴! 다행입니다.
// 이 주석은 그에 대해 설명할테니까요.- 주석은 코드 뒷부분에 위치할 수도 있다.
fn main() {
    let lucky_number = 7; // I’m feeling lucky today.
}
5. 제어문
5.1 if표현식
if표현식은 코드가 조건에 따라 분기할 수 있게 한다.
fn main() {
    let number = 3;
    if number < 5 {
        println!("condition was true");
    } else {
        println!("condition was false");
    }
}
// condition was true- 모든
if표현식은if란 키워드로 시작하며 뒤이어 조건이 온다. - 여기서 조건은 변수
number가 5보다 작은 값을 가지는지 여부가 된다. - 조건이 참일 때 실행하는 코드 블록은 조건 바로 뒤 중괄호로 된 블록에 배치된다.
if식의 조건과 관련된 코드 블럭은 갈래(arms)로 불린다.- 선택적으로
else식을 포함시킬 수 있는데, 이는 조건이 거짓으로 산출될 경우 실행시킬 코드 블럭을 프로그램에 제공한다. else식을 제공하지 않는데 조건이 거짓이 되면, 프로그램은if블록을 생략하고 다음 순서의 코드를 실행하게 된다.number의 값을let number = 7;와 같이 7로 변경하면condition was false가 출력된다.- 이번 코드의 조건은 반드시
bool이어야 한다.
fn main() {
    let number = 3;
    if number {
        println!("number was three");
    }
}
error[E0308]: mismatched types
--> src/main.rs:4:8
|
4 | if number {
| ^^^^^^ expected bool, found integral variable
|
= note: expected type `bool`
found type `{integer}`- Rust는 boolean 타입이 아닌 것을 boolean 타입으로 자동 변환하지 않는다.
fn main() {
    let number = 3;
    if number != 0 {
        println!("number was something other than zero");
    }
}
// number was something other than zero
5.1.1 else if와 다수 조건
if와else사이에else if식을 추가 결합하여 다양한 조건을 다룰 수 있다.
fn main() {
    let number = 6;
    if number % 4 == 0 {
        println!("number is divisible by 4");
    } else if number % 3 == 0 {
        println!("number is divisible by 3");
    } else if number % 2 == 0 {
        println!("number is divisible by 2");
    } else {
        println!("number is not divisible by 4, 3, or 2");
    }
}
// number is divisible by 3
5.1.2 let 구문에서 if 사용하기
if가 표현식이기 때문에let구문의 우측에 사용할 수 있다.
fn main() {
    let condition = true;
    let number = if condition {
        5
    } else {
        6
    };
    println!("The value of number is: {}", number);
}
// The value of number is: {5}if와else갈래는 모두i32정수형을 결과 값으로 가진다.- 위와 같은 경우 만약 유형이 다르다면 에러가 발생한다.
fn main() {
    let condition = true;

    let number = if condition {
        5
    } else {
        "six"
    };

    println!("The value of number is: {}", number);
}
error[E0308]: if and else have incompatible types
--> src/main.rs:4:18
|
4 | let number = if condition {
| __________________^
5 | | 5
6 | | } else {
7 | | "six"
8 | | };
| |_____^ expected integral variable, found reference
|
= note: expected type `{integer}`
found type `&str`if블록이 정수형을 산출하는 식이고else블록은 문자열을 산출하는 식이다.- Rust는 컴파일 시에
number변수의 타입이 뭔지 확실히 정의해야 한다.- 그래야
number가 사용되는 모든 곳에서 유효한지 검증할 수 있기 때문에
- 그래야
- Rust는
number의 타입을 실행 시에 정의되도록 할 수 없다.
5.2 반복문과 반복
5.2.1 loop와 함께 코드의 반복 수행
loop keyword는 Rust에게 그만두라고 명시하여 알려주기 전까지 코드 블럭을 반복 수행한다.
fn main() {
    loop {
        println!("again!");
    }
}
// 프로그램을 강제 정지하기 전까지 again!이 반복 출력된다.
// ctrl + c 를 통해 정지가능breakkeyword를 위치시켜 프로그램이 언제 루프를 멈춰야 하는지 알려줄 수 있다.
5.2.2 while와 함께하는 조건부 반복
- 조건이 참인 동안 반복문을 수행하고, 조건이 참이 아니게 된 경우에
break를 호출하여 반복을 정지시킨다.
fn main() {
    let mut number = 3;
    while number != 0 {
        println!("{}!", number);
        number = number -1;
    }
    println!("LIFTOFF!!!");
}
// 3!
// 2!
// 1!
// LIFTOFF!!!
5.2.3 for와 함께하는 콜렉션 반복하기
while구조자를 통해 배열과 같은, 콜렉션의 각 요소에 걸쳐 반복 수행 할 수 있다.
fn main() {
    let a = [10, 20, 30, 40, 50];
    let mut index = 0;

    while index < 5 {
        println!("the value is: {}", a[index]);
        index = index + 1;
    }
}
// the value is: 10
// the value is: 20
// the value is: 30
// the value is: 40
// the value is: 50- 이런 방식은 에러가 발생하기 쉽다.
- 정확한 길이의 색인을 사용하지 못하면 프로그램은 패닉을 발생한다.
- 또한 컴파일러가 실행 간에 반복문을 통해 반복될 때마다 요소에 대한 조건 검사를 수행하는 런타임 코드를 추가하기 때문에 느리다.
- 따라서 보다 효율적인 대안으로
for반복문을 사용한다.
fn main() {
    let a = [10, 20, 30, 40, 50];
    for element in a.iter() {
        println!("the value is: {}", element);
    }
}
// the value is: 10
// the value is: 20
// the value is: 30
// the value is: 40
// the value is: 50while구조자를 사용한 것과 같은 결과를 볼 수 있다.- 하지만 코드의 안전성을 높이고 배열의 끝을 넘어가거나 충분한 길이를 지정하지 못해 일부 아이템이 누락되어 발생할 수 있는 버그의 가능성을 제거했다.
Range는 한 숫자에서 다른 숫자 전까지 모든 숫자를 차례로 생성한다.rev메소드는 range를 역순한다.
fn main() {
    for number in (1..4).rev() {
        println!("{}!", number);
    }
    println!("LIFTOFF!!!");
}
// 3!
// 2!
// 1!
// LIFTOFF!!!
참고 문서
https://rinthel.github.io/rust-lang-book-ko/ch03-00-common-programming-concepts.html

GitHub - https://github.com/jenu8628