
Daily Coding
3. 2의 거듭제곱 판단하기
import java.util.*;

public class Solution {
	public boolean powerOfTwo(long num) {

      boolean result = true;
      double num2 = num*1.0; //double형으로 만들기

      while (num2>1){
        result = false;
        if(num2%2==0) result = true;
        num2 = num2/2;
      }

      return result;
	}
}
2로 계속 나눠서 판단했는데 소수점값까지 계산해야하다보니 double로 바꿔주었다. 이 방법은 큰 숫자가 들어올 때 무수히 많은 소숫점자리를 함께 계산해야하는 단점이 있다.
import java.util.*;

public class Solution {
	public boolean powerOfTwo(long num) {
      boolean result = true;

      while (num>1){
        result = true;
        if(num%2!=0) {
          result = false;
          break;
        }
        num = num/2;
      }
      return result;
	}
}
위에서 언급한 단점을 보완해 봤다.
또 아래 방법처럼 입력받는 값까지 새로운 변수에 2를 곱해서 비교할 수 있다.
import java.util.*;

public class Solution {
	public boolean powerOfTwo(long num) {
    if (num == 1) {
      return true;
    }

    if (num % 2 != 0) {
      return false;
    }

    long powered = 2;
    while (powered < num) {
      powered = powered * 2;
    }

    return powered == num;
  }
}
4. 문자열 각 단어의 첫 글자 리턴하기
(단어는 공백을 기준으로 분리한다.)
import java.util.*;
public class Solution {
public String firstCharacter(String str) {
String result = "";
String[] strA = str.split(" ");
if(str.length()==0) return "";
for(int i =0; i<strA.length; i++) {
result += strA[i].charAt(0);
}
return result;
}
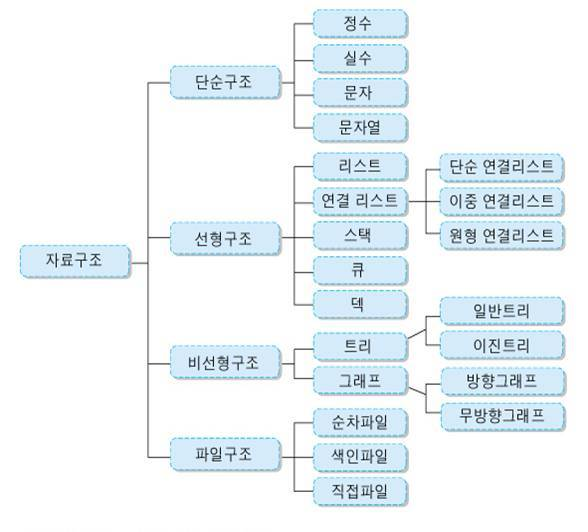
}Section2 - 자료구조
자료구조 = 여러 데이터의 묶음을 저장하고, 사용하는 방법
Stack
데이터(data)를 순서대로 쌓는 자료구조
-
가장 먼저 들어간 데이터는 가장 나중에 나올 수 있다. (후입선출)
- 입력과 출력이 하나의 방향으로 이루어지는 제한적 접근
- LIFO(Last In First Out) or FILO(First In Last Out)
-
데이터는 하나씩 넣고 뺄 수 있다.
-
하나의 입출력 방향
-
메소드
- PUSH = 데이터를 넣는 것
- POP = 데이터를 꺼내는 것
-
ex) 브라우저 앞으로가기, 뒤로가기
Stack<Integer> stack = new Stack<>(); //Integer형 스택 선언

stack.push(1);
stack.push(2);
stack.push(3);
stack.push(4);

System.out.println(stack);

// [1, 2, 3, 4]

stack.pop();
stack.pop();
stack.pop();
stack.pop();

4, 3, 2, 1
//제일 마지막에 있는 데이터부터 차례대로 나옴
연습문제 - ArrayList로 Stack형 자료구조 만들기
import java.util.*;

public class Solution {
  private ArrayList<Integer> listStack = new ArrayList<Integer>();

  public void push(Integer data) {
        listStack.add(data);
    }

    public Integer pop() {
        if(listStack.size()==0) {
            return null;
        }else {
            return listStack.remove(listStack.size()-1);
        }
    }

    public int size() {
        return listStack.size();
    }

    public Integer peek() {
        if(listStack.size()==0) {
            return null;
        }else {
            return listStack.get(listStack.size()-1);
        }
    }

  public String show() {
    return listStack.toString();
  }
  public void clear() { listStack.clear(); }
}
-
ArrayList로 Stack을 사용할 때 주의해야 할 사항
- 마지막 인덱스를 제외한 인덱스를 사용하지 않도록 해야한다.
-
Java의 배열로 Stack을 구현했을때 생기는 단점
- 객체가 추가되면 저장용량을 매번 늘려줘야 한다.
Queue
선입선출 자료구조
-
먼저 들어간 데이터(data)가 먼저 나온다.
- FIFO(First In First Out) or LILO(Last In Last Out)
- 데이터(data)를 입력된 순서대로 처리할 때 사용
-
데이터는 하나씩 넣고 뺄 수 있다.
-
두 개의 입출력 방향
-
ex) 프린터기가 컴퓨터한테 data 받아서 출력하는거
연습문제 - ArrayList로 Queue형 자료구조 만들기
import java.util.ArrayList;

public class QueueTest {
    private ArrayList<Integer> listQueue = new ArrayList<Integer>();

    public void add(Integer data) { // 큐에 데이터 추가
        listQueue.add(data);
    }

    public Integer poll() { // 가장 먼저 추가된 데이터 삭제, 리턴
        if(listQueue.size()==0) {
            return null;
        }else {
            return listQueue.remove(0);
        }
    }

    public int size() { // 큐에 저장된 데이터 크기 리턴
        return listQueue.size();
    }

    public Integer peek() { // 가장 먼저 추가된 데이터 리턴
        if(listQueue.size()==0) {
            return null;
        }else {
            return listQueue.get(0);
        }
    }

    public String show() {
        return listQueue.toString();
    }

    public void clear() {
        listQueue.clear();
    }
}
- Java의 배열로 Queue를 구현했을때 단점
- 배열의 가장 앞에 있는 데이터를 꺼내오기 때문에 그 다음 인덱스의 데이터들을 한 칸씩 모두 이동해야 한다. (시간 복잡도 매우 큼)
Stack, Queue Quiz
브라우저 앞뒤로가기
	public ArrayList<Stack> browserStack(String[] actions, String start) {
    Stack<String> prevStack = new Stack<>();
    Stack<String> nextStack = new Stack<>();
    Stack<String> current = new Stack<>();
    ArrayList<Stack> result = new ArrayList<>();

    current.push(start);

        for(String o : actions) {
            if(nextStack.size()==0&&o=="1"){
                continue;
            }else if(prevStack.size()==0&& o=="-1"){
                continue;
            } else if(o=="-1"){
                nextStack.push(current.pop());
                current.push(prevStack.pop());
            } else if(o=="1"){
                prevStack.push(current.pop());
                current.push(nextStack.pop());
            }else {
                prevStack.push(current.pop());
                current.push(o);
                nextStack.clear();
            }
        }

        result.addAll(Collections.singleton(prevStack));
        result.addAll(Collections.singleton(current));
        result.addAll(Collections.singleton(nextStack));

        return result;

    }
웹 주소는 알파벳으로 들어오고 뒤로가기는 "-1" 앞으로 가기는 "1"로 입력받는다고 치고 작성했다.
박스포장
public int paveBox(Integer[] boxes) {

    Queue<Integer> queue = new LinkedList<>();
        int count = 1;

         for(int i = 0; i<boxes.length; i++){ // 큐 자료구조에 박스 데이터 전부 넣기
             queue.add(boxes[i]);
         }

        int compare = queue.poll();
        List<Integer> list = new ArrayList<Integer>();

        while(queue.size()!=0){

            if(compare >= queue.peek()){
                count++;
                queue.remove();
            }else {
                compare = queue.poll();
                list.add(count);
                count=1;

            }
        }
        list.add(count);
        return Collections.max(list);
    }
앞사람이 다 포장해야 뒷사람이 나갈 수 있다는 형태를 표현한 문제였다.
뒤에있는 숫자들 중 연속적으로 있는 앞숫자 이하의 숫자들은 한번에 나가도록 하고 이때, 한번에 몇개의 숫자가 빠지는지 카운팅 했다.
//queue = {5, 1, 4, 6}
if(queue.poll() > queue.peek() ){
                System.out.println(queue.poll());
                System.out.println(queue.peek());
            }

 //출력
 1
 4
위와 같이 테스트해보니 저번 Iterator.next와 마찬가지로 조건문에 사용해도 데이터를 삭제시켜버리니 poll을 조건문에서 사용하는 것을 최대한 지양했다.
프린터
bufferSize = 동시에 처리할 수 있는 작업칸수
capacities = 동시에 처리 가능한 최대 용량
(작업칸이 남아 있어도 용량이 오버되면 작업칸에 못들어오는거)
documents = 작업해야 할 목록 배열
public class QueuePrinter {

    public int queuePrinter(int bufferSize, int capacities, int[] documents) {
        int time = 0;
        int bufferTotal =0;
        Queue<Integer> doc = new LinkedList<>();
        Queue<Integer> buffer = new LinkedList<>();

        for(int o : documents){
            doc.add(o);
        }
        //System.out.println(doc);

        for(int i=0; i<bufferSize; i++) {
            buffer.add(0);
        }
        //System.out.println(buffer);

        while(!(doc.size()==0 && bufferTotal==0)){
            bufferTotal=0;
            for(int j : buffer){
                bufferTotal += j;
            }
            if(bufferTotal+doc.peek()<=capacities){
                buffer.add(doc.poll());
                buffer.poll();
                //System.out.println(buffer);
            }else{
                buffer.poll();
                buffer.add(0);
            }
            System.out.println(buffer);

            for(int k : buffer){
                bufferTotal += k;
            }

            System.out.println(bufferTotal);

            if(bufferTotal == 0 && doc.size()==0) {
                break;
            }
            time++;

            if(bufferTotal==0) time -= 1;
            //System.out.println(time);
        }
        //System.out.println(time);
        return time;

    }
}

//출력
[0, 7]
7
[7, 0]
14
[0, 0]
7
[0, 4]
4
[4, 5]
13
[5, 0]
14
[0, 0]
5
[0, 6]
6
Exception in thread "main" java.lang.NullPointerException
	at QueuePrinter.queuePrinter(QueuePrinter.java:27)
	at Main.main(Main.java:55)
doc에 요소가 남지 않아 doc.peek()를 수행하지 못해서 에러가 발생했다.
public int queuePrinter(int bufferSize, int capacities, int[] documents) {
        int time = 0;
        int bufferTotal =0;
        Queue<Integer> doc = new LinkedList<>();
        Queue<Integer> buffer = new LinkedList<>();

        for(int o : documents){
            doc.add(o);
        }
        //System.out.println(doc);

        for(int i=0; i<bufferSize; i++) {
            buffer.add(0);
        }
        //System.out.println(buffer);

        while(!(doc.size()==0 && bufferTotal==0)){
            bufferTotal=0;
            for(int j : buffer){
                bufferTotal += j;
            }
            if(doc.size()!=0) {
                if (bufferTotal + doc.peek() <= capacities) {
                    buffer.add(doc.poll());
                    buffer.poll();
                    //System.out.println(buffer);
                } else {
                    buffer.poll();
                    buffer.add(0);
                }
            }else { // << 추가된 내용
                buffer.add(0);
                buffer.poll();
            }

            System.out.println(buffer);

            for(int k : buffer){
                bufferTotal += k;
            }

            System.out.println(bufferTotal);

            if(bufferTotal == 0 && doc.size()==0) {
                break;
            }
            time++;

            if(bufferTotal==0) time -= 1;
            //System.out.println(time);
        }
        //System.out.println(time);
        return time;

    }

 //출력
[0, 7]
7
[7, 0]
14
[0, 0]
7
[0, 4]
4
[4, 5]
13
[5, 0]
14
[0, 0]
5
[0, 6]
6
[6, 0]
12
[0, 0]
6
[0, 0]
0
10
buffer = [0,0]인걸 확인할 수 있는데 이때 bufferTotal이 0이 아니라 2초가 빼지지 않았다.
public int queuePrinter(int bufferSize, int capacities, int[] documents) {
        int time = 0;
        int bufferTotal =0;
        Queue<Integer> doc = new LinkedList<>();
        Queue<Integer> buffer = new LinkedList<>();

        for(int o : documents){
            doc.add(o);
        }
        //System.out.println(doc);

        for(int i=0; i<bufferSize; i++) {
            buffer.add(0);
        }
        //System.out.println(buffer);

        while(true==true){
            bufferTotal=0;

            for(int j : buffer){
                bufferTotal += j;
            }
            System.out.println(bufferTotal);
            if(doc.size()!=0) {
                if (bufferTotal + doc.peek() <= capacities) {
                    buffer.add(doc.poll());
                    buffer.poll();
                    //System.out.println(buffer);
                } else {
                    buffer.poll();
                    buffer.add(0);
                }
            }else {
                buffer.add(0);
                buffer.poll();
            }

            System.out.println(buffer);

            bufferTotal = 0; // << 추가된 내용

            for(int k : buffer){
                bufferTotal += k;
            }

            System.out.println(bufferTotal);

            if(bufferTotal == 0 && doc.size()==0) {
                break;
            }

            time++;

            if(bufferTotal==0) time -= 1;
            //System.out.println(time);
        }
        //System.out.println(time);
        return time;

    }
}
//출력
0
[0, 7]
7
7
[7, 0]
7
7
[0, 0]
0
0
[0, 4]
4
4
[4, 5]
9
9
[5, 0]
5
5
[0, 0]
0
0
[0, 6]
6
6
[6, 0]
6
6
[0, 0]
0
7
bufferTotal 초기화를 한번 더 해줘야 했었다.
똑같은 코드에서 Buffer와 시간을 출력해 봤다.
[0, 7]
1
[7, 0]
2
[0, 0]
2
[0, 4]
3
[4, 5]
4
[5, 0]
5
[0, 0]
5
[0, 6]
6
[6, 0]
7
[0, 0]
7
마지막 처리에서 카운팅이 안되는 것을 볼 수 있다.
 public int queuePrinter(int bufferSize, int capacities, int[] documents) {
        int time = 0;
        int bufferTotal =0;
        Queue<Integer> doc = new LinkedList<>();
        Queue<Integer> buffer = new LinkedList<>();

        for(int o : documents){
            doc.add(o);
        }
        //System.out.println(doc);

        for(int i=0; i<bufferSize; i++) {
            buffer.add(0);
        }
        //System.out.println(buffer);

        while(true==true){
            bufferTotal=0;

            for(int j : buffer){
                bufferTotal += j;
            }
            //System.out.println(bufferTotal);
            if(doc.size()!=0) {
                if (bufferTotal + doc.peek() <= capacities) {
                    buffer.add(doc.poll());
                    buffer.poll();
                    //System.out.println(buffer);
                } else {
                    buffer.poll();
                    buffer.add(0);
                }
            }else {
                buffer.add(0);
                buffer.poll();
            }

            System.out.println(buffer);

            bufferTotal = 0;

            for(int k : buffer){
                bufferTotal += k;
            }

            //System.out.println(bufferTotal);

            if(bufferTotal == 0 && doc.size()==0) {
                break;
            }

            time++;

            if(bufferTotal==0) time -= 1;
            System.out.println(time);
        }
        time++;  // <<추가
        return time;

    }
//출력
8 = 정답
하지만 다양한 예시를 대입하니 1~5초정도 documents의 input이 커질수록 차이나는 시간도 커지는 것을 볼 수 있었다.
queueP.queuePrinter( 2, 10, new int[]{7, 4, 5, 6,1,1,9,8,4,6,5,2,7,6,5,4,1,5,2,6,4,3,1,5})

//출력
앞부분 생략
[5, 0]
5
[0, 0]
5
[0, 6]
6
[6, 1]
7
[1, 1]
8
[1, 0]
9   // << 이상함
[0, 9]
10
[9, 0]
11
[0, 0]
11
뒷부분 생략
원인을 찾기 위해서 위와 같이 큰 배열을 넣어봤다.
9초 부분을 보면 최대용량10을 초과하지 않는데
[1,9]와 같이 담기지 않았다.
더 자세히 확인을 위해서 아래와 같이 1,9로 반복된 배열을 입력으로 넣어봤다.
System.out.println(queueP.queuePrinter( 2, 10, new int[]{1,9,1,9,1,9}));

//출력
bufferTotal = 0
doc.peek() = 1
[0, 1]
time :1

bufferTotal = 1
doc.peek() = 9
[1, 9]
time :2

bufferTotal = 10 // << 전 결과가 10이니까 10으로 나옴
doc.peek() = 1
[9, 0]
time :3

bufferTotal = 9
doc.peek() = 1
[0, 1]
time :4

bufferTotal = 1
doc.peek() = 9
[1, 9]
time :5

bufferTotal = 10
doc.peek() = 1
[9, 0]
time :6

bufferTotal = 9
doc.peek() = 1
[0, 1]
time :7

bufferTotal = 1
doc.peek() = 9
[1, 9]
time :8

[9, 0]
time :9

[0, 0]
10
위 결과를 통해 조건식 bufferTotal + doc.peek() <= capacities이 잘못되었 다는 것을 알 수 있었다.
bufferTotal에서 빠지게 될 맨앞 요소값을 제외해주는 식으로 바꿔야겠다.
int time = 0;
        int bufferTotal =0;
        Queue<Integer> doc = new LinkedList<>();
        Queue<Integer> buffer = new LinkedList<>();

        for(int o : documents){
            doc.add(o);
        }
        //System.out.println(doc);

        for(int i=0; i<bufferSize; i++) {
            buffer.add(0);
        }
        //System.out.println(buffer);

        while(true==true){
            bufferTotal=0;

            for(int j : buffer){
                bufferTotal += j;
            }
            //System.out.println(bufferTotal);
            if(doc.size()!=0) {
                if (bufferTotal + doc.peek() - buffer.peek() <= capacities) {
                    System.out.println("bufferTotal = "+ bufferTotal);
                    System.out.println("doc.peek() = " + doc.peek());
                    buffer.add(doc.poll());
                    buffer.poll();
                    //System.out.println(buffer);
                } else {
                    System.out.println("bufferTotal = "+ bufferTotal);
                    System.out.println("doc.peek() = " + doc.peek());
                    buffer.poll();
                    buffer.add(0);
                }
            }else {
                buffer.add(0);
                buffer.poll();
            }

            System.out.println(buffer);

            bufferTotal = 0;

            for(int k : buffer){
                bufferTotal += k;
            }

            //System.out.println(bufferTotal);

            if(bufferTotal == 0 && doc.size()==0) {
                break;
            }

            time++;

            if(bufferTotal==0) time -= 1;
            System.out.println("time :" + time);
            System.out.println();
        }
        time++;
        return time;
//출력
bufferTotal = 0
doc.peek() = 1
[0, 1]
time :1

bufferTotal = 1
doc.peek() = 9
[1, 9]
time :2

bufferTotal = 10
doc.peek() = 1
[9, 1]
time :3

bufferTotal = 10
doc.peek() = 9
[1, 9]
time :4

bufferTotal = 10
doc.peek() = 1
[9, 1]
time :5

bufferTotal = 10
doc.peek() = 9
[1, 9]
time :6

[9, 0]
time :7

[0, 0]
8

종료 코드 0(으)로 완료된 프로세스
이제 정상적으로 작동하는 것을 확인할 수 있었다.
기능 수행에 필요없는 부분을 빼고 간략화하면 아래와 같다.
public int queuePrinter(int bufferSize, int capacities, int[] documents) {
        int time = 0;
        int bufferTotal =0;
        Queue<Integer> doc = new LinkedList<>();
        Queue<Integer> buffer = new LinkedList<>();

        for(int o : documents){
            doc.add(o);
        }

        for(int i=0; i<bufferSize; i++) {
            buffer.add(0);
        }

        while(!(bufferTotal == 0 && doc.size()==0)){
            bufferTotal=0;
            for(int j : buffer){
                bufferTotal += j;
            }
            if(doc.size()!=0) {
                if (bufferTotal + doc.peek() - buffer.peek() <= capacities) {
                    buffer.add(doc.poll());
                    buffer.poll();
                } else {
                    buffer.poll();
                    buffer.add(0);
                }
            }else {
                buffer.add(0);
                buffer.poll();
            }
            time++;

            bufferTotal=0;          // << bufferTotal 다시 계산해줘야하는데 이걸 뺴서 오류 났었음
            for(int j : buffer){
                bufferTotal += j;
            }
        }
        return time;

    }
위 코드는 buffer를 출력했을 때 사람이 보기 편하게 짠 코드지만
아래와 같이 poll과 동시에 빈자리에 0을 채워주지 않음으로 써
isEmpty를 활용할 수 있고 위에서 번거롭게 쓰인 bufferTotal을 생략할 수 있다.
Queue<Integer> queue = new LinkedList<>();
        Queue<Integer> buffer = new LinkedList<>();
        for (int document : documents) queue.add(document);
        int memory = capacities;
        int res = 1;

        while(!queue.isEmpty() || !buffer.isEmpty()){
            res++;
            // 문서에서 버퍼로 넘기기
            if(!queue.isEmpty()){
                // 큐에서 버퍼로 넣을 수 있는 경우
                if(queue.peek() <= memory){
                    memory -= queue.peek();
                    for(int i=buffer.size(); i < bufferSize-1; i++) buffer.add(0);
                    buffer.add(queue.poll());
                }
            }
            // 버퍼 이동시키기
            if(!buffer.isEmpty()){
                if(buffer.peek() != 0){
                    memory += buffer.peek();
                }
                buffer.poll();
            }

        }
        return res;
Tree
데이터가 바로 아래에 있는 하나 이상의 데이터에 무방향으로 연결된 계층적 자료구조
ex. 윈도우 폴더구조, 가계도, 조직도 등
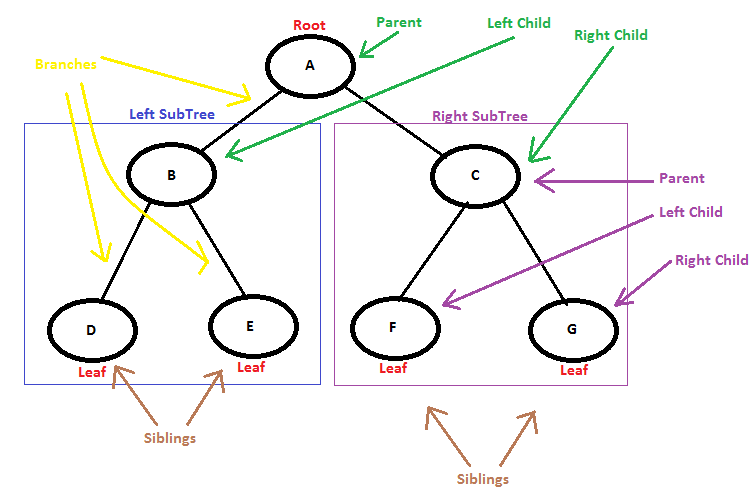
- 노드(Node) = 각 데이터
- 부모 노드(Parent Node) = 상위 데이터
- 자식 노드(Child Node) = 하위 데이터
- 리프 노드(Leaf Node) = 자식 노드가 없는 데이터
- 깊이 (depth) = 루트노드의 깊이는 0, B는 1, D는 2
- 레벨(Level) = 같은 깊이를 가지고 있는 노드들의 묶음
- 형제 노드(Sibling Node) = 같은 레벨에 있는 노드
- 높이(Height) = 리프 노드를 기준으로 데이터까지의 높이
- 서브 트리(Sub tree) = 트리 구조를 갖춘 작은 트리
Tree형 자료구조 구현
import java.util.ArrayList;

public class TreeTest {
    private String value;
    private ArrayList<TreeTest> children;

    public TreeTest() {	//전달인자가 없을 경우의 생성자
        this.value = null;
        this.children = null;
    }
    public TreeTest(String data) {	//전달인자가 존재할 경우의 생성자
        this.value = data;
        this.children = null;
    }

    public void setValue(String data) {
        this.value = data;
    }

    public String getValue() {      //현재 노드의 데이터를 반환
        return value;
    }
    public void addChildNode(TreeTest node) {
        if(children == null) children = new ArrayList<>();
        children.add(node);
    }
    public void removeChildNode(TreeTest node) {
        String data = node.getValue();

        if(children != null) {
            for(int i = 0; i < children.size(); i++) {
                if(children.get(i).getValue().equals(data)) {
                    children.remove(i);
                    return;
                }
                if(children.get(i).children != null) children.get(i).removeChildNode(node); // 이게 뭐지?? i번째 요소가 안지워 졌으면 다시 지우려고 재귀하는건 알겠는데..children.get(i).children?? -> 자식노드의 자식을 뜻함
            }
        }
    }

    public ArrayList<TreeTest> getChildrenNode() {
        return children;
    }

    public boolean contains(String data) {      //재귀를 사용하여 값을 검색
        if(value.equals(data)) return true;

        boolean check;

        if(children != null) {
            for(int i = 0; i < children.size(); i++) {
                check = children.get(i).contains(data, false);
                if(check) return true;
            }
        }
        return false;
    }

    public boolean contains(String data, boolean check) {      //재귀를 사용하여 값을 검색합니다.
        if(value.equals(data)) return true;

        if(children != null) {
            for(int i = 0; i < children.size(); i++) {
                check = children.get(i).contains(data, check);
            }
        }
        return check;
    }
}
Graph
여러개의 점들이 서로 복잡하게 연결되어 있는 관계를 표현한 자료구조
ex) sns 친구의 친구 같은 관계, 내비게이션 길찾기, 검색 엔진 등
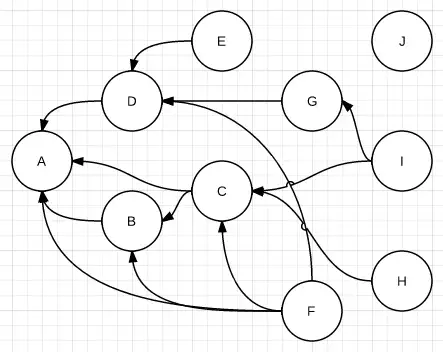
- 정점 (vertex): 노드(node)라고도 하며 데이터가 저장되는 그래프의 기본 원소
- 간선 (edge): 정점 간의 관계(정점을 이어주는 선)
인접 정점 (adjacent vertex): 간선에 의해 직접 연결되어 있는 정점 - 가중치 그래프 (weighted Graph): 간선에 가중치(=비용)가 있는 그래프
- 비가중치 그래프 (unweighted Graph): 연결의 강도(가중치)가 적혀져 있지 않은 그래프
- 무(방)향 그래프 (undirected graph): 간선의 방향이 없는 그래프
- 진입차수 (in-degree) / 진출차수 (out-degree): 들어오는 간선, 나가는 간선의 총합이 몇 인지를 나타낸 수
- 인접 (adjacency): 두 정점 간에 간선이 직접 이어져 있는 상태
- 자기 루프 (self loop): 정점에서 진출하는 간선이 다른 정점을 거치지 않고 곧바로 자기 자신에게 진입하는 경우
- 사이클 (cycle): 한 정점에서 출발하여 다시 해당 정점으로 돌아갈 수 있는 경우
Graph의 구조
- 직접관계 = 두 점 사이를 이어주는 선이 있다.
- 간접적인 관계 = 몇 개의 점과 선에 걸쳐 이어진다.
- 정점(vertex) = 점
- 간선(edge) = 선
Graph의 표현 방식
- 인접 행렬 = 서로 다른 정점들이 인접한 상태인지를 표시한 행렬로 2차원 배열의 형태
- 이어져 있다면 1(true), 이어져 있지 않다면 0(false)로 표시한 표
- 가중치 그래프라면 1대신 의미 있는 값을 저장. ex) 거리
(cf. 가중치= 간선을 이동하는데 필요한 비용) - 최단 경로 찾을 때 주로 사용
- 연결 가능한 모든 경우의 수를 저장하기 때문에 상대적으로 메모리를 많이 차지
- 인접 리스트 = 어떤 정점과 인접하는지를 표현한 리스트
- 메모리를 효율적으로 사용하고 싶을 때 주로 사용
Graph형 자료구조 구현
import java.util.ArrayList;

public class GraphTest {
    private int[][] graph;
    private ArrayList<ArrayList<Integer>> arr = new ArrayList<>();

    public void setGraph(int size) { //  size만큼의 버텍스를 추가
        graph = new int[size][size];

        for(int i = 0; i < size; i++) {
            for(int j = 0; j < size; j++) {
                graph[i][j] = 0;
            }
        }
    }
    public int[][] getGraph() { // 인접 행렬 정보가 담긴 배열을 반환
        return graph;
    }
    public void addEdge(int from, int to) { // fromVertex와 toVertex 사이의 간선 추가
        if(from >= graph.length || to >= graph.length) return;
        graph[from][to] = 1;
    }

    public boolean hasEdge(int from, int to) { // fromVertex와 toVertex 사이의 간선 존재여부 리턴
        if(from >= graph.length || to >= graph.length) return false;
        else if(graph[from][to] == 1) return true;
        else return false;
    }

    public void removeEdge(int from, int to) { //  fromVertex와 toVertex 사이의 간선 삭제
        if (from >= graph.length || to >= graph.length) return;
        graph[from][to] = 0;
    }
}
Binary Search Tree(이진 탐색 트리)
자식 노드가 최대 두 개인 노드들로 구성된 트리
모든 왼쪽 자식의 값이 루트나 부모보다 작고, 모든 오른쪽 자식의 값이 루트나 부모보다 큰 값을 가지는 특징이 있다.
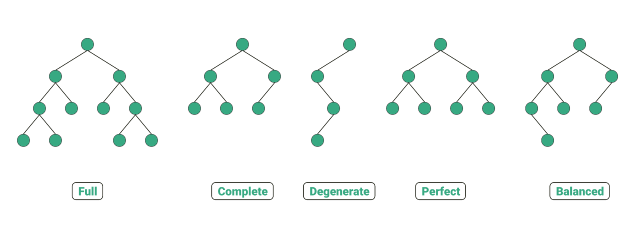
-
정 이진 트리 (Full Binary Tree) : 모든 노드가 0개 또는 2개의 자식 노드를 갖는 트리
-
완전 이진 트리 (Complete Binary Tree) : 맨 마지막 레벨을 제외한 모든 레벨이 완전히 채워져 있는 트리
(마지막 레벨의 노드는 가능한 한 가장 왼쪽에 있다. ➡ Heap) -
변질 트리 (Degenerate tree / Pathological tree) : 각 부모 노드는 오직 한 개의 연관 자식 노드로 갖는 트리.
(성능 면에서 트리가 Linked List처럼 동작) -
포화 이진 트리 (Complete Binary Tree) : 모든 내부 노드가 두 개의 자식 노드를 가지며 모든 리프 노드가 동일한 깊이 또는 레벨을 갖는 트리
-
균형 이진 트리 (Balanced Binary Tree) : 리프(잎) 노드에 대해 가능한 한 최대의 최소 높이(다른 말로 깊이)를 갖는 트리.
(주어진 수의 잎 노드에 대해, 잎 노드가 가능한 가장 큰 높이에 위치하기 때문)
Tree traversal(트리 순회)
-
전위 순회 (preorder traverse)
- root 노드를 방문
- 왼쪽 서브 트리를 방문
- 오른쪽 서브트리를 방문
-
중위 순회 (inorder traverse)
- 왼쪽 서브 트리를 방문
- root 노드를 방문
- 오른쪽 서브트리를 방문
-
후위 순회 (postorder traverse)
- 왼쪽 서브 트리를 방문
- 오른쪽 서브트리를 방문
- root 노드를 방문
BST구현
import java.util.ArrayList;

public class BST {
    public static class Node { // 트리를 구성하는 노드 클래스
        private int data;
        private Node left;
        private Node right;

        public Node(int data) { //생성자
            this.setData(data);
            setLeft(null);
            setRight(null);
        }

        public int getData() {
            return data;
        }

        public Node getLeft() {
            return left;
        }

        public Node getRight() {
            return right;
        }

        public void setData(int data) {
            this.data = data;
        }

        public void setLeft(Node left) {
            this.left = left;
        }

        public void setRight(Node right) {
            this.right = right;
        }
    }

    public static class binarySearchTree { // 이진 탐색 트리의 클래스
        public Node root;

        public binarySearchTree(){
            root = null;
        }

        public void insert(int data) { // tree에 value를 추가하는 메서드
            Node newNode = new Node(data); // 왼쪽, 오른쪽 자식 노드가 null 이며 data 의 값이 저장된 새 노드 생성
            if (root == null) {// 루트 노드가 없을때, 즉 트리가 비어있는 상태일 때,
                root = newNode;
                return;
            }
            if(root.data == data) return;   //중복일때 정지

            Node currentNode = root;
            Node parentNode = null;

            while (true) {
                parentNode = currentNode;

                if (data < currentNode.getData()) { // 해당 노드보다 작을 경우
                    currentNode = currentNode.getLeft();
                    if (currentNode == null) {
                        parentNode.setLeft(newNode);
                        return;
                    }else if(currentNode.data == newNode.data) return;
                } else { // 해당 노드보다 클 경우
                    currentNode = currentNode.getRight();
                    if (currentNode == null) {
                        parentNode.setRight(newNode);
                        return;
                    }else if(currentNode.data == newNode.data) return;
                }
            }
        }

        // tree의 value값을 탐색
        public boolean contains(int data) {
            Node currentNode = root;
            while (currentNode != null) {
                // 찾는 value값이 노드의 value와 일치한다면, true를 리턴합니다.
                if (currentNode.data == data) {
                    return true;
                }

                if (currentNode.data > data) {
                    // 찾는 value값이 노드의 value 보다 작다면, 현재 노드를 left로 변경후 다시 반복
                    currentNode = currentNode.left;
                }else {
                    // 찾는 value값이 노드의 value 보다 크다면, 현재 노드를 right로 변경후 다시 반복
                    currentNode = currentNode.right;
                }
            }
            return false;
        }


        // 이진 탐색 트리를 순회하는 메서드
        public ArrayList<Integer> preorderTree(Node root, int depth, ArrayList<Integer> list) {    //전위 순회
            if (root != null) {
                list.add(root.getData());
                preorderTree(root.getLeft(), depth + 1, list);
                preorderTree(root.getRight(), depth + 1, list);
            }
            return list;
        }

        public ArrayList<Integer> inorderTree(Node root, int depth, ArrayList<Integer> list) { //중위 순회
            if (root != null) {
                inorderTree(root.getLeft(), depth + 1, list);
                list.add(root.getData());
                inorderTree(root.getRight(), depth + 1, list);
            }
            return list;
        }

        public ArrayList<Integer> postorderTree(Node root, int depth, ArrayList<Integer> list) {   //후위 순회
            if (root != null) {
                postorderTree(root.getLeft(), depth + 1, list);
                postorderTree(root.getRight(), depth + 1, list);
                list.add(root.getData());
            }
            return list;
        }
    }
}
자료구조 추가 학습 블로그
