java활용 CSS

이번 시간에는 string 과 number를 구분하는 문법을 활용하면 if조건문을 구축할수 있다.
const age = parseInt(prompt("how old are you"));
console.log(age);

if (isNaN(age) || age < 0) {
    console.log("please write a real positive number");
} else if (age < 18) {
    console.log("you are too young");
} else if (age >= 18 && age <= 50) {
    console.log("you can drink");
} else if (age > 50 && age <= 80) {
    console.log("you need to exercise");
} else if (age === 100) {
    console.log("wow you are wise");
} else if (age > 80) {
    console.log("you can do whatever you want");
}
else if 를 활용하면 계속해서 이어갈 수 있다.
and && 와 or ||의 차이
&&는 양쪽 값이 모두 true 일 경우에만 실행된다
||는 한쪽이라도 true라면 실행
자바스크립트는 작은 괄호부터 액션이 시작된다.
event listen
사용자 위주의 서비스를 만들기 위해선 java가 대신 function을 사용해주는 것이 이상적이다
아래와 같은 식을 활용해 h1의 반응을 끌어낼 수 있다.
const h1 = document.querySelector(".his:first-child h1");

function handleTitleClick() {
    h1.style.color = "red";
}
function handleMouseEnter() {
    h1.innerText = "mouse is here"
}
function handleMouseLeave() {
    h1.innerText = "mouse is out"
}

h1.addEventListener("click", handleTitleClick);
h1.addEventListener("mouseenter", handleMouseEnter);
h1.addEventListener("mouseleave", handleMouseLeave);
마우스를 올리면 글이 바뀌고
클릭하면 색이 붉은색으로 변한다.
식이 길다면 다음과 같이 축약해서 작성할 수 있다.
title.onclick = handleTitleClick;
title.onmouseenter = handleMouseEnter;
title.onmouseleave = handleMouseLeave;
텍스트 뿐만 아니라,
윈도우, 즉 창에 영향을 주는 event도 만들 수 있다.
window.addEventListener("resize", hadleresize);
window.addEventListener("copy", handleCopy);
window.addEventListener("offline", handleWindowOff);
window.addEventListener("online", handleWindowOn);

function hadleresize() {
    document.body.style.backgroundColor = "powderblue";
};
function handleCopy(){
    alert("don't copy")
};
function handleWindowOff(){
    alert("need to connect")
};
function handleWindowOn(){
    alert("we are safe now")
};
class를 활용한 java
해당 식을 이용하면 h1태그를 누를때마다 색이 변하는 걸 볼 수 있다.
다만 이 방식에는 치명적인 오류가 있다.
const h1 = document.querySelector(".his:first-child h1");

function hadleClick(){
    const currentColor = h1.style.color
    let newColor;
    if(currentColor === "powderblue"){
        newColor = "red";
    }else{
        newColor = "powderblue";
    }
    h1.style.color = newColor;
}

h1.addEventListener("click", hadleClick);
java내에서 css를 건드린다면, 구현해야할 로직이 다소 지저분해진다.
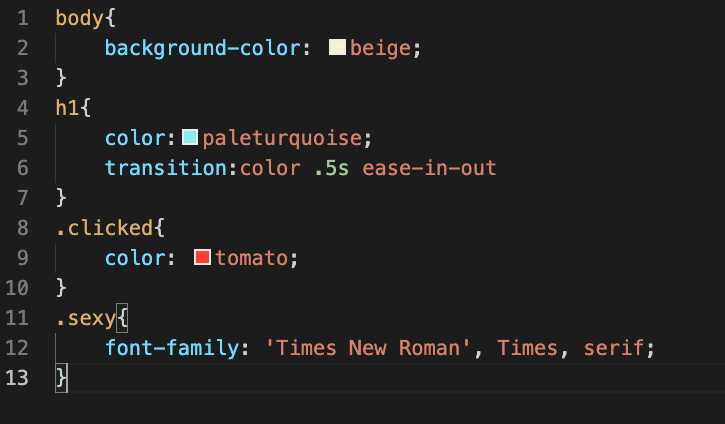
css는 별도의 class를 구성해 배치해둔다면 아래와 같이 구성할 수 있다.
먼저, css의 구성부터 살펴보자

해당 식을 통해 구성한다면,
스크립트내 코드는 클래스 clicked를 활용해 다음과 같이 구성이 가능하다.
const h1 = document.querySelector(".his:first-child h1");

function hadleClick(){
    const currentColor = h1.style.color
    let newColor;
    if(currentColor === "powderblue"){
        newColor = "red";
    }else{
        newColor = "powderblue";
    }
    h1.style.color = newColor;
}

h1.addEventListener("click", hadleClick);

클릭할때마다 다음과 같이 변하는 것을 확인할 수 있다.
다만 클래스의 이름 자체를 바꿔버리기 때문에, 글자가 깨질 수도 있다.
이를 방지하기 위해, 클래스의 이름을 바꾸는 것이 아니라, 클래스에 덧붙이는 방식을 적용하면 다소 해결 가능하다.
const h1 = document.querySelector(".his:first-child h1");

function hadleClick() {
    const clickedClass = "clicked";
    if (h1.classList.contains(clickedClass)){
        h1.classList.remove(clickedClass);
    } else {
        h1.classList.add(clickedClass);
    }
}

h1.addEventListener("click", hadleClick);
이 방식을 활용하면 반응할때마다, 이름을 바꾸는 것이 아니라
리스트를 추가하고 덜어내는 방식이라 다른 스타일을 그대로 유지한체 적용 가능하다.
그러나 이 모든 것을 단 한줄로 줄일 방법이 있다.
바로 토글이다
아래는 토글을 이용해, 굳이 5줄의 코드 없이도 같은 기능을 구현할 수 있게된다.
토글은 classlist를 확인해서, 없다면 추가하고, 있으면 지정한 클래스를 없애주는 역할을 한다.
반복 string을 사용할 필요가 없으니, 굳이 const를 지정할 필요 없이 바로 만들 수 있게 된다.
const h1 = document.querySelector(".his:first-child h1");

function hadleClick() {
    h1.classList.toggle("clicked");
}
h1.addEventListener("click", hadleClick);
해당 식을 이용하면 모든 기능을 동일하게 이용할 수 있다.
