
LazyVGrid란?
- SwiftUI의 격자유형
- 데이터 모음을 표시하는데 적합
- 이유는 미리 지정할 필요 없이 필요한 행 수를 자동으로 계산할 수 있기 때문
Grid / LazyVGrid 차이점
- LazyVGrid는 필요할 때까지 개별 격자 항목을 생성하지 않음
- 위와 같은 특징때문에 "Lazy"하다고 표현하고 앱이 한번에 표시 할 수 있는 것보다 더 많은 격자항목이 있을 때 발생할 수 있다.
- Grid와 같이 각각의 행을 개별적으로 생성하는 대신 LazyVGrid에 사용할 열 수를 지정하면 전달되는 보기 수 에따라 행 수를 결정한다.
- 이렇게 하면 LazyVGrid가 배열과 같이 데이터 모음에서 보기를 탁월하게 채울 수 있다.
1. 데이터 모음에서 격자 생성하기
예시 코드
import SwiftUI
struct ContentView: View {
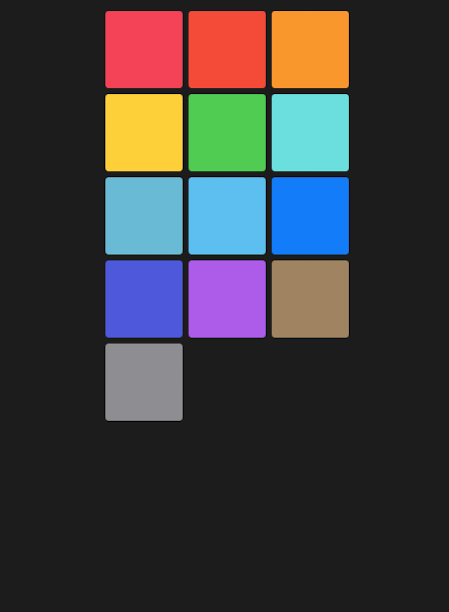
let columnLayout = Array(repeating: GridItem(), count: 3)
let allColors: [Color] = [.pink, .red, .orange, .yellow, .green, .mint, .teal, .cyan, .blue, .indigo, .purple, .brown, .gray]
var body: some View {
ScrollView {
LazyVGrid(columns: columnLayout) { ForEach(allColors.indices, id: \.self) { index in
RoundedRectangle(cornerRadius: 4.0)
.aspectRatio(1.0, contentMode: ContentMode.fit)
.foregroundColor(allColors[index])
}
}
}
.padding()
}
}
- ScrollView내에서 LazyVGrid를 만들고 columns에 대한 인수를 전달하여 표시되는 열 수를 결정한다.
LazyVGrid(columns: columnLayout) { }- columnLayout에 할당된 값에 3열 격자가 지정되고 LazyVGrid는 이 값을 사용하여 열 레이아웃을 결정
let columnLayout = Array(repeating: GridItem() , count: 3)- ForEach 문을 통해 격자가 표시할 각 보기를 생성
- indices => 반복 index를 알 수 있기위해 사용
ForEach(allColors.indices, id: \.self) {
	index in
    	RoundedRectangle(cornerRadius: 4.0)
        .ascpectRatio(1.0, contentMode: ContentMode.frt)
        .forgroundColor(allColors[index])
}
2. Lazy 세로 격자 조절
- GridItem 인스턴스는 다음과 같이 매개변수를 포함 할 수 있다.
GridItem(.fixed(75), spacing: 20, alignment: .center)
GridItem(.flexible(), spacing: 20, alignment: .center)
- 위의 변수 columLayout에서는 동일한 GridItem을 사용하고 특정 횟수를 반복하는 과정
- 열 레이아웃이 표시되는 방법을 제어하려면 각각의 GridItem을 만들어 레이아웃을 생성 할 수 있다.
let customColumns = [GridItem(.fixed(75)),
	GridItem(.fixed(100)),
    GridItem(.flexible(
    minimum: 125,
    maximum: 250
))]
- 전
- 후


Wooyo의 개발 블로그