1. 움직이는 웹 만들기
HTML(뼈대), CSS(꾸미기)에 이어 움직이기에 필요한 JavaSctipt, JQuery, Fetch를 배워볼 차례이다.
Click해여 사진 넘기기
Scroll 내려 배경 바꾸기
2. JavaSctipt, jQuery, Fetch
- JavaSctipt : 무언가에게 동작을 명령하여 웹을 움직이게 한다.
- jQuery : 부트스트랩처럼 복잡한 JavaSctipt를 쉽게 조작할 수 있도록 누군가 만들어놓은 라이브러리이다. HTML 뼈대를 선택해서 쉽게 조작할 수 있다.
- Fetch : 서버에서 내려오는 데이터를 가져다 쓸 수 있게 한다. 짧은 코드로 요청을 보내고 받아올 수 있다.
3. JavaSctipt
브라우저가 유일하게 이해하는 프로그래밍 언어이다. (브라우저 표준 언어)
jQuery와 함께 HTML을 조작한다.
- Java와 JavaSctipt 차이
아무 관련 없다.
인도 / 인도네시아
바다 / 바다코끼리
의 차이이다..
4 함수(function)
정해진 일을 늘 반복한다.
<!doctype html>
<html lang="en">

<head>
    <meta charset="utf-8">
    <meta name="viewport" content="width=device-width, initial-scale=1, shrink-to-fit=no">
    <title>스파르타코딩클럽 | 부트스트랩 연습하기</title>
    <!-- style.css 파일을 불러오기 -->
    <link rel="stylesheet" type="text/css" href="frontend/style.css">
    <!-- 자바스크립트 -->
    <script>
        function hey(){
            alert('안녕하세요!')
        }
    </script>
</head>

<body>
    <div class="mytitle">
        <h1>내 생애 최고의 영화들</h1>
        <button onclick="hey()">영화 기록하기</button>
</body>

</html>
5. alert 대신 console.log 써보기
<!doctype html>
<html lang="en">

<head>
    <meta charset="utf-8">
    <meta name="viewport" content="width=device-width, initial-scale=1, shrink-to-fit=no">
    <title>스파르타코딩클럽 | 부트스트랩 연습하기</title>
    <!-- style.css 파일을 불러오기 -->
    <link rel="stylesheet" type="text/css" href="frontend/style.css">
    <!-- 자바스크립트 -->
    <script>
        function hey(){
            console.log('안녕하세요!')
        }
    </script>
</head>

<body>
    <div class="mytitle">
        <h1>내 생애 최고의 영화들</h1>
        <button onclick="hey()">영화 기록하기</button>
</body>

</html>
[콘솔창 F12]
개발자들이 출력값을 찍어볼 수 있도록 만들어둔 Tab이다.
Console은 와 이어진다.
새로 고친 페이지에서는 Console 내용이 사라진다. (새로고침)
<script>
  function hey(){
      console.log('안녕하세요!')
  }
  /* 여기서부터 이어진다. */
</script>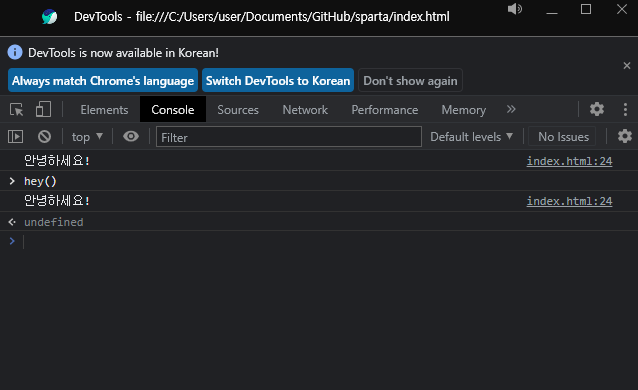
6. 자바스크립트 실습
변수(Variable) : 여러가지 값으로 변할 수 있는 수
숫자(number)
<script>
  let a = 2  /* let 변수 선언 */
  let b = 3  /* var은 조금 옛날 방식 */

  console.log(a+b)
</script>5문자열(string)
<script>
  let a = '대한' /* 문자를 넣을 땐 '' 또는 "" 안에 작성 → 변수명과 구분하기 위함 */
  let b = '민국'

  console.log(a+b)
</script>대한민국리스트(List)
첫번째 요소는 index 0부터 시작
<script>
  let a = ['사과', '수박', '딸기', '감']

  console.log(a)
  console.log(a[1])
</script>
['사과', '수박', '딸기', '감']
사과사전(Dictionary)
key value 방식
<script>
  let a = {'name':'영수', 'age':27}

  console.log(a)
  console.log(a['name']) /* a의 name이 무엇인가? */
  console.log(a['age']) /* a의 age가 무엇인가? */
</script>
{'name':'영수', 'age':27}
영수
27리스트 + 사전
<script>
  let a = [
      {'name':'영수', 'age':27},  /* list 안의 index 0번째 */
  	  {'name':'철희', 'age':15},  /* list 안의 index 1번째 */
  	  {'name':'영희', 'age':20}   /* list 안의 index 2번째 */
  ]

  console.log(a[0])
  console.log(a[0]['name'])
  console.log(a[0]['age'])

  console.log(a[1])
  console.log(a[1]['name'])
  console.log(a[1]['age'])

  console.log(a[2])
  console.log(a[2]['name'])
  console.log(a[2]['age'])
</script>
{'name':'영수', 'age':27}
영수
27
{'name':'철희', 'age':15}
철희
15
{'name':'영희', 'age':20}
영희
207. jQuery
JavaSctipt를 미리 작성해 둔 것 (라이브러리)
JavaSctipt로도 모든 기능(예 - 버튼 글씨 바꾸기 등)을 구현할 수는 있지만,
1) 코드가 복잡하고, 2) 브라우저 간 호환성 문제도 고려해야해서,
jQuery라는 라이브러리가 등장하게 되었다.
jQuery를 사용하기 위해선 import를 해야 한다.
JavaSctipt
document.getElementById("element").style.display = "none";jQuery
$('#element').hide();CSS에서 명찰이 필요했듯이 jQuery에서도 명찰이 필요하다. (id 선언)
<!DOCTYPE html>
<html>

<head>
    <title>자바스크립트 문법 연습하기!</title>
    <script src="https://ajax.googleapis.com/ajax/libs/jquery/3.4.1/jquery.min.js"></script>
</head>
<style>
    .button-part {
        display: flex;
        height: 50px;
    }
</style>
<script>
    function checkResult() {
        let a = ['사과', '배', '감', '귤']
        $('#q1').text(a[1])
        $('#q1').css('color', 'red')
        $('#q1').css('font-size', '40px')

        let b = { 'name': '영수', 'age': 30 }
        $('#q2').text(b['name'])

        let c = [
            { 'name': '영수', 'age': 30 },
            { 'name': '철수', 'age': 35 }
        ]
        $('#q3').text(c[1]['age'])
    }
</script>

<body>
    <div class="top-part">
        <h1>자바스크립트 문법 연습하기!</h1>
    </div>
    <hr />
    <br>
    <h2>1. 함수</h2>
    <div class="button-part">
        <button onclick="checkResult()">결과 확인하기!</button>
    </div>
    <div class="list-part">
        <h2>2. 리스트</h2>
        <div id="q1">테스트</div>
    </div>
    <div class="dict-part">
        <h2>3. 딕셔너리</h2>
        <div id="q2">테스트</div>
    </div>
    <div>
        <h2>4. 리스트 딕셔너리</h2>
        <div id="q3">테스트</div>
    </div>
</body>

</html>
반복문 foreach
리스트 요소 개수만큼 돈다
<script>
    let fruits = ['사과', '배' , '감', '귤']
    fruits.forEach((a) => {
        console.log(a)
    })
</script>
사과
배
감
귤조건문 if ~ else ~
<script>
	let ages = [12, 15, 20, 25, 17, 27, 24]

    ages.array.forEach(element => {
        if (a > 20) {
            console.log('성인입니다.')
        } else {
            console.log('청소년입니다')
        }
    });

    if (age > 20) {
        console.log('성인입니다')
    }
    else {
        console.log('청소년입니다')
    }
</script>
청소년
청소년
청소년
성인
청소년
성인
성인append()
jQuery에 자주 쓰이는 함수이다.
HTML에 어떤 데이터를 받아와서 순서대로 그 데이터를 붙이면서 해당 데이터 수만큼 HTML을 보여준다
jQuery에 HTML를 만들기 위해 변수에 Backtick(`) 안에 만들고 싶은 HTML을 붙인다.
<!DOCTYPE html>
<html>

<head>
    <title>자바스크립트 문법 연습하기!</title>
    <script src="https://ajax.googleapis.com/ajax/libs/jquery/3.4.1/jquery.min.js"></script>
</head>
<script> function checkResult() {
        let fruits = ['사과', '배', '감', '귤', '수박']
        fruits.forEach((a) => {
            let temp_html = `<p>사과</p>`
            $('#q1').append(temp_html)
        })
    }
</script>

<body>
    <div class="top-part">
        <h1>자바스크립트 문법 연습하기!</h1>
    </div>
    <hr/> <br>
    <h2>1. 함수</h2>
    <div class="button-part"> <button onclick="checkResult()">결과 확인하기!</button> </div>
    <div class="list-part">
        <h2>2. 붙이기</h2>
        <div id="q1">
            <p>사과</p>
            <p>귤</p>
            <p>감</p>
        </div>
    </div>
</body>

</html>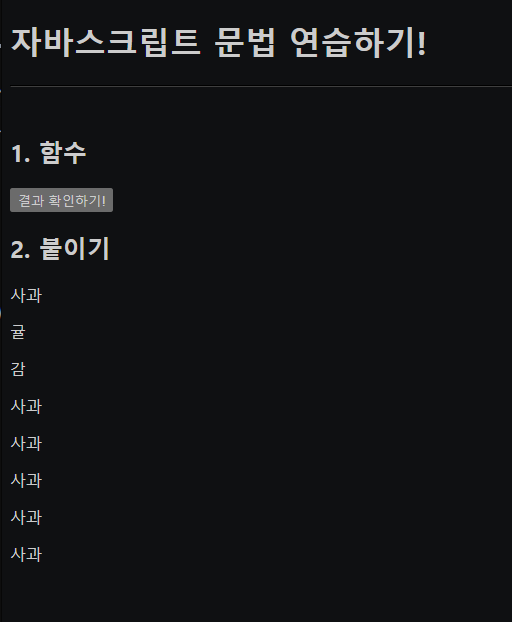
empty()
기존에 있던 내용을 지운다
<!DOCTYPE html>
<html>

<head>
    <title>자바스크립트 문법 연습하기!</title>
    <script src="https://ajax.googleapis.com/ajax/libs/jquery/3.4.1/jquery.min.js"></script>
</head>
<script> function checkResult() {
        let fruits = ['사과', '배', '감', '귤', '수박']

        $('#q1').empty()

        fruits.forEach((a) => {
            let temp_html = `<p>${a}</p>`
            $('#q1').append(temp_html)
        })
    }
</script>

<body>
    <div class="top-part">
        <h1>자바스크립트 문법 연습하기!</h1>
    </div>
    <hr /> <br>
    <h2>1. 함수</h2>
    <div class="button-part"> <button onclick="checkResult()">결과 확인하기!</button> </div>
    <div class="list-part">
        <h2>2. 붙이기</h2>
        <div id="q1">
            <p>사과</p>
            <p>귤</p>
            <p>감</p>
        </div>
    </div>
    <div class="list-part">
        <h2>3. 붙이기</h2>
        <div id="q2">
            <p>영수는 24살입니다.</p>
            <p>세종은 30살입니다.</p>
            <p>수영은 20살입니다.</p>
        </div>
    </div>
</body>

</html>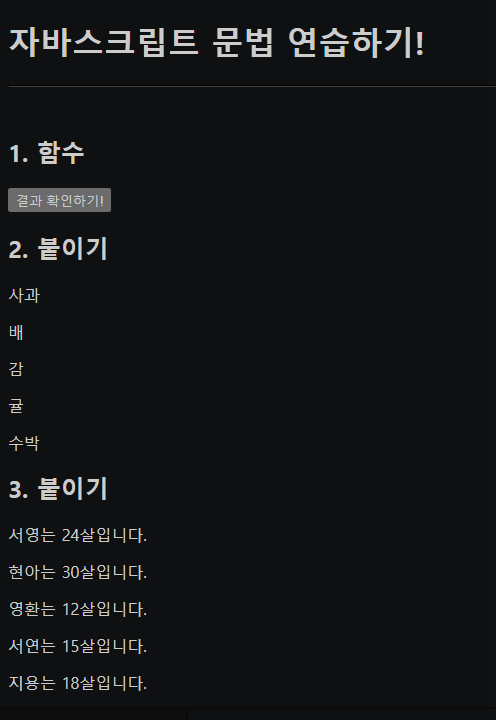
8. 서버-클라이언트 통신
서버 → 클라이언트 (JSON)
-
[Jsonnue 크롬 확장 프로그램 설치]
https://chrome.google.com/webstore/detail/jsonview/chklaanhfefbnpoihckbnefhakgolnmc?hl=ko
좀 더 이쁘게 JSON을 볼 수 있다 -
[서울시 미세먼지 OpenAPI]
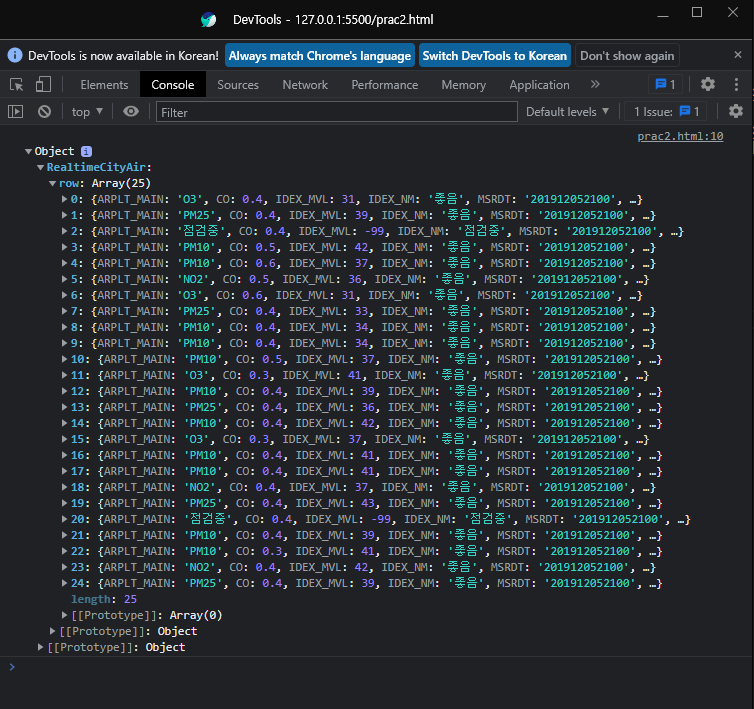
http://openapi.seoul.go.kr:8088/6d4d776b466c656533356a4b4b5872/json/RealtimeCityAir/1/99
데이터 생김새가 제각각이면 어디까지가 데이터고 어디까지가 설명인지 알 수 없다. JSON은 서버에서 클라이언트로 데이터를 내려줄 때 dictionary {key:value} 형식으로 가지고 올 수 있는 포맷이다.
클라이언트 → 서버 (GET)
서버가 클라이언트의 요청을 받기 위해선 받을 수 있는 문이 필요하다. (API)
데이터를 가져오는 url
https://movie.naver.com/movie/bi/mi/basic.naver?code=161967
http://openapi.seoul.go.kr:8088/6d4d776b466c656533356a4b4b5872/json/RealtimeCityAir/1/99
순서대로 은행 위치 (컴퓨터 위치) ex 우리은행 종로지점, 입출금 창구명, 회원 id라고 생각할 수 있다
9. Fetch 시작하기
서버에서 제공한 데이터를 가지고 와서 활용할 수 있다
데이터를 주는 url이 있다면 (API), 그 url에서 데이터를 가지고 온다
Fetch 기본 골격
<!doctype html>
<html lang="ko">

<head>
    <meta charset="UTF-8">
    <title>Fetch 시작하기</title>
    <script src="https://ajax.googleapis.com/ajax/libs/jquery/3.5.1/jquery.min.js"></script>
    <script>
    	/* Fetch 기본 골격 */
        fetch("http://spartacodingclub.shop/sparta_api/seoulair").then(res => res.json()).then(data => {
            console.log(data) /* API를 가져와 JSON형태도 만들어 활용하겠다. */
        })
    </script>
</head>

<body>
    Fetch 연습을 위한 페이지
</body>

</html>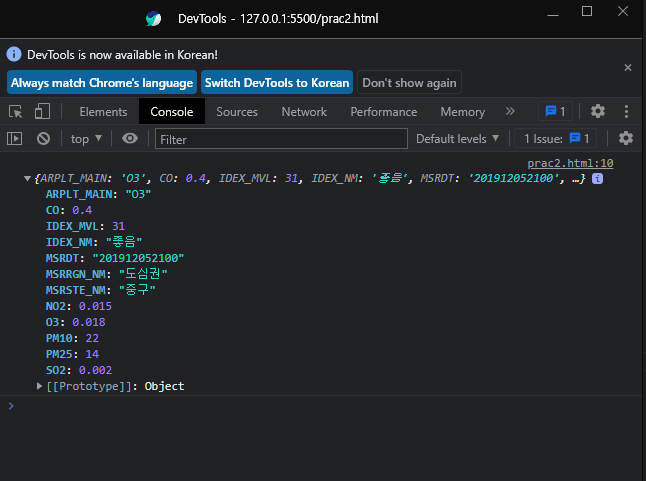
n번째 인덱스 값 가져오기
<!doctype html>
<html lang="ko">

<head>
    <meta charset="UTF-8">
    <title>Fetch 시작하기</title>
    <script src="https://ajax.googleapis.com/ajax/libs/jquery/3.5.1/jquery.min.js"></script>
    <script>
        fetch("http://spartacodingclub.shop/sparta_api/seoulair").then(res => res.json()).then(data => {
            console.log(data['RealtimeCityAir']['row'][0]) /* API를 가져와 JSON형태도 만들어 활용하겠다. */
        })
    </script>
</head>

<body>
    Fetch 연습을 위한 페이지
</body>

</html>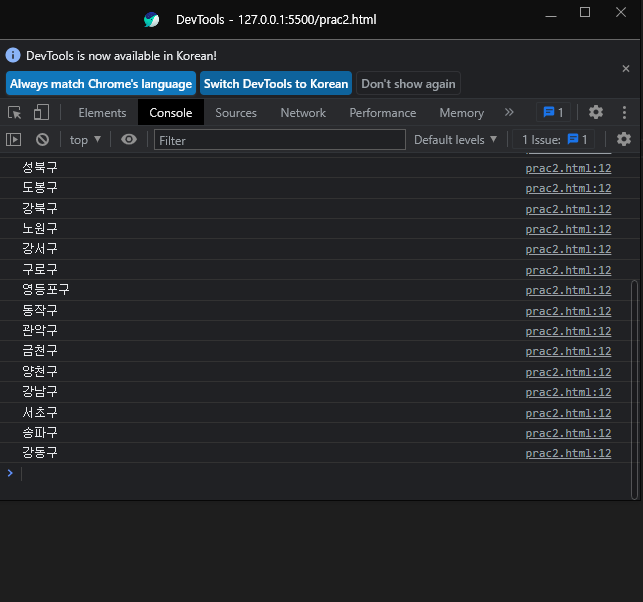
반복문 사용
<!doctype html>
<html lang="ko">

<head>
    <meta charset="UTF-8">
    <title>Fetch 시작하기</title>
    <script src="https://ajax.googleapis.com/ajax/libs/jquery/3.5.1/jquery.min.js"></script>
    <script>
        fetch("http://spartacodingclub.shop/sparta_api/seoulair").then(res => res.json()).then(data => {
            let rows = data['RealtimeCityAir']['row']
            rows.forEach(element => {
                console.log(element['MSRSTE_NM'], element['IDEX_MVL'])
            });
        })
    </script>
</head>

<body>
    Fetch 연습을 위한 페이지
</body>

</html>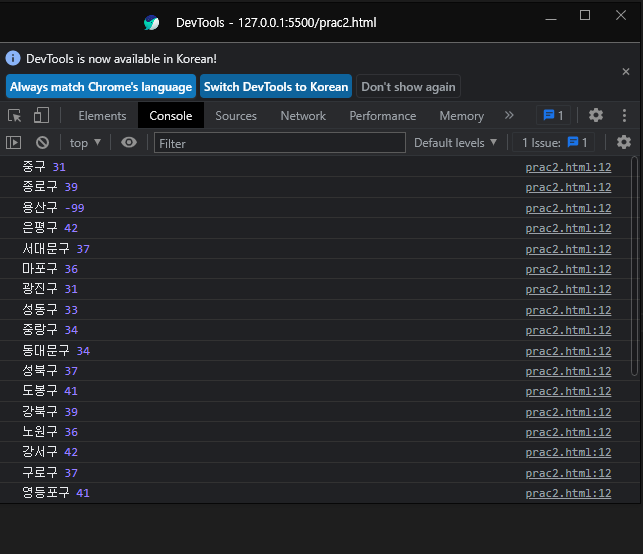
10. Fetch 연습하기
- 미세먼지 Open API
http://spartacodingclub.shop/sparta_api/seoulair
반복문
<!doctype html>
<html lang="ko">
<head>
<meta charset="UTF-8">
<title>미세먼지 API로 Fetch 연습하고 가기!</title>
<script src="https://ajax.googleapis.com/ajax/libs/jquery/3.5.1/jquery.min.js"></script>
<style type="text/css">
div.question-box {
margin: 10px 0 20px 0;
}
</style>
<script>
function q1() {
fetch("http://spartacodingclub.shop/sparta_api/seoulair").then(res => res.json()).then(data => {
let rows = data['RealtimeCityAir']['row']
$('#names-q1').empty()
rows.forEach(element => {
let gu_name = element['MSRSTE_NM']
let gu_mise = element['IDEX_MVL']
// console.log(element)
let temp_html = `<li>${gu_name} : ${gu_mise}</li>`
$('#names-q1').append(temp_html)
});
})
}
</script>
</head>
<body>
<h1>Fetch 연습하자!</h1>
<hr />
<div class="question-box">
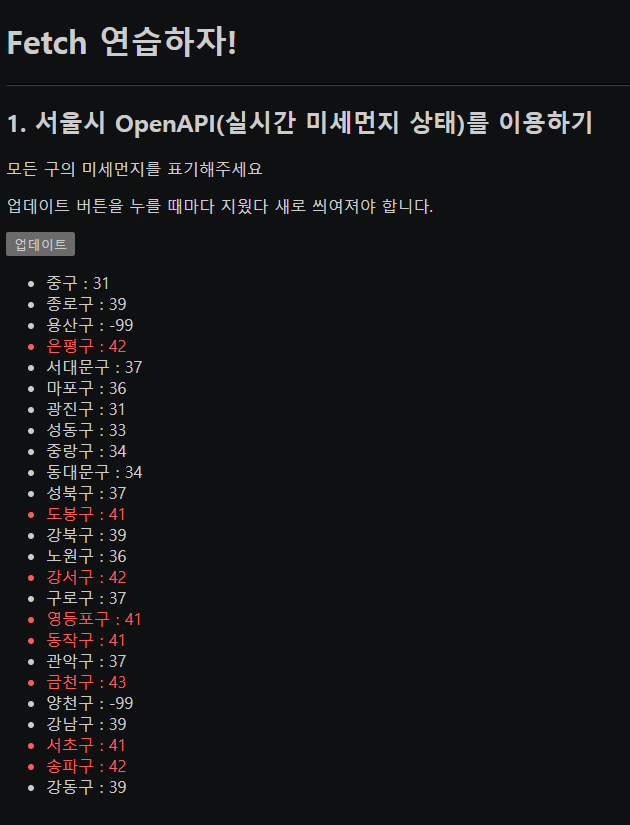
<h2>1. 서울시 OpenAPI(실시간 미세먼지 상태)를 이용하기</h2>
<p>모든 구의 미세먼지를 표기해주세요</p>
<p>업데이트 버튼을 누를 때마다 지웠다 새로 씌여져야 합니다.</p>
<button onclick="q1()">업데이트</button>
<ul id="names-q1">
<li>중구 : 82</li>
<li>종로구 : 87</li>
<li>용산구 : 84</li>
<li>은평구 : 82</li>
</ul>
</div>
</body>
</html>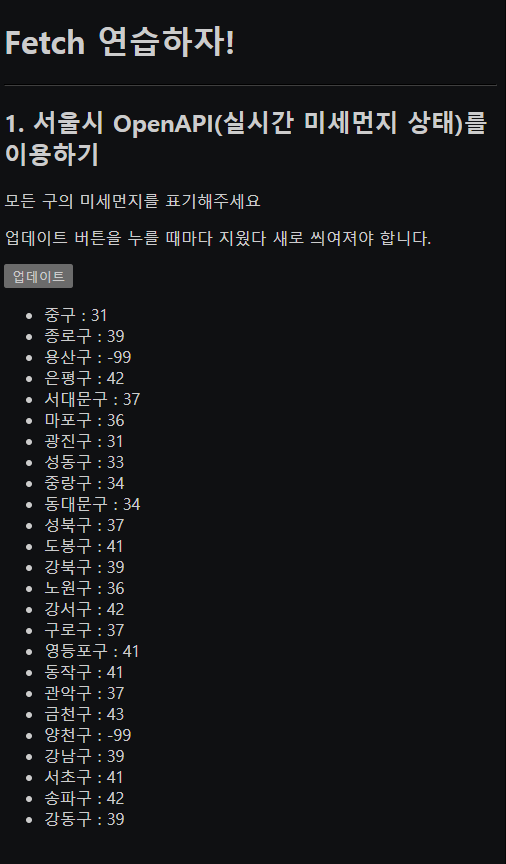
if절 + css 먹이기
<!doctype html>
<html lang="ko">

<head>
    <meta charset="UTF-8">
    <title>미세먼지 API로 Fetch 연습하고 가기!</title>

    <script src="https://ajax.googleapis.com/ajax/libs/jquery/3.5.1/jquery.min.js"></script>

    <style type="text/css">
        div.question-box {
            margin: 10px 0 20px 0;
        }
        .bad {
            color: red;
        }
    </style>

    <script>
        function q1() {
            fetch("http://spartacodingclub.shop/sparta_api/seoulair").then(res => res.json()).then(data => {
                let rows = data['RealtimeCityAir']['row']

                $('#names-q1').empty()

                rows.forEach(element => {
                    let gu_name = element['MSRSTE_NM']
                    let gu_mise = element['IDEX_MVL']

                    // console.log(element)

                    let temp_html = ''
                    if (gu_mise > 40) {
                        temp_html = `<li class="bad">${gu_name} : ${gu_mise}</li>`
                    } else {
                        temp_html = `<li>${gu_name} : ${gu_mise}</li>`
                    }
                    $('#names-q1').append(temp_html)
                });
            })
        }
    </script>

</head>

<body>
    <h1>Fetch 연습하자!</h1>

    <hr />

    <div class="question-box">
        <h2>1. 서울시 OpenAPI(실시간 미세먼지 상태)를 이용하기</h2>
        <p>모든 구의 미세먼지를 표기해주세요</p>
        <p>업데이트 버튼을 누를 때마다 지웠다 새로 씌여져야 합니다.</p>
        <button onclick="q1()">업데이트</button>
        <ul id="names-q1">
            <li>중구 : 82</li>
            <li>종로구 : 87</li>
            <li>용산구 : 84</li>
            <li>은평구 : 82</li>
        </ul>
    </div>
</body>

</html>