UIPresentationController
UIKit
입문하지 얼마 되지 않은 나는 여전히 기본 Transition만 사용하고 있다. 나도 화려한 UX를 만들어보고 싶다! 그 전에, 그 시작이 되는 UIPresentationController부터 알아보자.
시작에 앞서
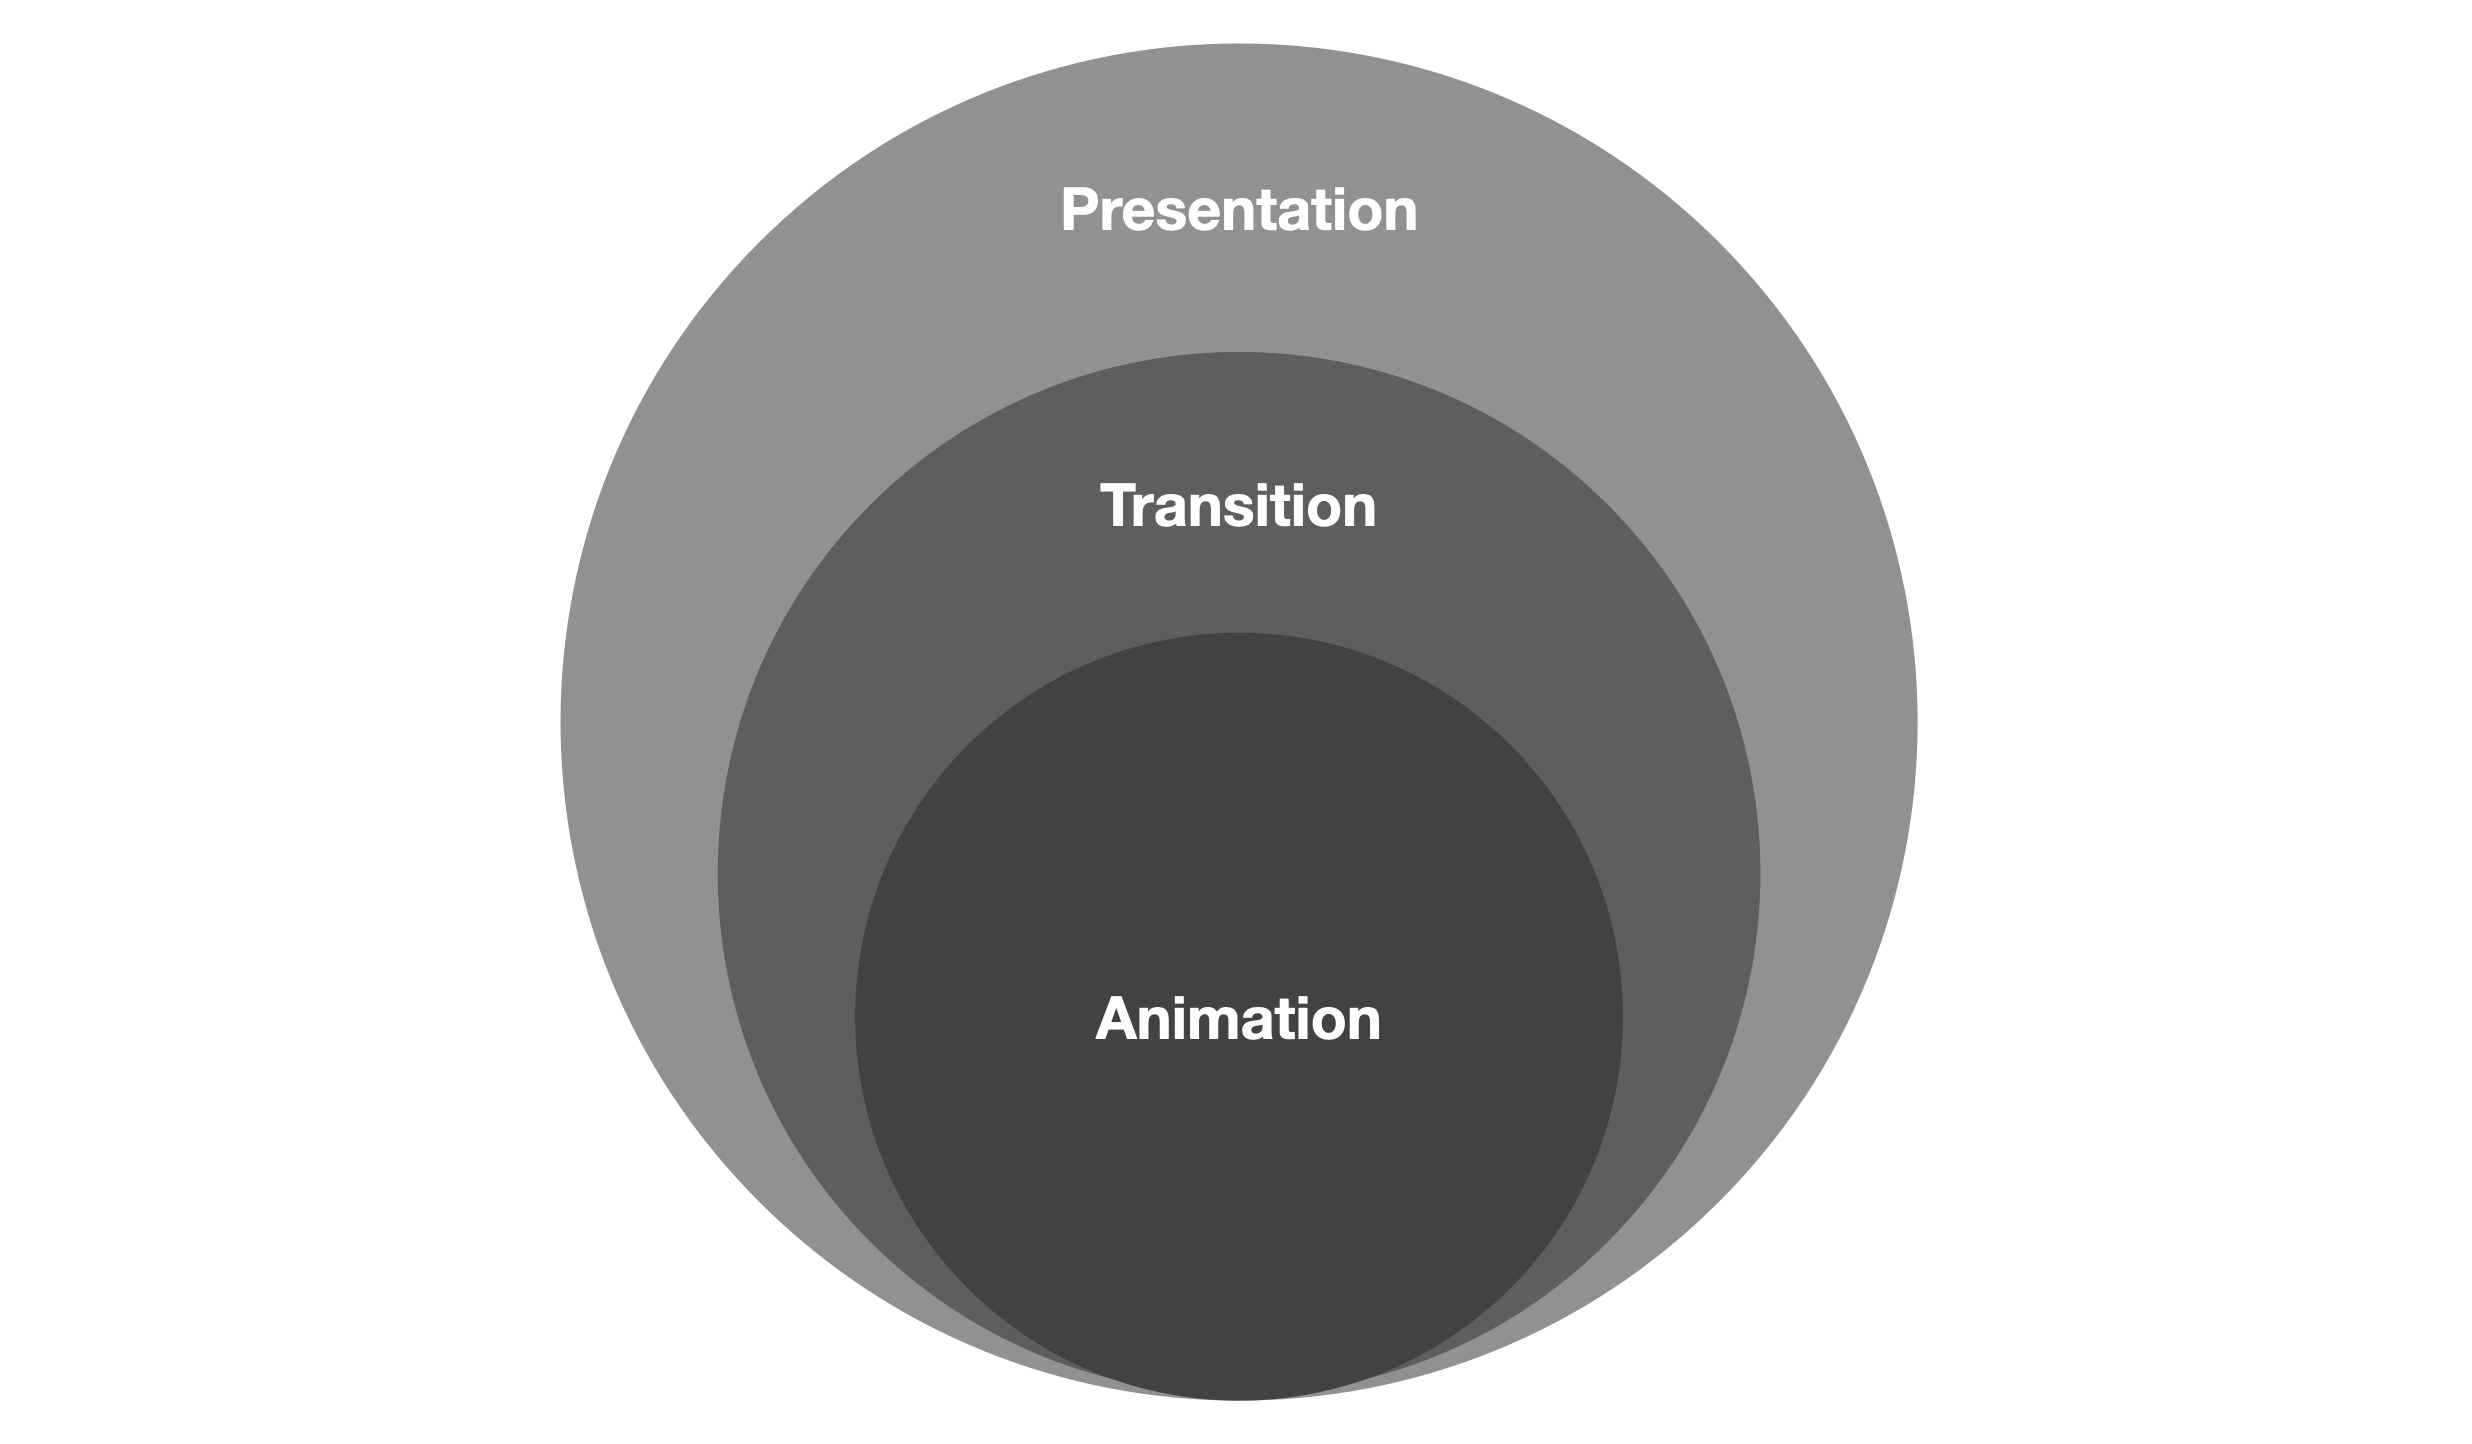
그 전에, 사실 Presentation과 Transition이 뭔지도 잘 모르겠다. 일단은 위와 같은 그림을 마음속에 살짝만 넣어두자. 정확한 그림은 아니다. 다만 Presentation이라는 개념이 Transition을 포함하는, 감싸는 상위 개념처럼 동작한다는 점을 기억하자. 그리고 Animation은 실제 animation 관련 코드가 들어가는 부분이다. 해당 부분은 어느 곳(presentation, transition)에서나 사용이 가능하다. 다만 실제 동작을 기술하는 곳이라 생각해두자.
UIPresentationController
일단 개념부터 잡고 가야한다. 화면 전환을 하고 싶은데, 나라면 어떤식으로 만들어서 관리할까? 화면의 전환에 있어서 무엇이 필요할지 한번 생각해보자.
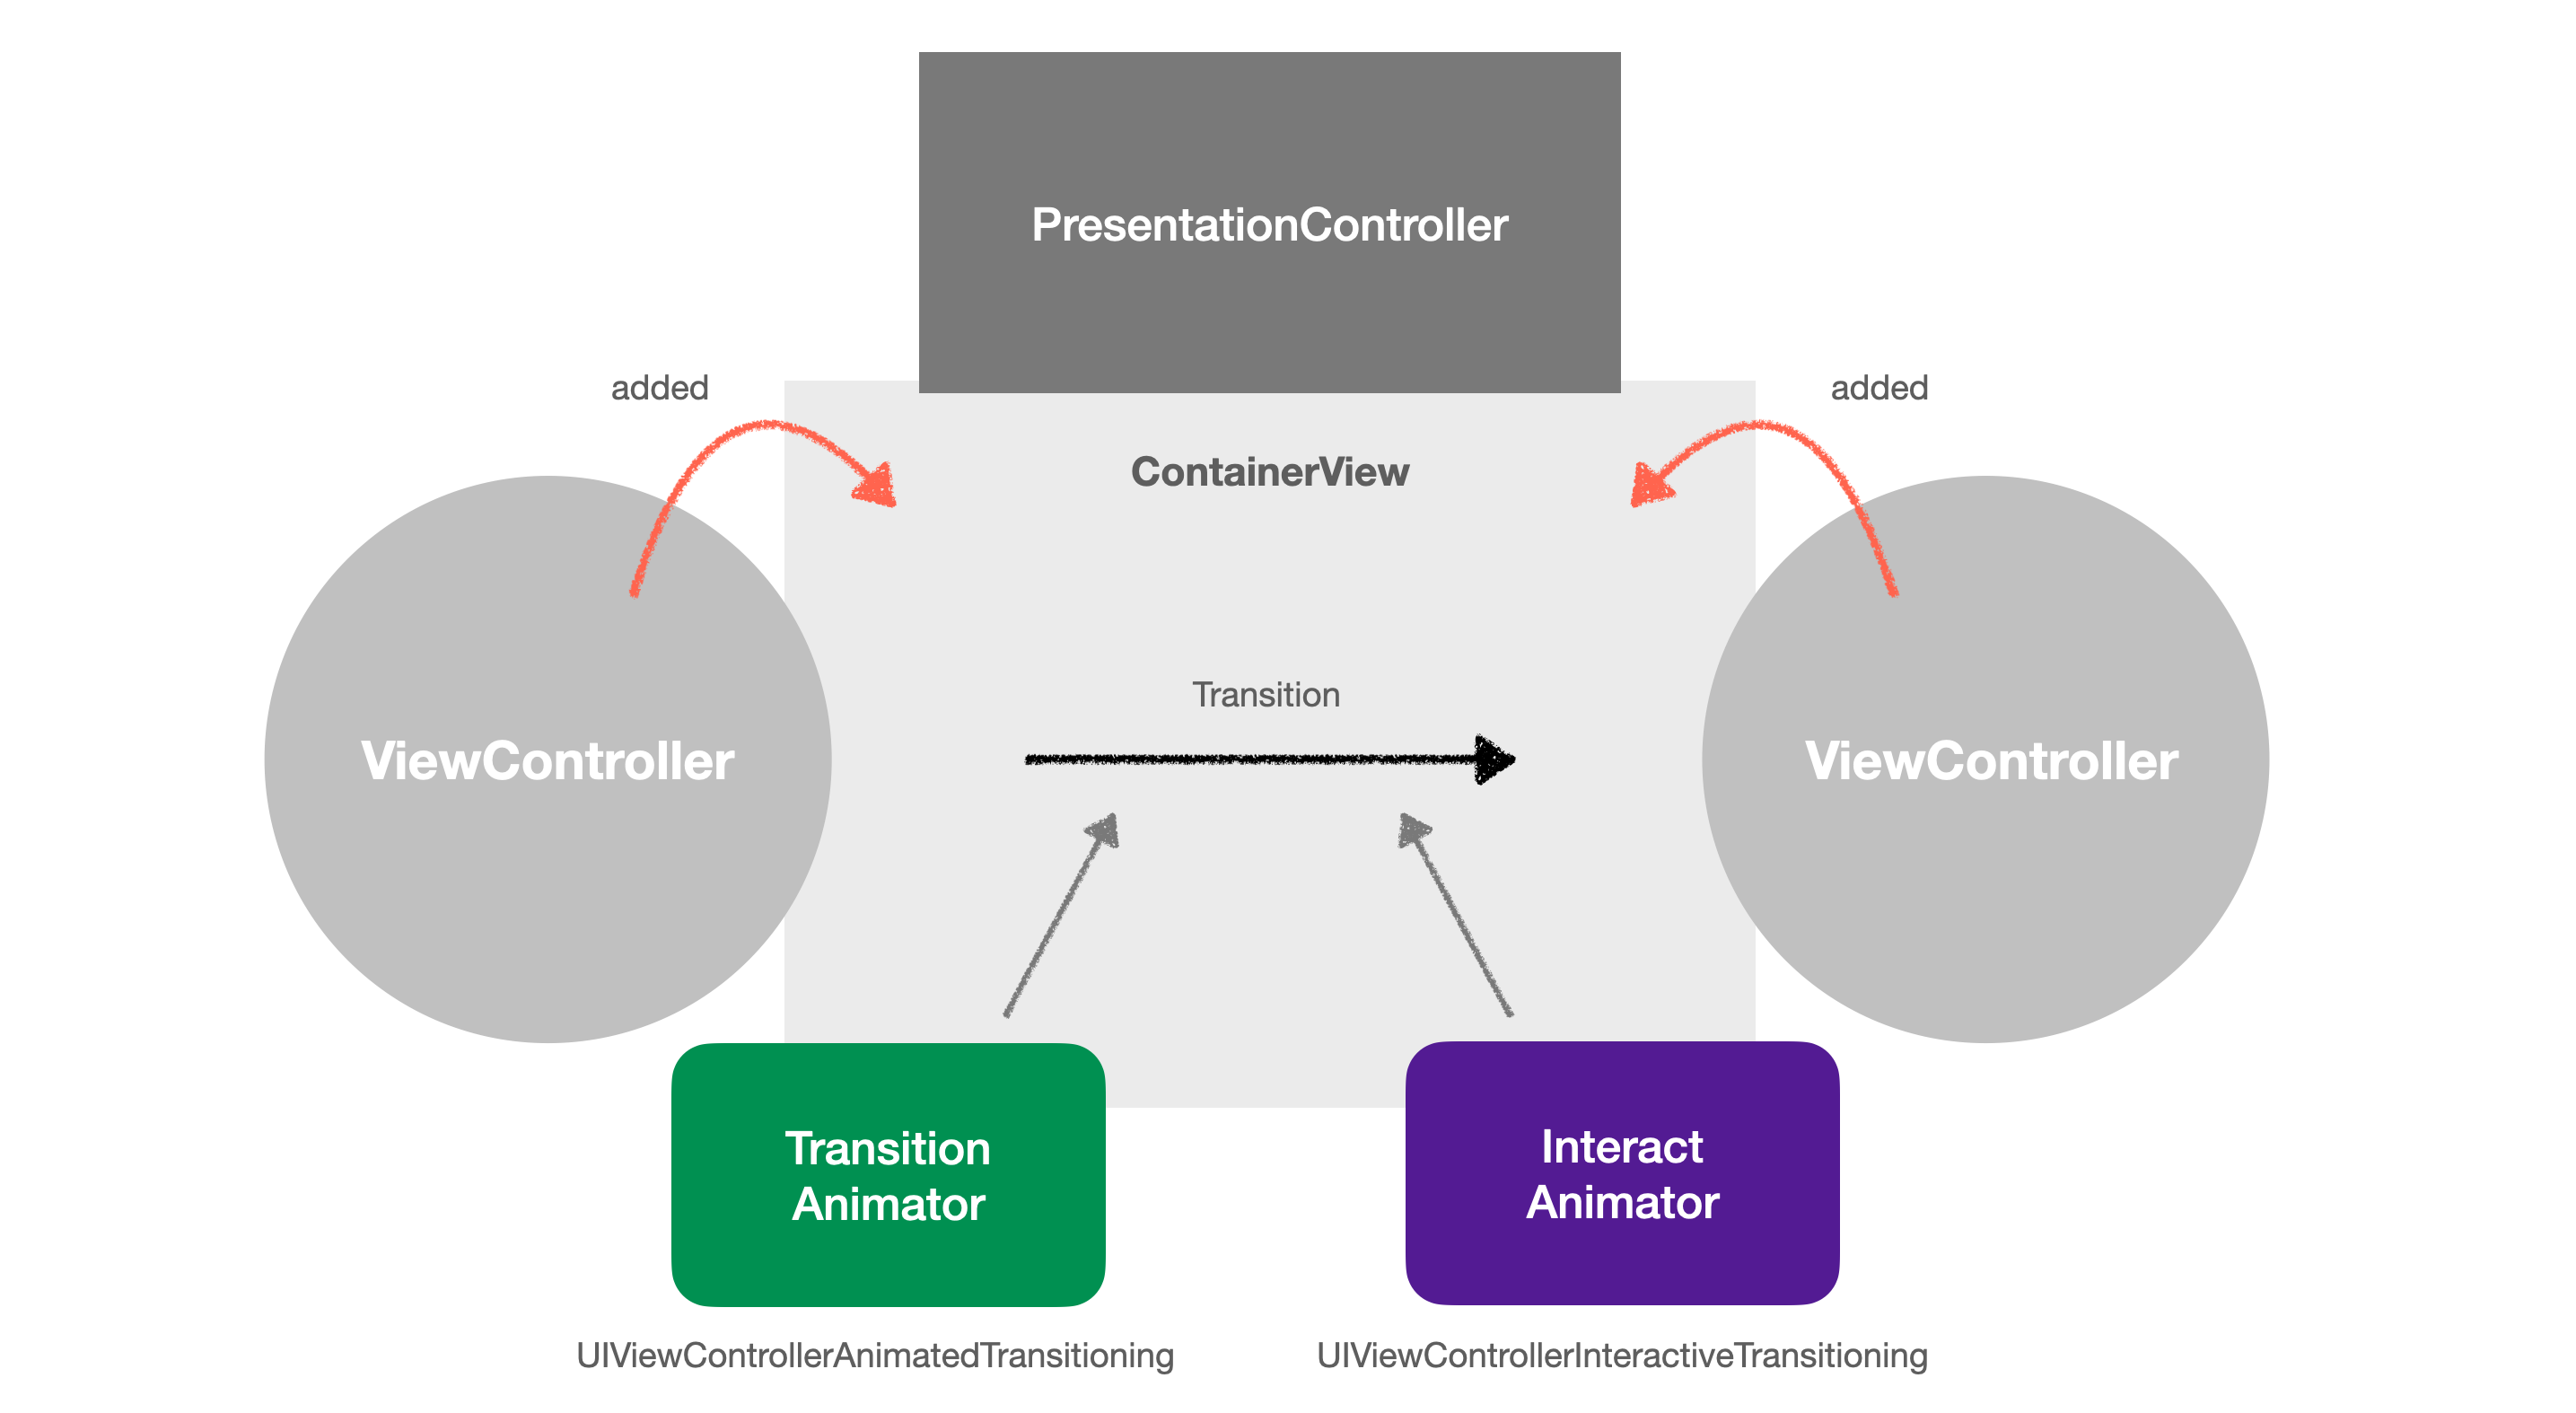
일단 화면 전환을 호출하는 VC, 그리고 실제로 다음에 보여질 VC 두 녀석이 필요할 것이다. 그리고 이 두 VC들이 잠시나마 Transition이 일어나면서 몸담고 있을 View같은 것도 필요할 것이다. 실제로 이러한 것들을 관리해주는 녀석이 바로 UIPresentationController이다.
class ViewController: UIViewController {
    override func viewDidLoad() {
        super.viewDidLoad()

        self.presentingViewController // == self.presentationViewController.presentingViewController
        self.presentedViewController // == self.presentationViewController.presentedViewController
    }
}
viewController instance에 접근하면 presentingViewController 이친구와 presentedViewController 이친구를 볼 수 있는데, 바로 presentationViewController 여기서 오는 computed property이다.
이녀석은 모든 ViewController가 가지고 있으며, ViewController가 보여진 시점에서 종료될 때까지 이 객체를 사용하여 Presentation 관련 Process를 처리한다. 우리가 ViewController에서 입력하는 modalPresentationStyle, modalTransitionStyle은 Built-in 된 기능으로, 결국에는 UIPresentationViewController가 처리하는 것이다.
간단한 Transition의 변화같은 경우에는 ViewController instance의 modalPresentationStyle, modalTransitionStyle만을 변경하는 것으로 적용이 가능하다. 복잡한 Transition을 적용하고 싶은 경우에는 UIModalPresentationStyle.custom으로 modalPresentationStyle를 변경해주어야 한다. 변경한 후에는 Transition이 일어나는 Background view와 같은 속성들을 변경할 수 있다.
특정 ViewController에서 이런 속성을 적용하고 싶으면, UIViewControllerTransitioningDelegate를 채택하여 제공할 수 있다. 어떤 PresentationViewController를 사용할 것인지, Transition에서 사용하는 Animator는 어떤 것을 사용할 것인지, interactive animator를 사용할 거라면 어떤 것인지를 묻게 된다. 여기서 interactive animator가 뭔지 몰랐는데, 해당 영상의 후반부를 보면 뭔지 알 수 있다. 요약해서 말하면 push가 일어나는데 이걸 손가락으로 와리가리 칠 수 있는 걸 말한다. 그게 안되는 건 누르면 그냥 애니매이션이 작동하는 것이다.
Presentation Context, Frame
여기서 잠깐 이 개념을 알고가자. 문서를 읽다보면 Context라는 단어가 종종 나온다. 이건 Built-In 기능을 만들게 되면서 발생한 단어로 보인다.
내가 Apple UIKit 개발자다. 어떻게든 쉽게 사용하게 만들기 위해서, 기본적으로 많이 사용하는 show(navigationController push)와 present(modal)을 만들었다. 그런데 이 show라는 메서드를 사용자가 잘못 사용했다. 즉, navigationController에서 동작하라고 만들어놨더니, 나같이 초보자가 그냥 써버렸다. 이럴 경우에 어떻게 동작하게 만들까?
이러한 상황에서 Apple 개발자들은, 현재 presentation context, 즉 상황에 맞춰서 동작하는 개념을 만들었다. 만약 현재 show가 실행된 ViewController가 NavigationController를 Container Controller로 가지고 있다면, push 동작을 할 것이다. 단일 ViewController였다면 present 동작을 할 것이다. 여기서 현재 문맥을 말하는 것을 presentation context라 한다. 그리고 presentation context를 기반으로 현재 presentating controller(보여주려고 하는 VC)를 Frame이라 한다.
containerView
Transition이 일어나면서 ViewController가 속해있는 곳이다. UIKit은 transitioning delegate를 제공받은 뒤에 해당 property를 초기화한다. 기본적으로 presented viewController의 view의 조상이다. 또한 transition animation이 진행될 때는 presenting view까지 container view에 추가한다.
animator까지 custom으로 만들어서 처리하는 경우에 이 animator 객체들은 container view를 containerView property로 접근해서 사용이 가능하다고 한다.
정리
이쯤 읽으면 왜 Presentation이 감싸는 개념이라고 했는지 이해가 될지도 모르겠다. 일단 나는 그렇게 생각하고 있다. 실제로 코드를 보면 같은 UIViewControllerTransitioningDelegate에서 제공하고 있긴 하지만, 이것이 보다 개념적으로 이해가 쉬웠다.
transition animator는 제공한다고 했는데, 이 때, present될 때의 animator와 dismissal될 때 animator 두개를 제공해주어야 한다.
Presentation Process
이제 어떤 순서로 Presentation이 일어나는지 알아보자.
- Presentation
- Transition Animation의 연속한 것들이 스크린에 표현되어 새 VC를 보여주는 과정을 말한다.
- Management
- 화면 회전 등에 관련되어 Animation이 되어야 하는 것을 처리한다.
- Dismissal
- Transition Animation의 연속한 것들이 스크린에 표현되어 이전 VC를 보여주는 과정을 말한다.
차례대로 각각 알아보자.
Presentation
- ViewController가 새로운 화면을 요청한다.
- TransitioningDelegate에게 어떤 PresentationController를 사용할 건지 물어본다. ()
- Delegate가 정의된 PresentationController를 만들어서 넘긴다.
- PresentationController는 Custom Presentation을 실행한다.
presentationTransitionWillBegin()메소드가 실행된다.- Transition에서 사용되는 CustomView를 추가한다.
- Animation에 필요한 다른 속성들을 설정한다.
- Transition이 실제로 진행되면서 화면이 전환된다.
- 실행되는 동안
containerViewWillLayoutSubviews(),containerViewDidLayoutSubviews()가 호출된다. - 해당 메서드를 override하여 presentation controller에서 사용하는 custom view를 update할 수 있다.
- 실행되는 동안
- Transition이 완료되면
presentationTransitionDidEnd()메서드가 실행된다.
실제로 그러한지 의문스러워 테스트 했다.
presentationTransitionWillBegin Called!!!
containerViewWillLayoutSubviews Called!!!
containerViewDidLayoutSubviews Called!!!
presentationTransitionDidEnd Called!!!
실제로 그랬다!
Management
다음으로는 Management이다. 화면 회전등을 처리하는데, size에 변화가 일어난 경우 viewWillTransition(to:with:)를 호출한다. 이게 이 친구와 관련된지 처음 알았다. autoLayout을 사용하고 있다면 크게 해줄 작업은 없다.
Dismissal
- Presented View Controller를 닫음을 요청한다.
dismissalTransitionWillBegin()메서드가 호출된다.- Dismissal이 진행된다.
- Dismissal transition이 끝나면
dismissalTransitionDidEnd()이 호출된다.
Project
이 개념을 어떻게 코드로 표현할지 하다가 좋은 Repo를 발견했다. App store가 상당히 깔끔한 transition을 제공했었는데, 이를 Clone한 사람이 있더라.. 땡삼
모든 화면을 볼 건 아니고, 딱 이 Transition custom한 부분만 보려고 한다. 바로 이부분.

Transition은 CardDetailViewController -> TodayViewController로 발생할 거다. 사실상 Presenting ViewController에서 많은 작업을 할 거다. 즉, CardDetailViewController에서 PresentationViewController를 넣어줄 거다. 하나씩 보자.
CardDetailViewController
아, 먼저 Presenting View Controller, 즉 여기서는 Card의 Detail을 보여주는 이 친구로 부터 transition이 시작되기 때문에 CardDetailViewController 얘가 Presenting View Controller이다. 여기서 moodalPresentationStyle = .custom으로 바꿔주고 시작해야 한다!!
class CardDetailViewController: UIViewController {
    init(cell: TodayTableViewCell) {
        self.cell = cell
        super.init(nibName: nil, bundle: nil)
        self.setupTranstion()
    }

    private func setupTranstion() {
        modalPresentationStyle = .custom
        transitioningDelegate = self
    }
}
그리고 나서 이제 진짜 핵심 부분을 확인해보자.
extension CardDetailViewController: UIViewControllerTransitioningDelegate {

    func animationController(forPresented presented: UIViewController, presenting: UIViewController, source: UIViewController) -> UIViewControllerAnimatedTransitioning? {
        return TodayAnimationTransition(animationType: .present)
    }

    func animationController(forDismissed dismissed: UIViewController) -> UIViewControllerAnimatedTransitioning? {
        return TodayAnimationTransition(animationType: .dismiss)
    }

    func presentationController(forPresented presented: UIViewController, presenting: UIViewController?, source: UIViewController) -> UIPresentationController? {
        return CardPresentationController(presentedViewController: presented, presenting: presenting)
    }
}
핵심은 이부분이다. 눌렀을 때 어떤 PresentationViewController를 제공할 것인지, 어떤 Animator를 제공할 것인지를 정의해주면 된다. 여기서는 interaction이 필요없으므로 transition animator만 적용한 것을 볼 수 있다. present할 때와 dismiss할 때 두 개의 animator를 제공한다.
CardPresentationController
그러면 이제 PresentationViewController를 어떻게 만드는지만 알면 된다.
class CardPresentationController: UIPresentationController {

    private lazy var blurView = UIVisualEffectView(effect: nil)

}
일단 이녀석은 추후 PresentationViewController의 containerView에 들어갈 녀석이다. 실제로 앱스토어 열어서 누르면 뒤에 View에 다른 View로 감싸지면서 보인다. 그래서 뭔가 깔끔해보이는 거다. 그 Blur를 담당하는 친구다.
class CardPresentationController: UIPresentationController {

    override var shouldRemovePresentersView: Bool {
        return false
    }

}
그 다음으로는 이친구다. 얘는 이제 Animation이 끝난 후에 뒤에 배경 View를 메모리에서 날릴 건지 물어보는 값이다. 기본값은 false로 되어 있다. 근데 왜 굳이 적었는지는 모르겠다. 만약 뒷 배경이 계속해서 필요하다면, 예를 들어 VC가 full view로 안보인다면 의미있는 값일 수 있겠다.
class CardPresentationController: UIPresentationController {

    override func presentationTransitionWillBegin() {
        let container = containerView!
        blurView.translatesAutoresizingMaskIntoConstraints = false
        container.addSubview(blurView)
        blurView.edges(to: container)
        blurView.alpha = 0.0

        presentingViewController.beginAppearanceTransition(false, animated: false)
        presentedViewController.transitionCoordinator!.animate(alongsideTransition: { (ctx) in
            self.blurView.effect = UIBlurEffect(style: .light)
            self.blurView.alpha = 1
        }) { (ctx) in }
    }

    override func presentationTransitionDidEnd(_ completed: Bool) {
        presentingViewController.endAppearanceTransition()
    }

    override func dismissalTransitionWillBegin() {
        presentingViewController.beginAppearanceTransition(true, animated: true)
        presentedViewController.transitionCoordinator!.animate(alongsideTransition: { (ctx) in
            self.blurView.alpha = 0.0
        }, completion: nil)
    }

    override func dismissalTransitionDidEnd(_ completed: Bool) {
        presentingViewController.endAppearanceTransition()
        if completed {
            blurView.removeFromSuperview()
        }
    }

}
이제 본격적으로 life cycle과 관련된 녀석들이 나온다. 해당 코드를 보면 transition이 일어나기 전에 필요한 요소들을 여기서 세팅하고 있음을 볼 수 있다. 저기 보이는 animate(alongsideTransition)은 animation을 동시에 실행시키는 method이다.
마무리
자.. 길고도 험했다. 이제 다음은 뭘까? 실제 Transition을 하는데 제공하는 animator를 보면 된다. 다음 글에서 알아보자. 끝!
Reference
- UIPresentationController
- UIViewControllerTransitioningDelegate
- UIViewControllerAnimatedTransitioning
- modalPresentationStyle
- UIModalPresentationStyle
- containerViewWillLayoutSubviews()
- containerViewDidLayoutSubviews()
- shouldRemovePresentersView
- iOS) UIPresentationController 를 알아보고 App Store clone app 을 살펴보자
- iOS) Presentation 과 Transition 그리고 Animation...
- iOS Swift Tutorial: Create Advanced Interactive Animations with UIKit
- appstore-clone
