Redux
Redux는 데이터 관리를 위해 만들어진 기술이다.
Redux는 Store에서 데이터를 관리하게된다.
Redux와 Context 둘다 성격이 뭔가 비슷한거같은데
컨택스트와 리덕스 둘중에 무엇을 사용하는게 효과적일까?
서버에서 가져온 데이터를 이용하여 새로운 결과물을 내는것 : Redux
Component의 통합 데이터를 관리하는 경우 : Context
라고 저자는 이야기한다.
Redux의 동작
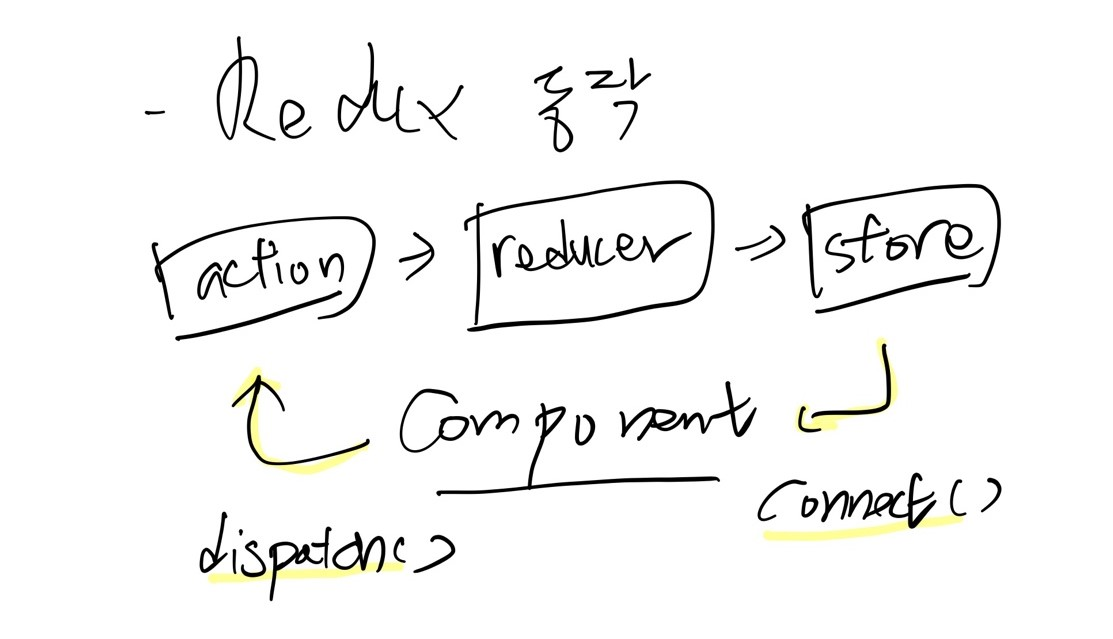
Component는 dispatch()를 통해 reducer에 action을 전달하게된다.
action에는 reducer에서 처리해야할 작업의 이름과 데이터가 객체 형태로 들어있다.
ex) actions
export const SET_COLLECTION = 'collection/SET_COLLECTION';
export const SET_AGE = 'collection/SET_AGE';

export const setCollection = collection => ({
  type: SET_COLLECTION,
  payload: collection,
});

export const setAge = (id, age) => ({
  type: SET_AGE,
  payload: { id, age },
});

ex) reducer
import { SET_COLLECTION, SET_AGE } from '../actions/collectionActions';

const initState = {
  ids: [],
  entities: {},
};

export default (state = initState, action) => {
  const { type, payload } = action;

  switch (type) {
    case SET_COLLECTION: {
      const ids = payload.map(entity => entity['id']);
      const entities = payload.reduce((finalEntities, entity) => ({
        ...finalEntities,
        [entity['id']]: entity,
      }), {});
      return { ...state, ids, entities };
    }
    case SET_AGE: {
      const { id, age } = payload;
      return {
        ...state,
        entities: {
          ...state.entities,
          [id]: { ...state.entities[id], age },
        },
      };
    }
    default:
      return state;
  }
};
Redux 설치
//1. redux와 react-redux 설치
yarn add redux react-redux

//2. chrome redux devtools 설치

//3. redux 개발자 도구 설치
yarn add redux-devtools-extension --dev
Store 생성
Store를 생성하는 방법은 createStore() 함수를 사용하는것입니다
아래에는 예를 보여주기위하여 state를 그대로 반환하는 화살표 함수를 사용했습니다.
class ReduxT extends PureComponent{
	store = createStore(state => state);
}
Redux 개발자 도구 연동
스토리북에 스토리를 추가하여서 컴포넌트를 확인할때에
크롬 개발자 도구의 Redux를 눌러서 확인하면 No store found... 메세지를 확인할수있는데,
이는 개발자 도구가 연동되어있지 않아서입니다.
위의 예제를 그대로 가지고와서
class ReduxT extends PureComponent{
    store = createStore(state => state,
    window.__REDUX_DEVTOOLS_EXTENSION__ && window.__REDUX_DEVTOOLS_EXTENSION__())
}
를 추가해주면 스토어의 데이터를 확인할수있습니다.
Action , Reducer의 관계
Action 형식
{
type: 'SET_LOADING',
payload: true,
}
{
type: 'SET_USER',
payload: {name: 'Park', age: 20}
}
type - 액션이 어떤 작업인지 쉽게 이해할수 있는 고유한값(문자열)
payload - store에 사용될 값(payload말고 다른 이름으로 지어도 된다)
Reducer 형식
function reducer(state, action) { return state;}

const reducer = (state, action) => state + action.payload;
스토어의 이전데이터(state), 액션(action)을 받아 새로운 스토어의 데이터를 반환하게된다.
리듀서의 반환하는 값의 자료형은 스토어의 이전 데이터와 동일해야한다는것이 주의점!
dispatch 함수
action은 dispatch 함수를 통해 reducer로 전달이되게된다.
import React, { PureComponent } from 'react';
import { createStore } from 'redux';
import { Provider } from 'react-redux';

class ReduxApp extends PureComponent {
  store = createStore(
    state => state,
    { loading: false, name: '두잇 리액트' },
    window.__REDUX_DEVTOOLS_EXTENSION__ && window.__REDUX_DEVTOOLS_EXTENSION__(),
  );

  componentDidMount() {
    this.store.dispatch({
      type: 'SET_LOADING',
      payload: true,
    });
  }

  render() {
    return <Provider store={this.store}>리덕스 예제</Provider>;
  }
}

export default ReduxApp;
componentDidMount()의 this.store.dispatch 안에
action이 reducer에 전달되고있다.
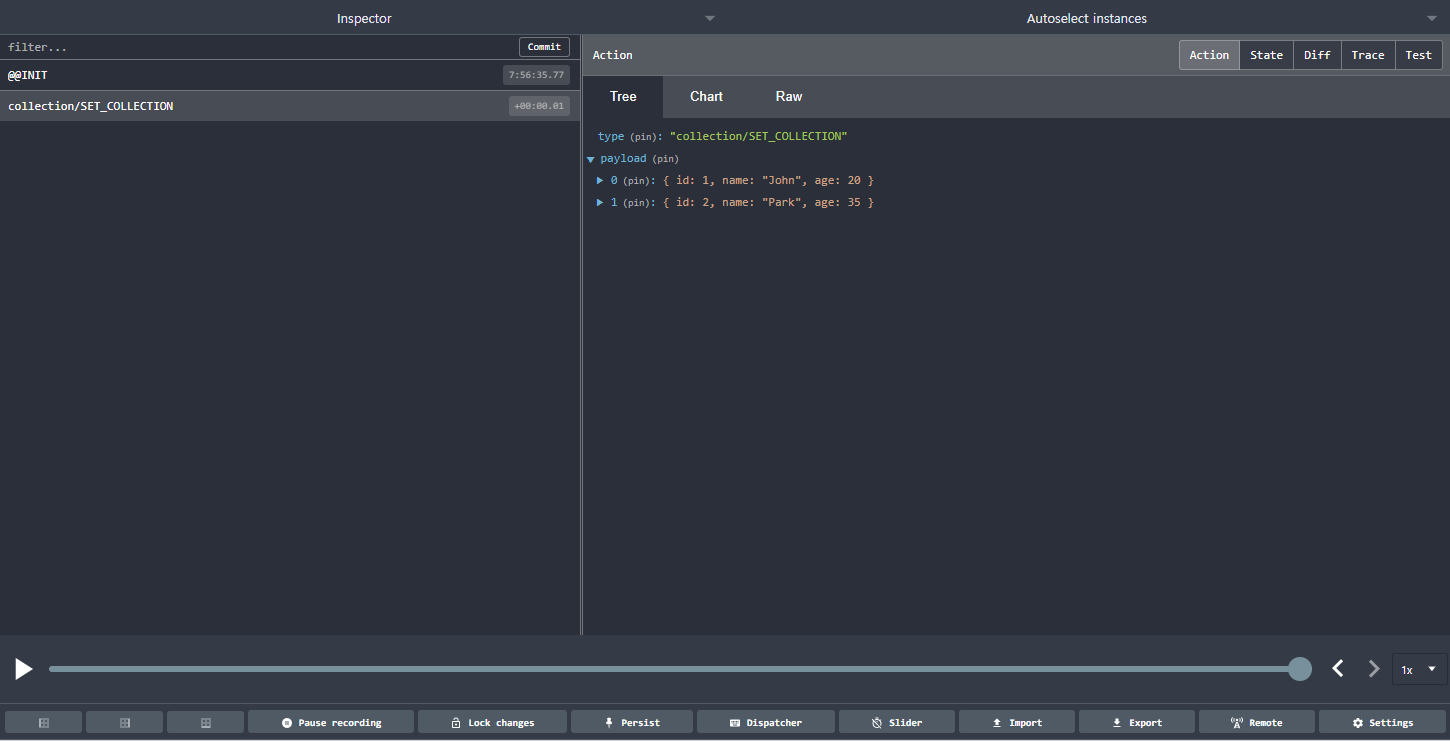
이때의 크롬 확장도구를 확인해보면 action이 추가된것을 볼수있고 action에서 상세내용을 확인가능하다.
또한 state에서는 reducer에 전달된 action으로
바뀐 스토어 데이터(state)도 확인할수있다.
reducer는 reduce() 함수에서 따온것인데, 변환 함수 배열을 최종 스토어 데이터로 변환하게된다.
//Redux Store class의 일부
class Store{
    state = {};
    dispatch(action){ //dispatch의 메소드 인자로 action이 들어가있다
      const reducer1 = state => state;
      const reducer2 = (state, action) => state + action.payload;
      ...
      const reducers = [reducer1, reducer2, ...];

      const updatedState = reducers.reduce(
        //변경된 스토어의 데이터 객체로 변환
        (nextState, reducer ) => reducer(nextState, action),
        this.state
      );
      //스토어의 원본을 교체
      this.state = updateState;
    }
}
reducer 구현
const reducer = (state, action) => {
  const { type, payload } = action;
  switch(type) {
    case 'SET_LOADING': {
      return {
        ...state,
        loading: payload,
      };
    }
    case 'RESET_LOADING': {
      return { ...state, loading: false };
    }
    case 'SET_USER': {
      return {
        ...state,
        user: payload,
      };
    }
    default:
      return state;
  }
};

class ReduxApp extends PureComponent {
	...
}
클래스 파일 위에 위와같이 reducer를 구현해줄수있다.
switch case문으로 type에 따라서 어떠한 데이터를 return시켜줄지에 대해서
나타내고 있다. 아래와 같이 당연히 reducer를 실행시키기 위해서는 dispatch 함수를 연결시켜주어야 실행이 될것이다.
componentDidMount() {
    this.store.dispatch({
      type: 'SET_LOADING',
      payload: true,
    });
    this.store.dispatch({
      type: 'RESET_LOADING'
    });
    this.store.dispatch({
      type: 'SET_USER',
      payload: { name: 'Park', age: 20 },
    });
  }
}
크롬 redux 확장 도구
리덕스의 장점!
1. action 목록을 눌러보며 단계별 스토어 결과 확인
버그가 발생할때 데이터를 예측하는것이 웹개발을 할때에 어려운데,
리덕스는 액션이 실행됬을때에 데이터를 확인할수있다.
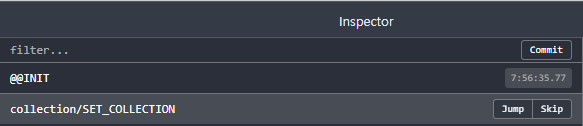
2. Store 데이터 복원
실행된 액션의 부분에 마우스 커서를 올리게되면 Jump, Skip 이라는 버튼이 나타나는데
Jump 버튼을 클릭하게되면 해당 시점의 액션이 실행된 스토어 데이터를 복원해준다.
action과 reducer 분리
reducer
import React, { PureComponent } from 'react';
import { Provider } from 'react-redux';
import { createStore } from 'redux';

const reducer = (state, action) => {
  const { type, payload } = action;
  switch(type) {
    case 'SET_LOADING': {
      return {
        ...state,
        loading: payload,
      };
    }
    case 'RESET_LOADING': {
      return { ...state, loading: false };
    }
    case 'SET_USER': {
      return {
        ...state,
        user: payload,
      };
    }
    default:
      return state;
  }
};

class ReduxApp extends PureComponent {
  store = createStore(
    reducer,
    { loading: false, name: '두잇 리액트' },
    window.__REDUX_DEVTOOLS_EXTENSION__ && window.__REDUX_DEVTOOLS_EXTENSION__()
  );

  componentDidMount() {
    this.store.dispatch({
      type: 'SET_LOADING',
      payload: true,
    });
    this.store.dispatch({
      type: 'RESET_LOADING'
    });
    this.store.dispatch({
      type: 'SET_USER',
      payload: { name: 'Park', age: 20 },
    });
  }

  render() {
    return (
      <Provider store={this.store}>
        리덕스 예제
      </Provider>
    );
  }
}
export default ReduxApp;
데이터 종류가 loading, user이므로 위의 예제를 아래의 구조로 바꾸어볼것.
- actions
- loadingActions.js
- userActions.jsx
- ruducers
- loadingReducer.js
- userReducer.js
- index.js
- AdvReduxApp.jsx
//userReducer.js
import { SET_USER } from '../actions/userActions';

export default function reducer(state = {}, action) {
  const { type, payload } = action;

  switch(type) {
    case SET_USER: {
      return {
        ...state,
        ...payload,
      };
    }
    default:
      return state;
  }
}
처럼 loadingReducer.jsx도 만들어주고, reducer를 묶어주는데,
index.js에
import loading  from './loadingReducer';
import user from './userReducer';

export default {
    loading,
    user,
};
처럼 묶어 주어서 여러개의 reducer가 하나의 reducer로 묶여지게 만든다.
스토어 설정 파일 만들기
combineReducers() - 여러개의 reducer 묶어주기
composeWithDevTools - redux 크롬 확장 도구 사용
import { createStore, combineReducers } from 'redux';
import { composeWithDevTools } from 'redux-devtools-extension';
import reducers from './reducers';

export default initStates => createStore(
  combineReducers(reducers),
  initStates,
  composeWithDevTools(),
);
action
//loadingActions.js
export const SET_LOADING = 'loading/SET_LOADING';
export const RESET_LOADING = 'loading/RESET_LOADING';

export const setLoading = loading => ({
  type: SET_LOADING,
  payload: loading,
});

export const resetLoading = () => ({
  type: RESET_LOADING
});
action의 type을 export한것은 reducer에서 사용하고자 export 시켰다.
//loadingReducer.jsx
import { SET_LOADING, RESET_LOADING } from '../actions/loadingActions';

const initState = false;

export default function reducer (state = initState, action) {
  const { type, payload } = action;
  switch(type) {
    case SET_LOADING: {
      return payload;
    }
    case RESET_LOADING: {
      return initState;
    }
    default:
      return state;
  }
};
따라서 action이 분리됬으므로 React App도 수정하여서 action이 사용되는 부분을 변경해주어야한다.
//
import React, { PureComponent } from 'react';
import { Provider } from 'react-redux';
import configureStore from './configureStore';
import { setLoading, resetLoading } from './actions/loadingActions';
import { setUser } from './actions/userActions';

class AdvReduxApp extends PureComponent {
  store = configureStore({ loading: false });

  componentDidMount() {
    this.store.dispatch(setLoading(true));
    this.store.dispatch(resetLoading());
    this.store.dispatch({
    	type: 'SET_USER',
        payload: { name: 'Park', age: 20 },
        });
  }

  render() {
    return <Provider store={this.store}>리덕스 예제</Provider>;
  }
}
export default AdvReduxApp;
SET_USER도 똑같이 해주면된다.
그래프 데이터베이스
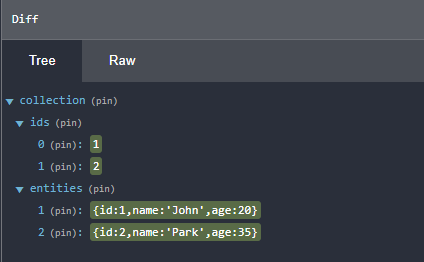
아래와 같이 collection 하위에 나타나는 형태의 데이터를 그래프 DB라고 부른다.
스토어 읽어 들이기
store.getState()함수를 이용하면 스토어 전체 객체에 접근이 가능하다.
그래프 DB는 collection이라는 key값을 가지고있으므로 객체 분할 할당식으로 추출.
componentDidMount() {
this.store.dispatch(
setCollection([
{ id: 1, name: 'John', age: 20 },
{ id: 2, name: 'Park', age: 35 },
]),
);
const { collection } = this.store.getState();
const { ids, entities } = collection;
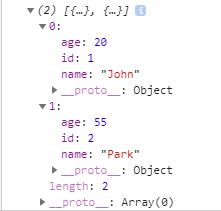
const originalPayload = ids.map(id => entities[id]);
console.log(originalPayload);
}- console.log(originalPayload)의 결과
간단한 데이터를 처리하기 위해 그래프 DB를 도입하는것은 비효율적이지만, 많은 양의 데이터를 처리하려면 그래프 DB 도입은 훌륭한 선택이된다고한다
데이터를 위한 컴포넌트
화면 컴포넌트 :
1. 화면을 출력하는데 집중
2. 프로퍼티를 통해 데이터 전달만 받고
3. 데이터 변경은 프로퍼티로 받은 콜백함수 및 state 사용
데이터 컴포넌트 :
1. 스토어의 데이터를 컴포넌트에 전달 및 변경
2. 공급자의 스토어를 연결하여 데이터를 관리. 리덕스와 연관이있다.
3. store의 reducer와 dispatch()함수를 화면 컴포넌트에 프로퍼티로 전달
4. react-redux의 공급자를 구독하는 소비자 컴포넌트 형태
do it react 책을 정리한 내용입니다!!