📖 개요
오늘은 FS 네임스페이스(마운트 네임스페이스)에 대해서 알아보겠습니다.
📦 FS 네임스페이스란?
FS 네임스페이스에 대한 자세한 내용은 여기를 참고해주세요!
FS 네임스페이스는 특정 프로세스의 파일 시스템(정확히는 mount 지점)을 격리하는 기술입니다.
사실 이 기술은 저번 시간에 /proc 디렉터리의 재마운트를 위해 사용해봤던 기술이기도 합니다.
🔧 실습해보기
해당 내용은
Sam Kim님의실습과 함께 완성해보는 도커 없이 컨테이너 만들기PPT 중 일부를 참고해 작성되었습니다.
저번 시간에는 단순히 /proc 디렉터리의 격리만 진행했었습니다. 하지만 Docker, lxc와 같은 상용 컨테이너의 경우에는 모든 파일시스템 전체(즉, 루트)를 격리합니다.
저희의 최종 목표는 상용 컨테이너처럼 동작하는 컨테이너 엔진 개발이기 때문에, 이에 맞게 루트 디렉터리도 격리해주는 실습을 해보도록 하겠습니다.
1. 가상의 루트 디렉터리 생성
먼저, 새로운 컨테이너에서 루트 디렉터리 역할을 해 줄 디렉터리가 필요합니다. 편한 경로로 이동한 뒤, 다음 명령어를 입력해 줍시다.
mkdir newRoot # 새로운 루트폴더 생성2. unshare 명령어 사용
이제 기존과 같이 unshare 명령을 통해서 프로세스 격리를 진행해 주시면 되겠습니다. 단, 저번과 달리 루트 경로를 지정하는 --root 옵션이 추가됩니다.
unshare -fp --root ./newRoot /bin/bash해당 명령을 실행하면, 다음과 같은 결과가 나오게 됩니다 :
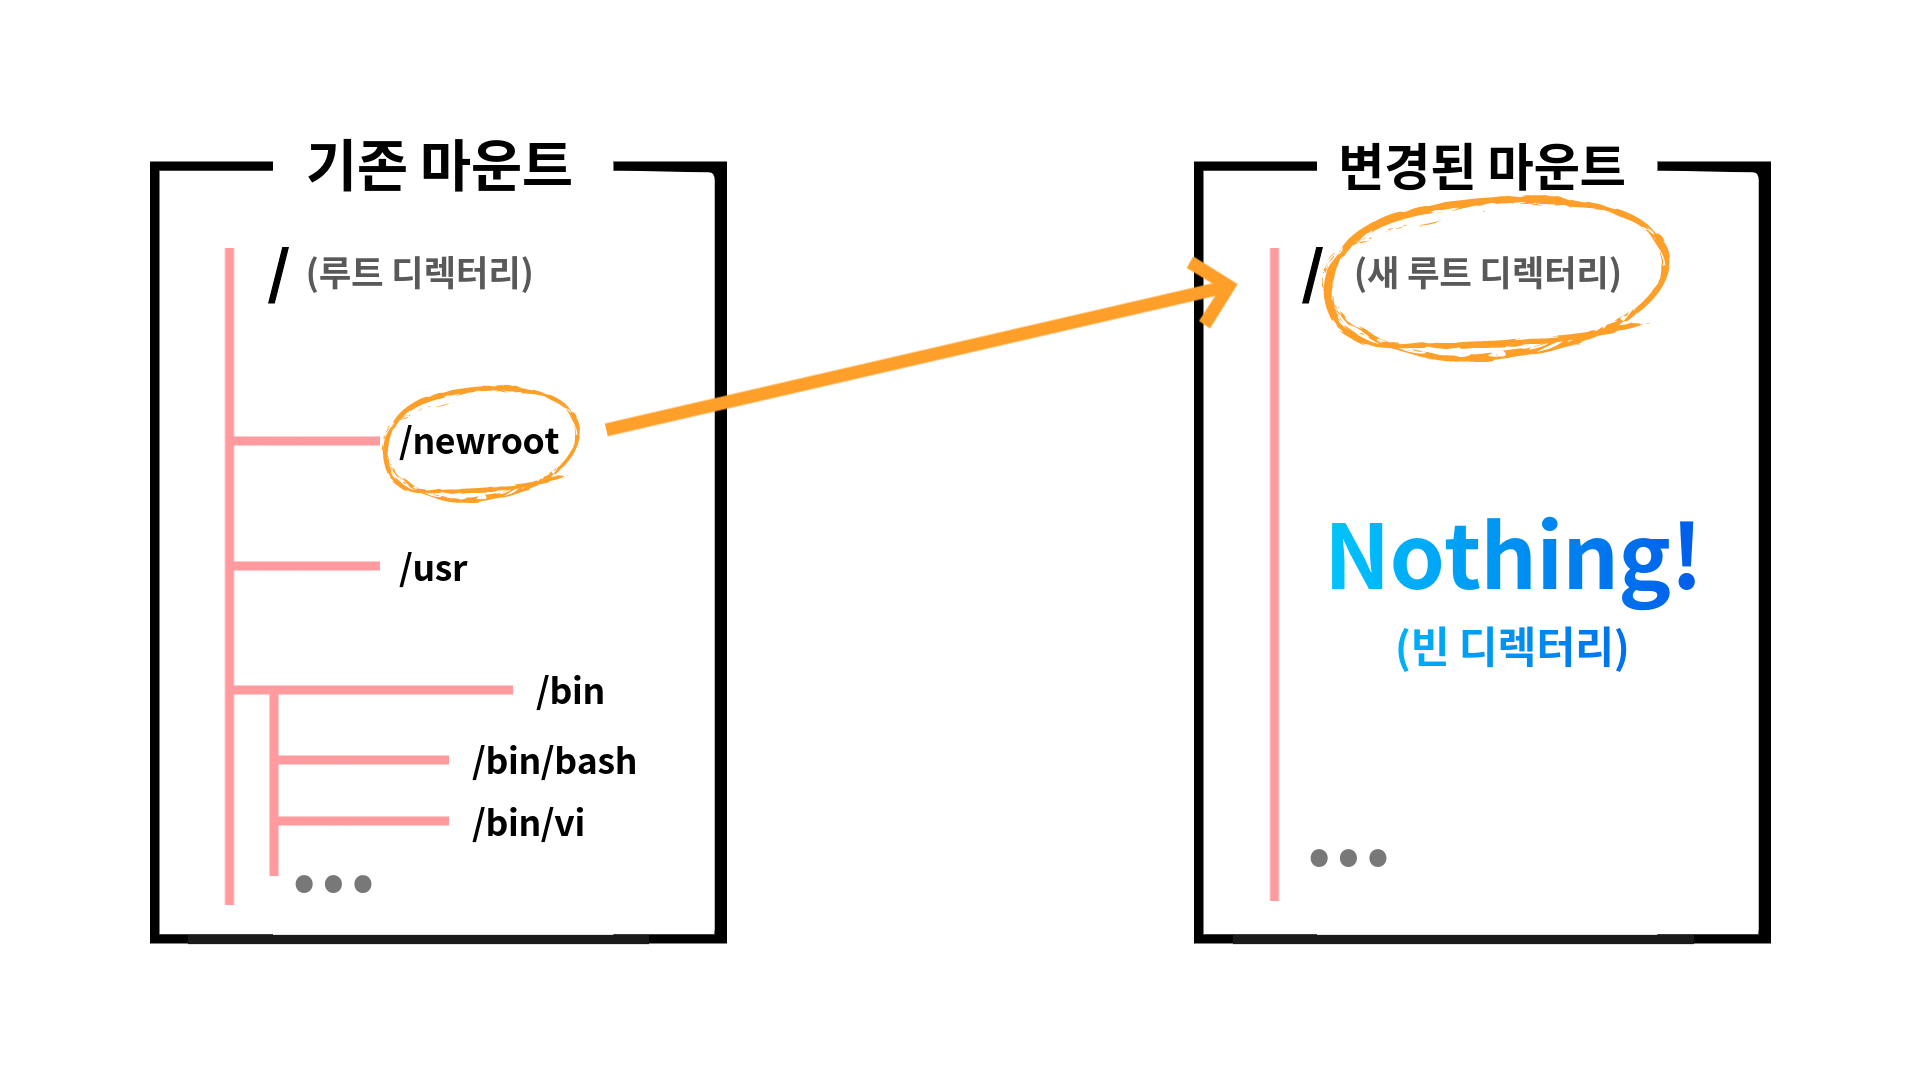
unshare: failed to execute /bin/bash: No such file or directory왜 이런 결과가 나오게 되었을까요? 저희는 방금 --root 옵션을 통해서 루트 디렉터리를 변경한 바 있습니다. 그런데, 새롭게 지정한 루트 디렉터리는 텅텅 비어 있습니다. 무엇을 의미하는 걸까요?
이것은 바로 새로운 루트에는 /bin/bash가 더이상 존재하지 않는다라는 말이 됩니다. /bin/bash가 존재하던 기존의 루트 디렉터리와는 달리, 텅텅 빈 디렉터리가 루트로 변경되면서 bash 또한 사라지게 된 것이죠.
그렇다면 어떻게 해결할 수 있을까요? 이 내용은 아래에서 언급하도록 하겠습니다.
3. 필요한 프로그램 복사
이렇게 루트 디렉터리를 변경하게 되면, 프로그램들도 복사를 해주어야 합니다.
그리고 여기에는 단순히 프로그램 뿐만이 아니라, 실행하는 데 필요한 라이브러리들도 포함됩니다.
따라서 ldd(List Dynamic Dependencies) 명령어를 통해 bash가 필요로 하는 종속성 라이브러리들을 확인해 봅시다.
> ldd /bin/bash # bash shell의 종속성들을 확인하는 명령

linux-vdso.so.1 (0x00007ffd21b2a000)
libtinfo.so.6 => /lib/x86_64-linux-gnu/libtinfo.so.6 (0x00007fb827fa4000)
libdl.so.2 => /lib/x86_64-linux-gnu/libdl.so.2 (0x00007fb827f9e000)
libc.so.6 => /lib/x86_64-linux-gnu/libc.so.6 (0x00007fb827dac000)
/lib64/ld-linux-x86-64.so.2 (0x00007fb828124000)
x86-64 Linux 기준에서는 다음과 같이 총 5개의 종속성들이 존재하는 것을 확인할 수 있습니다. 이 중에서 linux-vdso.so.1 파일은 Linux의 커널 계층에서 자체적으로 제공되는 라이브러리이므로 추가할 필요가 없습니다. 따라서 저희는 나머지 4개의 라이브러리들만 새로운 루트 디렉터리에 추가하면 됩니다 :
mkdir newRoot/lib/
cp /lib/x86_64-linux-gnu/libtinfo.so.6 newRoot/lib/
cp /lib/x86_64-linux-gnu/libdl.so.2 newRoot/lib/
cp /lib/x86_64-linux-gnu/libc.so.6 newRoot/lib/

mkdir newRoot/lib64/
cp /lib64/ld-linux-x86-64.so.2 newRoot/lib64/
이제 종속 라이브러리들의 복사가 끝났으니, 마지막으로 bash를 복사해 주시면 됩니다!
mkdir newRoot/bin
cp /bin/bash newRoot/bin/
해당 명령어까지 성공적으로 수행하고 나면, newRoot의 폴더 구조는 다음과 같이 구성될 겁니다!
> tree newRoot/

newRoot/
├── bin
│   └── bash
├── lib
│   ├── libc.so.6
│   ├── libdl.so.2
│   └── libtinfo.so.6
└── lib64
    └── ld-linux-x86-64.so.2

3 directories, 5 files
4. 이제 진짜로 실행!
bash를 격리된 파일시스템에서 실행하기 위한 모든 준비가 끝났습니다! 이제 직접 실행해 볼까요?
> unshare -fp --root ./newRoot /bin/bash

bash-5.1#
이제 bash shell이 정상적으로 작동하는 것을 확인하실 수 있습니다!
하지만 ls를 비롯한 다른 명령어들은 동작하지 않습니다. 이것도 아까 bash가 실행되지 않던 이유와 동일한 원인입니다. 루트 디렉터리가 바뀌면서 해당 프로그램들에도 접근이 불가능하게 된 것이죠.
(번외) 다른 명령어들 추가하기
다음 명령어를 추가로 입력해 ls 명령어도 동작하도록 만들 수 있습니다:
cp /lib/x86_64-linux-gnu/libselinux.so.1 newRoot/lib/
cp /lib/x86_64-linux-gnu/libpcre2-8.so.0 newRoot/lib/
cp /lib/x86_64-linux-gnu/libpthread.so.0 newRoot/lib/
cp /bin/ls newRoot/bin/
위 명령어를 입력한 뒤, 다시 unshare 명령을 실행해보면..
> unshare -fp --root ./newRoot /bin/bash

bash-5.1#

> ls
bin lib lib54
이렇게 ls 명령어를 사용할 수 있게 됩니다. 위와 같은 방식을 이용하면 이러한 명령어들 뿐만 아니라, 모든 명령어들을 추가할 수 있습니다.
⚙️ 프로그램 작성 & 실행
C 언어를 통해서 해당 과정들을 자동화해보도록 하겠습니다.
일단 프로그램 구동에 필요한 종속성들을 정리해 보겠습니다.
- /lib
- x86_64-linux-gnu/libtinfo.so.6
- x86_64-linux-gnu/libdl.so.2
- x86_64-linux-gnu/libc.so.6
- x86_64-linux-gnu/libselinux.so.1
- x86_64-linux-gnu/libpcre2-8.so.0
- x86_64-linux-gnu/libpthread.so.0
- /lib64
- ld-linux-x86-64.so.2
먼저 위 종속성들을 복사해주는 코드의 작성이 우선일 거 같습니다. 프로그램과 종속성들을 새 루트 디렉터리로 복사해주는 코드를 먼저 작성해 보도록 하겠습니다.
⚠️ 참고: 해당 코드는 설명용 코드로, 일부 구현이 누락되어 있습니다. 컴파일을 원하신다면 뒤쪽에 첨부되는 실제 코드를 사용하시는 것을 추천드립니다.
const char* rootDirectory = "/tmp/newRoot";

char* dependencies_lib[] = {
    "/lib/x86_64-linux-gnu/libtinfo.so.6",
    "/lib/x86_64-linux-gnu/libdl.so.2",
    "/lib/x86_64-linux-gnu/libc.so.6",
    "/lib/x86_64-linux-gnu/libselinux.so.1",
    "/lib/x86_64-linux-gnu/libpcre2-8.so.0",
    "/lib/x86_64-linux-gnu/libpthread.so.0"
};

char* dependencies_lib64[] = {
    "/lib64/ld-linux-x86-64.so.2"
};

void copyDependencies(char** dependencies, int length, char* dstName) {
    printf("passed length: %d\n", length);

    for(int i = 0; i < length; i++) {
        char cmd[100] = "cp ";
        strcat(cmd, dependencies[i]);
        strcat(cmd, " ");
        strcat(cmd, rootDirectory);
        strcat(cmd, "/");
        strcat(cmd, dstName);
        strcat(cmd, "/");

        printf("%s - %s\n", cmd, dstName);
        system(cmd);
    }
}

int main() {
    // 루트 디렉터리 생성
    char cmd[50] = "mkdir ";
    strcat(cmd, rootDirectory);
    system(cmd);

    // 종속성 폴더 생성
    char lib[50] = "mkdir ";
    strcat(lib, rootDirectory);
    strcat(lib, "/lib");
    system(lib);

    char lib64[50] = "mkdir ";
    strcat(lib64, rootDirectory);
    strcat(lib64, "/lib64");
    system(lib64);

    // 종속성 복사
    copyDependencies(dependencies_lib, sizeof dependencies_lib / sizeof(char*), "lib");
    printf("\n");
    copyDependencies(dependencies_lib64, sizeof dependencies_lib64 / sizeof(char*), "lib64");

    // /bin 폴더 생성
    char bin[30] = "mkdir ";
    strcat(bin, rootDirectory);
    strcat(bin, "/bin");
    system(bin);

    // bash 복사
    char bash[30] = "cp /bin/bash ";
    strcat(bash, rootDirectory);
    strcat(bash, "/bin/");
    system(bash);

    // ls 복사
    char ls[30] = "cp /bin/ls ";
    strcat(ls, rootDirectory);
    strcat(ls, "/bin/");
    system(ls);

	...
}
여기까지가 필요한 프로그램과 종속성을 복사하는 코드입니다. C 언어에서 파일 복사를 기본 헤더에는 지원하지 않아, 파일을 다루는 건 system() 메소드 호출을 통해서 해결했습니다. (물론 C로 파일 복사 함수를 직접 짜는 것이 깔끔한 방법이지만, 리눅스 네임스페이스에 중점을 두는 이번 강의의 특성 상 편의를 생각해 구현을 포기했습니다)
그리고 앞선 명령어 실습에서 사용했던 --root 옵션은 C에서 chroot를 통해 구현됩니다.
void remountRoot() {
    printf("chroot: %d\n", chroot(rootDirectory));
}
이것들을 제외한 나머지 코드는 이전 게시글과 동일합니다. (/proc 재마운트 부분 제외)
최종적으로 완성된 코드는 다음과 같습니다:
#define _GNU_SOURCE

#include <stdio.h> // 표준 입출력
#include <stdlib.h> // 표준 라이브러리
#include <string.h> // string 다루는 함수
#include <sched.h> // unshare() 메소드 및 flags
#include <unistd.h> // execl() 메소드
#include <sys/wait.h> // wait() 메소드
#include <unistd.h> // chroot() 메소드
#include <sys/stat.h>  // mkdir() method
#include <sys/types.h> // system types

// unshare 함수를 위한 인자
// PID 네임스페이스(p 옵션), FS 네임스페이스(mount를 위한 옵션)
const int flags = CLONE_NEWPID | CLONE_NEWNS;

const char* rootDirectory = "/tmp/newRoot";

char* dependencies_lib[] = {
    "/lib/x86_64-linux-gnu/libtinfo.so.6",
    "/lib/x86_64-linux-gnu/libdl.so.2",
    "/lib/x86_64-linux-gnu/libc.so.6",
    "/lib/x86_64-linux-gnu/libselinux.so.1",
    "/lib/x86_64-linux-gnu/libpcre2-8.so.0",
    "/lib/x86_64-linux-gnu/libpthread.so.0"
};

char* dependencies_lib64[] = {
    "/lib64/ld-linux-x86-64.so.2"
};

void copyDependencies(char** dependencies, int length, char* dstName) {
    printf("passed length: %d\n", length);

    for(int i = 0; i < length; i++) {
        char cmd[100] = "cp ";
        strcat(cmd, dependencies[i]);
        strcat(cmd, " ");
        strcat(cmd, rootDirectory);
        strcat(cmd, "/");
        strcat(cmd, dstName);
        strcat(cmd, "/");

        printf("%s - %s\n", cmd, dstName);
        system(cmd);
    }
}

// bash를 실행하는 함수
void spawnShell() {
    execl("/bin/bash", "bash", (char*)NULL);
}

void remountRoot() {
    printf("chroot: %d\n", chroot(rootDirectory));
}

int main() {
    // 루트 디렉터리 생성
    char cmd[50] = "mkdir ";
    strcat(cmd, rootDirectory);
    system(cmd);

    // 종속성 폴더 생성
    char lib[50] = "mkdir ";
    strcat(lib, rootDirectory);
    strcat(lib, "/lib");
    system(lib);

    char lib64[50] = "mkdir ";
    strcat(lib64, rootDirectory);
    strcat(lib64, "/lib64");
    system(lib64);

    // 종속성 복사
    copyDependencies(dependencies_lib, sizeof dependencies_lib / sizeof(char*), "lib");
    printf("\n");
    copyDependencies(dependencies_lib64, sizeof dependencies_lib64 / sizeof(char*), "lib64");

    // /bin 폴더 생성
    char bin[30] = "mkdir ";
    strcat(bin, rootDirectory);
    strcat(bin, "/bin");
    system(bin);

    // bash 복사
    char bash[30] = "cp /bin/bash ";
    strcat(bash, rootDirectory);
    strcat(bash, "/bin/");
    system(bash);

    // ls 복사
    char ls[30] = "cp /bin/ls ";
    strcat(ls, rootDirectory);
    strcat(ls, "/bin/");
    system(ls);


    // 네임스페이스 구성
    if(unshare(flags) == -1) {
        printf("Unshare failed!\n");
        return -1;
    }
    printf("unshared process successfully\n");

    // 자식 프로세스 생성(분기점)
    int forkResponse = fork();

    // 현 프로세스의 종류에 따라 기능 분리
    switch(forkResponse) {
        case 0: // 자식 프로세스일 때
            printf("현재 자식 프로세스입니다 / PID : %d\n", getpid());

            remountRoot(); // root 디렉터리 재마운트
            printf("Mount successed!\n");

            printf("Spawning /bin/bash :\n");
            spawnShell(); // '/bin/bash' 실행

            break;
        case -1: // 부모 프로세스에서 오류 발생 시
            printf("fork() 실행 중 오류 발생\n");
            break;
        default: // 부모 프로세스일 때(자식 PID 반환)
            printf("부모(PID %d)로부터 자식 프로세스(PID %d) 생성\n", getpid(), forkResponse);
            wait(NULL); // 중요: 자식 프로세스(/bin/bash)가 종료될 때까지 대기함.

            printf("Child process has exited.\n\n");
    }

    return 0;
}
해당 프로그램을 실행시키면 다음과 같은 결과를 얻을 수 있습니다:
> gcc 파일명.c
> sudo ./a.out

passed length: 6
cp /lib/x86_64-linux-gnu/libtinfo.so.6 /tmp/newRoot/lib/ - lib
cp /lib/x86_64-linux-gnu/libdl.so.2 /tmp/newRoot/lib/ - lib
cp /lib/x86_64-linux-gnu/libc.so.6 /tmp/newRoot/lib/ - lib
cp /lib/x86_64-linux-gnu/libselinux.so.1 /tmp/newRoot/lib/ - lib
cp /lib/x86_64-linux-gnu/libpcre2-8.so.0 /tmp/newRoot/lib/ - lib
cp /lib/x86_64-linux-gnu/libpthread.so.0 /tmp/newRoot/lib/ - lib

passed length: 1
cp /lib64/ld-linux-x86-64.so.2 /tmp/newRoot/lib64/ - lib64
unshared process successfully
부모(PID 782395)로부터 자식 프로세스(PID 782422) 생성
현재 자식 프로세스입니다 / PID : 1
chroot: 0
Mount successed!
Spawning /bin/bash :
shell-init: error retrieving current directory: getcwd: cannot access parent directories: No such file or directory
bash-5.1#
👏 마무리하며
이번 게시글에서 저희는 마운트 네임스페이스를 이용해 루트 디렉터리 격리를 구현해보았습니다. 다음 시간에는 UID 네임스페이스에 대해서 알아보도록 하겠습니다.