
Nexacro란?
투비소프트가 개발한 비즈니스 UI/UX 플랫폼으로 기업들의 다양한 개발 요구사항을 수용 할 수 있는 Unified JavaScript FrameWork 기반의 솔루션
넥사크로는 쉽게 설명해서 JS기반으로 이루어진 프레임워크 기반의 솔루션이다. Multi OS, Multi Browser를 지원하며 디바이스별 화면에 최적화된 다양한 기능 제공으로 사용자에게 최적화된 업무 시스템을 구현 할 수 있다.
구조 및 흐름
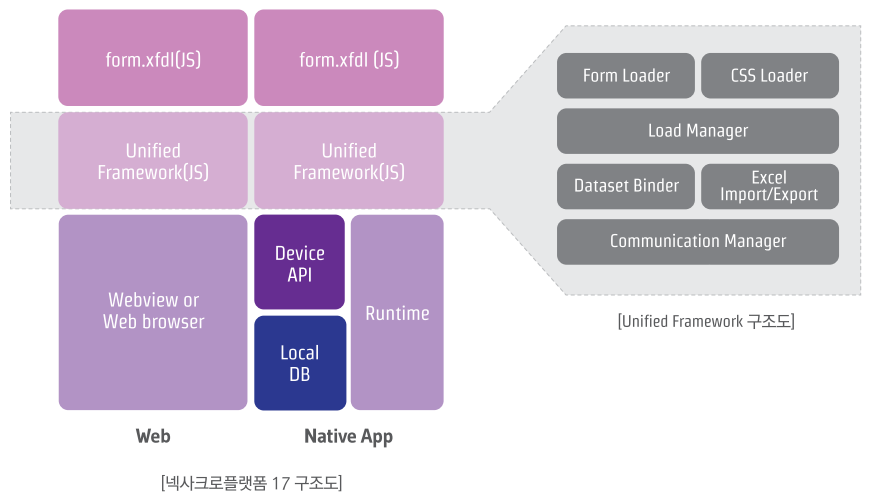
넥사크로는 .xfdl 파일을 .js로 변환하여 자체 프레임워크에 의한 서비스를 제공한다. 이때, 브라우저 및 런타임 환경을 구분하여 해당하는 기능들이 자동으로 실행되는 개념이다. 그렇다면 개발단계부터 배포에 이르기까지 어떻게 흘러가는지 개념에 대해서 아래 그림을 참고하자.
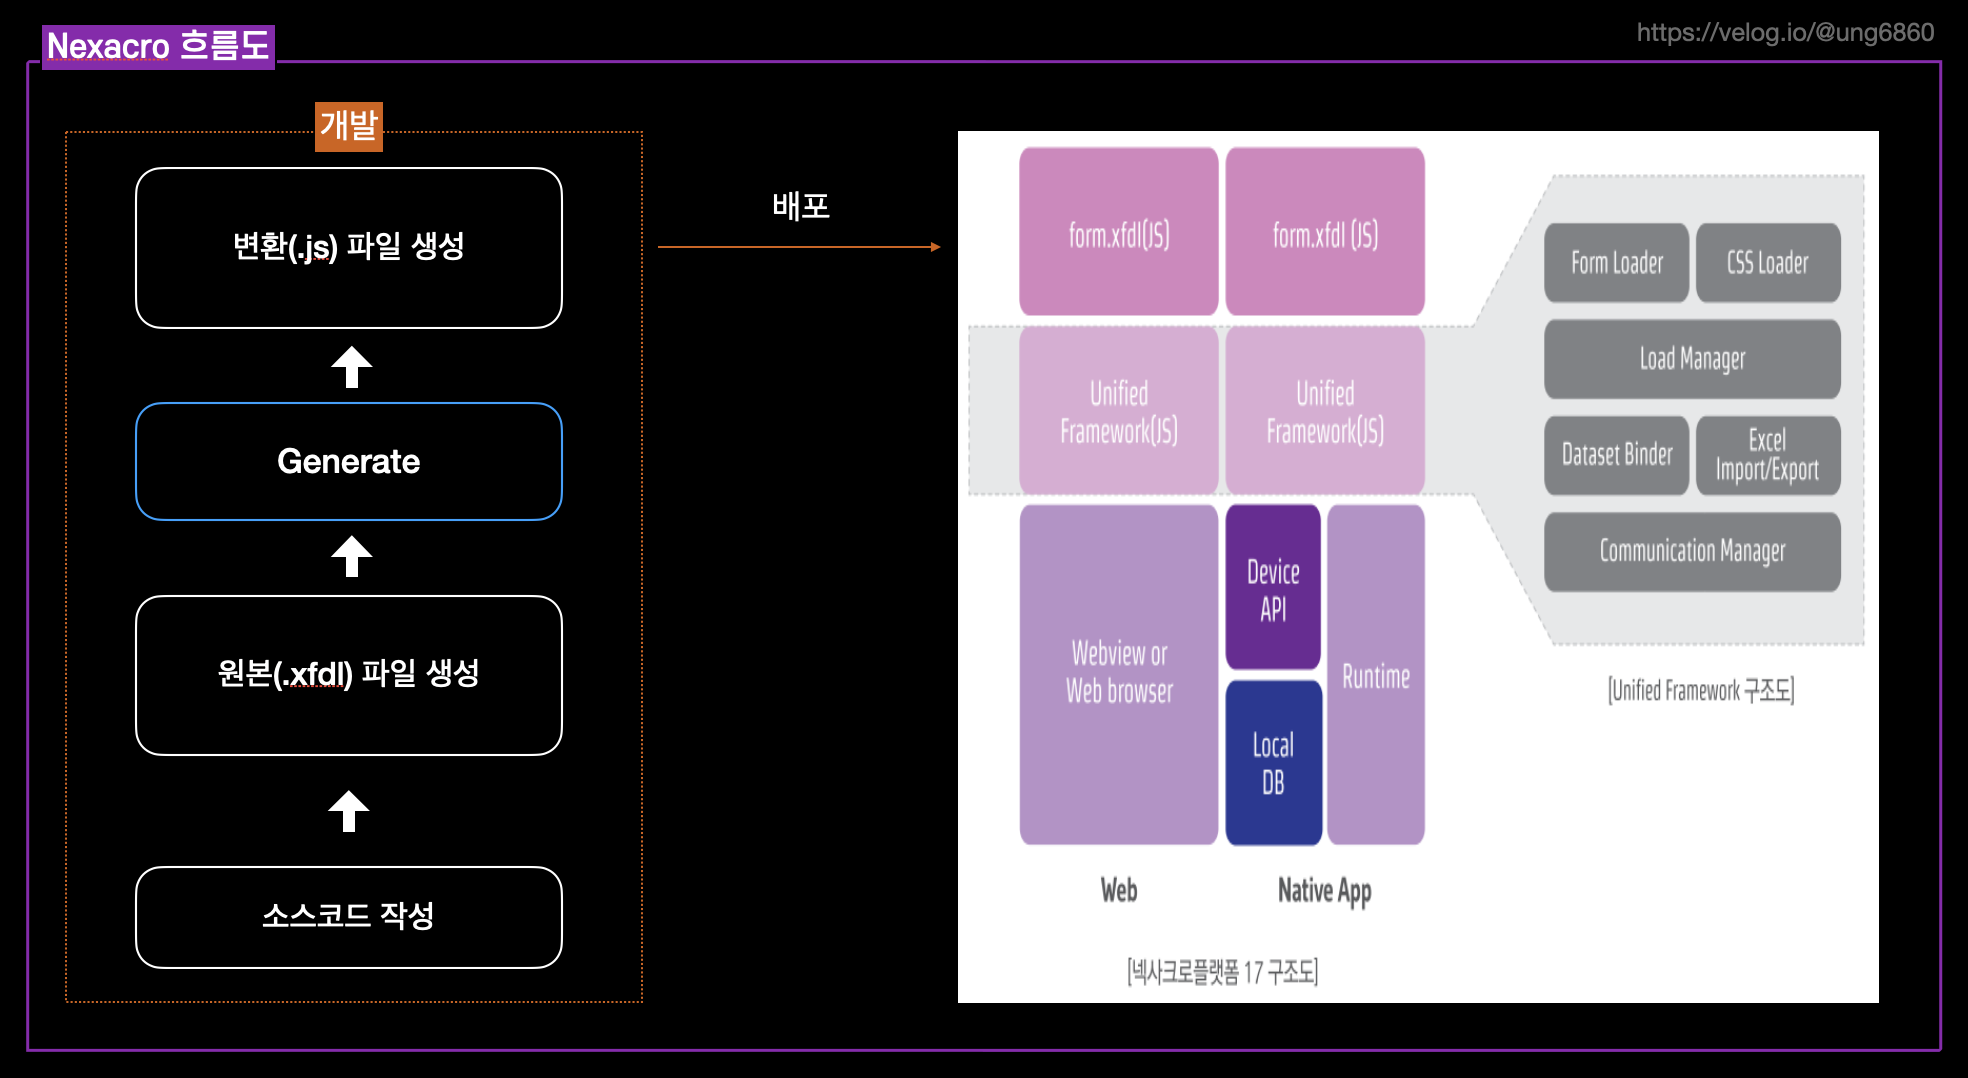
순서는 다음과 같다.
- 플랫폼에서 소스코드를 작성한다.
- 저장 및 Generate를 이용하여 원본 파일(.xfdl)을 변환한다.
- 변환된 파일(.js)를 output 디렉토리에 위치시킨다.
- 프로제그를 배포 후 실행 시 실행환경에 맞춰 프레임워크가 작동하며, 이때 .js 파일을 nexacrolib 폴더의 라이브러리들과 통합하여 실행한다.
자바를 예로 들어 설명하면 이클립스 또는 인텔리제이에서 소스코드를 작성한다. 이때 생성되는 .java가 넥사크로에서는 .xfdl이라고 생각하면된다. 이후 컴파일을하면 생성되는 .class가 넥사크로의 .js이며, 프로그램을 실행하면 .class가 실행되어지듯이 .js가 실행되는 것이다.
구성요소
넥사크로는 다음과 같이 4가지의 구성요소를 가진다.
- 프로그래밍 언어
- 개발환경
- 실행환경
- 배포환경
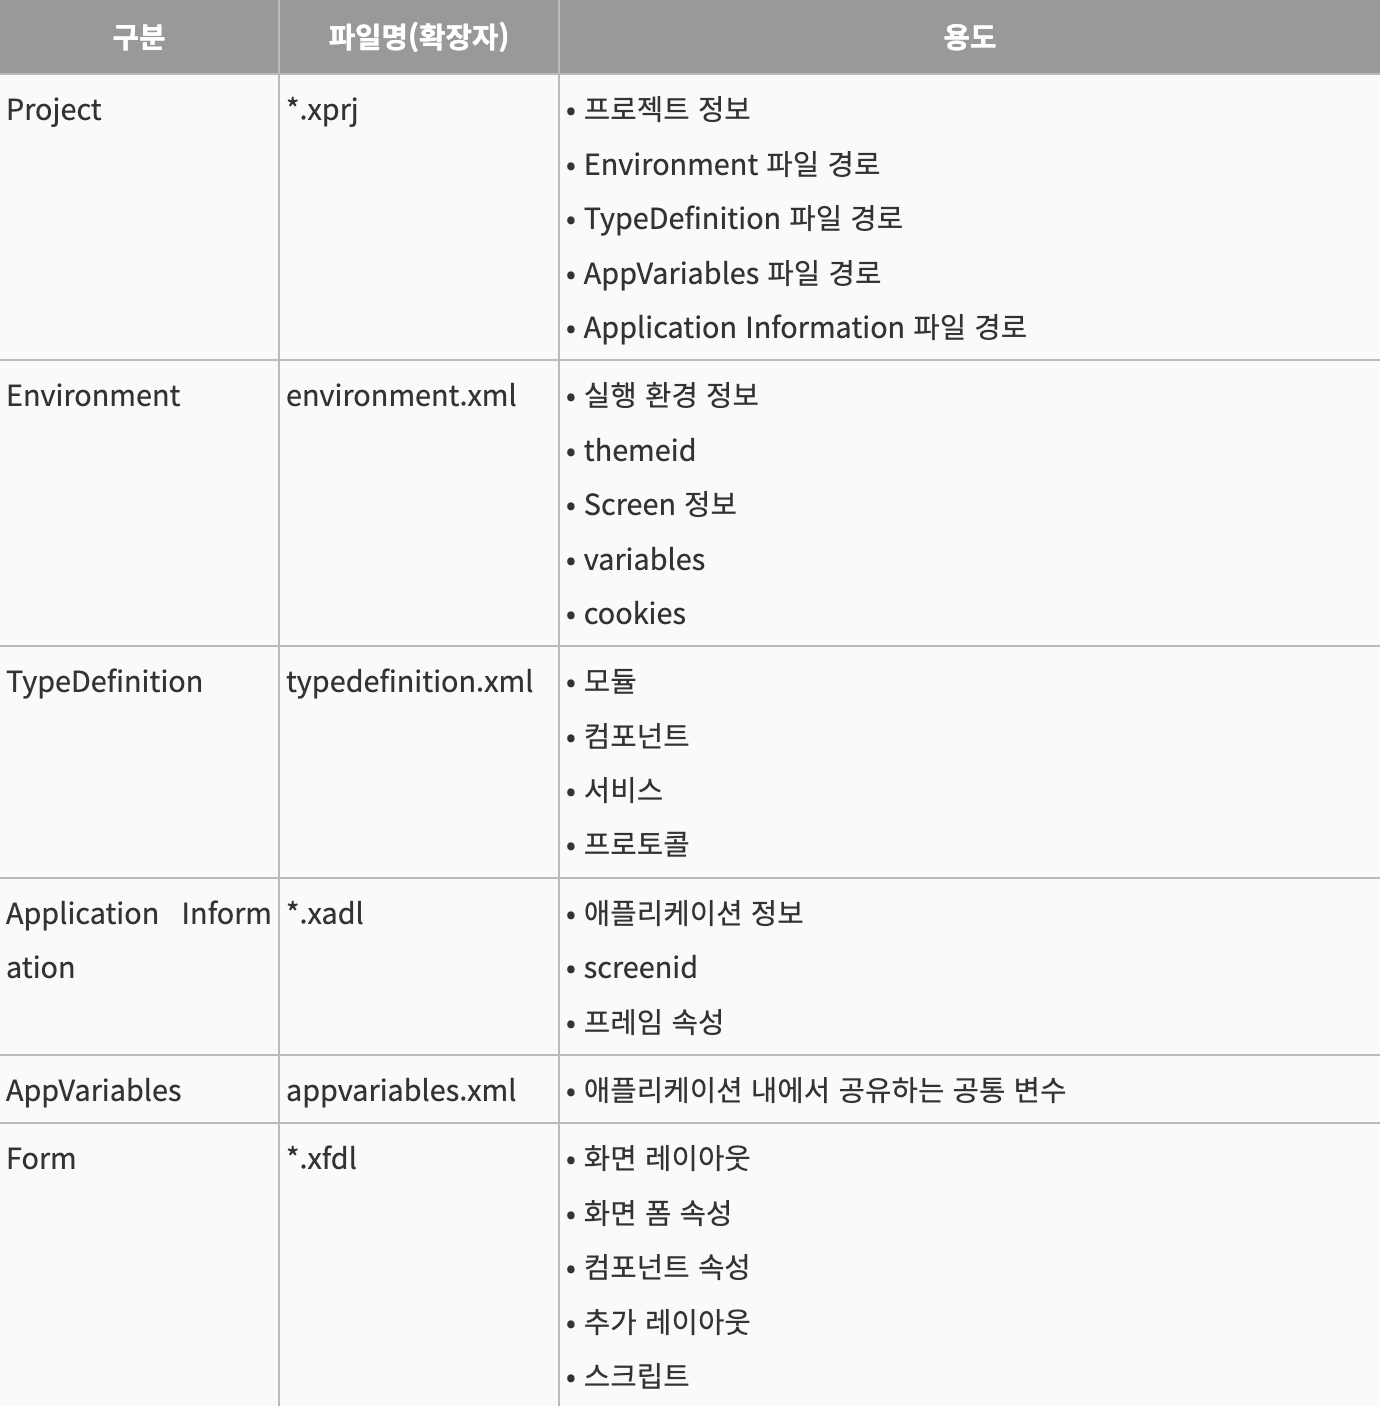
여기서 중요한 부분은 프로그래밍 언어이다. 기본적으로 자바스크립를 기반으로 하지만 화면을 배치하는 부분은 XML 기반으로 되어있다. 바로 이 XML이 .xfdl 파일이 되는 것이다. 또한, 어플리케이션 개발 시 기본적으로 생성되는 파일이 있는데 해당 파일들에 대한 정보를 아래 사진을 보며 확인해보자.
프로젝트 설정 및 연동하기
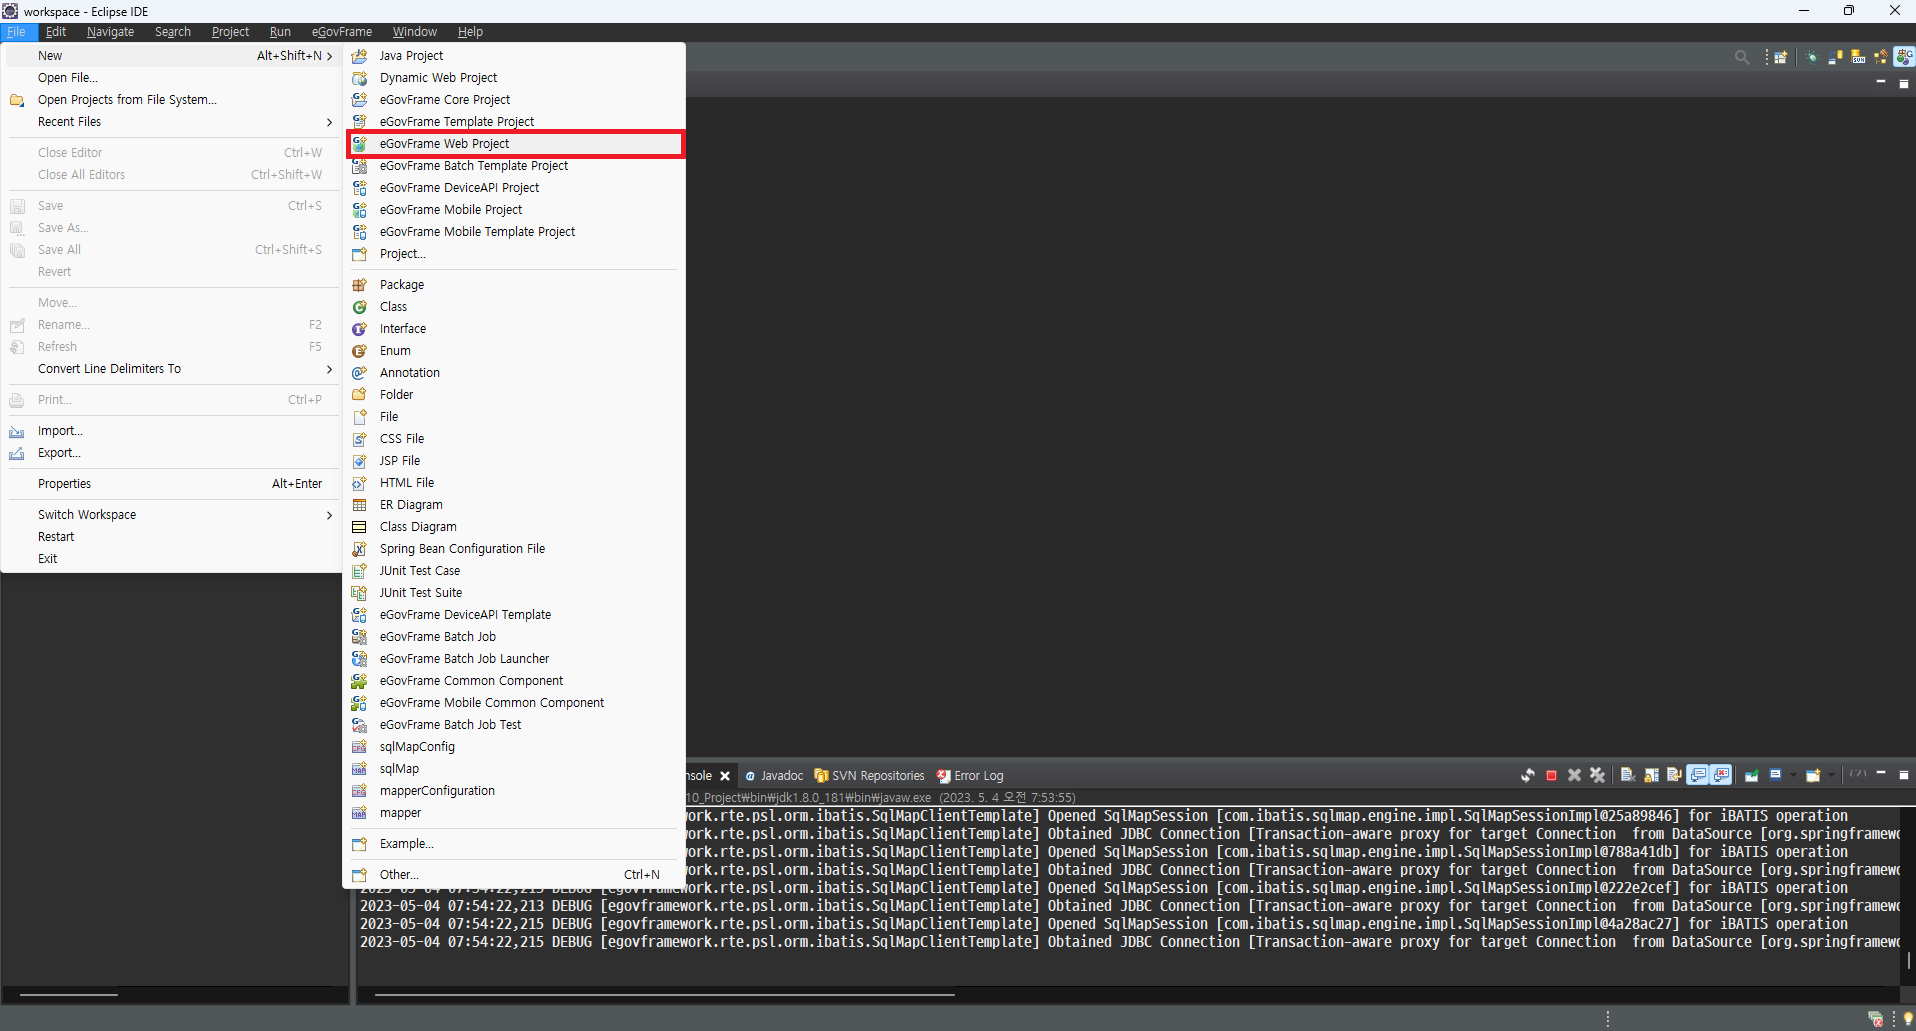
⚡️eGovFrame web project 생성
버전정보 : eGovframework 3.10.0
🖥️ eGovframework web project 생성
🖥️ project name 지정 및 groupid 지정
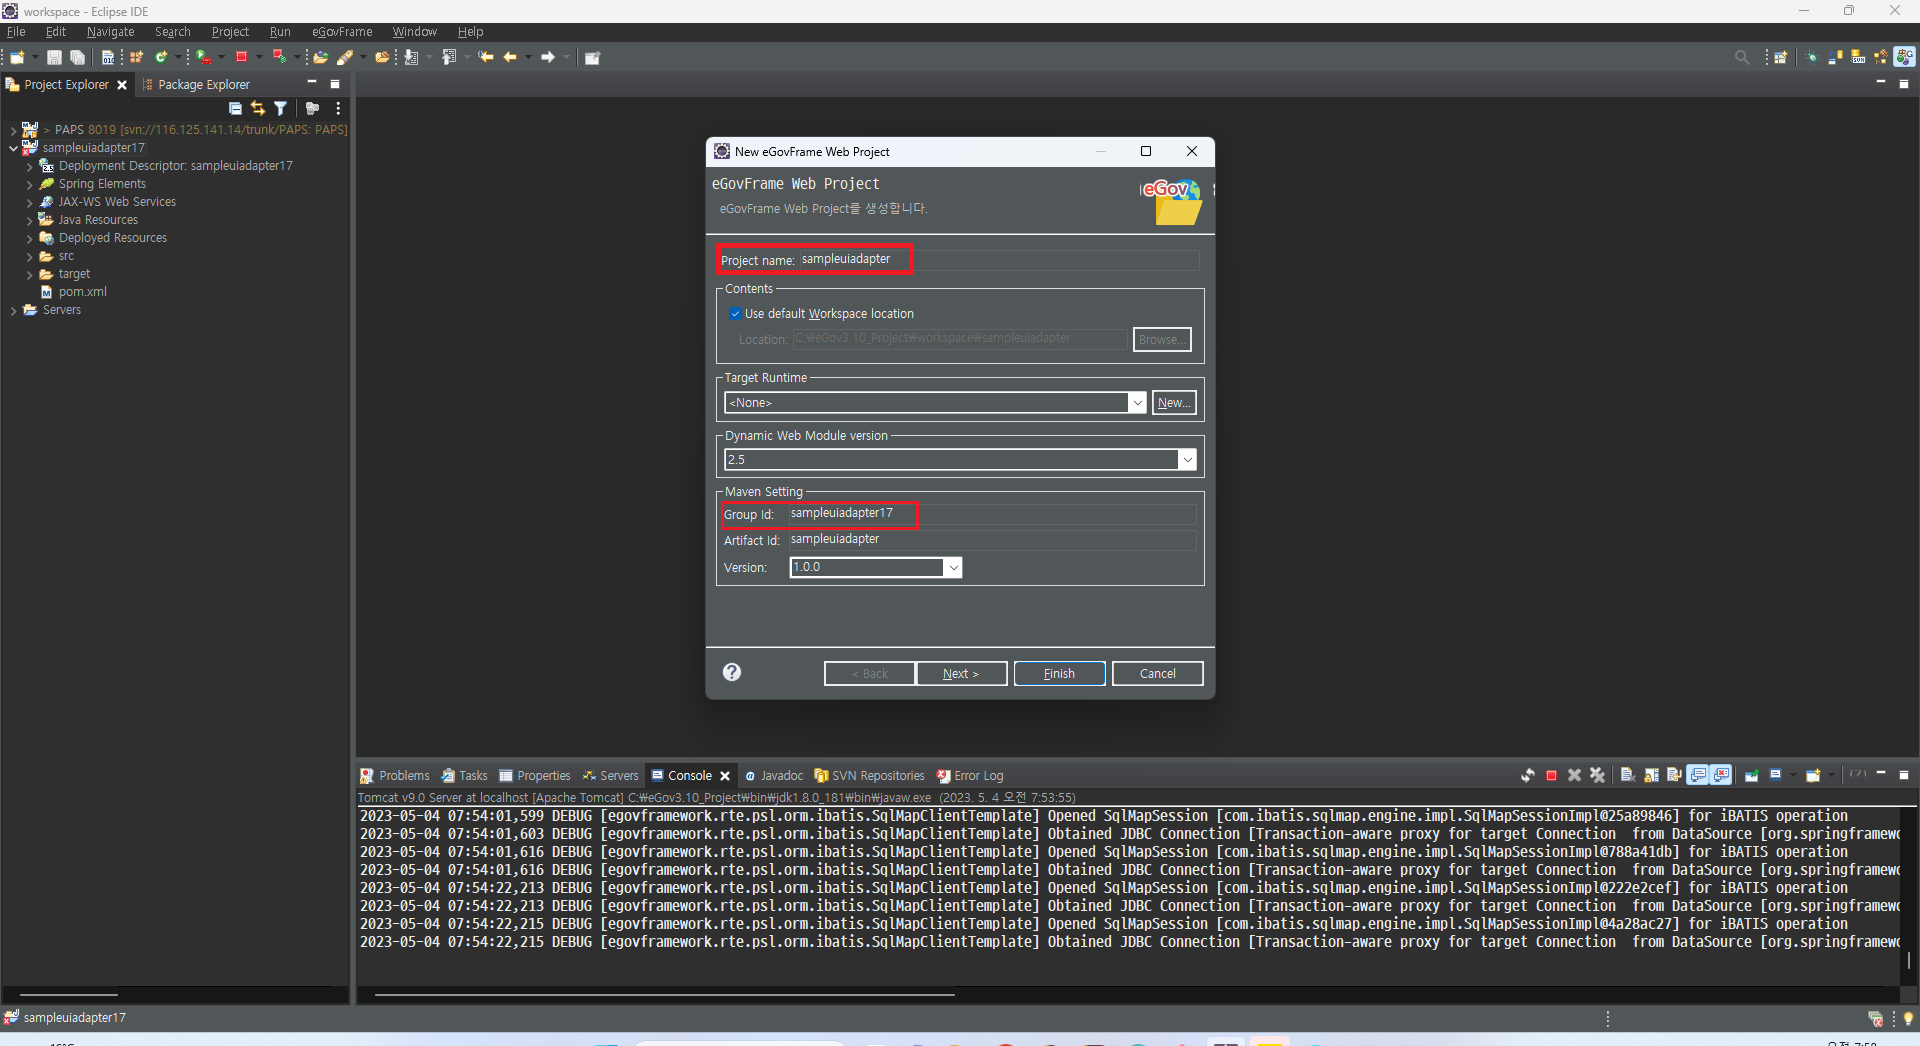
여기서 중요한 부분은 next를 누르고 다음화면으로 전환 시 Generate Example을 반드시 클릭하여 기본 설정 파일 및 테스트 파일들을 생성해주자.
🖥️ server 설정 : window > preferences > Server > Runtime Enviroments
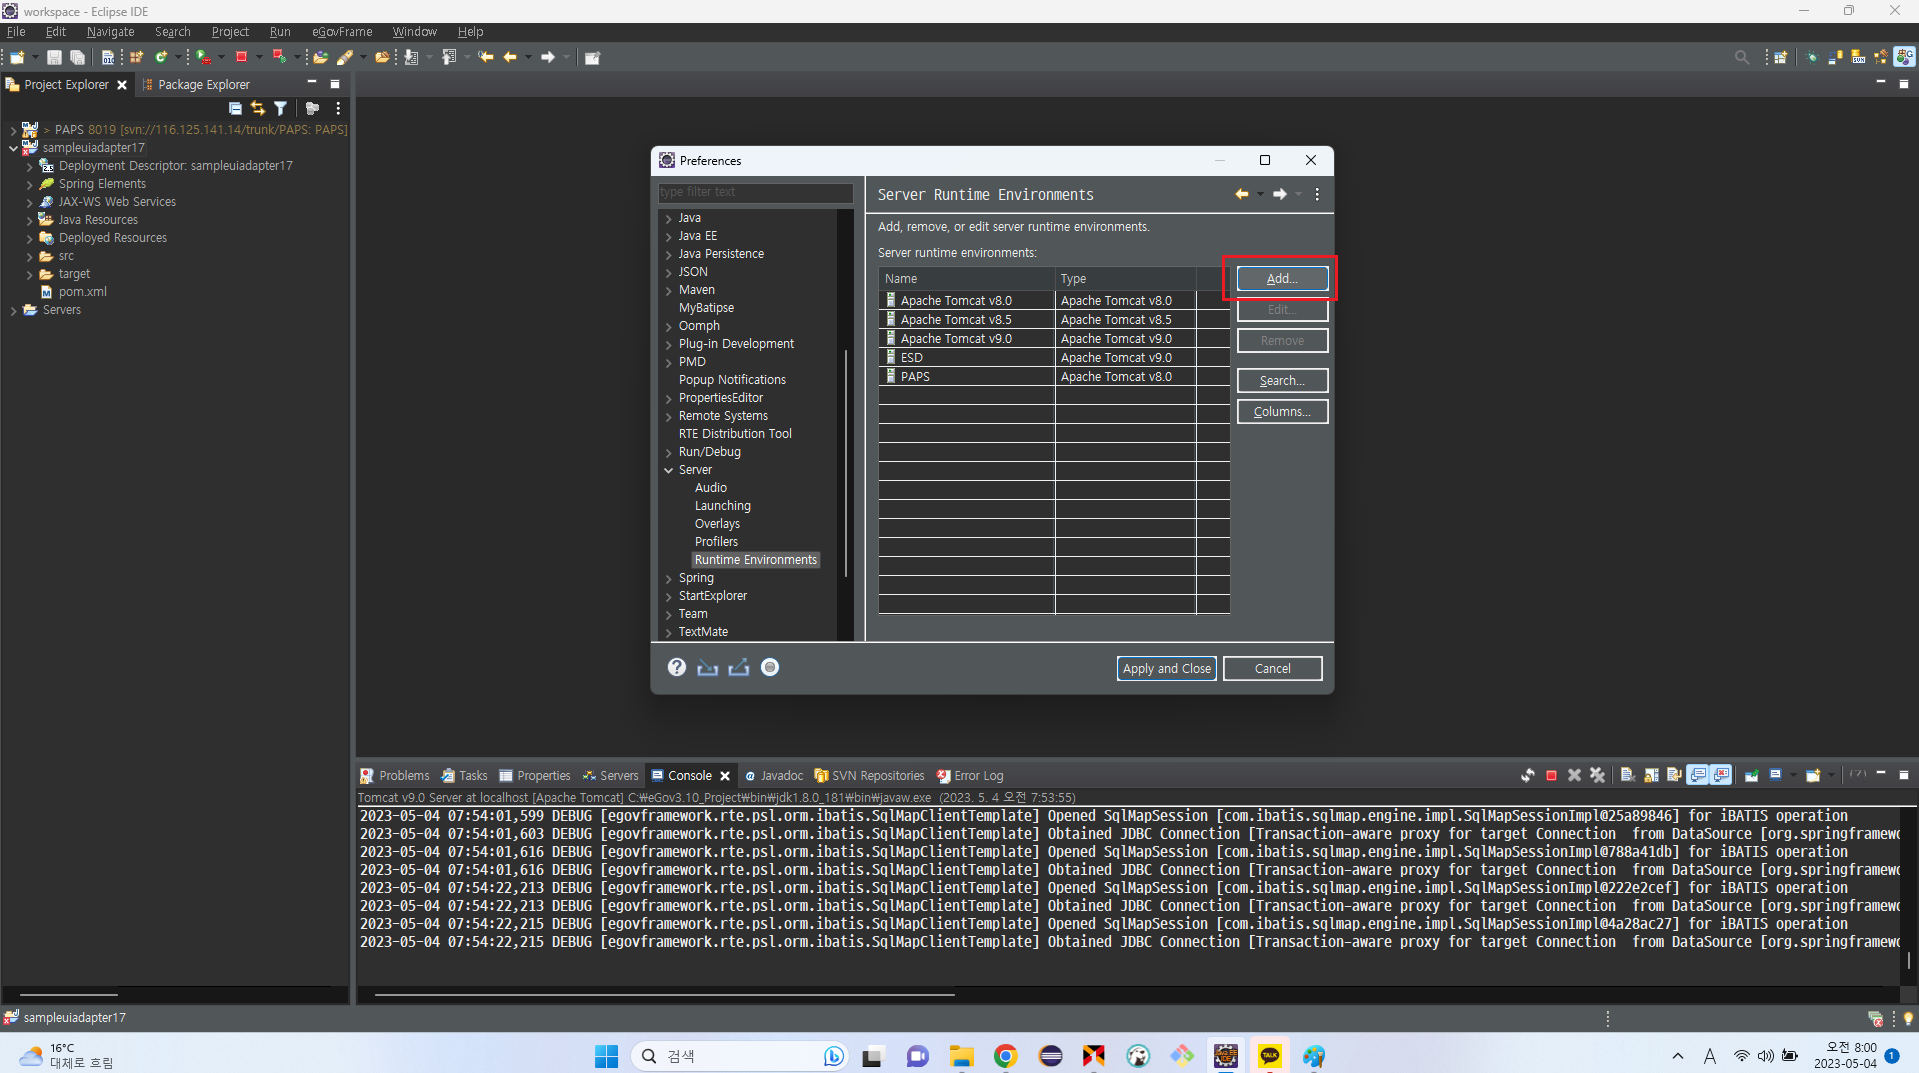
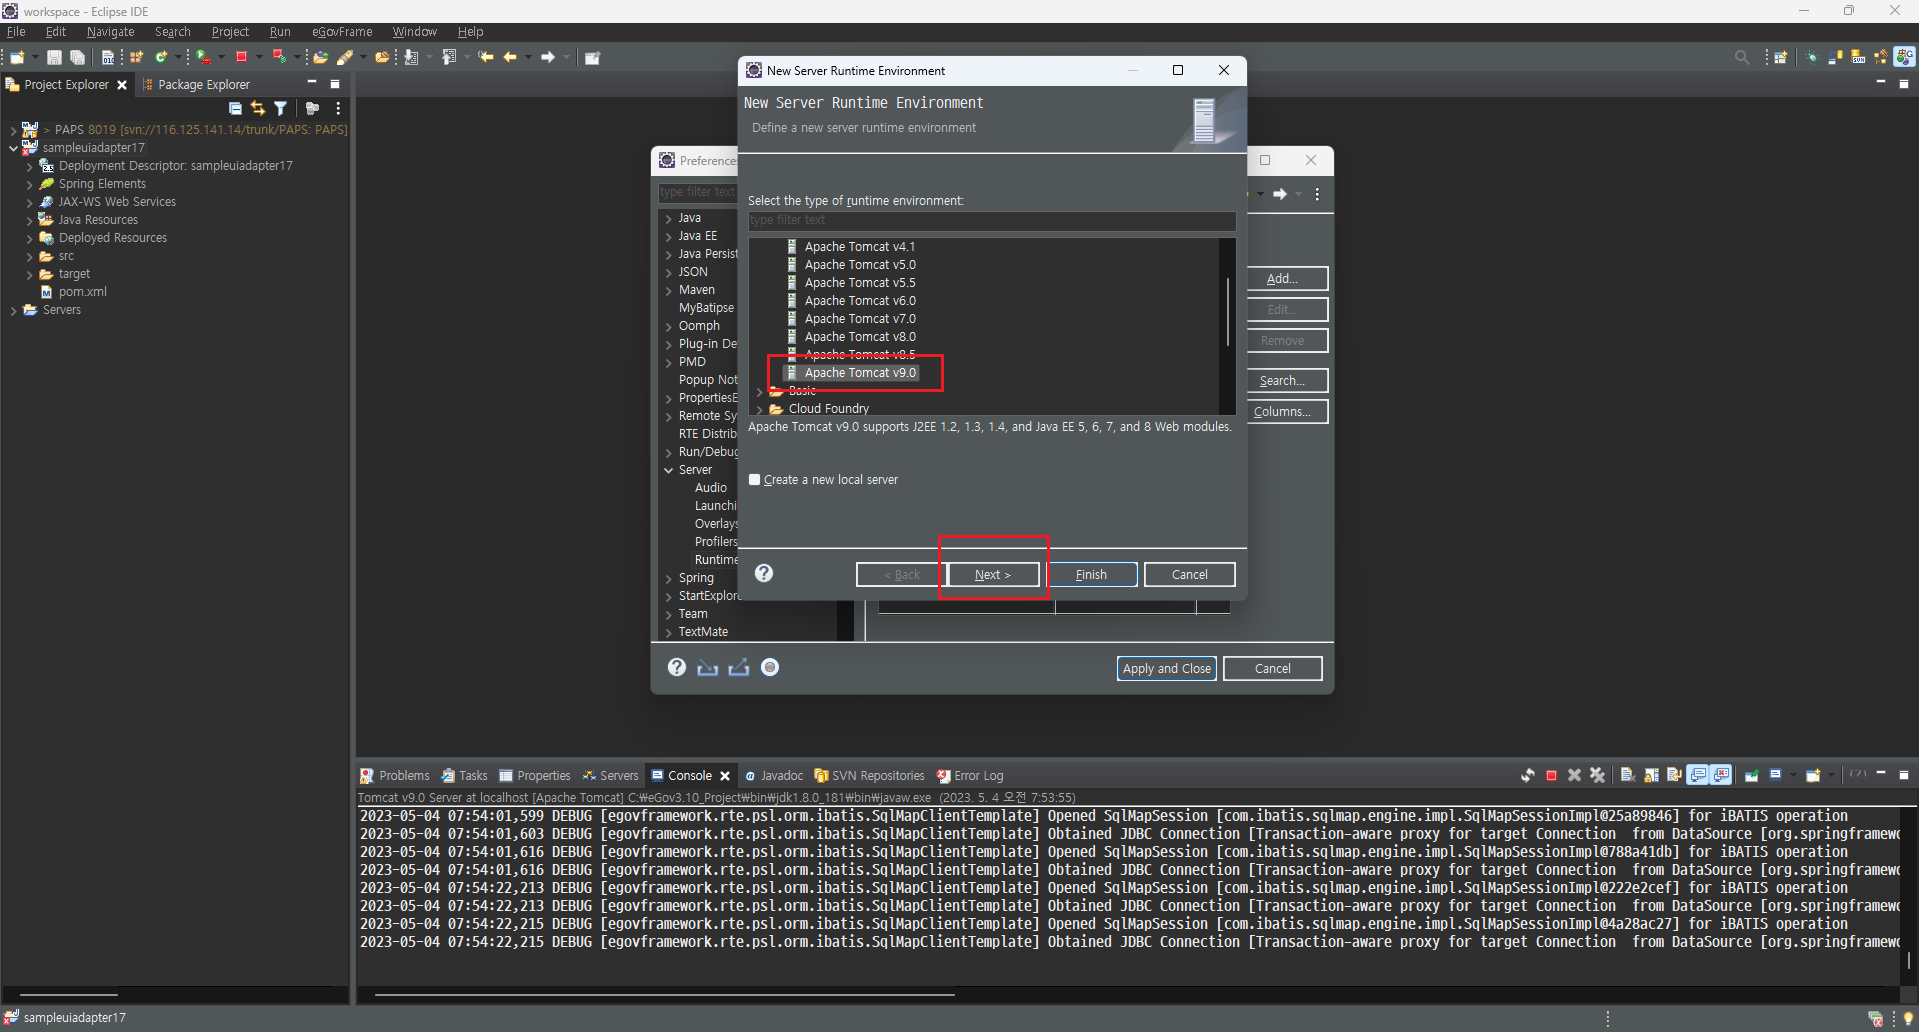

사용하고 있는 서버를 이용해도 되지만 없다면 위와 같이 새로운 서버를 추가해주자.
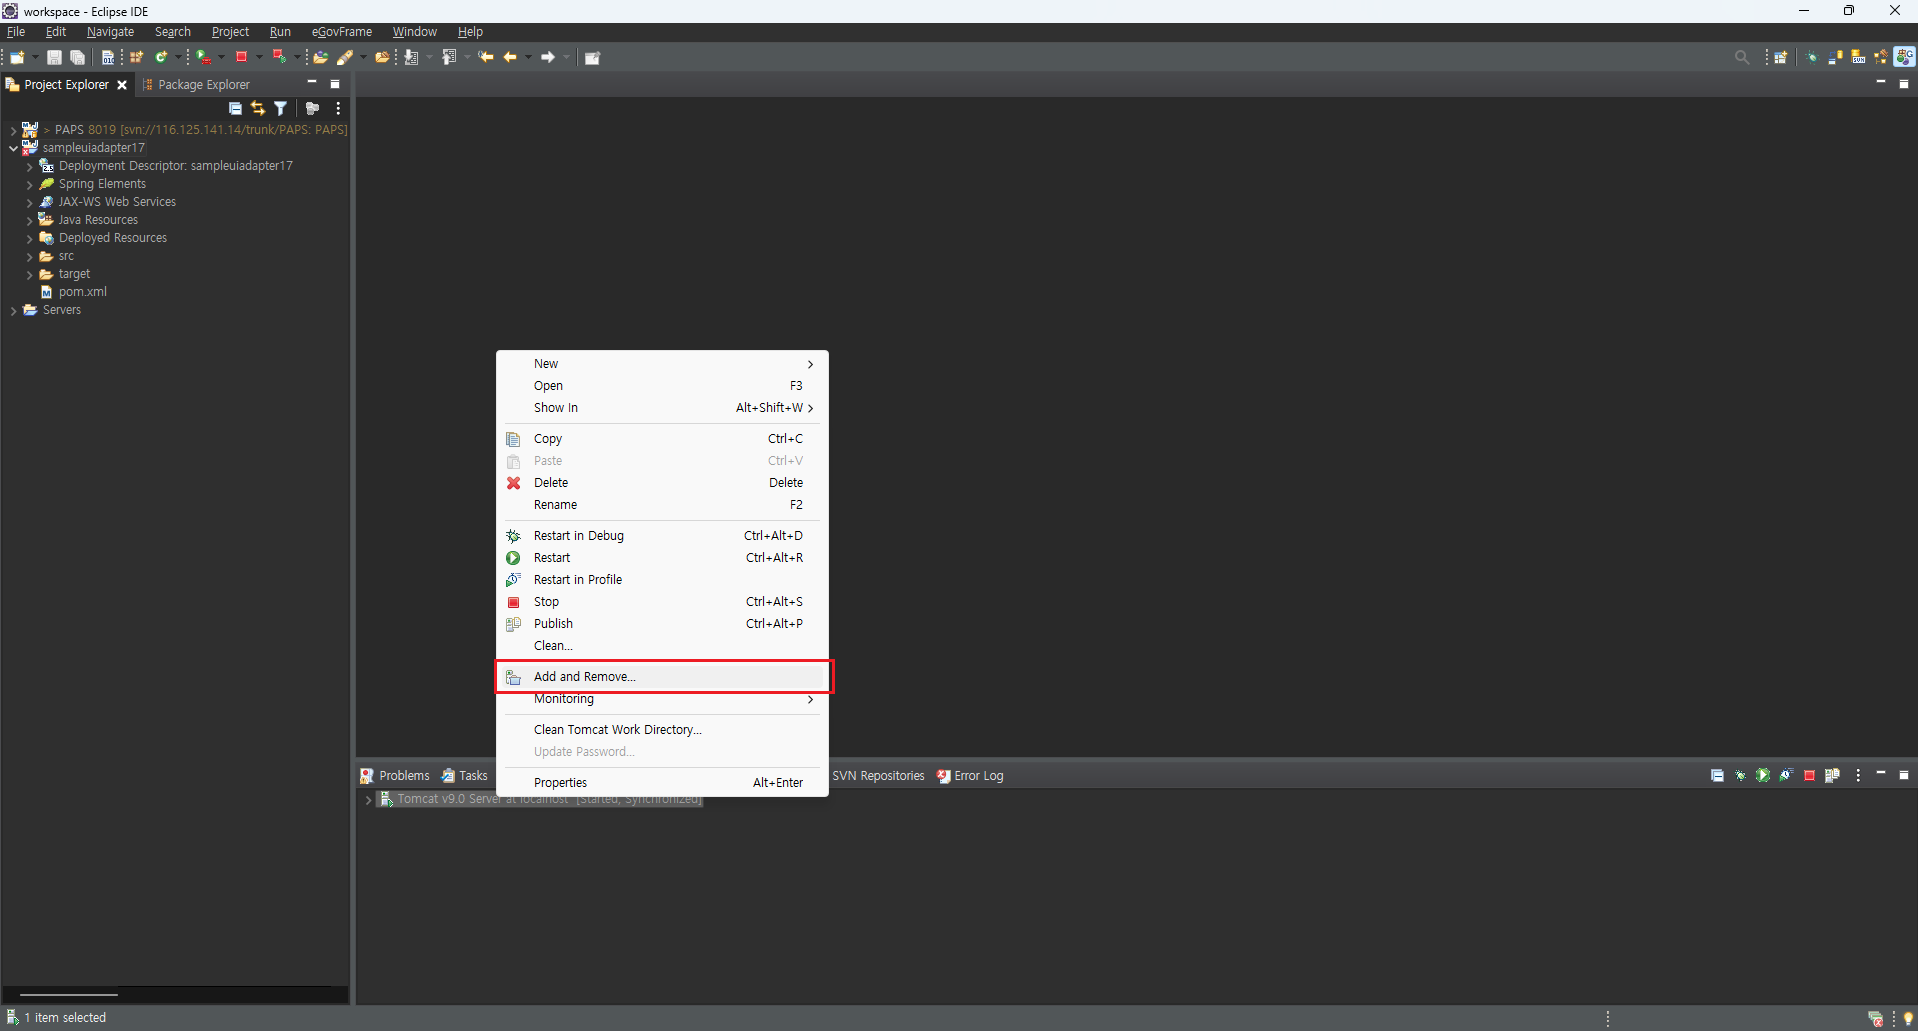
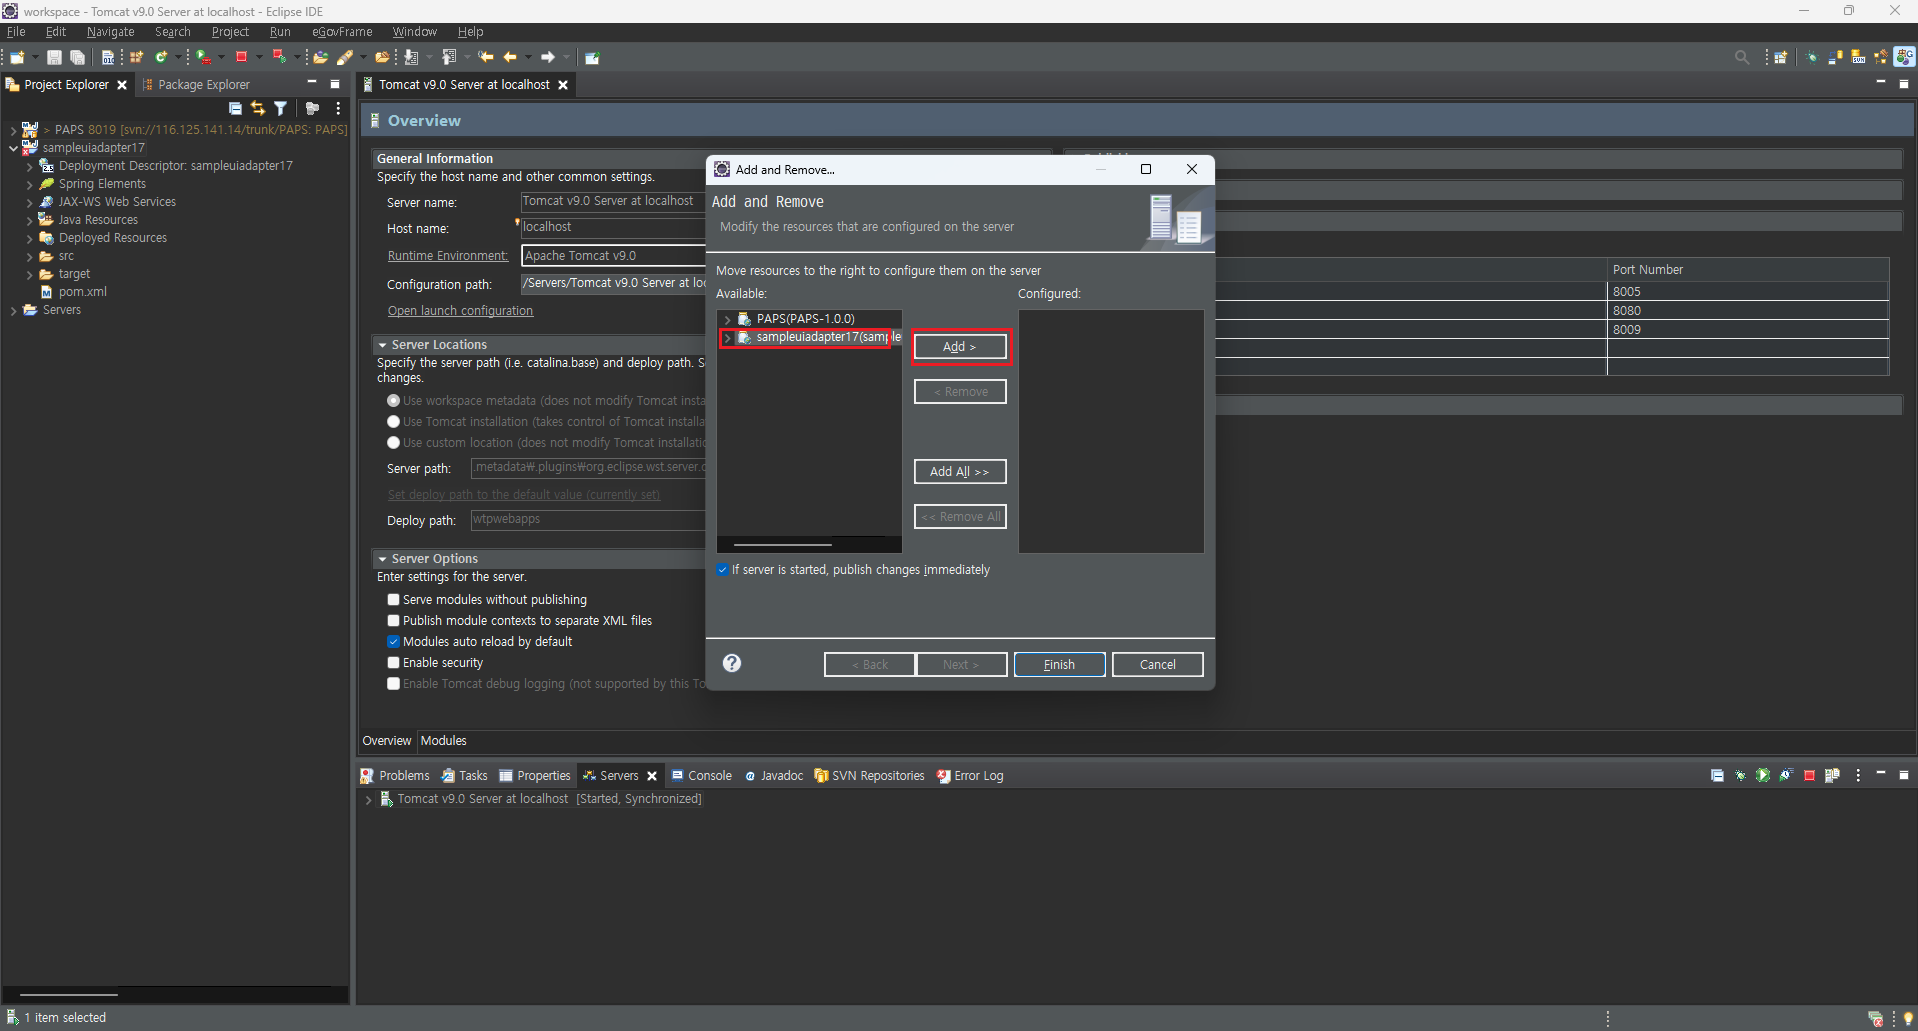
🖥️ tomcat에 project add
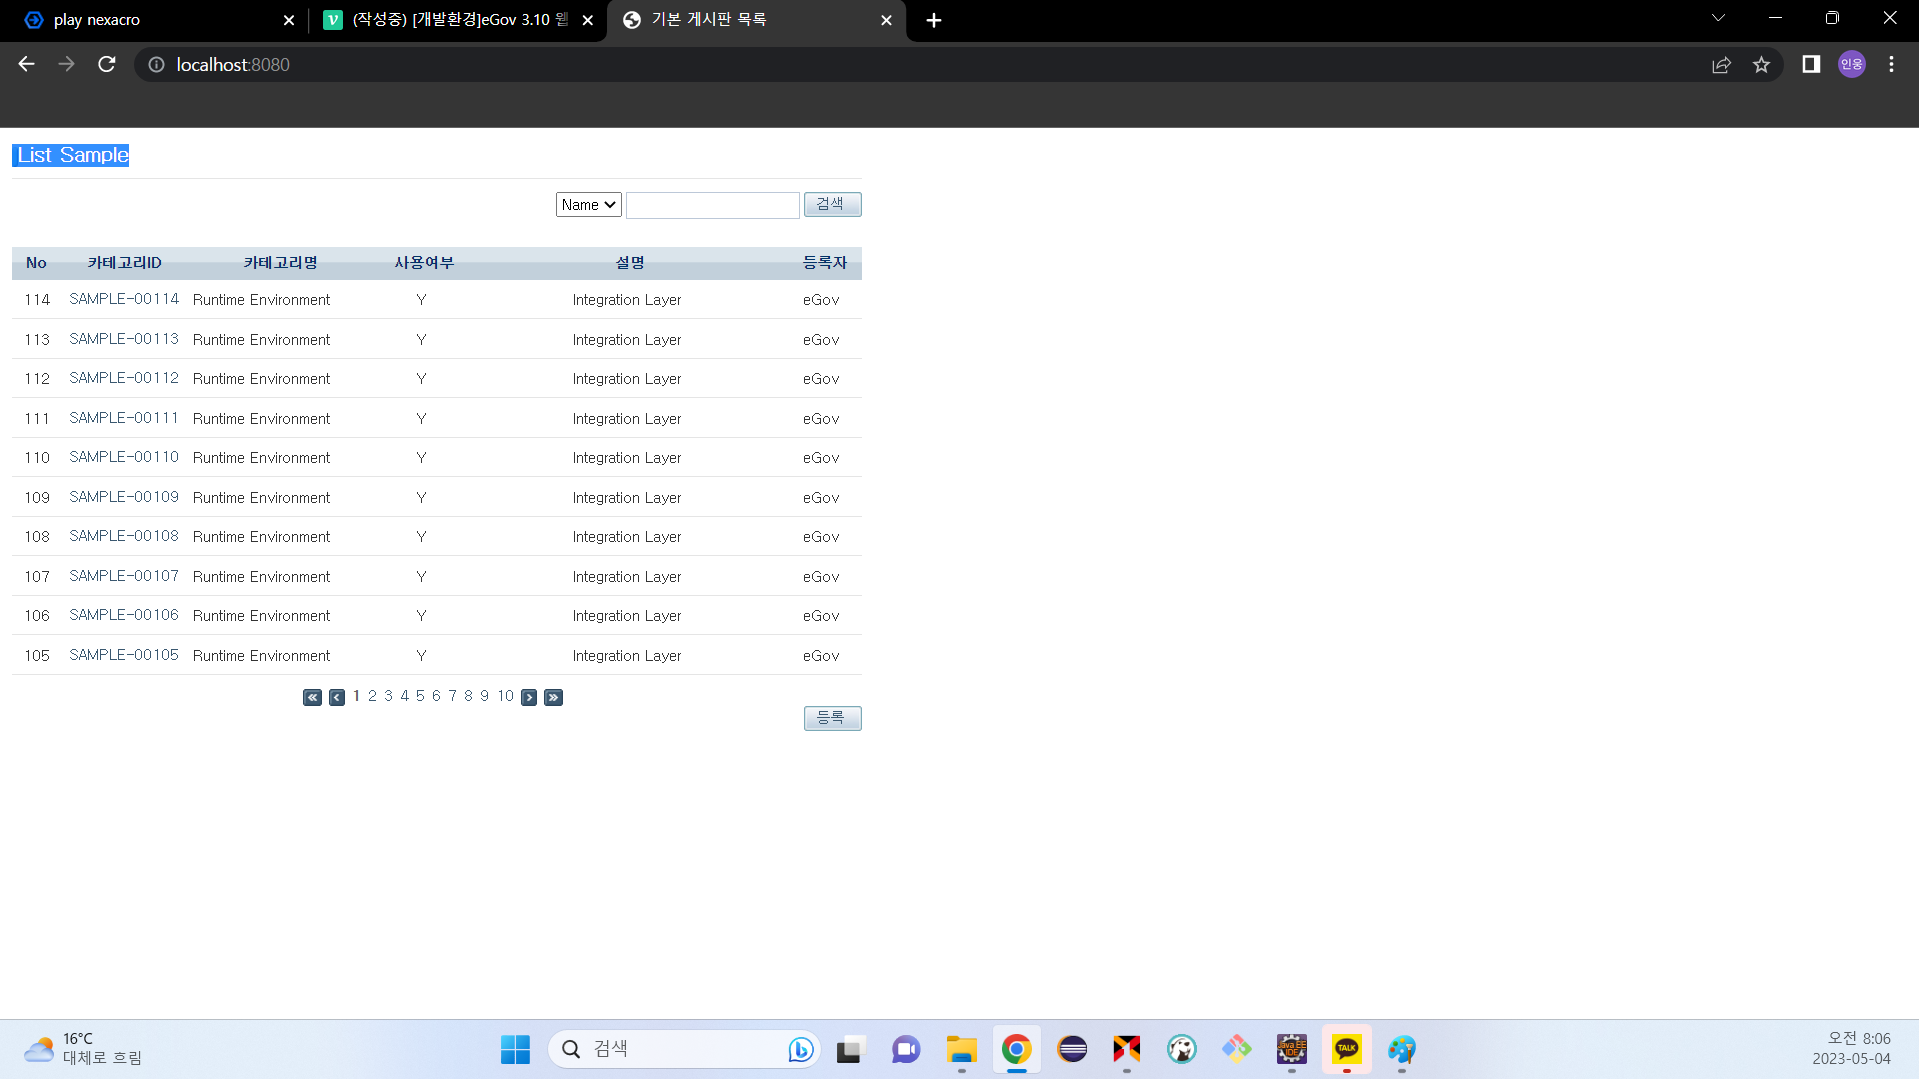
🖥️ 프로젝트 생성확인
프로젝트의 url(http://localhost:8080/"URL명칭") 접속 시 아래와 같은 화면이 출력되면 web project의 생성은 완료된 것이다.
⚡️ web project 설정
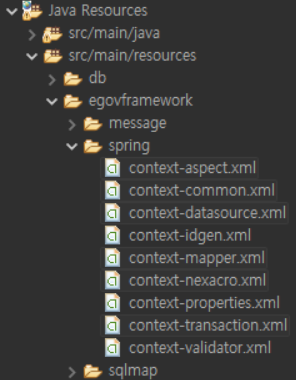
넥사크로를 연동하기 위해서는 설정해야 할 .xml 파일들이 많기 때문에 코드를 최대한 참고하여 해당 파일을 설정해주면 되겠다.
소제목에 대한 명칭은 경로 및 파일명을 표현해놓은 것이니 참고바란다.
🖥️ ser/main/resources/egovframework/spring/context-aspect.xml
기존에 있는 내용을 모두 지우고 아래 내용으로만 작성
<?xml version="1.0" encoding="UTF-8"?>
<beans xmlns="http://www.springframework.org/schema/beans" xmlns:xsi="http://www.w3.org/2001/XMLSchema-instance"
	xmlns:aop="http://www.springframework.org/schema/aop"
	xsi:schemaLocation="http://www.springframework.org/schema/beans http://www.springframework.org/schema/beans/spring-beans-4.0.xsd
        http://www.springframework.org/schema/aop http://www.springframework.org/schema/aop/spring-aop-4.0.xsd">

</beans>
🖥️ ser/main/resources/egovframework/spring/context-common.xml
@Controller의 스캔범위를 지정해준다.
<?xml version="1.0" encoding="UTF-8"?>
<beans xmlns="http://www.springframework.org/schema/beans" xmlns:xsi="http://www.w3.org/2001/XMLSchema-instance" xmlns:context="http://www.springframework.org/schema/context" xsi:schemaLocation="http://www.springframework.org/schema/beans http://www.springframework.org/schema/beans/spring-beans-4.0.xsd
        http://www.springframework.org/schema/context http://www.springframework.org/schema/context/spring-context-4.0.xsd">

    <!-- controller mapping -->
	<context:component-scan base-package="[스캔하고자하는 패키지명]">
		<context:exclude-filter type="annotation" expression="org.springframework.stereotype.Controller" />
	</context:component-scan>
    <!-- /.controller mapping -->

	<bean id="messageSource" class="org.springframework.context.support.ReloadableResourceBundleMessageSource">
		<property name="basenames">
			<list>
				<value>classpath:/egovframework/message/message-common</value>
				<value>classpath:/egovframework/rte/fdl/idgnr/messages/idgnr</value>
				<value>classpath:/egovframework/rte/fdl/property/messages/properties</value>
			</list>
		</property>
		<property name="cacheSeconds">
			<value>60</value>
		</property>
	</bean>

	<bean id="leaveaTrace" class="egovframework.rte.fdl.cmmn.trace.LeaveaTrace">
		<property name="traceHandlerServices">
			<list>
				<ref bean="traceHandlerService" />
			</list>
		</property>
	</bean>

	<bean id="traceHandlerService" class="egovframework.rte.fdl.cmmn.trace.manager.DefaultTraceHandleManager">
		<property name="reqExpMatcher">
			<ref bean="antPathMater" />
		</property>
		<property name="patterns">
			<list>
				<value>*</value>
			</list>
		</property>
		<property name="handlers">
			<list>
				<ref bean="defaultTraceHandler" />
			</list>
		</property>
	</bean>

	<bean id="antPathMater" class="org.springframework.util.AntPathMatcher" />
	<bean id="defaultTraceHandler" class="egovframework.rte.fdl.cmmn.trace.handler.DefaultTraceHandler" />

</beans>
🖥️ ser/main/resources/egovframework/spring/context-datasource.xml
사용하고자 하는 JNDI를 매핑해준다.
<?xml version="1.0" encoding="UTF-8"?>
<beans xmlns="http://www.springframework.org/schema/beans"
    	xmlns:xsi="http://www.w3.org/2001/XMLSchema-instance"
    	xmlns:p="http://www.springframework.org/schema/p"
    	xmlns:jee="http://www.springframework.org/schema/jee"
    	xmlns:tx="http://www.springframework.org/schema/tx"
    	xsi:schemaLocation="http://www.springframework.org/schema/beans
                			http://www.springframework.org/schema/beans/spring-beans.xsd
                			http://www.springframework.org/schema/jee
			                http://www.springframework.org/schema/jee/spring-jee.xsd
			                http://www.springframework.org/schema/tx
			                http://www.springframework.org/schema/tx/spring-tx.xsd">

	<jee:jndi-lookup id="dataSource" jndi-name="jdbc/[DB이름]" expected-type="javax.sql.DataSource" />

</beans>
🖥️ ser/main/resources/egovframework/spring/context-mapper.xml
SqlSessionFactoryBean을 설정하고, 매퍼로 등록될 bean들의 패키지 경로를 매핑해주자.
<?xml version="1.0" encoding="UTF-8"?>
<beans xmlns="http://www.springframework.org/schema/beans" xmlns:xsi="http://www.w3.org/2001/XMLSchema-instance"
	xsi:schemaLocation="http://www.springframework.org/schema/beans http://www.springframework.org/schema/beans/spring-beans-4.0.xsd">

	<!-- SqlSession setup for MyBatis Database Layer -->
	<bean id="sqlSession" class="org.mybatis.spring.SqlSessionFactoryBean">
		<property name="dataSource" ref="dataSource" />
		<property name="configLocation" value="classpath:/egovframework/sqlmap/sql-mapper-config.xml" />
      	<!-- 현재까지 등록된 mapper.xml이 없는 경우 주석으로 처리해주어야 에러가 발생하지 않는다. -->
		<property name="mapperLocations" value="classpath:/egovframework/sqlmap/mappers/*.xml" />
	</bean>

	<!-- MapperConfigurer setup for MyBatis Database Layer with @Mapper("deptMapper") in DeptMapper Interface -->
 	<bean class="egovframework.rte.psl.dataaccess.mapper.MapperConfigurer">
		<property name="basePackage" value="[패키지경로]" />
	</bean>
</beans>
🖥️ ser/main/resources/egovframework/spring/context-nexacro-xml
Spring의 ApplicationContext에 대한 설정 및 DBMS 매핑정보를 설정한다.
<?xml version="1.0" encoding="UTF-8"?>
<beans xmlns="http://www.springframework.org/schema/beans"
    xmlns:p="http://www.springframework.org/schema/p"
    xmlns:xsi="http://www.w3.org/2001/XMLSchema-instance"
    xmlns:aop="http://www.springframework.org/schema/aop"
    xsi:schemaLocation="
        http://www.springframework.org/schema/beans http://www.springframework.org/schema/beans/spring-beans-4.0.xsd
        http://www.springframework.org/schema/aop http://www.springframework.org/schema/aop/spring-aop-4.0.xsd
        ">

	<bean id="applicationContextProvider" class="com.nexacro.uiadapter.spring.core.context.ApplicationContextProvider" lazy-init="false" />

	<bean id="postgreDbms"  class="com.nexacro.uiadapter.spring.dao.dbms.Postgre" />

	<!-- DBMS 목록
	<bean id="hsqlDbms"   class="com.nexacro.uiadapter.spring.dao.dbms.Hsql" />
	<bean id="oracleDbms" class="com.nexacro.uiadapter.spring.dao.dbms.Oracle" />
	<bean id="mysqlDbms"  class="com.nexacro.uiadapter.spring.dao.dbms.Mysql" />
		/.DBMS 목록-->


	<bean id="dbmsProvider" class="com.nexacro.uiadapter.spring.dao.DbVendorsProvider">
	    <property name="dbvendors">
	        <map>
	            <entry key="PostgreSQL" value-ref="postgreDbms"/>
				<!-- DBMS Provider 목록
				<entry key="HSQL Database Engine" value-ref="hsqlDbms"/>
				<entry key="Oracle" 	value-ref="oracleDbms"/>
				<entry key="MySQL" 		value-ref="mysqlDbms"/>
	            	/. DBMS Provider 목록-->
	        </map>
	    </property>
	</bean>

</beans>
🖥️ ser/main/resources/egovframework/spring/context-transaction.xml
트랜잭션 처리를 위한 패키지 경로 매핑을 해주자.
<?xml version="1.0" encoding="UTF-8"?>
<beans xmlns="http://www.springframework.org/schema/beans" xmlns:xsi="http://www.w3.org/2001/XMLSchema-instance"
	xmlns:tx="http://www.springframework.org/schema/tx"
	xmlns:aop="http://www.springframework.org/schema/aop"
	xsi:schemaLocation="http://www.springframework.org/schema/beans http://www.springframework.org/schema/beans/spring-beans-4.0.xsd
    	http://www.springframework.org/schema/tx http://www.springframework.org/schema/tx/spring-tx-4.0.xsd
    	http://www.springframework.org/schema/aop http://www.springframework.org/schema/aop/spring-aop-4.0.xsd">

	<bean id="txManager" class="org.springframework.jdbc.datasource.DataSourceTransactionManager">
		<property name="dataSource" ref="dataSource"/>
	</bean>

	<tx:advice id="txAdvice" transaction-manager="txManager">
		<tx:attributes>
			<tx:method name="*" rollback-for="Exception"/>
		</tx:attributes>
	</tx:advice>

	<aop:config>
		<aop:pointcut id="requiredTx" expression="execution(* [패키지명]..impl.*Impl.*(..))"/>
		<aop:advisor advice-ref="txAdvice" pointcut-ref="requiredTx" />
	</aop:config>

</beans>
여기까지 따라왔다면 eGovFrame web project와 nexacro의 기본적인 세팅에 대한 부분은 완료한 것이다. 게시글이 너무 길어지기 때문에 다음 게시글에서 필터, 서블릿, 라이브러리 다운 등에 대하여 추가적으로 알아보고 설정을 마무리 해보자.
그럼 이만.👊🏽