[JWT] JWT 구현하기(Feat. Redis) (1) - 개발환경 & Spring Security(build.gradle, application.yml, SecurityConfig.class)
JWT 구현하기

개발 환경
Spring Boot와 React를 연동하기 위해 REST API 방식으로 구현할 예정이다. 사용자의 정보를 저장하기 위해 기본적으로 MySQL를 사용하고, Refresh Token을 저장하기 위해 Redis를 사용할 예정이다. Refresh Token을 가져오기 위해 토큰 검사가 필요할 때마다 DB에 쿼리를 날리는 것은 좋지 않다고 생각해 Redis를 사용하게 되었다.
Spring Boot 2.6.5
React.js
java 11.0.9
Redis
MySQL
IDE Intellij
build.gradle
dependencies {
	// spring boot
	implementation 'org.springframework.boot:spring-boot-starter-data-jpa'
	implementation 'org.springframework.boot:spring-boot-starter-web'
	implementation 'org.springframework.boot:spring-boot-starter-validation'
	implementation 'org.projectlombok:lombok:1.18.20'
	// DB
	runtimeOnly 'com.h2database:h2'
	// spring security
	implementation 'org.springframework.boot:spring-boot-starter-security'
	// Redis
	implementation 'org.springframework.boot:spring-boot-starter-data-redis-reactive'
	// jwt
	implementation 'javax.xml.bind:jaxb-api'
	implementation 'io.jsonwebtoken:jjwt-api:0.11.1'
	runtimeOnly 'io.jsonwebtoken:jjwt-impl:0.11.1'
	runtimeOnly 'io.jsonwebtoken:jjwt-jackson:0.11.1'
	// test
	testImplementation 'org.springframework.boot:spring-boot-starter-test'
	testImplementation 'io.projectreactor:reactor-test'
	testImplementation 'org.springframework.security:spring-security-test'
}
application.yml
spring:
  redis:
    host: localhost
    port: 6379
  datasource: # local db
    url: jdbc:h2:tcp://localhost/~/test
    username: sa
    password:
    driver-class-name: org.h2.Driver
  jpa:
    hibernate:
      ddl-auto: create
    properties:
      hibernate:
        format_sql: true

logging.level:
  org.hibernate.SQL: debug

jwt:
  secret: {임의의 문자열을 Base64로 인코딩한 값}
  refresh-token-validity-in-seconds: 1209600 # 14일
  access-token-validity-in-seconds: 43200 # 12시간
Redis와 JWT를 사용하기 위한 값이다. JPA Debug, DB 설정과 같은 추가적인 값들은 따로 작성하지 않겠다.
spring.redis: Redis 연결을 위한 설정 값.jwt.secret: 서명에 사용할 시크릿 키 값. HS512 알고리즘을 사용하기 때문에, Secret Key는 64Byte 이상 되어야 한다.jwt.refresh-token-validity-in-seconds,access-token-validity-in-seconds: 각각 Refresh Token과 Access Token의 유효 시간을 초(second) 단위로 나타낸 값.
Spring Security
인증(Authentication)과 인가(Authorization)
- 인증: 해당 사용자가 본인이 맞는지 확인하는 과정
- 인가: 해당 사용자가 요청하는 자원을 실행할 수 있는 권한이 있는가를 확인하는 과정
Spring Security는 기본적으로 인증 절차를 거친 후에 인가 절차를 진행하며, 인가 과정에서 해당 리소스에 접근 권한이 있는지 확인하게 된다. Spring Security에서는 이러한 인증과 인가를 위해 Principal(접근 주체)을 아이디로, Credential(비밀번호)을 비밀번호로 사용하는 Credential 기반의 인증 방식을 사용한다.
Authentication Architecture
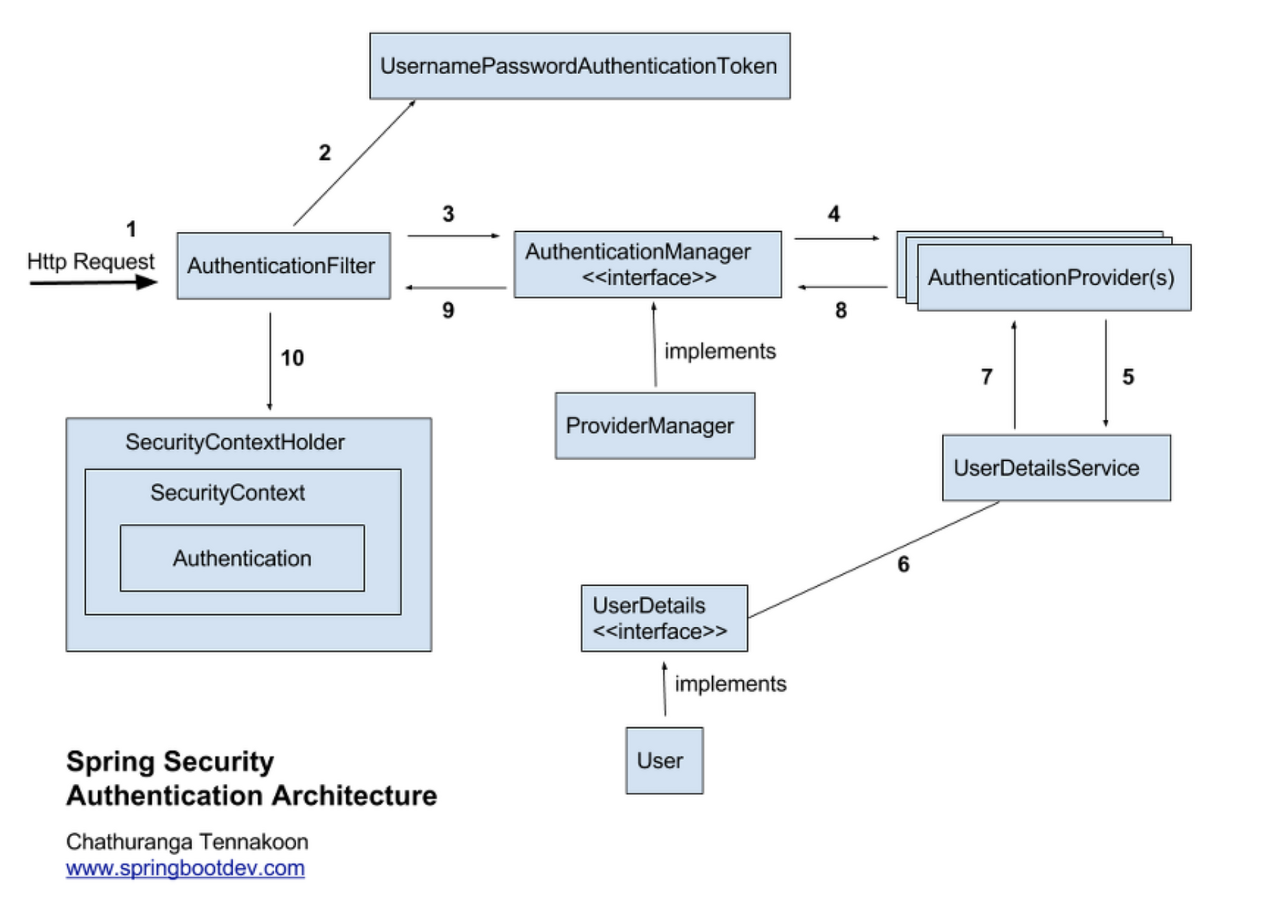
Spring Security는 '인증'과 '권한'에 대한 부분을 필터(Filter) 흐름에 따라 처리한다. 요청이 들어오면, 인증과 권한을 위한 필터들을 통하게 된다. 유저가 인증을 요청할때 필터는 인증 메커니즘과 모델을 기반으로 한 필터들을 통과한다.
Client (request) → Filter → DispatcherServlet → Interceptor → Controller
Filter는 Dispatcher Servlet으로 가기 전에 적용되므로 가장 먼저 URL 요청을 받지만, (웹 컨테이너에서 관리)
Interceptor는 Dispatcher와 Controller 사이에 위치한다는 점에서 적용 시기의 차이가 있다. (스프링 컨테이너에서 관리)
1. 사용자가 로그인 정보와 함께 인증 요청을 한다.
2. AuthenticationFilter가 요청을 가로채고, 가로챈 정보를 통해 UsernamePasswordAuthenticationToken의 인증용 객체를 생성한다.
3. AuthenticationManager의 구현체인 ProviderManager에게 생성한 UsernamePasswordToken 객체를 전달한다. 4. AuthenticationManager는 등록된 AuthenticationProvider를 조회하여 인증을 요구한다.
5. 실제 DB에서 사용자 인증정보를 가져오는 UserDetailsService에 사용자 정보를 넘겨준다.
6. 넘겨받은 사용자 정보를 통해 DB에서 찾은 사용자 정보인 UserDetails 객체를 만든다.
7. AuthenticationProvider는 UserDetails를 넘겨받고 사용자 정보를 비교한다.
8. 인증이 완료되면 권한 등의 사용자 정보를 담은 Authentication 객체를 반환한다.
9. 다시 최초의 AuthenticationFilter에 Authentication 객체가 반환된다.
10. Authenticaton 객체를 SecurityContext에 저장한다.
Security Filter Chain
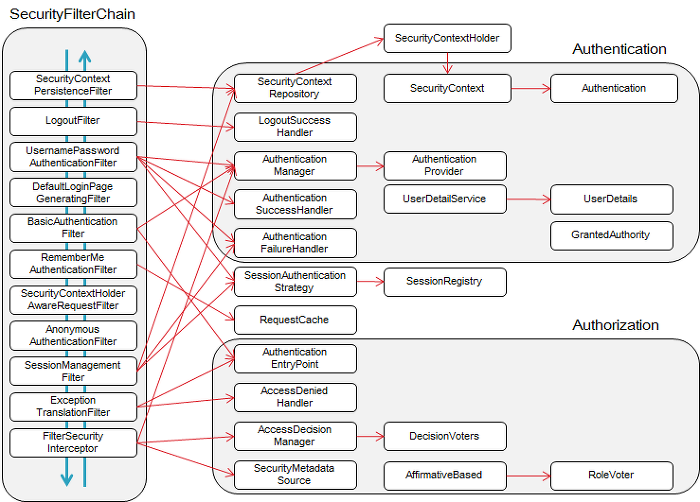
- SecurityContextPersistenceFilter - 요청(request)전에, SecurityContextRepository에서 받아온 정보를 SecurityContextHolder에 주입합니다.
- LogoutFilter - 주체(Principal)의 로그아웃을 진행합니다. 주체는 보통 유저를 말합니다.
- UsernamePasswordAuthenticationFilter - (로그인) 인증 과정을 진행합니다.
- DefaultLoginPageGeneratingFilter - 사용자가 별도의 로그인 페이지를 구현하지 않은 경우, 스프링에서 기본적으로 설정한 로그인 페이지를 처리합니다.
- BasicAuthenticationFilter - HTTP 요청의 (BASIC)인증 헤더를 처리하여 결과를 SecurityContextHolder에 저장합니다.
- RememberMeAuthenticationFilter - SecurityContext에 인증(Authentication) 객체가 있는지 확인하고 RememberMeServices를 구현한 객체의 요청이 있을 경우, Remember-Me(ex 사용자가 바로 로그인을 하기 위해서 저장 한 아이디와 패스워드)를 인증 토큰으로 컨텍스트에 주입합니다.
- AnonymousAuthenticationFilter - SecurityContextHolder에 인증(Authentication) 객체가 있는지 확인하고, 필요한 경우 익명 사용자로 Authentication 객체를 주입합니다.(Authentication이 Null인 것을 방지)
- SessionManagementFilter - 요청이 시작된 이후 인증된 사용자인지 확인하고, 인증된 사용자일 경우SessionAuthenticationStrategy를 호출하여 세션 고정 보호 메커니즘을 활성화하거나 여러 동시 로그인을 확인하는 것과 같은 세션 관련 활동을 수행합니다.
- ExceptionTranslationFilter - 필터 체인 내에서 발생(Throw)되는 모든 예외(AccessDeniedException, AuthenticationException)를 처리합니다.
- FilterSecurityInterceptor - HTTP 리소스의 보안 처리를 수행한다. 사용자가 요청한 request에 들어가고 결과를 리턴해도 되는 권한(Authorization)이 있는지를 검사합니다. 해당 필터에서 권한이 없다는 결과가 나온다면 위의 ExcpetionTranslationFilter필터에서 Exception을 처리해줍니다.
SecurityConfig.class
Spring Security 5.70 이후부터 WebSecurityConfigurerAdapter를 상속 받는 방식은 deprecated되었기 때문에, 공식 문서를 참고해 SecurityConfig를 작성해보았다.
@Configuration
@EnableWebSecurity // Spring Security 설정 클래스
@EnableGlobalMethodSecurity(securedEnabled = true)
@RequiredArgsConstructor
public class SecurityConfig {

    private final JwtTokenProvider jwtTokenProvider;
    private final JwtAccessDeniedHandler jwtAccessDeniedHandler;
    private final JwtAuthenticationEntryPoint jwtAuthenticationEntryPoint;

    @Bean
    public BCryptPasswordEncoder encoder() {
	// 비밀번호를 DB에 저장하기 전 사용할 암호화
        return new BCryptPasswordEncoder();
    }

    @Bean
    public WebSecurityCustomizer webSecurityCustomizer() {
        // ACL(Access Control List, 접근 제어 목록)의 예외 URL 설정
        return (web)
                -> web
                .ignoring()
                .requestMatchers(PathRequest.toStaticResources().atCommonLocations()); // 정적 리소스들
    }

    @Bean
    public SecurityFilterChain securityFilterChain(HttpSecurity http) throws Exception {
        // 인터셉터로 요청을 안전하게 보호하는 방법 설정
        http
                // jwt 토큰 사용을 위한 설정
                .csrf().disable()
                .httpBasic().disable()
                .formLogin().disable()
                .addFilterBefore(new JwtAuthenticationFilter(jwtTokenProvider), UsernamePasswordAuthenticationFilter.class)
                .sessionManagement().sessionCreationPolicy(SessionCreationPolicy.STATELESS)

                // 예외 처리
                .and()
                .exceptionHandling()
                .authenticationEntryPoint(jwtAuthenticationEntryPoint) //customEntryPoint
                .accessDeniedHandler(jwtAccessDeniedHandler) // cutomAccessDeniedHandler

                .and()
                .authorizeRequests() // '인증'이 필요하다
                .antMatchers("/api/mypage/**").authenticated() // 마이페이지 인증 필요
                .antMatchers("/api/admin/**").hasRole("ADMIN") // 관리자 페이지
                .anyRequest().permitAll()

                .and()
                .headers()
                .frameOptions().sameOrigin();

        return http.build();
    }

    @Bean
    public AuthenticationManager authenticationManager(AuthenticationConfiguration authenticationConfiguration) throws Exception {
        return authenticationConfiguration.getAuthenticationManager();
    }

}
API별 권한 제어 방법
@EnableGlobalMethodSecurity(securedEnabled = true)로 사용할 수 있다. Controller에 @Secured("권한 이름") 어노테이션으로 설정이 가능하다.
@Secured("ROLE_ADMIN")
@GetMapping("/api/admin")
public ResponseEntity<String> adminTest() { {
	// ...
}UserDetailsImpl에권한(Authority)정보를 담아줄 수 있다.- 1개 이상 설정 가능
“권한 이름”규칙ROLE_로 시작해야 한다 (ex.ROLE_ADMIN,ROLE_USER)
// 예시
public class UserDetailsImpl implements UserDetails {

    @Override
    public Collection<? extends GrantedAuthority> getAuthorities() {
        Collection<GrantedAuthority> authorities = new ArrayList<>();
        authorities.add(() -> user.getRole()); // key: ROLE_권한
        return authorities;
    }

    // ...
}
CSRF(Cross Site Request Forgery)
사이트간 위조 요청으로, 정상적인 사용자가 의도하지 않은 위조 요청을 보내는 것을 의미한다. Spring Security는 CSRF protection 기능을 default로 설정한다. Spring Security는 이 기능을 사용해 GET 요청을 제외한, 상태를 변화시킬 수 있는 POST, PUT, DELETE 요청으로부터 CSRF를 보호한다. CSRF protection은 CSRF Token을 발급 후, 클라이언트로부터 요청을 받을 때마다 해당 요청을 검증하는 방식이다. HTML에 다음과 같은 CSRF Token이 포함되어야 요청을 받아들임으로써 위조 요청을 방지한다.
<input type="hidden" name="${_csrf.parameterName}" value="${_csrf.token}"/>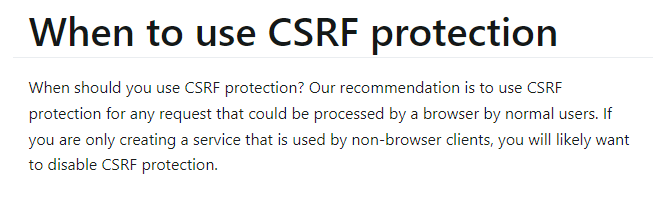 Spring Security Documentation에서는 non-broswer client가 사용하는 서비스라면 CSRF를 disable하여도 좋다고 한다. 이 이유는 REST API를 이용한 서버라면, session 기반 인증과는 달리 stateless하기 때문에, 서버에 인증 정보를 보관하지 않는다. REST API라면 클라이언트는 권한이 필요한 요청을 하기 위해서 요청에 필요한 인증 정보를 OAuth2.0, JWT 토큰 등에 포함시켜야 한다. 따라서, 서버에 인증 정보를 저장하지 않기 때문에 불필요한 CSRF 코드를 작성할 필요가 없다.
JWT 토큰을 사용할 것이기 때문에, http.csrf().disable()를 통해 Spring Security가 CSRF protection 기능을 사용하지 않게 했다.
Rest API 사용을 위한 설정
httpBasic().disable(): Http basic Auth 기반의 로그인 인증 창. 비인증시 로그인폼 화면으로 리다이렉트한다. REST API 방식을 사용할 것이므로 사용하지 않는다.formLogin().disable(): 일반적인 로그인 방식, 즉 ID/Password 로그인 방식 사용을 의미한다. REST API 방식을 사용할 것이므로 사용하지 않는다.sessionManagement().sessionCreationPolicy(SessionCreationPolicy.STATELESS): STATELESS로 세션 정책을 설정한다는 것은, 세션쿠키 방식의 인증 메커니즘 방식을 사용하지 않겠다는 것을 의미한다. 인증에 성공한 이후라도 클라이언트가 다시 어떤 자원에 접근을 시도할 경우, SecurityContextPersistenceFilter는 세션 존재 여부를 무시하고 항상 새로운 SecurityContext 객체를 생성하기 때문에 인증성공 당시 SecurityContext에 저장했던 Authentication 객체를 더 이상 참조 할 수 없게 된다.(참고)
예외 처리
.exceptionHandling()
.authenticationEntryPoint(jwtAuthenticationEntryPoint) //customEntryPoint
.accessDeniedHandler(jwtAccessDeniedHandler) // cutomAccessDeniedHandlerauthenticationEntryPoint: 401 에러 핸들링을 위한 설정accessDeniedHandler: 403 에러 핸들링을 위한 설정
리소스(URL)의 권한 설정
.authorizeRequests() // '인증'이 필요하다
.antMatchers("/api/mypage/**").authenticated() // 마이페이지 인증 필요
.antMatchers("/api/admin/**").hasRole("ADMIN") // 관리자 페이지
.anyRequest().permitAll()
우선 특정 리소스에 대해 권한을 설정할 수 있다.
anyRequest(): 그 외 나머지 리소스들을 의미한다.authenticated(): 인증을 완료해야 접근을 허용한다.hasRole("권한"): 특정 레벨의 권한을 가진 사용자만 접근을 허용한다.(SecurityContext에 저장했던 Authentication 객체의 Authorities를 검사한다.)permitAll(): 인증 절차 없이 접근을 허용한다.
참고
Spring Security - Filter, FilterChain
[Spring Security] Filter란?
Spring Security의 구조(Architecture) 및 처리 과정 알아보기

안녕하세요
전부 따라서 코딩해봤는데 Authentication authentication = authenticationManagerBuilder.getObject().authenticate(authenticationToken); 여기 메서드타서 UserDetailsServiceImpl -> AbstractAuthenticatinToken까지 가서 setAuthenticated 메서드에서 최종 오류가 발생하는데 혹시 이유를 알 수 있을까요?(오류 관련 내용이 예외로 터지거나 인텔리제이 로그에찍히지는 않지만 브라우저 콘솔쪽에만 401에러로 반환됩니다)
추가로 DB의 암호화된 비밀번호와 사용자 입력 비밀번호를 매칭하는 메서드가 안 보여서 어느 구간에서 진행하는건지도 궁금합니다.