예비군 끝나고 쉴까 했지만 한번 놔버리면 계속 놔버린다는걸
이때까지 많이 느껴왔기 때문에 할건해야지..
주문
{
  "orderProducts": [
    {
      "productId": 0,
      "quantity": 0
    }
  ]
}
주문한 상품들의 상품ID, 수량을 넣어주면 주문이 들어가고,
{
    "body": {
        "order": {
            "id": 38,
            "orderNumber": "2306209A2E50794",
            "customerId": "test1",
            "name": "어드민12",
            "phoneNumber": "01085452591",
            "email": "abc@naver.com",
            "address": "울산 북구 죽전로 2",
            "addressDetail": "1동",
            "orderDt": "2023-06-20 20:04:05",
            "orderStatus": "ORDER",
            "totalAmount": 200000,
            "orderProducts": [
                {
                    "productId": 144,
                    "quantity": 2
                }
            ]
        }
    }
}
백엔드에서 응답값으로 주문번호 생성, 결제모듈에 필요한 데이터들을 반환해준다.
결제모듈을 붙이기 전에 TypeScript로 구현중이라 포트원 API를 타입지정 해줘야 했는데
https://velog.io/@gunilna/%ED%8F%AC%ED%8A%B8%EC%9B%90-Front-end-%EC%97%B0%EB%8F%99%ED%95%98%EA%B8%B0
위 블로그를 참고해 작성했다.
타입정의
export interface RequestPayAdditionalParams {
  digital?: boolean;
  vbank_due?: string;
  m_redirect_url?: string;
  app_scheme?: string;
  biz_num?: string;
}

export interface Display {
  card_quota?: number[];
}

export interface RequestPayParams extends RequestPayAdditionalParams {
  pg?: string;
  pay_method: string;
  escrow?: boolean;
  merchant_uid: string;
  name?: string;
  amount: number;
  custom_data?: any;
  tax_free?: number;
  currency?: string;
  language?: string;
  buyer_name?: string;
  buyer_tel: string;
  buyer_email?: string;
  buyer_addr?: string;
  buyer_postcode?: string;
  notice_url?: string | string[];
  display?: Display;
}

export interface RequestPayAdditionalResponse {
  apply_num?: string;
  vbank_num?: string;
  vbank_name?: string;
  vbank_holder?: string | null;
  vbank_date?: number;
}

export interface RequestPayResponse extends RequestPayAdditionalResponse {
  success: boolean;
  error_code: string;
  error_msg: string;
  imp_uid: string | null;
  merchant_uid: string;
  pay_method?: string;
  paid_amount?: number;
  status?: string;
  name?: string;
  pg_provider?: string;
  pg_tid?: string;
  buyer_name?: string;
  buyer_email?: string;
  buyer_tel?: string;
  buyer_addr?: string;
  buyer_postcode?: string;
  custom_data?: any;
  paid_at?: number;
  receipt_url?: string;
}

export type RequestPayResponseCallback = (response: RequestPayResponse) => void;

export interface Iamport {
  init: (accountID: string) => void;
  request_pay: (
    params: RequestPayParams,
    callback?: RequestPayResponseCallback
  ) => void;
}

declare global {
  interface Window {
    IMP?: Iamport;
  }
}
주문 및 결제모듈 띄우기
https://developers.portone.io/docs/ko/auth/guide/readme
포트원 페이지에 API 정보가 잘 나와있다.
const onSubmitOrder = async () => {
    try {
      const response = await api.post("cal/v1/order", {
        orderProducts: cartItems.map((cart) => {
          return {
            productId: cart.id,
            quantity: cart.quantity,
          };
        }),
      });
      if (response && response.data.body.order) {
        if (!window.IMP) {
          console.log("안돼");
        } else {
          const { IMP } = window;
          IMP.init("imp48116556");

          const responseData = response.data.body.order;

          const data: RequestPayParams = {
            pg: "html5_inicis.INIBillTst", // PG사 : https://portone.gitbook.io/docs/sdk/javascript-sdk/payrq#undefined-1 참고
            pay_method: "card", // 결제수단
            merchant_uid: `mid_${new Date().getTime()}`, // 주문번호
            amount: Number(`${responseData.totalAmount}`), // 결제금액
            buyer_name: `${responseData.name}`, // 구매자 이름
            buyer_tel: `${responseData.phoneNumber}`, // 구매자 전화번호
            buyer_email: `${responseData.email}`, // 구매자 이메일
            buyer_addr: `${responseData.addres} ${responseData.addressDetail}`, // 구매자 주소
          };
          IMP.request_pay(data, callback);
        }
      }
    } catch (error) {
      if (axios.isAxiosError(error)) {
        handleOpenErrorModal(error.response?.data.message);
      }
    }
  };
필요한 값들을 전달해주고 구매하기 버튼을 누르면
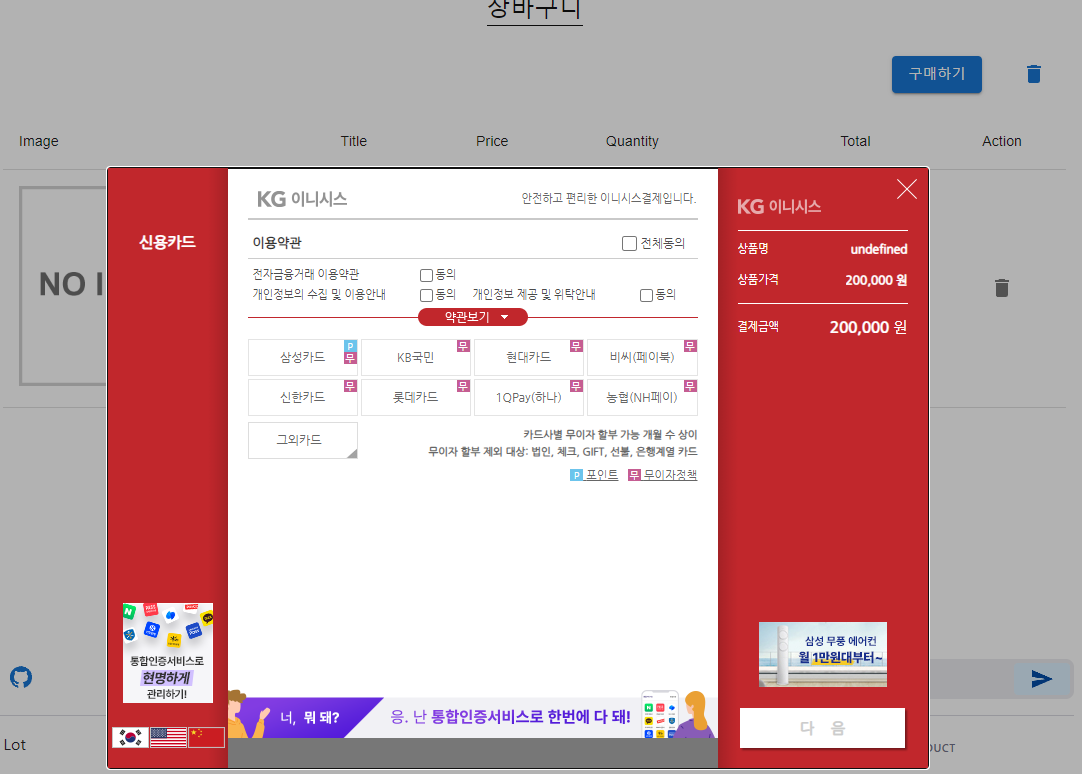
주문한 상품정보에 맞는 결제모듈 띄우기 성공
https://github.com/casealot/casealot-frontend
회고
주문확인을 어떻게 구현할지 고민을 많이 해보았는데, 주문확인 없이 바로 결제요청을 보내는것으로 합의를 봤다. 보통의 쇼핑몰에는 주문확인 페이지가 무조건 들어가있지만 프론트를 혼자 구현하고 있어 아직 구현해야 할게 너무 많이 남아있기도 하고 해봐야 주문정보 response를 뿌려주고 값을 변경하는 페이지가 전부라 이런 간단한 기능은 이번 프로젝트를 진행하면서 너무 많이 하기도했고 더이상 하는건 노가다나 다름없다고 생각했다.

구렁이