로또 추첨 App
참고 링크
- LocalDateTime
https://dev-coco.tistory.com/31 - SQLite
https://crazykim2.tistory.com/648
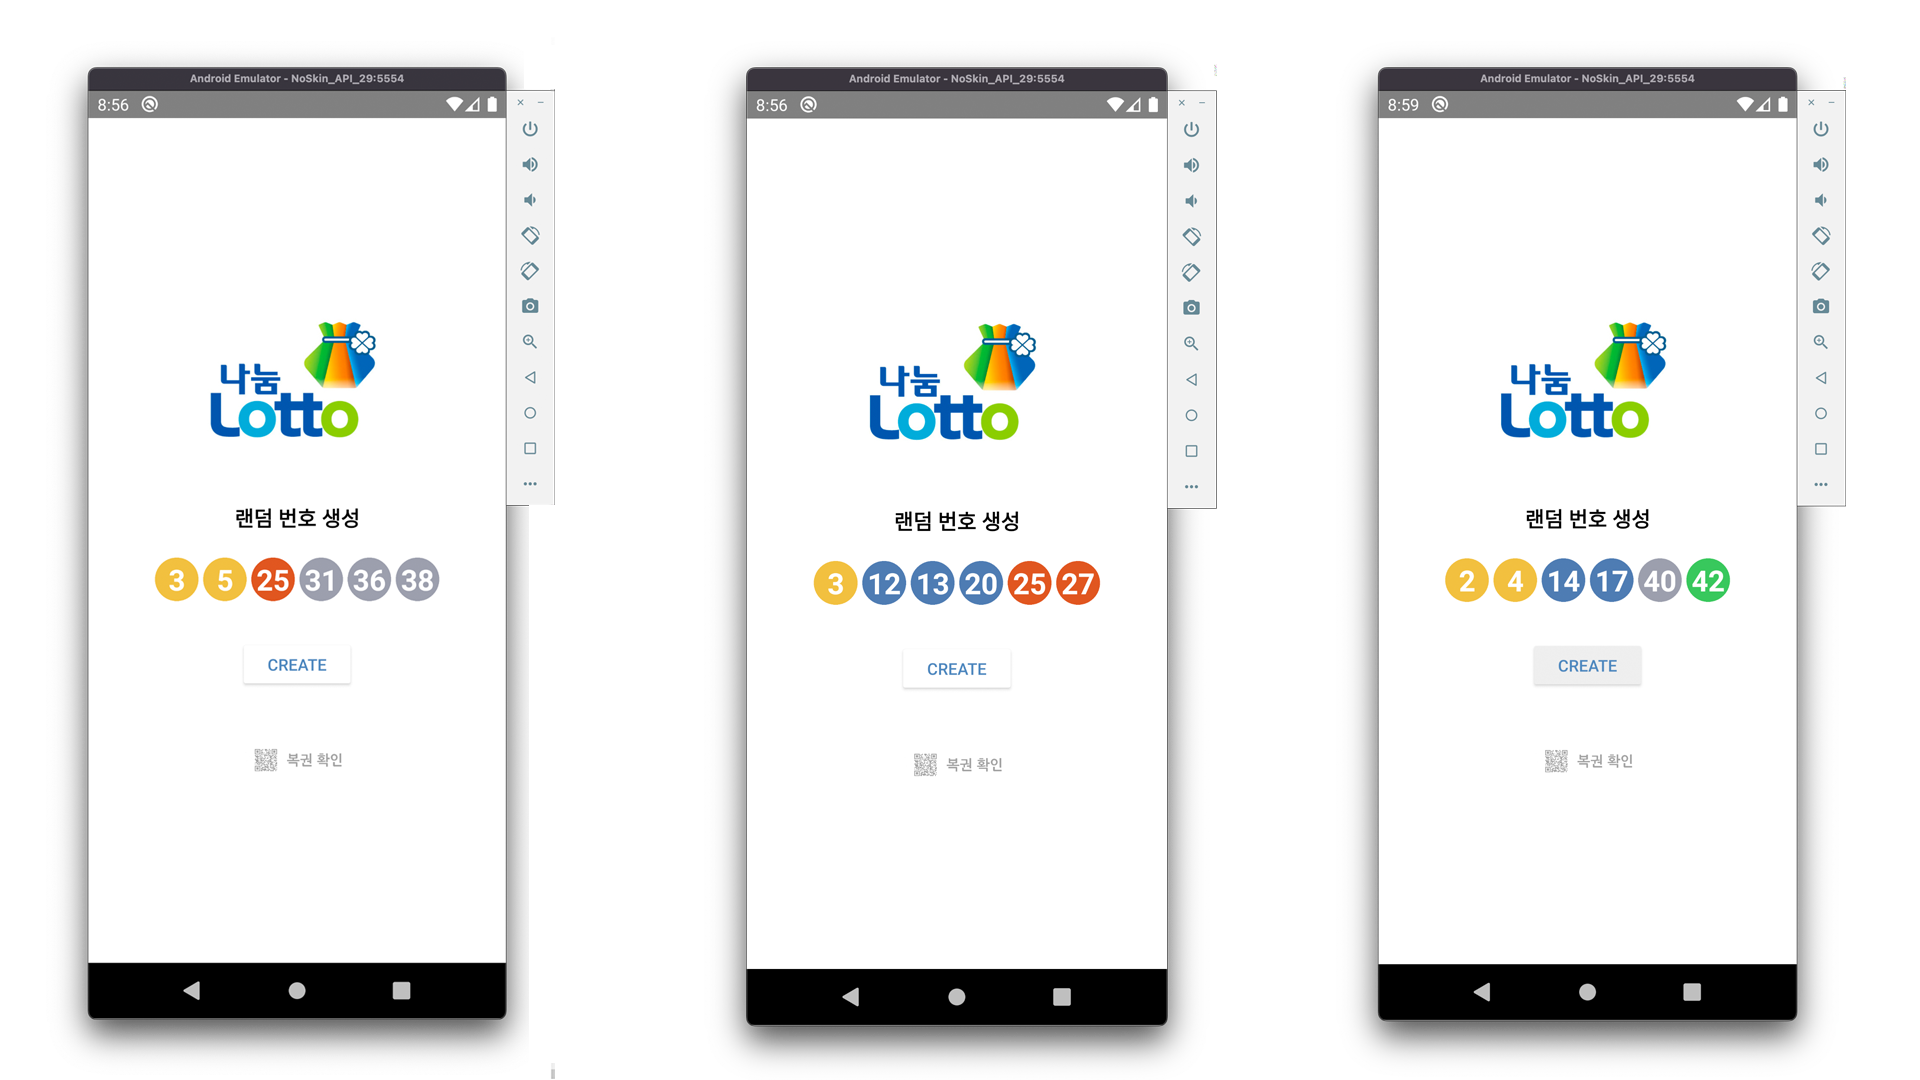
어플을 만들기 전 UI를 신경쓰고 싶어서 로또 사이트를 접속하여 번호 구간 마다의 색상 정보를 미리 알아와 저장해두었다.
[ colors.xml ]
<?xml version="1.0" encoding="utf-8"?>
<resources>
    <color name="purple_200">#FFBB86FC</color>
    <color name="purple_500">#FF6200EE</color>
    <color name="purple_700">#FF3700B3</color>
    <color name="teal_200">#FF03DAC5</color>
    <color name="teal_700">#FF018786</color>
    <color name="black">#FF000000</color>
    <color name="white">#FFFFFFFF</color>
    <color name="yong">#FFF2C03F</color>
    <color name="sib">#FF4E7CB3</color>
    <color name="esib">#FFE15620</color>
    <color name="samsib">#FF9C9FAD</color>
    <color name="sasib">#FF4E7CB3</color>
    <color name="theme">#4E7CB3</color>
</resources>
해당 번호들의 대한 공 모양을 📁drawable에 draw.xml을 만들어 설정해주어도 되지만, 포토샵으로 각각 공에 대한 색상 정보를 통해 이미지화 시켜 📁drawable에 이미지 파일을 넣어주었습니다.

[ themes.xml ]
시원하고 깔끔한 느낌을 위해 Status 바를 제거해주었습니다.
<resources xmlns:tools="http://schemas.android.com/tools">
    <!-- Base application theme. -->
    <style name="Theme.LottoApp" parent="Theme.MaterialComponents.Light.NoActionBar">
        <!-- Primary brand color. -->
        <item name="colorPrimary">@color/purple_500</item>
        <item name="colorPrimaryVariant">@color/purple_700</item>
        <item name="colorOnPrimary">@color/white</item>
        <!-- Secondary brand color. -->
        <item name="colorSecondary">@color/teal_200</item>
        <item name="colorSecondaryVariant">@color/teal_700</item>
        <item name="colorOnSecondary">@color/white</item>
        <!-- Status bar color. -->
        <item name="android:statusBarColor" tools:targetApi="l">#FFFFFF</item>
        <item name="android:windowLightStatusBar" tools:targetApi="m">true</item>
        <!-- Customize your theme here. -->
    </style>

    <style name="NoActionBar">
        <item name="windowActionBar">false</item>
        <item name="windowNoTitle">true</item>
    </style>

    <style name="AppBarOverlay" parent="ThemeOverlay.AppCompat.ActionBar" />

    <style name="PopupOverlay" parent="ThemeOverlay.AppCompat.Light" />
</resources>
[ activity_main.xml ]
<?xml version="1.0" encoding="utf-8"?>
<LinearLayout xmlns:android="http://schemas.android.com/apk/res/android"
    xmlns:app="http://schemas.android.com/apk/res-auto"
    xmlns:tools="http://schemas.android.com/tools"
    android:layout_width="match_parent"
    android:layout_height="match_parent"
    android:orientation="vertical"
    android:background="#FFFFFF"
    tools:context=".MainActivity">
    <LinearLayout
        android:layout_width="match_parent"
        android:layout_height="match_parent"
        android:orientation="vertical"
        android:layout_gravity="center"
        android:gravity="center">

        <ImageView
            android:layout_width="278dp"
            android:layout_height="148dp"
            android:layout_gravity="center_horizontal"
            android:layout_margin="10dp"
            android:src="@drawable/logo" />

        <TextView
            android:layout_width="wrap_content"
            android:layout_height="wrap_content"
            android:text="랜덤 번호 생성"
            android:textStyle="bold"
            android:textSize="18dp"
            android:textColor="@color/black"
            android:padding="20dp"
            android:layout_gravity="center_horizontal"/>

        <LinearLayout
            android:layout_width="wrap_content"
            android:layout_height="wrap_content"
            android:orientation="vertical">
            <LinearLayout
                android:id="@+id/line1"
                android:layout_width="wrap_content"
                android:layout_height="wrap_content"
                android:orientation="horizontal"
                android:layout_weight="1"
                android:gravity="center_vertical">

                <TextView
                    android:id="@+id/ball1"
                    android:layout_width="150px"
                    android:layout_height="150px"
                    android:layout_margin="2dp"
                    android:layout_weight="1"
                    android:textSize="25dp"
                    android:gravity="center"
                    android:textStyle="bold"
                    android:textColor="#ffffff"
                    android:background="@drawable/ball1"/>
                <TextView
                    android:id="@+id/ball2"
                    android:layout_width="150px"
                    android:layout_height="150px"
                    android:layout_margin="2dp"
                    android:layout_weight="1"
                    android:textSize="25dp"
                    android:gravity="center"
                    android:textStyle="bold"
                    android:textColor="#ffffff"
                    android:background="@drawable/ball1"/>
                <TextView
                    android:id="@+id/ball3"
                    android:layout_width="150px"
                    android:layout_height="150px"
                    android:layout_margin="2dp"
                    android:layout_weight="1"
                    android:textSize="25dp"
                    android:gravity="center"
                    android:textStyle="bold"
                    android:textColor="#ffffff"
                    android:background="@drawable/ball2"/>
                <TextView
                    android:id="@+id/ball4"
                    android:layout_width="150px"
                    android:layout_height="150px"
                    android:layout_margin="2dp"
                    android:layout_weight="1"
                    android:textSize="25dp"
                    android:gravity="center"
                    android:textStyle="bold"
                    android:textColor="#ffffff"
                    android:background="@drawable/ball3"/>
                <TextView
                    android:id="@+id/ball5"
                    android:layout_width="150px"
                    android:layout_height="150px"
                    android:layout_margin="2dp"
                    android:layout_weight="1"
                    android:textSize="25dp"
                    android:gravity="center"
                    android:textStyle="bold"
                    android:textColor="#ffffff"
                    android:background="@drawable/ball4"/>
                <TextView
                    android:id="@+id/ball6"
                    android:layout_width="150px"
                    android:layout_height="150px"
                    android:layout_margin="2dp"
                    android:layout_weight="1"
                    android:textSize="25dp"
                    android:gravity="center"
                    android:textStyle="bold"
                    android:textColor="#ffffff"
                    android:background="@drawable/ball5"/>

            </LinearLayout>
            <LinearLayout
                android:id="@+id/line2"
                android:layout_width="wrap_content"
                android:layout_height="wrap_content"
                android:orientation="horizontal"
                android:visibility="visible"
                android:layout_weight="1"
                android:layout_gravity="center_vertical">
            </LinearLayout>
        </LinearLayout>
        <LinearLayout
            android:layout_width="wrap_content"
            android:layout_height="wrap_content"
            android:paddingTop="30dp"
            android:orientation="horizontal"
            android:layout_gravity="center_horizontal">

            <Button
                android:id="@+id/btnCreate"
                android:layout_width="100dp"
                android:layout_height="45dp"
                android:backgroundTint="#FFFFFF"
                android:textColor="@color/theme"
                android:text="CREATE" />

        </LinearLayout>

        <LinearLayout
            android:layout_width="wrap_content"
            android:layout_height="wrap_content"
            android:paddingTop="30dp"
            android:orientation="horizontal"
            android:layout_gravity="center_horizontal">

            <ImageButton
                android:id="@+id/btnQrReader"
                android:layout_width="120dp"
                android:layout_height="60dp"
                android:src="@drawable/qrreder"
                android:background="#FFFFFFFF"
                android:scaleType="fitCenter"/>
        </LinearLayout>

        <Button
            android:id="@+id/btnUpgrade"
            android:layout_width="wrap_content"
            android:layout_height="wrap_content"
            android:layout_marginTop="50dp"
            android:text="DROP TABLE"
            android:visibility="gone"/>
    </LinearLayout>

</LinearLayout>
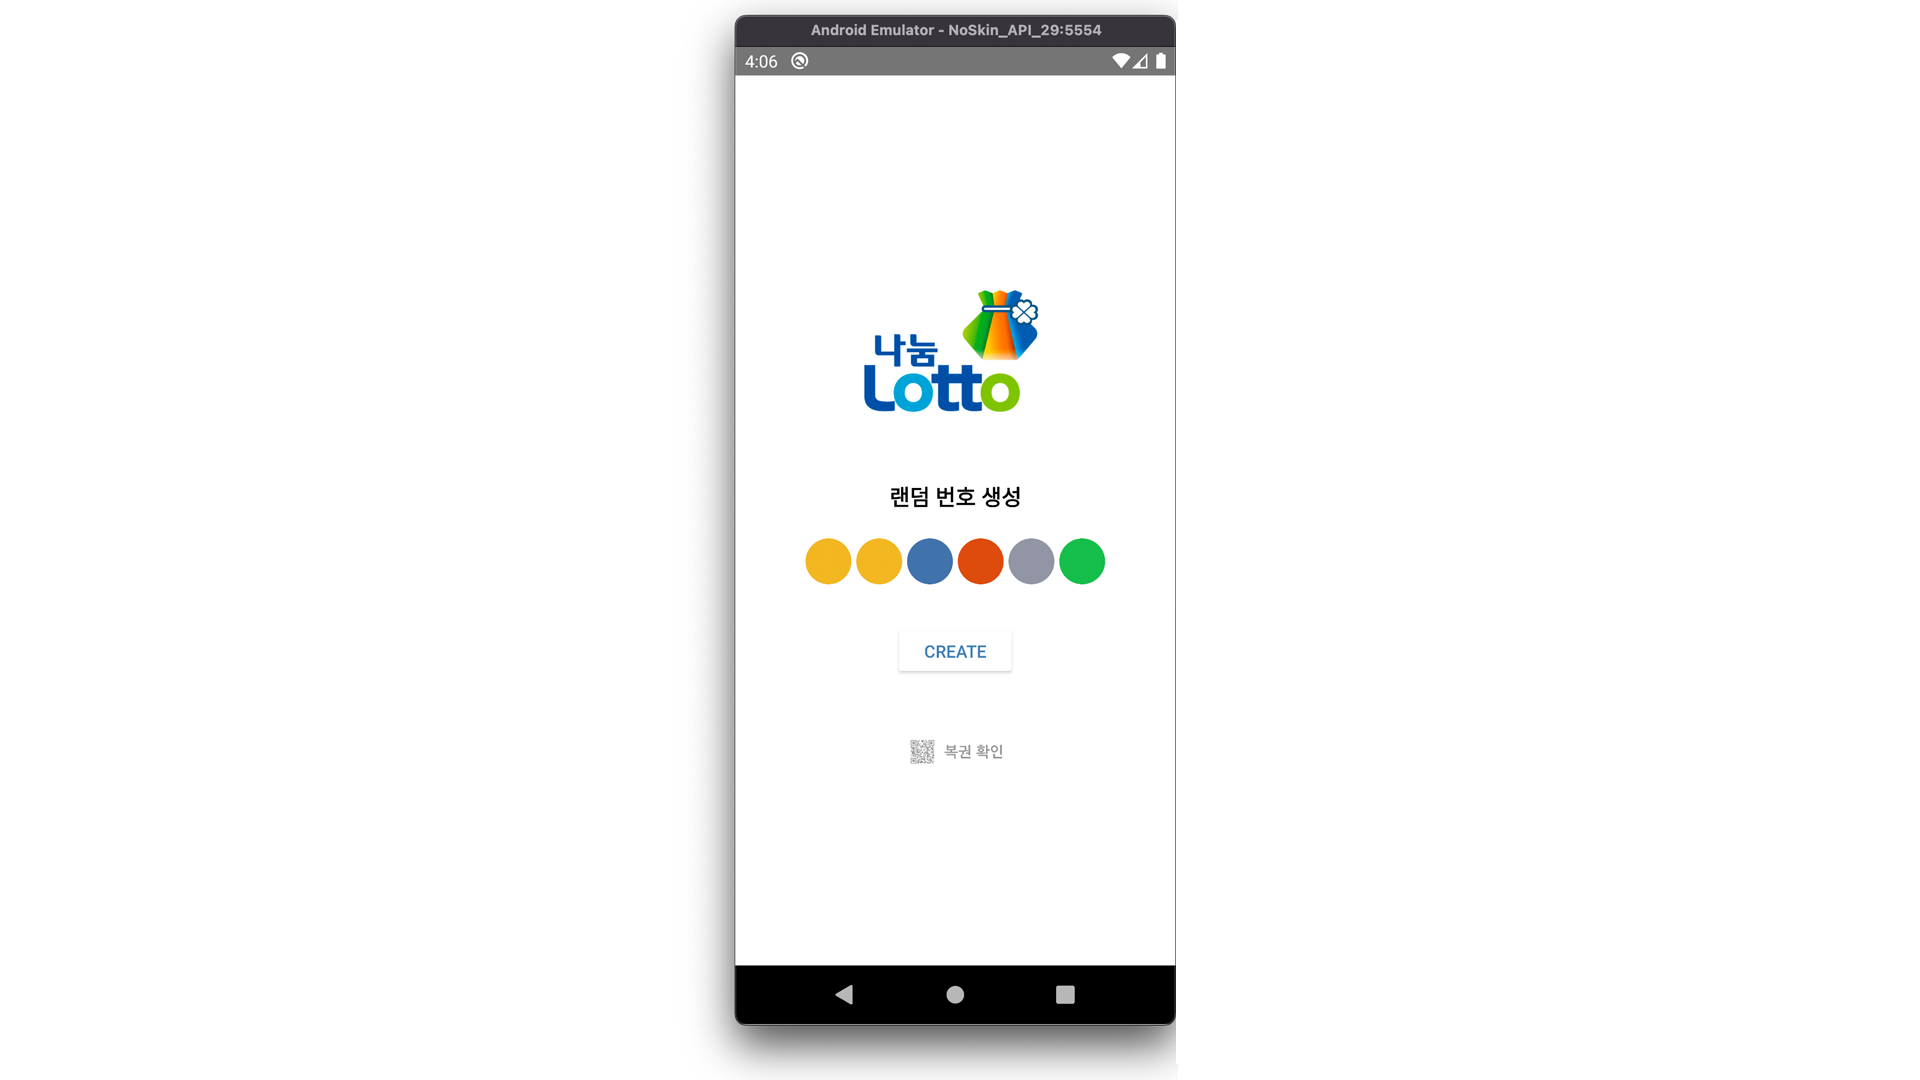
위와 같은 기본 액티비티가 구성되었습니다.
이제 각 기능들으 하나씩 구현해보겠습니다.
[ MainActivity.java ]
우선 기본적으로 뷰들을 변수와 연결시켜주기 위해 뷰를 담을 변수들을 선언해주었습니다.

그 이후, findViewById()를 통해 뷰들을 변수와 연결해주었습니다.
TextView는 간단하게 for문을 작성하여 주소값으로 하여금 변수와 연결해주었습니다.

[ CREATE 버튼 클릭 시 이벤트 ]
CREATE버튼이 눌리면 난수를 생성하는 알고리즘을 불러와야합니다.
CREATE버튼이 눌렸을 때의 이벤트를 선언해주겠습니다.
public void onClick(View v) {
        switch (v.getId()) {
            case R.id.btnCreate:
                // 로또 공을 뽑아주는 메서드
                setBall();
                // 로또 회차를 뽑아주는 메서드
                int round = LottoRound();
                dbHelper.insert(null, round, raffleNumbers.get(0), raffleNumbers.get(1), raffleNumbers.get(2), raffleNumbers.get(3), raffleNumbers.get(4), raffleNumbers.get(5));
                String res = dbHelper.getResult();
                Log.d("Lotto Data : " , res);
                break;
        }
    }
여기서에 setBall()은 뽑힌 번호를 어떤 색의 공 이미지로 설정해줄 것인지에 대한 메서드이며
public void setBall() {
        RandomBall();

        Log.d(this.getClass().getSimpleName(), raffleNumbers.toString());

        for (int i = 0; i < 6; i++) {

            int num = raffleNumbers.get(i);

            if (num >= 1 && num <= 10) {
                ball[i].setText(Integer.toString(num));
                ball[i].setBackgroundResource(R.drawable.ball1);
            } else if (num >= 11 && num <= 20) {
                ball[i].setText(Integer.toString(num));
                ball[i].setBackgroundResource(R.drawable.ball2);
            } else if (num >= 21 && num <= 30) {
                ball[i].setText(Integer.toString(num));
                ball[i].setBackgroundResource(R.drawable.ball3);
            } else if (num >= 31 && num <= 40) {
                ball[i].setText(Integer.toString(num));
                ball[i].setBackgroundResource(R.drawable.ball4);
            } else if (num >= 41 && num <= 45) {
                ball[i].setText(Integer.toString(num));
                ball[i].setBackgroundResource(R.drawable.ball5);
            }
        }
    }
버튼이 클릭되면 setBall()이 호출되며, setBall()에서 추첨 알고리즘인 RandomBall()을 호출하여 번호를 뽑고 그 번호에 대한 색공을 맞추어 각각의 TextView에 뿌려지게 됩니다.
[ 추첨 알고리즘 ]
우선 1부터 45까지의 수를 랜덤으로 뽑아서 작은 번호부터 큰 번호까지 오름차순으로 정렬하여 각 TextView에 뿌려주어야합니다.
전역변수에 추첨 번호(raffleNumbers)를 담을 리스트를 선언해주었습니다.

우선 1부터 45까지의 난수를 뽑는 코드를 구하자면
// 난수를 뽑는 알고리즘
public void RandomBall() {
        raffleNumbers.clear();
        while (raffleNumbers.size() < 6) {
            int raffle = (int) (Math.random() * 45) + 1;
            if (!raffleNumbers.contains(raffle)) {
                raffleNumbers.add(raffle);
            }
        }
        Collections.sort(raffleNumbers);
    }
볼을 뽑을 때 마다 배열 리스트를 비어주고, 리스트의 사이즈가 6(추첨 번호가 6개가 되지 않는다면)보다 작으면
계속해서 숫자를 뽑고 뽑은 숫자가 리스트에 포함되어있지 않다면 리스트에 숫자를 넣어줍니다.
그렇게 6개의 추첨 번호가 모이면 raffleNumbers를 sort문으로 정렬하여줍니다.
그럼 배열 리스트에는
< raffleNumber >
| index | 0 | 1 | 2 | 3 | 4 | 5 |
|---|---|---|---|---|---|---|
| num | 제일 작은 번호 | ... | ... | ... | ... | 제일 큰 번호 |
위와 같이 리스트가 정렬된 상태로 존재하기 때문에 TextView에 차례대로 .get(index)를 통해서 값을 설정해주면 됩니다.
이제 로또가 몇 회차인지 뽑을 메서드를 정의해줍니다.
[ 회차 메서드 ]
public int LottoRound() {

        LocalDateTime localDateTime = LocalDateTime.now(ZoneId.of("Asia/Seoul"));

        int standardMonth = 8;
        int standardRound = 1031;

        Calendar baseCal = new GregorianCalendar(2022, standardMonth-1, 27, 20, 0, 0);
        Calendar nowCal = new GregorianCalendar(localDateTime.getYear(), localDateTime.getMonthValue()-1, localDateTime.getDayOfMonth(), localDateTime.getHour(), localDateTime.getMinute(), localDateTime.getSecond());

        long passedSec = (nowCal.getTimeInMillis() - baseCal.getTimeInMillis())/1000;
        long passedDay = passedSec/(24*60*60);

        Log.d("BaseCal : ", baseCal.getTime().toString());
        Log.d("NowCal : ", nowCal.getTime().toString());
        long round = passedDay / 7;

        return (int)(standardRound + round);
    }
회차 기준(baseCal)은 2022년 8월 27일 22시 (1031회)를 두고
현재 시간(nowCal)을 통해 기준 날(baseCal)과 7일 차이가 나면 회차가 증가하여 다음 회차의 추첨 번호를 뽑도록 하였다.
이제 이 뽑은 번호들을 데이터베이스에 담아줍니다.
데이터베이스에 들어갈 컬럼 값들은
lotto.db {
	id { - 각 레코드를 구분할 컬럼
  		(userCode도 넣고 싶음 - 회원 기능이 생긴다면 회원들을 구분할 값)
	    round { - 몇 번째 회차인지 표현할 컬럼
    		num1 -  첫 번째 공의 값을 표현할 컬럼
		    num2 -  두 번째 공의 값을 표현할 컬럼
		    num3 -  세 번째 공의 값을 표현할 컬럼
		    num4 -  넷 번째 공의 값을 표현할 컬럼
		    num5 -  다섯 번째 공의 값을 표현할 컬럼
		    num6 -  여섯 번째 공의 값을 표현할 컬럼
       }
   }
}
[ DBHelper.java ]
DBHelper.java 자바 파일을 생성해줍니다.
package my.app.lottoapp;

import android.content.Context;
import android.database.Cursor;
import android.database.sqlite.SQLiteDatabase;
import android.database.sqlite.SQLiteOpenHelper;

public class DBHelper extends SQLiteOpenHelper {
    static final String DATABASE_NAME = "lotto.db";

    // DBHelper 생성자
    public DBHelper(Context context, int version) {
        super(context, DATABASE_NAME, null, version);
    }

    @Override
    public void onCreate(SQLiteDatabase db) {
        db.execSQL("CREATE TABLE Lotto(id INTEGER PRIMARY KEY AUTOINCREMENT, round INTEGER, num1 TINYINT, num2 TINYINT, num3 TINYINT, num4 TINYINT, num5 TINYINT, num6 TINYINT)");
    }

    @Override
    public void onUpgrade(SQLiteDatabase db, int oldVersion, int newVersion) {
        db.execSQL("DROP TABLE IF EXISTS lotto");
        onCreate(db);
    }

    public void insert(Integer id, Integer round, Integer num1, Integer num2, Integer num3, Integer num4, Integer num5, Integer num6) {
        SQLiteDatabase db = getWritableDatabase();
        db.execSQL("INSERT INTO lotto VALUES(" + null + ", "+ round + ", " + num1 + ", " + num2 + ", " + num3 + ", " + num4 + ", " + num5 + ", " + num6 + ");");
        db.close();
    }

    // lotto Table 조회
    public String getResult() {
        // 읽기가 가능하게 DB 열기
        SQLiteDatabase db = getReadableDatabase();
        String result = "\n";

        // DB에 있는 데이터를 쉽게 처리하기 위해 Cursor를 사용하여 테이블에 있는 모든 데이터 출력
        Cursor cursor = db.rawQuery("SELECT * FROM lotto", null);
        while (cursor.moveToNext()) {
            result += " id : " + cursor.getInt(0)
                    + ", round : " + cursor.getInt(1)
                    + ", num1 : " + cursor.getInt(2)
                    + ", num2 : " + cursor.getInt(3)
                    + ", num3 : " + cursor.getInt(4)
                    + ", num4 : " + cursor.getInt(5)
                    + ", num5 : " + cursor.getInt(6)
                    + ", num6 : " + cursor.getInt(7)
                    + "\n";
        }

        return result;
    }

}
onCreate 메서드는
테이블을 만들 명령문을 작성하여줍니다.
CREATE TABLE [테이블명] (컬럼1 타입 속성, 컬럼2 타입 속성, 컬럼3 타입 속성, ...)
onUpgrade 메서드는
테이블을 지울 명령문을 작성합니다.
DROP TABLE IF EXISTS [테이블명];
insert 메서드는
생성된 값을 넣어주는 명령문을 작성하여줍니다.
INSERT INTO [테이블명] VALUES(컬럼1 값, 컬럼2 값, 컬럼3 값, ...)
<학습>
AUTO_INCREMENT 속성의 경우 null 값을 넣어서 비어있는 항목을 채워줌
getResult() 메서드는
데이터베이스에 있는 값을 확인 할 수 있는 메서드로 다음과 같이 작성합니다.
`SQLiteDatabase 객체명 = getReadableDatabsase();
String result = "" // 값들을 담을 변수
Cursor를 통해 테이블에 있는 데이터를 하나씩 선택하여 대입.

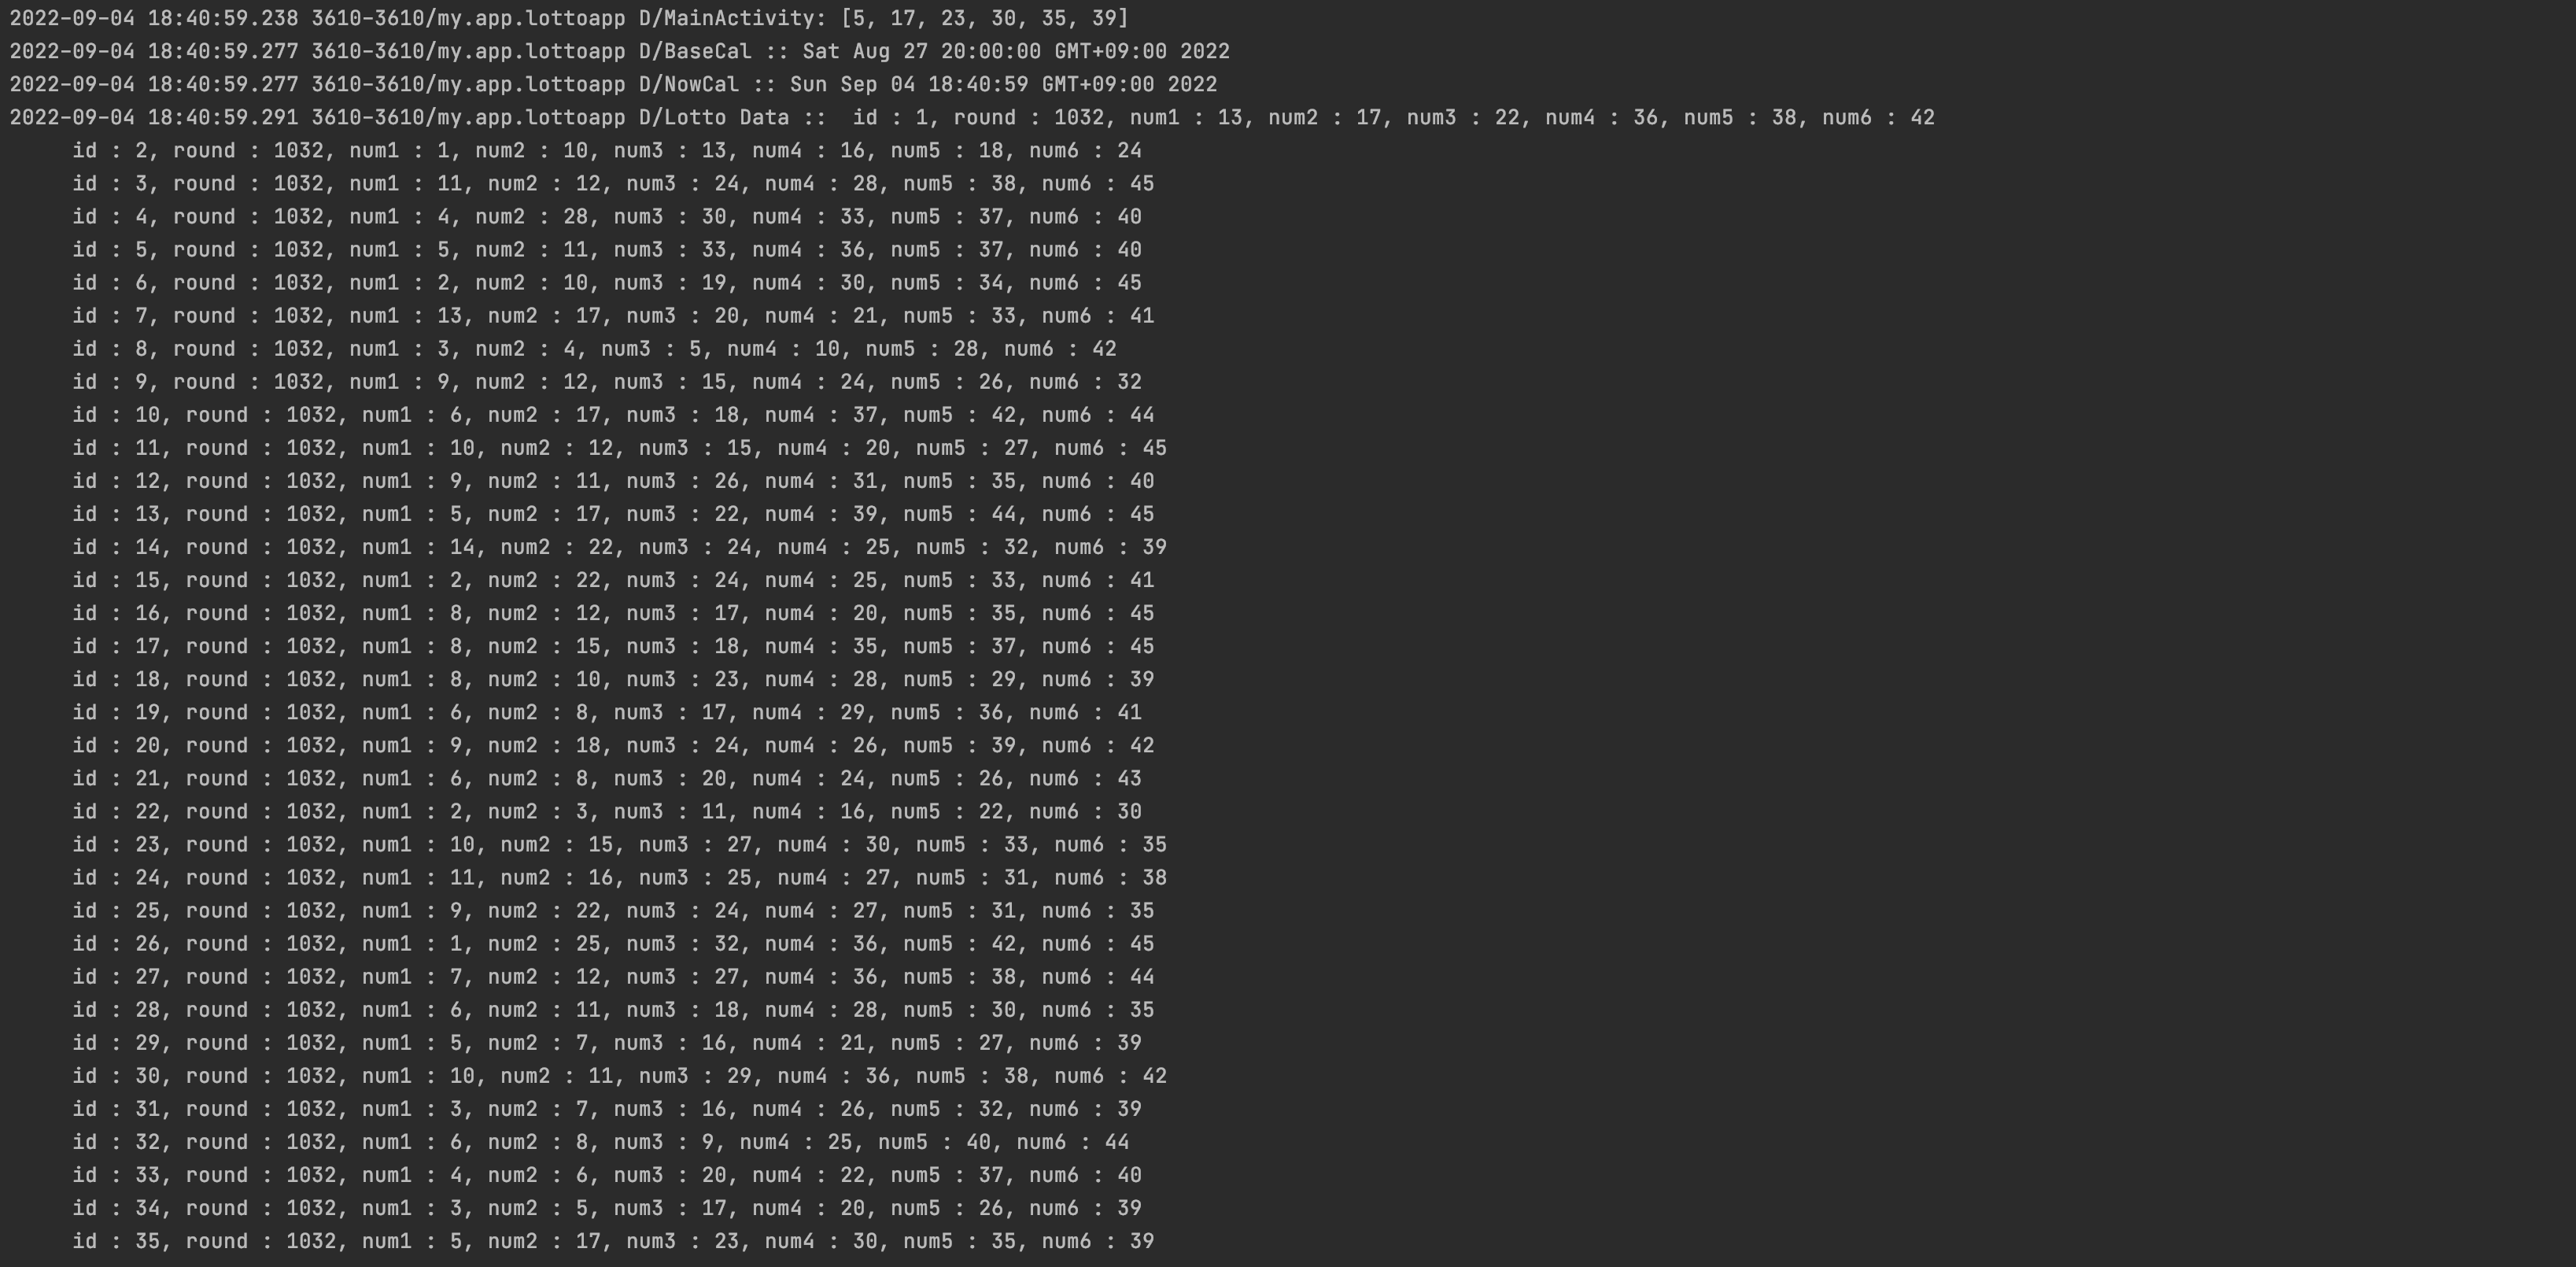
이제 MainActivity.java 에 onClick메서드에서 CREATE버튼을 누르면 라운드를 뽑고,
dbHelper(DBHelper의 객체)에서 insert 메서드를 통하여 각각의 값들을 삽입.
맨 위에 최근 출력된 값이, 가장 맨 아래로 내려가 기록된 것을 볼 수 있습니다.
[ QR코드 (zxing) ]
QR코드를 실행하기 위해 AndroidManifest.xml에 코드를 추가해주어야한다.
[ AndroidManifest.xml ]
//카메라에 접근하기 위한 접근 제어
<uses-permission android:name="android.permission.CAMERA"
...
<application
	...
	android:hardwareAccelerated="true"
    ...
    <activity android:name=".ScanQR" />
    <activity android:name="com.journeyapps.barcodescanner.CaptureActivity"
            android:screenOrientation="fullSensor"
            tools:replace="screenOrientation"/>
[ build.gradle (Module) ]
	// QR 사용을 위한 zxing
	implementation 'com.journeyapps:zxing-android-embedded:3.5.0'
    implementation "com.google.zxing:core:3.3.0"
[ activity_scanner.xml ]
<?xml version="1.0" encoding="utf-8"?>
<androidx.constraintlayout.widget.ConstraintLayout xmlns:android="http://schemas.android.com/apk/res/android"
    xmlns:app="http://schemas.android.com/apk/res-auto"
    xmlns:tools="http://schemas.android.com/tools"
    android:layout_width="match_parent"
    android:layout_height="match_parent"
    tools:context=".ScanQR">

</androidx.constraintlayout.widget.ConstraintLayout>
[ ScanQR.java ]
package my.app.lottoapp;

import android.content.Intent;
import android.net.Uri;
import android.os.Bundle;
import android.util.Log;
import android.widget.Toast;
import androidx.appcompat.app.AppCompatActivity;
import com.google.zxing.integration.android.IntentIntegrator;
import com.google.zxing.integration.android.IntentResult;

public class ScanQR extends AppCompatActivity {

    protected void onCreate(Bundle savedInstanceState) {
        super.onCreate(savedInstanceState);
        setContentView(R.layout.activity_scanner);

        new IntentIntegrator(this).initiateScan();
    }

    @Override
    protected void onActivityResult(int requestCode, int resultCode, Intent data) {
        IntentResult result = IntentIntegrator.parseActivityResult(requestCode, resultCode, data);
        if(result != null) {
            if(result.getContents() == null) {
                Toast.makeText(this, "Cancelled", Toast.LENGTH_LONG).show();
                // todo
            } else {
                Toast.makeText(this, "Scanned: " + result.getContents(), Toast.LENGTH_LONG).show();
                Log.d("QR URL", result.getContents());
                String url = result.getContents();
                Intent lottoIntent = new Intent(Intent.ACTION_VIEW, Uri.parse(url));
                startActivity(lottoIntent);
                finish();

            }
        } else {
            super.onActivityResult(requestCode, resultCode, data);
        }
    }
}
new IntentIntegrator(this).initiateScan();
onCreate에 위 코드를 이용하여 스캔할 화면을 실행시켜준다.
그 후 onAcitivityResult를 오버라이드 하여 값을 처리해준다
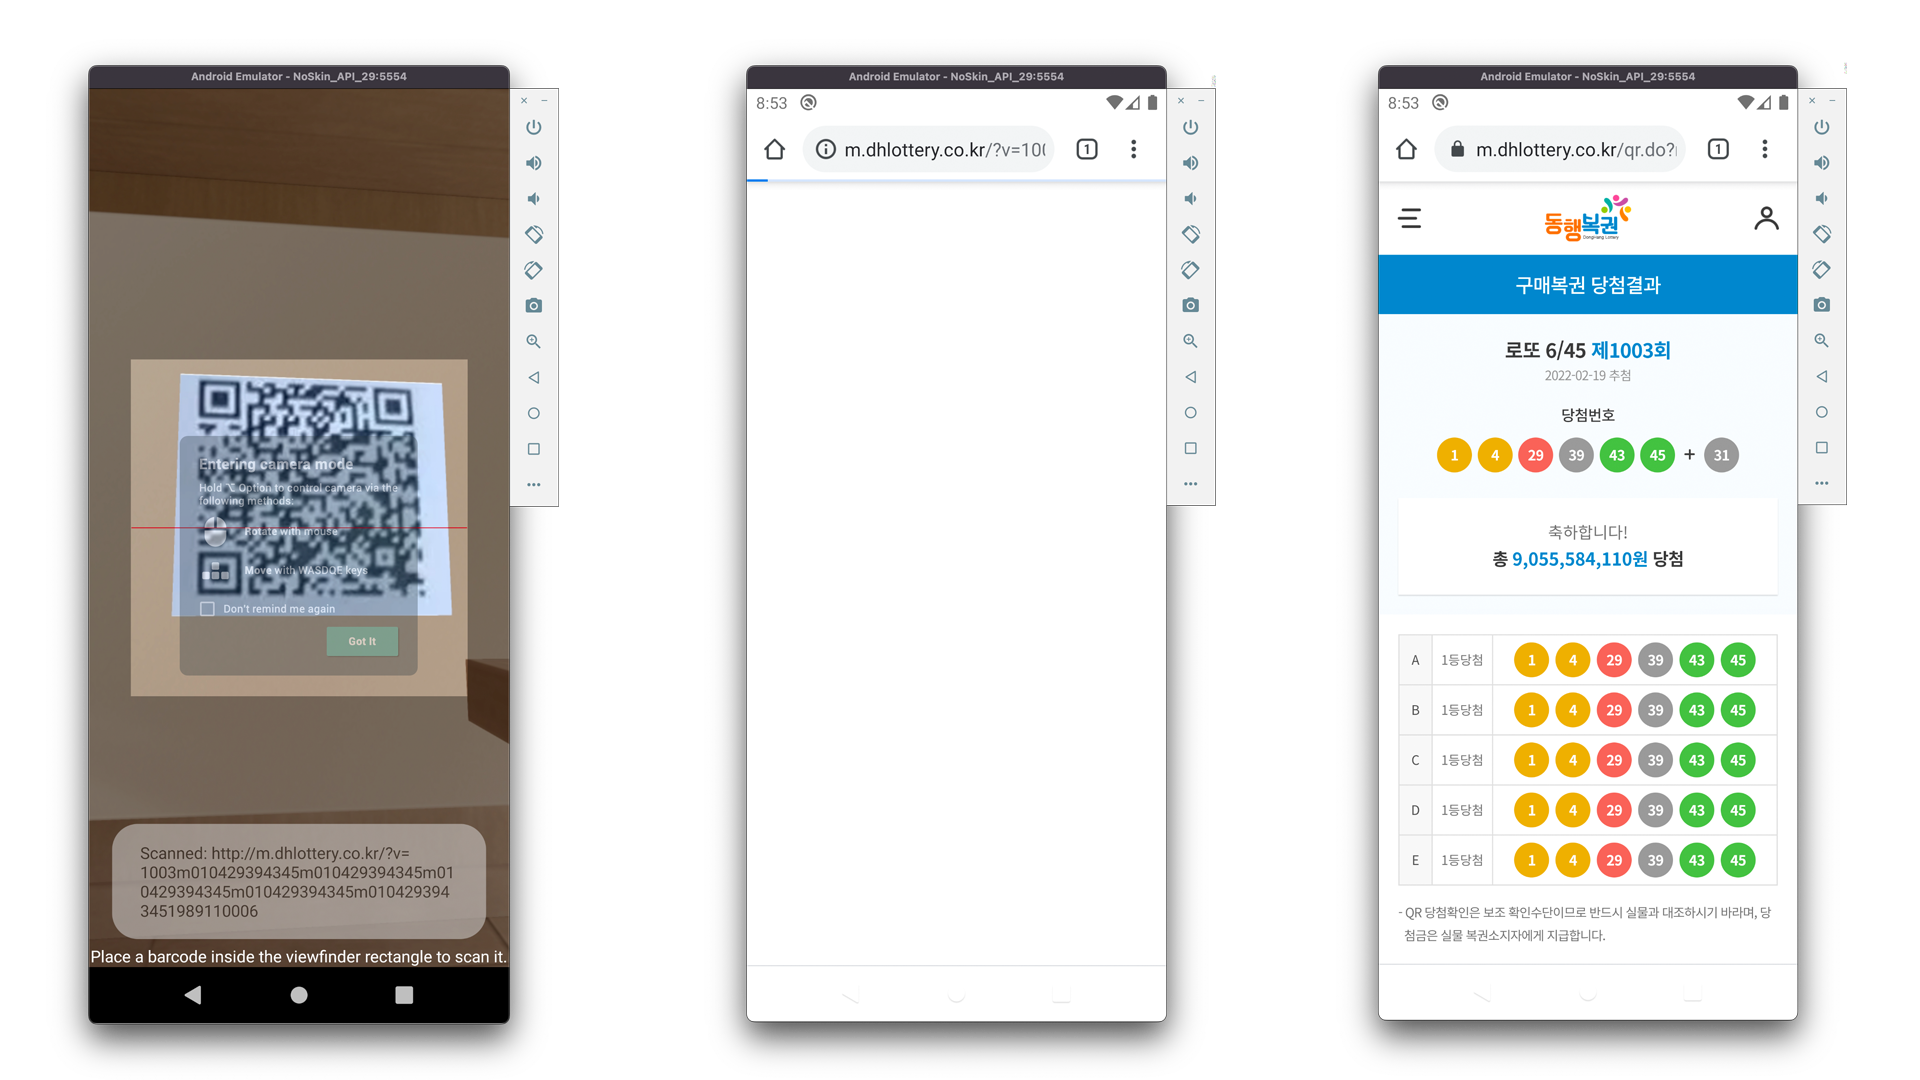
Log.d를 이용하여 .getContents()값을 확인하여
Intent를 이용하여 URL값으로 창을 이동하게하였습니다.
이동하고 돌아오면 하얀 화면만 남아있으므로, 창을 꺼주기 위한 finish()를 통해 최초 액티비티로 돌아올 수 있도록 만들어주었습니다.
[ 완성 ]